Porch to the house with their own hands projects. How to build a wooden porch - a beautiful and functional extension to enter the house
We will send the material to you by e-mail
To The stigma is a functional element of any household and is its hallmark. Such a structure should be located at the entrance to the building and fit into the created exterior of the building. By choosing the right material, you can build a luxurious porch to the house with your own hands. Projects, photos and design drawings can easily be found in our review. In addition to practical functions, this structure performs a decorative function. At the same time, the canopy and railings are decorated with beautiful carvings and other decorative elements.
In many buildings, the porch is part of the project and fits perfectly into the overall exterior.
The porch in a private house, photos of which can be viewed on the site, is an open area with a staircase in front of the entrance to the house. It can be of any shape, and also made of various materials.
Such a structure can be made in the following variations:


- the structure of the attached type is more mobile.

Helpful information! To avoid skewed steps and cracks, a foundation must be installed.
Foundation: construction features for all types of porch
A strong foundation is needed to make a porch to the house with your own hands. Designs, photos and descriptions will help create a quality foundation.
Related article:
Do-it-yourself porch to the house: projects, photos of various types of porch
They will help you choose the best design of the porch of a private house with photos that can be found on the site. In this case, it is worth deciding on the material for the future design. Traditional options include wood, concrete, stone and brick, or metal.

Metal structures: the nuances of the device
Metal products are mounted using electric welding. The design is assembled from standard parts. If desired, you can use forging elements for a metal porch in a private house. The photo will allow you to choose interesting solutions.

Such a design is mounted in several stages:
- two channels are laid in parallel at a distance of future steps. Then a corner is cut to the size of the steps;
- a part equal to the height between the steps is cut off from the corner. Both elements are welded in the form of the letter G;
- L-shaped parts are attached to the channel;
- then the channel is connected using corners.

Ready. Steps made of any material are mounted on it. If more than three steps are provided, then railings are mounted. The visor completes the design.
Concrete options: design features
The concrete structure involves the continuation of the foundation in the steps. In this case, reinforcement is used, which will prevent the appearance of cracks. Such a structure requires additional cladding with stone or tiles.

Formwork is made for each step. The finished structure is covered with decorative material.
Helpful information! The space between the foundations of the main building and the extension is sealed with mineral wool, which ensures better stability of the structure.

Do-it-yourself wooden porch for a private house: installation features
Do-it-yourself wooden porch to the house is popular. Projects and photos of such structures are diverse. The best material is larch and other conifers. For such raw materials, special protective impregnations are required.

Installation of a wooden structure consists of the following steps:
- the manufacture of stairs includes the formation of a bowstring. These elements are connected to the base;
- installation of the site consists of mounting the shelf boards to the finished base;
- steps are being installed. At the same time, steps and risers are attached with the help of self-tapping screws;
- the design is carried out with the help of railings and a canopy.
Helpful information! The durability of the structure depends on the correct preparation and processing of wood. The material must be well dried.

Related article:
Porch made of brick or stone
It is very difficult to make brickwork for the porch, since the brick must be laid out perfectly evenly. It is even more difficult to lay a stone porch without certain skills. The chipped edges don't fit together.

Simple options include the construction of a concrete staircase and facing it with stone or brick.
Visor options
An important addition to the extension is the canopy over the porch. The photo on the site allows you to see interesting options for this element.

The visor is created from timber, metal, plexiglass or metal pipes. Wooden structures must be treated with special solutions every 2-3 years so that the wood does not deteriorate.

The visor should at least protrude half a meter beyond the area of \u200b\u200bthe main structure. Piles for the canopy supports are mounted at the stage of creating the foundation. Polycarbonate, plexiglass or tiles can be used as a coating. This element must have a pitched shape.
Helpful information! A wooden structure or metal sheets can be coated with paint in several layers.

Which porch is better: glazed or open?
A closed porch is often used for a private house. Photos of projects can be found on the Internet. Most often, these are transparent structures made of metal and glass. The frame and piles are made of metal. The walls are made of glass. A roof of this design can be combined with a balcony on the second floor.

The glazed version is made with a concrete foundation, a canopy and a staircase. The frame is made with the help of corners. In this case, the corners are attached to the installed piles.
Save Time: Featured Articles Every Week by Mail

If you want to build a porch to the house with your own hands, then we have great news for you - it is quite possible to do it yourself! What's more, you can even choose from several options available - concrete, wood, or metal porches! In this case, in the latter version, the design will be equipped with a beautiful polycarbonate canopy.
Let's take a closer look at each of the available options. First, let's get acquainted with the instructions for making a concrete porch to the house.
Option one. concrete porch
The strongest and most durable design, which also looks quite solid. First, decide on the size of the porch.

Stage number 1. How to calculate the dimensions of the porch

In most cases, the porch of the house is just a few steps. You are obliged to choose the optimal dimensions of this design. Ideally, the width of the stairs should be between 0.8 and 1 meter. If possible, you can make it even wider - so the whole porch will look more attractive and comfortable. Making the width smaller is highly discouraged.
As for the angle of inclination of the stairs, it should be in the range of 28-45 degrees. The table below shows the optimal dimensions of this design.

The width of all steps of the porch should be the same and be approximately 25 centimeters, while the optimal height is from 12 to 20 centimeters (it all depends on who exactly the porch is intended for).
Note! When arranging the upper platform, try to keep it below the front door by about 5 centimeters.

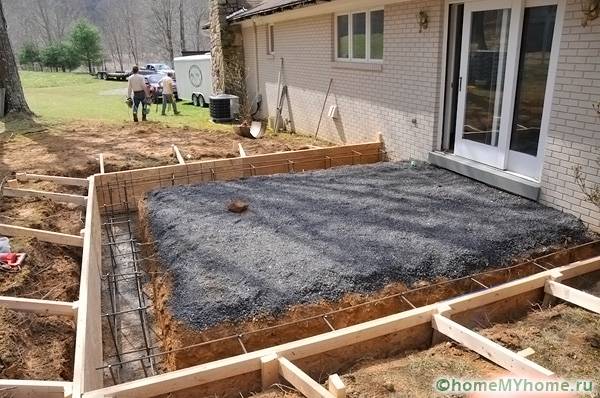
Stage number 2. How to make a porch foundation
First, dig a pit according to the dimensions of the future structure (at least half a meter deep). Build formwork around the perimeter.

Then take the crushed stone and fill it with the bottom of the resulting pit (the thickness of the layer should be about 20 centimeters). Thoroughly tamp the gravel, then pour sand on top of it in a 10-centimeter layer. It is desirable to pour sand with cold water to make it easier to compact it.
Cover the resulting area with roofing material. From above, lay a reinforcing mesh with cells of 100x100 millimeters, then fill everything with concrete mix. You can easily cook the latter with your own hands, for this, adhere to the following proportions:
- one part of cement;
- five pieces of rubble;
- three parts of sand.
After pouring, level the surface of the concrete, pierce it in some places with a reinforcing bar to remove air. Now it remains only a few days to wait for the initial curing of concrete to occur.

Stage number 3. How to build a formwork for steps

To build the formwork for the steps, you will need thick plywood. At the same time, it is important that the height of such formwork is 20 centimeters greater than the height of the porch itself. The construction process itself is nothing complicated: cut out all the details of the formwork from plywood (according to the height of each of the steps), and then install them in the right places. To tighten the shields together, use metal plates, wooden bars, or any other suitable fasteners.

Note! The shields located on the sides must be reinforced without fail with additional stiffeners.
In addition, reinforce all the steps, and lay the reinforcement in such a way that it is located in all 3 planes at once. Alternatively, you can weld an iron frame, the shape of which matches the planned staircase, and build the formwork around it. This will be even more convenient. In other words, do what feels right for you.


Stage number 4. How to pour steps for the porch with your own hands
To begin with, lubricate, using oil, all the internal surfaces of the formwork. This is necessary so that later you can remove the structure without much effort. As for the pouring solution, prepare it in the same way as before.

Start pouring in stages, starting with the first step. After pouring each new step, take a short break so that it dries a little, and then proceed to pouring the next one. So your porch for the house with your own hands will turn out to be as strong and durable as possible. In the course of pouring, fasten additional formwork parts in front of each step. In this case, the height should be the same as that of the first step.
Note! The formwork surface that will be in contact with the mortar should be as smooth as possible.
After pouring, carefully level the concrete, then pierce it with reinforcing bars.

It is possible to dismantle the formwork no earlier than in a week, and even better in 10 days. At the end, finish the structure. For cladding, you can use tiles or natural stone, boards or, alternatively, any other finishing material (decide for yourself).

Installing railings is not necessary at all, do it at your discretion. If you still decide to install, then please note that the height of the handrails should be at least 0.9 meters. As an example, we give an option that is equally suitable for metal / wood structures. Install support posts made of metal pipes above and below the porch. In this case, the length should be such that the angle of inclination of the railing is similar to the inclination of the stairs. Connect the ends of the racks together with iron pipes, but of a smaller diameter. Use a welding machine to connect.
The top tube will serve as a handrail. To fill the space between the pipes, you can use absolutely any rental. When mounting the element, the gap can also be any - here everything will depend solely on your personal preferences.

Upon completion of installation, thoroughly clean all metal parts, cover them with two layers of primer mixture. Thanks to this treatment, the service life of the railing will increase markedly.
Video - Construction of a concrete porch to the house with your own hands
Option two. Do-it-yourself metal porch (with a polycarbonate roof)
Immediately make a reservation that the option described below is successfully combined with almost all types of private houses. The process consists of several stages, let's get acquainted with the features of each of them.


In this case, there are no fundamental differences from the foundation that we previously created for the concrete porch, the only exception is the fact that the support posts for the future canopy must be installed at this stage. We recommend installing supports in each of the corners of the structure - thanks to this, the structure will turn out to be more stable. If the dimensions of the porch are large enough, make several supports along its length in increments of 2 meters.
First, dig holes about 1.5 meters deep for supports (by the way, steel pipes can be used as the latter). Place each pipe in the appropriate hole, then fill it with concrete.
Note! Wooden bars can also serve as supports. The sequence of actions here is the same, only the lower parts of the bars should be pre-tarred or wrapped with roofing material, and also treated with an antiseptic.
Also install supports under the stairs. Also dig holes, place metal racks in them, and then fill them with concrete. It is unlikely that the length of the stairs will be too large, therefore, the supports above and below the structure will be enough. Although, for greater reliability, you can additionally put supports in the middle of the flight of stairs.
When pouring concrete, make sure that the ladder is somewhat recessed into it. Pour concrete not to the very top of the site - leave a small gap (within 10-30 centimeters, the specific figure depends on the current dimensions of the structure). Later, when the assembly of the metal structure is completed, you can fill the pit to the top.


Stage number 2. How to weld a ladder

To get started, take a couple of metal channels. Weld them to the supports that were installed and poured with concrete in the previous stage of work. Later steps will be welded to these channels. Take an iron corner (without fail equal-shelf), cut it according to the length of the steps, adding the width of the weld. After that, weld this corner along the contour.

Take the second segment of the corner, weld it in the same way, only to the attached corner. At the next stage, it is necessary to weld the second corner to the channel. As a result, you should get something like the following.


It turns out a kind of L-shaped product, you have to connect them together. For the upper connection, use an equal-shelf corner - weld it along the contour to both elements so that the shelves are placed inward. Make the bottom connection using the same corner, but the shelves should already “look” outward.


To fill the steps of the stairs, which will decorate the future porch to the house with your own hands, you can use any materials - for example, plywood or wood. For fixing, use self-tapping screws, twisting them from below. And to further secure the wooden elements, use glue or, alternatively, silicone-based sealant.


In principle, further finishing can be done at your discretion. If you want, you can not close the horizontal openings at all - in this case, the casing will be mounted directly on the steps.
Stage number 3. How to make a canopy over the porch with your own hands

So, we installed the racks at the stage of pouring the base, so the further algorithm of actions should look something like this.

Take the cross supports and install them in accordance with the dimensions of the frame. If you like, your future canopy can be curved. To achieve this, cut the profile every 4 centimeters and bend it as needed. The advantage of canopies with a curved shape is that precipitation and various kinds of debris will slide freely from them.


Take polycarbonate, install it on the frame and fix it with self-tapping screws (we recommend using special thermal washers). The fastening step in this case should be 30 centimeters. Seal the edges with glue. Everything, the canopy can be considered ready!

Video - Do-it-yourself porch to the house from a profile pipe under polycarbonate
Option three. wooden porch
You can find a diagram of a porch made of wood below.


The work consists of several stages, we will get acquainted with the features of each of them.

Stage number 1. How to build a foundation
The best option in this case is a pile foundation. The fact is that such a base is extremely simple and quick to install, but its reliability is at a fairly high level.
First, dig holes where the piles will be located - not only in the corners of the future structure, but also along the length of its sides (the step should be from 0.8 to 1 meter). It will be great if you do this below the freezing level of the soil. After that, take the support bars and treat them with an antiseptic, and wrap the lower parts with roofing material for waterproofing. After that, insert the bars into the holes. Align them vertically, and then fill with concrete mortar.
After the concrete has hardened well, you can proceed to the next step.
Stage number 2. How to mount lags
If necessary, trim the tops of the beams so that all supports are at the same level. It is worth noting that when calculating the height of the piles, it is necessary to act in such a way that, upon completion of the installation of the platform, a 5-centimeter height difference remains between the front door and it.
Stage number 3. How to make a bowstring (kosour)


Now start making the supporting part of the ladder structure. It is to this part that the steps will subsequently be attached. In other words, the kosour is, as it were, the side face of the steps.
To make a bowstring, you will need boards that are 50 millimeters thick. Take one of them, draw steps on it and cut them out with a saw or jigsaw. At the end, connect the stringer to the joists using a tenon-groove connection.
Stage number 4. How to arrange steps and platform

This is the last stage, after which the porch to the house with your own hands can be considered completely finished. First, attach the sheathing boards to the joists (you can either nail them or screw them). If you want, you can also lay some kind of finish on the boards (here, again, everything depends only on your personal preferences).
Attach treads and risers to the stringer, and you need to start working only from the bottom step. The sequence of actions is as follows: fix the riser, install a tread on top of it, and so on. Fasten using a thorn-groove connection or self-tapping screws.


As for the arrangement of the visor and railings, there are no special restrictions here. We have given step-by-step instructions for mounting these elements above. The algorithm of actions itself is the same, but instead of cladding elements and supports, you must use similar wooden parts (you can use any other material you like).

Video - Original do-it-yourself wooden porch
Common mistakes in the process of building a porch to the house
There are several mistakes that are made in the work most often. Let's get acquainted with them.
- Mistake #1. The construction of the porch is carried out after the completion of the construction of the house itself. In such cases, the depth of the foundation is not significant, moreover, it is not associated with the foundation of the house. Consequently, the foundation is affected by groundwater, heaving of the soil, as well as a number of other factors leading to the fact that cracks appear between the porch and the house.
- Mistake #2. Wooden support poles, which are used in the case of arranging a wooden porch, are not treated with antiseptic preparations. The result of such an error is obvious - after some time, the structure has to be rebuilt.
- Mistake #3. The height of the platform is the same as the height of the entrance to the house. In winter, when the soil rises, the height of the porch increases, which can cause jamming of the front door.
- Mistake #4. There is no vapor barrier or it is of poor quality. As a result, moisture will seep through the structure and reach the cladding, which does not allow steam to pass through. Further, this steam will turn into water and simply remain under this material. With the onset of cold weather, moisture will begin to expand, which will lead to a breakdown of the finish.
Do-it-yourself porch made of stone or brick
We left this option to the very end, since it is perhaps the most difficult and time-consuming, so not everyone is able to do everything with their own hands. And it is not surprising, because building a foundation out of bricks, where there is no particular need for accuracy, is one thing, but laying it out perfectly evenly is quite another.

It's no secret that professional masons are engaged in laying bricks only if there are several helpers, whose job is to prepare the cement mortar and supply it in a timely manner. As for the stone, things are somewhat more difficult for them, because uneven edges are extremely reluctant to fit together. In a word, if you do not have experience and a couple of assistants, then it is better to immediately forget about the porch made of stone or brick, otherwise you will simply waste your time and money.

It is much easier to build a concrete staircase, and then choose a facing stone or tile for steps, the size of which is as close to natural as possible. After that, you can easily overlay the entire structure. Among other things, this method is attractive in that even if you make some mistake, then you can easily chip off the desired piece of cladding and repeat the finish without any problems.
How about a canopy over the porch?
If we talk about the visor, then it will serve not only to protect the porch and the staircase itself from rain or snow, but also as a decorative element in the design of the structure. On the net you can find a lot of different options for a visor, in addition, there are photographs in print media specializing in suburban construction.

Note! In most cases, visors are made from a frame - metal or softwood - and polycarbonate / plexiglass as a sheathing material.
Tellingly, visors made of wood must be tinted every few years or, alternatively, coated with special compounds, otherwise the wood will dry out and begin to crack along the fibers. The thickness of the polycarbonate used here should be 7 millimeters, and it is recommended that the material be laid in spans of a maximum of 0.7 square meters. You should not use glass for this, because in winter it may not withstand the mass of snow cover and simply crack (another reason for this may be the deformation of the wood).

Note! The visor should have a larger area than the entire porch to the house with your own hands, by about 50 centimeters. Otherwise, the performance of the main function - protective - can be forgotten.

In the instructions for pouring the base, we already mentioned that it is preferable to install support pillars under the visor even during the formation of the foundation. It is better to install your visor on such supports. In addition, this option will allow in the future (if such a need arises) to equip a closed glazed veranda in just two to three hours.
As for the coating, they can serve as sheet metal, on top of which a beautiful tile is laid, but it is still better to use polycarbonate or plexiglass, which we just mentioned.

Note! To protect the metal that covers the visor from corrosion, paint it with two or three coats of a suitable paint.
It is also important that the visor turned out to be pitched, and on it there was a metal chute installed at a slight slope. We also recommend attaching a chain almost to the ground to the end of this gutter so that water does not splash around when it rains. And in this case, it will smoothly flow down the chain. To avoid the appearance of puddles near the porch, you can equip drainage at the drain point.

Glazed porch - is it possible?
Such a solution as a closed porch has become increasingly popular in recent years. Transparent glass structures look extremely attractive, which is why many are eager to build something similar near their home.

What is a glazed porch? In fact, this is a simple foundation made of stone or concrete with a ladder and a canopy (the latter must be on piles). By means of corners, the length of which corresponds to the height of the piles, a frame is created.

Note! Sheets can be of any height, while the width must be a maximum of 1.2 meters. If the sheet is wider, then its windage will be so strong that the wind, which has a speed of 30 meters per second, will easily break 5 mm glass.
If the distance between the piles is more than 1 meter, then it is better to break them with pseudo-piles. Similarly, you can divide the height using a pair of double corners for this. Thanks to this, you will reduce the load on the sheets of glass, and the porch to the house with your own hands will still be light and transparent.
As you can see, you don’t need any specific skills or knowledge to build a porch yourself, since even the most complex options can be handled with your own hands. Each of the described operations is basic for the construction industry, and a person with skillful hands will perform them without problems.
That's all, good luck with your work and warm winters! And for a more detailed acquaintance with the issue, we recommend that you watch the thematic video below.
Video - We make a porch with our own hands
The owners underestimate the porch of the house, but in vain, it can be significantly transformed with your own hands, as in the photo. The porch is an important element of the facade of a country house, which is the face of the owners. The main entrance emphasizes the architecture, the view of a country house. You will not surprise anyone with the same type of buildings, so everyone wants to highlight their structure. There are ideas that will make it beautiful, cozy for outdoor recreation. We will talk about interesting design ideas - shapes, finishes, materials used, design ideas.
Projects
The choice of size, shape depends on:
- architectural features;
- the size of the house itself;
- personal tastes of the owner.
Designers believe that the canopy, railings should be done in the same style reading with the roof, balcony of the house.
Let's give an example: a house with a gable roof requires a similar porch canopy, but if bars are installed on the windows, the railing should have a similar forged pattern. No exception and the type of columns, arches, other decorating details.
We note several main types of projects, design:
- Discovery is a popular type; most often has a visor, railings; decorated with decor, which are transferred to the house in winter.
- Closed - has transparent or translucent walls made of materials: glass, polycarbonate, mosquito net. Such visors decorate the entrance, hallway, provide a place to rest in any weather.
- Hinged - this type is built if there is a basement in the house, and also, if such a need is required by the area near the house; the structure resembles a balcony.
- Terrace - an extended porch used as a place to relax.
In addition, it is worth noting the possible types of protrusions - rounded or rectangular.
The closed porch has a high level of heat and sound insulation. Glazing is recommended to be carried out using a composite.
To create a project, you must first measure the area in front of the house. Of course, if there is a lot of space, it is better to make a veranda porch, which will be an excellent protector from rain, snow, and also play the role of a family resting place. If there is not as much space as we would like, a semicircular veranda is a great option. If you do not overload the interior with decor, a monochrome structure will visually expand the space.
Important points:
For a wooden house
A wooden house is characterized by comfort, complete safety for the human body. The most used materials for building a porch to a wooden house are timber, boards.
Advice
If you want to insulate it, you will additionally need siding. To make the extension look cozy, you can use the clapboard.
The presence of a railing cannot be ignored if the entrance has several steps. This element is not only practical, but also perfectly decorates the finish. Our advice is to take some time to decorate the railing with carvings.
Wood is an inexpensive but whimsical material. Be sure to cover it with paint or varnish to avoid rotting, deformation. It is also recommended to cover the material with a special compound from different beetles. With the observance of such technology, the structure will last for more than a decade.
Using logs is a creative process. Here you need to adhere to the basic rule - we compact the site before construction. The rest is in the hands of the owner.
The porch and the house are one ensemble, but you should not limit your imagination during decoration. Do you want to make it sophisticated? Add some lanterns, hanging flower pots, paintings.
If you like luxury, aristocracy, then your option is artistic forging, sculptures near the entrance, a small fountain. An artificial fireplace will look great, giving warmth, comfort to family outdoor recreation.
Varieties of the porch
Porch: awnings
Each porch requires a canopy, because it not only protects from precipitation, but also protects from injuries in winter. If the canopy is built only for protection, then the usual design, which has a simple, expensive design, will do.
The main principle in this case is accuracy, cleanliness. Suitable materials for this:
- polycarbonate;
- metallic profile;
- metal tiles;
- soft tiles;
- corrugated board;
- slate.
You should adhere to the same style of house and canopy.
Some prefer more original canopies, for example:
- in Russian;
- classical;
- modern styles.
In this case, the selection of appropriate materials for the frame, flooring is required. For example, a house made of timber requires a wooden structure, an opaque roof.
The wrought-iron canopy looks great. Unfortunately, there are not enough own forces here, you will need to order the product in special workshops. Such a canopy not only performs the function of protection, but is already a significant part in the design. Finishing corresponds to the uniform design of the railings, platforms, stairs. The sophistication of the visor can be added with the help of lanterns, hanging flowerpots.
Advice
Forged canopy is perfectly combined with polycarbonate. Transparency makes it possible to appreciate the luxury of a forged product.
Speaking about the material, it is better to choose metal, as it is characterized by:
- High strength - metal supports are able to withstand any weight of the roof.
- The ability to build a structure of any area.
- Fire resistance.
- Availability, a wide range of materials in stores.
- Easy mounting.
- Wide range of modeling possibilities.
- Ease of maintenance.
The tree is slightly inferior to the above induced material in terms of technical characteristics. But it is suitable for a canopy of a small porch, while it will please with a low price, aesthetic appearance.
Polycarbonate
A porch that is completely made of polycarbonate is a rarity. Most often, this is just a canopy. In the case of using polycarbonate, the visor acquires several advantages:
- Originality, completeness of appearance.
- Protection of entrance doors from sunlight, heavy rain.
- Practicality, originality, low price of the material.
- It is characterized by excellent flexibility, stability, reliability.
It is not recommended to make the entire terrace out of polycarbonate, as it is not entirely beautiful. It is better to combine it with wood, natural stones. It looks quite stylish, extraordinary.
A small suburban area, modest houses look good with an ordinary polycarbonate visor. Refinement will add a tree in combination with polycarbonate. A steel frame is suitable for mansions - original, solid. Dark shades will give maximum style.
Want more vibrant colors? Then flowerpots with cute flowers placed on the frame are an excellent design element that gives comfort. Chairs, sofas can be decorated with bright pillows to match the main color.
Closed
An enclosed porch is an extension that is protected on each side. In fact, this is a separate room. The type of structure should correspond to the general appearance of the house. Is the aesthetic aspect important to you? Then combine these two elements with something common, for example:
For lovers of bold decisions, they will like the combination of a wooden extension and a brick / stone facade - it is suitable if the house has any wooden element - shutters, a balcony.
Often there are extensions to private houses with glazing, polycarbonate frames.
Visor
The visor is an architectural facade structure that performs decorative and protective functions. It can be performed in the following ways:
- Modular - consists of prefabricated parts; easy to install.
- Monolithic - a solid element together with walls; maximum strength and durability.
The visor is an architectural facade structure
The choice of material depends on your taste, but still pay attention to the harmony of the overall style. This also applies to the form, if there is imagination, it can even be unusual bends.
Visors are divided according to the method of fastening:
- Suspended - small size, made of lightweight materials, suspensions are used for installation.
- Supports - props are used.
The visor is able to give the structure a unique look, which is why we pay maximum attention to this issue. Here are some design solutions:
- The beams supporting the structure can be made in the form of antique-style columns - this gives a refined, luxurious look.
- Wooden props can be styled antique, and a gable classic canopy will add fabulousness to the building; don't forget other decorating aspects in the landscape to complete the picture.
- Love brevity? Then your option is a monolithic visor with the style of finishing the whole house - strictly, but solidly.
- Using the same architectural details, you will definitely win, for example, it can be a veranda or a roof slope.
- The arched canopy has a special effect, it softens the shape of the facade, makes the house visually more comfortable.
The level of protection, the visual effect depends on the size of the canopy. Small canopies are suitable for small houses. Large - this is most likely the necessary protection of solid buildings.
Lighting
An important part is the choice of lighting. If the canopy has a strict shape, it is better to choose built-in lights, they will not disturb the overall composition. The same lighting is ideal for highlighting active decor, drawing attention to the right accents.
Lighting is an important part when planning a porch.
For classic extensions, it is better to choose small pendant chandeliers. Universal idea - wall sconces. Neon lights and figurines with artificial light look unusual.
Stylistics, textures
- facade;
- fencing;
- gate.
You can highlight such basic styles, design solutions will be introduced below. But the combination of different textures looks interesting.
For example, a path that smoothly turns into a brick railing with wooden balusters. Try to smooth out the sharp roof with the smooth shapes of the walkway, and connect the round balcony and rectangular steps with the sidewalk.
Classical
Characteristic features - strict, seasoned, moderate style. The extension is equipped with a gable roof, which can be supplemented with beautiful columns, railings with rounded balusters. Facing materials suitable for classicism - natural stones, ceramics, painted wood.
Russian style
The entrance has long been distinguished by sophistication. The extension is decorated with:
- carved elements;
- turned balusters;
- pillars made in a complex shape;
- various ornate patterns.
Now the Russian style is especially popular. It involves the use of natural materials, handmade decor.
Middle Ages
Pretty modern style. Such a veranda is similar to ancient fortresses, which are decorated with natural stone. You can decorate the front entrance with torch lamps, forged gratings, unhewn logs.
This type will attract the attention of others with its luxury.
Country
Wooden structure with carved pillars, railings. For decoration, you should use the maximum number of colors in a variety of readings:
European
Distinctive features - the presence of regular shapes, restrained lines. The extension has the appearance of a small restrained structure, for the cladding of which natural stones and ceramic tiles are used. For decoration, figurines, flower pots are used.
mediterranean
Has two readings:
Combines Greek, Roman culture. A characteristic feature is a stone courtyard, supplemented by multi-tiered steps. Sandstone is used for decoration, metal elements are used for decoration.
Combination of Italian, Spanish, French style. The difference is the maximum of irregularities, relief. Exterior - an open terrace, located in several tiers. The floor area is covered with paving stones, sometimes with clinker. The flooring near the house is made of deck boards. The canopy is arranged on columns. Concrete balusters are placed throughout the veranda. Fountains, flower tubs, sculptures are used as decor.
French
One of the varieties of European style, which has charm. The highlight is the presence of a glass door with a lattice in an openwork design. The design should be decorated with curly elements, beautiful wicker furniture, a lot of fresh flowers (pots on the floor, hanging flowerpots).
Fortress house
Massive veranda finished with natural stones. Relevant details - the presence of forged gratings, torch lamps. Lattices can be decorated with flower pots.
"Gingerbread"
Combines metal gratings, decorative brick elements. Covered with a gable roof. The decor is plants that curl. Isre dka details from a tree which are painted in natural shades are used.
Patio
A patio is an outdoor terrace that adjoins the house. It has a table and benches. In such a territory you can gladly receive guests in the summer. The only difference is the absence of a visor or roof. Most often, the patio combines a porch and a garden gazebo in terms of its functionality.
Construction material
metal
Most often, metal elements are:
- roof;
- steps;
- railing.
But you can find completely metal structures. The main advantages of such visors are high strength and durability.
This design requires additional expenses for painting, coating with a special compound to avoid the appearance of corrosion and rust. A metal floor is a very bold decision, because it is cold. Terraces additional They are additionally covered with wooden beams, concrete.
Metal construction - high strength
The design of this veranda is strict, but stylish. To dilute cold shades, we advise adding interesting decor, bright colors, installing more light sources.
Concrete
Concrete construction is considered the cheapest, most versatile, but at the same time reliable material. The main advantage is a long service life, since the monolithic structure is resistant to various factors. We note a simple repair, decoration. In addition, with the help of concrete, you can create any form, and this will not increase the price, construction time.
Concrete construction - the cheapest and most versatile option
It is good to use clinker tiles for decoration, natural stones and paint look good. If you are a supporter of modern style, then leave the siding facade unfinished - this will emphasize the texture of the walls.
from brick
Reliable, unpretentious variation. A veranda made of such material is a little more expensive than those induced, but quite an attractive solution. Although the construction takes a lot of time, requires a lot of effort, in the future, the owners will be happy with ease of maintenance. Immediately, we note that the floor, steps should be additionally covered with concrete.
From natural stone
Natural stones are strong, durable, beautiful material. This design has several variations. An excellent design solution is the use of two types of stones, one of which is for the base (more expensive, more reliable), the second for decoration. This extension is resistant to bad weather, does not require special care.
Natural stones are a durable material
steps
Now let's look at the steps:
- A concrete staircase should be lined with ceramics, natural or artificial stones, the latter option will save you money. Excellent option for concrete, brick buildings. Treads are recommended to be finished with rough-type tiles (without relief, pattern).
- Wooden steps can be made in completely different ways. Of course, you don’t want to hide the natural texture of wood, so you can cover them with oil or varnish.
You can paint the steps. Elegant, cheerful option - alternation of shades. But it is better to choose dark tones.
It looks good wood finish according to the firing method.
Metal steps are most often trimmed with wood, but there are stairs made of tin sheets. Although it looks aesthetically pleasing, elegant, it is not the best option, since wet or icy material can lead to injury.
The steps will be completed with original railings that can become a highlight. For decoration, vertical type balusters, horizontal crossbars are used, the main thing is an interesting shape that suits the style.
Ideas:
- For metal - the use of openwork forging.
- Wood - through carving.
For handrails, wood (chopped, block, frame stairs) or plastic (concrete, brick) should be used. The parapet of steps can be laid out with a beautiful facing brick of a suitable shade.
It is recommended to install step heating. The harsh winter climate turns the porch into an icy area. If concrete was chosen as the base, a heating cable can be laid under it. For wooden buildings, a special anti-icing system is provided.
Country ideas
Here are some interesting ideas regarding the design of a country terrace:
- Lots of space? Then add a small table, a few stools with cushions.
- Place flower pots on the steps, walls.
- A woven or knitted rug will add warmth.
- Climbing plants are a natural decoration for the veranda.
- On the walls you can hang compositions of dried fruits, plants, flowers.
- An unusual idea for autumn is the use of an old watering can, rubber boots for planting flowers.
- Home furnishings are provided with a carpet, a wicker table, small rocking chairs.
- You can make a small rug of shells with your own hands.
- Soft curtains of a light shade will save you on a hot day.
Furniture
Making, landscaping the veranda requires the right selection of furniture. For this, garden furniture is suitable:

With the right choice of a porch for a country house, you need to take into account the budget and desires and consider the finished photos. Our article will provide you with information about the types of porches, with all possible shapes, a variety of materials and examples of finishes.
To decide on the project of the porch, it is necessary to take into account not only the preferences of the owners of the house, but also its features. According to the designers, the style of the canopy and railing should match the style of the roof and balcony of the building. For example, for a building with a gable roof, the same canopy over the porch is suitable.

For forged balconies and window grilles, it is advisable to choose railings with the same forging patterns. At the same time, you should worry about the similar design of arches, columns and other decorative elements.

Types of house porch design
- Open - the most common way to enter the house. An open porch is mounted with a railing, a visor, decorated with decor that can be transferred to the house in winter.
- Closed - glass (transparent or translucent), polycarbonate, or a simple mosquito net can be used for wall design. It is comfortable to use the closed porch as an additional entrance hall, in such a room it is cozy and convenient to spend your holidays at any time of the year.
- Hinged - the need for such a porch comes from the design of the landscape next to the building or the presence of a basement. Hanging decoration similar to a balcony.
- The porch-terrace is decorated with an open area to relax in the fresh air.

The shape of the ledge of the porch is rectangular and round.
An important place in the design of the porch is the choice of materials. Today, concrete structures have become very popular. Their convenience lies in the fact that concrete is easy to paint, decorate with tiles, stone. Even the design of the porch is possible using wood, metal, stone and brick.
Note! Kitchen in a private house - 100 photos of design and layout ideas

A wooden porch is best suited to a wooden house. Moreover, wood is an environmentally friendly material and creates an extraordinary feeling of coziness and comfort. Such a solution has become popular not only among wooden houses, but also brick ones. They are installed on a base made of metal, concrete or wood.
What tree is the most suitable? Of course, pine - it is used in 80% of cases. This is a relatively cheap material that will serve you for many years. The main thing is reliable sealing, varnishing and painting. Although, as practice shows, when using several materials at once, the result is a stunning architectural composition.

Do-it-yourself porch to the house
Let's start with an example of installing a wooden porch. For its manufacture, first of all, it is necessary to have a design drawing. Using boards and other materials, all the details are made. An electric jigsaw will be needed to create leading supporting elements, stringers. But for the manufacture of complex design details, such as railings, it is better to seek help from a specialized workshop. There you can also ask for help from the development of a professional set of drawings, so that the dimensions of the house and additional requirements are taken into account.

It is necessary to start the assembly with the supporting parts. We must not forget about using the building level to check the horizontal position at each step of construction. Remember! In order for the porch to serve you for a long time and reliably, it is better to mount it together with the construction of the house.

Porch with canopy
Approaching any house, the first thing we notice is just a visor. And depending on the appearance, an impression is formed about the dwelling itself. Therefore, it is so important to pay attention to the design of this part of the house. What will he be like? It all depends on your financial capabilities and imagination.

The main function of the visor is a presentable appearance and protection of the entrance to the house from the gifts of the weather. Therefore, the first is the definition with the materials of manufacture. Then - the definition of the shape and design of the canopy. And the last - the implementation of the installation of the structure.

When choosing a roofing material, you should study the technical characteristics of all offers and stop at the most suitable option. Let's consider some of them:
- Polycarbonate is the most popular material. The visor has a beautiful translucent appearance, resistant to temperature changes, flexible, shockproof, fireproof. The disadvantage is the poor transfer of UV radiation, so it should immediately be treated with a protective layer so that the canopy does not become cloudy and does not lose its appearance after a couple of years.
- Metal is an inexpensive option, but it is much more difficult to work with it, since you need to use welding or fixing bolts. Such a visor will last a long time and reliably, if it is protected from corrosion and periodically care for the surface.
- Metal tile - has an excellent appearance and will last an unlimited amount of time. It is lightweight, durable, low maintenance and easy to install. The metal tile will have an attractive appearance and look wonderful with any type of frame. Among the shortcomings - the lack of sound insulation and strong heating in the summer.
- Decking - has the same advantages as a metal tile. The advantages include ease of use due to the large area of the sheets, affordability and ease of installation, as well as no need for additional painting, practicality and durability.
When choosing a design, it is important to consider the material of the roof, the parameters of the canopy and the side of the drain.

According to the installation method, it can be supporting (a heavy structure reinforced with wooden beams or metal pipes), suspended (it has a small size and is mounted on an outer wall).

By form:
- flat - such a visor is mounted open and is made of any material;
- gable - will save from rain, wind and blizzard, you can use different materials for construction;
- three-pitched - made on a metal frame made of metal tiles or corrugated board, reliable and easily sheltered from blizzards and rain;
- metal - made by forging. This version of the visor will be large, have a representative appearance, especially strong walls are needed for decoration;
- polycarbonate - protects from wind and dust, because of its flexibility, the visor can be easily shaped into an arch, tent or umbrella, which is why designers love to use it so much.

Whatever your decision about choosing a porch, always sensibly assess your options. Remember that it is better to order complex elements in a specialized company, and in order to flawlessly perform individual work, additional training from professionals is necessary.

And do not forget about working drawings, materials, tools, a photo of a porch for a private house and fixtures that will be needed to plan future actions.


Photo of the porch of a private house


It's no secret that building a porch in a country house is not an easy task, given that it must fit into the overall look of the building, as well as be truly functional.
In most cases, it is the originally designed porch that can become an unusual business card for the house.

There are a huge number of different options for the final stage in building a house. Everything primarily depends on how you see a truly beautiful porch for yourself and what budget you have.

At the same time, it is worth noting that if you are interested in how to make a porch with your own hands, then it is quite simple and all you need to do is read this article and perhaps use some of the advice of builders.
What is a porch?
In fact, a constructive porch built in a private house is the simplest open area with a staircase that is made right in front of the entrance to the building. In this case, the porch can be of the most diverse form, with or without an additional canopy.

If we talk about the design itself, which can be chosen for the porch and which determines the design for the most part, then they can be divided into three main types: simple, attached or built-in.

The porch of the latter type is almost always designed at the stage of building a house.
The most popular simple type of porch is the platform, which has additional steps and a canopy above them.

During the construction of this type of porch, the most difficult thing is pouring the necessary foundation, which will be needed anyway, even if it is a lightweight structure and you planned to make a wooden porch yourself.

The attached porch is very similar in appearance to the beautiful built-in porch, but it is very often rebuilt and modified in various ways.
Foundation - foundation
An important point that you should definitely pay attention to when laying the foundation is that its depth during construction work must necessarily coincide with the depth of laying the foundation itself for the entire building. Otherwise, after the settlement of the soil, it is quite possible that deformation will occur completely at the entire structure of the porch.

If, after the settlement of the soil, the structure is shifted towards the house, then the destruction will begin from the foundation of the porch. In this case, cosmetic repairs will not be possible and you will have to build a porch from the very beginning.

During the construction of the foundation, special attention should be paid to the waterproofing of the foundation being built.
Varieties of the porch for the future home
First of all, before starting the construction of the porch, it is imperative to decide which material you like best. Most often it is either concrete, or expensive metal, or stone, classic brick, affordable wood.

Having decided to make a porch to the house out of wood, many simply hope that this is the easiest and most affordable option, in fact, they are not even aware of the large number of nuances.

It is a photo of a porch made of wood that can be easily found in various magazines more than others. This is due to the fact that wood is considered by many to be a traditional material.

All you need to build such a porch is minimal building skills, a circular saw, and a construction square.
Note!

If possible, it is best to use either larch or any coniferous species as a material. They are distinguished by good strength indicators, and are also quite easy to independently process.

After a specially made impregnation, the material will definitely not be inferior, for example, to material from any other hard rock.

Above the porch, you should definitely take care of the visor. This will not only protect the steps of the stairs and its platforms from various precipitations, but also allow you to decorate the wooden porch in an interesting way in a short time without serious financial investments.

Photos of a wide variety of canopies can also be found on the Internet and magazines dedicated to the construction of various country houses.

DIY porch photo


Note!


We also recommend
 Hero pioneers in the Great Patriotic War Heroes of the Patriotic War pioneers presentation
 Presentation "Formation of posture in preschool children Hygiene of correct posture presentation for children
 Sciences of the human body
 Presentation "history and prospects for the development of robotics"
 The value of the struggle of Russia with the Polovtsy
 Asia and Africa after World War II