How to make a spinner at home. How to make your own spinner at home
Bearing spinner
The basic rules for manufacturing an actual turntable are: central bearing; radially arranged weighting blades.
With a certain skill, you can make a spinner based on four bearings. Buy them at a sports store that sells roller consumables.
Prepare the center of the toy: take out the anthers on the sides with a knife and place the part in the solvent for 3-5 minutes. To get rid of grease, clean the bearing with a toothbrush and dry thoroughly with a cloth.
Attach the blades to the prepared center with superglue. If you try, you will be able to make a spinner even better than a store spinner! Decorate it creatively, for example, glue it with a colored cord.
How to make a spinner without a bearing
It is very easy to make a spinner from four plastic bottle caps of the same size. The future blades of the gadget will serve as counterweights, so fill them with plasticine and fill them with a glue gun.
Make a hole in the center of the fourth cover with a red-hot knitting needle. This detail is the middle of a homemade spinner. Glue three blades to it. After that, complete the axis of the spinner.
Make two pieces of the glue gun rod, each about a centimeter long. Place the center of the spinner on the half of the toothpick, put pieces of glue sticks on both sides of the axis. Color the gadget with acrylic paints.

You can make the center of the spinner a bearing, which is attached to a form pre-cut from plywood. Excellent blades will be obtained from coins glued together.
On the Internet you can find instructions, a cardboard spinner, using the origami technique. To create a collection of unique gadgets, show your imagination and try to invent new ways to make a spinner toy.
Interesting facts about the spinner
- The invention of the spinner is credited to Ohio chemical engineer Katherine Hettinger, who made a soothing pinwheel for her sick daughter in the 1990s.
- In its current form, the spinner was patented by Scott McCoskery. The metal pinwheel, which he invented in 2014, helped him cope with business meeting anxiety, he says.
- The wave of popularity of the spinner came in 2017. Some American schools even had to ban the gadget because it distracted students from class.
- In pursuit of the current trend, Kim Kardashian released golden fidget spinners in 2017, and with a Novosibirsk spinner made from Zhiguli, she collected more than one hundred thousand views on YouTube.
- Experts say that the spinner develops fine motor skills, relieves stress and irritation, and helps to concentrate. The benefits of gadgets for patients with autism and ADHD are claimed.
If you are reluctant to buy spinners in the store, feel sorry for hard-earned money, too lazy to wait for delivery, or just a creative impulse plays in your soul, then you can try to assemble the turntable yourself.
With even hands, the toy will turn out no worse, and often even better than the purchased one - after all, you put a piece of yourself into it.
How to make a do-it-yourself spinner
1st method: we make a spinner from bearings
We need bearings, for example, from a skateboard. Before using the bearing in practice, it is necessary to clean it of grease, otherwise the turntable will rotate quietly, but not for long. This method is very simple, since you do not have to make a spinner body, all we need is four bearings.
They must be laid out in the correct form. In order to make this form accurately, use a squared notebook sheet. After we have a perfect triangle, we glue the bearings together with glue - best of all, superglue or cold welding.
Or you can draw a circle with a compass and divide it into 3 parts, like a Mercedes badge. Drawing and geometry lessons to help.

When the glue is dry, it is necessary to increase the bonding area, for this we sprinkle the glue with salt, then the area will increase and the bearings will hold each other better. At the end, we wrap the gluing points with any thread and impregnate it with glue, this will betray even more strength.
A few video instructions on how to make a spinner from bearings:
And another option without a rope:
2nd method: spinner with clamps
For the next method, we need two ties or clamps. They need to be inserted into each other. After that, we place three bearings in the center of the ties and tighten the ties until they are firmly held.

Cut off the protruding ends. In principle, at this stage, the spinner is ready, but it does not hold firmly. In the event of a turntable falling, everything will fly out of it. We don't need this, of course. Therefore, it is necessary with the help of glue to make it more reliable. In all places where the bearings interlock, where the ties touch the bearings, it is necessary to drip with glue.
Such a spinner, due to its high degree of gravity, spins for less time and not so fast, but it is easier to manufacture.
You can see in more detail how a spinner with ties is made in the video:
How to make a spinner without a bearing
We need: six plastic bottle caps, a toothpick, a large gel pen refill, coins and glue.
- To begin with, we take one of the covers and make a hole in it, using a burner or a soldering iron, in extreme cases, with a hot metal nail.
- Now we cut off a small part from the rod, about a centimeter long and paste it into the cork.
- After that, we take two more plugs and cut off the upper part.
- Then we take a toothpick and cut off the sharp ends so that a stick remains, about three centimeters long.
- Using glue, glue it to the top of the cork.
- After that, we pass it through part of the rods and glue the second cork. The middle plug should spin easily.
- In the end, it remains for us to glue the remaining three plugs.
To understand what we are talking about, watch the video where there will be step-by-step instructions on how to make a spinner from plastic bottle caps:
As a result, we already have a pretty good spinner, but in order for it to spin even better, it needs to be weighted. For this we will use coins. We take a coin and glue it to each of the corks. That's all, our spinner is ready.
How to make a paper spinner
1st way: from cardboard
We make a template for a spinner from cardboard using a plastic bottle cap.
- We circle it so that we get a triangle. We connect the circle with the rest of the circles with smooth lines and cut it out.
- We put the finished template on cardboard, circle it and cut it out.
- We also need four more circles of a smaller size, we make them.
- Now we need coins. We take them and glue them on the sides of the first half of the spinner, and glue the second half on top.
- Using nail scissors, make a hole in the center of the spinner.
- Next, we need to cut off about a centimeter of the rod from the handle, and make small holes in two small circles.
- All the details are ready, now you can paint our spinner with paints to give it a more beautiful look.
- Now we assemble our spinner from the resulting parts. We insert the axis into one circle and glue it, put it into the spinner and press it on the other side with another circle.
- Glue the remaining two circles on the sides. That's all, a homemade paper spinner without a bearing is ready.
For details, watch this video:
2nd method: paper spinner
To make such a spinner, we need two square sheets of paper and two pushpins. The assembly diagram will look like this:

We advise you to immediately watch the video, otherwise the instruction may seem too complicated:
- We fold the sheet in half, then open it, like a book, we bend both sides of the paper to the bend.
- Next, we fold the resulting rectangle again and get an even smaller rectangle.
- We fold the resulting figure in half to make a bend. Then we open it and put it vertically.
- We take from the lower left corner and bring it to the right side. You should get a figure similar to the English letter L.
- We repeat the same with the other part of the paper, only now we bend it to the left side.
- From the resulting figure, we bend each corner so that we get two triangles at two ends.
- We make a rhombus out of the resulting one, run our fingers several times along the bends and open it back to the previous figure.
- We repeat the same with the second sheet of paper, only at the fold stage we do the folds in the opposite direction.
- We connect the two resulting figures together. We put the ode vertically, the other, on top, horizontally. We fill the corner of the vertical figure into the corners of the horizontal one. As a result, you should get a figure that looks like a shuriken.
- Now we make a hole in the center of our star, using a pushpin so that it can spin with ease.
- Now we take the second button, heat the iron tip and take it out. We put on the remaining cap, on the other hand. Spinner is ready.
More interesting articles.
Spinner is rapidly conquering the world. Millions of people from all over the world spin and toss this toy at work, in traffic jams, at home, on a walk, in line, etc. The spinner is a powerful and at the same time very simple and affordable anti-stress, which helps to get rid of tension and relax without attracting attention. The spinner became so popular that people began to do various tricks with it. This toy is loved by everyone from young to old: it is played by both preschoolers and big bosses in modern offices.
Spinner is an affordable thing. If at first they could only be found online, today they are sold literally on every corner, and there are also very budget options. However, homemade spinners are not inferior in popularity to ready-made options: Web users are actively looking for how to make a do-it-yourself spinner at home. And this is easy to explain: homemade spinners are unique, made from improvised materials, and their manufacture is also a kind of anti-stress.
We offer you several options for making this accessory. The first is the most time-consuming, the rest are a little easier. Choose the one that seems most understandable to you and you like the most.

Option one: difficult, but interesting
We will use really only improvised means. We will need:
- wooden ice cream sticks (20 pieces);
- metal or ceramic bearing (if you want the spinner to spin easier and longer, opt for the latter) size 8*22*7;
- 50-kopeck coins (make a hole in its center with an awl) (12 pieces);
- nuts and bolts, small in size and diameter (4 pieces each);
- buttons from jeans or jeans (or the simplest pushpins) (2 pieces);
- glue;
- sandpaper;
- paint (it is more convenient to take aerosol).
How to make a spinner?
Step 1: Preparation
We take two wooden sticks and cut each into two equal parts (along). That is, at the output of two sticks we already have four.

Now we take five whole sticks, press them tightly against each other and apply a layer of glue on top. We put the second layer of sticks on top: put four whole ones in the center, and put the previously cut sticks along the edges. We cover with a layer of glue and them. The third layer will consist of five whole sticks (like the first one). The fourth and last layer is a repetition of the second.

At the output, we have a base consisting of four layers of sticks glued together.

Step 2: Basic work
Choose the size of the spinner for you. We will tell you on the example of a 9 * 9 square, but the proportions can be freely changed.

Make marks on the workpiece and cut out a square (say, 9 cm).

Now inside the square we draw an equilateral triangle. To do this, divide one of the sides of our square in half and draw two 9 cm segments from this point, and then connect the ends.

Then divide each side of the triangle exactly in half and make serifs. Connect each notch to the opposite vertex. The intersection point of these segments (they are called medians) is the center of the spinner, in which we will place the bearing. Outline it with a pencil.

On the same segments, make notches at a distance of 2.5 cm from each vertex. Place a coin in the center of each of them (a hole is needed to align the hole with the serif and not go astray) and circle it with a pencil.

Using an awl or a sharp knife, dig holes inside the traced outlines. And then loosen them to cut even holes. You can press the bearing and the coin into the workpiece (but carefully so that the glued layers do not separate).


Cut out a triangle from the workpiece. Now we make two-centimeter serifs in the center of each of its sides. Like this:

The notch height at the median is 7 mm. Cut out these side triangles.

Step 3: Polishing
We take sandpaper and sand the surface of the future spinner. We walk around the edges. We paint the workpiece on both sides and leave to dry.
Step 4: Loads
We glue four coins together. We will have 3 stacks that we will insert into our holes in the spinner. Place the bearing in the center.

To make it easier to turn it, we place the previously prepared buttons or buttons in the center of the bearing and glue them. The finished product can be varnished.
Tip: if you own a jigsaw and a drill, take note of the diagrams from our instructions and make the spinner body not from ice cream sticks, but from an ordinary wooden panel. Then just sand your workpiece with sandpaper, paint and varnish.

Ready!
Option two: the easiest
With the help of superglue, glue gun or cold welding, we connect three or more bearings together. A video tutorial on making a spinner at home is below.
Option three: energy-intensive
It is most reliable to connect the bearings not just with glue, but also with a housing. For this, ordinary screeds are suitable, as well as wooden (as in the first method), plastic and metal cases. How to make them, see the next master class.
Option four: for cyclists
If you have an old bicycle chain, this DIY spinner is for you. True, you will have to work hard to make this popular toy. We lay the chain in a special way, fasten it with a tie, fix it, put the bearing in the center. Watch the video for detailed step by step instructions.
Option five: if you don’t have cutting tools, but you still want to make a spinner
A paper or cardboard spinner is also a great option for this toy. It will spin no worse! We take cardboard and a compass, cut out 4 circles of equal diameter from it (determine the size of the spinner for yourself, it doesn’t matter), glue them together. Take bright cardboard or paper to make the toy more attractive and please you not only with its properties, but also with its appearance.
Make holes for bearings slightly smaller than the diameter of the bearings themselves. This is necessary so that they sit tightly and do not slip out when you twist your toy. Learn more about making such a spinner in this video.
Option six: if there are no bearings, but the spinner is still very necessary
If you do not have bearings, a spinner can be made from the simplest material that is easy to get - from plastic caps. We need six pieces (take colored ones to make the toy look prettier and more interesting) and a toothpick or pen rod.
Let's see how to make a bearing from plastic caps.
Bonus
The video tutorial below shows three of the easiest ways to make a spinner at home. They all repeat the last three instructions in one way or another (No. 4, 5 and 6), but in this video you will also find some important tips for making the popular anti-stress toy.
Choose the method that seems most interesting and understandable to you. It is quite possible to make a spinner with your own hands in 2-3 minutes, or you can get confused and make a toy in a more time-consuming way. The result will directly depend on your efforts. However, no matter which method you choose, at the end you will definitely get a cool anti-stress toy, which is so popular today.
Views: 5 951
Spinner conquers the galaxy at the speed of light. Millions of people twist, spin and toss the toy that has become a favorite accessory at work, home and school. For those who suddenly returned from a business trip from the forest, we explain: the spinner is the coolest anti-stress gadget for children and adults. A toy is made from a variety of materials: metal, plastic, wood, and so on. In previous materials, the game portal Game2Day told, and.
However, despite the fact that spinner prices start at a few dollars, many users are still looking on the Internet for how to make a spinner with their own hands. Today we will tell you how to make a spinner yourself at home without unnecessary complicated stray. Let's start with a simple one: we will make a spinner from Cola caps and cardboard. And then we will try to complicate and make a spinner from a bicycle chain. Well, let's see what the human imagination is capable of.
What do you need to make a spinner? Prepare cardboard, paper with a pencil, a compass with a ruler, a few round bearings, a stationery and a simple knife, as well as a lot of glue: liquid, hot and super glue.
Making a spinner out of paper and cardboard
A hand spinner made of paper or cardboard is easy to do: create a drawing (four equal-sized circles with places for bearings), cut out the details from paper, and paste them on cardboard. Cut the holes for the bearings a little smaller so that the metal part fits snugly and does not pop out. And then just glue three circles together around one at regular intervals.
Wooden spinner
Do you own a jigsaw and a drill? Fine! You can make an eco-friendly and pleasant to the touch wooden spinner. There are a lot of drawings on the Internet, we download and print them on paper. We apply the workpiece to a wooden board, carefully circle it with a pencil and cut it out along the contour. It would be nice to sand the resulting toy with sandpaper and varnish or wood oil. You can even age the spinner with a lighter. Holes for bearings can be made with a drill (drill halfway, turn over and drill further). The thickness of the plank must match the thickness of the bearing.
Spinner made of plastic caps
Spinner can be made without bearings. We take 6 plastic covers (it can be of different colors, it will be more beautiful). In two covers we make small holes in the center. We glue them with a flat surface to each other, but so that the holes are not filled with glue. Fold three covers around the resulting figure, distributing them at the same distance. We glue them to our double cover on the sides at an equal height. Then we take a wooden stick and put it through the hole in the center. We cut it off, leaving 3-4 millimeters on both sides so that it sticks out a little from the lid. Fill the stick with glue, wait. Everything, you can twist! Your mom is an engineer!
Bearing spinner
We will need three bearings, one of which should be slightly smaller than the others. We pick off the protective liners from the small bearing with a knife and put them in a row so that the large ones are at the edges. We take three plastic clamps and tighten them around the future spinner. Strongly, so that you can lift the spinner by one of the clamps. We take two more clamps and tighten them across (on the sides of the small bearing). We cut the clamps and vzhuuh, magic!
A three-beam spinner will require seven bearings, a tube of superglue and hot glue, a wooden stick, acetone, salt (!!!), napkins and a clerical knife. We remove the protective liners from the four bearings and clean them of oil residues with acetone. Then we lay out all seven bearings on the table so that one is in the middle and the rest are around it (bearings without liners should go through one). We glue them with superglue to each other from above. We do NOT glue bearings with liners! As soon as the glue dries, remove the excess, and glue the spinner at the junction of the glands. Pour salt there to fill in the gaps and coat the spinner in a circle with hot glue. We are waiting for everything to harden and go to show off to friends.
What else can you make a spinner from?
Ohohohonyushki! Well, we have questions today. Spinner can be made from anything. Seriously. Even a Lamborghini can be made into a spinner. Would you like to see? You are welcome!
For tough men - a brutal bullet spinner. Melted and poured into a special form. You can walk around the area without fear. There is!
But this spinner is the exact opposite of the previous one. Do you want to make a toy out of Gummy bears? That way.
Young chemists started up ... Gallium spinner, how do you like that? It is said that this material literally melts in the hands. But one thing is clear, it is very fragile, but beautiful: it resembles silver. You can troll werewolves.
One of the most expensive spinner options is gold. What for? We don't know. Maybe someone has more than school medals. Or teeth inherited from a great-grandfather. In general, if you have nowhere to put one of the most expensive metals on the planet, make yourself such a spinner. Maybe the hammer will go even more expensive.
And these spinners are especially for boys and girls. Bright, colorful and completely safe. They are mainly made of cardboard, and the drawings can be downloaded from the description of the video. Offer to do this in the lessons of labor or needlework. Teachers will definitely like it, maybe they will even allow you to do tricks in the lesson
The next set - as many as three spinners: from a bicycle chain, which can be made in a very short time; a very cool spinner with LED lights that glows in the dark, and the third option is from LEGO.
Gorgeous brass spinner. Handmade, but it looks like it was made in a factory by hardworking Chinese. Or Filipinos. In general, see for yourself, if you happen to have such tools at hand - go for it!
There was already a spinner made of Gummy bears. It's time for another edible toy. Candy spinner made by an American blogger. Weak repeat? Spinner from barberries - it will come out cool!
Another luminous spinner with LED lights. You can put production on stream and supply local clubs instead of stamps on hand. Why not a startup? Use on health.
The sakura blossomed. Dripping silver rain. Making spinner shuriken. During the process, you can come up with more than one haiku, you know.
If you have nowhere to put your iPhones, make a spinner out of one. Seriously, it both spins cool and looks expensive. Only you can’t call him ... also to me, the quality is called. Think they drilled a hole in the middle!
Glamorous spinner for girls with sparkles. You can also decorate with beads.
Classic metal spinner for cool tricks and spins. Reliable, simple. You just have to get a lathe first.
You can come up with just as many models for spinners, if not more. The main thing is that there is enough imagination and improvised tools. Good luck and let the curvature of your hands disappear for the time you spend on making new spinners. Surprise us with your options in the comments, happy spinning!
If I didn’t have children, it would be difficult for me to answer the question of what a spinner is.
But our children always know new trends and, like crazy, I pick up new epidemics, immersing us adults in the know. So I had to find out what kind of thing this is and why it is needed at all.
I was interested to know if the older generation knows about spinners and I asked my father if he knows what it is and what thoughts came to his mind.
And this is what he replied:
« I once watched as my dog hit the bicycle pedal with his paw and it rotated with a slight buzz. The game captivated him for ten minutes, then he got tired of it and he lay down and cooled down the kennel to an empty occupation. Now, seeing a spiner, I remember my male and I am very upset when comparing them. Fashion is fashion, but stupidity must have limits«.
Well, I don’t know about stupidity, let’s go, we’ll figure it out in order ...
What is a spinner?
The spinner itself is a spinning toy with blades, inside of which there is a bearing that allows you to spin the blades to high speed. The functionality of such a toy tends to zero, so children arrange speed tournaments, whose spinner develops a high speed, that one will be “cool”.
 Some interesting finds from the AliExpress website. Spinners are so popular now that they are not only made of plastic and metal, but also modified by integrating Bluetooth for synchronization with a smartphone and speakers
 The material from which this turntable is made is the most diverse, plastic, brass, stainless steel, copper, and anything else are used.
Variety of forms
The number and shape of spinner blades is also the most diverse, for example, in the classic version of the “spinner” it has 3 blades, but it also happens to have two - and six-blade options or just round, cubic shapes. And for greater effect, LEDs, bluetooth, speakers are inserted into some. What they can't think of!

And handmakers manage to insert blades, knives into the blades, make spinners from everything that comes to hand.
Here is one craftsman who managed to make a spinner from a bicycle chain, and I must say he successfully coped with his goal.
The guys from Novosibirsk, apparently, also get bored from time to time and it’s not knives that are used, but cars.
In practice, this did not show any results, it just began to fall apart in parts, I think it was immediately clear that welding was not such a strong thing for such undertakings. Silly, isn't it?
And some guys - YouTubers took a big risk by replacing the blades with very sharp knives, at first they just spun the spinner, then the idea came to the bad minds to wrap the blades with a material soaked in a combustible mixture and spin this spinner in a burning state, this is already from the fire show area.
This is not worth repeating. This is dangerous! Moreover, protect children from watching such videos.

Is spinner dangerous?
You can argue for a very long time about the danger of these toys, because for some reason people begin to come up with quite extreme tricks with spinners. The speed is mesmerizing, I want to test the spinner for everything it is capable of, and sometimes the issue of safety somehow fades into the background. It turns out that the danger of the toy lies in the heads of its testers. Someone, trying to break glass with a spinner, forgets that a glass fragment can bounce off and hit the face, or the spinner itself at high speed can ricochet from a solid object into the body of the tester.
Is a toy dangerous for the human psyche?
Why did this question come up at all? Have you heard something about the danger of the top? Did you really have to put your psyche to the test as a child, playing with spinning toys? With the same button, for example? I imagine a psychologist sits and says: "Never look at a helicopter, it's dangerous for your psyche" wow ...
At the expense of the development of fine motor skills with a spinner. If we are talking about a spinner that was simply bought for a child, then no motor skills are involved in this, and if the child assembles the toy himself, glues something, cuts it out, then I agree 100%.
I looked at my children, they showed some interest, twisted and put these spinners on the shelf, where they are gathering dust, waiting for the next meeting with the children, but it seems this will not happen soon. I think that the danger to the psyche is very far-fetched.
Does the spinner soothe?
It is difficult to answer this question. But I think the point is that if a person has some kind of nervous tension and is used to biting his nails or breaking pencils, then these stupid habits can be replaced by spinning the spinner, but the very reason for this behavior cannot be affected.

How much does a spinner cost?
The question price starts from 29 rubles, usually knowledgeable people order them from Alliexpress. But like everywhere else, there are madmen who, if there is demand, can make such a chic offer:

How to fix a spinner if it is broken?
What can break?
The spinner itself consists of a housing and a bearing, so it is logical that the plastic housing may be damaged or the bearing clogged with dirt. 
If the housing is broken, then superglue will help to glue it, and you can clean the bearing WD-40 or alcohol, after that it is necessary to lubricate it with synthetic oil.
We disassemble the spinner
1. It is necessary to remove the cover and buttons of the bearing. Usually, the cover is fixed on the thread,
therefore, in this case, you just need to carefully fix it on one side, and gently unwind it on the other.

In some models, the lid fastening is made magnetic, such a lid must be opened by carefully separating it. Under the cover, the bearing is protected in the form of a plastic or metal partition, which can be easily removed if you simply pick it up with something thin.
2. If the bearing is fixed inside the housing with a sealant. you shouldn't try to pick it off, as you can unbalance the snipper. In this case, you need to rinse with a non-aggressive agent, so as not to damage the case, isopropyl alcohol is best.

We clean the bearing
1. Pour the cleaner on the balls and scroll them so that the liquid cleans the balls from all sides.
2. We wash the bearing, dry it with a hairdryer (a towel or napkins for drying will not work, as small fibers and dust will get inside). We lubricate the bearing with synthetic oil, one drop is enough for these purposes.
How to make a do-it-yourself spinner?
To make a spinner yourself, you need to consider what material you would like to create it from. The simplest spinner can be made from improvised materials, something that can be found in any home without much difficulty.
In any case, first you need to make a drawing of the future toy. In this case, you need to show imagination and some drawing skills. But you can make it easier: circle the finished drawing downloaded from these drawings:

Spinner without glue and bearings
The simplest spinner model, the one in which the bearing is replaced with an axle around which a simple spinner rotates, in this design you don’t even need glue. Simply, either assemble or cut out the turntable body itself, making a hole in the middle for the rod (axis). Thread the rod and the toy is ready.
paper spinner
For a paper spinner, we need two colored squares of paper, 15 by 15 cm in size. Let's prepare a toothpick as the axis of the spinner and a pair of clip caps from the stem of an ordinary writing pen.

According to the scheme, we make the body of the turntable, then we pierce a hole in it with scissors, slightly expand this hole so that the axis freely enters it.
Spinner without bearing and hot glue made of cardboard
We suggest you make another spinner option out of cardboard. Below is a step by step guide with photos.
We make a cardboard spinner template, for this we circle any cover of the desired diameter, then draw an isosceles triangle inside this circle and draw circles on each corner, thus we get a three-bladed blank of our spinner.

Then we bring the shape of the spinner to the desired one and decorate our spinner as our imagination tells us.
Another type of cardboard spinner is on a rope with or without a button.
We make a cardboard blank in the form of a circle, paint it as fantasy tells us, then we attach a button with two holes and pierce our blank in the right places with scissors, after the leads are ready, glue the buttons with glue, then we thread the rope into one hole and pull it out of the other, we tie our rope. If you don't have the right buttons, you can just make two holes and thread through them.

How to make a do-it-yourself spinner from plastic bottle caps.
For this spinner design, we need bottle caps, depending on the number of blades from 4 to 7, four 6000RS bearings, a drill, a knife, sandpaper and a glue gun.
We make a hole of the required size for the central bearing in the cork, glue the corks together, insert the bearings into the covers, fixing them on the sides inside the corks.
The design of your brainchild depends on your imagination.
If you have something to add, write in the comments, we will discuss.
History of the spinner
Open any site where there is information about the spinner, you will read that supposedly the toy itself came to us from America (whatever the virus, it is American).
It is not known for certain who the inventor of this toy is, e according to wikipedia, then the inventor of the spinner, Katherine Hettinger, who came up with the prototype of this spinner for her daughter.

In her interviews, the woman each time came up with new versions of what influenced the implementation of the spinner idea.
Scott Mac Coskery, according to the same Wikipedia, came up with a rotating metal device, which, according to him, helped him cope with the excitement before important speeches or meetings.

I'll tell you more, the prototype of this toy is over 5000 years old. Its predecessors were found in the territory from China to Venezuela and Israel, and why go far, do you remember your childhood? I am speaking to those people whom children consider to be dinosaurs, who rewound cassettes for a tape recorder with pencils. In our childhood, there was also a spinner, but it didn’t have this name, remember?
Well, if I tell you a word - a button?

Well, yes, we remembered, here it is our favorite ... and we twirled it and stuck all sorts of things to the button to see how it would twirl, our children simply go through the same stages, but with toys that have passed evolution, in parallel with our brain. Yes, it looks like this is the toy that has been played with for 5,000 years and will be played with for a very long time to come.
There is another interesting fact about the same spinner, and we will talk about the biophysicist Manu Prakash. He visited a hospital in Ugada, noticing how the centrifuge from the laboratory, designed to separate blood fractions, simply propped up the door with itself, because there was no money for banal electricity.
Manu did not think for a long time, he tested a paper spinner, although his name is completely different, but the essence is the same.
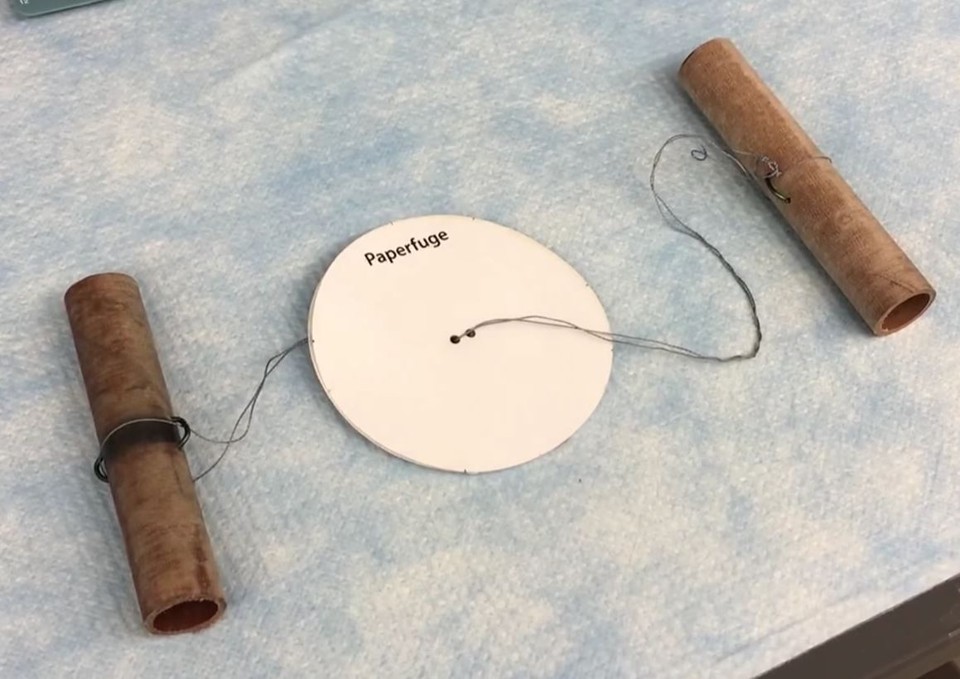
On the basis of paper discs and ropes, the Manu team created a paper fug that developed a speed of 125 thousand revolutions per minute, despite the fact that centrifuges in the laboratory reach speeds of up to 16 thousand revolutions per minute and at the same time are not cheap, but when compared with the price of paper machine, the price is simply sky-high.

Making such a paper blower is not at all difficult, says the Manu team, which has submitted an application to the Guinness Book of Records to place their super invention.
If the Internet had been so developed in my childhood, there would always be people who wanted to talk about the dangers and benefits of the top, plastic dolls, or some other mass enthusiasm.
The essence of the dispute is whether a spinner is harmful or not, it’s not worth a damn, there’s just a hype around the novelty and everyone is trying to make a PR campaign on this: psychotherapists who have a lot of time and effort with a version of personality imbalance, bloggers who are ready to chop off themselves for the sake of likes fingers, destroy cars or set fire to your house, but first things first.
One conclusion can be drawn: if children did not have toys, the world would stop in its development.
Do you have such a toy at home? Write your opinion below...
We also recommend
 Hero pioneers in the Great Patriotic War Heroes of the Patriotic War pioneers presentation
 Presentation "Formation of posture in preschool children Hygiene of correct posture presentation for children
 Sciences of the human body
 Presentation "history and prospects for the development of robotics"
 The value of the struggle of Russia with the Polovtsy
 Asia and Africa after World War II