We translate the image into a tree. How to make a cutting board out of wood: ideas, choice of material, manufacturing
One of the oldest types of creativity and drawing is wood painting. This method of decoration was widespread in Rus', with the help of paints they painted wooden boards, decorated panels, trays and caskets. To learn how to decorate wooden objects on your own, you just need to learn the basic painting techniques.
This type of arts and crafts has been passed down from generation to generation. Adults together with children depicted original patterns based on folk motifs, which were later framed. Decorating with the help of painting various interior items was considered popular. In this form, this art has reached the present day, when furniture, dishes, toys, musical instruments are decorated with decorative wood painting.

As a material for the work of the master, coloring compositions for various purposes are used. You can paint on wood with gouache, acrylic, watercolor and even oil. It will not be difficult even for a child to make a beautiful painted board for cutting food on their own: the whole process consists of selecting a picture, transferring it to the surface, and gradually decorating it. It is important to achieve the right combination of colors so that the boards look harmonious.
Painting techniques are of three types:
- Khokhloma - characterized by a black background, as well as yellow and red colors, where fancy flowers are depicted.

- - the main motifs are drawings dedicated to urban scenes, epics and flower arrangements.

- - a type of drawing on wood, the main subjects of which are ornaments and horses.

To learn how to paint on wood, you need to familiarize yourself with the basic techniques, which can be found in the following sections.
How to paint a kitchen board with acrylic paints?
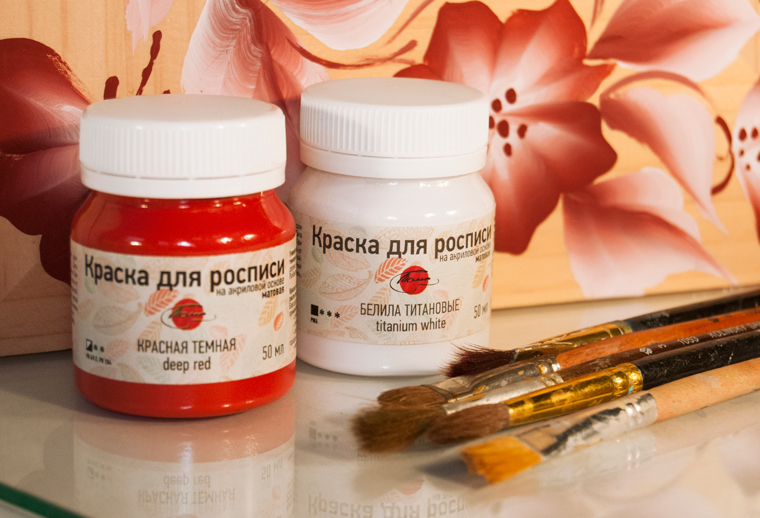
Acrylic paints are the most convenient material for getting acquainted with folk art and mastering technology. They have sufficient density, they can be mixed to achieve a spectacular image. After painting a wooden board with such paints, it is not necessary to varnish the surface, because acrylic creates a strong protective film.
For work you will need:
- cutting board with a smooth surface;
- specified paints of the required colors;
- brushes;
- stencils for painting.
Choose high-quality artistic acrylic paints that have sufficient density - this is how the drawing will be saturated.
The surface of the board should be flat, if there are protrusions on it - it is recommended to use sandpaper and sand the plane of the tree. After that, the masters recommend impregnating the base with white acrylic so that subsequent sketches lie flat on the board. While the workpiece is drying, it is necessary to transfer the drawing to the tree, how to do this can be found in the last section of this material.
The peculiarity of the products obtained after painting is that they have a bright and saturated color. It is necessary to start painting the board with large elements of the picture, gradually moving on to smaller details. To highlight individual details of the image, paint them with a thin brush in black or white.

After painting on wood with acrylic paints, the product must be thoroughly dried. The next step will be varnishing the board, if further use of the product for its intended purpose is expected. If the finished result will perform only a decorative function, then it is not necessary to varnish the board - painting with acrylic paints will independently stick to the tree.
On the video: painting a cutting board with acrylic paints.
Painting a tree with watercolors and its features
The technology of painting wooden bases with watercolors involves the rapid application of paint to the surface. Some argue that watercolor is completely unsuitable for such coatings, because abundant wetting of the tree leads to its damage. You can correct the situation and learn how to paint on wood with watercolors correctly - you just need to choose the right technique.
For beginners, painting with watercolors should not be a difficult procedure; you can practice on wooden blanks in the form of nesting dolls. After translating the drawing, it is necessary to draw 1 time with a wet brush over the part of the workpiece that needs to be painted. This is done for better adhesion of the paint. In stages, large areas are first painted, after which colors are added to the details.

The use of watercolor on wood has a number of features:
- the ability to create light and airy images, equipping them with shadows and color transitions;
- lack of relief stroke, which cannot be said about painting wooden bases with acrylic or oil paints;
- a face painted on a tree in watercolor most accurately truthfully conveys shades;
- the possibility of mixing watercolors with other types of paints for painting on wood.
The finished product can be coated with a transparent varnish. Backgrounds on panels are also decorated with watercolors, because this paint is a pigment diluted with water, which is best suited for large areas.
Gouache for painting as an alternative
A cutting board for the kitchen is one of the practical items of regular use. In order for this accessory to please the eye every day, it is recommended to paint it, you can do this with gouache paints on wood. Such a coloring material is similar to acrylic, but loses a little in saturation.

Painting on wood with gouache consists of the following steps:
- Board grinding. If the surface of the product was not smooth enough, it must be polished with sandpaper.
- Structure protection. If the board does not have a varnish coating, it must be treated with stain.
- Priming. For this, acrylic of any suitable color is used. The wooden board should be carefully covered with paint without gaps. This will facilitate easy and quick coloring.
- Drawing. After the translation of the image or independent drawing, you need to start painting on the board. For beginners, it is better to choose simple ornaments or floral motifs. Before painting the tree with gouache, you can add a little PVA glue to the jar for better adhesion.
- Lacquering. After the end of the process, it is recommended to open the product with varnish. You can use any composition that is at home, but odorless acrylic varnish is considered the most suitable.
The master class presented below in the photo is designed for people who do not have skills in painting kitchen boards. Painting on wood brings pleasure, and the result delights everyone around.

It is necessary to apply varnish on the finished product in several layers, but after the previous layer has completely dried. The kitchen is a place where moisture is constantly exposed, so this stage is considered mandatory.

Methods for transferring a drawing to a base
Some lovers of wood painting only with experience begin to draw pictures on wood on their own. Beginners cannot afford such an activity, so the question arises, what are the ways to transfer a picture onto a wooden base? You can find out more about them below:
- Carbon paper. This method is considered the simplest - it requires the presence of an ordinary dark or (in the case of a black base) white carbon paper. The printed sheet is superimposed on a carbon paper, under which a wooden blank is placed. With the help of a pen, the drawing is completely outlined along the contour. As a result, an image is formed on the workpiece, which can be painted. The resulting painted product is neat.

- Tracing paper. To make the painting have beautiful borders, you can use tracing paper. To do this, it is applied to the prepared drawing and outlined along the contours. Next, the sheet is turned over and generously rubbed with graphite. After that, the tracing paper is applied to the tree and the image is circled with a sharp object. Using this method, it is possible to draw even the most complex patterns.

- Soap. The method is similar to the previous one, but it is good when the painting templates are transferred to a black surface. It is necessary to repeat the same operations, only rub the tracing paper not with graphite, but with soap.
To hone your skills, experts recommend using different techniques for painting on wood. It’s also good to draw on a former wooden base under a tray, on a box or other things. The received products can be given as a gift or decorate the house with them.
Wood painting workshops (2 videos)
Such a technique as decoupage gives a lot of room for creativity. With its help, you can give a completely new look to old things or your individual style, which you will not find in stores. The technique of creativity here is very simple, it consists in cutting the drawing and transferring it to various surfaces, after varnishing the drawing resembles a real artistic painting.
Today we will practice this technique and transform the ordinary cutting board, an item that is easy to find in every home.

Most cutting boards are wooden, which is convenient for a beginner, wood is the most convenient material for creativity, convenient and comfortable, it is easy to prepare for work.


Also, the board is a flat object, without sharp volumetric rolls, there is no problem to glue any part of the drawing without creases. A decoupage cutting board is a simple craft option perfect for a beginner.

Instructions for beginners or how to choose materials
Glue: it can be used both special for decoupage and PVA, in the second case, you need to understand that over time it can turn yellow and for things that you plan to use for a long time this is a big minus. On the other hand, for beginners, it will obviously cost less than professional glue, which is selected for certain surfaces.

Acrylic paint - always white, other colors at your discretion.


Brushes: For glue and paints, it is better to have a separate one, it is good to have several brushes of different sizes. They should always be cleaned immediately, otherwise, when the glue dries, even with a cleaner, difficulties may arise, in general, it is best to periodically wash the brushes with soap or an inexpensive shampoo.

Sponge or sponge: A sponge is essentially the same sponge, only attached to a brush stick, you can build such a device yourself.

Sandpaper or sandpaper: it is best to have several types for different materials.

Primer: for leveling surfaces.


Lacquer: Acrylic lacquer is usually used, it is best in a spray can, it is more convenient to work with.

Preliminary preparation of working materials
Cutting board, wooden
We sand the board with coarse sandpaper or sandpaper so that the surface is as smooth as possible and without roughness. You also remove dirt and dust accumulated on the board, if it is not new, which has managed to soak into the top layer of wood.

For a better leveling of the surface, you can treat it with a primer. If you have not worked with a primer, remember that the movement of the brush should be such that you drive the primer between the fibers of the wood of the board, trying to fill all the free space inside.

IMPORTANT! If a drawing was depicted on the board, it must be removed with sandpaper, if the drawing is cut out, it must be laid with a primer.


Drawing for drawing
Drawing selection. You should think about how the transformed piece of furniture will be combined with the surrounding space, the same kitchen and household utensils.

For example, in this master class, the decoupage of a cutting board is made in the Provence style, neutral enough to go with the usual classic kitchen. But if you have a brighter interior made in a certain theme, you might want to choose something closer to it.

Check the location of the details of the picture and choose the best one. In the process, it will be unpleasant if you suddenly did not calculate in advance and some detail suddenly did not fit. It's better to check everything in advance. Also keep in mind that the paper is retracted by 0.5-0.8 cm, and the position of the pattern may change.

Master class "How to make a decoupage cutting board"
With the help of a sponge, if you don’t have one, a soft sponge for washing dishes will serve as a substitute, paint the board where the drawing will be located with white paint. No need to smear the sponge on the board, gently trample the paint into the wood with it. A sponge is needed so that the painting is the most accurate and no bubbles form on the surface.


Apply 2 layers of paint in this way, wait for the paint to dry, then smooth out the bumps with sandpaper. Before gluing the napkin, remove unnecessary lower two layers from it. We knead the sizing mixture: glue and water, in appearance you should get something similar to liquid sour cream. Then lay the drawing on the board, dip the brush into the glue solution and drip onto the center of the drawing.


In the photo you can see an almost finished decoupage cutting board. It remains only to fix the work with varnish. It is best to do this from a distance and in several layers. Please note that if you plan to use the board not as an interior item and will wash it, it is best to use yacht varnish, not acrylic.


Subtleties
Cutting board decoupage - despite the simplicity of the material, it requires attention for beginners. To avoid defects, do not forget:
- Remove excess glue, when they dry they will leave marks and will definitely ruin the drawing.
- Each layer of work, no matter what it is, paint, acrylic outlines or another layer of drawing, glued on top, requires fixing with varnish.

Photo of decoupage cutting board


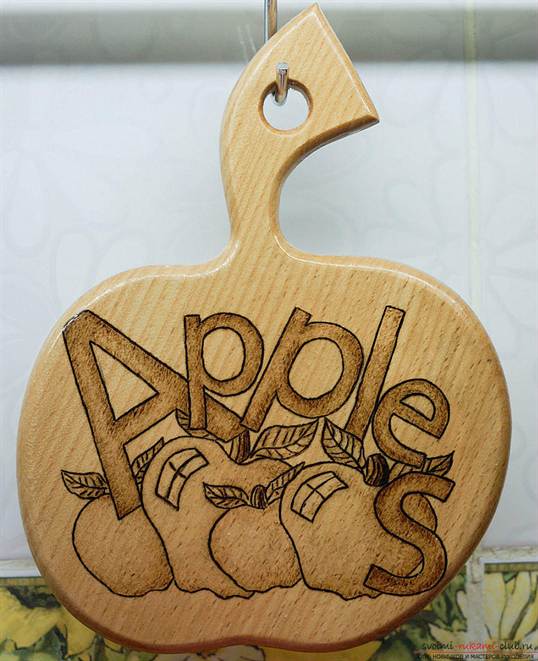
Burning on a cutting board is no different from burning on any other wooden object. Of course, cutting boards are constantly exposed to water, a knife, or other liquids. And therefore, if you are going not just to create a decor element from the board, but to decorate the work surface, then be prepared for the fact that it will not live with you for very long. But what does the service life mean compared to the joy of creating a real, albeit small, masterpiece with your own hands? Let's take a look at popular drawings that are just right for burning on a pre-prepared cutting board.
We analyze popular drawings for burning on a cutting board
For cutting on a cutting board, 4 types of wood are used as standard. All of them are excellent in their density and color. The lighter the wood, the softer it is, which means that the lower temperature of the burner will work. In addition, light shades of wood give a great opportunity to create shadows and various shades of strokes, which means that it will be easier to create real “live” pictures on their surface. It is light and soft varieties of trees that are best suited for beginner burners.

To begin with, it is worth deciding whether the board will be just a decoration for the kitchen or will it still be used for its intended purpose?
If you want to use the board in the future, then the drawing should not occupy the working part of the board. A simple pattern that borders the board, or a small picture from the very corner will look great.

You can make a board not only beautiful, but also useful - if you burn a simple line on it, it will be easier to cut food into slices of the same length and thickness.
With the help of a scorched drawing, you can also mark the functionality of the board. For example, burn bread on a board for cutting bakery products, fish on a board for fish, as well as fruits and vegetables. This will help avoid the problem of mixing food odors, because wooden boards hold the smell of food cut on them very tightly. For such burning, you can use the templates below, or download others from the Internet.

If you just want to create an original decor element, then the choice of pictures will be much wider. Again, a board with a scorched image of animals divided into certain meat parts with the name of each of them can be very useful in the kitchen.
Any mother or grandmother will be very pleased to hang a cutting board in the kitchen, received as a gift and made by the hands of her beloved child. But it’s enough to buy a wood burning kit for children, help translate a beautiful congratulatory picture and teach the child how to burn it correctly. The time spent with the child allows you to give your mother or grandmother an excellent board, and the child acquires a new exciting hobby. Look at an example of such work in the photo:

Video on the topic of the article
To transfer any template to a tree, you can always use a simple carbon paper, but what to do when it is not there? Watch the videos below, maybe one of the methods described in them will suit you.
Often, when we come to a housewarming party, we think in stereotypes and give tea sets or dishes. But what if each of the guests comes with a set of cups or plates? We advise you to pay attention to such a wonderful gift as a cutting board, especially since you can paint it yourself. Or rather, do not even paint, but burn your own drawing on it! The topic of drawings for burning on a cutting board is very popular today, we will talk about this.
Even if you have no experience in pyrography or wood burning, it's okay, this activity is available for everyone: for adults and for children. There is absolutely nothing to be afraid of here, because pyrography is not difficult, but very exciting. You can see an example in the photo.
Wood burning drawings are easy to find on the Internet, there are a lot of different templates and stencils that are suitable for beginners. The main thing in this matter is to be patient and have 1.5-2 hours left for a simple drawing.
What you need

First of all, you need pyrograph. This is such a special wood burner. It can be bought at craft stores. The pyrograph is also included in a special set for wood burning. This set includes a board (not a cutting board) and a ready-made stencil for burning.
It is very easy to buy a set, they are now common in almost all hobby hypermarkets and needlework stores.
Also, of course, you will need cutting board. It is best to choose a board made of light wood. Linden or birch is perfect. The next thing you need is sandpaper. Acrylic or watercolor will also work. paints, to decorate the board with color. Additionally you will need wax to perform the waxing procedure at the end of the coloring of the finished drawing. Waxing will add saturation to the image and keep the colors of both the wood and the paint for a long time. You will also need stencil and simple pencil to transfer the drawing to the tree.

Learning to translate

Many people ask the question “How to transfer a drawing to a board?”, So this is done using a stencil. You need to find and download pictures of fruits, flowers or animals that interest you, as these are the most commonly used patterns for wood burning. It is best to choose simple templates, especially if you are doing pyrography for the first time.

We print the downloaded stencil and cut out the figure if the figure in the picture is empty. If there are additional internal details, you need to use carbon paper. Attach it to the tree, put the printed stencil on top and circle the drawing. Try not to move the image.

There is another way to transfer pictures to the board. You also need to print the stencil you like, printed in mirror image. Prepare a bowl of water, decoupage glue, wood varnish, acrylic paints, a brush and a sponge.
Cut out a stencil or finished drawing, then carefully coat it with decoupage glue and attach it to the wooden surface with the pattern down. Smooth the drawing with a sponge so that it does not "bubble" and also that there is no excess glue left. Let dry. It is best to leave the work to dry overnight.

After drying, moisten the motif with a damp sponge and begin to erase the paper until the pattern appears on the wood. Carefully discard all paper. Then, with our fingers, we begin to rub the remaining paper, making spools that remain on the wooden surface. We brush them off the tree, and the finished drawing remains, which, after complete drying, can be supplemented with burning (for example, burn out its contours) or simply decorate with paints. Then varnish the work.

Mastering the technique
After the drawing is outlined on the board, it's time to start burning. Make sure the board is completely dry. Then heat the burner so that its feather turns dark red.
Be careful when working with a hot pyrograph, it is very dangerous! It is better to do everything slowly, but there will be no consequences.
Burning is best done from the contour to the center. That is, first we circle all the outer edges and only then move on to the inner ones. It is best to burn out in separate areas: you have worked one, move on to the next, but in another part of the picture. This will allow the drawing to cool evenly and not form extra lines or random strokes. When the work is completed, it can be decorated with paints. And after that, wax it so that the board has a shine.
Let the owner of the house decide whether to use your gift in everyday life or hang it on a wall or put it on a shelf. In any case, your gift will find its rightful place in the kitchen and in the heart of your friend!


We also recommend
 DIY crafts from foamiran for beginners: photo, video
 Flowers from foamiran master class with video
 How to make a cutting board out of wood: ideas, choice of material, manufacturing
 "Fair Masters": customer reviews Fair Masters marketplace
-
"Fair Masters": customer reviews
 The structure of a bee is an example of a complex organism