How to make a tree from cones and rowan. Do-it-yourself tree from cones
Marina Cheltykina
In October of this year, the Ministry of Education of the Chuvash Republic announced a competition for crafts made from natural material "Secrets in a Basket". A prerequisite was the manufacture of a basket or basket of their natural material. Some parents of the middle and senior groups enthusiastically joined the work. Well, I decided not to fall behind. Together with our daughter Tanya, who is 6 years old, we decided to make pine cone topiary. Topiary is also called"Tree of Happiness"
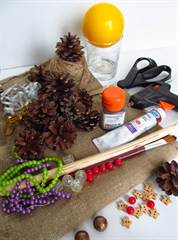
For this craft, we needed:
mayonnaise bucket,
A strong stick (we have hazel,
- Pine cones,
Glue "Moment",
- decorative elements: nuts, acorns, acorn caps, thuja twigs, corn, etc. Later I used rowan berries and even thin sticks for the pot.

First we knead the plaster.

Then pour this solution into a mayonnaise bucket.

We form a ball from newspapers.

We insert one end of the stick into the plaster until it has hardened, at the other end - a newspaper ball, after making a small hole in it with a knife and smearing it with glue. Gypsum is covered with moss.

We begin to glue the ball with cones. We select identical, fully opened cones. We try to glue them as close as possible to each other.


Here we glued it.

We close empty places with thuja branches.

Since, according to the terms of the competition, the basket should be made of natural material, it was decided to replace the mayonnaise bucket with something suitable. After some thought, I decided to make a pot out of branches. She brought straight branches from her garden, cut them to the same length.

I fastened the sticks with thread.

Gypsum by this time has already hardened completely. So I cut open the mayonnaise bucket and removed the plaster pot without much difficulty. She wrapped it in a cloth of sticks. and tied with thread.

And started decorating the pot. We glued rows of acorns and hats.

I wanted to use corn kernels, but it seemed to me that there would be too much decor. At the last moment, I glued rowan berries between the cones. Sprayed with glitter hairspray. The daughter sprinkled nuts and berries on the moss.
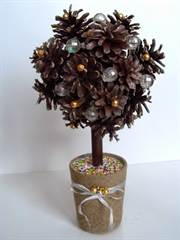
Here we have such a "Tree of Happiness"!
Whether it will be appreciated at the competition in Cheboksary, time will tell.

So, to make a tree of cones, you will need:
- pine cones,
- wire (we took copper),
- electrical tape (but you can use long and thin strips of fabric),
- plastic bags (packages from “diapers” went into action),
- scissors and pliers
- building gypsum (or any modern building mixture for puttying and sealing gaps, we took Volma),
- "bucket" from under mayonnaise (plastic),
- scotch,
- silver and gold paints in cans,
- PVA glue (we did without it).
Let's start creating a tree from cones (master class with step-by-step photos):
1. Cut the wire into long pieces - according to the height of our tree, taking into account its "roots": 
2. We fix the bump on the wire:
- insert the tip of the wire between the scales: 
- bend the wire through the bottom of the cone: 
- stretch the wire between the scales in a full circle: 
- we fix the tip of the wire in the middle of the bottom of the cone, simply by passing it through the wire there: 

3. We got a whole bouquet: 
4. Now we create "branches" by connecting the wires of the cones to each other and wrapping them with electrical tape. The more wires we connected, the thicker the “branch” will be: 


5. We connect the "branches" into a tree of cones. If the wire is very soft and the branches bend down under the weight of the cones, put a wire or toothpicks folded several times into them: 
You can also use a stiffer wire (for example, steel) and wind it along the entire trunk, releasing a piece “on the roots”:
6. Now we need to make the trunk thicker in its lower part. We take a plastic bag, twist it with a bundle and fasten it to the wires with electrical tape: 


7. The cone tree is almost ready: 
8. Now we need a pot for it: again we take plastic bags, fold them with flagella and attach them with adhesive tape to a plastic mayonnaise jar: 


9. Next step: put the tree in a pot.
To do this, first we fold our wire "roots" to the size of the pot, and then fill them with a gypsum mixture.
I prepared the mixture as follows: I poured water into the same empty mayonnaise bucket (a little more than half), then with a tablespoon I began to carefully pour the mixture (“Volma”) one at a time, and stir with the second spoon. Unfortunately, I did not write down how many spoons I poured. The mixture should be similar in thickness to sour cream. If it turned out thicker (“Volma” seizes in a couple of minutes), quickly add water, stir and pour into the bottom of the “pot”. And immediately immerse your cone tree in the mixture: 

10. Make some more mixture and gently spread it over the trunk of the cone tree, imitating bark. To increase the setting time of the mixture, add a little PVA to it and mix thoroughly (we did without adding glue). The glue will also improve the adhesion of the mixture to the duct tape so that it won't flake off even if you (or your children) accidentally drop the cone tree. 
11. As soon as the mixture completely hardens (after a couple of hours), the cone tree can be coated with paint from a spray can. It's best to do this indoors. 
Tip: it is more convenient to install such a tree from cones in a pot together: one holds the tree in a pot vertically (or at the right angle), and the second reports the mixture and “sculpts” the roots and bark. 
It remains only to slightly “walk” over the cones with gold paint so that the tree of cones looks more festive (see the first picture for this article).
Creation has ceased to be an occupation only for schoolchildren. There are more and more ideas of combining man-made objects and elements of natural origin. Want to make an exclusive Step by step the process is given below. Read the tips, look at the photos. You will definitely have inspiration, and you will be able not only to repeat the pattern, but also come up with an original idea on your own.
DIY souvenirs
Fashion for handmade things has ceased to be the lot of the elite, but has acquired the character of a trend among all. Knitting, embroidery, decoupage, artistic metal - all this has become available to everyone.
Thanks to the abundance of information and numerous opportunities to purchase any material for creativity, mastering any technique is easy even for a beginner. To create a beautiful thing with your own hands, just be patient, study the instructions, purchase everything you need and start creating.
However, there is one problem. You can buy almost anything, but the price of some art materials is very high. If you want to master budget technology and make original souvenirs from what literally lies under your feet, then the best option is a Tree, an animal figurine, a photo frame, a basket and much more everyone can do without special artistic skills. skill.

Advantages of natural material
Any object that is related to the natural environment is environmentally friendly. It does not contain synthetics, chemistry and other substances of industrial production. This is a significant advantage as it can be used anywhere. Such crafts can be put even in the room of a small child.
The beauty of nature has always inspired people to be creative. The same applies to natural materials: dried leaves, flowers, collected cones, nuts, twigs. In nature, everything is subject to the laws of harmony and beauty. By adding a little man-made energy to the collected material, you can create, for example, a cone tree of amazing beauty and grace. How to make such a craft will be described below. If you have a rich imagination and your imagination works well, you yourself can come up with as many original souvenirs as you like. And for motivation, you should look at ready-made examples.

decorative tree
Making souvenirs is a very exciting process. It's always nice to see the fruits of your labor. In order for a gift not only to please the eye, but also to have some kind of sacred meaning, you need to choose the right object that you will create and give it the appropriate idea.
From this point of view, a miniature cone tree can be an excellent souvenir. It's very easy to do it step by step. Such an object will symbolize life, happiness and prosperity. If you add a souvenir with decorative elements, such as coins, hearts, bows, you get a symbolic money tree or a tree of love and good luck, etc.
It can be absolutely any form. As a basis, you need to find a suitable branch or snag. It should be fixed in a solid base so that it holds firmly and does not fall, even taking into account the future weight of the cones. There may be few of them - it all depends on the size of the souvenir itself. For a desktop, a couple of dozen or less will suffice. It is important to nicely place the bumps on the driftwood so that it looks natural. Use the color of the elements in natural or paint in gold, silver, white, pink or any other according to your idea.
The components can be glued together, but there is a second option. The wire is taken, cut into pieces of the desired length. Each element is fixed in a cone. Branches are intertwined from the resulting "bouquet", and the stem is fixed in a solid base. The frame is wrapped with decorative tape, beautiful fabric or paper. The product can be supplemented with beads, bows or anything else.
Christmas tree made of cones
On New Year's Eve, everyone tries to decorate their office desks with small Christmas trees. You can make a Christmas tree from cones. How to make it? Very simple.

The process of creating a souvenir will be as follows:
- You make a cardboard base in the form of a cone with a bottom.
- For stability, fill the inside with crumpled paper, newspapers.
- Install the resulting structure on a solid foundation and fix it there.
- It is better to paint the frame in the color in which the Christmas tree itself will be presented (green, white, silver, gold, brown, if the product retains its natural tone). This is done so that the gaps between the cones are invisible.
- Sort the collected cones and start gluing them in rows. Place the big ones on the bottom. Moving towards the top, try to choose smaller ones. It is best to attach them to the base with a thermal gun. It is a device in which special glue sticks melt under the influence of heat. Through the nozzle, the viscous composition enters the junction of two objects. This is a very versatile device. In our case, it is convenient and gives the most reliable result.
So, making a Christmas tree or any other Christmas tree from cones is very simple step by step. When the design itself is ready, it can be painted, decorated with beads.
Pine cone topiary
Nowadays it is a very fashionable souvenir and a nice gift. It is made from ribbons, coffee beans, beads, balls, pebbles, shells. This object resembles a beautifully trimmed ball-shaped dwarf thuja in a pot.
It is also easy to create such a decorative tree from cones step by step. The sequence of actions will be as follows:

This is how easily and quickly an original tree is created from cones. The master class, which is given here, will help you realize this idea yourself. By the way, you can first make the whole base, and then decorate it. Everyone does as he pleases.

Souvenir from fir cones
Do you want to surprise with an unusual idea? Make a spruce topiary. A tree of happiness from cones will perfectly decorate your table in the office or become an original souvenir for a friend. The principle of execution is the same as in the previous version. The difference will be in the shape and fastening of the elements. They can, like the rod, be cut to a shallow depth inside the base sphere and glue the joint.
Craft from painted cones
Such a souvenir will look original, made not only in a single color, but also in a multi-colored version. To do this, you will need to prepare paints in advance and paint the elements. Children will be delighted. They like to create crafts from cones. A tree, and even a multi-colored one, will seem wonderful and fabulous to them. Turn a mastery lesson into magic!

If you make a Christmas tree from pine cones, painted specimens can play the role of bright toys. In the case of topiary, you can simply make color transitions by gluing rows of different-colored elements from bottom to top. At the trunk - for example, white, in the middle - a couple of shades of pink. Great gift idea for Valentine's Day. Such a thing will look cool if you add it with a cute ribbon, bow or heart.
Christmas crafts: cones
It is always much easier to work with instructions or a ready-made sample. However, if you apply your imagination, souvenirs can turn out to be even more original. If you need to make a lot of beautiful gifts, and time is short, the easiest way is to use the idea below.

- Collect the required number of large spruce cones.
- Color them green.
- You make an imitation of white snow on the branches.
- Fix each cone on a solid base.
- Lubricate the gaps between the scales with glue and sprinkle them with beads, colored groats, beads.
So easily and quickly you can get a lot of small decorative Christmas trees!
You have seen how easy it is to make a tree out of cones. A master class in the form of tips, supplemented by illustrations, will be your starting point in the creative process. Arm yourself with inspiration, be patient and start creating beauty with your own hands.
What do you associate with cone crafts? For the older generation, most likely, it will be school days and the insanely popular “little cones”. However, cones can be used not only for wonderful, but already become something ordinary, little men. For example, you can make a topiary (or, as it is otherwise called, a “tree of happiness”). It is great for those who do not like to take care of home plants, and those, in turn, reciprocate. Moreover, the topiary is a great craft for a school competition or just a good way to have fun, together and usefully spend time. Just look what beautiful trees you can make with a little imagination and patience!


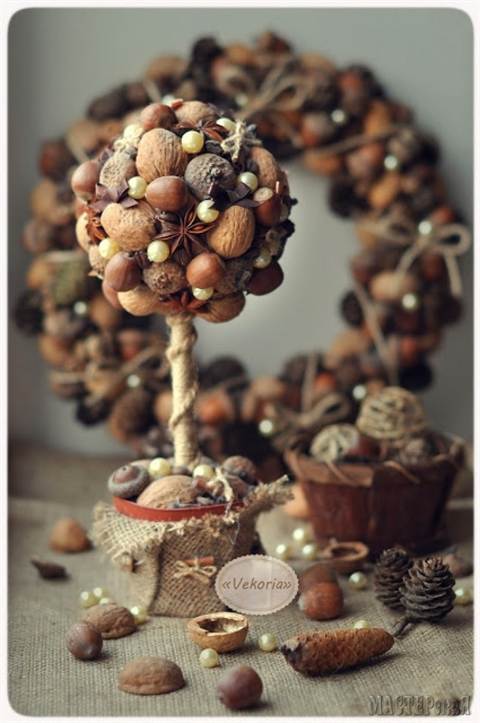
And now we present you a master class on making topiary from cones and acorns, which can serve as a decor for your apartment, as well as an unusual gift for friends and relatives!
Here we will make such a wonderful and even, one might say, fluffy tree.

Work materials
1. Pine cones;
2. Thermal gun;
3. Hot glue;
4. Newspaper (you can use plastic balls, but making a hole in them under the topiary trunk is very inconvenient);
5. Gypsum (or alabaster);
7. Pine branch;
8. Paint;
Topiary from cones: master class
1. We form a ball of newsprint.

2. Wrap the ball with thread so that it retains the shape of a ball.

3. Apply glue to the bump.

4. Glue the bumps on the ball as close to each other as possible.

5. Let's form a rounded shape from the cones.

6. Sharpen the pine branch.

7. Let's make a hole in the bottom of the ball.

8. Insert a pine branch into the hole and fix it with glue.

9. Paint the ball with silver paint.

10. We breed gypsum (or alabaster) in a pot, leaving 4 cm from the edge of the pot. By consistency, it should resemble sour cream.

11. We insert the barrel with the crown into the solution, fix it until it dries completely.

12. We decorate the base of the topiary with small cones, as in the photo.

13. The final chord - varnish the product.

The art of creating decor with your own hands attracts many needlewomen. Everyone wants to create something original and amazing, something to be proud of. Topiary is one of my favorite crafts, as it is a universal thing. It is made from a variety of improvised means or specially purchased material is used to create chic decoration elements for the home, summer cottage, for a gift to relatives, friends, colleagues. This is a great idea for spending time with children, teaching them something new, training hand motor skills, educating a child's creative taste, love of work. Some natural ingredients that nature itself gives us may be appropriate material for a topiary. Real flowers, leaves, everything that grows on trees, rowan berries, acorns, nuts, cones. This article will describe how to make a topiary from cones step by step. Step-by-step instructions with a photo will help you visualize this process.


original eco tree
Let's conduct a small guide on how to make a do-it-yourself topiary from cones using one of the examples.
Cones are collected in the forest or in the park under the fir trees. If you collect closed cones, they have one feature - they open with a bang when warm.
We will need cones, a plastic ball for a children's pool, paint, best of all acrylic brown, a glass, a stick for the barrel, gypsum, PVA glue, a hot glue gun, burlap, beads and ribbons for decor, scissors, a brush.
Let's get to work.
Stage 1. We make a hole in the ball for the stick, process the edges with a glue gun and insert the stick. The glue dries quickly. We glue the ball with pieces of newspaper using PVA glue so that we can easily paint it with paint. We cover the barrel and ball with paint, wait for drying.

Stage 2. We glue the cones one by one onto the ball with glue from a heat gun. The process of creating a crown is simple. So we move on to our potty. We cut out a piece of burlap so that it masks the walls from the outside and, lowering it a little inside the glass, glue it with hot glue, insert the crown with the barrel into our resulting pot and fill it with gypsum solution. Waiting for freezing.


Stage 3. The topiary as a whole is ready, now it remains to decorate it with beads and ribbons. Pour PVA glue into a glass and decorate with a mound of bright beads, with the help of a thermal gun you can also decorate the tree crown, between the cones.
We tie a ribbon with a bow to the pot and also add beads. Such a topiary looks very aesthetically pleasing and amazingly beautiful, you can decorate your house with it on New Year's holidays.


forest wonders
Wood materials are very beautifully arranged among themselves. Small twigs can decorate pots like a small fence, and acorns instead of beads. Small master classes on topiary from cones and acorns of various variations.
1) Cones, rowan berries and juniper twigs, a straight stick for the trunk, acorns, moss.
From the basics, we have a foam ball and a mayonnaise bucket, plaster and glue. Small branches are collected by a fence. We put a bucket on them. Glue acorns on top with hot glue. We fix all our natural ingredients with glue or insert into a foam ball. We attach the ball to the trunk and send it to the pot. Fill with a mixture of gypsum and wait for solidification, after which we put the moss in a pot, plant acorns on the glue.


2) Cones, acorns, chestnuts, nuts can be covered with paint, and berries of trees with transparent varnish.
The shelf life of such a topiary will be extended, the look is not so natural, but in some interiors, in modern design styles, it is sometimes appropriate to use imitations of wildlife.


3) Topiary made from forest materials can be combined with spices, such trees retain their aroma and feel nature next to them. It will create a very warm atmosphere not only in the kitchen in the house, but also in restaurants and cafes. This is a great gift for lovers of nature and environmentally friendly materials, complemented by natural fabrics in confirmation of pure motives.


We also recommend
 DIY crafts from foamiran for beginners: photo, video
 Flowers from foamiran master class with video
 How to make a cutting board out of wood: ideas, choice of material, manufacturing
 "Fair Masters": customer reviews Fair Masters marketplace
-
"Fair Masters": customer reviews
 The structure of a bee is an example of a complex organism