How to choose the right step of the crate and truss system for a soft roof. Roofing technology from OSB What is the thickness of OSB on the roof
General leadership
OSB floor installation
We list the general principles for installing a floor from OSB boards.
Boards with straight edges should be joined on joists, maintaining an expansion gap of at least 3 mm around the board. When installing boards between walls or in the case of “floating floors”, leave a gap of 12 mm between the board and the wall.
Lay the slabs with the main axis perpendicular to the joists. The connection of the short edges of the slab must always be on the joists.
The slab used for the roof or for the floor should be mount print side down. If OSB boards are laid in a row longer than 12 m, an additional 25 mm gap must be left

Laying OSB boards on the floor
Long edges not supported by joists should have a tongue-and-groove profile, an auxiliary support, or a connecting H-bracket.
If the ceiling does not have a roof, then during precipitation, drainage holes should be made for drainage.
With a wooden floor on the first floor of a building, wind protection should be created on the underside of the floor structure, plus additional waterproofing directly on the ground.
Table of a preliminary assessment of the dependence of the distances between the lags and the thickness of the slab used in the housing
Nails 51mm (2″) spiral, or 45mm (1 3/4″) up to 75mm should be used to fasten the boards. we drive in every 30 cm on intermediate supports and every 15 cm on the slab joints.
In order to increase the rigidity of the floor, it is possible to glue the slab to the joists using a synthetic assembly adhesive (water-based adhesives cannot provide a reliable connection due to the waxy surface of the ContiFinish).
Tongue-and-groove connections must be glued (eg with D3 glue).
Installation of walls from OSB-plates
Plates OSB on the walls can be mounted in a horizontal and vertical position. Between the plates and around the door and window openings, it is imperative to leave a gap of min. 3 mm.
The recommended thickness of the slab for wall cladding is 12 mm with a distance between wall supports of 400 mm and 600 mm. For additional thermal insulation of walls, it is recommended to use mineral wool with lining in the form of mineral plaster.
To fasten the wall tiles use 51 mm (2″) helical nails or 45 mm (1 3/4 “) to 75 mm ring nails. We drive in nails every 30 cm on intermediate supports and every 15 cm on slab joints.
On the outer edges of the walls, we drive in nails every 10 cm. The distance from the nail to the edge of the slab should not be less than 1 cm.
OSB roof installation
Before installing the sheathing, make sure that the rafter legs or the crate form a flat surface. Curved or uneven rafter legs will affect the final appearance of the roof and make installation difficult (for example, with a large unevenness, it may not be possible to join the tongue-and-groove joint along the entire length of the slab).
Slabs that have been soaked in the rain should be left to dry completely and protected from biological corrosion before tiles, roofing sheets, thermal felt or shingles are laid.
Unheated underfloor space or attic should be well ventilated. Ventilation openings must be at least 1/150 of the entire horizontal surface.
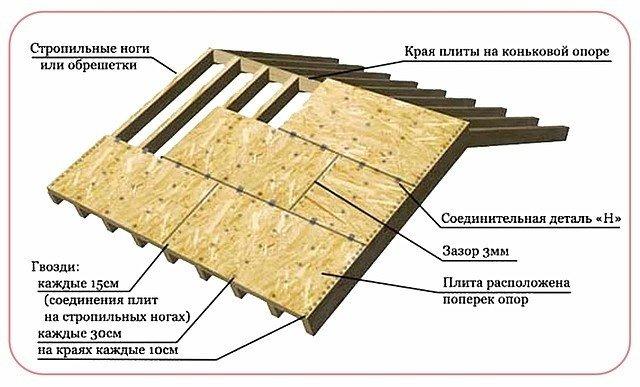
The greatest operational load should fall on the long main axis of the plate. The connection of the short edges of the slab must always be supported by roof (wall or floor) supports. The long edges must be on auxiliary supports, tongue-and-groove or H-bracketed.
Leave a gap of min. 3 mm to give the plate the ability to change dimensions with changing temperature conditions. The slab must be laid on at least two supports, and the joints of the slabs must also fall on the supports. During the fastening of the slab, workers must stand on the rafters or crate, observing safety rules.
Table of preliminary assessment of the dependence of distances between
rafter legs or battens and thickness
used slab for roofs with a slope of more than 14 degrees:
If the roof structure has openings for chimneys, then the roof sheathing must be moved away from the chimney at a distance in accordance with accepted building codes.
For fixing plates OSB on the roof, 51 mm spiral nails or 45 mm to 75 mm ring nails should be used. We drive in nails every 30 cm on rafter legs or battens and every 15 cm on slab joints. The distance from the nail to the edge of the slab should not be less than 1 cm.
 ATTENTION!! OSB boards must be applied according to a design that complies with the requirements of the relevant Building Codes and Regulations. The recommendations given by the manufacturer are for informational purposes only, the final decision for each case of using boards in building structures should be made on the basis of qualified engineering calculations.
In construction and repair, various sheet materials are often used for wall and ceiling cladding. One of these materials is oriented strand board (OSB), which is also sold under the English name OSB (Oriented Strand Board).
OSB: what is it and how to use it
OSB is made from wood chips and large chips, gluing them together at high temperature with synthetic resins.
The slab consists of several layers, usually 3-4, with different chip orientations.
In the outer layers, the chips are located along the long side of the sheet, in the inner layers - across. According to its characteristics, OSB is close to plywood, but costs less.
Advantages and Features
A distinctive feature of OSB is its high strength, due to the cross arrangement of wood fibers. In terms of strength, the boards are superior to MDF, chipboard and wood, slightly inferior to plywood. Plates show high resistance to chemicals. Some manufacturers use special impregnations in the production of boards - fire retardants, which reduce the combustibility of the material. OSB boards are easy to process; to work with them, you need a regular woodworking tool.
How OSB boards are calculated

 To calculate the quantity, it is easiest to draw a wall plan on checkered paper, taking the cell size as 250 for European standard plates or 300 mm for American. Then draw OSB boards on the plan and count their number. It is better to arrange the sheets in a checkerboard pattern. In this case, it is necessary to take into account how the surface will be finished in the future.
If sheathing is planned, for example, with siding on the street or gypsum board indoors, joining with non-factory cuts is allowed, but if painting is provided, try to join the plates with factory cuts. It is desirable to keep the number of joints to a minimum. For example, it is better to sew up a wall fragment measuring 2.4 m by 1.2 m with one sheet, and not with 3 pieces of 0.8 * 1.2 m, because it is rather difficult to make a perfectly even cut, and even a slight deviation from straightness forms a gap. To the received amount of OSB, you need to add a few sheets for a margin in case of marriage or errors when cutting.
An easier way is to divide the surface area by the leaf area. In this case, "in reserve" it is necessary to take at least 20% of the quantity. Round up the resulting number.
What are OSB boards for exterior walls
 OSB is made of 4 types:
- OSB-1 - used only in dry rooms for sheathing.
- OSB-2 - used as a structural material in dry rooms.
- OSB-3 - can be used both indoors and outdoors. Can be used in conditions with high humidity. Strength allows OSB-3 to be used as a structural material.
- The most common class of OSB-4 is more durable and moisture resistant than OSB-3.
For exterior wall cladding, only classes 3 and 4 can be used.
Installation outside: crate
 External wall cladding can be carried out in several cases:
- In order to level existing walls, hide defects (cracks, crumbling plaster, etc.) and just as a cladding.
- In frame construction - to protect the insulation from wind and precipitation, as well as an element of the carrier system.
- When insulating walls - to protect the insulation from atmospheric phenomena.
In all 3 cases, OSB sheets are attached to the crate. The crate is made of wooden lumber of various sections, depending on the task. Most often, an unplaned coniferous bar of natural moisture with a section of 50 * 50 or 40 * 50 mm is used. Mounting OSB on a metal frame is allowed.
When insulating, the crate is made in increments of a multiple of the width of the insulation minus 20 mm, without insulation - the step is chosen so that the joints of the sheets fall on the bar, several additional racks are added between the joints with a distance between them of at least 600 mm.
When cladding walls, use a moisture-windproof film, following the recommendations of its manufacturer, in particular, the distance between the membrane and the OSB.
How to attach panels to the wall
 OSB boards are usually attached to the wall through the crate with self-tapping screws for wood when used in a frame of bars or for metal when attached to a frame made of a metal profile. The length of the self-tapping screw should be 25-45 mm.
It is allowed to mount the OSB directly on the wall. To do this, holes are drilled in a sheet cut to size, the sheet is put in place, the wall is drilled in the marked places with a puncher, dowels are inserted and self-tapping screws are tightened. When fastening to a wooden base, the hardware is twisted without pre-drilling.
Fasten the screws in one selected direction, for example, from left to right from bottom to top, otherwise the OSB sheet may bend.
How to decorate from osb outside beautifully
OSB has a rather interesting texture, which leaves many options for finishing. At the same time, it must be remembered that OSB is 90% wood, so the material is subject to the same hazards as wood. Fungus, mold can appear on the plates, they are prone to rotting to a small extent, the resin can be destroyed under the influence of sunlight, the ends of the panels absorb moisture.
 OSB-plate is treated with wood compounds for outdoor use. The composition must provide protection from ultraviolet radiation. To preserve the color and texture, the surface is covered with colorless varnish and antiseptic impregnations, to give wood shades - decorative antiseptics, for painting in various colors - facade paints for wood.
To obtain a smooth surface, OSB walls are plastered and puttied. Before applying the plaster, the surface of the slab must be protected from moisture with special primers or glassine, then the plaster mesh is fixed and plastered. It is possible to apply decorative plaster or paint.
Also, OSB walls can be covered with any type of siding or facade panels, block house, clapboard, etc.
OSB material for interior work
OSB indoors is used for cladding walls, ceilings, for subflooring, as a structural material in the manufacture of built-in furniture, for creating decorative elements, boxes, technological cabinets. In frame housing construction, the internal wall cladding of the OSB increases the strength of the structure.
Work progress
 OSB wall cladding consists of the following steps:
- Markup.
- Sheathing device.
- Laying heat and sound insulation, if provided by the project.
- Fastening solid sheets of OSB.
- Sawing OSB to size.
- Fastening the rest of the sheets.
Instruments
For sheathing OSB walls you will need:
- Hacksaw, circular saw or jigsaw for cutting material.
- Screwdriver.
- Level.
- Marking tool (tape measure, square, pencil).
- Perforator for sheathing brick walls.
- Chisel.
Interior finishing options
The unusual structure of the OSB allows you to create a rather attractive interior. Plates can be used without finishing, but it is better to varnish them to improve performance. OSB can be painted with wood paints, treated with decorative impregnations for wood. To obtain a smooth surface, the panels need to be puttied with wood putties, after which they can be painted or wallpapered.
How to make a crate for osb
 When constructing a crate from bars, a bar is first fixed around the perimeter, then vertical racks are installed in increments of 406 mm with a sheet width of 1220 mm and 416 mm with a sheet width of 1250. If you need to join the sheets in height, a horizontal bar is attached at the junction.
The bars are attached to the wall in 2 ways:
- Directly through the bar. When attaching to concrete, brick, cinder block and aerated concrete walls, holes are drilled in the bars along the diameter of the dowel in increments of 300-400 mm, the bar is attached to the wall, holes are drilled through the prepared holes with a perforator in the wall, dowels are inserted and screws are screwed in or anchors are used. It is more convenient to first fix the bar along the edges, after which you can not hold it and calmly fasten it at the other designated points. When fastening to wooden walls, the bar is attracted with self-tapping screws without drilling holes. Self-tapping screws are better to use "white" or "yellow", because. with excessive effort, the “black” hat breaks off and it is very difficult to remove such a self-tapping screw. To adjust the frame vertically, wood linings are used.
- On galvanized corners or U-shaped fixing profiles. In this case, the position of the bars is first marked, fasteners are installed according to this markup, then the bar is attached with self-tapping screws.
When using a metal profile for the frame, a guide profile is attached around the perimeter, and a rack profile on the plane. The profile is fixed to the wall on special suspensions.
Racks and rails on the walls must be strictly vertical!
Is a frame crate with OSB sheathing inside mandatory?
 OSB boards can be mounted directly on the wall, but it is better to use a crate. This will allow you to correct the slope or curvature of the wall, lay mineral wool to improve heat and sound insulation. Also, the crate creates an air cushion, so that the space between the wall and the OSB-plate is ventilated.
Installation of OSB boards
OSB is fixed with the long side oriented vertically to reduce the number of horizontal joints. When attaching the first sheet, you should control its level position, otherwise cracks may appear in the corners of the walls. Otherwise, the fastening rules are the same as for outdoor work.
What should be the thickness
 OSB comes in different thicknesses: 6, 8, 9, 10, 12, 15, 18, 22, 25 mm.
Sheets with a thickness of 6 and 8 mm are used for sheathing ceilings and structures that are not subject to mechanical stress. OSB-plates with a thickness of 6 mm can be used for curved surfaces with a large radius of curvature.
Plates with a thickness of 9-12 mm are the main sheathing material for facing walls and ceilings both outside and inside the premises, for the construction of a continuous crate under the roof.
Material with a thickness of 18 mm or more is used for the manufacture of furniture, load-bearing structures and subfloors.
Work examples
 OSB sheathed loft
 OSB built-in shelving
 OSB seating area
 OSB putty
Operation of finishing from OSB: features
Walls made of OSB boards do not require any special care, it is enough to follow the rules common to wooden surfaces, for example, to prevent prolonged exposure to moisture.
OSB is a modern high-tech material that, with proper installation, can last for many years.
Useful video
Soft roofing is increasingly being used to decorate roofs in low-rise construction. It is practical, beautiful, modern and reliable. But the durability of its service will depend on whether the installation was carried out correctly. Of considerable importance is the correct crate for a soft roof. How to do it correctly, what requirements should it meet?

Also known as shingles. For the first time in the building materials market, it was introduced about 30 years ago. This elastic material is made on the basis of fiberglass or polyester, which are impregnated with bituminous compounds. The result is a water resistant, durable yet flexible material that is ideal for roof finishing.


The surface of a flexible tile is always covered with a special dressing - fine crumbs obtained during the processing of various minerals. And the bottom layer has a sticky base that allows you to stick the tiles on the roof. Tiles of this type are used in the arrangement of roofs with slope angles of at least 11-12 degrees.

On a note! The flexible tile differs in a wide choice of shades and flowers, the sizes. That is why you should not purchase materials made by different manufacturers, even if they are very similar to each other.
Due to its softness, such tiles need a special foundation. It can only be laid on a crate made in a certain way.

Prices for various types and manufacturers of shingles
What is a crate, its types
Lathing is an element necessary for each roof, which is a system of boards and beams on which roofing material is attached. It comes in different types, the choice among which is made depending on which roofing material is used. For example, if the roof is covered with slate, then the crate can be sparse, that is, there will be gaps between its elements (a certain step). If soft coatings are installed on the roof, then the crate should be continuous, without gaps. For laying bituminous tiles, it is necessary to use a solid type of crate.

On a note! The crate can have two layers at once - sparse and solid. Due to this, it will be possible to achieve good roof ventilation, lay thermal insulation and improve the quality and reliability of the roof as a whole.

The sparse crate is always laid perpendicular to the roof rafters (parallel to the ridge), the solid one is fixed on top of the mounted sparse one. At the same time, do not forget about laying heat and waterproofing materials.

A high-quality and properly installed crate for a soft roof must meet the following criteria:
- be strong;
- do not bend under the weight of the roofing material;
- remain stable even under the influence of environmental factors;
- be even - not have bumps, protrusions, bumps, all sharp elements are removed from it, the heads of nails and self-tapping screws should not protrude above the level of the horizontal surface of the boards;
- should not have large gaps between individual elements (maximum step - 1 cm).

On a note! Sometimes a solid crate is laid directly on the rafters, without the use of a sparse crate - the so-called single-layer flooring. This is done to speed up the construction process, usually the option is used only for houses that do not need enhanced insulation and waterproofing.

Materials for the manufacture of crates
The crate for soft tiles can be made from several types of materials. The main requirements for them are strength, reliability, durability and evenness.

Plywood most often used to create crates for soft tiles. This is an environmentally friendly material, multi-layered, sufficiently wear-resistant, inexpensive, easy to use and durable. The main thing is to purchase a moisture-resistant option for the roof - ordinary plywood cannot be used here. The most suitable brand is FSF plywood. It has the qualities necessary to create a crate - fracture strength, ductility, low density, light weight, and is not afraid of the effects of fungus. Such plywood is resistant to moisture, which means it will not rot. In the process of its manufacture, remnants from the processing of coniferous wood are used.

Another good and suitable material for creating crates is OSB board, a somewhat improved version of the chipboard familiar to many. It is characterized by a high level of moisture resistance, dense and durable, not afraid of snow load, very smooth and does not deform under the influence of moisture. It will ensure that there are no height differences and will allow you to make the crate perfectly flat. Installation is quite simple and does not require the use of any special tools.

Lathing for a soft roof can be made of edged or tongue-and-groove softwood board. The material should have a low moisture content - no more than 20%. The width of the boards used should be 140 mm. The main disadvantage is the tendency of the boards to deform, due to moisture they often warp and bulges and cracks form on the surface of the crate.

Important! Before being used in construction, wood must be treated with antiseptic compounds, as well as preparations that increase the fire resistance of the material.
Prices for different types of building boards
Building boards
Rules for the manufacture of crates
The creation of a crate can only be done in compliance with certain rules. Otherwise, the design will not serve for a long time, it will quickly deteriorate. And the manufacturer of soft tiles does not guarantee its material in case of violation of the installation technology.
So, special attention is required to determine the value of the angle of inclination of the roof slope. If it is very small and is only 5-10 degrees, then it is necessary to lay soft tiles only on a continuous crate made of plywood, boards. And in general, in this case, this material is not recommended to be used. If the slope angle is equal to a value within 10-15 degrees, then the crate is made of a bar with a section of 45x50 mm, covered with plywood or OSB. The bars are installed in increments of 45 cm. If the angle exceeds 15 degrees, then a bar of the same section is used to create the crate, but mounted in increments of 60 cm.

Attention! When calculating the requirements for the crate, it is important to take into account the climatic features of the region - the load that the roof will experience due to snow cover. The load that will be created due to the roofing material itself is also taken into account.
Table. The dependence of the pitch of the rafters on the thickness of the material used.
| Step cm | Plywood thickness, mm | OSB thickness, mm | Board thickness, mm |
|---|---|---|---|
| 30 | 9 | 9 | Not used |
| 60 | 12 | 12 | 20 |
| 90 | 18 | 18 | 23 |
| 120 | 21 | 21 | 30 |
| 150 | 27 | 27 | 37 |
During the installation of the crate, it is worth remembering the compensation gaps that are left between the elements of the material from which the solid base is created. The gap between sheets of plywood or OSB should be 5-10 mm. In the event of swelling of the material, it will save the roof from curvature, and the roofing material from damage.

plywood prices
Lathing technology. Design features
The basis of any roof is a system of rafters. They are fixed on the Mauerlat - a support that is mounted around the perimeter of the house and will experience the maximum load. Therefore, the Mauerlat must be strong and securely fixed. Fixation is carried out using anchor bolts. If the walls of the house are not built of wood, but of aerated concrete or brick, then it is recommended to additionally fix the anchors with a cement composition.

After installing the Mauerlat, the truss system is created. Rafters can be made of wood, metal and other materials. The easiest way to work with wood, it is easy to fit it to certain dimensions on the spot, and you don’t have to order special equipment to climb up. The rafters are installed in increments, which is determined based on the thickness and width of the materials used for the continuous crate (if it will be laid immediately on them). For example, with a board thickness of 2 cm, the pitch can be 50 cm. The same pitch can be used when laying plywood or OSB with a thickness of 10 cm. If the pitch is too large, the roof base will sag over time under the weight of the roofing material itself.

On a note! If the crate is mounted from a board, then it is important to round its edges in order to avoid uneven surfaces on the surface in the future.
Do not forget that the roof must have ventilation. As it, the gap that is formed between the solid and sparse crate is quite suitable. If the boards are laid on the logs, then it is important to think about how to make the air. Otherwise, condensate will accumulate under the roofing material, which will have a negative impact on all elements included in the roof structure.

Waterproofing is also an important aspect that should not be neglected.. A material capable of retaining moisture is laid on the rafters and fixed with bars - a counter-lattice is formed (sparse crate).
Thermal insulation is useful if the house is planned to be used as residential throughout the year. In the case of a temporary country house, where they will live only in the summer, thermal insulation may not be useful.

The fastening of the materials of the crate is carried out using self-tapping screws. Nails are used less often. However, regardless of which fastener option is used, the caps must in any case be recessed into the base. Otherwise, the coating on top may be damaged. Fasteners are made in increments of at least 15 cm.
Plywood sheets are stacked apart - their joints in parallel rows should not be in the same place. OSB boards are installed in a checkerboard pattern, that is, the expansion of the seams is also necessary. The joints of the longitudinal seams should be located on the bars of the batten (counter battens).

Important! After the work on creating the crate is completed, the lining carpet is laid on a flat base. Only after this is the installation of the most flexible tiles.
Don't forget the drip
A dropper provides protection for cornices and rafters from moisture. Its purpose is to remove moisture from the roof into the drainage system. Thus, this element will protect the wooden parts of the structure from moisture, the onset of rotting processes, the development of mold or fungus.
The dropper is fixed on the edge of the roof in a vertical position. Due to this, water from the roof will flow directly into the drain. As a rule, this element is made of galvanized steel, painted in such a color as to harmonize with the roofing material. It is installed around the entire perimeter of the roof. Fastening is made to the crate.

Creating a crate for soft tiles
Step 1. Taking into account the bearing capacity of the foundation and the shape of the roof, a rafter system is created from a board with a section of 150x50 mm. Elements are installed in increments of 60 cm.

Step 2 From the inside, a vapor barrier membrane is attached to the rafters, which will prevent moisture coming from inside the house from affecting the roofing materials. The vapor barrier roll is rolled out parallel to the eaves, the material is fixed by using a construction stapler to the rafters. The individual strips of material are laid overlapping each other. The overlap is 10-15 cm. The membrane is also overlapped on the walls.


Step 3 Insulation is being installed. Mineral wool, which will be used in this case, has a thickness of 20 cm. This is the best option for the regions of Russia. In general, the thickness of the insulation will vary depending on the climate of the area. The material is laid on top of the vapor barrier membrane. The width of the insulation should be equal to the installation step of the rafters. If the material is laid in several layers, then the vertical seams should be spaced apart.


Attention! From the inside, several support boards are nailed to the rafters through the membrane to help hold the insulation in place.
Step 4 In increments of 60 cm, a counter beam with a section of 5x5 cm is installed. Another layer of thermal insulation 5 cm thick is laid between the individual bars.

Step 5 A vapor-diffusion membrane is being laid, which will protect the roofing materials from dust and moisture. It is laid on a heater, a roll of material is rolled out parallel to the eaves. Separate strips are laid with an overlap of at least 10 cm. The membrane is also extended 20 cm beyond the contour of the insulated layer of the building. Fixation of the material is carried out using a stapler. The overlaps are additionally glued with adhesive tape.


Step 6 To ensure under-roof ventilation, a ventilation chamber is created. To do this, counter-bars with a section of 5x5 cm and a step of 30 cm are installed parallel to the rafters. The bars are fastened in a checkerboard pattern so that there is a free gap of about 5-10 cm between them every 1.5-2 m.


Step 7 Oriented strand board or plywood creates a solid base for shingles. The thickness of the material is at least 9 mm. The plates are laid apart relative to each other, while small gaps remain between them - 4-10 mm. Sheets are laid parallel to the eaves.


Step 8 Mounting of cornice strips is carried out. They are installed on the edge of a solid base. Fixation is carried out with self-tapping screws in increments of 25-30 cm. Individual elements are installed with an overlap on each other. The overlap must be coated with sealant.

After that, the flooring of the lining carpet and the laying of the soft roof are made.
Prices for OSB (Oriented Strand Board)
OSB (Oriented Strand Board)
Video - Creating a base for a soft roof
Sheathing is one of the most important details in a roofing system created using soft tiles. It is not difficult to create a crate, but it is important to remember all the intricacies of installation, otherwise the roofing material will not last long.
In order to fix any type of roofing material on the roof, a crate is used. What it will be depends on the type of coverage. In this material, we will talk about what should be the crate for soft tiles and how to properly fix it.
In essence, a sheathing is a series of battens or other materials that are attached to a truss system for subsequent laying of a finish coat.
The main nuances and scheme of the crate
The sheathing scheme for flexible tiles can be of two types:
- with gaps - for the installation of hard coatings, for example, metal tiles, slate or corrugated board;
- laid in a continuous layer - for soft roofing.

It is noteworthy that the installation of a continuous crate for laying soft roofing is carried out in two layers. First, a rail or board is stuffed at intervals over the rafters, and then a continuous layer of lathing from a solid OSB slab under a soft roof or from plywood with moisture-repellent impregnation is attached to them. By the way, this finishing layer serves as additional sound and heat insulation.
Installation technology of lathing and OSB under soft tiles
As well as in the case of all other structural elements of the roof, the installation of the batten must be carried out in accordance with the following rules:
- A continuous coating of boards or sheets of moisture-resistant plywood is performed on pitched roofs with a slope of 5-10º.
- On slopes, the slope of which is 10-15º, first a crate for OSB is made on the roof from bars with a section of 45 × 50 mm, laying them in 45 cm increments parallel to the eaves, and then laying waterproof plywood or chipboard.
- The same beam is also used on roofs with a slope of more than 15º, however, they are laid 60 cm apart.
- Additional lathing bars are installed in places where the valley is attached to the ridge run.
It is believed that the roof will last the longest if the soft roof is laid on boards calibrated to the same size. In this case, the crate will turn out to be even, without height differences, so that the joints can be perfectly adjusted. Therefore, on this basis, the coating will not be damaged ahead of time, and will not lose its performance characteristics.

The most preferred for construction are edged coniferous boards, which combine low price and good performance.
When organizing a sparse crate for the subsequent laying of soft roofing, the boards are laid with an indent of no more than 10 cm. For a solid type of crate, edged boards, chipboards and moisture-resistant plywood sheets are successfully used. Please note that the installation of OSB under a soft roof must be carried out necessarily on strong boards, while its humidity should not exceed 20%.
Since the crate will be exposed to external influences, it must be strong enough to withstand:
- increased snow loads in winter;
- weight of the finish.

Based on these conditions, the calculation of the structural elements of the roof is performed. In particular, if the pitch of the rafters for a soft roof is 50 cm, the crate is made of 20 mm edged boards or 10 mm waterproof plywood. When the rafter pitch is increased to 120 cm, plywood with a thickness of 20 mm or a board of 30 mm thickness is used. That is, the thickness of the OSB for a soft roof directly depends on the distance between the rafters.
Please note that wood, unlike soft tiles, is very susceptible to decay and the development of fungus. Therefore, before installation, without exception, all wooden elements must be treated with an antiseptic.
Why do you need a drip on the roof
The dropper is one of the essential components of the crate. Its function is to protect the cornice from water leakage. This is important, because it is in these places that wooden structures are most susceptible to decay. The inner angle of the dropper can vary between 100-130º, depending on the steepness of the slopes. These elements are mounted on the edges of the roof, making sure that the water flows along them strictly vertically directly into the drain. In addition, the dropper gives the entire roof structure a more finished look.

Drip Features:
- they produce such parts from galvanized sheet steel with a polymer coating that provides additional anti-corrosion protection;
- the color scheme of the dropper must match the color of the main coating so as not to create dissonance;
- drippers must be installed around the entire perimeter of the roof in order to equally protect the roof and facade from water leakage;
- this element reduces the windage of the pitched roof, this allows you to protect the structure from the wind.
Drip installation method
The technology for installing droppers involves some nuances:
- the main part of the dropper is fixed on the crate board, while its lower segment should be directed to the drain;
- adjacent segments of steel drips are laid overlapping each other;
- additional protection of the edge of the crate is provided by front slats;
- at the next stage, the installation of the roofing carpet begins, not forgetting to coat its edges with mastic so that it grabs better;
- soft roofing is laid on top of the drip.
So, the crate is a very important element that allows you to lay a quality soft roofing.
- For a soft roof, two layers of lathing are required, combined into a single structure.
- The surface of a continuous crate should not contain height differences and defects.
- To avoid damage to the soft surface, all protruding sharp edges and bends must be rounded off.
- As a rule, a cut board with a width of 14 cm is used.
- To prevent moisture from seeping into the space under the roof, the board should be laid with the tray up.
- As well as sharp ribs, the ends of the edge boards must be rounded so as not to damage the roofing material.
- Protection of wood from pests and rotting will be provided by treatment with antiseptics.
- The strength of the wind in a particular region, as well as the slope of the pitched roof, affect the step of the crate for soft tiles. Decreases as the wind strength increases.
- Moisture-resistant plywood sheets or chipboard under a soft roof should be laid with an indent of 1 cm so that when the material swells from moisture, it does not crack.
- The dropper will protect the wooden cornices and the crate from the flow of precipitation.
Very convenient and multifunctional material for various construction works - oriented strand boards. Since the technology for the production of these plates is not complicated, for interior finishing work, the master can choose a specific option from the four types of OSB plates or consider special types of these plates.
What are the sheets of these products made of? It's simple - wood chips are used (flat fragments are used), shavings: these materials are glued together and a really excellent finishing material is obtained. Three or four layers of wood chips or shavings - these are the indicators that can be called optimal. Mounting OSB on walls is more preferable than using the same chipboard.
However, oriented strand boards are a kind of modification of wood-fiber material, some of its modern analogue. If finances allow, it is better to choose OSB for facing work (plywood or chipboard is increasingly being abandoned today).
Scope of OSB, classification of plates
Before considering the classification of slabs and deciding what is the best way to finish walls from OSB, it is important to pay attention to the characteristics of such a material.
Types of OSB boards
Here everything is as follows:
- OSB boards of the first class - they are usually chosen for such premises where there is a low level of humidity;
- Type two - the material can be safely chosen for dry rooms, it is even used as a structural element during construction work;
- Type 3 OSB - these plates are used in those rooms where there is a high level of humidity;
- The fourth type of such products is used for cladding structures that are able to cope even with significant mechanical loads. Moreover, we are talking about conditions where the level of humidity is high.
Application area

One thing can be said about the scope of application - the installation of OSB is a really relevant task, since such plates are used in many construction aspects.
It's just that this material has such a manufacturing technology, due to which all internal defects are simply excluded (at the same time, they very often appear in chipboard sheets - voids, uneven fillings). Due to all this, OSB is a more preferable option - it does not deform, does not shrink.

And now in detail - Where can this material be used??
- Often for walls, OSB sheathing is a very profitable solution. Due to this approach, the house receives reliable protection from dampness, while also gaining additional insulation. What is most pleasant here: there is no need for additional finishing work after OSB installation;
- In the construction of frame-panel houses, OSB boards are usually used, which have a high level of moisture resistance;
- Since the material has such a valuable quality, it makes a decent reusable formwork;
- It is used as a base when making external wall cladding, as well as in internal work - if wooden country houses, cottages are being finished (from timber, rounded logs);
- OSB boards are your faithful assistant if you are making a sheathing, roof rafters. This material can work even under a serious load - it will definitely withstand the weight of not only the roof itself, but also all related loads (wind, snow) - even if natural tiles are laid on the roof (material that weighs a lot);
- If you need to level the floors in the house or lay them from scratch - here again you can pay attention to the OSB installation. Just such a plate is ideal for creating a very strong, even base. It is best not to find under plank floorboards, carpets or other coverings;
- Pay special attention to the process when it is necessary to fit the joints of the plates along the plane. If necessary, they must be equalized - without this in any way.
An interesting point - not every manufacturer can use OSB boards as underlayment layers - in the case of organizing floor coverings. And the laying of the panels is carried out so that the smooth side is located up.
What else does a master need to know?? Following:
- It is not necessary to apply an additional protective coating in the form of paint or varnish on the plates - the material initially has excellent protection in the form of a special impregnation;
- Processing plates is not so difficult - about the same as ordinary wood. Screws, nails on the surface are excellent. OSB boards are not afraid of rotting, fungal influences, the decorative qualities of such material are at their best;
- OSB panels are often used today in furniture production - after all, this is a great alternative to natural wood (but in terms of cost - it is significantly more profitable);
- The material does not weigh that much - therefore, it is perfect for finishing, construction, painting work and more.
How to finish your house faster

It is quite logical that any owner wants to move into his house faster - especially if the construction is carried out independently. Private cottages are located separately from neighboring buildings - so in this design you don’t have to worry about neighbors.
Here a well-founded question may arise: maybe not to make a rough sheathing - but immediately fasten the OSB finishing materials directly to the frame racks?
Is such an approach to business allowed, or is it excluded?
If you pay attention to the instructions drawn up by professionals, it will immediately become clear: this cannot be done. There will also be reasons for such a conclusion. Simply, it is important to insulate the house - only in this situation it will be comfortable in it (especially since winters in the Russian Federation are cold - almost throughout the entire territory).
Why are frame cuts required at all - lower and upper? Everything is simple here: they form spatial rigidity - together with the skin. They can also be called mandatory elements, if we consider the design of any frame structure.
A frame that does not have slopes, even with sheathing, will retain its mobility - as in the case when there are any. However, if there is no skin, you can imagine what the consequences could be.
Exterior wall cladding

For rough sheathing, a lot of different materials are used today. There is definitely a choice here - everyone will agree with this. Pay attention to at least these options:
- Board;
- OSB boards.
Any of these surfaces needs a fine finish: it can be cladding with plaster - with a mesh or a layer of foam. There is an opinion that even boarding can be left as a fine finish - but in this case it will be necessary to process the wood additionally. Under the boards, hydro-wind protection of the walls is also arranged.

You should consider the following: it is not recommended to finish the frame with a board - without rough, preliminary sheathing of OSB with plates. Otherwise, there is a risk that the boards will unscrew in the fall or spring. In addition, it is important for the spatial rigidity of the frame.
You will get fewer joints due to the area of \u200b\u200bOSB sheets - which cannot be said about working with other materials. OSB trim is usually made with a material whose thickness is 11-13 mm.
Let's take a closer look:
- The OSB plates are fastened to the racks so that there is a joint in the middle. And between the plates there should be a small gap - three to five millimeters is enough;
- The sheet completely overlaps the lower trim;
- The upper harness is closely connected with the number of storeys of the house. It will be hidden entirely - and the edge of the OSB plate will be aligned with the edge of the strapping if the structure has only one floor;
- When the building consists of two floors, the sheet is located as follows: it must go to the racks of both floors at once. But somewhere in the middle of the sheet, the upper trim overlaps. This condition cannot be called mandatory, but if it is met, the rigidity of the structure increases significantly, which benefits the structure;
- Sheathing with OSB boards, when fastening to a window opening in two-story houses, should be done in a single sheet - this is exactly what professionals advise. Then all joints can be moved to adjacent racks outside the opening racks. A window opening is simply cut through in the slab - there is nothing complicated in such work. Here https://krepezhmaster.ru you can purchase fasteners for absolutely any purpose;
- When horizontal or vertical jumpers are made in the frame, a very convenient joining of the plates is obtained. In the event that these jumpers have the same cross section as the racks - and this happens often;
- For fastening, spiral nails are selected. Self-tapping screws are also suitable - 0.5 or 0.45 cm long. You should not refuse combined fasteners (both nails and self-tapping screws) either - such a solution is considered to be of very high quality.
Keep in mind that basic rules for the execution of fastening work must be observed.
Namely:
- It is customary to fix the finishing of OSB plates in intermediate sections every 300 mm;
- After 150 mm, fix the places where the plates are joined;
- After 100 mm, the outer edge must be stitched.

So that a crack does not go through the material due to too zealous fasteners, a distance of 1 cm is maintained from the edge of the plate to the place of fixation (maybe a little less).
- A gap of 4-5 millimeters is left between the plates - so that they do not warp. Fasteners are driven into the rack by 4-5 cm;
- The part of the OSB board that is vulnerable (one might say, this is the “Achilles heel” of the finishing material) is the ends. To ensure the protection of these areas, gaps are provided, which are called expansion gaps (between the girder beam and the top edge, also between the foundation wall and the bottom edge). Here the gap will be 10 mm. And between those plates where the groove-ridge is not available, 3 mm is quite enough;
- To process these expansion gaps, an acrylic-based sealant is used. It is important that he carefully fills all the cavities - and that this work is done evenly;
- Wind protection, waterproofing - all these tasks will be performed by a superdiffusion membrane, which also has the property of vapor permeability (this figure is 750 g / m² or more).
Use polyethylene, various films, glassine - do not recommend the master. It’s just that these materials have a low level of vapor permeability, all excess moisture must be reliably ventilated.
Also, you should know:
- The superdiffusion membrane is installed depending on what is the rough lining with materials, what is the fine finish. For example, the membrane is often attached close to the insulation - to the racks of the frame;
- They make a crate (here wooden slats are used, the cross section of which is 2 by 5 or 3 by 5 cm. Thanks to this design, the required gap will be achieved. Then it is already possible to finish the OSB surface with slabs, LSU, DSP or sheathe with boards;
- From the inside of the room with the help of a film, you can make a vapor barrier of the walls. The material is installed in such a way that it fits snugly enough to the insulation. For fastening, a construction stapler is used. The overlap is done by joining - 150-200 mm, the joints must be glued with adhesive tape.

For such work, you can choose the simplest adhesive tape - there is no need to use building material. Vapor barrier adhesive tape is also suitable.
- To perform a vapor barrier, foil polyethylene can be used, which will not thicken the wall insulation (basic). Foam material is also often used for this task - this practice is common in our time.
Finishing the structure inside

Which is better: OSB cladding or plasterboard cladding? Many people are unambiguously inclined in favor of option number one - when it comes to interior finishing work in the house. It is quite difficult to keep the frame racks in a completely even state - when work is being done, the same applies to drywall.
It's just that the sheets of this material are softer when compared with osb plates. They will easily repeat all the bumps - so then you have to work hard to get a completely flat surface - more layers for alignment will need to be applied.
OSB board in its structure is an order of magnitude tougher than drywall sheets, so that all flaws can be smoothed out to a certain extent. After that, they begin to carry out work related to the final finishing.
Watch a video about how OSB boards are used for interior decoration. This material will definitely be useful if you do not have much building experience.
OSB-3 boards and roofing

Roofing is a very popular way to use material such as OSB boards. By the way, to cover the roof with OSB-3 slabs, a material thickness of 0.18 cm is enough.
In order:
- Both the castle and the flat edge can have products. The first option is more preferable;
- The distance between the supporting beams should not be more than 609 mm - this applies to both the organization of sloping and flat roofs;
- Whether the plates are able to expand is of great importance. It is customary to leave a gap for each linear meter: 2 mm is quite enough (believe me, this is enough);
- When laying plates with even edges, the gap is already made a little larger - 3 mm. Leave it around the perimeter of each plate - this is the only way to achieve optimal results;
- To fix the OSB to the roof, nails are chosen. Attached to support posts. There should be a distance between them: 10 cm or even more;
- Finishing OSB boards are attached with nails - they should have a length that exceeds the thickness of the board by two to two and a half times (or even more) - this is quite normal.

If the interior decoration is carried out using OSB panels, the following can be noted here: a slab of polished panels will look better if appearance is very important in your space. For finishing such plates, it is better not to use ceramic tiles or wallpaper - this is recommended by the manufacturers themselves. And it is best to listen to their opinion!
We also recommend
 Smartphone xperia z5 premium black
 Download toilet paper business plan
 Description Nokia X2 dual sim on the Android platform, powerful processor and support for two sim cards
 Is it possible to open a hostel in an apartment?
 Services to the public: the most promising business ideas
 How to start farming?