Country ponds with their own hands. Decorative pond in the country - options
Vacation in the country is a favorite pastime for many people. Only a trip to the shore of a reservoir can argue with him. Having arranged an artificial pond in your country house, you can get a great place to get rid of fatigue and relaxation. Moreover, it will not be difficult to arrange an artificial reservoir with your own hands, you only need a little perseverance and imagination.
Types of reservoirs
Depending on what functionality you plan to endow the pond you have built, artificial reservoirs can be divided into several categories.

Swimming pool
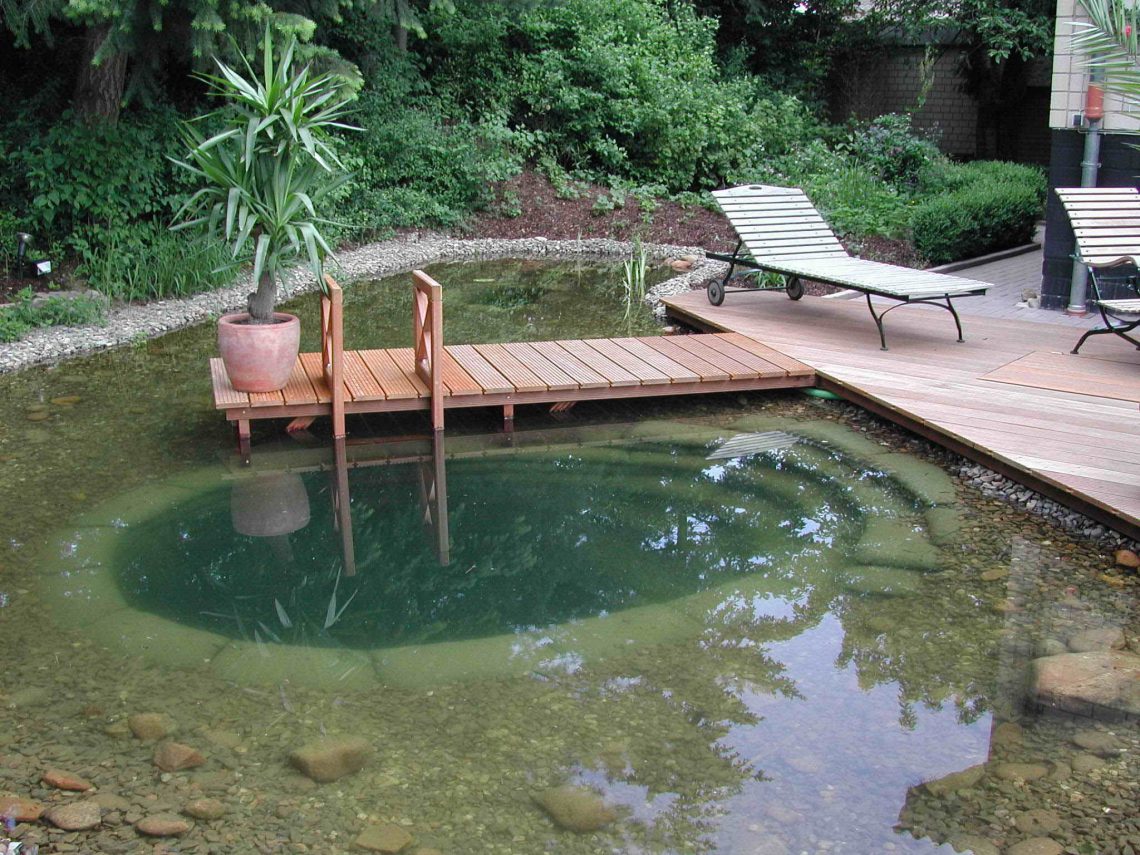
This category includes artificial reservoirs of considerable size. Such a pond, built in the country with your own hands, as in the photo, has not only decorative properties, but also allows you to freshen up, or even swim, without leaving the site.

Pond with fish
The pond for breeding fish is suitable not only for lovers of fishing. Your family members, especially children, will enjoy spending time by the lake, watching bright and beautiful fish.

Mini pond in the country
A small reservoir, which is an element of landscape composition. It performs exclusively decorative functions and does not imply the placement of a recreation area around it.

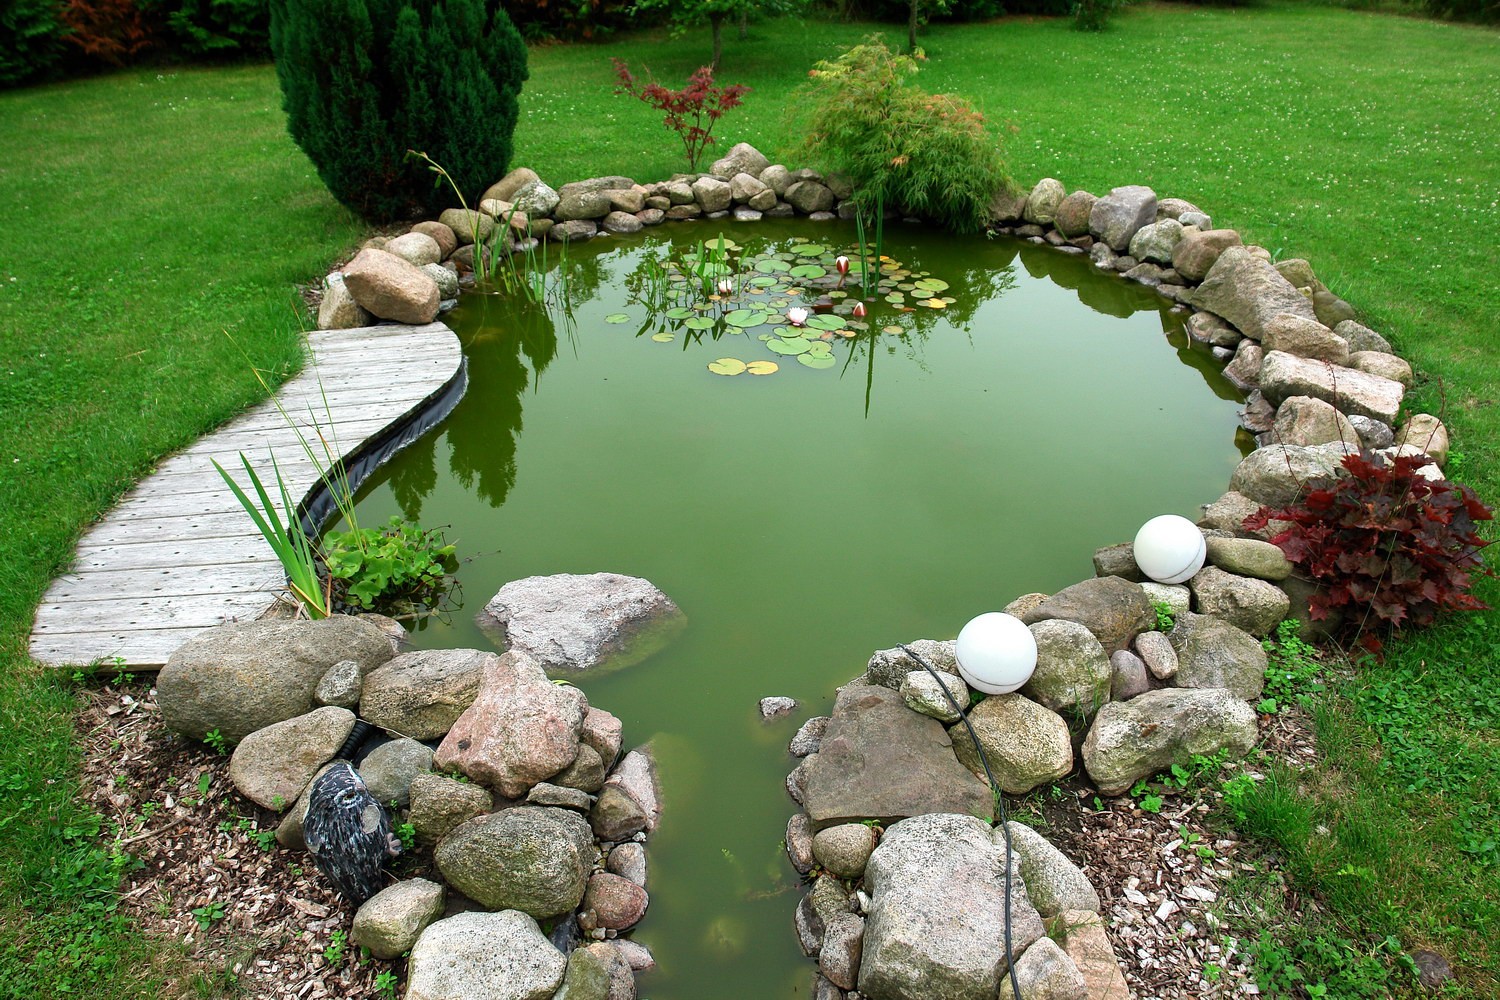
Decorative pond in the garden
Garden pond, built by hand, which is the central place of the recreation area. The combination of sufficient size and beautiful design will not only please the eyes, but also give a pleasant coolness on a hot day.

Style
Having decided on the functionality of the reservoir, it is worth moving on to choosing the style in which the decorative pond in the country will be executed. There are two main options.
- Formal (regular) pond. Artificial reservoir of strict geometric shape. Ideal if there is a desire to emphasize the geometric shapes of the building or the site itself. Creates a sense of order, looks appropriate next to geometrically regular flower beds, lawns and other decorative elements on the site.
- Landscape pond in the country. It is carried out in any form and fits very easily into the surrounding landscape. This option is suitable for any style and looks as natural as possible. Its construction requires much less effort than the equipment of a geometric reservoir.
 Location selection
Of great importance when organizing a pond in the country with your own hands, as in the photo in the article, is the terrain. On flat areas, you can place a pond in a garden of any style and size. Areas with irregularities create more difficulties when deciding how to make an artificial pond, but at the same time they can serve as natural cascades and elevations for waterfalls.
It is necessary to arrange a pond with a fountain in the country house with your own hands in an open area so that the reservoir is clearly visible from every corner of the country house. The depth of groundwater, the qualitative composition of the soil can affect the allowable depth of the reservoir, as well as the complexity of the work and the use of additional materials. When thinking about how to build a pond in the country with your own hands, in addition to the terrain, it is worth considering a number of other important points.

- Compatibility with the environment. Visible from all sides, a mini pond in the country should be combined with buildings and green spaces on the site.
- Illumination of the site. It is preferable to choose the most shaded place on the site for the location of the reservoir. This will prevent increased water evaporation. In addition, with prolonged exposure to direct sunlight, there is a high probability of active development of microorganisms in the water, which will negatively affect the aesthetic component.
- Environment. Do not abuse the vegetation next to an artificial reservoir. The long and thick roots of large trees can lead to damage to the insulating layer over time, which in turn will require repair and putting the reservoir in order. Leaves falling into the water from tree branches located too close to the reservoir can lead to silting and will require regular cleaning. On clear days, nearby trees or buildings will be reflected on the surface of the water. Therefore, you should take care of a beautiful exterior in advance so that your eyes do not fall on a rickety shed or a dry, fallen tree.
- Expansion of the reservoir. In the future, you may come up with the idea of the need to increase the area of \u200b\u200bthe reservoir, additional functional and decorative elements. Therefore, it is worthwhile to provide a place in advance for the possible expansion of the reservoir in the country with your own hands.
- Electrification. If you plan to install lighting near or directly in a pond, or place an electric fountain or other movable structures, you should worry about laying all the necessary electrical wiring in advance. It is best to place the wires underground, protecting them with strong boxes or corrugation.

Size selection
Having chosen a place on the site that the pond will occupy in the garden, you should decide on the size of the future reservoir. Landscape designers do not give clear recommendations on this matter. However, a do-it-yourself decorative pond built on a summer cottage should not occupy more than 8-10% of the area of \u200b\u200bthe site, because. a larger structure will look bulky and alien.

The depth of the pond in the garden depends on the purposes for which it is created, as well as on the capabilities of the owner, who equips the pond with his own hands on the site. The photos below will help you make your choice.

Material selection
When arranging ponds in a summer cottage with your own hands, you should approach the choice of material with all care. There are many options for what material is better to use in order to equip a small pond in the country with your own hands.

The photos in the article and the following list highlight the following main categories.
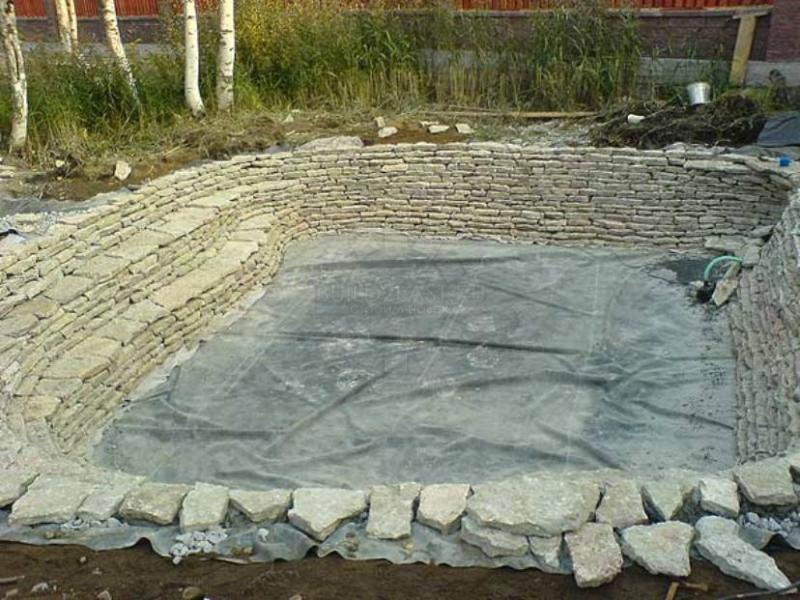
Concrete pond
Capital construction, which is the most expensive option for arranging a pond in a country house. The advantages of using this material include increased strength and durability of use.

plastic container
An industrially made form of high-strength plastic allows you to solve the question as soon as possible: how to make a pond in the country with your own hands. Various shapes and sizes allow you to choose the option suitable for the most demanding owner.

PVC film or polyethylene film
The use of these materials makes it possible to create a garden pond with your own hands of absolutely any shape. The disadvantages of such a material include low resistance to external influences, and how short the service life

Butyl rubber membrane
A do-it-yourself garden pond made of such a film will please the eye longer than a decorative pond in the photo below made of polyethylene or PVC. When planning how to make a reservoir on the site with your own hands, it should be borne in mind that the life of the membrane reaches 50 years, and the increased resistance of butyl rubber to severe frosts makes it a very profitable material.

In order to save money, you can use various improvised materials. An old bathtub, a basin or a car tire for a mini pond - these and other "folk" remedies are used to create ponds in the country. Our photo gallery will suggest other original ideas.

Necessary equipment
Depending on the functionality of the reservoir and the material from which it will be made, the following tools may be required during the creation process: a shovel, a cart for transporting excess soil, a level, pegs and a strong cord for marking, as well as a hose for irrigation. Such a set of tools will be enough to place mini ponds in the country with your own hands, as in the above photo. If the planned pond in the garden is of considerable size, it is worth evaluating the feasibility of using construction equipment. For a pond intended for fish breeding or designed for a particularly long service life, the installation of additional equipment may be justified:
- An aerator that saturates the water with oxygen necessary for fish.
- Pump for filling or draining water.
- Cleaning filter.
- A device for sterilizing water and removing dead algae.
Details of creating a pond from a film
PVC film, due to its performance and relatively low cost, is one of the most popular materials for arranging a pond. In addition, in order to make a pond with your own hands from PVC film, you do not need special skills and special knowledge.
For the arrangement of reservoirs, it is not necessary to use films with a thickness of less than 0.5 mm., And if it is planned to create a particularly deep reservoir, it is better to take a film with the maximum available thickness.
The use of a multi-colored film allows you to achieve different optical effects: a black one will make the bottom of the reservoir mirror, and it will clearly reflect the trees and buildings standing nearby, a brown film is perfect for simulating a ground bottom, and a film of light blue or cream tones will make the reservoir as transparent as possible, which will allow you to easily observe the movement of fish.
The selected film should be cut in such a way that it covers the bottom and walls of the reservoir, leaving a margin of up to one meter. The cut pieces must be connected with specialized glue or adhesive tape for such work.

Before digging a pit, it is necessary to carefully consider the size, shape of the bottom and walls of the reservoir. If you plan to create a complex multi-stage structure, it is better to first draw a detailed diagram on a piece of paper indicating all dimensions.
Having marked the selected area, we proceed to digging a recess. It is better to remove the soil in the direction from the edges of the future reservoir to the center, gradually deepening to the required limits. The bottom and walls of the finished pit should be carefully examined for the detection of foreign objects, sharp roots, etc. Any debris found must be removed to avoid damage to the film. We lay out the prepared film on the rammed bottom of the pit, fixing it with stones and sprinkling soil around the edges.
Next, you need to strengthen the banks of the pond. To do this, you can use various materials. For gently sloping shores, a geogrid or a polymer grid is suitable; you can also use a regular chain-link mesh. For vertical banks, the use of piles or props will be required.
You can complete the design of the pond by adding various decorative elements, planting plants and installing underwater or outdoor lighting.

Plant decoration
When decorating a pond in the garden with plants, it is worth understanding that they are divided into those that are planted on the shore along the edges of the pond, and plants that live directly in the water. The root system of coastal plants will additionally strengthen the walls of the pond. When planting plants in a pond in the garden, it is important to keep in mind the speed of their growth, otherwise, after a long absence, there is a risk of finding a pond completely covered with a thick carpet of vegetation.

Decor
In order to decorate the pond in the yard with your own hands, in addition to various plants, beautiful stones and other decorative elements, the use of lighting gives a good effect. The colored glow spreading from under the water will create a beautiful decoration for your pond at night. Additional lighting can be placed above the water.

As a decor for decorating a pond in a country house with your own hands, as in the photo in the article, you can use various fountains. The functioning of the fountains is ensured by the operation of pumps that can be hidden at the bottom of the pond under the stones. Surface devices are also used. Pumps come in different capacities, which affects the height and intensity of the water jets.

fish
Ornamental fish can be launched into the pond in the country, when choosing which it is important to fully understand the conditions for their maintenance. It is worth buying such types of fish that get along well with each other and do not quarrel.

Pond Care
Decorative pond in the country requires some care. Planted plants must be sheltered from the cold or transferred to a warm room. During a long absence, the surface of an artificial reservoir in the country should be covered with a special net to protect it from debris. Leaves and other debris that have fallen into the country pond are caught with a net, and in the event of the formation of a large amount of silt, it is necessary to clean the reservoir. Water must be periodically renewed using a garden hose or a regular bucket for topping up (if specialized equipment is not available).
Photo gallery
In our photo gallery you will see more than 33 examples of beautiful ponds in the country.
Let the dacha be a place where work first goes on, and then rest, we do not forget about the beauty that helps us not to lose heart and enjoy every day spent there. Therefore, today we invite you to feel like landscape designers and build a pond in the country with your own hands.
Do-it-yourself pond creation rules and material requirements
A pond in the country is not a luxury, but in some way even a necessity. As the ancient philosophy of Feng Shui says, water near the house brings financial well-being and soothes.

In addition, it allows you to maintain relative humidity in a single area, pleases the eye and allows you to create an original solution in a designated area. Therefore, more and more often summer residents create ponds and ponds with their own hands, as in the photo.


Not everyone on the territory has a reservoir that can be put in order, surrounded by stone and made into an element of the landscape. More often we create a pond in the country with our own hands from scratch, faced with many issues that have to be addressed during construction.
Let's start with the fact that it is necessary to determine the location of the reservoir. For this the following factors should be taken into account:
- relief of the territory;
- the location of trees and other plants with a powerful root system, as well as foliage;
- illumination of the selected area.
Study the terrain carefully. You may already have well-placed indentations, pits, or ruts that you made earlier. All of them will simplify the process of digging the pond itself.
In addition, do not forget that plants tend to grow and take up more and more space underground. The roots can spoil or even destroy the bottom of your pond over time, and the foliage, seasonally falling into the water, will rot and exude an unpleasant odor. Which will require you to pay more attention to the care of the pond, but not the joy of having it. Therefore, before digging, it is worth considering how far trees and bushes are located.
Most landscape designers recommend placing a pond near your home. This will make it easier for you to illuminate it without requiring separate lights and lamps for yourself. In addition, there is always enough free space near the house with natural light, because. there are no tall trees and dense vegetation nearby, blocking the light.

If you have found a place that meets the above requirements, then you can start work.
But for starters, it’s worth stocking up on materials and an approximate design of your future artificial reservoir.
Exist several ways to create a pond with their own hands in the suburban area:
- from the finished bowl;
- PVC film, polyethylene or rubber;
- with the help of available materials.
Besides in addition to materials for the bottom device, you will need:
- shovel,
- measuring tools,
- finishing and decorative materials,
- water.
After creating a pond, you can launch fish into it. But then the depth of your artificial reservoir should be at least a meter so that the fish do not freeze in winter.

The order of work on the arrangement of the pond
If you decide to arrange the landscape, choose a place and think about the appearance of your future pond, then first decide the main question - what will it be like? Will you choose a ready-made bowl or cover the excavated pit with foil? It's up to you to decide. And we will help you create it according to all the rules.
We dig in the finished bowl
The prefabricated mold, cast at the factory, is an excellent and simple solution for those who want to enjoy a charming and calm view of the pond after a busy summer day.


Now in specialized stores they offer bowls of different sizes, types and contents. They may be:
- simple plastic baths;
- containers with several levels of depth;
- bowls with complex contours of the coast.
Therefore, everyone will be able to choose the form that best suits the territory and landscape without spending extra time.
In addition, there are other advantages of ready-made bowls:
- the plastic form is durable and not exposed to ultraviolet radiation;
- the bowl is non-toxic and easy to install;
- the average shelf life of this form is calculated in tens of years, which makes the pond durable and of high quality.
The main thing is not to damage the bowl during its installation in the future pond. The form is not subject to repair and restoration. However, if you are building to last, you can pick up a fiberglass bowl, it is famous for its strength and lasts 2-3 times longer.


So, you have chosen a bowl, found a suitable place, cleared it and are ready to create a pond with your own hands in the country. What's next?
First you need to transfer the contours of the bowl to the ground so that it fits exactly into the dug pit. For this you will need:
- bowl;
- pegs;
- shovel;
- rope.
To make the contour as similar as possible to the shape of a bowl, you need to install it on the ground and step back 10-20 cm from its edge. Repeating the shape of the bowl, stick the pegs into the ground and pull the rope along them.
So you will get the outlines of your future pond, under which you need to dig a foundation pit 20-30 cm more than the height of the bowl.
Don't forget to keep an eye on the top level. It is very important that the surface of your excavation is even, otherwise the ground around the pond will be wet and viscous all the time, spoiling the appearance of the shore.
When you achieve the desired depth and shape, be sure to sprinkle everything with sand and carefully tamp it down. This sand cushion will become the foundation for your pond. After you can set the form and fill the free space between the side of the bowl and the ground with sand.
When your future pond becomes stable, you can start filling and decorating it.
You can cover the shore with a decorative stone, plant water lilies or other water-loving plants along it. Install small figurines of swans or others created by yourself.


Making a film pond
If for some reason you do not want or cannot buy a finished bowl, then you can always make a pond with your own hands without it.


Enough to stock up:
- shovel;
- a rope or hose to outline the contour of the future pond;
- thick film.
You will need the rest (water, decorative elements and figurines) later, when the main stage is completed - creating a foundation pit for a pond.
As with creating a pond with a finished bowl, first you need to decide on the size of the future reservoir and its contour. Then apply its borders to the ground with a rope or hose, which can simply be laid along the lined border, or can be wrapped around driven pegs.
When you are sure that you like the shape and approximate appearance of the future pond, you can start digging. Here the process will always be the same, because we just need a foundation pit.
The level of the pond should be the same. Therefore, check the evenness of the banks with the help of a building level or a beam laid on both sides of the pit.

When you reach the desired depth, fill the bottom with sand, compact it well, and then lay it with geotextile so that the film does not tear over time. To do this, you can use special material sold in hardware stores, or you can do it on your own. Take, for example, old carpets, rugs, roofing material or linoleum, suitable for the area of \u200b\u200bthe dug pit.
Now that the bottom is ready, measure your future pond and calculate the size of the film you need to create it. Usually, it is enough to know the area of \u200b\u200bthe pit and its depth. After that, add an allowance of 50 cm on each side to strengthen the film along the shore. And you can go shopping.
The film must be very strong and dense in order to withstand the weight of the water that we eventually pour into the pond. Therefore, do not save on this primary material and choose it wisely - the film thickness must be at least 300 microns so as not to tear under constant pressure.

So, as soon as the film is laid out on the bottom:
- Flatten it so that there are no folds and swelling.
- Line the shore with stones so that when filling it does not gather at the bottom.
- Prepare the plants if you want the pond to be with water lilies or other living decor.
The trick of how to arrange plants and flowers in a film pond will be shared with us Maxim Maximov in my master class:
The film pond is quite economical and allows us to create it in any shape and depth, which is impossible to do with a finished mold cast at the factory. That is why many choose this option to create their own reservoir in the country with their own hands.


But do not forget that the deeper you want to make the pond, the more likely it is that the shore may crumble. That is why we recommend that you, after the pit is dug, strengthen its walls. Depending on their height, you can use tiles or slate. And how best to do it, he will tell us Talla Khukhrianskaia in my master class:
When all technical issues are resolved, the pit can be filled with water. To do this, just throw a hose connected to the water supply into it.
In addition to the stone, which has an important function and holds the film on the shore, you can put decorative figurines, flower pots and handicrafts that you have made for giving your own hands. Decorate the pond so that it reflects your creative nature and is pleasing to the eye.
Do not get carried away with decor, because periodically the pond needs to be cleaned so that the water does not fade in it and does not turn a beautiful country pond into a large puddle. And for this, be sure to leave a place on the shore so that you can go to the pond. Better yet, provide a stream that will drain the water.
We create a pond in the country from improvised materials
Unfortunately, it is not always possible to find the right and high-quality building materials, but if the desire to create a pond with your own hands does not go anywhere, do not despair. Simple improvised materials will also come to the rescue, which any summer resident has enough of.
A pond can be made from a variety of things:
- from an old car tire;
- from an old bathtub left after repair;
- from a barrel, basin or bucket.

Bathtub pond...

... from old tires ...

...and from an old barrel
If you really want to create an unusual and original pond, then the lack of capacity will not stop you.
Using old containers
As we have said, a pond can even be made from an old bathtub. After all, in fact, it is no worse than the finished form.


The process of creating such a pond will be similar to the previous ones:
- dig a pit under the form;
- fill it with sand and make a cement screed;
- insert bath;
- fill with water.
Due to its weight, the bathtub will sag heavily in the pit, which is why it is recommended to tighten its bottom with cement - to strengthen it. So that over time the pond does not go deeper.
Also, do not spare sand and earth to stabilize the tub inside the pit. For a snug fit of our handy bowl to the shores, fill in all the voids.
And do not leave the side of the bathtub open, it will not look aesthetically pleasing and will spoil the appearance of the future artificial reservoir.

And how to dig a bath and arrange it in a pond with your own hands will clearly show and tell Vitaly KIY in your video tutorial:
However, if your summer cottage is not large enough to have a full-fledged pond on it, do not be discouraged - you can also make a pond with your own hands in the country from small containers, as in the photo.


Take an old metal or wooden basin, a small barrel or tub. All of them can become an original decorative reservoir, which does not even have to be submerged below ground level.
At the little pond from an old basin there are many benefits, so do not deny yourself the joy of creating a modest artificial reservoir, if the area of \u200b\u200bthe site does not allow more:
- does not require excessive costs - everything you need for its device is at hand;
- it will take a little time to arrange it - from several minutes to a couple of hours, but not a day or more;
- it can be placed anywhere;
- if you installed the pond on the surface, and did not dig it in, then you can always rearrange it to another place by simply pouring out the water and refilling it after being carried;
- it does not require special attention to care - it is enough to change the water from time to time and wash it from the inside so that the bottom is clean.
Ponds from a basin or a small barrel can be installed on a reinforced, flat surface, filled with water and decorated with decorative figurines or flowers.


But if your pelvis has long lost its decent appearance and there is no way to restore its former gloss, then simply dig a small ditch to fit its size, install it there according to the principle of an old bath and overlay it with pebbles along the shore.

As you can see, old containers allow us to fantasize and create incredible ponds with our own hands in a country house of any size. And it helps us realize our creative potential.
Pond to the cottage from the tire
However, if repairs are not planned in the apartment, and the old basins have long been worn out or turned into flower beds, do not despair, you still have a chance to get your own pond.
And for this you will need the most indispensable and affordable material - a car tire. Tires in modern dacha society have long become a universal substitute for building materials.

And no wonder - the strength and shape of the tire allows you to make anything out of it, including a pond. And the size of the future reservoir will depend only on the size of the tire you choose.
First you need to prepare your future container - cut it off along the top edge so that only the sides remain. To do this, you will need a jigsaw or a sharp knife (if you chose a tire from a car).
After you can go to the pond itself.
Installation steps:
- Outline the tire and dig a pit along the height of the prepared bowl.
- Fill the pit with sand and tamp the bottom.
- Insert the cover inside.
- Cover the tire and the bottom of the future pond with a thick film.
- Fill the edges of the film with sand, and then decorate with turf, stone or embankment so that the film is well fixed.
- Fill the pond with water and decorate with pre-designed decor.
Your tire pond is ready. And it will not yield in beauty to either ready-made bowls or large film ponds located in large spaces.

In addition, it is easier to care for and keep clean, and it does not require a lot of water or effort to arrange it.

As you can see, if you have been wanting to feel like a landscape designer for a long time in order to turn your dacha into a beautiful vacation spot where you can not only work, but also enjoy nature away from the noisy city, you can always create a pond with your own hands at no extra cost.
If you like our ideas, check out the other articles in the series!
Most owners of summer cottages or country houses dream of equipping it with an artificial reservoir, thereby making it more interesting and attractive. But, the arrangement of such a zone requires certain knowledge, where to place it, how to provide water, how to clean it, and so on. Our article is just for those who have more questions than answers.
Artificial reservoir on the site, features
Finished plastic pond tank
Ready reservoir
The finished pond is a plastic form that needs to be dug into the ground or installed on a special frame in your backyard. Let's look at the pros and cons of buying it.
Advantages | disadvantages |
Availability | Limited shapes and sizes |
Durability | The fragility of the form itself |
Ease of installation | Lack of naturalness |
Ease of maintenance |
A more complex option, but the possible forms of such a pond are endless.
It can be either a complex concrete structure, or simply a pit dug in the ground, lined with pebbles or a special butyl rubber film to provide waterproofing.
The advantages of such a device are:
- unlimited choice of shape, depth and size,
- creating the effect of a natural zone,
- a huge selection of ways and methods of decorating.
This method of building a reservoir has its drawbacks. The main drawback is the time, it takes much more than, for example, to dig in a finished plastic mold.
To carry out such work, you need to have experience and the right equipment. Often this option will cost much more, as materials will be needed, plus the masters will take money for the work.
Do-it-yourself artificial pond on the site is real, 7 stages
If you decide to build a pond, you can do it yourself, with little experience in construction, desire and imagination. The whole process can be conditionally divided into seven successive stages.
We perform markup
You can get started by deciding on the size, depth and style of the zone.
We prepare the pit
We dig a pit according to a given markup, taking into account multi-level depth
Having decided on the location of our reservoir, following the tips described above, we begin to dig a pit. To do this, we first clean the area from all unnecessary and markup. You can dig with a shovel, in the process removing stones, roots, someone's treasure, and so on from the ground, so that this soil can be used in the future.
The depth of the pond can be made single-level or several levels. The coastal part is less deep than the central one, creating a cascading effect. There may be several such cascades. We distribute the depth:
- The coastal part is from 10 cm to 40 cm. Plants can be placed here.
- Shallow water - from 40 cm to 100 cm. Deeper plants can be placed here. Lay out the pebbles.
- Deep-water part - from 100 and above. This zone is necessary if fish will live in the pond. It can be laid out with larger stones. The area of such a part should be approximately 30% of the total pond area.
It is desirable to level the coastal part with a level. You can use laser or water. In this case, the water level will be uniform around the entire perimeter.
Choosing a base material
The bottom of the pit must be closed with something, waterproofed from the ground, otherwise the pond will quickly silt up. There are several options for arranging this part, choose the appropriate one:
Pond concreting
concreting, reliable, but expensive and long way. It is not difficult to implement it being a specialist in monolithic works. I choose this option, as a rule, for large reservoirs or pools. Only hardened concrete mortars are used, more details about which can be found here.
plastic mold. This is a fast device method that can significantly shorten the entire process. This form is placed in a pit, the remaining voids are filled with soil or sand.
Mini ponds can be made from improvised materials: an old bathtub, a barrel or even a basin. According to the installation technology, they are identical to the installation of a plastic mold.
Filter installation diagram
Buy a cleaning filter in a specialized store. It can be pressurized and non-pressure, they differ in the way they work, pressure filters more quickly. An effective way to clean, but professional models can cost a lot of money. They can be disguised as sculptures, decorative boats or amphoras. The disadvantage of this method is the increased stress for the inhabitants of the reservoir.
Plants for a water treatment pond. They also purify water, less effectively and for a longer time, but in a natural way. The following will fit:
- blotnotsvetnik (nymphaeum);
- nymphea or water lily;
- vodokras ordinary;
- yellow capsule;
- urut (pinnate);
- eichornia;
- vodokras;
- pondweed;
- hornwort;
- duckweed;
- aponogeton.
It is not difficult to buy all these plants in the store. They will also tell you how to properly plant them and how to care for them. However, many plants will die when the temperature drops, which is simply unavoidable in our climate zone.
Fish in the pond
Launching the fish. If you still decide to do this, you need to choose climate-adapted species. It is better not to experiment and immediately consult a specialist. Keep in mind that the fish will need to be fed, so consider whether you need them.
It is impossible to launch fish immediately after filling the reservoir with water, need to wait some time, 3 to 7 days until the microclimate is formed.
An inverted aquarium in a pond, now the fish are watching us
Making lighting. This is a rather spectacular element of decor, but requires some care, as it involves the use of electricity next to water. It is best to entrust this work to an experienced electrician.
 You can independently put autonomous solar-powered lamps around the pond. Their choice is quite large, they do not require a network connection and installation is very fast.
Nearby you can equip a patio area or a gazebo. Both one and the second option are perfect for enjoying the freshness and beauty of the pond.
Video lessons
Pond Care
Even if you have installed automatic pumping and cleaning pumps, you still need to monitor the pond. Excess plants should be removed, the surface of the water should be cleaned of debris and leaves. Keep an eye on the fish: remove sick individuals or very large ones, for which this reservoir has already become small in size.
Periodically, 1-2 times a year, it is necessary to clean the bottom of the pond with a water vacuum cleaner from silt. This can be done without pumping out water, if the technical features of the apparatus allow and it is convenient to do this from the shore.
I really want to relax after the summer heat and physical labor near a picturesque place. Perhaps the first thing that comes to mind is water. Unfortunately, not all land owners are lucky to have a pond in their country house. Therefore, many summer residents equip a mini pond in the country with their own hands. We will talk about this in this article.
Perhaps at first you will have questions: how to do it? what material? where to place? But believe me, you can build a pond with your own hands. Moreover, we are talking about a small pond in the country - mini copies of reservoirs from 0.5 to 1.5 m3.
Design of the future pond
Thanks to today's technologies, the owner can build a pond of any complexity. For example, there are three possible options for a small pond: wrap a hole in the ground with foil and fill it with water; use a ready-made container that may be right at hand; fill the walls of the recess in the ground with concrete and fill with water.
Option 1
To get started, create a project for the future pond on paper. Consider the width, depth, and sills for planting. Start drawing contours on the ground. This can be done with paint or sand.
 If several tiers are planned in the pond, then mark them out and dig them out one by one
 Purchase a film for your pond with a calculation of +0.5 m on the sides on the sides of the pit bowl. More purchases will be needed: geofabric is a material that is laid on the bottom and walls of the bowl to protect the film from damage. Although you can use something from the bins: unnecessary carpet, old linoleum.
 Geofabric for reservoirs
 You can fix the film with rubble, laying it in trenches dug along the edges of the thresholds. Fill the pond with water gradually, taking breaks. Lay out the shore line with stones and cover the bottom of the pond with small pebbles.
Option 2
First, decide on the shape of the container in which the water will be. Then dig a pit under it, retreating 30 cm from the sides. Tamp the bottom so that it is even. If you have chosen a multi-tiered plastic form, then pour water gradually, and fill the space between the form and the pit bowl with sand.
There are many more options for a small pond in the country. Can be used:
- Unnecessary bath. Mark the area with the dimensions of the bathroom, adding 10 cm on the sides. Dig the pit 20 cm deeper. Under the drain hole of the bathtub, make a drain with stones for draining. Pour crushed stone with sand at the bottom of the pit and tamp it down.
- Taz. We take the path of least resistance and use the most budgetary option, because even a leaky basin can be used by covering the hole with a film. Leave the edges of the basin above the ground. Under the bottom and between the walls of the basin and the pit, lay a layer of a solution of clay and sand. Fill the bottom of the basin with soil to plant the duckweed and bury it, or whatever you choose. Such a pond will be miniature and beautiful.
 Bathroom pond
 And more tires, a barrel, a boat or even an old cabinet! It is convenient that some of these containers can be brought into the house for the winter. Indeed, making a pond with your own hands is not difficult!
How to make a pond from the bathroom (video tutorial)
Option 3
I think many will agree that to build a pond according to the third option, some, at least basic builder skills are needed. But at the same time, do not let this scare you, because any summer resident or owner of a plot in the private sector is already a bit of a builder. And as a reward for your work, you will have an almost eternal piece of paradise in your yard.
Stages of construction of a reservoir in the country (video)
Seriously approach the choice of the location of the pond, because it will be impossible to move it. Now you can start.
If you decide to make a reservoir without thresholds, then this will greatly simplify the task. Dig a pit with slopes at 45 degrees. Tamp the hole and fill it with sand.
Lay a PET or PVC film on the bottom, without pulling it hard. Start pouring concrete from the walls, and then go to the bottom.
Try to do this part of the work in one day to avoid cracks at the joints.
Press in reinforced mesh. Pour the second layer of concrete as soon as the first one dries. Constantly check the level of the horizon. Pour in water when the concrete is completely cured.
 concrete pond
 Before deciding on the option of building a pond, decide which design idea will look particularly organic on your site. If the house, paths and flower beds are designed in a strict style, feel free to break a clear-cut pond. If you like everything natural, then any free form will do.
Decide on a place
How to make all the inhabitants of the pond feel comfortable? If you have a large plot of land, then carefully study the area so as not to make a mistake with the choice. There are several secrets that we will share with you.
- The roots of old trees can interfere with the work, and over time, even the walls of the reservoir. Also, falling leaves and fruits will make you clean your pond often.
- Choose a place with the expectation that the pond will be in the shade for some time so that algae and microorganisms do not develop too actively in it.
- At the same time, the sun is needed for plants along the bank. So you have to look for the best option, given these nuances.
- If your pond is small but deep, then make sure that it is always in sight when children play nearby. And why hide such beauty from the eyes?
- Best of all, the reservoir will look in the hollow. They almost always go down to the lake, river, sea.
 Mini pond for a summer residence
 Consider a possible ecosystem
If you want fish to live in your pond and flowers to bloom, then a few rules from this section will help you.
Plant selection
Decorative flowers in the pond do not suffer from temperature changes and can even tolerate frost (of course, except for the southern varieties of plants that will need to be hidden for the winter). But still, make sure that the water in the pond will be heated by the sun for at least five hours during the day.
The less light, the faster the mini pond in the country will turn into a small swamp. Then it will look completely unattractive, a characteristic smell and flowering will appear.
In nature, an amazing process of self-purification has been launched, and at home, the owner should take care of the cleanliness of the reservoir.
As in a natural pond, plants in a home pond are divided into the following types:
- those that grow on the shore;
- those that grow in a humid zone on the border with water;
- floating on the surface;
- shallow and those that grow at depth.
Although the air humidity will be higher on the shore along the pond than in other places, simple garden plants will be able to take root there. But still, consider that they do not look ridiculous or casual next to other inhabitants of the pond. Begonias, aquilegia, balsam and many other perennial plants that are used to decorate landscapes will harmoniously combine.
A zone with constant humidity, but without stagnant water, is the best place for moisture-loving perennials. Among such stars are meadowsweet (meadowsweet), lysichiton, darmer, iris and many others.
 Irises also successfully get along in shallow water. They compete with susak, pontederia, tail
 A water lily can rightfully be called a deep-sea queen. She copes well with harsh winters. Water lilies are not only beautiful, but also useful. It is they who can create the shadow necessary for the pond. Among other deep-sea beauties, the lotus (although it needs to be dug up for the winter, because in most of the territory of the former USSR the water does not warm up for almost 8 months, as it is necessary for the flowering of such varieties), water paint, oronium, water chestnut and many other bizarre inhabitants of the depths.
Rivals of deep-sea plants are algae, which saturate pond water with oxygen and support the vital activity of other organisms. Among them are the swamp, hornwort, etc.
Animal inhabitants
Insects, microorganisms and protozoa will start up in your pond on their own. You will have to take care of the fish yourself.
 Fish in the pond in the country
 But don't think that you can't get them. In fact, there is nothing supernatural here. Check the depth of your pond - it should be at least 90 cm deep. This is necessary for the fish, because this way they can overwinter. And in summer the water does not warm up too much. Smaller ponds are suitable only for growing ornamental plants.
By the way, in ponds with fish, a third of the surface of the water should be covered with greenery.
Please answer one simple question: what object can transform a summer cottage beyond recognition? Hint: this is not a garden or gazebo.
The answer is simple - this is an artificial decorative pond in the country, made by yourself. The construction of a pool can be problematic: a large area and volumes of water, the construction process is costly and painstaking. Another thing, if you build a small pond in the country. Absolutely anyone can afford such a reservoir. Moreover, the pond in the garden does not require the help of specialists - all work is done alone. Your desire and diligence will help to achieve a good result!
You can build a structure of any shape, decorate it with beautiful swamp plants, run bright Japanese plants inside.
What you should definitely know about ornamental ponds?
Haven't decided on a place for the future pond yet? We recommend doing this first. A little secret: choose it in such a way that the pond in the garden with your own hands is not exposed to direct sunlight for more than 6 hours. Prolonged exposure to the sun promotes the growth of bacteria, the growth of algae - an unpleasant odor appears.
On the other hand, building ponds in the garden next to the trees is also not recommended. Dry branches and leaves will float in the water all the time, trees standing nearby can destroy the structure with their roots.
From the point of view of the oriental art of Feng Shui, decorative ponds are always placed on the south or east side of the site. So water can bring energy benefits. But the area densely planted with fruit trees is better not to use at all. It is desirable that the area of the structure does not occupy more than 3% of the territory.
The next fact that you didn’t know for sure concerns the size of the pond. It turns out that the larger the reservoir, the easier it is to care for it. This is due to the fact that solid volumes of water and area contribute to the creation of a sustainable ecosystem between the animal and plant worlds.
The basis for the reservoir is a ready-made container: a huge cast-iron bath, a reinforced concrete bowl, a film of butyl rubber, polyvinyl chloride. Some craftsmen make a homemade tire pond with their own hands. When there is a ready-made container, construction is simplified. You simply dig a hole, put this container in it. Although it will be problematic to build a large reservoir.
The most convenient and at the same time economical option is a film. In addition, it allows you to adjust the shape and depth. It is better to refrain from using ordinary polyethylene. Due to the short period of operation, it will leak after 2-3 years.
What does the construction process look like?
Now you will see that building with your own hands step by step is an almost elementary task. As evidence, we attach a photo and a detailed description of the construction:
- Bottom preparation. Dig a recess in the ground at least a meter, with an area of 3-4 square meters. m. The pit should be perfectly flat, without any roots and stones, as well as protrusions. You don't want to damage the film that will become the base, right?
- Drainage. Putting the film on is only half the battle. To immediately prevent shrinkage, a layer of sand is placed on the bottom. Of course, you can make a great pond bottom if you fill it with concrete, line it with granite. This is a solid financial investment, so it is better to get by with simpler methods. The geotextile layer perfectly protects against rodents.
To achieve maximum elasticity of the film, laying is best done on a bright, sunny day. Under the influence of high temperature, it stretches much better and easily bends around the ledges of the pit.
- Laying the film and pouring water. The edges of the film are fixed along the coast line. To strengthen the decorative pond, as in the photo, use heavier stones, fill the edges with gravel or ordinary river pebbles. Ready-made plastic containers with landing sites have proven themselves well.
After filling the artificial container with water, do not rush to cut the film. Wait a day for the PVC material to take its final volume.
After that, you can cut the film, and lay the edges in the previously made trench. They are carefully tucked up and covered with rubble. If the width is not enough, you can connect several pieces together using soldering.
- Registration. Much will depend on your imagination. It can be all kinds of figurines on the shore of the pond, beautiful plants, jugs, from which water supposedly flows, and so on. The bottom of the pond is lined with pebbles or gravel, the plants are placed in containers.
- Pond care. Without proper care, artificial reservoirs quickly turn into a swamp. To prevent this from happening, care should be taken to prevent stagnant water. Buy a filtration system or plant plants that can regularly absorb carbon dioxide, saturating the water with oxygen that is useful for life.
Do not be afraid to experiment, actively combining several options at once.
In winter, the water drains, the plants go for wintering in a home aquarium or a natural reservoir located nearby. Plants are best planted immediately in baskets that are placed at the bottom of the pond. As a decor, you can use lilies, capsules, as well as water lilies. You can carry out artificial lighting, additionally install a pump for high-quality water circulation. In the evening, the pond will delight you with beautiful illumination and a pleasant murmur.
Do-it-yourself pond made from a bath
Let's look at the use of a cast iron bath as a base for a pond in more detail. Do not rush to hand it over for scrap or throw it in a landfill. In a private house, it can be used for various purposes, including the creation of a decorative pond.
Make a recess and, filling it with sand, make a cement screed. Thanks to this simple method, groundwater will never be able to erode the structure. The ratio of sand to cement should be approximately 10 cm to 3-4 cm.
After 5-7 days, pour twenty centimeters of gravel and lower the cast-iron bath. The side openings are also filled with gravel. Make sure that the edges of the vessel do not rise above the level of the shore. It will look very, very unnatural. Lay out the pebbles around the perimeter - it is desirable that it be flat.
The bathroom installed on the slope is strengthened with a large stone on one side and made similar to. That's all - you can fill in water and plant plants!
How to take care of an artificially created pond?
Building a reservoir is half the battle. Like any other object on the site, it requires careful and attentive care. Without it, even the most beautiful pond will quickly turn into a dirty, swampy place, it will begin to dry out, emitting an unpleasant smell. To avoid this, experts are ready to give some advice.
In the spring, an artificial reservoir is inspected with their own hands as soon as the ice melts. Usually this is the middle or end of March. You can’t think of a better time - work in the garden and in the garden has not yet begun, you can inspect the pond slowly and very thoroughly. Everything is taken into account, from the appearance to the shores. Have they remained intact, what state is the form in?
Owners of deep waters often leave fish for the winter in the pond. Be sure to check their condition, pay special attention to electric pumps, filters. It will not be superfluous to check the bottom of the reservoir for integrity. If cracks or leaks appear, they need to be repaired as soon as possible, and the fish in the water should be temporarily resettled.
The end of March, the beginning of April is a great time to take care of the plants. Are you 100% satisfied with last year's flora? Then put her back in her original place. Do you want something new? Buy new plants. Do not forget about the nearby flower beds that create a special atmosphere.
Most likely, a lot of leaves will float in the water, which the wind brought back in autumn. In the spring, they are cleaned clean to prevent rotting processes and not to spoil the water. The walls of a small pond are cleaned with an ordinary brush, dirty water is pumped out, and a new one is poured in its place.
During the summer period, the main concerns are related to maintaining the water at the proper level. On too hot days, when moisture evaporates before our eyes, water is pumped in additionally. To saturate the liquid with oxygen, it is recommended to create an artificial shadow and turn on compressors from time to time.
The plants that grow around the pond are trimmed in time, as shown in the photo. Emerging weeds are removed in a timely manner. This also applies to the remnants of food that remains after the meal of the fish. If you do not get it, the quality of the water may deteriorate.
With the onset of the first cold weather, the initial task of the summer resident is to minimize the ingress of debris and leaves into the pond. Plants on the shore are trimmed, the leaves are removed. You can hang a fine net over the pond to keep leaves from falling into the water. Some representatives of the flora can be removed in a warm room until spring. Feeding fish can be increased - it must stock up on nutrients for the winter.
If the pond is shallow and freezes to the very bottom in winter, completely pump out the water, and take the fish to the home aquarium until spring. You can not take fish from a deep reservoir. Make sure that the pond has a polynya to provide living creatures with oxygen.
We also recommend
 Smartphone xperia z5 premium black
 Download toilet paper business plan
 Description Nokia X2 dual sim on the Android platform, powerful processor and support for two sim cards
 Is it possible to open a hostel in an apartment?
 Services to the public: the most promising business ideas
 How to start farming?