Bath in field conditions. Do-it-yourself camping bath: all the subtleties of construction
Everyone knows what a bath is, which cannot be said about such a structure as a camping bath. In this article I will tell you how to make an impromptu steam room in nature at no extra cost. Plus, we will talk about what the modern market offers us, with an overview of all the advantages and disadvantages of specific models, tourist baths and stoves for them.
Homemade steam room in nature
Of course, a mobile bath in a high-quality factory design is a good thing, we will also talk about it, only a little later. But for those who go out into nature once a year and are not going to seriously invest in expensive equipment, simpler solutions are needed, and we will start the conversation with just such options.
Where does it all start
It is no secret that traditional baths come in white and black, a bath in nature is no exception. But before delving into the intricacies of technology, let's first figure out what tools and raw materials we need.
In principle, almost all such structures, whether they are mobile or stationary, are arranged in the same way. In a closed room, a heater stove is installed, which is heated and then these heated stones are poured with water.

You don’t need any specialized tool for building a steam room with your own hands in field conditions; it’s quite possible to get by with a standard tourist kit. That is, you must have an ax, a knife, a supply of rope and a shovel.
To build an impromptu room for our steam room, you need a frame.
There are several options here:
- The easiest way is to go to the nearest forest and chop the young there. You should choose straight poles with a thickness of about 3 - 4 cm and a length of up to 3 m;
- A prefabricated frame from a tourist or, at worst, a market tent is perfect. Iron tubes are certainly a good thing, but they are heavy, so it is better to give preference to aluminum racks here.

Now there are still frames made of carbon fiber and fiberglass, I won’t lie, I personally didn’t test them, but according to experienced tourists, the material is quite worthy of attention.
Naturally, the frame needs to be covered with something, and for these purposes there are also several pretty decent options:
- In the "bins of the Motherland" of almost half of our compatriots, you can find an old canvas tent without a bottom, still of the Soviet type. A canvas tent is a thing that cannot be killed even for an impromptu steam room, it fits perfectly, the only negative is its weight, the tarpaulin is heavier than modern analogues;

- If somehow it didn’t work out with a canvas tent, then you can buy a two-layer technical polyethylene with a thickness of 100 - 200 microns. You can take a roll, but you have to fuss more with it, I recommend buying a whole canvas. Now in stores they sell pieces 6x6m in size, such dimensions are enough for you to build a steam room for 4 - 6 people;
- A friend of mine adapted an old advertising banner for this purpose. Dense polymer fabric is of course a strong thing and you can use such an awning for a steam room more than a dozen times, but the banners are heavy, so this option is more suitable for autotourists.

In no case do not use modern synthetic tents for the construction of a steam room, they burn out from any small spark. Such an awning after the first call can be thrown away.
Choosing a place wisely
When choosing a place, first of all, remember that a camping bath with a stove should be equipped next to a pond. It is not so important whether it is a lake or a river, the main thing is that there is a lot of water, it will not work well to wash from an imported tank.
The second no less important point is firewood, and you will need a lot of firewood. When my friends and I organize a fishing steam room, two people need about 2 hours to collect. Only dead wood should be taken, logs should be 10–15 cm thick. Thick logs will not burn out, and thin logs will not give the desired heat.
By the way, advice for motorists, having a chainsaw in the trunk will significantly speed up the process, plus you won’t have to sweat so much with an ax in your hands.
And finally, it will take a lot of stones to fold the stove for a camping sauna, and the choice should be taken seriously.

- Approximate amount of material 1 bucket of stones per 1 person;
- In addition, you do not need to take all the stones in a row. Only large and medium boulders are suitable for us, preferably rounded;
- Do not take stones with extraneous inclusions and multi-colored stones. Such material, when heated, will almost certainly crumble, or even worse, begin to “shoot”;
- Cracked stones will not suit us either;
- In no case do not try to build a stove for a mobile bath from slate, it is categorically not suitable for these purposes;
- As a result, we are interested in rounded homogeneous boulders, the diameter of which starts from 10 - 15 cm.

I will give you a separate secret of selecting stones from my own experience. I choose stones on a sunny day, preferably in an open area, and I take only hot boulders. If the stone is heated by the sun, it means that it accumulates heat well and fits perfectly under the stove for a camping bath.

We organize a bath on white
For you to understand, a white bath is a fire with hot stones separately, and an impromptu steam room is separate and only at the very end of heating all this is combined.
We start by heating the stones, and while they are heating, we are building a steam room. Although if there are enough people, then you can do everything at the same time. At the same time, the distance from the fire to the steam room is approximately 1.5 - 2 m, so that the heat or sparks do not burn the awning.
The process goes in stages, the first row of the thickest logs is laid on the ground. One layer of stones is poured on it. Lay out another row of logs on top and cover with a row of stones. Thus, you should get a "sandwich" of 3 - 4 layers of stones, after which the fire is kindled.

As the firewood burns out, you gradually add rows of stones and cover them with dry firewood. This continues until all the stones are in the fire. Then they need to be brought to the desired temperature, it takes an average of 2 to 3 hours, so the fire should burn all this time.
It is best to organize this action in the afternoon, so by the time it comes to the procedures themselves, twilight will come, and at twilight you can clearly see the moment when the stones turn red from the heat.
By the time the stones are finally warmed up, you should have a steam room ready. It’s easier, of course, to build a hut like an Indian wigwam. But it is bad because the heat will collect in the upper cone, and miserable crumbs will remain on the lower tier, where people actually soar.

My friends and I always collect a cube, fuss with it more, but the effect is much better. Although in principle there is nothing complicated. You dig in 4 support posts, make a strapping from above and tie diagonals on the walls for stability. On the ceiling, the diagonals should be crossed.
So that the polyethylene does not break through the sharp corners of the home-made frame, they should be wrapped in advance with some rags. Plus, you need to dig a small pit for laying stones in the farthest corner of the steam room from the entrance and dig a gutter from this pit to the fire.
Now a couple of people are arming themselves with strong sticks, scooping heated stones out of the fire and pushing them along the chute into the steam room, unloading them into one common pile in the pit.

Some tourists do otherwise, they build a frame, drag stones there, and only after that they quickly cover the frame with an awning. The method is acceptable, but in my opinion erroneous, too much heat goes to the wind.
My friends and I do this:
- The awning is calmly and carefully covered in advance and lined with stones around the perimeter for tightness;
- When it comes time to move stones into it, 2 people push these stones to the entrance to the steam room, while the third person, being inside the steam room, quickly picks up the stones on a shovel and stores them in the right place;
- For everything about everything, it takes no more than 10 - 15 minutes, and most importantly, all the heat remains inside the steam room.
Some of the stones may crumble from the heat, so you should not rake these fragments out of the fire, they will not make the weather. Plus, at the end of the moving process, the gutter should be poured abundantly with water, small coals will definitely remain in it, which can be burned.

Bath in black
A black sauna is a profitable option from the point of view of heating the steam room, but at the same time this option is more smoky and, if I may say so, more dirty. It can be organized in two ways.
The easiest and least expensive way is to set the largest boulder available in the center, and lay all the other stones around the perimeter and on top in the form of a pyramid.
Then you dump all the firewood that you have on this pile of stones, set it on fire and wait for the fire to burn out. When the fire begins to die out, you start building a frame for the steam room around this pyramid, but do not immediately cover it.

The main thing here is not to miss the moment of the highest heating of the stones. When you decide that this moment has come, take a broom from freshly cut branches and sweep the remaining coals away from the frame. And inside the frame itself, you pour water on the ground and lay tree branches; coniferous spruce branches are well suited for these purposes.
Now the main thing is to quickly wrap the frame with an awning and press it around the perimeter with stones. By the way, that is why I recommended buying a single wide piece of polyethylene, it is easiest for them to do this.
If you have a prefabricated frame, then you can immediately cover it with an awning and put it aside. When the time comes, a couple of strong men can easily lift this structure and cover it with a pyramid of hot stones.

The second method, in my opinion, is more effective, but at the same time it takes more time. Here, initially, a square furnace of large stones is built at the base and a pyramid of smaller stones is built above it.
Further, this impromptu stove for a camping bath is melted and maintained in an active state for about 4-6 hours. Since the dimensions of the firebox itself are often small, a person must constantly be on duty near it in order to throw a fresh portion of firewood into the fire.

But this method is good because when things are approaching the end, you can build a frame right around the stove and even partially cover it. The fire is concentrated in one place and here, with a few strokes of a shovel, you will completely remove the coals from the furnace.
Moreover, coals can not be raked out at all, just fill them with plenty of water. Then quickly close the tent and enjoy the bath procedures. By the way, if the roof is made with a hatch or completely removable, then such an oven can be melted several times.
In order not to constantly look for large stones for the construction of the firebox, one of my comrades immediately welded a cube from a corner of 35 mm, with dimensions of about half a meter, he installs it in the base of the firebox and covers it with stones, simply and conveniently.

Features of homemade designs
- In any case, a certain number of stones will crack and crumble, and so, in order to minimize this percentage, first collect the stones, and then make a fire. No need to take a stone from the river and throw it into the fire, believe me it's dangerous;
- Of course, stones rarely crack after a temperature rise, but in order not to risk it again, you do not need to pour cold water on them. You have enough time, put a bucket of water on the fire in advance, boil it and pour boiling water over the stones;
- Despite the great heat from the fire, the ground near the reservoir is always cool and so that this dissonance does not prevent you from steaming, immediately prepare heat-insulating rugs and sit on them;

- Do not expect much from the first entry, on the first entry the person and the steam room warm up, real relaxation occurs only on the second entry;
- Experienced bath lovers know that steam is a kind of temperature indicator. When the stones are well heated, the steam from them is translucent, it quickly rises up and disappears there. If you poured water on the stones and the steam room filled with thick fog, this indicates that this entry was extreme.
Choosing a serial model of a mobile bath
Of course, a bath in nature, assembled with your own hands from improvised means, is filled with special romance, but its construction takes a lot of time and effort. Therefore, a serial camping sauna with a stove is now more popular, plus you can also cook dinner on such a stove.

Here you can go in two ways - buy a tent separately and pick up a stove for it or order everything in the complex. Each of these options has its pros and cons.
We buy everything separately
First, let's talk about the most popular models of stoves, 2 marching designs "Pashekhonka" and "Bereg" are in the lead here. Both of them are assembled from stainless steel sheets and function perfectly, but there are still differences.
The Pashekhonka oven has standard dimensions of 300x300x500 mm, it is equipped with four removable metal legs. A box for stones is not provided here at all; instead, two stainless steel metal screens are hung from both sides of the furnace.

In addition, the stove for the Pashekhonka mobile bath is equipped with a one and a half meter chimney with two removable knees. With their help, the chimney is easier to adapt to a specific awning, plus the smoke output can be adjusted in a certain direction.
The relative disadvantage of the Pashekhonka stove is the lack of a grid for stones. But if this is really important for you, then stones can be poured onto the upper plane, their temperature, of course, will not be the same, but there is a certain charm in this.
The stove for a camping bath "Coast" is a more capital structure. The so-called convection casing is equipped around the perimeter of this furnace, into which, if desired, about 25 kg of stones can be loaded. This design improvement significantly improves heat transfer, but it is not the only one.

The oven doors are equipped with a special glass, the instruction says that with the help of this device it is possible to regulate both the temperature inside the furnace and the general temperature in the steam room.
Like the previous model, "Bereg" is equipped with a collapsible chimney, only here the kit does not include knees for it. Manufacturers also equipped this design with a spark and a flame arrester, which, according to them, save from overheating.
As for the tents, there are also 2 leaders here. The Mobiba trademark is more widely known in the domestic market, but I will devote a separate chapter to it. Right behind it in the popularity rating is a bath awning from the Nova Tour company.

The thin and light bath tent from Nova Tour is designed for 4 people, when folded it fits easily into a backpack and weighs only 2.5 kg. A big plus is the presence of several windows, and most importantly, the price for this tent fluctuates around 4 thousand rubles, while Mobiba will cost much more.
In fact, the only disadvantage of the Nova Tour sauna tent is that the frame is not included in the kit, it will have to be bought separately or built from improvised means.
Popular models from the brand "Mobiba"
A mobile bath in nature is not always bought purely for tourist purposes. Hunters, geologists and even summer residents are also interested in this product, because at the stage of building a capital mansion, you need to wash somewhere.
Therefore, before you start choosing, answer yourself a few questions:

- You only need a sauna or you are going to use an awning for living. If the first, then should there be a vestibule in the bath?
- Will the structure be operated only in the summer or is it a year-round option?
- Will the awning be assembled occasionally at the exits or installed for a long time in a semi-stationary way?
- Again, what is the maximum capacity of the structure?
Now let's go through all these issues more specifically:
- If you are interested in a two-in-one design, that is, a tent and a bathhouse, then among single-layer awnings, MB-104 or MB-103 are suitable for this purpose. Among the two-layer options, MB-552, MB-442 and MB-332 are more suitable for you. In all these models, the partition is made detachable;

- But MB-12, MB-5 and MB-1T are purely baths, the partition in them does not come unfastened. But keep in mind, the MB-5 model does not have a vestibule at all, so it is considered the lightest and most mobile;
- For year-round use and a terrible winter cold, the MB-552, MB-442 and MB-332 models are suitable. In addition to a two-layer protected awning, they are equipped with a reinforced frame made of light tubes with a cross section of 16 mm;
As for the number of layers, this is the case. According to manufacturers, a single-layer awning can be used at temperatures up to -20ºС, it is considered demi-season. The winter two-layer version withstands frosts down to -40ºС.

- There are 2 types of frames, they practically do not differ in design and assembly principle, the difference lies only in the cross section of the tubes. Light frames are made from tubes with a section of 13 mm, and capital ones from a section of 16 mm. All tubes are made of D16T aviation alloy;
- But do not think that lightweight frames are excessively flimsy, they are stronger than most of the frames of ordinary tourist tents, only these frames are not advisable to be left unattended for a long time, they are designed to be assembled in a "couple of days". While a heavy frame can be installed for the whole season;
- As for specific models, MB-104, MB-103, MB-12 and MB-5 come with light frames. But the models MB-552, MB-442, MB-1E and MB-332 are equipped with powerful frames made of a 16 mm tube, but these frames weigh much more;

- Almost all models are produced with different dimensions. The capacity of the tent ranges from 2 to 10 people, so this is often not a problem;
- The mobile bath is without fail completed with the furnace, 2 models "Optima" and "Medina" are presented here. If we compare their characteristics with the above-mentioned furnaces, then "Optima" corresponds to the "Pashekhonka" furnace, and "Medina" is closer to the "Bereg" furnace, the differences there are insignificant;
- By default, all single-layer models MB-12, MB-5 and others are equipped with Optima. Of the two-layer awnings, Optima is installed only in MB-552, the rest all come with Medina. Although the manufacturer can change the package at your request, this is usually not a problem, only the price will change.

Conclusion
A camp bath on a "wild" vacation, fishing or hunting, is an irreplaceable thing. I tried to provide comprehensive information, both on homemade and factory options, now it's up to you. In the photo and video in this article, you can clearly see the process of arranging such structures. If you have any questions, write them in the comments, I will try to help.

A do-it-yourself camping bath is one of the easiest options to perform. Having built a small sauna-tent, you can take a steam bath while hunting or fishing, as well as on a hike. If desired, such a structure can be built even on a suburban area, if the traditional version is still at the design or construction stage.
 Do-it-yourself camping bath - photo
There are many manufacturing options. You can purchase a ready-made portable tent - in whole or in parts (oven, awning, frame).
 Mobile bath
  Mobile portable bath Mobiba
  Mobile bath Mobiba
There is an alternative option - to make a bath from a tourist tent, but exclusively of the Soviet type, that is, made of tarpaulin. This is explained by the fact that modern tents are made from fabrics that are not only not designed for high temperatures, but are also capable of releasing harmful substances when heated. As for the old canvas models, they are quite suitable for this: there are no harmful fumes and the thermal insulation is good.

If we talk about creating a camping bath from scratch, then this will require a frame, heat-insulating material and a stove.
| Design features of a camping bath | Description |
|---|---|
| It is better to make it from aluminum racks (for example, from a stall), since this material is safer than wood. In the absence of such, supports can be made from young trees, in which case you will have to carefully monitor that the wood does not ignite. To fix the frame elements, you can use both a rope and a soft wire. |
| The simplest option is a dense polyethylene film, but due to its disadvantages - low thermal insulation qualities and density - it is preferable to use a tarpaulin. It is important that it be a large and solid piece of material. The dimensions of the covering material depend on how many people will steam at the same time, but if it is no more than four or five people, then a piece of 6x6 m will be enough. |
| Here the choice is also quite wide: you can put a factory stove-heater, you can make it yourself in the form of a mesh metal box made of metal rods or thick wire, or you can simply fold a well of rounded stones and overlay it with firewood. |


Note! A camping bath can be made “in white” (that is, the heater is built separately, and hot stones are transferred to the tent) or “in black” (the stove is set up directly in the steam room). Let's take a look at each option today.
Important conditions
A camping bath can only be crafted under certain conditions. The resting place must meet the requirements below.
| A photo | Conditions | Description |
|---|---|---|
| First of all, there must be water. | The ideal option is to choose a place on the banks of a river or other body of water. |
| Still there must be stones. | Do not use layered cobblestones, because when heated, they can shatter into pieces, causing serious injury to soaring. The stones should not be too small or too large, the optimal size is 100-120 mm, the shape is somewhat elongated. If the stones are smaller, they will not be able to accumulate the required amount of heat and will cool down very quickly; large specimens will heat up for a very long time. Although, if you have time, you can build a kind of foundation for a future fire from large stones. If there are no boulders, then it is quite possible to use pebbles. As for quantity, for each person who will bathe, 1 bucket of stones will be required. Therefore, each participant is obliged to collect a bucket of boulders for himself. |
| Near the resting place there should be thin young trees (or even better, dead wood) that will be used to build the frame (if the aluminum posts were not prepared in advance). | From these trees, you need to make poles with a diameter of about 30-40 mm, you should also think in advance how to attach them. |
| Firewood will be required for a fire, and in large quantities, because it will burn for at least 3-4 hours. | Logs that are too thick are not suitable for this, as they do not burn well. The maximum diameter of firewood should be 100-150 mm - so they quickly burn out and transfer all the heat to the stones. |


Making a camping bath "in white"
First, the simplest option will be considered, for which only adhesive tape and film (possibly clothespins) are required from special materials. We are talking about a white-bath-tent here, that is, the stove will be located separately from the steam room.

We start with the manufacture of a camping bathhouse.
Stage one. Frame manufacturing
There are several ways to make a frame, consider them.
Method number 1 (suitable only for a "white" bath)
For work you will need:
- axe;
- film, 10-15 m; you can use the thinnest film - it will cost less, and it weighs less, experience shows that the film is almost never used more than once anyway;
- wide tape (1 skein);
- stationery clothespins (20 pieces, they can be replaced with the same adhesive tape).
After preparing everything you need, we proceed to create the frame.
Step 1. First, we prepare 8 poles with a length of at least 100 cm (more is possible, but warming up the steam room will take longer). From the poles we build a parallelepiped or a cube, depending on the number of people who will bathe. If there are a lot of people, then it is preferable to bathe in four people - this is the best option.

We connect the poles with tape. A lot of adhesive tape will be required - it is intended not only for fastening, but also for protecting the film from the sharp ends of the frame.

Step 2 Having finished with the frame, we build a place for stones on the side, using 3 more poles 300 mm or 500 mm long each.
The result should be something similar to the design shown in the image below. The base of the stove is lined with stones.
It is worth noting that much here is optional. So, the design of the frame can be significantly simplified and made in the form of a wigwam. The frame in this case will consist of 3 poles connected at an angle.

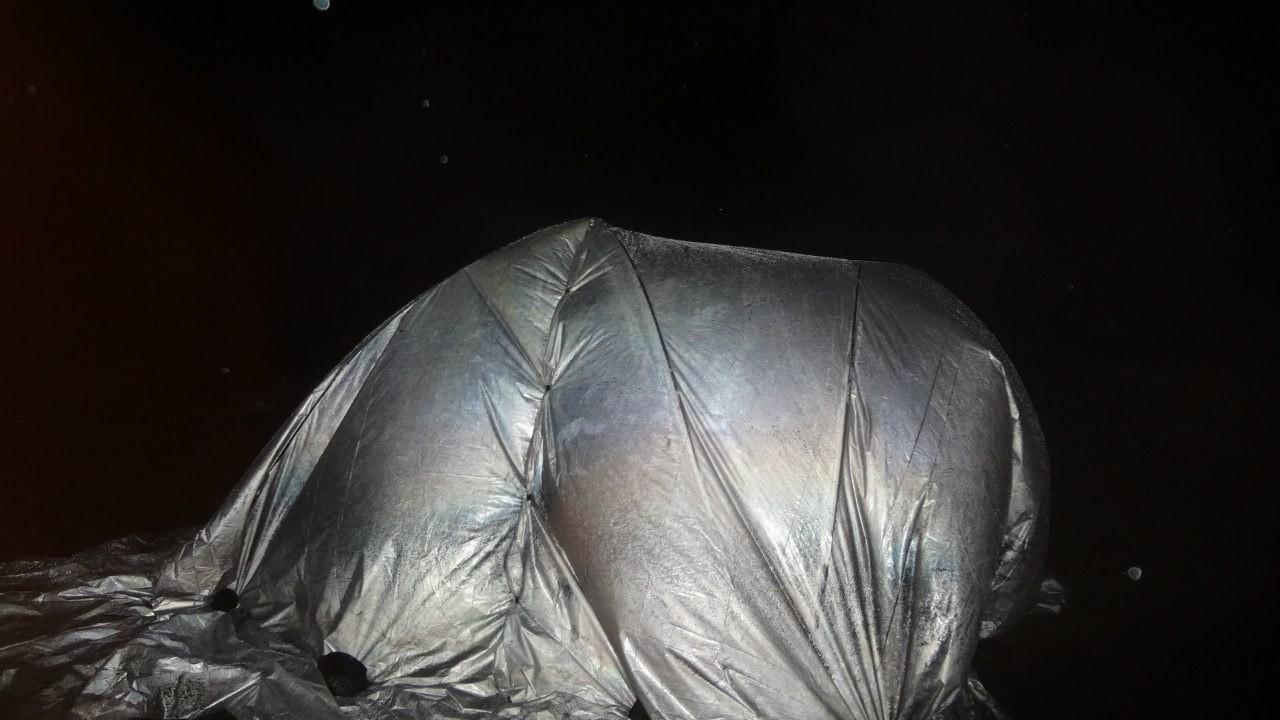
Step 3 Next, the frame must be covered with a film. The width of a standard film sleeve is 1.5 m. We cut it and get 10 m or 15 m of a film 3 m wide. We wrap the finished frame with a film, we do this very carefully so that sharp ends or knots do not pierce it.
Note! The dimensions of the frame can be made such that the width of the covering material (3 m) is enough not only for the walls, but also for the roof. In this case, the tightening procedure will be noticeably simplified, there will be no need to cut the film and make additional seams.
There will be no problems at all with fitting a wigwam.

 Tree trunks were used as racks. The film is fixed between them
  Variant of a camping bath in the form of a hut
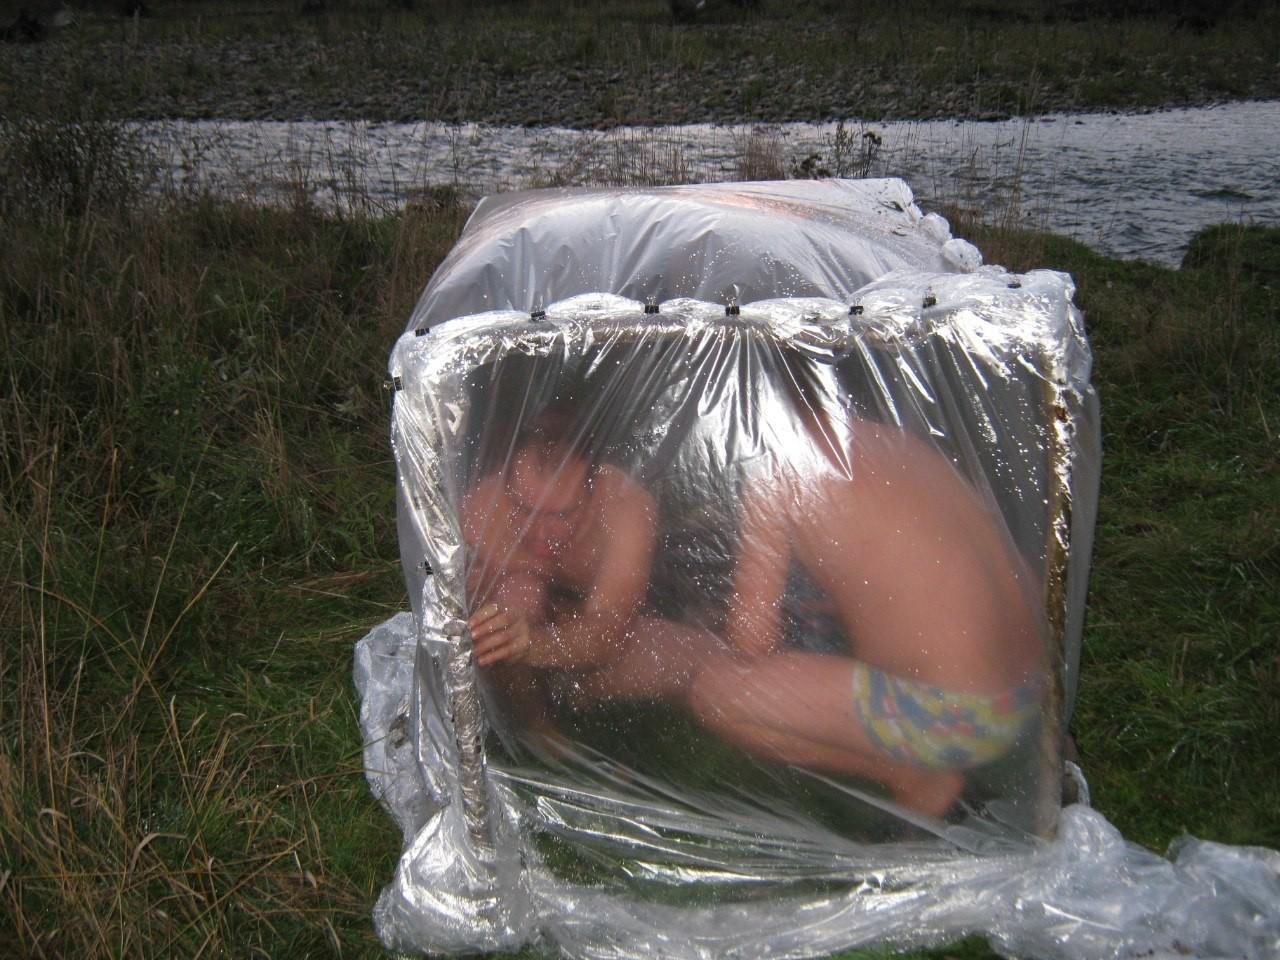
  Bath from the inside
Step 4 We fasten the film to the frame using clothespins or ordinary tape.

Step 5 On the entrance side, we leave enough film for the “door”. The entrance must be securely closed so that the steam from the tent does not come out. This can be done in one of two ways:
- fasten the film with clothespins from the inside;
- leave a person at the entrance who will hold the “door”.

Almost finished bath
Step 6 Using heavy stones, we press the film to the ground along the perimeter.

Step 7 To cover the floor, you can use spruce branches, which not only smells good, but is also good for health. You can sit directly on the spruce branches, although there are other options: lay a small tourist rug, bring folding chairs or hemp.
Film prices
film roll
Method number 2 (can be used for a black bath)
We use improvised materials - for example, four willow branches 1.4-1.5 m long. Using adhesive tape, we tie two branches in length and set them crosswise. Of course, you can try to find a couple of long branches to cross them, but it will be quite difficult to find ones that would be the right size. You can also build a square structure, as described above, but this will require more time and effort.


If the bath is large, and the standard 3 m width is not enough for this, you can connect two pieces together using stationery clothespins.


Method number 3 (can be used for a black bath)
A prefabricated frame can be welded from profile pipes. It only takes a few minutes to assemble it at the resting place. The image below shows that for the manufacture of such a frame, metal tubes 60-70 cm long were used (a total of 16 pieces will be required).
Table. Elements for connecting the frame
For this, pipes of a larger diameter were used.
The heat-insulating material in this case is an awning, pre-sewn in accordance with the dimensions of the structure.

 Awning, sewn to the size of the frame
Method number 4 (can be used for a black bath)
An easier way is as follows: you need to purchase an ordinary double tent, cut off the tarpaulin, and use the tent arches as a frame.
Often, tents are set up entirely, but for the reasons described at the beginning of the article (unpleasant smell, possible release of toxic substances), it is still better to use a film.


Having finished with the frame, we proceed to the manufacture of the stove.
Stage two. Stove
To create a stove you will need:
- river stones of the above sizes, about 25 pieces (you can not from the river, but from the shore);
- sapper shovel or slingshot from branches (for transferring cobblestones to the steam room);
- firewood.
Note! Once again, we remind you that fragile stones (such as sandstone) should not be used, because at high temperatures they can crack.
Step 1. From the collected stones we build a well about 10 m from the bath. It is important that the well is stable, so it is better to take flat stones for it. It may not work the first time, so be patient.


Step 2 After that, we cover the stones with firewood so as to completely hide them. We burn wood.

By the way, the film on the frame can be additionally covered with the same spruce branches or branches (as shown in the images below) so that the steam room retains heat longer.

Step 3 While the stones are warming up, we prepare a sapper shovel or slingshot. In order for the stones to heat up to the required temperature, it will take about 1 hour. Throughout this time, the firewood should burn intensively. After heating, the stones are transferred to the bath.


Note! It is advisable to carry the stones together, so as not to let them cool down. Also, inside the tent, you should put a few plastic bottles with warm water in advance, which will be poured over hot cobblestones.

Camp stove prices
camp stove
Video - Portable bath
The main difference of this option is that the heated stones will not need to be transferred from the fire to the steam room. A large frame in this case will be placed directly on top of the red-hot cobblestones after cleaning the coals. The manufacturing procedure begins with the construction of the furnace.

Stage one. Bake
There are two options here, let's get acquainted with each of them.
Option number 1
We add a bunch of stones and make a hole in it for loading firewood (in the image, the hole is on the reverse side - where the smoke comes from). Stones will be required much more than for a white bath, but neither the shape nor the size play a special role.
It is worth noting that this option is rather complicated in execution, so you should be prepared for the fact that the heap will constantly collapse.

Option number 2
Using a welding machine, we pre-make a small frame (40-50 cm high, similar width) from reinforcement bars with a diameter of 5 mm or more. Already in place, the finished frame is covered with stones. The main advantage of this design is that the stones will rest on the frame, so they will not fall apart. At the same time, they will take more time to heat up than in the variant described above.


Note! In addition to its direct purpose, such a frame can serve as a kitchen stove, and if you put a sheet of plywood on top, then also as a table.


Option number 3
Here, on a pre-selected site, it is necessary to lay out the foundation of the heater with sides of 100 cm, after digging a small hole under it with a depth of 50-60 cm. -30 cm.


We install stone slabs on top of the boulders in such a way that there is a small through hole in the center of the structure, through which the fire will reach the top of the heater. At the end, we lay another plate (it can even be a mesh or a sheet of thick metal), which will close the central hole.
Having finished the construction of the furnace, we load firewood and set it on fire. Stones, as noted above, will warm up for a long time. We maintain an intense fire all this time, periodically we put firewood. While the cobblestones are heating up, we proceed to the construction of the frame.
Stage two. frame
We make the frame in one of the possible ways (in the images below - a design of 4 poles). When the stones are heated to the required temperature, remove the coals and cover the frame with a film. Along the perimeter we press down the film with large cobblestones, if possible we cover the floor with spruce branches. Everything, you can proceed directly to the bath procedures!
For comparison: how much does a factory bath-tent cost?
Today, camping baths are produced by both Russian and foreign companies. The price of the finished model ranges from 25,000-30,000 rubles. (the set consists of a heater, a hood and a thermal tent). The amount is considerable, but you can save money: build a frame with your own hands and buy only a small metal heater. In this case, the costs will be about 9000-10000 rubles.

Tips for using a camping bath
- Despite the fact that the manufacture of such a bath requires a lot of time, it will still not work for a long time to bathe in it, because the stones will cool down quickly, especially if they are watered.
- Stones with visible defects at high temperatures can shoot off small pieces, so you need to stay as far away from the furnace as possible. It is worth knowing that after watering the stones with water, the risk of cracking is minimized.
- The stove must be installed in the opposite part of the tent from the entrance - it will be safer to leave / enter.
- The main disadvantage of the bath-tent is the low temperature near the ground. Therefore, you need to put something under your feet, otherwise you can catch a cold.
Video - Instructions for making a camping bath
If you intend to go out into nature on the weekend, or another day, and at the same time think about the bathhouse and think about canceling the trip to the bathhouse, then the answer is obvious. Take the sauna with you or build a new one there. After all, a trip to nature and a trip to the bath can be combined and made one whole. We are talking about a bath in field conditions, which you can build with your own hands.
Tarpaulin camping bath
Is it possible to buy a camping bath?
For beginners in this matter, it is necessary to know in detail what needs to be available during the construction of this structure, so that, in the end, the planned event with washing and a steam room still happens. If a trip to nature is planned by personal transport, then it is better if the racks for the frame of the camping bath are already available. Also, if you want to avoid unnecessary work, but, nevertheless, if you need a camping bath, buying such a design today is not a big deal. You can buy a camping bath as a whole, you can buy - by its constituent elements: only a stove, only a frame, only an awning. In short, it’s more economical to buy what you most don’t want to invent and do with your own hands. The purchased bathhouse looks, of course, more aesthetically pleasing, so it is best to purchase it for a country house or cottage, if there is no stationary bathhouse there yet, but you really want to wash yourself, and even more so, take a steam bath. The principle of such baths, no matter what design they are, is the same - hot stones are poured with water or herbal decoctions.
What you need to make a bath on a hike
For those who are planning a hike on foot, of course, it is more reasonable to build a bathhouse right at the place of rest. Still, there are some things you need to take with you. But in order to fulfill the plan, you need to know whether everything that is missing will be in this place. Indeed, in order for a camping bath to turn from an imaginary object into something real, certain conditions are necessary. At the place of halt it is obligatory and necessary:
- Availability of water. Without water, in fact, it will be very difficult to wash. It can be the coast of a river, the coast of a sea or a lake.
- The presence of stones. Steam when splashing on stones - without it, a bath in field conditions will turn into a simple dousing with water. Well, if this is the coast, there will certainly be stones. It is worth choosing them carefully. It is better to take homogeneous round large boulders, the fact is that different components of the stone can react differently to temperature differences and, as a result, when heated, the stones will crack and scatter into small components. In the absence of boulders, you can get by with pebbles. You need a lot of stones, approximately 1 bucket - for 1 wash. In short, each participant in the bathing procedure must collect a bucket of stones for himself.
- The presence of young thin trees for the construction of the frame. You can also stock up on racks in advance. These can be simple aluminum racks from stalls. They are quickly and easily assembled and disassembled, easy to transport. Some hikers use carbon fiber racks, they are also safe. If these are not available, young trees will have to be cut down. In diameter, the finished poles should turn out to be about 3-4 cm. But here it must be borne in mind that wooden racks will be disturbed within the framework of safety, and you will always have to think about this. About the way they are fastened together, you also need to think. Moreover, each campaign will need to invent new poles. Therefore, regular lovers of camping baths take collapsible racks on a hike. This allows you not to think about fire safety, and also saves construction time.
- Availability of firewood. Firewood will also need a lot, on the basis that they burn for at least 2-3 hours. No need to choose too thick logs. They burn poorly and do not save time from this at all. The size of the firewood should be a maximum of 10-15 cm, then they will have time to burn out and give up all their heat.
But with what to cover the constructed frame, you need to think in advance. Covering material must be taken with you, since, unfortunately, nothing suitable can be found in nature. There are also many options here, you can buy something, maybe there is something on the farm. The easiest option is a square piece of polyethylene measuring 6 by 6 meters. You can also use an awning from an old tent, the bottom of which, of course, needs to be removed, or a piece of tarpaulin of a similar size.
The construction of the stove: the first option
When all of the above is already available, the main question remains, how to put it all together so that it works, in other words, how to make a camping bath? First things first, you need to take care of the fire, since it will burn for at least three hours, so you can do the frame later. Well, if a lot of people gathered on the campaign, and everyone wants to wash, let them participate in the work. Then all the work can be done in parallel: some collect stones, others build a frame, others deal with an awning, fourth ones chop wood, and the most responsible one, of course, manages the whole process. The stove in our case will be like a layer cake. A layer of stones is piled on a layer of firewood, which are also covered with a layer of firewood. Now you need to build a fire and when it flares up, put another layer of stones. This procedure with layers must be repeated until the stones run out. Within 2-3 hours it is necessary to maintain a good heat, the stones should be red-hot, in the dark it is more noticeable.
Frame construction
It is necessary to make the frame strong and not far from the fire (two meters) and water. The neighborhood with water provides fast and uninterrupted water supply, and if desired, it will replace the presence of a pool. And the fire must be at a safe distance, and at the same time we must remember that there will still have to be transported stones. It may happen that they have time to cool down before they get to the steam room. For stones, by the way, on the territory of the frame, you need to dig a pit, and stones will be collected in it when they heat up to the desired condition. If the frame is made of poles, they can be connected using the example of a hut or a cube. The joints can be tied with a rope, wrapped with tape or electrical tape (all this should be prudently taken with you). After assembly, the ends of the poles must be "packed" in soft material so that they do not pierce the film. If there are racks for the frame, its construction will not take much time. We insert the racks into each other, according to the design technology, and the frame is ready for use.

Insulated camping bath
Installation of covering material
If the stones have already warmed up to the desired condition, it's time to move them into the frame, into a hole specially dug for them. The stones are moved as best they can, who rolls, who drags with a shovel, the main thing is to do it quickly. Strongly crumbled ones should not be taken. When all the stones are already in place, it is necessary, for fire safety purposes, to pour water over the places where the fire (or stones) come into contact with the ground. Now you need to hoist the awning on the frame. This must be done carefully, without touching hot stones. Outside, you need to leave the “skirt”, spreading out on it everything heavy that is at hand: stones (cold), logs and the like, so that as little heat as possible comes out. It is better to make the entrance in the opposite direction from the stones, but directly - to the water, there, after the parks, you can dive and rinse. To check whether everything is ready for the park, you can splash water on the stones, if the steam rises up in a hot wave, then the bath is ready for the steam room, if the steam has filled the structure with thick fog, this means that the stones have cooled down and you won’t be able to take a steam bath anymore.

Kamenka for a camping bath
The construction of the stove: the second option
There is another option for the design of the stove. A camping bath, in this case, will resemble a Russian bath "in black". Such a bath, of course, is more smoky, but also hotter. The stove for such a camping bath needs to be built in a slightly different way, and the essence will be the same, but the forms will be different. The first attempt - a huge stone is placed in the middle of the proposed stove - a boulder, around it are poured, all the other stones are superimposed. All firewood is piled on this pyramid at once, so that no more firewood is added. When the whole fire has burned down - the bath is ready. The second attempt is to make a structure out of stones in the shape of the letter “P”, and lay firewood in the middle. It will take 5-6 hours to heat such a stove, the bath is ready. The third attempt is to make (in advance) a non-combustible stone box and hoist it over the fire. And this bath is ready.

Construction and installation of the stove
Installation of an awning
The "black" sauna option is convenient for those who do not like playing golf, with rolling stones in one hole. Here, on the contrary, a frame with an awning is installed above the place where the stones are heated. But first you need to remove all unburned logs and cracked fragments of stones from the fire, pour water around the fire. It is necessary to equip places for a steam room, spreading around the stones, for example, a layer of needles. The entrance to the bath can be done in the same way as the previous version - opposite from the stones, next to the water. Well, the issue of safety, in this version of the camping bath, must be approached most carefully. If everything is ready - you can bathe.

Camping bath - transformer
So, the options have been exhausted. Of course, they all have a chance to exist. Which one is better to choose, practice will help. One thing is indisputable - after a day spent in nature, a steam room in a bath is its best completion. You can feel it only when you experience all the splendor of this procedure for yourself. It is better to try and not regret than not to try and regret the missed chance all the time left until the next trip!
A trip to nature is planned for the weekend and the usual next trip to the bathhouse will have to be canceled!? And completely optional. You can make a camping bath your own
Tourist bath - an easy way to relieve stress in field conditions
At the mention of rest, almost everyone has an association with rest in comfortable conditions, contributing to the maximum relaxation of the body and its purification from toxins. Meanwhile, a do-it-yourself tourist bath or a ready-made mobile version has long been in the everyday life of travel lovers. Such a steam room is not at all like a traditional one, but it has the same healing effect and is able to relieve tension after a hard day.
Many do not like trips for unsanitary conditions - without hot water it is difficult to wash well, but a camp bath allows you to relax clean and rested. In addition, when you live in the country for several days or even weeks, the issue of cleanliness also becomes acute, in which case an impromptu bath will come in handy.

Any tourist will be happy to visit a steam room away from civilization
Do-it-yourself bath option
If you are traveling on foot, then it is quite difficult to carry a ready-made mobile bath with you, so you have to make do with improvised means.
In doing so, remember the following facts:
- The cheapest covering material is polyethylene, you should purchase a piece sufficient to securely cover the frame of the bath.
- A tarpaulin is more durable and holds heat better, so you can either sew a custom-sized canopy or use an old tent.
- In trade, there are ready-made options for mobile baths, which are a tent without a frame. This option is quite attractive - you only need to build a frame of the right size from improvised means, after which a tent is put on it. The price of this option is quite democratic, in a twisted form the canopy takes up little space and weighs very little.
- At the place of construction of the tourist bath there should be enough material for the construction of the frame, firewood to maintain the fire in the heater and stones for the construction of the hearth.
- Stones for the hearth should be round in shape and have a diameter of 20 cm or more. They should not have a layered structure, as this is fraught with the fact that the stone will explode during the heating process.

Tarpaulins are much more durable than film, and they retain heat better.
Bath device steps
Heating and building a bath takes some time, but if you work in parallel with the work on arranging the camp, you can save a lot of time.
So, the simplest instruction for the construction of a tourist bath:
- At the location of the stove, the turf is removed, after which the bottom is lined with stones, and a hearth is arranged on top, inside which a fire is immediately kindled. The fire must be maintained until the stones reach a temperature sufficient for bathing procedures (the stones most often turn white or redden).
- When the fire is burning, you can start building a frame, which is best made of wood and connected with pieces of rope, since it does not heat up like a wire from high temperature.

In the photo - the frame can be of any shape and size: it all depends on the number of steamers, the size of the canopy and the number of stones
- After that, a canopy made of a film or other material is put on the frame, while one wall or ceiling remains open to remove smoke. When the stove reaches the desired temperature, the tent is hermetically sealed, it is better to dig a groove around the perimeter, put the edge of the material into it and fill it with earth, this will significantly reduce heat loss.
- Quite a large amount of heat is lost through the floor in a camping bath. It must be carefully laid with coniferous spruce branches, and branches of deciduous trees should be laid on top - this will keep the heat.
- After heating the stones, a bucket of water is placed on the hearth, when the time comes to steam, the stones will be poured on it.
Advice: it is better to put a bath next to a pond - after a steam room it is especially pleasant to plunge into cool water.

Camping bath on the shore - a great solution
Disadvantages of this type
The main disadvantages are the following factors:
- Long heating time of the stove and the need to collect stones every time the bath is built.
- The complexity of harvesting wood for the frame and its construction.
- The fragility of the polyethylene film and low heat retention, as a result of which the bath cools down much faster.

If you have little covering material, you can build a bathhouse even in a dugout
Ready-made mobile baths - specifics of use
Many lovers of steam rooms purchase ready-made tourist baths, which are used in field conditions.
There are several main types of mobile baths:
- Tents without a frame, such systems weigh very little and are convenient for hiking.
- Tents with a frame weigh more, but also provide a quick and convenient erection of the structure. All racks are made of lightweight and durable materials.
- Mobile tents with stove stove. A full-fledged option that does not require anything other than firewood, and even those you can carry with you. The temperature is dialed quickly enough, which increases ease of use. However, even the most compact stove weighs quite a lot and is difficult to carry with you, this option is ideal for summer cottages and car trips.
Important: when choosing a ready-made tent, it is worth considering the approximate number of people who will rest in it.

The finished bath is easy to build and easy to operate
Despite the presence of undeniable advantages: reliable heat retention, ease of installation and highly efficient use of heating materials, this type has several disadvantages:
- The high price of mobile baths.
- The heavy weight of the equipment makes it difficult to carry when hiking.
Tourist steam rooms are an excellent solution for long hikes. With their help, you can maintain good hygiene conditions even far from the benefits of civilization. Due to the simplicity of their construction, almost any tourist group can cope with this task.
Tourist bath: do-it-yourself video installation instructions, photo
Tourist bath: do-it-yourself video installation instructions, price, photo
Camping bath tent: do it yourself and choose the finished one
Sauna-tent is the simplest of the possible options for baths. A camp bath will allow you to relax during a long hunt or fishing, on a hike or during a jeep safari. It can also be installed in a summer cottage (if a “stationary” bath is being built or is still at the project stage).

Camping bath-tent - a great option for relaxing in the country, fishing or hunting
There are many options for the execution of the bath-tent. You can buy a ready-made tent with or without a stove, or you can completely build everything from improvised materials. It is not recommended to use ordinary tourist tents. Firstly, such fabrics are not designed for high temperatures and you will soon have to buy a new tent, and secondly, when heated, they can release harmful substances. Well, they are not designed for use in such aggressive conditions. But an old canvas tent can be used as a bath: it keeps heat well and no harmful fumes. If a tarp is not available, suitable size plastic sheeting will do.

Bath-tent made of polyethylene film
How to make a camping bath-tent
You need to start by choosing a place. You will need a flat piece of soil near a pond. It is better to arrange such a bath on the banks of a river, stream or lake: it is good to plunge into cool water after a steam room, and you will need to wash yourself somewhere.
We collect materials
Then you will need to take care of finding the frame material, firewood and stones. If you have a ready-made awning or an old canvas tent, there will be less trouble, if there is nothing of the kind, you can get by with a piece of plastic wrap. Its dimensions depend on what size you are going to make a tent. If a couple of people will bathe, then a small structure is enough, and for 4-6 people you will need a piece of polyethylene 6 x 6 meters (the thicker the film, the better).
Poles for the frame can be found in the nearest forest or planting, where you also need to find dead wood for the stove (or bring a couple of bags of coal with you). And one of the important activities is the search for stones, thanks to which you can bathe. When heated, they accumulate heat and allow for some time to maintain the desired temperature in the steam room. It is advisable to pick up stones on the banks of a river or lake. They must be homogeneous, smooth, free of extraneous inclusions and inclusions (spangles of mica, layers of quartz, etc.).

Bath stones can be picked up on the river bank
Important! Layered stones, when heated, can break into small pieces, causing serious wounds. The stones should not be very large, but not very small either. The most optimal size is 10-20 cm and a slightly elongated shape. If you take stones of a smaller size, then they will not accumulate much heat and quickly cool down, and it will take a long time to warm up large specimens. Although, if you have enough time, you can also lay large stones as the basis for the hearth.
Do not forget to make a broom for the steam room. The blessing of materials both in the forest and on the field for him is a mass. True, you can do this a little later, when the main part of the work is done, and you will be waiting for the stones to heat up.
Stages of manufacturing a camping bath-tent
When all the materials are collected, you can proceed to the device of the steam room. To do this, first of all, you put a hearth / fire / fireplace out of stones - who has enough skill or desire for what.

How to fold a stove for a sauna tent
One of the easiest options is to lay firewood and stones in layers, then light a fire. Then it is only required to maintain intense burning until the stones turn red or white (depending on the degree of heating and the type of stones).

When arranging a hearth, you can use an iron sheet on which to lay stones
When the stove was folded, the fire was kindled, you can begin to collect the frame. If you have an iron frame from an old tent, that will work too. And if the height of the iron racks is not enough, and they are hollow (as usually happens), then they can be built up with the same poles. So, we need four corner posts that need to be driven into the ground. From above, along the perimeter, you need to tie poles, which will all be connected into one structure.
We make a frame around the hearth / fireplace / stove
It is advisable to tie a few more sticks on the roof - they will prevent sagging. If the tent turns out to be high, you need to add another harness around the perimeter at about the middle of the height (do not forget to leave a place for the entrance by raising the harness higher on one side). You can fix the poles with a rope, wire, tape, etc. The main thing is that the design is sufficiently reliable.
Real tourists bath attendants have a ready-made frame for a camping bath in their arsenal. As a rule, such frames are made of light-alloy tubes.
You can use a ready-made prefabricated frame for a tent-bath
After installing the frame, you can flood the heater. While the stones are warming up, take care of the flooring. The best option is to lay coniferous spruce branches from below, and from above - birch, oak, linden foliage - any trees that are nearby.

We warm the floor of the bath-tent with the help of coniferous spruce branches
When the stones begin to heat up, put the water on to heat, and while it is heating, you can begin to stretch the awning and fix it. Only until all the firewood burns out, it is impossible to hermetically close the tent - you can inhale smoke, or, much worse, carbon monoxide. You can leave open either one of the sides or the roof - depending on the design of the awning / film.
When all the firewood burns out, the ashes and coals are raked out and taken out of the tent, leaving only heated stones. Now you can seal everything tightly. By the time you're done, the air in the camping steam room will warm up well. All you have to do is turn on the steam by pouring water or brewed herbs onto hot stones. Camping bath-tent is ready. You can steam!
If plastic wrap is used, the heat will not last long and you need to steam quickly. If a tarpaulin was used, then the heat should be enough for 3-5 full visits, and this is almost a real bath.
Ready-made mobile sauna tents
If you lead an active lifestyle and long hikes are not uncommon for you, it makes sense to purchase a ready-made sauna tent. There are many models, manufacturers, configuration options. There are simply tents without a frame and a stove. They are made of a material that retains heat well and endures high temperatures. As a rule, they are light and compact (the weight of a tent for 4 people is 2.5-3 kg) and they are easy to carry in a backpack. But you will need to fold the stove out of stones (or purchase a portable camping version of it), look for poles for the frame and build it.

There are many types and models of ready-made bath-tents
There are tents with a ready frame and a stove. They weigh and place, of course, they take up more, but you don’t need to worry about anything. It is already difficult to carry them in the hands or on the back, so this is more likely an option for cycling or car travel.

Bath-tents with a ready-made frame and a prefabricated stove weigh quite a lot, so it is more convenient to transport them in a car
The only thing that needs to be found on the spot is stones for the heater, but they are required much less than when arranging the hearth and it will take a little time, although you can carry them with you if you have somewhere to put them ...

Sauna tents with a stove
When choosing a ready-made tent-bath, you need to pay attention not only to the size and cost. One of the important characteristics is the installation/assembly speed.
Mobile bath "Mobiba"
For both large and small companies, you can find suitable products from the Mobiba product range.

Mobile bath "Mobiba" for such a small company
Bath-tent firm "Mobiba" can be single-layer and double-layer. In a single-layer bath, you can steam at an ambient temperature of up to -25 degrees Celsius, and a two-layer bath up to -40 degrees.
Tents are made from Oxford (Oxford) - a durable fabric made from chemical fibers (nylon or polyester) of a certain structure, usually coated, which ensures complete water resistance of the fabric. The fabric is also water repellent.
The frame is made of D16T aluminum aircraft alloy, which combines two important qualities: lightness and reliability.
A fairly popular model is the Mobiba MB-104. It turns out that our compatriots bring such baths even to America.
Bath Mobiba is designed for the use of stoves. A hole for the chimney has already been prepared in the ceiling. For fire safety purposes, the passage under the pipe is finished with heat-resistant materials.
Important! Do not use wood-burning stoves that are not intended for this purpose, for example, made in China, for heating the bath-tent. The fact is that when the stove is fired with wood, one way or another, sparks will fly that will burn through the ceiling. For Mobiba baths, it is better to use specially designed fashionable wood-burning stoves that exclude sparks - they have a built-in spark catcher. Such furnaces are "Median" and "Optima".

For more information about the Optima oven for Mobiba MB-5, Mobiba MB-12, see the video clip.
Camping sauna tent Nova Tour
Bath-tents of the Nova Tour company (Nova Tour) are popular with tourists. Tents are very light, which makes it possible to carry them even in a backpack when hiking. For example, a bath-tent designed for 4 people weighs only 2.5 kg.
Camping sauna-tent Nova Tour
Tent material - Poly Taffeta fabric. The fabric is made of polyester (polyester fabric), which, unlike nylon, is more resistant to UV rays and stretches less when wet.
The tent has windows, so there will be no problems with lighting during the daytime. The entrance to the bath is sealed with a zipper.
Bath closes with a zipper
Nova Tur tent for 4 people can be bought for 4 thousand rubles.
Attention! There is no frame included in the kit, so it will have to be built on a hike from improvised means. You can buy a ready-made frame for a bath-tent or make it yourself.
Conclusion
More choice means more benefits. There is always a choice. If it is not possible to purchase a ready-made bathhouse, then buy a piece of thick polyethylene and you can always build a camping bathhouse while in the forest.
If you are fond of auto-tourism, then it is logical to purchase a ready-made camping bath, which can be installed within 30 minutes.
Camping bath tent: do it yourself and choose the finished VIDEO
Bathing on a hike is not a dream. It can even be made from a piece of film and a few poles. The most important thing is to find enough stones for the heater and also -
Do-it-yourself camping bath
A long stay far from civilization is no reason to abandon its achievements. Inveterate bathers can do without breaking their tradition, as a camping bath is almost the same as a regular bath. We need a steam room - a closed room for procedures, as well as a source that provides heat. Outdoor stores sell collapsible camping baths, even equipped with stoves. But to show a special chic is to organize it with your own hands.
Appointment of a camping bath

Mobile camping baths are ideal for tourists during long journeys, for summer residents whose plot is under construction, for construction teams who are on the road and tied to their object.
Requirements for a bath in field conditions

For the construction of the structure, you will need a sketch or drawing of a camping bath, the necessary set of simple tools and compliance with certain conditions on the spot:
- Availability of water. It will be difficult to wash without it. Therefore, to place a camping bath, you should choose the bank of a river, pond, lake or stream.
Construction of a camping bath
Frame with an awning for a camping bath

The prepared racks of the future camping bath with the stove are connected at the ends until a cube-shaped structure is obtained. For dressings, you can use a rope, tape, etc. The ends of the stakes should be wrapped with cloth, otherwise they will make holes in the awning when it is pulled. If you connect the corners of the roof with poles, then these rigid diagonals will increase the stability of the structure.
Stove for a bath in field conditions

First of all, a stove is needed to heat the collected stones. In the presence of its finished frame, it is lined with large stones on opposite two sides with minimal gaps between them. Two sides remain open, they will support traction when burning firewood. Then smaller stones are laid on top and on both sides of the furnace. This will be the "heart" of the steam room.
Using the sauna while camping

A ready-made camping bath can be taken in black and white. The main difference between these options is the location of the frame. Black baths are located above the stove or fire, and white ones contain only stones heated on it, which are rolled into the bath-tent with improvised means.
- Bath in black. In such a camping bath, ash and coals are raked out of the furnace, and the space surrounding it is filled with water. The finished frame covered with an awning or film is installed over hot stones. Containers with hot and cold water are brought into the tent room. Water can be heated on the same stove. You should not enter such a bath without shoes, since when cleaning the firebox, small coals left on the ground can burn your feet.
For a good rest in a camping bath, you can stock up on a couple of brooms in advance; in the field they are not steamed out, but simply soaked in cold water. When heating water to moisten hot stones, plants can be added to it for aroma: juniper, needles or lingonberry leaves. They will complement the healing effect of a camping bath with a pleasant invigorating smell.
- Hot water should be poured over red-hot stones, as cold liquid can cause their destruction.
It is unlikely that you will be able to assemble a camping bath with your own hands without the help of friends. After all, it is difficult to install and tighten the frame alone, drag water, stones and chop wood for a fire. Resting with a company, you can simply determine the responsibilities of each team member for such an event, and things will immediately go smoothly.
How to make a camping bath with your own hands
Many people prefer hiking and relaxing in the bosom of nature. But some are annoyed by the lack of hot water and washing in the field. Way out of this situation
A camping bath is a convenient device for going out into nature. It is necessary if you like to get out into the mountains or into the forest belt for the weekend with the whole family or with friends. There is nothing more pleasant than after many hours of moving, overcoming heavy obstacles and temperature changes, to relax your tired body in a bathhouse and take a steam bath with good heat. This is truly heavenly delight!
You can buy such a device, or you can build a bath with your own hands, having thought through all the details that you want to have in your steam room. Here are some ways.
"Wild bath"
In order to make the usual version of a camping bath, you will need:
- stove-heater;
- tent;
- special frame.
Previously, an awning for a bath was made of a film, installed on a frame, and the gaps could be glued with ordinary adhesive tape. And why not a bath?

But unfortunately, the required amount of film for the steam room is very voluminous, and such a burden will take up half the backpack. This material dries for a very long time, besides, folding the film into the original bundle will be quite difficult.
Bath, arranged in the wild, consists of three sections:
- Dressing room.
- Steam room.
- Kamenka. In this section, you should build a stone oven.
Advice: prepare a canopy for a bath from a film. Size 2*2*2.5 meters. With careful use, this canvas will last you 3-5 trips.
The portable camping bath in its modern form is made of special nylon fabrics. Although they are very light, the nylon material is much stronger than film. And most importantly, you will save space in your backpack.
Of course, a mobile bath is more expensive, and only four people can carry out procedures in it, if you make room, five people. But what if there are more people who want to take a steam bath? Unfortunately, in stores you will not find an option for a larger number of people. Here you will be saved by a hand-made mobile bath, and the quality can be controlled personally. If a mini-version of the bath suits your company or family, you can purchase a "warm place" in any tourist shop.
Camping bath of industrial type
Basically, modern tourists prefer the Novoturskaya mobile bath. It combines quality, reasonable price and meets all expectations.

For a small family or a company of several people, the Mobiba industrial bath is suitable. If you want to take a steam bath in the country or you like to go out into nature using a personal car, this is the best option for a tent-type bath from the proposed designs of this type on the modern market. It has a stylish design, good construction and excellent vapor. True, if you decide to go camping on foot or are a supporter of water tourism, this version of the bath will not work.
Advice: to install a tent-type bath, find a large flat area. With such a platform, you will install the structure in just a few minutes.
As for other options for industrial baths, they are not popular with tourists. This is due to the low stability in windy weather. We have to properly support the structure with stones so that the bath does not move. Otherwise, these portable baths, like the options proposed above, look like a tent or an awning that can easily fit in a hiking backpack. No additional accessories, such as an oven or frame, are included in the kit. Therefore, everything else will have to be made with your own hands directly at the place of rest from what is at hand.
Mobile bath from a bar
One of the most reliable options is the type of mobile bath built from timber. The scheme is simple:
1. Prepare the necessary material:
- wooden beam or boards for the construction of the frame of the bath;
- a metal perforated box with a grate that will serve as a container for coals. This is necessary in order to water the hot stones with water, and hot steam will come out through all the holes in the box;
- bricks for laying an impromptu stove with a firebox;
- an awning or oilcloth with holes for entry and ventilation to fit the prepared frame.
2. Mount the frame from the prepared boards, lay out the stove with a place for firewood.
3. Install a container with coals on the stove and cover the structure with an awning or film.
By following these instructions, you will get the perfect budget option for a vacation in the country.

The usual camping bath with a stove is the simplest and most proven option by tourists. It is not only reliable and convenient, but also not expensive: sewing a tent and buying accessories will cost several times cheaper than a finished structure purchased in a store. Spend the saved money on buying a good camping stove, stones and other pleasures.
This type of bath is very spacious: a company of 8 people can easily accommodate in it and there will still be room. It can serve as a canopy in rainy weather. A store bath will not provide such comfort.
Such a bath is 2 m wide, 2 m high, 2.5 m long. Its weight is approximately 2 kg, if folded - 40 * 20 * 20 cm.
To build such a bath, you will need the following materials:
- a set of slings 50 mm thick and 0.5 m long, as well as blanks 25 mm thick, 2 m long;
- 2.5 m of braid 15 mm thick;
- elastic band 2 cm wide approximately 2 meters;
- spool of thread (nylon or lavsan);
- zipper with pawl on both sides 2 meters long and 7 mm wide;
- polyester cord - 16 meters.
We sew all the parts cut out according to a special pattern with threads using a double seam (first of all, the walls of the future bath, then dumps that do not need to be sewn in the corners).
Lastly, we attach the roof, zipper and braid. In order to make guy loops, we fold the cut piece 50 cm from the sling 25 mm wide and 12 cm of the board, the width of which is 5 cm. Then we attach the cord for subsequent stretching and installation of the awning. We fasten it to the extreme loop.

We make loops on the lower corners of the tent from an elastic band that needs to be folded in half. During the installation of the bath, we insert the ends of the pillars into the middle upper loop. Rubber bands can be attached directly to the pegs.
To finally be ready for a hike - make a cover for your new camping bath for ease of movement.
We fold the oven
For a mobile bath, you can make a stove directly at the place of rest.
If you have a car, you can make a more advanced version of a pipe and potbelly stove. Where can you get stones? It is better to buy them in the store in advance, and find a few more cobblestones of not very large size on the spot. Stones bought in a store heat up instantly, but they also quickly give off heat. Therefore, the stones you found will help keep the heat longer.
Advice: making a stove-heater is not difficult, but there are some points.
There are three laying options:
- Solid.
- Vaulted.
- With jumper.
The worst thing is to use the "solid" option, as the fire does not hit the upper stones. The easiest way is to fold the oven with a jumper.

You can heat hot water for a bath on the stove using a metal bucket. It will boil within 3 hours. It remains only to take a broom and pour water over the stones. Enjoy Your Bath!
It is impossible to express in words the feeling of delight and renewal that a person experiences after a good bath. If bathing procedures were carried out after hard physical work, a long expedition, hunting, fishing, or simply staying in the forest, mountains, near a river, the effect is indescribable. A do-it-yourself camping bath is what a tired person needs to restore his strength, communicate with nature.
A bit of history
There is an opinion that our geologists, gold diggers, taiga hunters and just travelers borrowed the idea of a camp bath from the peoples living in the chum, covered with deer skins with a hole at the top. In the middle of the plague, a fire was burning, lined with stones. When the stones warmed up well, they were poured with water. That's the whole bath! A similar do-it-yourself camping bath is available for our travelers. Rate our photos, maybe they will give you useful ideas for making them a reality.


Various options for a camping bath
The idea of the taiga people was picked up by industrialists. They developed a project for a modern-style bath-tent complete with a stove, a collapsible frame, and a fire-resistant cover. This option is used by some travelers who travel in a roomy car that can carry all the accessories.


For the installation of such a bathhouse does not require much experience. All components ideally fall into place. The wood-burning stove has a chimney outlet and provides good heating and soft steam. Such a portable bath has two drawbacks: the need for transport and the high price of the finished kit.
A more modest option is a homemade blank, in which metal tubes for the frame, tarpaulin, stones, and a metal blank for the furnace are stocked. Made from modern materials, such camping baths also require transportation and investment of money. There may be a stove-heater made of cobblestones, or a finished stove with a chimney.


The most optimal, inexpensive option is a do-it-yourself camping bathhouse made from dead trees, poles, spruce branches. Stones lying on the banks of reservoirs are suitable for the heater. Firewood for the hearth is also collected locally. All materials are natural. In extreme cases, you need to stock up a plastic film or a piece of tarpaulin and a rope for attaching the film or tape. Although in this case, travelers can take advantage of the young bast of deciduous trees.
Attention: When arranging a sauna, you cannot use modern tourist tents made of synthetic material, they are poorly resistant to fire.
Stages of work carried out during the construction of a camping bath with your own hands
Do-it-yourself camping bath is not a very simple matter without preliminary home preparation. But our people are "cunning to invent", they will be able to make a small sauna for 2 people and one where several people can sit.

To build a mobile sauna, you need to choose a place near a river or other body of water. After all, water will be needed for washing, watering stones.
1st stage: heater installation
The most important point in the construction of an impromptu sauna is the hearth device.

The whole effect of soaring will depend on how the pebbles heat up. For the furnace you need to prepare large stones. They heat up longer, but also "exude" more heat. They are folded in such a way that there is a place inside for laying firewood 50-60 cm deep for long logs. An inlet with a width of 40-45 cm and a height of 40-45 cm will be convenient for laying firewood and maintaining a fire. Specialists, who are not the first to install a sauna fireplace, choose stones of a certain shape for this, which fold together securely, but not too tightly. In order for firewood to burn well, they need access to oxygen. Properly laid cobblestones provide access to the air that supports combustion. Do not use granite and stones with a heterogeneous or layered structure for a sauna. Cobblestones of a rounded or oblong shape are most suitable for a sauna.
Handmade blank
Some travelers bring with them a blank of steel rods of rectangular fittings, which will serve as a stove when arranging a sauna, and in other cases it will become an impromptu table or chair.

Attention: It is necessary to heat the heater for at least 5 hours. The result of all the work will be a hot sauna, where you can warm up for 2 hours. The number of bathers depends on the size of the camp bath.
Tip: In order for the stones to heat up well, you need to prepare firewood that gives a high heat transfer. It is desirable that the company should have one person responsible for the heating of the stove. The stove must not be allowed to go out and then rekindled.
2nd stage: frame manufacturing
While the stove is heating, you can mount the frame. It is made in any convenient way. In some cases, even the trunks of growing trees are used. The easiest and safest way to build a camping bath is not a thick round timber.


The frame can be mounted square, rectangular or in the form of a hut. Round timber is dug into the ground and fixed in various ways.
Tip for building a bath from improvised materials: In order to ensure better stability of the structure, the diagonals of the roof can be connected with poles. In some cases, you need to connect the sides obliquely.
Some "experienced" travelers use tubes from a tent, a board, metal pipes prepared in advance and brought by car for the frame. This option will significantly reduce your work, but again - requires the use of vehicles.
3rd stage: interior arrangement and preparation of benches for sitting
The floor inside the steam room can be covered with branches, moss, and benches can be installed for sitting. For a low bench, a round timber (for several people) or hemp is suitable - for one sitting place.
Final stage
The taiga dwellers first “heat” the bathhouse, and then remove the coals and ash. This is done when the stones are well warmed up. Ashes and coals are raked out with a shovel or a wide stick. The remaining coals must be extinguished with sand or moss. This is done in order not to “burn out” (not to be poisoned by carbon monoxide). Then the frame is wrapped with a film, fixed with ropes or a bast. In order for the film not to swell and hold tight, you can dig a strip foundation around the heater. The covered film is pressed down with stones, sand, cobblestones. When arranging a camping bath, you need to provide an exit. Each builder has his own version of the entrance window. It is carried out, depending on the design and dimensions of the bathhouse, construction methods and the material available. The ideal option for covering the bathhouse is an old tent without a bottom. During the day, it will serve as a cover for the sauna, and at night it will perform its direct function. But this option also has its drawback - poor illumination.
The process of soaring in a camping bath
They take a steam bath in a field sauna, pouring water over hot stones. At the same time, a high temperature is reached in the plague, causing sweating and a pleasant sensation from natural aromas. In such a sauna, you can warm up well, relax, relieve yourself of the burden of everyday worries. A broom brought with you or made from fresh birch or oak twigs will not be superfluous in a camping sauna. A fresh broom in a field setting is steamed with cold water. Fragrant herbs, leaves, needles, balms can be added to water for watering stones.
Conclusion
Armed with the proposed ideas and knowledge, you can not be afraid that you will not be able to wash yourself during the campaign. If desired, you can find stones of appropriate sizes, firewood for the hearth, trunks for the frame. If there is no film, in this case pine or spruce green branches can help.

True, the increased comfortable temperature in such a camping bathhouse will be stored much shorter. To each his own choice!
We also recommend
 Smartphone xperia z5 premium black
 Download toilet paper business plan
 Description Nokia X2 dual sim on the Android platform, powerful processor and support for two sim cards
 Is it possible to open a hostel in an apartment?
 Services to the public: the most promising business ideas
 How to start farming?