Plot in two levels landscaping. Site layout with a slope
Gardens on uneven areas where there are height differences are decorated with a scattering of stones. In the place of the site where the slope angle of the terrain is large, you can create an unusual rocky garden, and where the slope is small, compositions that use an alpine slide or rockery will look better.
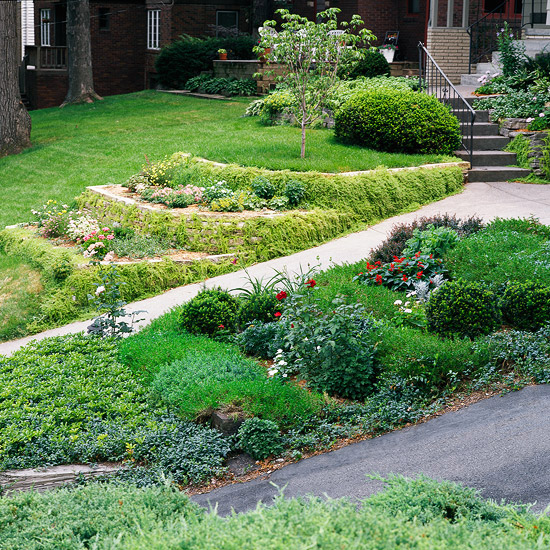
With a very large difference in height, it is better to divide the site into separate terraces, which can be interconnected by stairs, but this task is laborious and expensive. If the slope of the terrain is small and does not interfere with cutting the grass, the lawn is divided into uneven parts. Below is an example of a garden, two levels of which are separated by an alpine rockery.
An example of a rational layout of a multi-level garden

1 - wood; 2 - hedge; 3 - mixborder; 4 - shrubs;
5 - gazebo; 6 - descending slope; 7 - garden path;
8 - hydrangeas; 9 - lawn; 10 - alpine hill-rockery;
11 – lawn; 12 - patio; 13 - continuation of the courtyard;
14 - conifers; 15 - stairs leading down; 16 low shrubs;
17 - path around the house; 18 - House;

We level the patio and the lawn, after the alpine hill, which smoothly turns into rockeries, we break the lawn. Next to the slide, you can create an artificial reservoir by using the excavated soil from the pit to create a slide. Naturally, planting plants in it is not worth it. The soil needs to be improved by adding fertile soil. In order for the composition created by you to please your eyes and become a real decoration of the garden, it must be thoughtful and harmonious. This is easy to achieve if we follow a few simple rules.
We use stones in the same color scheme. The natural beauty of the stone is in its restraint, so multicolor will be superfluous. We choose the central stone, it will be the dominant element, we build the entire landscape composition around it. Small stones will complement the alpine hill, the coastline of a decorative reservoir. When designing a pond, pay attention to the choice of stones. They should be flat, without sharp corners, so as not to injure the leg. After all, on a summer day, you or your child will want to walk barefoot around the beauty created by your hands.
Multi-level gardens: successful design options


Creating a harmonious, beautiful landscape design on a hilly, relief area is the most difficult creative task even for experienced professionals. By studying examples of successful design of a multi-level site, you can draw a lot of interesting ideas and finds. However, you should definitely take into account the individual characteristics of your garden, its layout, soil characteristics, as well as the style of the house and the personal requirements of the owners.

When drawing up a landscape project for a multi-level site, it is imperative to link all buildings, a recreation area, paths, small architectural forms and plants into a single composition. Such thoroughness of preparation is due to the fact that even the slightest flaws and mistakes are perfectly visible on the relief territory. But there is another feature of the uneven area. Even a small sloping or hilly area, well-designed and well-executed, can become a real highlight of landscape design, an original creation of the owners, which they will enjoy and be proud of for many years.

Analyzing the most striking examples of successful design of a multi-level site, you understand that there are no trifles in such work. Even at the preparatory stage, materials and plants, furniture and decorative elements should be selected with special diligence. And only then the garden will shine with exclusive, unique beauty, which will be successfully combined with convenience and comfort. By the way, for clarity and greater expressiveness, you can capture in advance on a photo or video filming the site before the start of work, the implementation of each stage and the solemn completion of all events.
Geoplastics of a multi-level site

Often, the initial state and the actual topography of the territory dictate the choice of the main idea for landscape design. For uneven, multi-level areas, experts recommend using geoplastic techniques. At the forefront is the development of a plan for the arrangement of retaining walls used to strengthen and redistribute the soil. The height and number of structures directly depends on the elevation difference, the relief of the site and the individual characteristics of the soil. You may have to look at various examples of successful design of a multi-level site with similar properties, come up with your own, author's approaches. But the result will justify all the time and financial costs.

Geoplastics of a complex area allows you to immediately divide it into separate zones, create a spectacular overview perspective, and it may be possible to plan the construction of additional relief zones to compensate for sharp drops and arrange the desired slope.
The biggest difficulties for the owners of cottages are when designing the territory of the garden and vegetable garden. Typically, multi-level plots often present problems such as soil erosion, irrigation and drainage problems. But with proper landscape design, all the disadvantages of space can be easily turned into great advantages.

On multi-level plots, zones using natural stone and high-quality finished wood look advantageous. Stone pyramids, alpine hills and dry streams, as well as other rocky landscape structures that do not require further careful maintenance and a complex water supply system, are effectively visible.

For paving paths and arranging a recreation area, in the general concept, flat stones or wooden blanks are also used. Trees and plants are selected with a powerful root system, and mechanical water supply is immediately provided for irrigation.
Nature does not have bad reliefs, everything is harmonious and original in it. It is believed that if you got a plot with a slope, then this is not good. But this is not a reason to be upset - this is an occasion to think about how to turn his shortcomings into virtues. We will build a house at the top of the plot, decorate the middle with terraces, in the lowland under the slope - the best place for a small reservoir. Many flat land owners artificially create hills and lowlands to embody exquisite design ideas. After all, uneven terrain is a huge field for creativity, the main thing is not to be afraid and roll up your sleeves.
Improvement of the sloping site will require serious both material and physical costs. But as a result, you will get a unique, stunningly beautiful and expressive landscape of the estate, prompted by nature itself.
First you need, the direction of water flow, the composition of the soil, the orientation of the slope in relation to the cardinal points. The next step will be planning a place for future buildings and recreation areas. It is better to entrust the design and all calculations for a site with a particularly difficult terrain to specialists, and a slight slope will make it possible to do all the work yourself.


Experts will help evaluate the site from an engineering and architectural point of view, suggest how best to adapt an uneven site to the desired operating conditions.
In the process of planning a site on a slope, it is necessary to take into account several characteristic features of such a relief.
- On the slopes, the soil is highly susceptible to various natural and climatic influences (snow, rain, wind, and others), which can cause its erosion or creep.
- In different parts of the slope, the microclimate will be different. The lower part is characterized by a slightly lower temperature, accumulation of moisture, and some stagnation of air masses. And the top of the slope is exposed to the strong influence of the sun and winds, so the land there quickly dries up.
- The orientation of the slope relative to parts of the world should be taken into account. The southern slope will always be sunny and the plants will need additional watering, while the northern one will be shady and humid.
- When starting work on the improvement of a “difficult” site, it is necessary to carefully consider the geoplastics of the soil. Where it is possible to level the relief as much as possible, removing part of the soil layer in one place and pouring it in another. Sometimes it may be necessary to additionally fill the area. This is due to the drainage and uplift of wet lowland soils or the formation of planes.


How to fill the site or its parts depends on the further use of the territory and the tasks set. So, to strengthen the soil for construction, to level depressions, to form terraces (with a lack of own soil), construction waste (broken brick and concrete) can be used in the lower layer, crushed stone or gravel for the middle layer. In damp wet places with close groundwater, in addition to the listed materials, sand is also used. The dumped area or part of it from above must be covered with a layer of fertile soil (the soil layer should be thicker for landscaping).
The first priority is to avoid ground displacement. You can leave the natural slope, leveling its relief and strengthening. Another option is terracing a site on a slope. Most often, these options are combined.
Slope strengthening
If the slope of the site is small, then various plants with a highly branched root system can be used to strengthen it. These are dwarf species of common spruce, mountain pine, creeping junipers, cross-pair microbiota, cypress, hornbeam, hazel, willow, spindle tree, snowberry, hawthorn, shadberry, barberry, Russian broom, golden currant, white deren, which you can learn more about. And fast-growing cornflowers, clover, bluegrass, fescue, buttercups, daisies will not only help strengthen the sloping site, but also create a beautiful Moorish lawn on it.

And what to do with strong slopes? Use geotextiles, geogrids, geogrids, geomats. These materials are high-strength, resistant to sunlight and aggressive environments, have a long service life, and do not harm the environment. They are laid on a slope, then covered with soil. And plants planted on top will enhance the bonding effect of these materials.
A strongly sloping area should also be strengthened with the help of terraces.
Terracing
Reliable strengthening of the slope is the creation of horizontal "steps" - terraces over its entire surface. You should not make them long and straight, it is much more beautiful and practical when they are different in shape and size. The advantage of terraces is that they provide a horizontal plane for arranging recreation areas, gazebos, and lawns. On the terraces, you can plant fruit trees or break garden beds. Each "step" of the tier should be designed differently, which will make the landscape design on the slope especially interesting.
You can arrange the terraces in any order, showing creative imagination. Their size will depend on the intended use. Each terrace is secured by a vertical retaining wall. The walls can be different in shape, but it is better to form them with ribbon-like bends that repeat the natural relief. This will make the whole structure more durable, bring harmony to the overall landscape.
The technology and materials for the construction of retaining walls are selected depending on the height of the ledge and the overall landscape design of the uneven area.


If the height of the tiers is very small, up to 50 cm, then simple masonry without a cement binder can be used, and seeds of perennial herbaceous plants are placed in the gaps between the stones, which, when germinating, strengthen and decorate the wall.
To create high retaining walls, as well as when placing construction objects on the terrace (house, outbuildings), concreting is used, as well as foundation blocks and slabs. The improvement of such walls is carried out using various materials that match the style.
Masonry made of natural stone or brick, bonded with cement mortar, is widely used in retaining walls.
Gabions are gaining popularity in landscape construction. These are mesh frames made of metal wire filled with natural stone. They are practical, easy to use, durable, decorative. It is easy to create retaining walls of any configuration from them. The production of such blocks is not very difficult. Sometimes stones are mixed with soil inside the net, and then seeds of ornamental plants are laid there. In gabions, you can use any stone or even some other material. In addition, they are easily integrated into almost any landscaping site with a slope.

The use of timber in strengthening retaining walls gives the site a certain flavor, looks very decorative. However, one should take into account the fragility of wood under various natural influences. Careful processing with special protective equipment will briefly extend the service life.
If the retaining walls are high, and also built on loose, moving soil, then they must necessarily have a good foundation. For low walls (up to 1 m), a crushed stone or gravel cushion (20-40 cm) is sufficient at the base.
A retaining wall of any material should be backfilled with fine gravel and have a small pipe at the bottom to drain water.
Slope drainage systems
The suburban area on the slope is most susceptible to soil erosion due to heavy rains and spring floods. Water is also destructive to retaining walls. In the rainy season, the bottom of the slope will be excessively wet and damp. Therefore, during the formation of terraces and the construction of retaining walls, it is worth taking care of drainage. This can be a simple drainage consisting of various water-permeable layers (broken brick, fine gravel, coarse sand, and others) or a complex system using plastic drainage pipes and filtration holes. In parallel with the drainage, the irrigation system is also arranged.


The drainage system may be closed or open. Closed will save space, and open will become an element of decor. The water running down the open decorative gutters can turn into a small waterfall on some ledge or form a decorative pond at the bottom of the slope. More practical owners can arrange the collection of water in special containers on the site, from which they can then carry out automatic watering.
It does not matter which one you choose, the main thing is that the drainage system is made correctly, taking into account the features of the relief and the direction of water flows.
The owners of suburban areas are trying to equip the territory so that it is comfortable and beautiful. More and more beds ...
Walkways and steps
Landscape design of a site on a slope cannot do without paths and steps. They serve for convenient movement around the territory and combine the terraces into a harmonious composition.
Paths are arranged on a relatively flat surface. Curving in a variety of ways, the paths will visually smooth out the steepness of the slope. And twisted by a serpentine, on the contrary, will emphasize differences in heights.
For harmonious integration into the overall landscape, stairs can be curvilinear or radius. Long flights of stairs should be interrupted by resting areas on which you can put a bench or decorative decoration. An interesting solution is when the staircase changes its direction from such a platform.


It is desirable that the paths and stairs are equal in width, and also made of the same or matching materials. It can be stone, wood, concrete, tile.
Equipping stairs, the main thing is not to forget about safety. Steps should be non-slip, not steep and fairly wide. With a strong slope, the installation of railings is mandatory. Lighting is very important. Decorative lanterns and lighting should serve not only to decorate the landscape, but also to ensure the safety of movement.
Rules for landscape design on a site with a slope
The landscape design of a summer cottage on a slope has a number of features. The location of the zones should be carried out taking into account each specific relief.
Most often, the house and outbuildings are located in the upper part of the slope. This is a more convenient option, since the entrance to the estate is nearby, and the spring melt waters do not cause inconvenience. Tall trees are always planted at the top of the slope. The house, built at the bottom of the slope, is decorated using low-growing trees and various shrubs. In both options, it is important that the plants do not cover the building.
If you want to visually smooth out the height difference, then the tallest plants are planted at the bottom point, and the short ones are closer to the top.

The selection of plants will directly depend on the location of the slope relative to parts of the world.
For the south, sun-loving drought-resistant plants are suitable. For example, maples, hawthorn, barberry, junipers, mountain pine, shadberry, shrub caragana, St. John's wort, spirea, lilac.
Various rocky gardens (rockeries, rock gardens, alpine hills) are perfectly located on the southern and southwestern slopes. They will be decorated with cute ground cover and undersized plants. For example, arabis, thyme, yaskolka, evening primrose, catnip, stonecrop, monetized loosestrife, woolly stakhis, grass, perennial phlox. Lush fescue pillows, carnations and a beautiful ground cover rose will add charm. And the tie and pachysandra will cover the slope with a dense green carpet and strengthen it.
On the western slope, bulbous primroses, as well as irises, echinacea, mallow, and alyssum will comfortably fit. East is suitable for dicentra, astilbe, bergenia, aquilegia.
The northern slope is the most problematic, it is shady, humid, not very warm. On such a plot, you can plant dwarf conifers, pea-bearing cypress, hazel, euonymus, snowberry, fieldfare. In the spring, primrose, lungwort, anemone will please with flowering, then astilba, volzhanka, geranium, aconite, rogersia will pick up the baton. You can also pick up shade-tolerant ground cover plants, for example, periwinkle, saxifrage, duchenea, tenacity.


In a lowland, a small decorative pond will ideally fit. The loosestrife, astilbe, meadowsweet, miscanthus, hosts, marsh geranium, swimsuit, brunner, and various ferns will help to ennoble its shores.
On one of the upper terraces, you can equip a recreation area, so it will be nice to relax, admiring the panoramic view of the entire site. If you prefer privacy, then create a recreation area below, so that on a hot summer day you can read an interesting book in silence and coolness.
Terraces will give you the opportunity to show all your creative imagination. For improvement, you can use various design directions. The most successful will be an alpine garden in the style of a chalet or a rustic landscape (natural) style.
We have considered the basic principles of planning and design of a territory with sloping terrain. Now you know how to make your "difficult" site with a slope comfortable, beautiful and original. Despite the sufficient laboriousness of the process, the result obtained will more than pay for all the difficulties. You will get much more than a banal rectangle of the earth.

Advantages and disadvantages of a plot on a slope, planning rules for a problem area, placement of functional zones, basic methods for improving an allotment.
Advantages and disadvantages of a site on a slope

Many people prefer to purchase only horizontal land plots for summer cottages, counting on the ease of their operation. However, allotments on the slopes provide more opportunities for the formation of an original appearance and the implementation of non-standard ideas. Therefore, do not be upset if you have at your disposal an area located at an angle to the horizon.
Its undoubted advantages include the following points:
- Dachas on the slope are always different from each other.
- Competent arrangement of the site will allow you to get a picturesque example of landscape art.
- By placing the house at the very top, you can view the entire territory from the window.
- On such land, you can build design elements that are inaccessible to flat areas - an alpine hill, a waterfall or a cascade.
- If the slope is directed to the south, you can harvest a good harvest of fruits and vegetables on it due to better sun exposure.
- It is difficult to grow a lawn on a steep slope.
- For the arrangement will require significant financial investments.
- Plantings should be watered frequently, because. water does not hold well on the slope.
- Buildings are built only at the top, because of the danger of erosion of the foundation.
- Unstable areas may slip.
- Moving on sloping terrain is tiring.
- Small children should not play on steep slopes.
Creating a Sloped Lot Design

The improvement of the territory begins with the analysis of various indicators, which will allow you to create an optimal layout for the placement of elements and develop a sequence of construction work.
The following characteristics need to be assessed:
- Surface relief. It determines the location of zones (residential, recreation, garden), placement of communications, etc.
- The size and geometry of the site. This characteristic influences the style of planning.
- Possibilities of leveling the territory by terracing.
- Soil type. Often it is necessary to import fertile land for growing garden and horticultural crops.
- The depth of groundwater. Information is needed to create a drainage system in order to drain rain and flood water.
- Dominant wind direction. Ignoring this factor can lead to the death of green spaces that do not take root well in very cold or very hot weather. It is necessary to select appropriate plant varieties or provide protection from the winds.
- The location of the inclined area in relation to the cardinal points and the illumination of the territory. Characteristics have a great influence on crop yields. It is necessary to choose the right plants.
- Systems of measures to strengthen the soil on the slopes. These include planting vegetation with a branched root system that creates turf, mechanical strengthening of the soil, planting plants with strong roots.
- Houses and additional outbuildings (showers, gazebos, garages, etc.). The main object on the territory is a residential building. The breakdown of the put on begins with it.
- Rest zone. Placement depends on the decision of the dacha owner to concentrate entertainment places in one place or scatter them throughout the dacha.
- Enclosing fence. A hedge of 2-3 rows of trees or trimmed shrubs looks beautiful.
- Area for a vegetable garden and a garden. Plots for them are prepared depending on the steepness of the slope.
- Terracing or other surface leveling methods. The resulting flat areas are used as lawns, pools are equipped in the hollows.
- Underground and overground communications.
The plan is drawn up in a regular, landscape or mixed style. For a site at an angle, a landscape style is most suitable, in which the elements are arranged freely and naturally. Correct and symmetrical forms are excluded, which adds to the attractiveness of the dacha. The regular style is designed for flat areas, and the mixed style combines the features of the first two.
The diagram is drawn at the selected scale, usually 1:100. Divide the sheet into 1x1 cm squares, each of which corresponds to 1 m 2 of the plot. Orient the sketch to the cardinal points. Cut out figures of buildings from cardboard in the same scale (house, shower, garage, front garden, garden, etc.) and place them on the plan at your discretion, taking into account building codes and other requirements. We recommend that you indicate the entrances and exits of buildings in order to avoid bitter disappointments. After obtaining satisfactory results, you can begin work on the improvement of the cottage.
The landscape of a site with a slope is formed according to its own rules. Each zone is located depending on its purpose, size, terrain, etc. Often, the arrangement of the territory is influenced by the possibility of creating terraces - horizontal platforms that are easy to operate.
Terracing

Leveling is usually done on slopes with a slope greater than 15 degrees. With a slight slope, no surface modifications are carried out. In areas with an average slope, it will be necessary to build supports for the terrace. If the angle is very large, serious construction work will be required using heavy equipment. The number of platforms and their dimensions depend on the angle of inclination. Stairs are used to move from one level to another.
Terracing begins with determining the steepness of the slope and is carried out in several stages:
- Marking horizontal areas. Their dimensions should be such that the elements of the site are freely placed - a house, a flower bed, a garden. They can be arranged in a different sequence - in one row, in a checkerboard pattern, asymmetrically, it all depends on the wishes of the owner.
- Formation of horizontal platforms. Work begins at the top, gradually descending to the base. The cut soil is moved to the lower areas. Usually, the height of the walls of the structure does not exceed 0.6-0.8 m, and the width is 4-5 m. On small plots, 2-3 levels are equipped, on large plots - from 5 or more.
- Overturning and shearing forces act on partitions, so the structure must withstand such loads. To increase the strength and durability of the walls, a foundation is needed, the dimensions of which depend on the size of the partition, as well as on the characteristics of the soil.
- In order for the support to withstand large vertical loads, a drainage system is created that prevents the base from being washed away with water.
- During the construction of the "dry" method, pour the stones with soil with seeds. After a short period of time, the wall will have a very beautiful appearance. But without cement mortar, the protective structure does not withstand the large amount of water that appears on the site during rain or snow melt.
- Brick walls are very beautiful and durable. Partitions can be made deaf, discharged, winding or zigzag, etc.
- Wooden structures look very beautiful, but their service life is short, even after treatment with special preparations.
- Concrete walls can be built up to 3 m high, which is much more than stone or brick walls (0.8 m). It is allowed to use ready-made panels or pour formwork.
Residential and auxiliary buildings

It is quite difficult to erect buildings on sloping sites. This requires a large amount of work to be done on the basement and underground parts of the building. Ideally, the building should protect the territory from the prevailing winds and not obscure green spaces.
When building, use our recommendations:
- Place buildings in such a way that there is the shortest distance between them.
- It is recommended to build houses in the north or northwest of the allotment.
- If the site is turned to the south, build the house at the very top. If to the east and west - also above all the elements of the cottage, at its northern border.
- If the territory descends to the north, erect the building in the middle of the allotment, closer to the western side.
- In any case, do not build a house at the bottom of a slope to avoid flooding. The facade of the building should face the street.
- Often, 5-7 m of free space is left between the building and the road, which is filled with flowers and low shrubs.
- The location of the windows is important. Openings facing southeast and southwest provide illumination of the room throughout the day, and to the north they create shading that cools the room in hot weather.
- By the size of the shadow cast by the house, you can determine the geometry of the recreation area and the parking lot.
- The gazebo is usually located in the most beautiful place, with a good view. The playground is located on the lawn under the windows of the room, where adults most often gather during the daytime. On the edge leave a place for a barbeque.
Green areas

Plantings look especially beautiful on sloping terrain.
Plants are planted according to certain rules:
- Vegetables and fruits are grown on the sunny side, where they take root well.
- Do not plant trees closer than 5 m from buildings, so that they do not have dampness from lack of light.
- On the north side of the building, plant sprawling fruit trees - apple trees, pears. You can also place an apple and cherry tree on the east side of the building. In this case, in the summer there will be a large shaded area near the house.
- Plant shrubs near the garage, as well as around compost heaps and other unsightly places.
- On the south side of the house, plant heat-loving plants - grapes.
- Grow vegetables in the middle of an area where there is no shade. Provide the same conditions for the flower garden.
- Give up tall shrubs along the edges of the garden, it gives a long shade. You can grow raspberries on the south side of the garden, it gives almost no shade.
Creation of a drainage system

The layout of the site with a slope must necessarily indicate the drainage scheme, which is necessary to maintain a constant water balance and quickly remove rainwater and moisture that appears in the spring during snowmelt. The danger from excess moisture is the formation of scours.
The steeper the angle of inclination, the faster the water will wash it away. Even small streams wash out deep gullies over time, which leads to the formation of deep ravines. The arrangement of drains is started after the completion of the construction of the main buildings, communications, green plantings.
Drainage can be open and closed. The latter option has an advantage, because saves usable space. Above them, you can organize access roads and paths.
The drainage system is a system of trenches and receiving collectors. Highways are dug along the slope. The most effective option is considered in which the ditches are arranged in the form of a "Christmas tree". In this case, additional outlets are adjacent to the central trench, which removes moisture outside the site or into the intake manifold.
The depth of the trenches is 0.3-1 meter. The bottom should be with a slope of at least 2 mm over a length of 1 m. Fill it with sand with a layer of 10 cm, then cover it with geotextile with an overlap on the walls. Sprinkle rubble on top with a layer of 15-20 cm.
Place the pieces of perforated drainage pipe on the prepared pillow and connect them together. Fill the pipe with crushed stone and cover with geotextile. Fill the remaining space with sand or soil.
Site decoration

The multi-level arrangement of individual sections allows you to introduce original ideas. A good option for non-standard territory is the Alpine style with a lot of raw stones and bright colors.
Using these elements, you can solve the following tasks:
- Zone design;
- Strengthening the soil with boulders;
- Snow retention;
- Site decoration.
There should not be free glades in the country. Fill the strips with lawn or ground cover plants that prevent soil from washing out. On a sloping slope, you can grow a lawn.
Track layout

To move around the site, consider the location of the paths.
They are subject to the following requirements:
- The width of the paths and the height of the steps throughout the area must be the same to avoid injury when going up and down. To smooth out differences in the heights of the tracks, make them winding.
- The maximum allowed path angle is 45 degrees. With these parameters, be sure to make a railing. Make treads 25-30 cm wide, risers 15 cm high.
- With a large slope of the land on the stairs, be sure to provide rest areas, after which the direction of movement should change.
- The most affordable price is a wooden staircase. In this case, the riser is made of boards fixed on the sides with pegs, and the compacted soil forms the tread.
- A staircase made of brick, stone or concrete will be more durable. In the latter case, use formwork.
- A section of stairs with 10 steps or more must be supported by a concrete base that will prevent it from slipping.
- The dimensions and shape of the stairs depend on the functional purpose of the site and do not necessarily meet accepted standards.
Slope strengthening

So that the soil does not slip, the soil must be strengthened. For this, the following methods are used:
- natural fortifications. They are used at small angles (up to 15 degrees). Sites on the slopes are recommended to be planted with creeping plants, near the base - with lilacs, wild roses, willows. The roots of these plants intertwine and form a strong frame.
- Use of geomaterials - geotextiles or geogrids. The material is laid on the surface and covered with soil. After a short period of time, a layer of turf and other vegetation appears, which reliably prevent the soil from slipping. The service life of the geomaterial is more than 50 years.
- mound. This is the creation of barriers from the soil, which is taken from the sole and sprinkled on top of the slope. Used on large areas, tk. takes up a lot of usable space. Periodically, the soil must be poured to increase the height of the embankment.
- Retaining walls made of wood or stone. Not only strengthen the slopes, but also create a comfortable terracing. Most often, this method is used on hilly terrain with any elevation difference. Partitions up to 0.8 m are easy to build on your own. Massive walls that can withstand heavy loads are built using heavy equipment.
- gabions. These are special factory-made structures filled with pebbles, stones and other materials. If the contents are sprinkled with earth, in the spring a growth will appear above the structure, which will disguise it.
A little attractive at first summer cottage, located at an angle to the horizon, with the right approach, it will become a beautiful and comfortable recreation area. To obtain a good result, it is necessary to study the features of using the problem area, which should be taken into account even at the stage of developing a summer cottage project.
Country plots located on the slopes differ from land plots located on the plains. Due to the peculiarities of the soil and relief differences, the owners have to deal with the need to carry out additional work. In most cases, to solve existing problems, it is necessary to resort to the installation of retaining walls, terracing and the construction of special structures that help strengthen the soil layer.
Land on a slope - what can be done
A detailed study of many nuances and a thoughtful approach make it possible to obtain original solutions at the end. Incorrigible at first glance, the shortcomings turn into a highlight, as a result of which the summer cottage located on the slope acquires attractive advantages that delight the neighbors.
In order for the efforts expended not to be wasted, it is advisable to study the area before starting work in terms of its further planning. Particular attention should be paid to functionality.

The buildings built into the slope look very original. This tactic expands the range of architectural solutions through the implementation of additional exits to the adjacent territory from different levels.
At the planning stage, it is desirable to determine the locations:
- outbuildings, the operation of which involves the supply of electricity;
- gas or water pipes (toilet, summer kitchen, sauna).
Saving time and effort also turns into early marking of sites for:
- flowerbeds;
- gazebos;
- canopy;
- recreation areas.
The slope can also be used for arranging a cellar.

In the photo - the manufacture of retaining walls
A careful study of level differences and ledges can lead to a non-standard solution in the field of landscape design.
Some corners seem to be created by nature for:
- waterfalls;
- streams;
- light openwork.
Rocky areas are ideal for rockeries that recreate a mountain landscape.
Steep slope fighting
The predominant part of summer cottages is used for planting trees, ornamental and agricultural plants.
Realization of the goals set is impossible without reducing the degree of steepness of the slope.
- To solve this problem, most often they resort to such a simple method of transforming the relief as terracing.
- During the development of the terrace plan, it is important to work out ways to connect individual sections.
- As the latter, level paths or stairs can be used.
- Ascents and descents on steep steps are fraught with rapid fatigue. As a result, it is highly desirable that the height difference between the elements does not exceed 10 cm.
- Stairs oriented to heavy loads should be wide.
Tip: during construction, give preference to monolithic structures erected using the formwork method from a concrete mixture.
- Decorating with stones and tiles is started at the end of the main work.
Tip: For small stairs, use wood and natural stone, cemented or dry-laid.

The transformation of the landscape begins after drawing up a site plan. A sketch created on the ground will also come in handy. Steep slopes require more terraces.
Tip: when arranging the latter, one should not forget about the level of difference. The value of this indicator should tend to a minimum.

Support structures
To enhance the stability of the erected terraces, supporting walls are used, the main function of which is to hold the soil and redistribute the pressure exerted by it. Consider different materials:
| Wood |
|
| A rock | People were convinced of the practicality of supporting walls made of stone several centuries ago. The basis of the method, which does not require the presence of a solution, was the selection of stones of appropriate shapes and sizes. The implementation of this method in practice requires creative thinking and perseverance. The price of work depends on the volume. |
| Concrete | Individuals who are far from building can resort to the method of pouring monolithic concrete. It does not require special knowledge and the arrangement of supporting walls made of natural stone, fixed with a mortar. |
| Blocks and bricks | The instruction allows the construction of supporting walls from such materials. Before laying, work related to the creation of a monolithic foundation must be completed. Most often, for these purposes, a tape variety is used, which attracts owners with a high degree of reliability. With its help, high terraces are equipped, which are characterized by large drops. |

The problem of excess moisture
The effective functioning of the supporting walls is impossible without the presence of a drainage system. With an excess of moisture, the drainage layer successfully fights, for the construction of which sand and gravel are used.
Cope with the task:
- drainage pipes laid in the direction of the slope of the terraces (1 pipe is laid for every 2.5 m);
- if required, drainage trays can be used.

Backfilling of the terrace is carried out in the following order:
- the drainage layer is covered with an infertile layer of soil;
- top is plant soil.
Remember, the possibility of soil settlement is not ruled out. The occurrence of this complication is most likely during the first few days.
Tip: it is advisable to start work related to the improvement of the site after filling up the settled soil.
Conclusion
Summer cottages on a slope can be turned into interesting territories using the terrace method. You will not only add usable space to yourself, but also make your place original. Only it is necessary to strengthen the slope in advance with the help of props.
The video in this article will help you find more information on this topic.

OLYMPUS DIGITAL CAMERA
beautiful landscaping garden retaining wall
We also recommend
 Switching power supply: repair and refinement
 Remote control of light
 Swimming lessons for preschool children
 Notes for the master - home household alarms
 Clock propeller on Atmega8
 Device and relay application examples, how to choose and connect a relay correctly Microcontroller and relay simple switching circuits