Do-it-yourself construction vacuum cleaner-cyclone. Homemade cyclone filter for a vacuum cleaner: a guide to action Do-it-yourself cyclone filter
Quite often, after various types of work, a large amount of fine dust and debris remains, which can only be removed with the help of good vacuum cleaner. A simple home apparatus is not adapted to this. It is necessary to use a high-powered industrial vacuum cleaner. You can make a filter for it yourself.
People who constantly work in the construction industry need to clean up a large amount of various small debris and dust. It can be old plaster, Styrofoam residue, drywall or wood dust. Such garbage is able to settle in a thick layer throughout the room. It is very difficult to sweep this dust with a broom or wipe it with a rag, because due to the large size of the room, such cleaning will take a long time.
 The use of a vacuum cleaner in this case is optimal. A conventional product that is used at home is not suitable for these purposes. The ingress of chips or sawdust will clog the vacuum cleaner or completely disable it. And also a large amount of fine dust will quickly clog the dust collector, which will need to be cleaned every 20 minutes.
But construction vacuum cleaners are large, inconvenient to use, maintain and have a very high cost. For this reason, some home craftsmen have learned to enhance the capabilities of their household product by equipping it with a specialized cyclone filter. Such dust collectors can be purchased at a hardware store or made at home with your own hands. On the Internet you can find many drawings of dust collectors for woodworking workshops.
Experts identify the following advantages of cyclone filters:
- no need to constantly buy disposable bags and containers for collecting fine dust;
- small size;
- quiet operation of the device;
- when the filter housing is made of transparent plastic, it is possible to control its contamination;
- high efficiency.
The principle of operation of the cyclone filter
The cyclone consists of several parts:
- pipe branch;
- frame;
- dust collector;
- chamber with membrane filter;
- intake fan.
Dirty air enters the cylindrical body of the product through the nozzle. The branch pipe is located tangentially to the side walls of the body, so the air flow near the walls of the cylinder is twisted in a spiral. Due to centrifugal force, dirt particles are pressed against the body of the device, and then fall into a special dust collector. The remaining air with dust particles enters another chamber, which is equipped with several membrane filters. As a result, all the collected dust enters the intake fan.
The least polluted membrane compartment, which must be cleaned only after cleaning. The collected dust is simply removed from a special drive, and the device is again ready to perform its duties.
Vacuum cleaners with a similar principle of operation are much cheaper than water ones, but more expensive than membrane ones. For this reason, home craftsmen assemble the cyclone on their own, and then connect it to a household vacuum cleaner.
Do-it-yourself cyclone from improvised materials
It is quite easy to assemble a cyclone filter for a vacuum cleaner with your own hands. It is often needed in the processing of wood. Together with a fraser or an electric planer, a membrane-type vacuum cleaner clogs very quickly and needs to be cleaned frequently, which greatly distracts from the production process. When the master is engaged in carpentry in a small room, then small sawdust create a lot of problems. For this purpose, a cyclone was designed and manufactured from simple parts, which is not inferior to its factory counterparts.
Materials for manufacturing
To make a homemade cyclone, the following materials will be needed:

Assembling a cyclone for a household vacuum cleaner
A special bracket for a small air filter is fixed on the lid of the plastic container, which can be made from a metal strip or corners. The air filter must fit very tightly to the plastic lid of the container. Otherwise, air with dust will enter the outlet pipe. Next, the outlet pipe must be hermetically fixed on top of the cover. Through it, the purified air will enter the household vacuum cleaner. Experts advise leaving the membrane filter of a household product. This will help keep the fan free from dirt and will not reduce the airflow.
Near the air filter, it is worth putting a special dust deflector, which is assembled from a thin metal sheet. This element is able to fight off small particles of dirt that do not fall under the influence of gravity, which allows you to clean the filter much less frequently. The same work can be done by an old women's stocking, which protects the pores of the filter from large and light parts of dust.
The self-made inlet pipe must be positioned tangentially to the walls of the case and tilted slightly towards the bottom of the device. Dirty air will immediately go in the right direction. In order for the walls of the container not to collapse from the vacuum environment, they must be well reinforced with a strip of metal. Plastic containers are not able to withstand heavy loads, because the material is quite thin. Since the fixture is large, it is worth making a plywood frame, which does not hurt to equip with small swivel wheels.
Next, you need to qualitatively fix the assembled filter and household vacuum cleaner to the frame. The mount must ensure quick dismantling in order to clean the container from the collected debris. At the end of the work, you need to test the device. All debris should remain at the bottom of the plastic container.
How to make a water filter for a vacuum cleaner
When a person does not need a professional construction vacuum cleaner, it is possible to make a water chip filter in another way. For example, it can be made from an ordinary traffic cone. Any plastic container with dense walls and a well-closing lid will serve as a dust collector. It is worth noting that plastic container acts as an air system, and leakage has a bad effect on the power of the device. It is necessary to cut off the reference square from the traffic cone. According to the resulting shape of the hole, you need to cut out the top cover from plywood.
An outlet pipe is fixed to the top cover with a sealant, which should be made from an ordinary sewer pipe. This part must be lowered to the middle of the building cone. When it is raised higher, the dust swirl will be wrong. If the outlet pipe goes too low, dirt will be sucked into it.
The narrow end of the traffic cone is also hermetically sealed into a plywood circle that attaches to the trash bin. It is worth checking the tightness of all seams and connections several times. An inlet pipe is placed near the upper cut of the cone, into which dirty air will enter.
Next, you need to check the correct assembly of the dust collector. The outlet pipe must be connected to the inlet of a household vacuum cleaner using a factory hose. Therefore, the nozzle should be selected in accordance with the diameter of the vacuum cleaner hose. The waste collection hose is connected to the inlet of the product. A test run is required. When the device is assembled correctly, all debris will accumulate at the bottom of the plastic container, and the membrane filter of the household vacuum cleaner should remain clean.
The shape for the cone can be made by hand. For example, to make from metal sheet, having previously calculated the development of the product. And an old bucket made of galvanized metal may also come up.
This is a video of the “Lawyer Egorov” channel about how to assemble a home-made full-fledged cyclone from a bucket and two corners of a funnel in five minutes. In other words, a separator for chips, sawdust and other debris.
If a household vacuum cleaner was used in a workshop or when repairing an apartment, then its dust collector will quickly fill up and the work will have to be interrupted. But using the Cyclone, you can forget about changing the dust bag for years. This separator has been serving for the second year, and the author of the development does not get enough of it. In just two minutes, make sure that the title of this video is not exaggerated, and you can assemble a complete separator in your garage in just a couple of minutes.

For ease of use in the Cyclone workshop, it can be installed on a makeshift platform in the form of a cart, the production of which will take at least half an hour. But the separator can be used without it. In the case when it is connected to the chip removal of a permanently installed router, thicknesser saw and other equipment that produces sawdust, the trolley is not needed at all. But it is very convenient when cleaning the workshop. A bucket, two hose cutters and a vacuum cleaner can easily fit under any household machine. By the way, if you plan to organize a single dust removal system in a small home workshop with your own hands, perhaps connecting such a separate chip suction to each machine will save you from obvious engineering and technical difficulties to solve.

From the circular table equipped with the Cyclone, sawdust almost does not fly out. It is recommended to power the tool and the chip extractor connected to it through one toggle switch. Then, when you turn on the machine, the vacuum cleaner will immediately work. In the manufacture of his bow, he used a milling cutter, and the dust from it flew in all directions. For this reason, until I made my own Cyclone, I tried not to use the router. Now there is less debris from the router. For a thicknesser, a corner from a larger diameter hose is better.
By placing the camera inside a homemade working Cyclone, you can see how the sawdust is sucked into the separator, but cannot escape from it and get into the vacuum cleaner. The idea of a cyclone type separator is to force the coarse dust sucked into the container to fall to the bottom of the container, to prevent this dust from entering the zone from which air is pumped out. Gravity, friction and centrifugal force cause the sawdust to rotate inside the bucket, pressing against its walls, and fall in a spiral to the bottom of the container. As you can see, the idea of a separator is extremely simple and there is simply nothing to break in this primitive design.
Everyone is used to the fact that such a container has the shape of a cone, but as practice has shown, the separator can also be cylindrical. The advantage of the proposed design is that the entrance to the tangential air flow separator is not through a curved side wall, which is not at all easy, but through a flat cover. And this is much easier and faster to do. In addition, it reduces the size of the structure. The entire design of the Cyclone is placed on one lid, which allows you to carry the Cyclone by simply removing the lid from one bucket and covering it with another.
There is unsurpassed mobility. So you can consistently fill bucket after bucket with sawdust, and then get rid of the sawdust at once. For example, put them in a compost heap, heat them up by loading them into a long-burning oven, or use them in any other way.
How the homemade cyclone was made
He described his Cyclone in more than detail. It's time to show how he did it. So, I drilled two holes in the lid. One is in the center of the lid, the other is on the edge, close to the stiffener. This was done with a core drill of a slightly smaller diameter than the polypropylene corner of the fan pipe. In this design, I used corners with a diameter of forty millimeters. Remove burrs and at the same time bore holes for a snug fit of the corner, conveniently wrapping a sheet of skin around the tube. It is important to stop here. Do not bore the hole beyond what is necessary. It remains to insert two polypropylene corners into the hole, and a full-fledged Cyclone is ready. As noted, I did not even seal the joints. I inserted the hoses from the vacuum cleaner into the corners, since there are sealing rings in the corners according to the size of the corrugated hose of the vacuum cleaner, and immediately began to use the separator. All operations did not take more than two minutes.
For the convenience of using the Cyclone and increasing its mobility, I assembled a T-shaped cart. Collected more than half an hour, but with repeated use, this work pays off. The trolley was assembled from the waste of a crooked worthless plywood. Marked the platform in place. I put a bucket and a vacuum cleaner on a sheet of plywood, marking the dimensions with a pencil.
The sawing table looks unsightly, as it was assembled from garbage in haste and these are all temporary solutions. A piece of square pipe and two clamps are used as a parallel stop. But, despite the primitive design, you can work on this homemade product. Set the depth of cut according to the thickness of the plywood ...
Discussion
- All vacuum cleaners (except one type) have at least two significant drawbacks. First, they throw the finest (and most dangerous!) dust back into the room (even water ones throw the finest dust back into the room along with the smallest drops of water). The second - during operation - these emissions raise the dust in the room into the air. On the Internet, experts indicate that fine dust settles for many hours, and even days! And this fine dust is practically not excreted by the body.
But there is a type of vacuum cleaners that do not have these shortcomings - these are central (or built-in) vacuum cleaners. These vacuum cleaners, sucking in air, do not supply it back to the room at all, and after cleaning, they throw it out of the room (usually outside the building). this, the vacuum cleaner itself does not need to be carried, carried along, because. it is permanently installed in another (utility) room, and special sockets are installed in the processed rooms, which are connected with a central vacuum cleaner with plastic pipes, and a flexible hose with a dust collection nozzle is connected to these sockets. I have a volume of 14 liters of storage dust collector (a large, durable plastic “bucket”), and its cleaning consists in a very convenient detachment of this container and its emptying - usually once a month. Such vacuum cleaners have long been used in hotels, childcare facilities and hospitals. (I have been using such a vacuum cleaner at my dacha for 4 years already). - I did an experiment on the manufacture of such a cyclone. It turns out that not every bucket is suitable. First, the bucket must be deep enough. The upper part, approximately 15–20 cm high, is the vortex zone. If the mountain of garbage reaches it, then the garbage will fly straight into the hood. So 12-liter paint buckets are of little use, they are tritely filled halfway (and shavings, for example, from under a thicknesser are very voluminous) in a minute. Secondly, the bucket must be rigid. If the inlet pipe is plugged, then the vacuum will collapse the bucket, deforming its wall, and the vortex will no longer be cylindrical, and the garbage will again fly into the hood. I took two buckets of paint, slightly different diameters. I cut out the bottom of the larger one, leaving a narrow side - this turned out to be a stiffener. And inserted one into the other. The double wall and rim provide acceptable rigidity, and the total height gives more volume - the bottom bucket is completely filled. Third, the lid should be easy to remove. The paint bucket has a self-sealing lid, and the vacuum sucks it in. Then you have to pry with a screwdriver - disassemble. You need to somehow loosen the cover or seat, perhaps cut or bend fragments of the sealing rim. Tightness will still be ensured by vacuum, the lid will suck very tightly.
- I would like to see how this vacuum cleaner gets rid of fine construction dust and how long it will last? Another question?? Is it hard to find such an empty iron bucket? let's say we don't have one in any hardware store, and ask every friend if he has one)) well, on the tenth person who says that there is no such bucket! already the search is turning into some kind of trouble. And even without a real vacuum cleaner, this device will not work. In a word, the result is to find an unnecessary good vacuum cleaner that works more or less, then find the ill-fated iron bucket, hell knows where to buy two dignity tubes, put it all in a diplomat and throw it to hell! Because how to go and buy an industrial one for 6 rubles and not engage in amateur performances. I agree for sawdust, this miracle cart will do!
- Good video. Everything is shown clearly, without unnecessary long explanations. I am suffering with a home dry vacuum cleaner Steel 1600W. As soon as I turn it on for cleaning, a cloud of fine dust flies out of it, then it already works normally. But it is not suitable for a large cleaning of a room, a corridor or something else voluminous. His bag fills up instantly, the bag is not very convenient, because. it clogs itself with dust, and knocking out and digging branches out of it is an unpleasant process. I like your bucket idea. I dreamed that there was water in the bottom of the bucket to absorb the pollen. Isn't it dangerous to pour some water into it? Will it close the system on itself?
A home vacuum cleaner is so familiar to the household that no one thinks about the principle of its operation. Since the invention of this cleaning assistant, the only possible way to separate dust from clean air has been used - a filter.
Over the years, the filter element has been improved, from a banal bag of dense tarpaulin, it has turned into high-tech membranes that hold the smallest particles of debris. At the same time, it was not possible to get rid of the main drawback.
Filter makers are constantly looking for a compromise between cell density and air throughput. In addition, the dirtier the membrane, the worse the air flow through it.
30 years ago, physicist James Dyson made a breakthrough in dust collection technology.
He invented a compact dust separator that works on the principle of centrifugal force. Needless to say, this idea was not new. Industrial sawmills have been using centrifugal scorch and chip accumulators of the "cyclone" type for a long time.
But no one guessed to apply this physical phenomenon in everyday life. In 1986, he registered a patent for the first cyclone type vacuum cleaner, called G-Force.
In general, there are three ways to separate dust from clean air:
- filter membrane. The most massive and cheapest way to remove dust. Used in most modern vacuum cleaners;
- Water filter. Air with garbage passes through a container of water (like in a hookah), all particles remain in a liquid medium, and a perfectly clean air stream enters the outlet. Such devices have gained popularity, but their use has not become widespread due to the high cost.
- Centrifugal dry cleaning filter of the "cyclone" type. It is a compromise in terms of cost and quality of cleaning in comparison with a membrane and a water filter. Let's take a closer look at this model.
The principle of operation of the cyclone
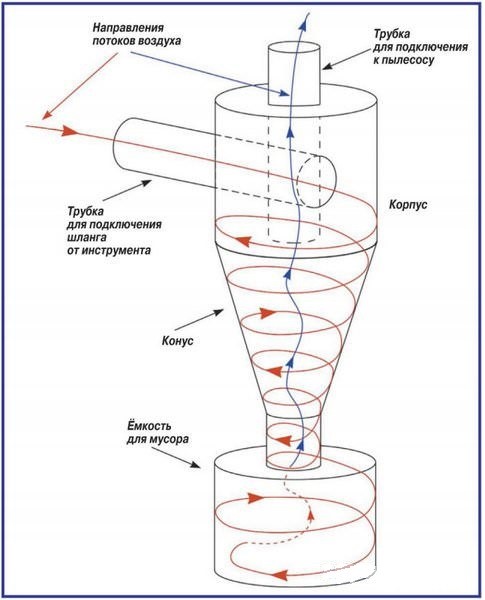
The illustration shows the processes taking place in the cyclone filter chamber.

Polluted air enters the cylindrical filter housing (2) through the pipe (1). The branch pipe is located tangentially to the walls of the housing, due to which the air flow (3) is twisted into a spiral along the walls of the cylinder.
Under the action of centrifugal force, dust particles (4) are pressed against the inner walls of the housing, and under the influence of gravity, they settle into the dust collector (5). Air with the smallest debris particles (which are not affected by centrifugal force) enters the chamber (6) with a conventional membrane filter. After the final cleaning, they exit to the intake fan (7).
The membrane filter is minimally contaminated and only needs to be cleaned occasionally after cleaning. All the dirt is simply poured out of the drive, and the vacuum cleaner is ready to work again.
Vacuum cleaners with such a filter are cheaper than water ones, but still more expensive than membrane ones. Therefore, many craftsmen make a cyclone-type filter with their own hands, and connect it to the entrance to a conventional vacuum cleaner.
When processing wooden blanks, everyone must have come across the fact that everything around is covered with a large amount of chips, sawdust and wood dust. In order to at least partially get rid of them, various dust collectors, chip extractors, filters and other devices are used. Many power tools and machine tools have their own dust collectors, while others have special outlets for connecting a vacuum cleaner.
In home workshops, it will be better to use special. vacuum cleaner than household. Firstly, the engine in special. the vacuum cleaner is designed for more than a long work, and secondly, as a rule, it is equipped with a hose with a length of 3 m, which greatly simplifies its use with power tools. And yet, the minus of each vacuum cleaner is a small container for garbage.

How to make a cyclone filter with your own hands
Having set out to somehow simplify the work of cleaning the vacuum cleaner and reduce the cost of bags, I began to collect information on this issue. On the Internet, I found a description of various types of simple devices in the form of intermediate dust collectors for a vacuum cleaner. Firstly, these are dust collectors in the form of a mini-cyclone. They do a good job of collecting dust in a separate container, preventing it from getting into the vacuum cleaner, which increases the service life of the bags tenfold. The process of cleaning the dust collector from debris is also facilitated. Ready-made fixtures are sold through online stores, but their cost is quite high with a very simple design.
Design. I decided to make my own mini-cyclone dust collector. The author and developer of this design is Bill Pentz from California. Having earned himself a serious allergy to fine wood dust, he subsequently devoted a lot of time and effort to the fight against both the disease itself and its causes.
The dust collector is a device, the main element of which is an inverted truncated cone, inserted into the bottom of the dust collection container. A tube for connecting to a vacuum cleaner is inserted into the upper part of the dust collector, and a tube for connecting a hose from the tool is inserted tangentially on the side.

When air is drawn in by the vacuum cleaner, turbulences form inside the apparatus, and debris, moving along with the air, is thrown by centrifugal forces to the inner walls of the filter, where they continue their movement. But as the cone narrows, the particles collide more often, slow down their movement, and, under the influence of gravity, fall into the lower container. And the partially purified air changes direction and exits through a vertically installed pipe and enters the vacuum cleaner.
There are two mandatory requirements for this design. This is, firstly, its tightness, otherwise there will be a sharp loss of suction power and air purification quality. And, secondly, the rigidity of the container and the cyclone body itself - otherwise it strives to flatten.
There are tables on the Internet with drawings of cyclones for various particle sizes. The cyclone body can be made from galvanized or plastic, or you can choose a ready-made container of a similar shape. For example, I have seen cyclones based on a traffic cone (necessarily rigid), a plastic flower vase, a tin horn, a large copier toner tube, etc. It all depends on what size cyclone is needed. The larger the debris particles, the larger the diameter of the tubes for connecting hoses should be and the more massive the cyclone itself is.
Bill Pentz points out some of the features of his design. So, the smaller the cyclone in diameter, the greater the load on the vacuum cleaner. And if the garbage container is low and flat, then there is a possibility that garbage will be sucked out of the container and get into the vacuum cleaner. When using a container of any shape, it must not be filled to the top with garbage.
The choice of material. I decided to use plastic pipes for external sewage and fittings for them as blanks. Of course, it will not be possible to create a full-fledged cone from them, but I was not the first to try to use them for this purpose. The advantage of this choice is the rigidity of the parts and the tightness of their connections due to seals. Another plus is that there are various rubber pipe inserts that allow you to easily and tightly connect the vacuum cleaner hose. In addition, if necessary, the structure can be easily disassembled.
For my collection of large sawdust and shavings, I made a cyclone from a ∅160 mm pipe. I used ∅50 mm pipes as hose connectors. I want to draw your attention to the fact that the eccentric adapter from a pipe ∅110 mm to ∅160 mm must be funnel-shaped. I have seen flat ones, but they won't fit - nothing will work with them, and debris will get stuck.
Do-it-yourself cyclone progress of work
Operating procedure. In the plug for the ∅160 mm pipe and the body pipe, I made holes for the hose outlets. Further, using a thermal gun, I glued a piece of pipe ∅50 mm into the plug. It should be located in the middle of the cyclone body and be a couple of centimeters lower than the side tube, so it is better to first glue the longer pipe into the plug, and then cut it in place during assembly.
On the Internet, I found complaints that hot glue does not stick to PVC pipe, and advice to weld parts with a soldering iron and pieces of the pipe itself. I tried, but didn't do it. Firstly, the glue stuck to me perfectly, and, secondly, the smell of melted plastic discouraged any desire to weld anything in this way, although the connection may be more durable and neat.
The difficulty of working with hot melt adhesive is that it does not spread, and the seam, in the absence of skills, is not very even. I had such a sad experience - I decided to heat it with a hair dryer to even out the seam. I got a smooth surface of the adhesive influx, but at the same time the plastic tube itself was deformed, and I had to throw it away.
In the next step, I glued a spiral to the inner surface of the case, which should direct the air flow down to the dust collector. This solution was recommended by Bill Pentz himself - according to him, this almost doubles the efficiency of the cyclone. The spiral with a height of about 20% of the gap should fit snugly against the body and make one turn with a pitch equal to the diameter of the inlet for the side pipe.

As a material for it, I used a plastic rod, which I heated with a hair dryer and bent in the form of a spiral (photo 1), and then glued it into the case (photo 2) using a heat gun. Then glued the side tube (photo 3), the inner end of which is directed slightly downward.
As soon as the glue had cooled and hardened, I measured and cut the vertical outlet tube so that it was 2-3 cm below the cut of the side tube, and finally assembled the whole structure.
I made a garbage container from a hard plastic barrel, to the bottom of which I attached wheels - it turned out to be very convenient for cleaning it (photo 4). I cut a viewing window on the side of the barrel and closed it with acrylic glass on hot melt adhesive. I reinforced the connection with a plastic ring and bolts from above. Through such a porthole it is convenient to monitor the filling of the container.

I didn’t have a barrel lid, and I made it from a piece of countertop, which had been waiting in the wings for a long time after inserting a sink in the kitchen (photo 5). On the underside of the countertop, a milling cutter selected a groove under the edges of the barrel and glued a window seal into it to seal the connection. (photo 6). The hole in the lid is supposed to be in the center, but then I would have problems placing the cyclone in the workshop, so I made an offset hole. The lid is attached to the barrel with latches from a long-broken vacuum cleaner. From him also used a hose to connect the cyclone. I want to draw your attention to the fact that it is better to take hoses from vacuum cleaners. If you take, say, a corrugated pipe for electrical wiring, when you turn on the vacuum cleaner, a whistle and a terrible noise appear.
Do-it-yourself cyclone for a vacuum cleaner
Connecting the cyclone to the instrument. Not all tools have an outlet for a vacuum cleaner. So I decided to make a simple adjustable vacuum cleaner hose holder. For him, from scraps of plywood, he made blanks for levers (photo 7). The holder was supplemented with a sewer clamp for attaching the hose (photo 8). The stand was specially made large in size so that it was possible to fix it with a clamp or hold it with a load. The holder turned out to be convenient - I use it not only for a vacuum cleaner hose, but also for a portable lamp, a laser level and supporting a long workpiece in a horizontal position.
After assembling the cyclone, he conducted several experiments to determine its efficiency. To do this, he sucked in a glass of fine dust, after which he measured its volume that fell into the dust collector capacity. As a result, I was convinced that about 95% of all garbage gets into the barrel, and only very fine dust, and then an insignificant amount of it, gets into the vacuum cleaner bag. This result suits me quite well - now I clean the bag 20 times less often, and only from fine dust, which is much easier. And this despite the fact that my design is far from perfect in terms of shape and proportions, which, of course, reduces efficiency.
Wiring. After checking the performance of the cyclone, I decided to make a stationary distribution of hoses around the workshop, since a three-meter hose is certainly not enough, and a vacuum cleaner with a cyclone is bulky and clumsy, it is inconvenient to move them around the workshop every time.
Due to the fact that standard pipes were used, it was possible to mount such a wiring in an hour. I pushed the vacuum cleaner and cyclone into the farthest corner, and laid pipes ∅50 mm around the workshop (photo 9).
In the workshop I use a specialized BOSCH green series vacuum cleaner. After four months of operation in tandem with a cyclone, I can say that they are generally coping with their task. But I would like to slightly increase the suction power (when working with a jigsaw, you have to move the hose almost close to the cutting zone) and reduce the noise level. Since few chips get into the vacuum cleaner itself, there is an idea to make a more powerful impeller and take it outside the workshop to the street.

I can also say that the suction power of the vacuum cleaner dropped a little when using it with a cyclone, but at work it is not very noticeable. There were doubts that static electricity could accumulate on the elements, because the whole structure is plastic, but this practically does not happen, although earlier, when collecting fine dust, the hose had to be grounded.
Of course, when using professional pipes with large outlets, pipelines of this diameter are not enough. It is better to take ∅110 mm or more, but then both the vacuum cleaner and the cyclone should be more powerful. However, for my homework, this is enough.
The hose of the vacuum cleaner was firmly fixed on a small pipe outlet ∅50 mm and inserted it in the right place of the wiring. At the same time, the remaining wiring outputs are closed with plugs, rigidly put on short taps. Relocating the hose is a matter of seconds.
During operation, I encountered one small problem. If a small pebble gets into the hose (the concrete floors have not been repaired for a long time) or another small but heavy object, it moves through the pipes to the vertical section in front of the cyclone and remains there. When such particles accumulate, other debris clings to them, and a blockage may form. Therefore, in front of the vertical section of the wiring, I embedded a chamber from a ∅110 mm pipe with an inspection window. Now all the heavy debris is collected there, and by unscrewing the lid, it is easy to get it. This is very convenient when fasteners or small parts accidentally get into the vacuum cleaner. here it’s simple - I unscrew the lid, turn on the vacuum cleaner and mix everything that remains in the revision with my hand. Small particles immediately fly into the cyclone tank, while large particles remain and are easily removed. Their number is usually insignificant, but recently I found a missing screwdriver bit in such garbage.
Also, the inspection hole can be used for temporary connection of a ∅100 mm hose. It is enough to unscrew the cover - and we get a finished hole ∅100 mm. Naturally, in this case it is necessary to muffle all other wiring inputs. A flexible adapter can be used to simplify connection. (photo 10).

To remotely turn on the vacuum cleaner, a switch was installed next to the hose clamp (photo 11) and additional . It can be used to connect a power tool, then you will definitely not forget to turn on the vacuum cleaner before using the tool - this often happens to me.
I use all of the above devices on a regular basis. I am satisfied with the result - there is noticeably less dust in the workshop, it is easier to clean. During this time, I collected several bags of sawdust, and very little debris accumulates in the vacuum cleaner. I want to check the cyclone for collecting small garden debris and dust when cleaning the concrete floor.
I think this design is very useful and affordable for making at home.
Sergey Golovkov, Rostov region, Novocherkassk
Large garbage in the workshop can always be swept away and taken to a landfill in bags. But what about dust, metal or wood shavings, and numerous other microscopic waste products? Buying can be a good hit on the wallet. A regular vacuum cleaner can't do the job. But if you make a cyclone for a vacuum cleaner with your own hands or even your own construction vacuum cleaner, you can save yourself a number of problems!
Why do you need a cyclone filter?
Construction, metal or wood dust is completely harmless in appearance. But this is only at first glance. Working in a dusty environment can harm the respiratory system and cause serious illness. Yes, and the tools will deteriorate from the endless stream of garbage. There may be several reasons:
- Dust gets into the tool and onto the lubricant inside it. As a result, it overheats and fails.
- If the device has moving parts, then dust may well impede their operation, and also lead to breakage in the future.
- Dust can clog special ventilation holes that are designed to cool the tool. As a result - again overheating and breakdown.
The cyclone filter will ensure the collection of any debris in the workplace without harm to the vacuum cleaner.
Principle of operation
Using the aerodynamic air flow, the filter will bind the dust particles together. In turn, centrifugal force begins to act, pressing them against the walls of the container. And then gravity causes the debris to settle to the bottom.
There are many diagrams showing the operation of cyclone filters. One of them can be seen below.
Cyclone filter device
You can make such, or a similar filter yourself. There are a huge number of options for execution, but one thing unites them - the principle of operation. Any design will consist of:
- A conventional vacuum cleaner (preferably powerful);
- cyclone filter;
- Containers that collect garbage.
throughout the structure. In normal condition, it is designed for cleaning the house, suction of small debris and dust. In this case, a cyclone filter appears, which means that the length of the duct will be increased by almost three times, respectively, and the load on the device will be greater. The design turns out to be quite massive, unlike a conventional vacuum cleaner, so such a trick is necessary to ensure that the length of the hose is enough for comfortable cleaning.
Do-it-yourself construction vacuum cleaner: what you need
As mentioned above, you can use a regular household vacuum cleaner. But this option does not attract many masters, so a home-made unit becomes the best solution.
In order to make such a device, even if it has been preserved since the time of the distant Soviet past. This is the advantage that homemade vacuum cleaners can be made from unnecessary old units.
So, from the vacuum cleaner we extract such elements as:
- Motor;
- Cord connecting the device to the network;
- Power adjustment device;
- Suction corrugation.
Prepare for the body:
- A plastic pipe with a diameter of 5 cm;
- Container with lid;
- A sheet of plywood about 0.5 cm thick;
- 14 nuts and bolts M6;
- Galvanized sheet metal strip;
- Car filter (from a minibus);
- Switch - 220 V;
- sealant;
- Sandpaper;
- Glue gun rods;
- Corrugated hose (possible from a washing machine);
- Threaded stud with nuts and washers;
- Wiring corrugation PND32.
It is worth immediately preparing the tools:
- Drill;
- Glue gun;
- Sealant gun;
- Locksmith keys;
- Screwdrivers;
- Electric jigsaw;
- Wire cutters.
Manufacturing
At about a distance of 10 centimeters from the top of the container, we make a hole into which we connect the pipe. The hole should be an oval even shape. The branch pipe is placed in it slightly at an angle downwards, tightly adhering to the wall. With a glue gun, you need to fix the result, as in image 2.

A pipe inserted into a pre-drilled hole in a barrel
From the inside we fasten the adapter to connect the suction hose.
We cut out two circles about half the size of the cover, drill holes for the bolts. Parts are attached on both sides. After other circles are drilled, and with sandpaper, their surface is cleaned of burrs. We cover the products around the perimeter with sealant, after that, they are installed and finally fixed. The hole for the pin is made in the center. A little to the left there will be a larger hole for air intake.
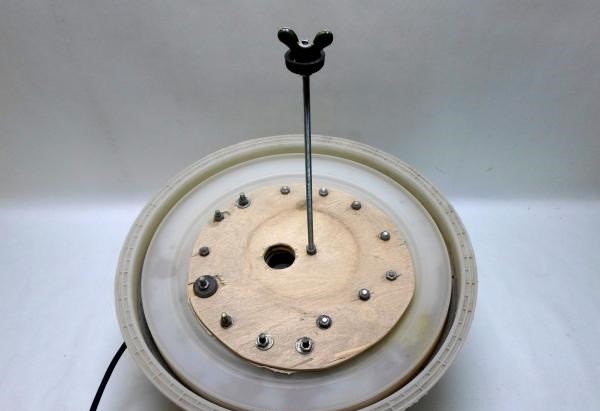
Location of stud and air outlet
We will need an air filter without a mesh (it will be clogged with debris, which is extremely unprofitable) in which it is placed. It must be removed with clippers. One side of the cylinder should be closed with a plywood plug. The filter is attached to the stud with a nut.
By the way, the filter will help not only get rid of dust, but also prevent the inhalation of dangerous small particles, such as toner. If you use a conventional vacuum cleaner in this case, the bags are easily clogged with toner dust. In this case, all particles will settle in the collection container.
In order to make it more convenient to mount, it can be cut out along with the plastic parts. To fix it on the lid, you will need a clamp, which can be made from a strip of tin.
The switch and regulator are placed side by side. After that, all parts are connected to each other with wires, and a wire with a plug is connected.
Make sure that everything is connected correctly and there are no bare wires, and only after that check the operation of the device.

Location of motor, switch and power regulator
The length of the suction hose is usually not enough, so it is extended with a corrugated pipe.
Standard nozzles from a vacuum cleaner will help to put things in order in any workshop. They can also be used to connect to equipment, for direct garbage collection, using simple adapters.
So, a home-made cyclone-type construction vacuum cleaner is ready!
What to do if there is no way to make a vacuum cleaner with your own hands?
Of course, not everyone wants to make a vacuum cleaner from scratch, and the necessary parts may not be there. In this case, a regular household vacuum cleaner is perfect, preferably with high power. Next, you just need to make a cyclone filter for it, which will not require large expenditures. Most often it is made from a traffic cone or bucket. Let's consider both options.
A drawing of a homemade cyclone can be seen below.
Cyclone drawing
Road cone cyclone
A simple and quick way to build a cyclone on a vacuum cleaner directly with your own hands is to make it from a traffic cone.
What is needed for work?
Since the manufacture of the cyclone will be carried out with your own hands, you need to prepare the necessary tools and consumables. So we are preparing:
- traffic cone;
- Plastic pipes (about 40 mm)
- 45 degree angle;
- Plywood;
- Pieces of chipboard;
- Glue gun and rods;
- A container with a lid, it is possible from under the paint.
Let's start manufacturing
To begin with, we take plywood to make a cover from it that closes the cone. We cut out a circle of the desired diameter, and cut two holes in it. One will be in the middle, the second parallel at the edge, as in Figure 6.

Plywood circle with holes for air inlet and outlet

Pipe inserted into one of the holes
It is also necessary to insert a pipe into the second hole, but a 45-degree angle is put on top of it. It is moving along it that the air will twist into a whirlwind. The angle is inside the cone.
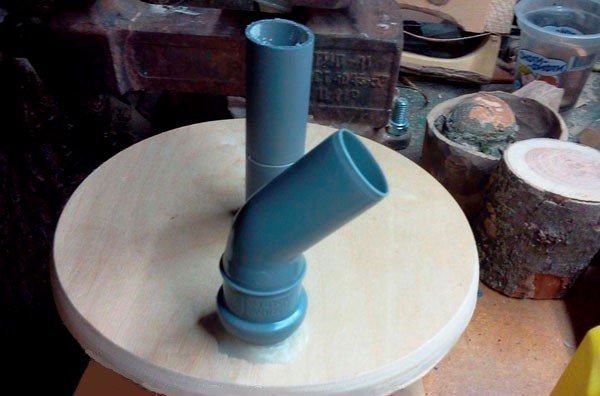
Corner location for proper air circulation in the cyclone
After the pipe is glued as in the case of the first. The lid is ready. Then it is glued into a cone.
The tip of the cone must be cut off. After, it is inserted into the bucket lid in the center into a pre-prepared hole. The place of attachment is glued. From the inside, the cover must be reinforced with pieces of chipboard. After they are pulled together with self-tapping screws.
The result is a product as in Figure 9.

Ready product
Bucket cyclone filter
Another simple material for making a cyclone filter will be an ordinary bucket, you can even use paint. The volume must be calculated based on the power of the vacuum cleaner - this is approximately 1 liter of capacity for every 80-100W.
The bucket must have a hermetically sealed lid, and the shape of the container itself must be round!
For manufacturing you will need:
- A bucket with a lid (can be from under construction mixtures);
- Compass;
- 2 knees 90 and 45 degrees;
- plastic pipe;
- Silicone;
- Rubber or o-rings;
- Stationery knife;
- Glue gun.
Manufacturing
We make holes in the lid. You can use a factory compass, or you can make a homemade one. Screw two self-tapping screws into the wooden rail at a distance of exactly 2.7 centimeters from each other.
The center of each hole is marked 4 cm from the edge. Next, circles are cut out for pipes at the marked places.
We insert the knee tightly into the socket, having previously applied silicone to its side. From the inside of the product, a sealant is pulled onto the socket. If necessary, crimp with a clamp. It will turn out as in Figure 10.

We insert the pipes into the bucket lid, turning the corner correctly
From the outside, the inlet pipe is almost flush with the cover. On the reverse side, the knee is directed by the rotary part to the center of the bucket. But for the desired effect, it is supplied with a 45-degree turn, which is directed obliquely down as in Figure 11.

View from the back
The second branch pipe, which will draw air, is located in the opposite direction. A knee is inserted into it so that air is taken from the wall of the bucket. O-rings must be used in each case, they will securely fasten the pipes and prevent them from turning.
We conclude that you can make a cyclone for a vacuum cleaner with your own hands quickly and easily, using improvised means. At the output, you should get approximately the same device as in the figure below.

Cyclone filter connected to a household vacuum cleaner
Difficulties you may encounter while working
It is not difficult to create a cyclone filter with your own hands, or even a home-made vacuum cleaner, as we have seen, if you have the necessary materials.
In some cases, it is recommended to take metal containers for collecting garbage, as they are considered more durable. In the presence of a vacuum cleaner with huge power, a plastic bucket can “collapse” so to speak. It is drawn in due to the strong flow of intake air. This happens extremely rarely, but it is better to immediately provide for such an option. It can be leveled, but damage to the product will be on the face. So you always need to consider the quality of the plastic and the power of the device. In the case of a traffic cone, this problem does not arise.
We also recommend
 Switching power supply: repair and refinement
 Remote control of light
 Swimming lessons for preschool children
 Notes for the master - home household alarms
 Clock propeller on Atmega8
 Device and relay application examples, how to choose and connect a relay correctly Microcontroller and relay simple switching circuits