Do-it-yourself folding serving table on wheels. Serving table on wheels: stylish options and modern designs (90 photos)
You can make a serving table with your own hands using boards and perforated metal corners available in hardware stores. The final product will look stylish and fit perfectly into a modern kitchen. And if you have ever tried yourself in something similar, for example, you did, then this project will not seem difficult to you.
Note: Since the perforated corners can be of any length, you can make the serving table a height and size that suits you. These parameters largely depend on the purpose for which this piece of furniture will be used. If, for example, as a coffee table, it will be lower. But if you plan to equip, where the serving table will serve as the same island, then it should be taller and larger.
Required tools and materials:
- 4 corners 38x38 mm, 79 cm long (for vertical corner posts);
- 6 corners 38x38 mm, 53 cm long (for short edges of shelves);
- 6 corners 38x38 mm, 90 cm long (for the long edges of the shelves);
- 2 shelves 90x53.5 cm, 26 mm thick (in this case, from a glued board);
- tabletop 120x60 cm, 26 mm thick (glued board);
— 4 furniture swivel wheels with braking mechanism;
- 4 wooden bars 7.5x10 cm, 35 mm thick for mounting wheels;
- cutting board 30x30 cm 26 mm thick;
- hacksaw for metal;
- bolts, nuts, washers and spring washers;
- connecting plates;
- a tool for tightening bolts and nuts (for example, a socket wrench);
— shaped cutter with a rounding nozzle 6 mm;
- a drill with the necessary nozzles for screwing in screws, a 3 mm drill;
- a circular saw;
- impregnation for wood;
- screws 25 mm and 50 mm;
- nozzle for a drill for drilling holes 90 mm;
- clamp, flat rail;
- fine-grained sandpaper;
- chisel;
- furniture fittings.
DIY serving table: step by step instructions
Step 1. Cutting corners

With a hacksaw for metal, cut the corners for the future table according to the selected sizes. For convenience, you can fix the corners with a clamp before cutting, and place the hacksaw blade at a slight angle to the plane of the corner (as in the photo).
Note: Vertical racks can be made in other lengths.
Take the short horizontal details of the table (corners 53 cm long). At each corner on one of its planes (sides), step back from opposite ends by 40 mm. Make an incision in these places to the middle of the corner (fold at an angle of 90 degrees). After making an incision from each edge of the corner along its rectangular fold, remove the resulting pieces of 40x38 mm. This is necessary so that when short and long horizontal parts of the table come into contact, there are no overlaps on which the wooden shelf will lie unstable.
Step 2. Assembling the table frame

Assemble the table frame by bolting the long and short horizontal corners to the inner sides of the vertical corners. Do not overtighten the nuts at this stage. Under the top shelf (where the countertop will be attached), screw the connecting plates to the vertical posts - two per post. This will allow the structure to be stable during operation.
Step 3. Aligning the structure

At this stage, check the squareness of all corners. Measure the diagonals - they should be the same. Now you can tighten the nuts tightly, fixing the correct shape of the frame.
Step 4: Fitting the countertop and shelves

Most likely, for the serving table that you plan to make with your own hands, you will not find shelves and countertops of the right size in the store. Therefore, you will have to adjust their sizes yourself. To do this, take measurements, draw cut lines and use a clamp to attach a flat rail in the right place. Please note that the rail should not touch the cutting line, but be at the distance from it that the saw is placed from the edge of the tool. Check everything again. Now make the desired cuts.
Step 5: Rounding the Edges

Use a router bit to round off the edges of the tabletop. Sand with fine sandpaper. Paint the finished edges with wood stain of the appropriate color (in this case, walnut).
Note: If you chose unpainted boards for making your own serving table, you can paint them along with the finished edges at this stage.
Step 6. Fastening the boards

Center the tabletop on the metal frame. Drill 3 mm holes with a drill bit where you need to drive 25 mm screws. Drill and drive screws from the underside of the shelves.
Step 7 Attaching the Wheels
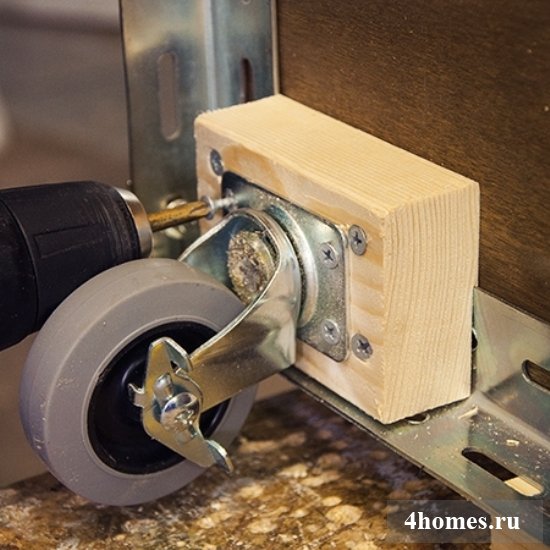
Make a hollow in the wheel bars with a chisel 2 mm deep and 3.5 cm wide along the long edge of the bar (see photo). One side of the corner should hide in it so that the bar fits perfectly to the bottom shelf. Attach the bars to the shelf with 50mm screws. Attach the wheels to the bars.
Step 8 Attach the Cutting Board

Step back to the center of the table from two adjacent edges of the tabletop by 30 cm. In this place, drill a hole with a diameter of 90 mm with a drill bit.
Note: Do not throw away the sawn off circle, but screw it on the underside of the cutting board. Insert the sawed-off circle in its place and watch how the cutting board rotates on the countertop around its axis.
Coat all wood surfaces with a sealant that can be used on food contact surfaces.
Step 9. Finishing work
Now is the time to equip the mobile table with convenient accessories. Attach them to the side or bottom of the countertop. In this case, I used a paper towel holder, a glass holder, a ladle holder, a bottle opener, and two metal towel handles. Place a bucket for food waste under the sawn hole in the countertop.
Well, the do-it-yourself serving table is ready!
The original swivel round coffee table with book and magazine stands is a very popular option, and it is quite possible to make it yourself. Such tables were very popular back in the 20th century, and years later they often decorate living rooms. How ?
A table on wheels is very convenient in everyday life, because if necessary, you do not need to overstrain it, but you can simply easily roll it to the right place in the apartment.
To make the table not massive, but a fairly light structure, it must be equipped with wheels, which will be hidden under the plinth.
This design is very convenient, because it allows you to move it anywhere without problems, even if it is the canopy of books and magazines.
Materials and fixtures
To make a table yourself, you will need:
Since it can be difficult for a beginner to make this product, it is advisable to strictly follow the step-by-step instructions during the work.
Back to index
Part preparation
To assemble the coffee table, it is necessary, using a jigsaw and a hacksaw, to prepare the following parts:
The dimensions of a small table for the kitchen on wheels.
- 1 round piece with a diameter of at least 55 cm (future countertop, its size is chosen as desired, but it is better that its diameter is no more than 750 mm);
- 2 semicircular parts (as a sample - a circle with a diameter of 55 cm), their width is 265 mm;
- a round blank with a diameter of 55 cm (it will be the base of the table);
- rectangular blank: height 71.5 cm and width 55 cm (this is the central partition that fastens the tabletop to the base);
- rectangular blanks of the following parameters: 245 by 230 mm, 245 by 350 mm, 470 by 245 mm;
- 8 rectangular blanks - 6 by 19 cm and 4 parts - 9 by 9 cm.
Back to index
Product assembly process
- On the cut of the central partition of the table (on the sides with a width of 55 cm) and in the center of the table top and base, use a drill to drill holes for the tongues (use a stopper to prevent drilling through the workpieces). The gap between the tongues is no more than 10 cm.
- At a height of 35 cm and 47 cm, on different sides of the central partition of the table, also make holes for fixing 2 rounded shelves (holes for tongues should also be prepared in their smooth surface).
- Mount the tongues and connect the entire structure into one, carefully look to see if all the parts are connected evenly.
- Attach vertically rectangular blanks (whose height is 35, 47 and 23 cm), mark the areas for their fixation and make holes for the tongues on their sections in the tabletop and at the base of the future product (the entire product should be disassembled). In the rounded shelves, drill holes through to fasten the top and bottom blanks, placed directly one above the other, using a tongue and groove.
Do not coat the tongues with glue yet, since it is rather difficult to make the product correctly for the first time. Assemble all the components on the tongues, carefully see if everything is done correctly. Then you need to disassemble the table.
- When assembling the entire product, start from the bottom: fasten the base to the glued tongues on the central and lower partitions, then 2 rounded shelves, upper partitions and finally the tabletop. When fastening all the elements of the table, use a wooden mallet.
- Wait a bit for the glue to dry.
- On 8 blanks 19 cm long, file the ends at an angle of 67 °, so it will be possible to assemble an even octagonal figure from the blanks. Glue all the ends, fasten them together, press lightly and leave to dry. Apply adhesive tape (such as masking tape) to the outer edges of the elements to prevent them from moving.
- Then you need to turn the table over and glue the resulting octahedron from below to the base of the table - you get a base. When the glue dries, remove the adhesive tape.
- Now attach the wheels. They are attached with screws to the base of the product inside the octagonal product, make sure that they are not visible from under the plinth, which, in turn, should not prevent the table from moving. You can control the height of fixation of the rollers due to the thickness of the supports to them. Pay attention to the fact that all 4 wheels spin easily and do not touch the plinth.
- Glue the ends of the product elements with a furniture edge.
In conclusion, the coffee table can be originally decorated. There are various ways to decorate, for example, mosaic, decoupage, craquelure, painting, etc. You can also decorate the coffee table to your taste with sea shells, mirror elements, wood, etc.
The option of decorating countertops using decoupage is widespread. After its completion, at least 2 layers of varnish must be applied to the countertop. When each new layer dries, it is necessary to sand the product - this is necessary in order for the varnish coating to turn out to be absolutely smooth and even.


How to make a mobile table on wheels with your own hands In a small apartment you can’t fit a lot of furniture. The more valuable becomes a table that can be used for different needs, for example, for a laptop or computer, which, if necessary, is reclassified as a coffee or dining table. It is such a mobile table that we will build today. It is a tabletop with legs on wheels and a shelf. You will need From materials 2 carpentry boards of any kind of wood - one 1.8 cm thick, the second - 2.5 cm 4 furniture plastic wheels Sandpaper with a grain size of 6-60 2 types of screws - the first type is 4.5x35 mm in size, the second - 7.5x60 mm Wooden plugs for screws Glue on wood Furniture varnish From tools Electric jigsaw Router Grinder Screwdriver, which can also be used as a drill. It will be good if the drilling depth is regulated on it. Three types of drills - the first type with a diameter of 4.5 mm, the second - 7.8 mm, the third - 10 mm. - 50 cm from a board 2.5 cm thick. In principle, you can make a part of any other size that is convenient for you. Shelf 83 cm long, 41 cm wide from a board 1.8 cm thick Legs in the amount of 4 pieces. The legs are 62 cm long and the section size is 5x5 cm. 76 cm long and 4 cm wide, two side 34 cm long and 4 cm wide. 4 front and rear fastening strips 73.5 cm long and 2.2 cm wide 4 side fastening strips 31.5 cm long and 2.2 cm wide, cut drawers and fastening strips from a board with a thickness 1.8 cm. How to cut and prepare parts for a mobile table On the shield, mark each part. Cut them out with a jigsaw. Regarding the legs - since the cross section of the legs is 5x5 cm, and we have the thickest shield 2.5 cm thick, you cut out not four blanks, but eight. Then glue them together, holding them with clamps while the glue dries. As you cut out the sides, make hidden spikes on the ends and round them with sandpaper. The dimensions of the spikes for the upper tsargs are 1x1x5 cm. For the lower ones - 1x1x3 cm. The tsargs are cut out with a milling cutter, but if you don’t have one, then cut it shallowly with a hacksaw from four sides. Then secure the drawer with a clamp and use a chisel with a hammer to knock out the unnecessary. Sawing out the tsargs In the legs, cut out the grooves for the spikes of the tsargs with a milling cutter. To find out where to cut, attach the side to the desired place and circle the spike with a pencil. Sawing grooves in the legs for the drawers Then, in the center of the groove, make a through hole with a drill with a diameter of 7.8 mm. From the outside of the groove, drill a hole with a drill with a diameter of 10 mm. The depth of the drilled hole should be 1.2 cm. You will sink the head of the screw into this hole. Preparing the Hole for the Screw As for the shelf, once you cut it out, make a 4.5x4.5 cm cutout in each corner of the shelf. Drill holes in the mounting strips with a 4.5 mm drill. Attach them to the inner sides of the drawer side with screws so that they are flush with the edges of the drawer side. Assemble the table without fastening the parts to check if all the parts fit together. If not, then bring them to mind. If yes, then go to the next section. How to assemble a mobile table on wheels for a small room Coat the grooves of the legs with glue and insert the side drawers into them. To make the connection strong: 1. attach two beams to the table top, the distance between which is slightly greater than the length of the leg-side-side joint 2. place the draw-side-leg joint between them 3. drive the pegs into the gap between the leg-side-side joint and the bars so that the drawers pressed against the legs very strongly 4. leave the part in this position until the glue dries. In the same way, insert the front and rear sides into the legs. Screw the legs to the sides with screws, the dimensions of which are 7.5x60 mm. You remember that we made holes in the grooves of the legs. How to screw, insert plugs. Sand all the details, then varnish. When the varnish dries, sand the parts again and varnish them. When the second layer of varnish is dry, use 4.5x35 mm screws to fasten the table top and shelf to the fastening strips on the sides. Turn the table over and screw on the wheels. The result should be such a table.
Serving tables are back in fashion and are especially relevant before the holidays. Thanks to its compact size and convenient wheels, such a table can be at hand anywhere in the house. Do you need extra space for drinks in the living room when guests arrive? No place to put sauce and chips when you and your family decide to watch a movie on the couch tonight? Tired of running between the dining room and the kitchen, setting the table? It is much easier to arrange glasses, cutlery and snacks on a serving table and calmly lead them to the right place, rather than having a steeplechase run over each plate.
Serving table by Cattelan Italia
Most serving tables are very compact in size, so they are suitable even for small apartments. In addition, in conditions of limited living space, it is always better to give preference to mobile and transforming pieces of furniture than stationary ones. For example, it is worth considering that a table on wheels will be more convenient than a regular stationary tea table, because it is much easier to move it into a corner if it interferes, or transport it to a room that currently lacks horizontal planes.

Serving table by Jacues Bar Cart
For small apartments, a folding serving table is perfect, which can literally be hidden in a closet when it is no longer needed.

Folding table from Rexite
For studio apartments or those who like to organize unexpected gatherings on the terrace, a compact folding table may be suitable, which, if necessary, turns into a dining area for four people, but when folded does not take up much space.


Buffet table by Flix - mobile solution

Remember that round models are usually more compact than rectangular ones, West Elm
A serving table can also be useful in the kitchen, especially if you do not have enough space in stationary drawers and shelves.


Table-container for the kitchen, Miniforms
Of course, an important factor in addition to the size of the table is its appearance. Among the variety of models, you should focus on the general style of your interior.

Modern, minimalistic model with a focus on a copper shelf from Miras

Table for fans of classical and baroque style from Modenese Gastone group

Table for outdoor and country style interiors, Atmosphera

The embodiment of the Scandinavian style in the interior from Artek
What else should you pay attention to when choosing a serving table? Very often, it is these small objects that become the color or stylistic focus of the entire interior, attracting the main attention to themselves. This is especially convenient for those who want to add zest to the decor, but do not dare to buy a bright sofa or an unusual designer wardrobe. A mobile and small table is just right as an accent for a living room or dining room, while it will not look intrusive.

The giant wheels of the Chariot table are a decoration in themselves. You can choose from a variety of colors and finishes


An unusual combination of colors and materials in a model by Douglas & Company
It is worth paying attention to models with additional shelves and compartments, in which it will be convenient to place the little things you need at hand.

Swivel shelves and bottle holders in colorful side table by Colé Italian Design Label
When choosing furniture for your home, keep in mind the wide variety of options available, and do not get hung up on the standard set: wardrobe, diva, table. Even one small design item can significantly change the perception of the interior and become the starting point for creating your own unique style.

Table made of recycled aluminium, Roost for Forma Living
We also recommend
 Switching power supply: repair and refinement
 Remote control of light
 Swimming lessons for preschool children
 Notes for the master - home household alarms
 Clock propeller on Atmega8
 Device and relay application examples, how to choose and connect a relay correctly Microcontroller and relay simple switching circuits