Do-it-yourself garden barbecue fireplace scheme. When there are no competitors in the kitchen: how to make a brick barbecue with your own hands
We will send the material to you by e-mail
It is hard to imagine a vacation in a country house without meat roasted on coals. Metal braziers, no doubt, are convenient and inexpensive designs. But no matter how carefully you treat them, any metal burns out over time, and you will have to think about a new purchase. In addition, the metal brazier must be removed after use so that hunters for other people's good do not covet it in your absence. The most correct and reasonable way out is to build a brick barbecue in the country. The editors of the site have collected for you, in our opinion, the most interesting ideas for finished projects, as well as detailed construction instructions from the foundation to the exterior.
A beautiful barbecue oven will decorate your yard
The main thing in the design of a garden brazier is the correct distribution of heat. For this, a barbecue and a brick brazier have three vertical walls and a chimney for extracting combustion products. The heat from the fuel rushes up into the hood, so working at such a barbecue is a pleasure. These garden ovens keep heat for a long time, so you can roast more than one batch of meat while the coals cool.
It's all about the practical side of things. But there is also a purely aesthetic one - such do-it-yourself designs can become a real decoration of the recreation area on your site. The main thing here is to observe reasonable proportions and correctly combine the architecture of the building with the overall design project of the estate. The most popular today is the country style, which combines rustic simplicity and practicality with solidity and special aesthetics. Natural stone in the decoration and powerful canopies that can hide from the weather are the main features of this style.
Look at the photo of how brick barbecues can look like.


Pros and cons of brick barbecues
Skeptics may object: why bother with such costly and heavy construction, when it is much easier to get by with a factory-made brazier made of thick-walled metal? Let's look at the pros and cons of a brick garden fireplace.
| Advantages | disadvantages |
|---|---|
| Long service life - such braziers do not rust and do not burn through. | The solid design takes up a lot of space, requires the allocation of a separate area that is safe for working with open fire. |
| Excellent heat retention, which allows you to save fuel and evenly fry meat. | The brick brazier is not mobile, it cannot be moved. |
| The possibility of including the structure in the overall architectural ensemble, a worthy design of the recreation area. | For the construction of a barbecue, a special heat-resistant material is required. |
| The possibility of building with your own hands and the variability of finishes. |
The dimensions of a brick barbecue directly depend on your needs. Drawings and photographs of a wide variety of designs are easy to find on the Internet, it will not be difficult to choose the option that is right for your yard.

Related article:
Brick barbecue complex: dimensions and design
If you have planned the construction of a brick outdoor barbecue, it makes sense to consider an integrated design. It can include work surfaces for arranging dishes and cutting meat, a firewood rack for storing fuel, a cauldron, additional devices for smoking meat and fish.

You can focus on the following dimensions:
- the minimum width of the oven is 60 centimeters, the optimal one is 80. The dimensions largely depend on the brick used;
- the height of the grill is 70 centimeters. These parameters can be adjusted according to your height;
- the stove itself, the place for fuel are located 10 centimeters below the grill;
- the height of the barbecue is at least 2 meters, and taking into account the chimney - all 3.
These are the dimensions of the simplest design. Add to them countertops and other fixtures you need, and get the overall dimensions of the complex.
How to choose the right place for a barbecue design
Location is an important point in the construction of a barbecue complex. Here are some tips for choosing a territory:
- an open fire stove cannot be built near wooden buildings and other flammable objects;
- it is better to choose the location of the complex away from home so that the smoke and aromas of food do not go through open windows;

- the smoke from the stove should not disturb your neighbors, otherwise your barbecue plans may be thwarted by the arrival of the fire brigade.
If you summarize these requirements, it turns out that the best option for the location of the barbecue is the backyard on the leeward side.

Related article:
Brick BBQ Projects: Popular Models
Any construction begins with a project. You can not do without it in this case. The sketch of your future complex needs to be turned into order. This is not easy, so for beginners, the best advice would be to use the drawings and photographs of brick barbecue projects with the finished order. So, it will be easy to imagine the location of each brick. For free, such drawings for making a brick barbecue with your own hands can be found on many resources. We have selected a few examples for you.


How to build a brick barbecue oven with your own hands
It would seem that the construction of a brazier is a simple matter. Nevertheless, it is worth approaching it with all responsibility. The durability of the structure will depend on your approach. Properly selected material and stable construction, good finishes are all components of success.
The choice of material and the necessary tools
To build the foundation, you will need cement, sand and gravel or crushed stone. Reinforcement of the foundation is carried out using metal reinforcement. For the furnace, in addition to bricks, you will need to buy a stainless steel sheet, a metal pallet, roof tiles, a metal corner and a wooden beam.
And now about which brick to use for barbecue. Keep in mind: the brazier can only be built from special, refractory bricks, and not every building material is distinguished by such qualities.

Only fireclay or ceramic bricks are suitable for building a barbecue. Fireclay is usually used to make the firebox itself, while ceramic is used to build a pipe. The main requirements for bricks for barbecue:
- brick density in the technical documentation - from 20 to 100 units;
- frost resistance (marked in the documents with the letter F) - from 30 to 300;
- the brick must not have cracks, chips or other visible defects;
- the porosity of the material should be low, and the color should be uniform.
You can quickly check the brick right in the warehouse: hit it with a hammer. From a good solid brick, the tool will bounce. Poor quality will immediately “pop up” with cracks.

For work, you will need the usual tools of a bricklayer: a shovel and a trough for preparing a binder mixture, a trowel, a building level, a tool for jointing.
The basics of making a do-it-yourself drawing of a brick barbecue
It all depends on whether you are going to build just a stove with a hood or build a gazebo around it. If we are talking only about the barbecue, then a primitive drawing with a size calculation will do. It should be based on the dimensions of building materials. The height of the foundation is usually 3-40 centimeters, the dimensions are one square meter. Under the brazier, a firewood is usually planned. Much more difficult if you are planning a brick barbecue in the gazebo. Here you have to start with the layout of the canopy itself, calculations of its area and the location of the brazier.

There should be a meter of free space in front of the barbecue so that it is convenient to cook. You also need to think about where the table will be located, and plan a place for pulling out chairs.
Step-by-step instructions for building a barbecue oven with an oven and a cutting table
Let's figure out how to independently create a monolithic brick barbecue with a cutting table.
| Illustration | Action Description |
|---|---|
 | Work begins with determining the location and marking the site for the barbecue complex. After marking, select the ground by about 20 centimeters and install the sides for pouring. |
 | Fill the prepared place with crushed stone and prepare the reinforced frame for pouring. |
 | Fill the prepared area with concrete. Use high-quality cement grade not lower than 300 for pouring. |
 | The lower part of the barbecue can also be folded from foam blocks. They will not be exposed to heat, as they do not directly contact the brazier. |
 | The author of this project used an original idea - he used wave slate to fill the base of the brazier. I made bumpers for it and fixed it on the mortar directly on the base masonry. |
 | Pour the base with concrete mortar and wait a few days until it becomes. |
 | For the brazier, you need to make a metal pallet from thick-walled steel. |
 | A small oven for baking on an open fire can be made from an old gas cylinder. |
 | After installing the stove, you can mark out a place for the brazier and proceed to laying its walls. |
 | Perform laying in sequence. By the way, the back wall can be made of less “smart” brick, as it will still turn black from smoke after the first cooking. |
 | To install the chimney, gradually narrow the masonry upwards. |
 | The chimney can be adapted from a concrete pipe or an old metal barrel. |
 | Lay out the cutting table with ceramic tiles. This surface will be easy to clean. |
 | The lower part of the structure must be closed. To do this, make wooden doors. |
 | Install the doors and place inside the firewood and the necessary equipment for cooking: baking sheets, grates, and so on. |
 | Place a meat rack over the roaster. To install the grate during the masonry process, you need to remove the metal pins on which it will rest. |
 | Enjoy the process. In such a complex, you can cook pies, and bake meat and vegetables. |
Video: brick barbecue step by step
How beautiful to decorate a brick barbecue
The design of the barbecue complex can be very diverse. You can use natural stone, it looks very colorful against the backdrop of the garden. Tile, colored bricks, plastering and the use of real tiles are popular.
Masonry drawings for ordering a brick barbecue are specific plans or diagrams created specifically for convenience during the assembly process. A general plan drawing is required for any order in order to get acquainted with the dimensions of the barbecue, calculate the amount of material for it.
The base, of course, is behind a monolithic foundation; without a reinforced base, a serious structure cannot be delivered. It is also important to put several layers of insulation on an already dried foundation before working with rows to avoid moisture gain.
Working in order
We start with the first row, where it is important to maintain the level. We are talking about the level of the floor, if the construction is above the natural horizon. It is most convenient to set the cord along the planes and only then use a trowel, applying cement or clay mortar to the base.
The simplest brick barbecue order
If the first row is usually just a plane laid out of bricks, then it can be more difficult further on, because some barbecue designs are arranged with a cauldron or an additional oven.

An example of ordering a barbecue with a cauldron or an outdoor oven
Description of masonry
From the sixth we move on to poking (transverse masonry). It should turn out so that the brick will stand on the ledges on each side (plane). They are necessary for the installation of the lattice, its correct location in the future.
Continue the next 3-4 rows in half brick, maintaining the original thickness. And from the tenth row, it is necessary to repeat the ordering of the barbecue oven, with the expectation of re-transverse masonry for gratings.

Although brick ledges can be bypassed by replacing them with steel corners or other fasteners. It is important that this moment be thought out at the time of laying outdoor barbecues, then you can do it yourself reliably, with the expectation of space for a smokehouse or additional compartments.
They often try to make the corner option according to the type of extension, when the main stove is simply placed on the foundation, and a brazier or a place for a cauldron firebox is laid out separately on the corner. Everything is simple here: we put a wall with a height under the working plane, finishing the last row with bonded masonry. Similarly, a support is placed for a stone countertop, for example. But such material is not always affordable, it is often replaced with wood tiled.
Variants of orders and schemes

Scheme for a barbecue or fireplace stove

The device of the center of the barbecue, similar to a barbecue for a gazebo
How it works in practice
The order is not difficult to present in the schemes created for the construction literature. But in reality, everything looks much more interesting.

Start work like this

This is the basis and space for fuel. Then you need to raise small walls, form spaces for the door and ash pan
After that, you need to arrange the overlap of the lower tier of three rows of bricks. Then it will turn out to equip a barbecue next to the firebox, just under the ash pan.
Let's just say that, having done this work, the first cycle is downloaded. You can start creating a structure from above, where there will be protrusions or rods.
The most important point in studying the order is that you need to use a refractory type of brick, which you cannot put on ordinary clay.
You need to buy a heat-resistant solution or special clay.
The plan also includes a chimney on almost every brick barbecue project. But it is desirable to do it after the complete drying of the finished structure. The way out of a situation where there is no time and excess material is to construct a frame from reinforcement and boards. It turns out a kind of formwork into which concrete is poured. So cheaper and faster.

Technical points
A simple do-it-yourself brick structure is sometimes placed on a poured foundation slab, but mortar is not used. This approach is optimal for those who are not confident in their abilities, want to save money or just test the country version of a barbecue or barbecue.

It will come out quite original, and the order is the same, only it can be disassembled if necessary, increased in size, or even assembled into stacks of bricks
There is only one minus - this is the lack of good protection from the wind, because there is no familiar arch. And if the structure is not assembled under a canopy, then the heat from coal during the rains will have to be protected.

A barbecue without a solution, a smokehouse and a cauldron can be assembled by eye, but they always try to calculate their actions in advance, calculating similar plans or drawings on paper
Results
Simple barbecue ovens and brick braziers are not built without several proven orders. Yes, you can build for good luck if you have extra money. But the main mistake in this case is that nothing can be redone without damaging the furnace. Therefore, before landing on the solution, they try to measure each row dry, undermining the marriage, working on inaccuracies.
The debate about who is the ancestor of the barbecue does not subside to this day. In fact, almost every nation has a culture of cooking on an open fire or coals. Although the word barbecue itself is of English origin and means an open fire, the stoves on which food is cooked have a lot of varieties and design solutions.
Design choice
Several factors influence the design of the furnace. A barbecue area in the country house with your own hands can be equipped, but this requires a suitable place. If the territory is limited, and you plan to fry the meat on major holidays, then it is quite enough to buy or make a metal one. This is the simplest and most affordable solution.
It is much more difficult to fold a barbecue in a brick cottage with your own hands, plus the price of construction will be higher than in a portable version. But this design is more functional and durable. Also, do not forget about the aesthetic side of the issue, brick or stone stoves, with the right approach, can become a pearl in the design of your site.
As for ovens that are exotic for our country, such as the eastern tandoor, it is better to entrust the arrangement of such structures to professionals. The same can be said about the stove complex, when, in addition to a brazier with a grill, it is planned to build a smoking compartment, a wood-burning stove with an oven, a washing department, a table and a storehouse for firewood.

The video in this article shows how to make a simple brazier.
Choosing a place for construction
Theoretically, 1.5 m² is enough for the simplest barbecue or grill, but cooking on fire is a special ritual and the surroundings that accompany this action should also be appropriate.
As a rule, a do-it-yourself barbecue area in the country is set up in places that are not accessible to prying eyes. It can be a free-standing gazebo or a canopy, partially bordering on summer cottages.
Planning such a complex in the far corner of the garden would not be the right decision. Of course, from a fire safety point of view, this would be ideal, but think about how many times you will have to cross the site while you prepare a feast, and after that it will still need to be cleaned.

To ensure fire safety, a distance of about 5 m from the fire is sufficient. Most often, this place to relax is located under a canopy near the kitchen. With this approach, it is much easier to bring water from the house and draw a conclusion into the drain pit.
Important: the entire furnace complex is being built separately, it should not border on any utility or residential buildings, this is fraught with a fire.
When starting to build a barbecue in a brick cottage with your own hands, pay attention to studying the wind rose on your site. The stove is installed on the leeward side, because neither you nor your guests or neighbors will like to breathe smoke from the brazier at all.

Undoubtedly, the central place in such a complex. But for convenience, it would be useful to equip a small storage for firewood, some compartments for dishes, a place to store skewers or grill grates. It would be nice to bring water and equip a cutting table.
Let's talk about construction
When choosing the design of the complex, it is better to give preference to more open options. There are enough closed spaces in the city and when you get out to the dacha, you want volume and closeness to nature. It should be noted right away that, having no experience in construction, building a good indoor pavilion with your own hands is quite problematic. But the brick barbecue itself is quite within your power.

Unlike the classic barbecue, the barbecue is a multifunctional design. The hearth itself is practically no different from the barbecue, it also has a rectangular shape and guides for skewers.
But stops for grilling are mounted above, sometimes with a spit, a smoking cabinet can be located above them, in addition, an oven and a number of related compartments can be attached, starting with shelves for dishes and ending with a mini-bar. Of course, the number of compartments is selected individually. Such a design cannot be called easy and for its installation it is necessary to lay the foundation.

Foundation laying
After a worthy place has been chosen and a general sketch of the structure has already been sketched out, you can start laying the foundation. The length and width of the barbecue is calculated individually, depending on the size of the firebox and the presence of related structures.
Important: the foundation slab or block must exceed the dimensions of the brickwork, along the perimeter by half a brick.

You can lay the supporting structure in 3 different ways.
Choosing the appropriate method should be based on data on the composition of the soil, the presence of quicksand and the climate in the region.
- The fastest option is to use a precast concrete slab. For this, the soil is selected, the depth is determined depending on the thickness of the slab. At the bottom, a sand and gravel cushion of 50 mm is made, and after tamping, a slab is laid. Although the option is quick, you will need a crane to lay the slab, plus there is a possibility of uneven shrinkage.

- The next option is also a type of slab foundation, but is considered more reliable. The point is that the reinforced concrete slab is arranged on site. To do this, a pit is made with a depth of about 350 mm and a dense sand and gravel cushion is laid.
After that, the formwork is mounted, the reinforcing cage is installed and concrete is poured. The solution is made with the proportions of concrete grade M200 - M300. - But the most common and reliable is considered to be the usual strip foundation. Unlike the construction of houses, here it is done not according to a closed contour, but according to the U-shaped principle. The laying is carried out to a depth of up to 50 cm. Next comes the standard instruction, 150 - 200 mm sand and gravel filling, on which a reinforced concrete base is poured.

Important: traditionally, concrete gains design strength within 28 days.
But according to technology, in the first 10 days it must be regularly moistened, otherwise the monolith may crack.
Experts advise to cover the foundation with plastic wrap before curing.
Wall masonry
For the construction of a barbecue in the country with their own hands, 2 types of bricks are used. The furnace and that part of the clack, which is in direct contact with high temperatures, is laid out from refractory bricks. It can be fireclay bricks or solid, pre-fired red bricks.
The rest of the structure is made of facing bricks or any block material, up to natural stone. We will consider brickwork, since its installation, in this case, requires less professional skills.
All bricks are soaked in water immediately before laying.
- When the foundation is settled and gained strength, it should be checked for horizontality, according to the level. Deviations are eliminated due to the thickness of the solution when laying the first 2 rows of the base. Before laying, the foundation is covered with waterproofing, it can be roofing material or other rolled material.

Tip: after laying the first 2 rows and clearly leveling horizontally, it is better to let the mortar set for 3 to 4 days.
This is not necessary, but it will be less likely to skew the masonry in the future.

- Traditionally, the height of the furnace is at a distance of 0.7 - 1 m from the ground. After laying 2 rows of the base, another 5 rows of ordinary bricks are laid on them. Next, the firebox will go, so the brick must be refractory. From this point on, every 2 rows it is recommended to lay a reinforcing wire, copper is better, but ordinary wire rod with a cross section of 0.6 mm is also possible.
- The next, bonded row is laid out with refractory bricks across, so as to form an inner rim. The bottom of the firebox will be based on it, it can be made of the same refractory brick, but it is faster and easier to use cast iron grates.
- Further, from 2 rows of refractory bricks, the furnace bath itself is laid out and the bonded row of masonry is repeated again. Skewers with meat will fall on it. If it is difficult for you to lay bonded rows, then a wide metal strip 5-7 mm thick, which is laid between the rows, is suitable for guides under the skewer, but in this case another row of ordinary masonry is added.
- When the support for the skewers is ready, another row of bricks is laid, after which the bonding level of the masonry is repeated again. It is designed to support the grid under the grill.
- Empirically, it was brought that for comfortable cooking, the furnace window should be about 1 m wide and 70 cm high. Above the opening, another 2 - 3 levels are made and the pipe can be laid out.

Chimney and auxiliary structures
- The dimensions of the smoke intake are calculated according to GOST standards, which state that for 1 m³ of the firebox there should be 960 cm² of pipe area, plus the height of the chimney, with such data it should be about 12 m. the pipes for it will be 120 cm², which is 110x120 mm with a pipe height of one and a half meters.
- The chimney cone can be bought or welded from metal. But if you decide to lay it out of brick, then this must be done with a gradual narrowing. For the front and rear walls, a quarter of the width of the brick is taken. For the side walls, half of the length of the block is taken. So gradually bring to the desired section.
- Among the people, the laying of such structures is made on the basis of a clay-sand mortar. But we advise you to use a special fireclay composition for laying furnaces. It is sold in a dry finished form and there is an instruction on each package. Facing is traditionally laid on a cement-sand mortar, the best option is sand concrete grade M300.
- After the firebox is ready, you can proceed with the installation of auxiliary structures and beauty. As mentioned earlier, the stove is lined with facing bricks from above, at the same time a base is being built for a sink and a cutting table. The masonry must be tied into a single structure.
- It is easiest to make stops for mounting a washing bath from a corner measuring 45 - 50 mm, laying it directly into the structure. A table or other horizontal surfaces can be mounted from facing bricks by laying it on a metal corner. Or use an asbestos-cement slab, which is tiled for beauty.

The video in this article shows some of the subtleties in building a barbecue.
Output

When the barbecue area in the country house is equipped with your own hands, the warmth of your hands remains in it, and for the rest of your life your children and grandchildren will remember that it was you who did it. At every feast or just watching the firewood burn, they will remember you with gratitude.


Country rest on Sundays in in most cases associated with cooking delicious meat, fish and vegetable dishes on hot coals. Of course, you can always quickly organize a small brazier, even simply digging a recess in the ground and inventing some crossbars for the net or skewers. But, you see, it is still much better and tastier, with less fuel consumption, the products will be cooked, in the case of using special structures - a barbecue, grill or barbecue.
It is probably a sin for owners of suburban areas in general not to have such devices, stationary or portable, at their disposal. The stores offer a fairly wide selection of such devices welded from metal. However, if the owner of the site has at least basic skills in carrying out construction work or in metal processing and welding, it will probably not be a particularly big problem for him to build a barbecue with his own hands, of varying degrees of complexity.
What is hidden under the word "barbecue"?
First of all, it is necessary to figure out what we should get if the goal is to create a barbecue.
The etymology of this name is not entirely unambiguous - there are several versions of its origin. The most plausible seems to be the option linking him fromancient Greek, and then the Latin word "barbarus", which meant a stranger, a stranger, alien to culture. In our language, the word gradually transformed into "barbarian".
Perhaps the way of cooking these most semi-wild nomadic tribes - barbarians - on open fires or in stone cave hearths, formed the basis of the established name. But, you must admit that we all really, really like this “barbaric” way!
Decided to build a barbecue oven?
But before moving on to the barbecue article, be sure to read how to lay a brick -.
In addition, the tandoor is an excellent solution! Read about your own hands also on our portal.
But the question immediately arises - there are many recipes for cooking on the grill, on the grill or barbecue culinary technology. What is the difference, what is the subtlety that distinguishes one from the other?
By and large, the difference is small, but still it is.
- An ordinary barbecue, as a rule, is some kind of metal or brick container for coals (box, box, etc.), on top of which skewers are placed or a grate is installed on which products are laid out. At the same time, the installation height is not regulated in any way - the delivery is always the upper edge of the brazier itself. From above, the cooked products are freely blown with air, for which no barriers are created. In the box itself, holes were made to blow in the air necessary for burning firewood and subsequent smoldering of coals. In principle, they do not create any additional traction in the brazier - only heat transmitted by direct thermal radiation is involved in the cooking process, which immediately dissipates above the level of skewers or grates.
 The simplest in the "family" is an ordinary barbecue
 This, as you can see, is the simplest of the listed devices. Cooking meat on it requires some skill, since the heat comes only from below, and it is important not to overcook, not to overdry the side of the food facing the fire.
- Grilling also involves cooking on charcoal, but the principle here is different - the closed volume in which the process takes place is important. Meat products may also be skewered or lined on the gridaboveon the smoldering coals that took heat, but then the grill must be closed with a lid.

Hot air in a closed volume is distributed more evenly, and the roasting process occurs simultaneously from all sides. Of course, combustion requires air inlets and smoke outlets, so grills are often supplemented with a small chimney.
- But the barbecue brazier occupies some intermediate position between the usual barbecue and grill, and is closest to the "cave", "barbaric" conditions for cooking meat. It resembles a hearth with one open face.
 Barbecue requires either a hearth closed on three sides ...
 Another option is when there is always a side around the barbecue grill, a wall that does not immediately allow the heat to diverge on the sides from the slightest breeze.
 ... or the grate is surrounded by a side wall that retains heat at a certain height from the fried products
 The walls of this side or hearth are also heated and participate in the cooking process. It turns out a kind of thermal cushion that envelops the product from the bottom and from the edges, and in the case of a focal type of barbecue, also to some extent from above. It is clear that in such conditions the meat is cooked faster, and there is much less risk than overdrying it on the grill or even burning one of the sides. As a rule, on all barbecues one or another possibility of adjusting the height of the grate above the coals is thought out.
There is no artificial draft in a barbecue - the slower the hot air moves, the better. In a focal type barbecue, of course, one cannot do without the organization of smoke removal, but the pipe should not be high - usually from the level of the brazier to the upper head - no more than one and a half meters.
To be honest, all these three culinary devices are so “related” to each other that very often they easily and simply transform one into another. For example, a grill installed or suspended below the level of the barbecue walls immediately transforms it into a barbecue. And if you close the lid on the barbecue or cover the hearth door, then, accordingly, you can cook according to grill technology.

Perhaps the reader will object to such a gradation of appliances for cooking on an open fire and coals, since there are a lot of various opinions on this subject on the Internet. Nevertheless, further in the article those options for the manufacture or construction of a barbecue brazier that meet the criteria described above will be considered.
Barbecue prices Forester
Barbecue Forester
Options will be considered in sequence from simple to complex, from temporary to portable braziers, and then to stationary complexes.
The simplest barbecue grill in ten minutes
This option is available to literally everyone, even people completely unaware building skills. By itself, the method of erecting such a barbecue brazier is in many ways reminiscent of a children's game of cubes.
For work you will need:
- About a hundred bricks (pos. 1). Their number may be less - it all depends on the height of the future "structure".
- Metal sheet (pos. 2) and grate (pos. 3). The size of these elements should be approximately equal. In fact, their length and width will determine the size of the brazier.

The masonry will be carried out "dry", that is, no mortar will be needed.
- For the construction, it is necessary to prepare a flat and solid platform, so that it is fireproof. For example, it is quite possible to lay out a brazier on a compacted soil area, cleared of dry grass.
- On the finished site, a circle is laid out of bricks laid flat, leaving gaps between them of the order of 50 mm for free passage of air from below. It’s worth immediately comparing the diameter of the laid out circle with the dimensions of the sheet and the grate - these metal elements should completely cover it with the resulting “well”. In the above diagram, 12 bricks are involved in the laying of one row.
- In the same way, four more rows are neatly laid, each with an offset, so that the masonry is “in the dressing”.
- A metal sheet is laid on top of the fifth row. Its thickness should be at least 2 ÷ 3 mm, since it is on it that a fire will be made, firewood will burn and coals will smolder.
- The next two rows of bricks will create a kind of hearth. The masonry principle here remains the same as from below, but there is one peculiarity - one brick from the bottom is not reported from the front side and, accordingly, two in the second row (pos. 4). This opening will become a furnace window through which firewood will be loaded and ignited, and coals will be turned.
- The next step is to lay a metal grate on the brick "well", on which the fried products will be placed.
- Two more rows of bricks are laid on top of the lattice. At the same time, gaps between them should not be left - a solid side should form around the brazier so that the “barbecue principle” is implemented. It is also permissible to leave a small opening in the front part, for the convenience of manipulating a spatula or tongs while turning over the fried foods.
Such a brazier can be left on site at summer period, but if there are fears that bricks and metal parts can simply be “taken away” in the absence of the owners, then not difficult at all dismantle it to close the materials in the utility room. If necessary, building a barbecue again will not be ore and will not take much time.
Metal barbecue grills from improvised materials
If the owner of the house has good skills in metal processing and welding, then a portable barbecue model can be a very good option. The task will be even more simplified when there are old unnecessary metal barrels or gas cylinders.
In principle, you can even do without welding - it is this option that will be discussed. Pictures in the left column of the table can be viewed in more detail by clicking on them.
| Image | Description |
|---|---|
 | An ordinary standard metal barrel in good condition is taken. It is important that flammable products (e.g. gasoline) are not stored in it beforehand. External markings are immediately made on the barrel - two parallel lines between the bottom and the lid. The area to be cut should be approximately ⅓ of the surface. The figure shows the markings made by two strips of electrical tape (blue arrows). Pay attention to the location of the filler neck of the barrel - almost at the level of the far marking line, with a slight shift back (red arrow). This is important, as the neck will then be used for the chimney. |
 | The transverse cut lines are marked approximately 50 mm from the flange joints of the cover and bottom, and must run strictly parallel to them. Then, with the help of a "grinder", the intended window is cut out. It is very important to make cuts as evenly and accurately as possible, since the cut out fragment will be used as a cover, and the gaps when it is closed should remain minimal. |
 | Further work will be easier if you immediately build a stand for a future barbecue. There can be a lot of options here, but for example, we can give a simple design that does not require welded joints. The circuit is shown in the figure. You will need pipe sections Ø 40 mm - 4 pieces 750 ÷ 800 mm long (this height will provide the most comfortable use of the brazier), and 2 pieces equal to the length of the barrel laid on the horizontal surface with the addition of another 150 mm to the top attachment points. The connection of the legs with the crossbars is carried out with bolts, for which holes are drilled in the pipes (shown by the arrow) |
 | Now it's time to make jumpers, which will give rigidity to the design of the stand. And it will be cheaper and easier to make them wooden, or more precisely, their plywood with a thickness of at least 10 mm. For this, two strips 700 mm long and two strips 900 mm long are cut, with a total width of 150 mm. In two of them, holes Ø 42 ÷ 45 mm are selected with a drill-crown, equidistant from the center and the distance between the intended centers of the holes is 500 mm. The other two holes are the same, but the distance between their centers is increased to 750 mm. This will give a slight inclination of the legs inward, which will increase the strength of the structure. The first pair of plywood blanks is put on the pipe legs of both metal halves of the frame (blue arrow). For greater rigidity, the jumpers are interconnected using self-tapping screws with a cross member, also made from a plywood strip (red arrow). By the way, this jumper can be made wide - then it will also serve as a fairly convenient utility shelf. |
 | Now - how to fix this wooden jumper spacer at the right height? The easiest way is to fasten ordinary clamps on each of the legs - they will prevent the plywood parts from falling down. It is important to place this node no closer than 400 mm from the top rails so that the wooden parts do not burn from the heat when using the barbecue. Such fixation with clamps will allow, if necessary, to quickly disassemble the entire structure, simply by loosening the nuts and removing the parts from the legs. The lower jumpers are installed in the same way, in which the holes are spaced somewhat wider. The height of their location is 100 ÷ 150 mm from the ground level. It is not necessary to connect them with a cross member. |
 | Everything, the barbecue stand is ready. You can install the barrel from above and continue working. The barrel cylinder is securely placed between the metal crossbars (blue arrow), and its ends rest against the connecting nodes (red arrow), which excludes its movement in any direction. Under the weight of the barrel, the entire structure of the stand, located at a slight slope, will finally wedge inward and will be motionless. |
 | We continue to work on the barrel itself. The main tools are a drill, a screwdriver, wrenches, since all connections will be threaded. It is undesirable to use aluminum rivets, since the thermal resistance of this metal is low. First of all, brackets are installed on which the grid of the brazier will be laid out. These are ordinary steel corners, bolted just below the level of the cut-out opening on one side - and horizontally to them - on the opposite side. Placement of corners - depending on the size and rigidity of the existing grating, so that it is securely installed with emphasis on at least all four corners, and if necessary - with additional corners to avoid deflection. |
 | Most often, a collapsible grate of two halves is used - it is easier to install it in the cavity of the barrel. The figure shows just such an option. The arrows indicate the installed brackets. |
 | It's time to do the hinged lid. On the rear, high part of the opening, ordinary steel window hinges (non-separable) are attached to the screws. |
 | The second half of the loops is screwed to the fragment cut earlier from the barrel. It is necessary to measure the location of the hinges very accurately so that the resulting cover fits exactly to the size of the window and closes it as tightly as possible in the lower position. |
 | Now the next step is the chimney (red arrows). The plug in the drain neck is removed, and a threaded sleeve of the appropriate diameter is screwed in instead. so that a protruding threaded pipe (pos. 1) is obtained. A 90 ° outlet (pos. 2) is screwed onto it, to which a low pipe can then be connected, placing it in such a way that the exhaust smoke does not become an obstacle to a person engaged in cooking. In the lower part of the end of the barrel, it is additionally fashionable to make an adjustable blower (blue arrows). To do this, several holes Ø 10 ÷ 12 mm are drilled (pos. 3), and a damper is placed on the axle bolt above, which can be used to regulate the air flow into the furnace. This is especially important when grilling, as when the lid of the frypot is closed, combustion without oxygen can simply stop. |
 | The last "touches" remained. A chimney pipe is installed (blue arrow). Be sure to provide for the presence of a handle for which the lid of the barbecue grill will open. It is desirable to make it from a material that will not heat up much. Options can be different, for example, such as shown in the figure (orange arrow). If there is a desire, then after preliminary cleaning it is possible to cover the top of the barrel with a special heat-resistant paint. The master who made the barbecue, about which the story was told, additionally fixed a thermometer (red arrow) on the surface of the lid, which allows you to monitor the temperature during the cooking process in the “grill” mode. In fact, the assembly of the barbecue is finished. |
Similar or to a certain extent modified, at the request and imagination of the master, barbecues can also be made from their old gas cylinders. (In this case, care must be taken during the first cut of the container, since there may be an explosive residual concentration of gas inside. It is recommended to rinse the cylinder several times with water, and the first cut should also be carried out in a state filled with water).

A creative approach makes it possible to significantly expand the functionality of the manufactured structure. For example, it is easy to provide an additional “option” for a smoker by installing an additional chamber at the smoke outlet from the main brazier. Another option is to install a separate combustion chamber at the bottom, which will be used specifically in the mode of smoking products. And to maintain the desired temperature and the concentration of smoke required for smoking, an adjustable valve is installed on the chimney. A good example of such a barbecue grill model with the ability to switch to smoking mode is in the attached video.
Video: an interesting model of a barbecue grill with a smoker
If the structure is heavy, then it can be equipped, for example, with a single-axle wheel drive. This will allow you to easily move it around the site or put it in a barn or garage for a period of no demand.
Stationary brick barbecue
Those owners of country mansions, who they love solidity and solidity, they will probably prefer something more monumental, stationary, built of brick for years. Well, in this matter, there is nothing impossible for the independent construction of a brazier-barbecue or even a whole complex or otherwise - a barbecue area.

Choosing the best place for a barbecue complex
First of all, you need to decide on a place. This takes into account a number of rules:
- Very often, brick barbecues are installed next to an existing recreation area - a terrace or a gazebo. It is quite possible to combine these buildings under one roof, of course, taking into account fire safety requirements.
- You should not place the complex too close to a residential building or even attach it to it - this is also dictated by elementary safety rules. It is strictly forbidden to place near garages or utility rooms where there may be a supply of fuel.
- For reasons of hygiene and comfort, a barbecue oven should not be planned in the immediate vicinity of walking places or cesspools, one’s own or neighbors’.
- If possible, it is worth giving preference to a place located on the leeward side of a residential building (taking into account the predominance of winds in the area).
- You should avoid the neighborhood with tall bushes and trees, the crowns of which may be above the barbecue. This, firstly, is unsafe, and secondly, plants can wither and die from high temperatures.
- If the construction of a barbecue is planned in a gazebo that has already been built earlier, then the placement of the stove should be provided so that the chimney does not fall on the roof rafters - it should be approximately in the center between them.

- A good owner will definitely provide for laying paths to the barbecue area so that it can be easily approached, for example, after rain. For the same reasons, it is advisable to pave the site near the furnace itself.
- It will be very convenient if water is brought to the barbecue area, at least through a temporary summer main. Also, it will never be superfluous to conduct a power line - this will make it possible to organize lighting and connect the necessary household appliances. Of course, both plumbing and electricity are optional elements, only at the request and ability of the owners.
- And, finally, the barbecue should be positioned and finished in such a way that this structure fits organically into the overall design concept of the site.
After the site is chosen, proceed to the construction. And it always starts with the construction of the foundation.
Foundation for a brick barbecue oven
Barbecue prices GREIVARI
Barbecue GREIVARI
Any brick stationary structure always has a considerable mass, which means that it requires a reliable foundation. In the case of the construction of a garden barbecue stove, both a tape and a slab, monolithic foundation can be used, but the second one is still preferable. One way or another, it is recommended to pave the area around, and it will already be the basis for, for example, laying ceramic tiles. In addition, a monolithic foundation, even with a small depth, will be a stable foundation for the structure being erected.
- A pit is dug under the foundation in such a way that the resulting slab is at least 100 mm wider in any direction than the planned perimeter of the brickwork. On the front side, the protrusion can be made larger to form a small platform. The depth of the pit can be about 400 mm - this will be quite enough.
- The bottom of the pit is covered with a 100 mm sand cushion, which must be compacted with a manual rammer. On top of it, also with compaction, the same layer of gravel or gravel is covered. As a result, the underground poured part of the foundation will be about 250 mm thick.
- A wooden formwork is installed around the perimeter of the pit. It should protrude about 100 mm above the ground surface - this is how the basement of the slab will be formed. It is advisable to strictly align the formwork horizontally - then the upper edge of the boards will become a beacon for leveling the mortar.
- A reinforcing mesh with cells of 100 × 100 mm is laid. It is better to install it on linings, so that it falls approximately in the middle of the slab to be poured.
- A cement-sand mortar (1: 3) is being prepared, which is poured into the formwork until it is completely filled. The top is leveled by the rule.

Now it remains to wait for the plate to solidify and gain the necessary strength. Recommended first 3 — For 4 days, regularly moisten the surface and protect it from drying out and cracking by covering it with plastic wrap. The formwork can be removed in a week, but gelatinous to proceed with further construction work earlier than in 3 weeks - by this time, concrete should gain about 70% of the strength necessary to withstand the increasing load of brick walls on it.
On the finished foundation, you can build the selected one. We will not consider too complex complexes. For a novice builder, one of the rather simple models, which, nevertheless, have good functionality, will be enough.
A simple option without a chimney

Such a stationary brazier-barbecue should be able to fold any person with the initial skills of a bricklayer. There is nothing complicated - it does not even require ordering. The above scheme will be enough, which can be taken as a basis, and, if desired, changed in terms of the dimensions of the building or its individual elements.

- The size in width and depth of the building will be determined by the dimensions of the available metal sheet for the brazier (pos. 10). It is desirable that it be made with sides, like a baking sheet, so that the coals do not wake up down. Should be the same size fit and grate (pos. 9) - there can be several of them, for cooking different products at the same time on several levels.
- The construction starts from the foundation (pos. 1). The diagram shows an already paved slab, but it is clear that the cladding is done after the construction of the entire barbecue oven.
- Construction begins with laying out 5 U-shaped rows of bricks (pos. 2). The space remaining below (pos. 3) can be used to store some kitchen utensils or a supply of firewood.
- Masonry always starts from the corners of the wall (pos. 6), so that a whole brick lies in these places. The bricks themselves (pos. 7) can be used any burnt ones - the open placement of the firebox does not imply critical temperatures for them. The rows are laid out "in dressing", with an offset of ½ brick.
- The thickness of the seams formed between the bricks (pos. 5) is about 10 mm. As a solution, you can use a heat-resistant masonry mixture, which is purchased in a store. However, the design allows you to get by with the usual masonry cement-sand mortar with the addition of clay. Another option is one part of cement and slaked lime and three parts of sand.
- After laying the first five rows, lay the sixth row on both sides with a transverse arrangement of bricks (pos. 4). Thus, shelves are created on which the brazier pan will lie.
- Above, the masonry continues in the usual straight rows, to the required height (seven rows are shown in the diagram). On the inner side of the walls, brackets (pos. 8) are attached at several levels, which will become stops for laying gratings.
The design can be slightly modified. For example, the photo above shows that several levels of placement of the pan - brazier and grates are provided, respectively, by several rows of transverse brick laying. In addition, the transverse bricks protruding from the outside can become a support for side tables, which are very convenient for preparing and cutting food right at the barbecue. To do this, it is easy to lay out another brick wall on one or even both sides.

Such a simple barbecue grill does not imply directional smoke removal. True, if such a structure is supposed to be placed in a gazebo, then you can hang a smoke hood on top, like a kitchen hood, and from it you can already draw a conclusion outside.
Prices for popular barbecues
A more difficult task - a barbecue with a pipe
The task can be somewhat complicated - to lay down a barbecue with a hearth and a chimney completely closed on three sides. It is clear that the labor intensity and total costs here will be significantly higher, but the structure itself already looks much more solid and can become a decoration of the site.
There is probably no need to tell a lot here in words - much more information will be brought by the detailed ordering of the masonry. It remains only to make some notes to it:

- Experienced stove-setters always recommend, especially for beginners, to anticipate laying on a “dry” mortar, that is, each row of bricks is first laid out without mortar. This helps to accurately determine the row configuration and fit those bricks that require cutting.
- Since the structure already has a closed hearth, its laying out (internal lining) involves the use of fireclay fire-resistant bricks. In the diagram, it is shown in a lighter shade.
- In the basement, you can use the usual masonry mortar. Starting from the level of overlap under the hearth and above, where the area of elevated temperatures will be, a heat-resistant masonry composition is used.
- Masonry begins with the first completely solid row. Of course, there is a constant check for horizontality using the building level.
- Metal corners are laid on top of the fifth row - jumpers along which masonry will be carried out at the beginning of the sixth, and then the seventh solid rows. Two compartments, which will be located under the hearth, can be used to warm up or keep ready-made meals in a hot state.
 Continuation of the scheme - ordering from the tenth row to the very top of the pipe
 - Over the eleventh row, jumper strips are again laid, and on top of them - two continuous rows, which will become the bottom of the focal chamber.
- From the 14th to the 21st row - a hearth, the walls of which are immediately lined with fireclay bricks from the inside. If it is assumed that the fire will not be built on a removable metal pallet, but directly on the surface of the hearth, then its base should also be lined with fireclay bricks.
- After laying out 21 rows, a jumper is installed along which the front overlap of the hearth will be laid.
- In the future, the masonry goes strictly according to the scheme, with a gradual narrowing towards the center - this is how the pyramidal part of the chimney is formed.
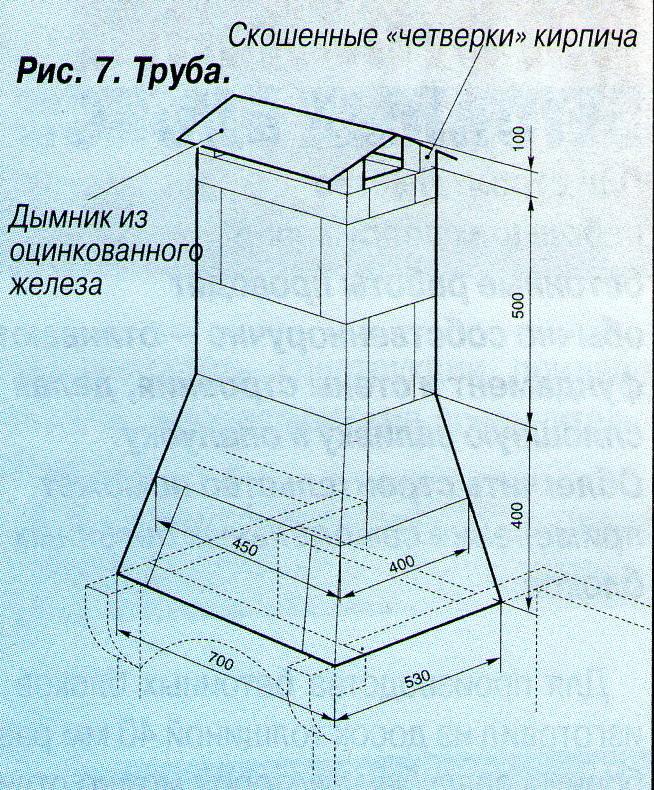
- The stepped rise of the pipe can subsequently be lined with a casing made of thin sheet metal - so that rainwater or snow does not accumulate and stagnate on the ledges. A rainproof metal cap completes the pipe device.
- On the side walls of the hearth, metal brackets can be fixed at several levels for the location of barbecue grills.
As you can see, in this case, there is nothing critically complicated: the main thing is consistency, utmost accuracy and accurate calculation when laying each row, with the obligatory control of the horizontal and vertical walls.
Again, this structure can be basic, near which it will be easy to attach cutting tables.

Well, for those who still want to build a more complex complex on their own, with broad functionality, with a stove, oven or cauldron for cooking pilaf, you are invited to familiarize yourself with the detailed video instruction. This will help you to quickly assess your funds and building capabilities in order to make the right decision on choosing an acceptable model.
Video: instructions for building a brick barbecue complex
It’s good if there is a metal barbecue on the plot, but not only practicality is important for a person, you also want beauty. Functionality and attractive appearance - this is a brick barbecue. There are both simple models, the manufacture of which does not require special skills, and there are very complex structures - real brick complexes that only a professional can make. It’s better not to take on the construction of such structures without experience, and everyone can try to lay down a simple brick brazier or a barbecue oven.
What is the difference between a grill, a fireplace, an oven and a barbecue
 At the fireplace, stove and barbecue, there is a brick wall on the back of the brazier, which the grill does not have. It is necessary to keep the heat, and to reflect it on the frying food.
The design of the fireplace, stove and barbecue provides for the construction of a chimney that allows you to remove heated air and smoke away from the cook, the grill does not have this element.
In fireplaces and stoves, the heat is located in the firebox, in the grill device there is a metal tray for this.
The heat at the grill, fireplace and barbecue is retained only during the combustion of fuel, and the stove is able to remain warm for a long time. 
Barbecues and stoves combine the function of a heating device with cooking, a grill is needed only for cooking, and a fireplace is exclusively a heating device.
What tools and materials will be required to build a brick barbecue:

Preparing the masonry mix
 For the construction of bricks, you need to choose high-quality mortars. You can use 2 options for such solutions:
- ready-made compositions (separate mixtures for walls and fireboxes);
- clay mixed with pure sand.
Such compositions have their drawbacks and advantages, they need to be examined in detail. Previously, only clay was used in the construction of furnaces, but it has a serious drawback. Heating structures built on clay mortar must be well protected from moisture. It cannot be used for laying bricks on a pipe; in such places, mixtures based on cement or lime are used. In recent years, refractory compounds have become available and sold dry in hardware stores. They go to work after dilution with water.
Clay is the cheapest binder that is completely environmentally friendly.
For masonry, you must choose dark red clay. Checking the quality of raw materials and the finished mixture is carried out as follows:
- You need to take 500 gr. clay, stir it with 200 ml of water so that it does not stick to your hands.
- They make a lump out of this mass and throw it on the floor or on the wall, if cracks appear on the lump - the clay is too greasy, if the lump immediately crumbles - there is too much sand in the solution, a good clay mixture for laying the stove should look like plasticine.
- For laying 1000 bricks, approximately 50-70 liters of the mixture will be required. To increase the strength of the mixture, 0.5 cups of edible salt are added to the composition for each bucket of clay. To increase the strength of the masonry, on slightly heated sections of the structure, it is permissible to add cement to the mixture no more than 500 gr. on a bucket of clay.
- The resulting mixture, outwardly, should resemble thick homemade sour cream.
- Often, when building brick heating devices, various dry mixes are used. The methods of their preparation and use are always indicated in the instructions.
Do not forget that they sell compounds that are designed for different temperature conditions for heating the furnace. There are mixtures intended only for laying fireboxes and there are simple compositions for arranging the walls of a fireplace or stove.
How many bricks do you need
 Before building a brick barbecue with your own hands, you need to calculate how much it will take. There are many programs designed for such a calculation. You can roughly calculate the need using a pre-prepared barbecue drawing. Standard brick dimensions:
- length - 25 cm;
- width - 12 cm;
- height - 6.5 cm, together with the solution, the height reaches 7 cm.
Taking into account the design and dimensions of the brick, a calculation is made. Instead of a brick chimney, you can install a tin pipe. Before work, focusing on the drawings and photographs of a brick barbecue, be sure to prepare layer-by-layer sketches of the masonry. There are 28 layers of bricks in the figure, 18 rows of them are the distance to the pipe and 10 rows to the lattice of the structure. Make 18 drawings, schematically mark the sequence of laying bricks on them. Don't forget that the bottom brick should always be overlapped by 2 bricks on top. Also, a brick lying longitudinally should be overlapped from above by 2 transverse bricks. The finished oven can be seen in the photo of a brick barbecue. 
You need to choose a convenient place to build a barbecue, while you need to consider:
- barbecue should be no closer than 5 meters from the neighboring area (better further);
- the structure is built at a maximum distance from wooden buildings;
- there should be no shrubs or trees on the lawn near the barbecue;
- it is necessary to bring lighting and water to the barbecue;
- it should be possible to build a canopy or gazebo.
Foundation device
 Immediately you need to make markings for the barbecue foundation at the selected place, its dimensions must correspond to the order of the brick barbecue and take into account the masonry drawings. In addition, the dimensions depend on the layout of the site - whether there will be a gazebo nearby, or whether you need to make a foundation just for building a barbecue. It is best to use a slab base:
- According to pre-installed markers, they dig a pit 40-50 cm deep.
- It is covered with a mixture of gravel and coarse sand to the level of the soil, rammed and a formwork 150 mm high is installed on top.
- In the assembled structure, the reinforcing cage is assembled.
- A concrete solution is poured into the formwork, it is well compacted so that there is no air left in the body of the foundation.
- Check the level of the platform with a level.
- After that, everything is covered with wet burlap in order to increase the drying time and prevent cracking of the concrete.
The foundation will be completely ready in three days, then you can remove the formwork.
Barbecue wall construction
 To protect the foundation and brick from moisture penetrating from the soil, the walls of the foundation must be treated with tar, 2-3 layers of roofing material are laid on top of it. Mix the mortar for masonry (the recipe is listed above). The first row of bricks is laid on the roofing material, spread on the foundation. On rows 7 and 10, metal plates are inserted into the masonry. Sheets of metal should be narrower than the oven by ½ the length of the brick.
When laying bricks, be sure to take long breaks that are necessary for the mortar to set, otherwise the tall structure may creep.
Fresh mortar sags, the seams between the rows of bricks dry out and become smaller, for this reason deviations from the project are possible. The shrinkage of the walls takes 2-3 days, this is affected by the ambient temperature. Do-it-yourself construction allows for breaks in work - this is a significant advantage over the use of hired builders who try to complete the object as quickly as possible.
 With a saw or a grinder, 1/2 half of the brick is cut off so that a sheet of metal can be laid in the groove made. We raise the walls further, laying bricks according to the drawings. On the 15th row, it is necessary to lay out the vault; for this, semicircular wooden templates are used. A template of the required curvature is made from plywood, a cut line is marked with a pencil and cut with a jigsaw. Prepare the second board in the same way. To strengthen the vault template, another board is inserted between the boards, and everything is connected. The ready template can be used. It is placed between the walls of the furnace, and the laying of bricks begins, connecting them with mortar.
The middle brick of the vault should be exactly in the center of the firebox opening.
For laying the firebox and the barbecue pipe, it is necessary to use heat-resistant bricks.
The pipe begins to be laid from the 18th row, to reduce the width of the hole in each row of masonry, ¼ of the width of the brick is removed. Thus, 28 rows of masonry are laid out. Instead of a brick arch, you can prepare a metal box and mount it in the masonry.
What you need to pay attention to:
- Using a barbecue on your site, you must not violate fire safety rules, otherwise your vacation may be ruined.
- You can not kindle a barbecue with gasoline or kerosene, use special compounds for this purpose;
- It is not necessary to impregnate coals or firewood with ignition compounds, they only sprinkle kindling from above;
- Do not forget that high-quality fuel means good rest and delicious food. For this reason, take care of dry firewood in advance. Connoisseurs advise using birch coals, from which products become fragrant and tasty.
White clinker brick barbecue - video
Step-by-step instructions for building a brick barbecue
We also recommend
 Switching power supply: repair and refinement
 Remote control of light
 Swimming lessons for preschool children
 Notes for the master - home household alarms
 Clock propeller on Atmega8
 Device and relay application examples, how to choose and connect a relay correctly Microcontroller and relay simple switching circuits