Make a warm shower for the cottage yourself. Do-it-yourself warm shower cabin: how I built it in the country
Who in the summer does not dream of a pleasant coolness and relieving fatigue? Jets of cool invigorating water are what you need on a hot summer day! In this article we will tell you how to make a shower in the country with your own hands.
You need to consider all solutions: turnkey purchased structures and drawing up a construction plan, as well as the subsequent installation of a summer shower.
Drawing a project
Summer shower schemeBefore choosing a place to build a shower, you should pay attention to some nuances. In order not to pull the hose or pipe for a long distance, it is better to place the structure near the well or well. It is also important to take care of the discharge of the drain, for example, into a septic tank or gutter. Otherwise, runoff water will seep into the soil, which can lead to its entry into the aquifer that feeds your well or a neighbor's. If you are planning an outdoor shower heated by solar energy, then it is important that it is erected on the sunny side.
It is better that the shower is located between trees or outbuildings, which will close it from prying eyes and wind.
Note! The site on which the structure will be located must be loose and even. If your site does not have the opportunity to bring the drain of dirty water to the sewer or septic tank, then make sure that there are no accumulations of water under the pan. The best option would be to build a summer shower on a hill, then the water will definitely not stagnate.  Drain device
To improve this process, make drainage using ordinary gravel for this. Do not place such a shower close to the fence of the neighbors, because the soil around the shower can often be damp, which will cause them displeasure.
If you design a shower near the summer kitchen, then using metal-plastic pipes and fittings for them, you can drain water from the sink in the kitchen and from the outdoor shower. Think over all the details in advance and create a drawing of the structure, while indicating the list of necessary materials. Think in advance whether the shower will be stationary or temporary, with the possibility of parsing for the winter.
Finished summer shower
 Polycarbonate shower cubicle
 When choosing a finished structure, you may be limited only by the size of your financial capabilities or your own imagination. The most popular among consumers is an outdoor shower made of a profile metal pipe or corners. As walls in this variation, an ordinary curtain made of dense polyethylene or cellular polycarbonate is used.
In addition, you have the opportunity to purchase a wooden or metal frame shower.
There are a lot of models of ready-made shower cabins on the modern market, but it’s probably not worth going into an extensive review of them. Sales managers are unlikely to give you the opportunity to get confused. When buying this type of product, pay attention to the following documents:
- hygienic characteristics,
- fire safety certificate
- sanitary and epidemiological conclusions,
- instruction manual and design certificate.
Foundation
 Equipped drain
 To give stability to the frame of the summer shower, you need to build a foundation under it. Please note that when planning the foundation, you should take care of arranging the septic tank or connecting the pipes from the shower to the sewer, and only after that you can do the rest of the processes. Most often, the construction of a pile foundation is practiced. To do this, you need to dig holes up to 1.5 m deep in the ground with a garden drill, then lower the pipes into them so that their ends stick out 30 cm above the ground. They will serve as a kind of piles. Optimal for this purpose will be the use of asbestos-cement pipes having a diameter of 10 cm, but ordinary metal pipes of the same diameter will also be suitable.
Note! The design must support the weight of the tank filled with water, therefore, if the frame is wooden, then the cross section of the beam must be at least 10x10 cm. In addition, before making the base of the shower cabin from a beam, you should treat the material with special water repellents. This approach will extend the life of the structure.
On the foundation, you should install a hewn beam, after which you can start tying the pillars, and you need to start the process from above. You must assemble the cabin frame on the ground and only then can it be fixed to the base with bolts of the appropriate length. Now you can make a ligation of the bars, which will be used as a log for mounting the floor in the cabin. Previously, this type was the only option for installing a floor in an outdoor shower, but now it is possible to choose a pallet in a specialized store, from which the drain can be drained into grass or into a septic tank, sewerage.
 You can also make a columnar foundation, for which 6 holes should be dug, having a size of 20x20 cm and a depth of about 50 cm. For each of them, you need to make a timber formwork with the same width, depth and height equal to 20 cm. Building level it needs to be aligned horizontally. To strengthen the foundation, stick 3 reinforcing bars into each hole, and then tie them with wire. To avoid contact of the foundation with the ground, lay a rolled piece of roofing material on the bottom. Now fill the recesses with cement mortar, and then align it with the formwork. Insert metal studs into the center of each of them. Part of each of them should remain outside, and the other part, equal to 12 cm, should be recessed into the cement mortar. After the concrete has hardened, remove the formwork. Start at the base of the foundation. Now you can proceed with the installation of your chosen and pre-prepared frame, which must be connected to the protruding studs.
 A less popular and more costly option is the arrangement of a strip foundation. To do this, first make a markup under the foundation. Measure the diagonals of the intended rectangle, they should be the same. Now dig trenches for the strip foundation. The width and depth of the trench corresponds to 30 cm; build formwork along the edges. Then fill the trench with concrete. After the foundation has hardened, check its levelness, and, if necessary, smooth out the unevenness with a sand-cement mortar. Now you can do the frame.
We build a frame
 wooden frame
 Decide in advance on the final dimensions of the building. To create a good water pressure, you need to raise a barrel or other container by 2.5 m. The space of the shower cabin from the inside should be at least 100x100 cm so that the person who is washing can bend down freely and also raise their hands up without bumping on the walls of the structure. To create more comfort, if the size of the site allows, you will need to provide a dressing room, the dimensions of which should be at least 160x100 cm. The final dimensions of your building, taking into account the wall thickness, are 200x150 cm. In this way, you can use the standard size of the boards without waste if your design will be made of wood.
If you plan to make a frame from metal pipes or corners, then you need to have the skill of working with a welding machine. The base for the canopy, consisting of pipes or corners, can be pre-concreted in the four corners of the foundation, which will only strengthen the entire future structure.
If you have to make a frame of wooden beams, then by all means bandage the frame from above and below. Assemble the frame on the ground by bolting it together and then install it on the foundation. To do this, pre-drill holes for the reinforcement in the lower base and put the frame on it. To increase stability, you can fix the struts diagonally on the side frames.
The walls can be sheathed with anything, for example, with ordinary opaque polyethylene - this is the most economical option, but also the least long-term. If you need a more reliable design, then sheathe the walls with plexiglass, slate, asbestos-cement boards, metal sheets, plastic panels, chipboard or OSB, etc. If you do not own large funds, then curtain the entrance to the shower with an ordinary waterproof curtain. But, if you are interested in a more aesthetic version of the shower cabin, then be sure to make a door for it from the same material with which you sheathed the frame. A flat water tank can serve as a roof. Otherwise, you will have to reinforce the base of the roof with jumpers, and then close it with the material chosen for the walls. Now you can install the tank.
We install the tank and organize the water supply
 shower tank
 Outdoor shower experts strongly recommend using a flat tank rather than a round barrel. Why? Everything is logical here, because in a flat container the water heats up faster by the sun than in a round barrel. Strengthening a flat tank is much easier than a round one, and its weight will be evenly distributed over the roof. Moreover, this way you can save money on a separate arrangement of the roof.
 Supply of communications
 Before lifting the container to the roof, you need to install a faucet with a nozzle and make a threaded outlet, you can use silicone to seal each thread. Install a water level meter or a special valve in the tank that will shut off the flow when it is filled. Now fix it to the roof.
Note! To quickly warm up the water, it is worth pre-painting the tank with black paint.
Also equip a kind of film greenhouse around the tank, for this you will need to cover the container on the north side with foil - this will reduce heat transfer.
Warming up the shower
If you want to create a shower enclosure that can also be used in the spring, then you need to make a special thermal insulation layer. As thermal insulation, you can use foam, polystyrene foam or other material at your discretion, due to the fact that the range of such products is very diverse.
So, for starters, you should fill the frame with insulation, and then cover it with polyethylene and secure it with staples. You should also wrap the timber at the base of the structure with a film. This will protect the inner material from moisture. To prevent blowing, install overhead heaters on the door. Now carry out the interior upholstery of the shower cabin. Basically, durable PVC film, plastic panels or linoleum are used for this. Then proceed to cladding. To maintain a single style, it is better to use the same material for this, which has already been used to decorate other buildings in the yard.
If you already made an insulated shower, then consider an electric water heating system. But, remember that it is very important to adhere to all safety measures here, yes, and if you are not an electrician, then it is better to use the services of a specialist. After all, in the process of performing these works, you need to take care of grounding and automatic switching on and off of the heating device for water.
Good preparation and a skillful approach to business will help you create for your loved ones for pleasure and for your own joy! Do you have experience in how to make a shower in the country? Have you successfully dealt with the difficulties encountered in the implementation process? Share your experience with us, write comments! We will be glad to learn from you useful and new facts!
Video
Homemade shower in the country:
A photo
 Communication scheme
  Examples of a shower for a summer residence
  Possibilities of interior arrangement
 stroysvoimirukami.ru
Do-it-yourself shower in the country: summer and winter options
Most summer residents think about creating a shower in the country with their own hands.
Firstly, it is an opportunity to improve comfortable conditions without high costs.
Secondly, a properly equipped outdoor garden shower allows you to meet the necessary sanitary needs, as it is suitable for use at any time of the year.
And besides, crafts for decorating it make any garden area exclusive.
Design features
Modification of the shower cabin depends on the duration and conditions of its operation.
If the shower will be used exclusively in the summer, then a simple quick-mounted structure, such as a shower rack, a camp shower or a toptun, is sufficient.

You can install a simple camping summer shower with your own hands in a fairly short time.
If long-term operation is planned, including in the cold season, then it is necessary that the design of the craft shower be reliable and provide for the possibility of installing equipment for heating not only water, but also air in the cabin.
It is more difficult to install a winter shower in the country with your own hands, since its design needs a frame and a foundation.
Regardless of the modification, the country version of the design provides for the following equipment:
- base or foundation;
- drain ladder or drain;
- pallet and floor;
- cabin;
- holder-diffuser and stop valves;
- pipeline;
- devices for pumping and heating water, as well as for heating the cab.
As a material for such crafts as a country shower room without a foundation, film or plastic is used.
For booths installed on the foundation, it is preferable to choose more durable materials - wood or brick. A good option is a do-it-yourself polycarbonate shower.
The most famous modifications of the shower craft used in summer cottages:
- Toptun - mat with pump and hose. The water supply is provided by pressing the feet on the mat;
- Camping - a compact portable plastic container equipped with a hose and nozzle. It can be stationary, mobile;
- Circular. The circular option provides water supply from all sides;
- Alekseev. Provides hydromassage by supplying water under high pressure;
- Tropical. The flow of water entering through a special grate looks like a tropical downpour.
Making a circular shower with your own hands is quite difficult, but the result of this work will please any summer resident.
Toptun - the most popular shower among summer residents
Simple designs-crafts of shower devices intended for summer operation are considered the best solution to the issue of country hygiene.
After all, installing the same circular or tropical shower is not as easy as it might seem at first glance. That is why, choosing which shower to make in the country with their own hands, summer residents most often stop at a trample.
To build a toptun shower with your own hands, you will need a car pump, two corrugated hoses, a container with a lid, and a shower head. You don't even need a holder.

The sequence of operation of the toptun:
- Water of the required temperature is drawn into the container. Considering that the volume of the container is small, a do-it-yourself shower tray, if it is a toptun, is not needed;
- Crafts are attached to the lid - a wooden or rubber cork equipped with holes and tubes, the diameter of which corresponds to the diameter of the hoses;
- The container is covered with a lid with attached hoses - one from a car pump, the second - a shower head holder. Under the pressure of air from the pump, water enters the hose. The watering can is held in the hand or attached to any surface.
By the same principle, you can make a camping summer shower. To do this, you will need a rubber mat or pedals equipped with built-in valves, as well as two hoses.
As a container for water, an ordinary bucket is used, covered with a lid, in the hole of which the inlet hose-holder of the watering can is fixed.
As in the first option, the pallet is not required, and the earth replaces the drain drain.
The water supply to the hiking version is carried out by alternately pressing the pedals with your feet.
Each step provides one serving of water. As a rule, the marching method saves water and is used in conditions with limited access to water resources.
Also, a camping outdoor shower can be used to wash a car.
A circular shower can be considered as another option for a country house, but in this case, the actions listed above will not be enough. You will need a special holder for it.
How to expand functionality?
The functional purpose of a shower room, even in summer cottages, should not be limited solely to hygienic considerations.
For many summer residents, their own bath is an important part of the suburban area.
But not everyone knows that a do-it-yourself country tropical shower in a bath can fully replace many of the procedures offered by spa salons.
In practice, the available functionality of the shower room is the result of the choice of its type.
That is, in order for the built country shower in the bath to live up to expectations, you need to learn more about its functionality and installation steps.
In the minds of most people, a bathhouse is associated with a healthy lifestyle, and visiting it is considered a preventive measure.
Therefore, the famous shower of Alekseev will come in handy in the bath.
Alekseev's shower is a new generation design, an analogue of the well-known Charcot's shower with hydromassage properties.
But Alekseev's shower, an invention of the Russian doctor of the same name, is equipped differently and has no analogues in the world in terms of the effectiveness of the impact.
The use of a device created according to the Alekseev method provides healing through massage and is recommended for many diseases.
To independently install Alekseev's shower in the bath, you need to understand how it works.
The unique difference of the device is the high-speed streams formed using the special design of the holes in the nozzle for the watering can.
If you make such a nozzle yourself, then installing Alekseev's device in your own bath is not difficult.
To do this, it is necessary to drill cone-shaped holes in the nozzle for the watering can - wide on the side of the water flow and tapering towards the outlet.
Then the craft nozzles are installed on the holder. The holder must be chosen carefully.
Considering that Alekseev's device gives a strong flow of water, care must be taken that the ladder ensures its full drain, or use a pallet.
At the same time, Alekseev's shower can be operated not only in a summer cottage, but also in an apartment.
Features of self-installation of various types
The functions of the device used in summer cottages can be expanded if you use the non-standard capabilities of its structural varieties.
For example, a circular shower, along with hygiene, will also provide a healing effect.
According to the principle of the device, the circular type of shower is a few systemically located pipes equipped with small holes and a faucet.

In the center is a holder with the main watering can. With the help of a tap, the water supply pressure is regulated.
Thus, the circular shower additionally provides a comprehensive hydromassage of the body.
You can install such a device yourself both in the country and in the apartment.
To create an original shower craft, it is necessary to connect several pipes equipped with small holes in series with the central riser, on which the mixer holder is located.
In shape, the circular type of shower resembles the back of a chair with transverse or longitudinal crossbars.
Then you should take care of the flow of water - the ladder will cope with this task. The owner of the cottage has the right to decide whether he needs a pallet in this case, or a ladder will do just fine.
An excellent alternative to a regular shower can be a rain shower. This is a device whose water flows mimic a tropical downpour.
Functionally, the tropical shower type is a hydromassage device.
However, not every apartment has the opportunity to install a rain shower, but if such a design is installed in the garden, the impression of authenticity will be complete.
It is not difficult to build a rain shower in the country on your own. To do this, it is enough to increase the area of \u200b\u200bthe watering can of the mixer and strengthen its holder.
A ladder will help control the discharge of a powerful stream of water, which distinguishes a rain shower. It is also convenient to use a deep pan.
But you need to remember that both the holder, and the ladder, and the watering can must be of high quality.
Construction stages
To build a summer shower with your own hands, you need to know the basic rules of the process:
- Preparation - determine the dimensions and draw a diagram;
- Choice of location - a sunny place on a hill, which is not too far from the house and the water supply, but with the possibility of arranging a drainage system if a ladder is provided in the shower equipment, or a drain pit if a pallet is installed;
- Construction of the foundation - level the site equal to the size of the building, then fill it with concrete;
- Installation of the frame - piles are installed and fixed at the corners of the site, then they are tied up, constructing the shower floor. The racks of the frame are fixed with self-tapping screws. Build walls and roof;
- Summing up communications - installation of a tank, equipment for draining, lighting and ventilation;
- Mount pipes and a pallet - it is necessary to drain water. Sometimes they do not use a pallet, but a floor in which a large ladder is mounted. The best option for a drain system is a ladder with a lock and a grate. The shower drain performs the function of a sewer, but may have a different throughput;
- Waterproofing, wall cladding. For operation in the cold season, the walls need to be insulated;
- Decorative shower cubicle. Beautiful crafts increase the aesthetic appeal of the entire suburban area.
If the weight of the structure is small, then a foundation is not required for its installation. For example, a metal frame for a polycarbonate booth is installed on fittings driven into the ground.

In addition, it is physically easier to build a do-it-yourself polycarbonate shower than a brick one.
A properly built base will allow you to upgrade your shower room in the future and enjoy its new possibilities endlessly.
stoydiz.ru
We make our own heated shower in the country
With the onset of the summer season, the owners of cottages and private houses are increasingly thinking about building a shower cabin on their site, since it is an indispensable part of personal use, especially for those who work in the beds. The owner may well make this structure on his own. To do this, it is enough to study the theory and gradually put it into practice. Let us consider in more detail what a country shower equipped with heating consists of.
The device and features of the summer shower

Summer shower for a summer residence
One of the simplest designs of a summer shower consists of a square or rectangular booth, the length of the sides in which is chosen taking into account the build of the people living in the country. If we talk about a water heater, then such cabins are common, the water in which is heated by the sun. The water tank itself is a plastic or metal container. A pipe is built into its bottom, to which a faucet and a shower head are attached. Opening the faucet allows water to flow out of the tank, providing enough pressure for comfortable bathing.
The outer surfaces of the tank of this design are painted with black paint, which allows it to more efficiently absorb the infrared radiation emitted by the celestial body. Usually by the afternoon the water becomes warm, and in the evening it is sometimes just hot.
- There is a more advanced version of heating - a tank with a heating element built into it, connected to electricity.
- There are also options for heating water with titans, and sometimes craftsmen mount a certain structure in which a blowtorch heats a coil with water flowing inside.
These are interesting, but not very effective methods of heating, although in the cold period you cannot do without them.
Preparatory stage: project drawings, dimensions
Any summer shower is required to think over and develop a project before erection. Doing this job is easier than you might think. The height of the structure must be at least 2.5 m so that the person is not constrained during the shower procedure.

Approximate drawing of the future design
It is also required to provide free space inside the cabin, sufficient so that at the moment of bathing it is possible to bend over without bumping into the walls with your elbows. The minimum dimensions of the room are 1 x 1 m. At the same time, you should think about where to store towels and personal belongings so that they do not get wet. For a "dressing room" an area of 0.5 m² is sufficient. In reality, the most comfortable design will be 1.4 x 1.9 m.
Tip: the small area of \u200b\u200bthe constructed shower room will subsequently cause its destruction. To ensure the stability of the structure, it is recommended to put the booth on a pile foundation.
Heating selection
It is possible to provide heating by purchasing an electric heater, but it is expensive, therefore unprofitable, because the country shower is used only periodically.
You can heat water with a blowtorch, while the pipes are required to be made of metal. Here is how such a design is mounted:
- The pipe supplying water to the tank should be taken outside the perimeter of the shower room. Outside the booth, a shelf is fixed on the wall, on which a heat exchanger should be installed.
- The last unit is made from a thin tube, twisted into a spiral, and then fixed in a casing. It is easy to make such a "serpentine" - it is enough to wind a thin one on a thick pipe. To get warm water, 4 turns are enough, but there will be a hot shower if you make at least 8 such turns.
- Then take a large pot. Its size should allow the coil to fit, as well as a blowtorch.
- The free ends of the "coil" must be connected to the water supply pipeline. If you make a connection on the couplings, then it can be removed for the winter.
There is another way - to build a small greenhouse above the tank. For this purpose, the frame is covered with a film. Such a design will increase the water temperature by 10 degrees, and the wind will not be able to cool it.
Necessary materials and tools
To build a shower stall, you will need some tools:
- hammer;
- roulette;
- level;
- corner;
- bolts;
- nails;
- tank and pipes;
- a pair of taps;
- shovel;
- shower head.
As well as the following materials:
- boards;
- slats;
- brick;
- plastic sheets;
- a frame that will be more convenient to make from pipes;
- cement and sand (to organize the foundation and lay out the brick);
- insulation, plaster, any paint (for finishing).
Step-by-step instructions for building a shower cabin with your own hands

The nuances of operating a country shower
- It is important for a comfortable stay in the room to have enough heat in it in addition to water. To do this, it is better to organize the thermal insulation of walls and roofs.
- It is a mistake to build thick walls with a door that closes tightly. As a result, poor ventilation will lead to the spread of mold.
- If the water is heated by a heating element, you should remember the rules for safe electrical installation. Since the degree of humidity in the shower is increased, it is necessary to use plastic drains.
Building a summer shower is a very simple and short-lived business. Stock up on the necessary tools, choose the right material, and add a little imagination and patience to your desire.
grounde.ru
Summer shower for a summer residence
Nowadays, it is almost impossible to find a person who does not have a country house where you can hide from the heat and city dust in the country. An outdoor shower is an indispensable attribute in any temporary housing (dacha, tourist base).
There are two ways to install it - buy a ready-made version, or do it yourself. The cost of such a design varies from 5 to 18 thousand rubles. But any beginner can build a shower on his own, for this there is no need to purchase expensive materials, since you can get by with improvised ones - plastic, plywood, polycarbonate, slate sheets, iron, etc.
 Summer shower for giving from plastic and woodBack to index
 Choosing a place for a summer shower
In order to properly build a shower with your own hands, you need to choose the right place, on which the convenience and functionality of the structure will depend. It must be protected from strong winds, since in the summer it is likely to get sick from the slightest draft during water procedures. Even if the water is heated by an electric heater, it is better to install the booth in a sunny place. The energy of the sun quickly heats the water and is able to retain heat at night.
 Summer shower in a sunny place
 For the normal operation of the shower, it is important to create all the necessary conditions for the disposal of wastewater and drainage. On hot days, the load increases, so it is better to make a drain pit with a volume of 1.5-2 m3 (this volume should be 2 times the volume of the water tank).
One of the easiest methods for shaping a drain is to dig a hole under the shower stall. But this method is not always practical. Therefore, a recess is often built where an inclined pipe is located, through which water is directed to a drain or compost pit.
The drainage and septic tank should be located next to the drain, but not under the shower stall, as they can be flooded with flowing water, which will lead to unpleasant odors, destruction of the soil and the very foundation of the structure.
 Scheme of the base for the summer shower
 Water runoff must be equipped with a waterproof coating. For such a layer, you can use:
- ruberoid;
- film laid on an inclined embankment;
- a slope reinforced with a metal mesh, equipped with a gutter;
- hydrostekloizol.
Tip: the slope must be positioned so that the outflow of water is directed towards the drainage tank or trench. To ensure good water flow, it is better to place a shower stall on a hill.
How nice it is to escape from the stuffy metropolis and find yourself in your dacha! Fragrant greenery, birds singing and friendly sun - it's wonderful. But, if there is no summer shower on your site, hot days will turn from relaxation into torture. But it’s not at all difficult to build a garden shower for a heated cottage with your own hands. It is only necessary to approach this process in detail.
Choosing a place for a shower in the country
Before proceeding with the construction of a summer shower, it is necessary to determine exactly where it will be located. Basic selection rules:
- Locate the shower stall in a sunny location. It is desirable to find an area where the sun penetrates throughout the day. Then you can rinse with refreshing water at any time.
- The shower stall should be on a hill for the best outflow of water. Showering will use a lot of water. Stagnation of water under the booth is fraught with erosion of the soil and, as a result, loss of stability of the structure. Also, stagnant water will lead to unpleasant odors.
- Lack of drafts and visibility. Despite the fact that the wind is warm in summer, the presence of airflow can bring you a lot of trouble.
It is worth considering that the location of the shower in the most prominent place is not desirable from an aesthetic point of view.
Organization of draining warm water
The best solution is to connect the drain to the gutter. If it is missing, dig a hole not far from the shower stall. Using a hose or pipe, connect the drain hole to the pit. The platform for the summer shower should be tilted towards the drain pit.
In this case, the used water will flow freely along the inclined pipe.
Equip the bottom of the shower cabin with a tray or make a container for draining water yourself. To do this, fill the area with concrete of the size you need. Place bricks around the perimeter that will serve as a side.
The shower drain cover must be provided with a waterproof cover. The following materials are suitable for this:
- ruberoid,
- hydrostekloizol,
- concrete with the addition of PVA,
- PVC film.
It is a mistake to use clay for drainage. Such flooring will wash out with water over time.
How much will it cost is detailed in this article.
How to build a country shower and toilet so that they do not interfere with each other is detailed in.
Shower cabin and dressing room
Designing a cabin for a country shower
The width and depth of the shower cabin must be at least 1 * 1 m, and the height of 2 m and above. The space inside the finished structure should be enough to turn around, raise your arms and bend over without obstacles.
It should also be noted that in the booth there should be a place for a dressing room where water will not penetrate. For the locker room, it will be enough to allocate 60 cm. Thus, the optimal size of the shower room will be 1.6 m * 1 m. A wooden beam can serve as a material for the frame. The standard diameter of the racks for such a structure is 100 * 100 mm.
Various methods can be used to give stability:
- Concrete every part of the frame;
- Attach the lower corners of the structure to pegs driven deep into the ground.
When designing a shower stall, consider the design of the buildings in your yard. The shower room should not stand out from the general style.
Installation or how to do it yourself
Cut the timber to the length you need. Connect the side parts of the frame in the form of frames. Reinforce each frame in the middle with jumpers from distortions. Jumpers are made from the same beam and should be installed at an angle of 45 degrees.
If you decide to make a shower cubicle with a size of 1.6 * 1 m, then the side parts will be 1 m, the back - 1.6 m, and the front 1 m, since in the front part it is necessary to leave a space for the door equal to 60 cm. For for a convenient passage to the shower room, it is not recommended to make a door less than 60 cm. Then you should connect the frames.

Before fastening the frames together, make sure that their diagonals match.
Having fastened the frames, reinforce them with jumpers at the top and bottom. Thus, you will get a solid frame that can be closed with polycarbonate or any suitable material. It will be interesting to know that along with a shower, you can also build a toilet, as well as a utility block, but how to do it correctly will help you figure out the content.
Install the resulting structure over the prepared inclined platform for water drainage. Use a spirit level to level the shower frame horizontally and vertically. Stuff the slats on the bottom jumper. Leave a distance between them so that the water drains freely down onto an inclined platform.
For the shower door, make a frame in the same way: assemble a frame from 4 planks of timber and reinforce them with jumpers crosswise to protect the door from warping. The size of the frame should be approximately 1 cm smaller than the opening for the doors to open freely.
- slate,
- lining,
- moisture resistant OSB,
- cellophane,
- plastic,
- glass.
Please note that any of the materials listed must be opaque.
After choosing the base, cut the walls to the desired size and install them on the frame frames. The top and bottom of the booth do not need to be closed completely for good ventilation. The door must be cut separately. Install the doors on the hinges and sheathe the door with cellophane so that water does not get on the timber. But, so that it would not be expensive and very simple, it is indicated in the article.
Capacity: tank, barrel or water tank
The minimum volume of the water tank should be 100 liters, the maximum - 500 liters. Installed on support posts above the shower.
Please note that the material from which the outdoor shower tank is made must not be subject to corrosion. The best option would be plastic or stainless steel. If you chose the plastic option, you need to not only install it on supports, but also tie it to them. Since in the event of strong gusts of wind, an empty container may fall.
It is best to purchase a flat tank with a fitting thread for screwing in a tap. If this is not found, make a hole for the faucet yourself.
It is good if your container is equipped with a lid, thanks to which the water will not clog. The cover can be made of metal, plastic, glass or cellophane.
Water supply to the tank can be carried out manually or using a pump. The latter option is preferable.
Sources of water heating in the summer shower
The water in the garden shower can be heated in various ways.
Firewood
To increase the temperature of the water in the summer shower with firewood, install a stove next to the cabin. On its surface, place an expansion tank that will push hot water into the main shower tank. The principle of the expansion tank is the constant circulation of water.
Hot water from the heating system will go up, cold water from the tank above the shower will go down. The connection between the expansion tank and the main tank will be a metal pipe.
With a wood-burning heating system, you need to use a metal container for water, not a plastic one.
Electricity
Install a boiler or heating element with a power of 2 kW or more in the water tank. If you use a heating element to heat water, it must be inserted into the bottom of the water tank. The boiler is lowered into the tank from above. But be sure to monitor the water level during the heating process. Otherwise, your appliances may burn out.
To prevent a short circuit, the wire stretched from the outlet to the shower must be one-piece. A thermometer should be installed on the water tank, which will indicate when the heating devices can be turned off. Or purchase a tank with automatic heating, where there is control not only of the temperature, but also of the water level.
A good option for a summer shower with electric heating would be to use 2 tanks at once: a large one for cold, a small one for hot water. In this case, each family member will be able to choose a comfortable temperature for themselves. Get a faucet to mix hot and cold water.
As in the case of heating with wood, it is not recommended to use a plastic tank along with heating devices.
The sun
The most economical and hassle-free heating option is the sun's rays.
It is more convenient to rinse in the midday heat - which means that the shower stall should be in the place where the rays penetrate in the morning; If you prefer an evening shower, choose an area that receives the sun during the day so that the water has time to warm up. Find out how to make a country toilet without a cesspool.

The shower cubicle should be located in a place that the sun heats all day. If this was not found, decide at what time it will be more comfortable for you to use the shower.
How to enhance the effect of heating by sunlight?
- Paint the water tank black. The sun's rays warm up dark colors the most.
- Wrap the shady side of the tank with foil, as this material will keep the heat inside the tank.
- Using an additional frame, stretch a plastic film over the open tank, which will create a greenhouse effect.
Conclusion
After the final installation of the summer shower, you can create a certain style by adding a few details to it. Plant moisture-loving plants around the booth that will not only please the eye, but also contribute to accelerated drainage. Decorate your shower room with decorative elements to turn an ordinary cubicle into a bright accent of your garden area. Read about a country shower with heating and a locker room.
Hooray! To the cottage. Dacha is a great way to take a break from office routine or hard work in production. At the cottage, you can perfectly relax with friends, barbecue and cognac, or work on the site.
But in any case, after working in the garden or relaxing with your best friends, you need to clean yourself up in the shower. Not every summer resident has an estate equipped in the same way as a city apartment. But organizing a warm shower in the country is easy and simple.
What is needed for this? The answer to this question is different for everyone. Someone chooses a home-made design, someone will get a ready-made heated one, especially since the assortment is very wide.
If you decide to make amenities with your own hands, then first of all study your site. Evaluate his winning and losing zones. The shower room should be located near the house in order to wash and immediately be warm. You also need to take care of the drain. And of course, you need to choose exactly the area where the shower cabin fits well and harmoniously into the landscape.
In addition to choosing a place to build a shower, you should choose a water heater for a shower in the country. Water can be heated by the sun or by electricity.
To do this, choose a black water tank, or paint a metal barrel black. It heats up the water faster. A tank is installed on the shower cabin and a shower head is welded from below. You can make such a garden warm shower with your own hands. The big drawback is that it will only work on hot sunny days.
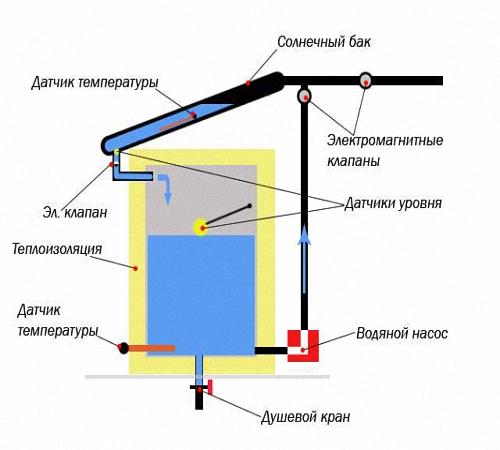
In this case, the water for a country shower can be heated using sunlight. For this, a solar storage water heater was created. In these devices, water is heated, thanks to vacuum tubes. The water here is heated at any air temperature. In winter, such a device heats water up to 60-70 degrees, and in summer you can get boiling water. The device works perfectly even in cloudy weather, since the work depends on the ultraviolet solar radiation.

When installing an electric water heater, you need to make sure the quality of the wiring. If you do not have a central water supply in your country house, and the supply of water is limited or it has to be delivered, then you need a bulk heater. Typically, such heaters are equipped with a 50-100 l tank, a heating element, protection and a thermostat. Water is supplied by buckets or a pump.

Which method of heating to use depends on your capabilities. Today, many companies offer a heated country shower as a turnkey solution. Such complexes are equipped with a cabin, a tank, an electric heater.
And if you like to do everything yourself, then a heated garden shower will be an exciting adventure for you. To do this, you need to choose a place for a country shower, put a metal frame and hang wall-curtains from all sides, and install a heated tank on top.
There are metal and plastic in the country shower. The advantage of plastic ones is that the water does not bloom in them, the welds do not rust, which means that the water in them remains clean, without impurities. The volume of tanks can be from 100 to 320 liters, both classic round and square.
Not every suburban area has a shower, although it is practically indispensable here. After working in the garden or around the house, everyone wants to freshen up. This is where the economical and easy-to-design outdoor heated shower comes to the rescue. The main advantage of this type of shower is that it is used both in cold and warm seasons, unlike an ordinary summer shower. We will consider recommendations for the construction of a heated shower with your own hands below.
Features of the manufacture of a combined heated garden shower
We suggest that you familiarize yourself with the recommendations that will help you build a combined heated shower at your summer cottage. The main advantage of this shower is that on warm days it is used as an outdoor shower and does not turn on heating, while saving electricity, and when it is cold outside, the water in the shower is heated with a heating element.

Building a shower with your own hands is not a difficult process, if you carefully understand everything. The main advantages of such showers are the availability of their arrangement, due to the minimum number of components, and if the shower is properly decorated, it will become a real highlight of the summer cottage.
The process of bathing in the shower after hard work has a positive effect on human health, relieves fatigue, relieves stress and relaxes. It is possible to buy a ready-made shower, but its independent production will cost several times cheaper.
When choosing a place where the shower will be located, one should proceed from the fact that in summer the water should warm up well, therefore it is not recommended to place the shower in the shade, since the water tank must be constantly exposed to direct sunlight.
The best option for the location of the shower is an open area of \u200b\u200bthe garden. But, it should be noted that electricity must be supplied to the shower, which will provide heating of the water using a heating element. Garden shower includes:
- heated tank;
- tap;
- watering can;
- racks;
- moisture resistant material;
- mat.
To build a shower of this type, choosing a place, you should install racks, and make sure that the structure is strong and stable. A dark tank is installed at the top of the shower. Since it is he who will attract heat at a time when the water is heated by the sun. A hose, a faucet and a watering can are installed at the bottom of the tank. Installing a rubber mat on the floor will make bathing more comfortable, and the racks are covered with moisture-resistant material, such as film or shower curtains. Such a shower is perfect for swimming in the summer or spring season.

Another way to arrange the shower is its extension to one of the walls of the cottage. You should carefully consider the choice of the wall to which it will adjoin, since the sun's rays should fall straight on the tank.
In this case, the tank is connected to the wall and clings to it, a frame, hoses, a watering can and a faucet are installed, electricity is supplied. To protect the wall from moisture, it must be made moisture resistant. To do this, overlay it with tiles or fix the film. But, keep in mind that the water will not warm up well in such a shower, so you will need to use heating more often, since the shade from the house does not provide good access to the sun.
Country shower with heating: manufacturing instructions
We suggest considering the option of constructing a heated polycarbonate summer shower. Before proceeding to study the instructions for its manufacture, let's get acquainted with the main advantages of the equipment of such a shower:
- when using such a shower as a summer shower, polycarbonate warms up very well, so in summer the heating elements are practically not used;
- the cabin retains heat for a long time;
- polycarbonate is resistant to mold, so this surface is more antiseptic;
- the material is durable and has a long service life;
- ease of installation and dismantling;
- a variety of colors, allows you to choose polycarbonate in accordance with the desire of the buyer.
When constructing a heated summer shower, it is necessary to plan in advance its location and make a project.
The place where the shower will be installed must first be leveled. Water must flow downhill, so this aspect also requires organization. The surface of the drain must be lined with a waterproof material, such as concrete, roofing material or waterproofing foil. To prevent unpleasant odors and ensure ventilation, a special mesh should be laid over the drain. If the shower will be used by more than three people, it is recommended to build a drain hole into which water will flow. The recommended depth of the pit is from two to three meters, and the distance from the pit to the shower is at least three meters. Sand or gravel is laid at the bottom of the pit. Use old car tires or a plastic sewer barrel as walls. The drain pit must always be closed, for example with wooden boards, for the safety of animals or small children.
When the preliminary work is completed, proceed to the construction of the frame structure. To do this, it is recommended to use an aluminum profile, which will help to give the soul the desired shape. Use polycarbonate sheets eight to sixteen millimeters thick. A water tank is placed on the roof, and to ensure the operation of the shower in the cold season, you need to install a heated tank or an autonomous water heater.

Heated summer shower tanks are different. In relation to the form they are divided into:
- oval;
- rectangular;
- square;
- flat.
Depending on the material from which the tank is made, they are:
- steel;
- plastic.
Among the steel water tanks are:
- stainless steel tanks;
- from galvanized steel;
- from ordinary metal.
When choosing the volume of the tank, you should be guided by how many people will bathe in the shower. The average recommended volume for a family of four is 100 liters. It is better to choose dark-colored tanks, as they have higher thermal insulation properties. Heated tanks are equipped with special taps and heating elements that are connected to electricity. Therefore, they do not require preparation; after purchase, they are safely installed on the roof of the shower.

To make the heating efficiency even greater, a polycarbonate roof should be installed on top of the tank, which will create a greenhouse effect and retain the warmth of the water.
Another mandatory component of each tank is a device that indicates the amount of water in the tank. Since the heating elements are very sensitive to an anhydrous environment, and burn out with a lack of water, this parameter must be constantly adjusted.
To equip the floor in such a shower, you should install a drain pipe and make a small threshold separating the shower part from the locker room, in which things, towels and soap products will be stored. A pallet is installed on the floor, and then a rubber mat.
The door must be made polycarbonate; for this, its frame is preliminarily constructed, to which the hinges are attached. After installing the polycarbonate, a handle is attached to it. With a moisture-proof bath screen, separate the washing and changing areas.
To make the shower more beautiful and attractive, it is recommended to decorate the area located nearby with beautiful flowers, decorative figures or mosaics.
1. When choosing a place to install a shower, make sure that there are no strong drafts there, which will lead to the possibility of getting sick, the person using the shower.
2. The volume of the drain pit should be two and a half times larger than the water tank.

3. Do not place drainage and septic materials directly under the shower stall, they must be installed near it. This procedure will reduce the risk of unpleasant odors.
- waterproofing roll materials;
- ruberoid materials;
- gutter reinforced with metal mesh;
- hydrostekliosol.
5. Do not use clay in the construction of a water-resistant layer, because as a result of its erosion, it will clog the drainage system.
6. To increase the efficiency of water flow, install the shower stall on an elevated area, if available.
8. The minimum cubicle size is one square metre, but additional dressing room space will be required.

9. In practice, the most convenient size of a heated summer shower is a cabin 190 cm long and 160 cm wide.
10. Watch the strength of the base frame of the shower cabin, as a tank filled with water is installed on top. It must be strong and withstand heavy loads.
11. To make the outer upholstery of the shower room, you will need one of the following materials:
- polycarbonate;
- slate sheets;
- films;
- lining;
- waterproof plywood.

12. It is desirable that the cladding material harmoniously fit into the exterior of the entire site. It is possible to paint it or apply decorative patterns that will make the shower not only a place for bathing, but also a decorative element of the cottage.
13. Watch the tightness of closing the door, because drafts are not allowed in the shower.
14. Since the shower door is constantly exposed to moisture, it is recommended to install special sealing mechanisms on it that save heat inside the room.
15. To use the shower in winter, you need to resort to warming it. For this, any insulation in the form of mineral wool, polystyrene foam or expanded polystyrene is suitable. To fix the insulation, a film is used that is laid on top of it and fixed with a stapler.
Features of the construction of the heating system, floor and installation of the water tank
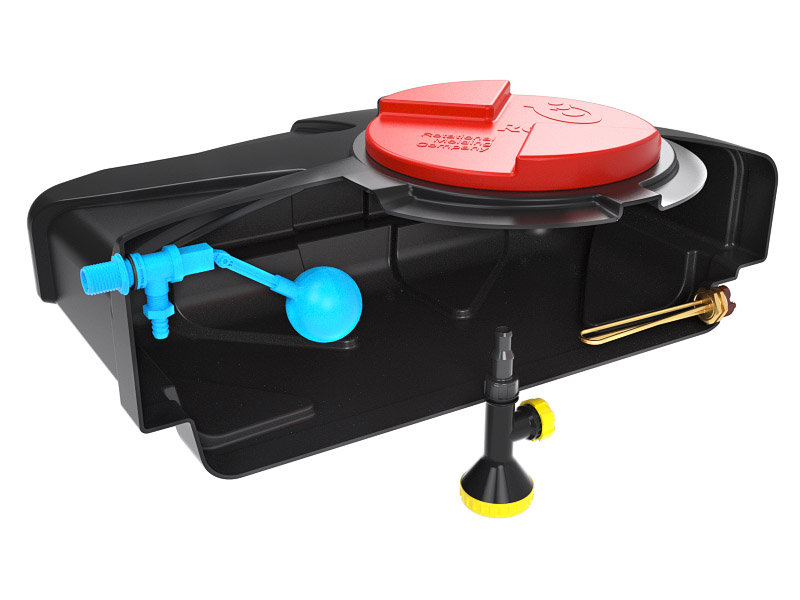
The location of the water tank is the support pillars that are above the shower. In order to save money, it is possible to buy an ordinary barrel of one hundred or two hundred liters, and independently arrange it for the soul. Before installing the tank, a threaded outlet should be made in it, into which a ball valve with a watering can will be installed.
There are three ways to fill water:
- manual - involves pouring water in buckets;
- pumping - connection to the circulation pump;
- plumbing - connection to the water supply system, if any.

For the construction of the water supply, use metal-plastic pipes. Adjustment of the water flow is carried out using a tap or water pressure. It is better to worry about installing a plumbing valve that will regulate the amount of water in the tank.
To install the floor in a heated summer shower, it is recommended to make a concrete screed. Next, a wooden pallet is installed, on which it is convenient to stand with bare feet. It is possible to install a wooden floor without a cement screed, but in this case, a small draft will appear, causing discomfort when swimming in winter.
Another way to equip a shower is to install a purchased plumbing tray that has a siphon hose for draining. In this case, the arrangement of a waterproof layer in the lower part of the shower is not required.
A popular mistake when arranging a heated outdoor shower is installing a leaky door and thick walls that do not allow air to pass through. Poor ventilation contributes to the spread of fungus and mold, due to the fact that the walls practically do not dry out.
In summer, when the water is heated by the sun's rays, there are no problems when swimming. But, sometimes you have to come to the dacha in autumn, spring and even winter. In this case, it will be very cold to swim in the summer shower. For these purposes, it is recommended to equip a heating system that will provide a shower with hot water.
Consider the option of building heating with a blowtorch:
1. Use only those pipes that are made of metal. The pipe that delivers water to the tank on the roof of the shower is removed from the cabin for several meters. Outside the room, a shelf with a heat exchanger and a water heater is installed. In the absence of a shelf, it is possible to use a table.
2. For the manufacture of a heat exchanger, a coil should be made from a thin pipe, pre-twisted with a spiral. If warm water is required, then three layers of pipe winding are sufficient, if hot water is needed, about eight windings are required.
3. Insert the casing into the prefabricated coil. For its manufacture, a large saucepan or a bottomless bucket is quite suitable. Fix the coil in the casing by welding.
4. The ends of the coil are connected to a metal pipe that brings water to the shower. It is better to make a coupling mount, which can be easily removed in winter.
Another important aspect in the construction of a heated summer shower is its aesthetics and attractive appearance. In addition, properly selected finishing materials play an important role. Indoors, it is recommended to use moisture-resistant materials that will not collapse over time. To improve soil drainage, it is recommended to plant moisture-resistant plants next to the shower, thus avoiding waterlogging of the soil.
Before you buy a heated shower, you should study the requirements that apply to it:
- profitability - affordable cost that justifies its quality;
- environmental friendliness - a heated shower must be made of materials that are harmless to human health;
- fire safety is another requirement, since a heated shower is connected to electricity, all contacts and connections must be made with high quality and in accordance with fire regulations;
- comfort - being in the shower should be pleasant, and the size should be comfortable for bathing;
- modernity is a requirement for the design of the purchased, it must be in harmony with the overall exterior.
When choosing a model of a purchased shower, one should be guided by the volume and shape of the tank, which are chosen based on individual preferences. There are models with or without cabins. It is possible to install additional options, such as automatic heating and draining of water, additional nozzles and hygienic devices.
There are pedal options or showers with separate changing rooms, they differ in cost, the latest models are more expensive, but much more convenient to use.
Another requirement for a heated shower is the convenience of its installation, since the shower is purchased, a maximum of three hours is allotted for the time of its connection or installation.
The shower cabin should have a window or mesh elements through which light and air will enter, killing fungus and mold.

Among the additional functions of a purchased heated summer shower are:
- an indicator that is responsible for the level of filling the tank with water;
- heating devices or off timers;
- devices for draining or filling water;
- thermostats.
The location of the heating element is lower, middle and central.
It is difficult to imagine modern life in the country without the usual comfort. A heated country shower will help maintain the desired level of hygiene and comfort for those who love countryside holidays or work on weekends in the country. A simple shower already greatly increases the level of comfort for the backyard. In order to maximize the level of comfort, a summer shower with heated water will help, it can be used in any weather, thanks to insulation and a fenced-off changing room.
There are quite a few methods to equip country shower cabins with heated water on your site, properly equipping it, starting from a custom design and its turnkey installation at a specialized enterprise and ending with the purchase of individual units and the independent implementation of all work from a sketch and marking to installation towel holders and soap dishes.
If someone is quite satisfied with the average temperature of the water, so as not to get a cold when using a regular garden shower, then for some it is fundamentally important to have a warm shower with the ability to adjust the heating temperature. Based on this, it is necessary to consider all common summer and all-season models with their pros and cons in order to make it easier to choose the best option.
- Titanium. A country shower equipped with forced heating can be equipped with wood or coal titanium. This method allows you to get hot water, regardless of weather conditions. To increase efficiency, it is necessary to mount an expander that will help ensure the circulation of water - the cold one will go down to the heat exchanger, while the warm one will go up to the tank.
The category of especially dangerous equipment includes equipment whose work is directly related to open fire, and if you do not have the necessary experience, it is better not to try to make a do-it-yourself country shower with heating based on a boiler, titanium or stove. The best solution in this case would be to buy a ready-made design with the appropriate certificates and a quality guarantee. But even in this case, there are serious drawbacks that relate to security.
In order to avoid fire, it will be necessary to install asbestos or thermal insulation protection. In order to mount titanium inside the shower cabin, you will need to carefully choose the material that will be used to construct the walls, floor and ceiling. If a decision is made on external placement, then it is necessary to take care of the titanium or furnace fencing to prevent children from approaching them.

- Electric heating. One of the most convenient methods of heating is electricity, of course, if all the necessary safety measures are observed during the assembly of the structure. The disadvantages of such heating include a serious load on the network, which comes from heating elements or a conventional kilowatt boiler (this option can be used with a limited budget). When designing a country shower with a similar heating method, it is necessary to optimize the power grid in advance to obtain warm water.
Important: any electrical equipment (whether lighting or heating) is essential to install, in accordance with the requirements of safety rules: all cables, switches and sockets must be waterproof, and in addition, they must be equipped with reliable grounding for better protection.

- Solar panels. The arrangement of a country shower with heating using a vacuum solar collector is quite expensive. Panels with vacuum pipes are accumulative water heaters. The principle of their work is the use of ultraviolet radiation from the sun, and not its heat to generate thermal energy. Equipment for such a shower can be bought, but also if you have special knowledge and skills, then you can make such a heated tank with your own hands.
Proper operation directly depends on the selection (it is necessary to take into account the load recommended by the manufacturer) and the quality of the equipment itself, capable of heating water. Based on these data, it is worth concluding that it is not worth saving on the purchase of equipment, as it may turn out that the money was spent in vain.

Preparing a place on the site for installing a shower
The choice of location plays a major role not only during the installation of a shower with solar water heating, but also for other types of showers. If you install a country shower in an open sunny place, this will allow the shower stall to dry faster, and if you also make an open riser (such as, for example, a drainage ditch), this will avoid the “eternal puddle” even during frequent use of the cabin.
Before starting work, you must also decide on the method of drainage - this detail can have a significant impact on the entire structure, for this it is necessary to foresee everything during the design, so as not to correct the finished structure later.
The most popular types of drainage in a country shower, perhaps, include the following:
- the simplest is a direct drain to the ground or into a ditch through a drainage hole or cracks in the floor;
- using a pipeline through a pallet or a drainage hole in the floor and transporting them to the sewer;
- use of a septic tank.
Based on these dirty water removal methods, based on the availability of materials, conditions and budget, a huge number of options can be created.

The project is the most important part of the construction of a shower house
Before you start building even the simplest cabin or a shower for a polycarbonate cottage with a dressing room, you need to think over a project that will avoid serious mistakes. It is not difficult to do this, the main thing is to think over the end result and build on this topic.
The total height of the structure should not be more than 3 meters, since a person should be able to freely raise his hands up. You also need to remember about space. While in the shower, movement should not be restricted.
During the construction of the soul, you must follow the following characteristics:
- booth dimensions should not be less than 1 × 1 m;
- you need to remember that you will need to allocate space for clothing.
During the construction of a warm shower in the country with your own hands, you need to take into account a small area that can lead to the destruction of the entire structure. To strengthen the structure, you can erect a pile foundation, this will make it more reliable and durable.
Pile foundations are quite popular in construction due to their good reputation. The modern pile foundation is quite in demand, since its price is much less than that of its "brothers", and in terms of quality it is in no way inferior to them.
In order to build this foundation, it is necessary to use pipes whose diameter is 100 mm. For them, holes are drilled in the ground of such a depth that the pipes protrude 15-30 cm above the ground.

How to install a heated shower in the country?
The work on the erection of a country summer shower consists of the following stages:
- Making a foundation (if the foundation is piled, it will be necessary to drill holes for it in the ground, for a filler, dig a small pit).
- Installation of the frame (horizontal and vertical racks) and the upper ceiling for mounting the tank.
- Hanging on one of the vertical supports of the door.
- The frame must be sheathed with the selected material, which will play the role of walls.
- If there is such a need, it is possible to perform thermal insulation of the entire structure and install a roof over the tank space (only necessary if there is forced heating).
- Installation of the tank and heating equipment, reflectors, protective film (it all depends on which type of heating was chosen).
- Hanging hooks, shelves and hangers.
In cases with ready-made options, it is worth mentioning a plastic country shower with a water heater.
Recommendations for choosing a ready-made country shower with heating
Before purchasing a tank for a country shower with heating, it is necessary to study what requirements are imposed on it:
- profitability - low cost, but also the corresponding quality;
- environmental friendliness - the materials used to make a heated country shower should not harm human health;
- fire safety - is a mandatory requirement, if the shower is heated by electricity, all contacts and connections must be of high quality and reliable, taking into account fire safety standards;
- comfort - being in the shower should not cause inconvenience, and the dimensions should be comfortable for swimming;
- modernity - this requirement is imposed on the design of the purchased, as it must fit into the overall picture.
When choosing a purchased shower, it is necessary to be guided by the volume and shape of the tank, the choice of which is characterized by personal preferences. There are models both with booths and without them. It is possible to install various add-ons, such as automatic heating and draining of water, various hygienic devices and additional nozzles.
Additional options for a purchased country shower with heating include:
- indicator responsible for the level of filling the tank with water;
- shutdown timers and heating devices;
- devices for filling and draining water;
- thermostats.
The heaters can be located at the lower, central and middle levels.
There are pedal options and showers equipped with separate changing rooms, their difference lies in the price, the latter are more expensive, but also more comfortable.
Convenience during installation is another requirement for a heated shower, and since the shower is purchased, installation and connection should take a maximum of three hours.
The shower cabin should have a window or mesh elements through which light and air can penetrate, killing mold and fungus.

In the event that the country shower provides for the installation of electrical wiring, it is necessary to remember the elementary safety rules when carrying out electrical work. The shower is a place with high humidity, so you need to take into account all the nuances:
- In order to make it more convenient to use the shower, it is recommended to replace the iron pallet with plastic ladders. Their advantage is that - the air circulates well and the water does not stagnate.
- Thermal insulation is one of the main requirements for the normal operation of a shower with thermal insulation. For such purposes, polystyrene foam is most often used. This material is great for places with high humidity and at the same time it is quite easy to install. To achieve tightness, the womb is covered with an additional dense film. A room with this type of thermal insulation will be quite warm and comfortable. For year-round operation of the shower, the entire structure must be insulated.
- The most common mistake when installing a heated shower is installing a leaky door and thick walls. As a result, due to poor ventilation, various fungi and mold begin to spread.
- To prevent electric shock, the operation of the shower while the heating element is on is strictly prohibited.
- Careful monitoring and maintenance of the correct water level will help prolong the life of the heater. Turning on the heater without water can cause it to simply explode. Repair of this type of product is not provided.
In order to create comfort while bathing in a country shower, water heating is essential. And warm water in the shower is truly a real treasure for avid lovers of countryside holidays and summer residents.
We also recommend
 Switching power supply: repair and refinement
 Remote control of light
 Swimming lessons for preschool children
 Notes for the master - home household alarms
 Clock propeller on Atmega8
 Device and relay application examples, how to choose and connect a relay correctly Microcontroller and relay simple switching circuits