Armrests for cars - how to make this “thing” comfortable? Do-it-yourself tuning, another nugget with DRIVE2 Making the center console with your own hands.
Complete information on the topic "do-it-yourself beard on the classics" - all the most relevant and useful on this issue.
Most often, the “beard” of the VAZ-2107 is made from a sheet of plywood 6 mm thick, fiberglass or borrowed parts from foreign cars. You can give it an aesthetic appearance with your own hands, make it more functional. The center console turns out to be aesthetically attractive, its functionality increases, there is a place for the necessary things.What can be placed on the center console
Tuning enthusiasts make their own beard to place on this panel:
- clock;
- multimedia devices (radio, radio, etc.);
- knobs for adjusting the degree of illumination of the dashboard;
- block of switches for the fan, fog lights, outdoor lighting;
- pocket for small items;
- USB sockets for charging gadgets
- part of the control devices of the car.
Before taking measurements for the manufacture of the center console, it is necessary to remove the decorative trims from the existing part and everything that will interfere with the installation of a new part. In order not to make a mistake with the dimensions, you first have to make blanks from cardboard, try them on.
How to make a "beard" with your own hands
In order to match the dimensions of the central panel with its dimensions on the car, it is necessary to mark the cardboard pattern and accurately transfer it to plywood. As the basis of the pattern, you can use the standard factory console. Additionally, you need to prepare compartments for devices that will be placed on the panel. Be sure to make enough space for
gearshift lever movement.Alteration of the "beard" can be combined with a change in the entire dashboard, covering it with carbon, leather or other material. The homemade plywood center console is a three-dimensional structure consisting of several flat parts.
For its manufacture, tools are used:
- jigsaw;
- screwdriver;
- angle grinder;
- mounting gun for glue;
- furniture stapler.
Details of the "beard" are carved with a jigsaw, and then connected with carpentry hot glue and screws. This method will prevent the dismantling of the structure from vibration during operation. After the assembly is completed, the finished structure must be covered with material. It is attached to plywood with a stapler or hot glue.
After assembly, the beard must be left for a day, so that the glue is completely dry and seized. After that, it is installed. At this stage, it is necessary to bring all the planned switches to the new panel, fix them in the prepared holes, and connect them to the car's power circuit. Only then fix the panel in a permanent place in the interior of your car.
la.How to make a beard yourself on a VAZ 2107
The front panel of the VAZ 2107 has a console in the middle, which houses a variety of equipment (tape recorder, clock, cigarette lighter). This rather functional part of the interior of the car motorists call the "beard". Tuning enthusiasts often pay special attention to this node, making it original and increasing its functionality. Tuning a VAZ 2107 beard involves adding additional elements and devices that make it more useful:- MP3 player.
- Dashboard lighting control.
- Clock.
- Switches for outdoor lighting, electric fan, fog lights.
- USB sockets for charging gadgets.
- Control devices for the operation of the car's electrical network (voltmeter, ammeter).
- A cell for small items, placed near the gearshift lever.
Also, the console is sheathed with decorative trim, which serves as an ornament to the standard interior of a production car.
Materials and tools
Console tuning usually consists in the fact that a new VAZ 2107 beard is made, on which mounting points for switches, indicators, control devices and other equipment are provided in advance. The most affordable material for self-made beards is plywood. The thickness must be at least 6 mm, otherwise it will not be possible to achieve the necessary rigidity of the product. For finishing, artificial leather is most often used, matched to the color of the interior elements, or, more recently, carbon fiber of a suitable color.
Sometimes tuning the VAZ 2107 beard is accompanied by a complex alteration of the interior design with the replacement of finishing materials for door trim and front panel trim with carbon fiber or leather vinyl. To make a tuned beard VAZ 2107, in addition to finishing materials, the following fixtures and tools are needed:
- jigsaw;
- electric drill or cordless screwdriver;
- "Bulgarian" (angle grinder);
- metalwork corner;
- pencil;
- ruler (roulette);
- glue gun (tube of glue);
- furniture stapler (for attaching leatherette).
A new console (beard) is installed in place of the standard one, which should be dismantled to free up space and take measurements necessary to create drawings of the workpiece.
Making a beard VAZ 2107
Depending on the skills, imagination and personal preferences, you can develop an individual design of the console (beard) or implement a ready-made solution by copying the product you like. A beard is a complex spatial structure made of flat parts. For its manufacture, patterns are needed, which are best made from hard cardboard. Solid material allows to achieve high precision in the manufacture of console parts. If you are not completely confident in your skills, you can first make a cardboard mock-up of the console. This will make sure the drawings are correct and check how well the new beard fits into the installation site.
The design of the center console, made by hand, can be very diverse. Usually, the design includes a capacious box placed between the driver's and front passenger's seats (where the gearshift and handbrake levers are located). It can accommodate compartments for small items, appliances, switches or just coasters for glasses.
After the patterns are made and the details of the console are marked, they are cut out of plywood with an electric jigsaw. It is better to connect the parts with self-tapping screws and glue. The first will allow you to fix the elements motionlessly for a while while the glue sets. This is the easiest and most reliable way to connect console parts.
The finished beard is covered with leather, fabric or carbon fiber. For fixing finishing materials, glue and furniture clips are used.
When the glue dries, it remains to install the new console in place and secure. Before mounting on it, you should fix some of the devices and switches, which will be difficult to install if the beard is fixed in place. However, this depends on the design features of the tuned console. Sometimes it's easier to mount switches, appliances, and devices after the console is in place.
DIY classic beard
Homemade "beard" for the classics
I was sitting in the car, waiting for a friend. The radio was playing. On the radio, as usual, there was nothing on the track, in connection with this, we constantly had to switch stations. In domestic cars, if you sit imposingly on the seat, then reaching out to the radio buttons is simply not realistic, you have to reach out. And then an idea came to me.
But what if I take and make my own “beard” design, where the radio tape recorder will be located closer and more conveniently, and at the same time change the heater control to round control knobs.
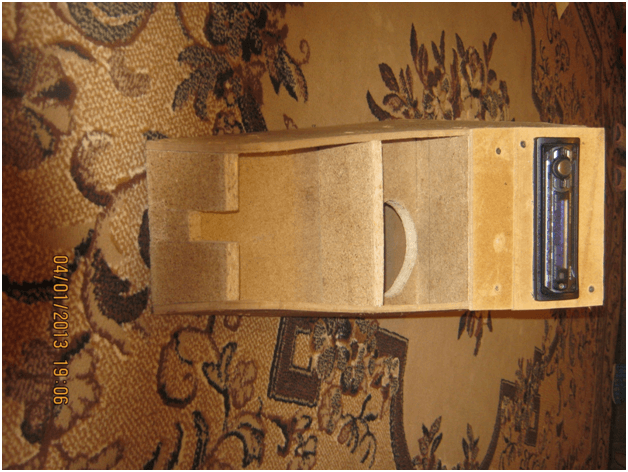
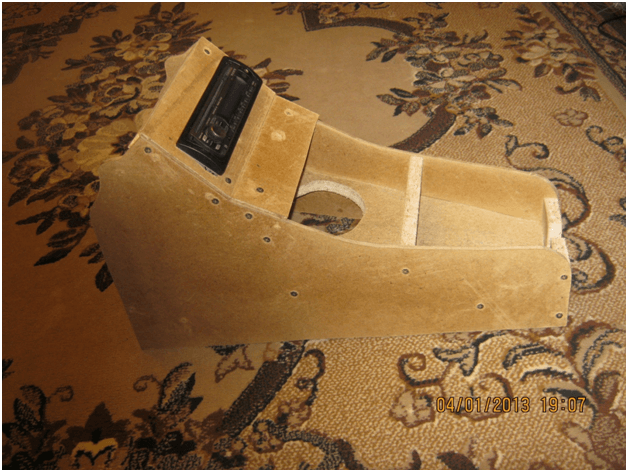
The first thing I started with was the search for a technical solution for controlling that heater. I considered several options for foreign and domestic blocks. Inomaroshnye disappeared immediately there was one travel option (at that time), this is a control unit from the new GAZelle. The option, I tell you, is very good, but it has one single minus - its cost. B: I didn’t find earplugs, and a new one cost a lot, not a little 1300 rubles. (a bit too much for a piece of plastic). I was a little upset, but what to do about finding funds. But everything was resolved much easier and cheaper. I have a ChevyNiva company car. Somehow, during the next trip, I drew attention to the same heater control panel, and immediately caught myself thinking: “If only it were not electronic” .... And what was my surprise that there are simple mechanics ?. I went to the store, found this block, carefully studied .... and bought. It turned out to be the best solution. It was decided to make the frame itself from 9ka plywood (although during the production process I realized that it would have been 7ka itself). Also purchased: vinyl leather (with texture as on the main panel), epoxy resin and bars 2.5x2.5 (to create a frame).
The production process began with cutting out a template from a piece of cardboard.
Then it was transferred to plywood (with some changes) and cut with an electric jigsaw. Next, bars were inserted (the length of which was later corrected from) and all this was pulled together with self-tapping screws.
There is one serious problem here. In 6s, the distance between the front seats is very small, and since I decided to make a whole “beard” with an armrest, it was necessary to somehow make the transition from a very wide part (near the installation of the radio tape recorder) to a very narrow one (near the armrest) . I had to abandon one bar that had previously been installed. A simple mechanical contraction of two walls is practically unrealistic .... I had to resort to bending the plywood, first by simply heating it over the stove (which did not help), then by boiling it in water.
Thus, the main form of the structure was set, all this was twisted into temporary partitions (in the photo, in the armrest area) and left to dry completely (about 2 days)
The next step was the process of manufacturing a bent plywood insert with a hole for the gearshift lever. With the dimensions of this insert, the current hit from the 3rd time. it has a curved shape. She bent as follows: Boiled in, then pressed against the walls of the kitchen sink, pre-prepared plywood discs, a set radius, after which she cooled sharply with snow. Due to the low-quality performance of plywood in factory conditions, during the boiling process, it naturally stratified. I had to glue the layers again (PVA glue was used). After drying the plywood, it had to be given greater strength, which was done as follows: the plywood was doused with epoxy and a piece of a lady's stocking was put on it ... .. and so on for several layers. Next was drilled, a hole for the gearshift lever.
The next step was the process of installing the heater control unit on the console. Due to specific features, it was decided to glue this block (which, of course, is not the best option, but nevertheless) into the console with epoxy resin .... Holes were cut for the installation of the radio and the unit itself.
There is no front panel on the block, which made me very sad (still in the store), I had to come up with a solution to this issue ... for a long time I could not decide how to do it ... finally I decided to make a relief panel. With this decision, she should look much prettier.
Also, places were planned for placing additional buttons, in my case 2 buttons will be installed: amplifier power control and heated seats. The buttons are taken from the sheviniva or 15ki (the same)
Next, holes were cut in the overlay panel and all corners were ground off flush with the main one. To control the heater, 3 holes were cut and thin, colored, translucent plastics were glued on the reverse side, so that light from the backlight, which was installed on the unit from the factory, passed through them.
The most difficult stage was the stage of preparing and sewing patterns for tight fitting.
In some places I had to alter it several times. Next, the close-fitting itself. 4 types of glue were used: PVA - for gluing the main flat surfaces, 88 - for smaller areas, Supermoment - for all fine work (because it grabs instantly), and epoxy for processing directly on top of vinyl and plywood (in the area of \u200b\u200bthe stove), so that the vinyl does not peel off from the hot stream. Next, a stocking for the gearshift lever was glued.
Standard control devices were also placed on this design: backlight brightness control, cigarette lighter, and an LED (instead of a light bulb) of the brake fluid level. The alarm button has been moved to the steering wheel. there is a regular place (there is a 5th box on the steering column)
During the production process, another important factor was taken into account … an air duct was made from the stove to the rear seats.
Lada 2106 Papa Carlo is resting! › Logbook › Beard-Central Console / VAZ 2106 do it yourself.
Beard. Dress rehearsal.
Of course, all this was done as a trial version, because. I wanted to check what I myself am capable of. I searched a lot on the net to compare with something. It all seemed that, the whole work is stupid initially. But during the manufacturing process, I came to the conclusion that the work is worth it. When planning the style, of course, I tried to stick to the classic one.
Door cards are not yet completed and are not on the car.
There will be armrest handles made of solid wood, a podium with a speaker (wood with vinyl), everything is also in a soft classic style.
The beard itself was remade about 4 times. If you do not go into details, then the interior space of the cabin does not allow the installation and fastening of a decent beard. Therefore, when I did it all the time, I ran into underwater "stones". One interferes with the other. You can't even make a proper bar.
The main rule of which I adhered to was the absence of sharp edges, high workmanship (dimensional tolerance, surface finish, gaps, quality of materials used)
Upon closer examination of the photo, you can see that all the details are made in volume and with radii.
The work requires a lot of patience and perseverance.
All panels are made of natural wood.
Lada 2106 1992, 69 l. with. - tuning
Comments 141
Cool beard! I want the same, only with a short-stroke rocker and shifted gearshift knob closer to the handbrake. So you can make the angle of the console more gentle) and the color of the tree to freeze under the oak. Like.
Good luck. Color, and geometry adjustment is already your right. All these photos, his car specially exhibited in great detail. So that everyone can take my work as a basis. Although in my beard, there are flaws ... Now, of course, I would change a lot!
I hate the tree in the car, but yours looks somehow cozy) I just want to sit and look at it ...
fucking awesome. if you do it with red, I think it will be even cooler
better than rolls
Thank you. I did my best. Of course, mostly for yourself!
Unfortunately no!
Good day! Are there any blueprints for this?
Beauty, really the best of the home-made ones that I have seen. And the main thing is that they stretch less and there is the right supply of space for the radio.
That's honestly - the best panel on the classics of all that I've seen. Usually they are all angular, poorly fitted, etc. Everything here is smart and well done!
The only thing I didn't really like was the lacquered wood, but that's a matter of taste.
Thank you for the first words! What exactly is wrong with the tree?
Everything is fine with the tree, I just personally don’t like it very much in the car, there is some feeling of furniture, heaviness, but on the other hand - warmth and comfort ...
I think that "wood" is more appropriate at home, and in the car I personally like the texture of aluminum, plastic and rough leather more.
I would like to see your other work.
how did you bend the plywood around?
plywood was not used. it's a birch tree!
The only disadvantage of birch is the lack of a pattern and any texture. And it turned out to be so cool
Oh, it's a pity that VAZ still can't do that! ((
It is a pity that you can not click "Like" 100 times. Great job!
Finalization of the beard VAZ 2107, VAZ 2105, VAZ 2104, Lada Zhiguli, Classic
Inomaroshnye disappeared immediately there was one travel option (at that time), this is a control unit from the new GAZelle. The option, I tell you, is very good, but it has one single minus - its cost. I didn’t find used ones, but a new one cost a lot, not less than 1300 rubles. (a bit too much for a piece of plastic). I was a little upset, but what to do about finding funds. But everything was resolved much easier and cheaper. I have a ChevyNiva company car. Somehow, during the next trip, I drew attention to the same heater control panel, and immediately caught myself thinking: “If only it were not electronic” .... And what was my surprise that there are simple mechanics ?. I went to the store, found this block, carefully studied .... and bought. It turned out to be the best solution.
Then it was transferred to plywood (with some changes) and cut with an electric jigsaw. Next, bars were inserted (the length of which was later corrected from) and all this was pulled together with self-tapping screws
After all installations, the panels were fastened and glued. Small irregularities are patched. Also, in view of the lack of factory knobs on the heater control unit, knobs from an old “romance” tape recorder were used .. it turned out very well.
Next up is the wrap itself. 4 types of glue were used: PVA - for gluing the main flat surfaces, 88 - for smaller areas, Supermoment - for all fine work (because it grabs instantly), and epoxy for processing directly on top of vinyl and plywood (in the area of \u200b\u200bthe stove VAZ 2107 ) so that the vinyl does not peel off from the hot stream. Next, a stocking for the gearshift lever was glued.
Standard control devices were also placed on this design: backlight brightness control, cigarette lighter, and an LED (instead of a light bulb) of the brake fluid level. The alarm button has been moved to the steering wheel. there is a regular place (there is a 5th box on the steering column).
During installation on the car, the native control of the heater was removed, the cables were replaced with longer ones (they were included with the Sheviniv block).
The portal will help you complete the work on finalizing and repairing your VAZ car with your own hands.
Tuning VAZ Classic | Tuning regular beard VAZ-2106
Looking once again at the regular, ugly beard of the VAZ 2106 and envying foreign cars, I decided: “Why is mine worse !?” And I went to buy materials 🙂
2. Liquid nails (Universal, 2 tubes)
3. Fabric for sheathing (I sheathed with carpet, mona leather)
4. A couple of self-tapping screws of different lengths
5. files, sandpaper, saw, jigsaw, drill.
6. A little imagination and patience 🙂
First, let's imagine what we want. Then we apply in turn each wall of the standard beard to the plywood and circle it (for a general shape). Next, using a drawing tool (pen, pencil.) Draw what we want and cut it out. We immediately try on and adjust.
My family trips last up to 36 hours a week, so to keep my family from getting bored, I decided to install a TV monitor in the car and connect the Xbox.
Step 1: Monitor Stand
To make a stand, I used a metal rod that had been lying around in my yard for a long time. How to determine the length? Inside the car, the bar must be at least 7 inches from both door handles.

Step 2: Straighten the ends of the metal rod
To flatten the ends of the rod, you will need something like a sledgehammer. The ends should be as flat as possible so that they can be bent more easily later.


Step 4: Checking the Stand
In order not to scratch or damage the car during testing, I used a sponge that I wrapped around the handles.


Step 5: Find out which screws/screws your TV has
My TV turned out to have 3" x 3" screws.

Step 6: Finding something to mount the TV to
To hang the TV, I used a square frame from a broken metal chair that was lying around in my yard.

Step 7: Disconnect the desired part from the chair
It is necessary to grind off the tips from the legs and the part we need will fall off by itself.

Step 8: Attaching the Square Tube to the Main Stand
Mark with a marker how much the main stand (rod) protrudes compared to the square pipe (former chair leg), then you need to grind off the unnecessary with a grinder.

Step 9: Drilling a Hole in the Square Pipe
Drill a hole in the square pipe, but don't drill a hole in the metal bar yet. The holes must match, so before drilling, you need to measure where exactly in the rod the hole will appear.

Step 10: Drill Holes for TV Monitor Screws
You now have a TV stand. Drill holes in the middle of the rod and above it, into which you will then screw the screws.

Step 11: Screw the Square Tube to the TV
Place a small piece of rubber between the TV and the pipe. Take 4 bolts and lock washers, which can be purchased at any specialty hardware store. You also need to drill a hole in the metal bar and bolt on the square tube.


Step 12: Power supply
You need to add the wattage in watts of your TV and the connected device, in my case the TV has a power of 45, and the Xbox 145. It turns out 190. You need to buy an inverter that exceeds the power of the resulting number. If the total power is more than 80 watts, then you will need a surge protector or socket that can withstand such power, since conventional filters can withstand no more than 80 watts.

Step 13: Attaching the Socket
I used 12mm thick wire which works great with the inverter. Next, I made a small hole in the rubber socket and placed it behind the center panel, and then connected the inverter to it.
car imageshould be complemented by comfort. The longer you have to spend behind the wheel, the more the car interior needs additions. Installing an armrest will create a cozy and comfortable environment for long trips.
The armrest itself is a multifunctional car accessory. Its first and main purpose is a surface for additional support. The armrest will help relieve tension in the muscles and relieve stress on the elbows and shoulder joints. Staying in long traffic jams or traveling long distances will become much more comfortable when you have the opportunity to relax your arms and their comfortable position with the help of armrests.
We manufacture armrests for cars, some of which are equipped with a small box. Such an armrest can be used as a small glove compartment where documents or items needed on the road are stored. In addition to standard models of armrests, we produce multifunctional designs. Some types of armrests provide functions for controlling the climate control system or power windows. You can choose an armrest with a built-in mini-fridge. Additional comfort will be provided by the installation of an armrest with a sliding design, which can free up additional space between the car's seats.
Armrests, as an element of car tuning, are carefully developed and designed taking into account the features of the interior of a particular model and brand. We use only high-quality materials and modern technologies, thanks to which the manufacture of armrests for a car is one of the main services of our auto studio.
A variety of colors and models of armrests gives each visitor the opportunity to choose the best option for their car, stylish and elegant.
Consoles for the car
Another opportunity to make your stay in the car as comfortable and ergonomic as possible is to install a console. The functional element of tuning also increases the degree of the image of the car owner. The console can be installed between the passenger seats and between the front seats.
Our service offer includes not only the manufacture of the console in the car, but also a variety of additional work to improve and add more console functions.
Price from 10000 rubles
The manufacture of armrests for a car, as well as the manufacture of a console in a car, is necessary to ensure maximum comfort when traveling and to strengthen the image of the owner.
Examples of completed work on the manufacture of the console
The price for the manufacture of an armrest or console in our Tuning Atelier is from 50,000 rubles. The final cost depends on the shape, the number of additional niches, pockets, sockets, the activation of ventilation for rear passengers
Car KIA CARENS
Photos before and after works:
1.1. Staff console. Top view, 1.2. Console based on Mercedes ML. View from above.

Based on the dimensions between the seats, the console of the 2010 Mercedes ML350 was taken as the basis. Used materials: aluminum, extra strong plastic, genuine leather, flock. In this project, at the request of the owner, there are: 4 sockets 12v. (2-rear, 2 front, mobile phone pocket, retractable ashtray at the back, two compartments under the armrest).
2.1. Staff console. Left side view, 2.2. Console based on Mercedes ML. View from the left.


On many vehicles, the front panel has a console in the middle that rests on the floor and serves to accommodate a wide variety of equipment. The so-called beard of the VAZ 2107 model is a fairly functional interior detail. The center console is an excellent stylistic solution for the interior designers of the VAZ 2107, and it is also very functional. Tuning enthusiasts often make this knot with their own hands and give it an original look. Additional elements are added to the design that increase the usefulness of this device, give uniqueness. Often put on a beard:
- Clock.
- Radio or other multimedia device.
- Dashboard lighting dimmer.
- Block of switches for the electric fan, outdoor lighting and fog lights.
- At the bottom of the gear lever there is a convenient pocket for small items.
Materials and interior preparation
The manufacture of this assembly with your own hands is usually carried out from a plywood sheet with a thickness of at least 6 mm. For exterior decoration, a wide variety of materials can be used, mainly leather-vinyl, matched to the upholstery of other interior parts. Advanced tuning enthusiasts go further, they fit the front panel, the inner surface of the doors, and some other details with this material.

For the manufacture of the center console for a VAZ 2107 car, the following tools are used with your own hands from the materials listed above:
- electric jigsaw;
- cordless drill or screwdriver;
- angle grinder;
- tape measure, metalwork corner, pencil;
- mounting gun for glue;
- furniture stapler.

A do-it-yourself beard is installed in place of a regular knot. It must be carefully dismantled in order to free up a platform for a homemade console.
The order of dressing the beard
Each of the craftsmen develops his own design of this element for the VAZ 2107 car, which makes it possible to achieve its maximum uniqueness. The beard is a spatial structure of complex shape, made up of flat parts. In the manufacture of patterns of side surfaces, it is recommended to use hard cardboard. This will make it possible to achieve maximum precision in the manufacture of individual parts.
The shape of the center console of a VAZ 2107 car, which is made by hand, can be completely different. Most often, craftsmen prefer to combine it with a box that is installed between the front row seats. This part houses the handbrake lever.


Separate parts of the "beard" for the interior of a VAZ 2107 car are cut out of plywood using an electric jigsaw and interconnected using self-tapping screws and glue. The finished unit is pasted over with leather or other material. Then the console is installed in the place intended for it and fixed. All devices are installed in the panel cutouts and the car is ready for operation with a do-it-yourself interior.
We also recommend
 How to make a healthy banana smoothie
 Harvesting asparagus for the winter recipes for cooking at home
 Chicken pie with zucchini and cottage cheese Dukan's recipes zucchini pie with cottage cheese
 Gingerbread with icing
 How to cook a salad with crab sticks and carrots
 Cabbage salad with bell pepper - the best recipes