Do-it-yourself wicker fence: how to make a wattle fence. Weave a fence with our own hands: a horizontal design How to make a fence from a wattle fence with our own hands
The technology of weaving a fence from a vine has remained unchanged since ancient times, when this type of fence was the most common type of fence. Today, wattle is used more as an element of landscape design, characterizing the national Slavic flavor.
How to choose and prepare the material for weaving? What technology should be followed when creating a fence? We will dwell on these and other aspects of the manufacture of the fence in more detail.
Features of wicker homemade hedges
A wicker fence is an interesting option for fencing a front garden or zoning a plot inside a backyard space. Fence fabric is made from a variety of available materials. It can be a hazel, willow, willow or vine branches. Decorative hedge is a component of landscape design and gives the garden a special flavor.

- Among the main advantages of a fence made of vines or other models of "braiding" include:
- High decorative and aesthetic qualities. By combining fences from different materials or different weaving methods, you can create an original design.
- Ease of manufacture. Weaving technology does not cause any difficulties. The main thing is to properly prepare the rods and adhere to the chosen scheme.
- Environmental friendliness of the mini-building. Thanks to natural components, the fence looks organically in the garden, near the gazebo, in the flower bed, etc.
- Affordable cost. If you stock up the rods yourself and do all the work, then the fence will turn out to be very cheap. Possible costs: consumables and the purchase of missing tools.

Despite weighty arguments in favor of a wicker fence, skeptics note some of the disadvantages of such a fence:
- "Pletenka", even from durable materials, is not a complete protection of the site from intruders. Therefore, a fence made of rods is installed mainly for the purpose of zoning a personal plot from the inside.
- Limited period of operation and susceptibility to adverse weather conditions. With strong weaving, the service life of the fence will be no more than 7 years.
- Fire hazard of the fence.
- The difficulty of restoring the damaged area. If one or two rods break, the fence will have to be partially dissolved and twisted.
Varieties of wicker fences
All options for a wicker fence are classified according to the main parameters:
- material of manufacture;
- the size of the finished product;
- weaving method.
Manufacturing material. Braids are made of reed, cattail, hazel and willow. Vine fences are especially popular. More durable models are made of veneer and boards - such a tyn forms a dense panel with a minimum number of gaps.

PVC fences are increasingly common in cottage and summer cottages. Plastic fences are less whimsical to weather conditions, but they are inferior in attractiveness to counterparts made of natural materials.
Wicker fence dimensions. By height, all fences are divided into three types:
- Low products up to 1 m are suitable for fencing flower beds, garden paths and playgrounds.
- Medium fences 1-1.5 m high visually divide the space into different functional zones. For example, the pool area can be fenced off from the rest of the yard.
- High fences - more than 1.5 m. Such fences are installed around the perimeter of the site, acting as a full-fledged fence.
Weaving methods. When arranging the site, the following methods are most often used:

- Vertical weaving - the rods rest on the ground. If you use vine shoots, then over time a hedge with green leaves will form.
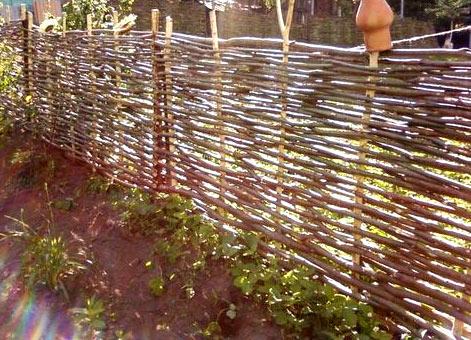
- Horizontal weaving is one of the easiest options. Flexible rods are laid along the ground between the installed supports.
- Inclined method - the branches of the canvas are fixed diagonally to each other. Such a fence looks very interesting and does not overload the space at all. Oblique weaving is recommended for shaded small areas.
- Chess way - horizontal bars are placed in groups. The product is difficult to manufacture, additional fixation with self-tapping screws is required. It is better to entrust the creation of a braided checkerboard to experienced craftsmen.
When choosing a material for creating a fence, it is necessary to evaluate the advantages and disadvantages of each of them.
Willow has good strength and flexibility. For the construction of the fence, any kind of "weeping" tree is suitable. With the help of willow, you can create a hedge using young shoots of a tree. The buds on the branches develop rapidly, and the fence is overgrown with leaves.
Cattail and reeds are available and easy to process. However, the material is short-lived due to low strength. Thickets of reeds can be used in the construction of low fences intended for zonal delimitation of space. The main disadvantage of reeds is strong flammability. In hot weather, a carelessly tossed cigarette can start a fire.

A hazel wattle will last up to 10 years. The harvesting of material is carried out in early spring, when the buds have not yet ripened on the branches.
Weave a fence with our own hands: a horizontal design
Selection and preparation of vines for the fence
The following types of vines are best suited for work:
- Beloloz - willow grows on moist soil, it is distinguished by greenish or yellow shoots. During heat treatment, the rods of the vine become bronze in color.
- Hemp willow - greenish-brown branches are very flexible. To build a fence, three-year-old shoots must be used.
- Goat willow is the best option for weaving a fence. The main advantage of the material is the smooth bark.
Important! For the "weaver" it is undesirable to use a willow. The shoots of the red-colored willow have a small core, so the fence will turn out to be dilapidated.

If the rods are used uncleaned, then the workpiece can be performed year-round. If the bark is planned to be removed, then it is necessary to cut off the shoots in October-November with the onset of the first frosts. At this time, the kidneys hide inside, and the rods become smoother. Starting from January, it is not recommended to cut the rods - they become viscous.
There is an easy way to choose a vine for a fence. Bend the cut branch at its thickest point. If the shoot has not cracked and has withstood a 180° bend, then the vine bush is suitable for work.
Rules for cutting rods:
- shoots 2-4 cm thick are suitable for weaving.
- the cut must be made with a sharp pruner at an angle of 60 °.
Vine preparation:
- Remove the bark from the shoots.
- Rods cut in autumn or winter should preferably be boiled for five minutes. In this case, the bark does not need to be removed.
- The temperature regime for storing blanks is above 0°С, but not more than +35°С. The best place is a dry insulated attic.

Immediately before weaving, the “spring” vine must be taken out and dried in the sun for three to four days. Shoots that have overwintered in the attic must be soaked in order to restore flexibility to the material.
Development of a drawing of a wicker fence
Before you start work, you need to decide on the weaving pattern. The drawing must display the length and height of one canvas, the number of racks and the distance between the supports.
Typical drawings of a wicker fence are shown below.


Preparation of materials and site marking
For work, in addition to the prepared rods, you will need the following tools and materials:
- support poles - wooden stakes, metal pipes or rods are suitable;
- manual drill for mounting racks;
- garden pruner;
- wire for forming hedge stiffeners;
- pliers;
- mallet;
- wood preservative.
Clean the site for the installation of the fence from excess branches and debris. Level the surface and mark the places for the installation of support pillars.
Installation of support legs

At the same distance from each other, drive in metal stakes, the depth is about 50 cm. If wooden supports are installed, then drainage must be done under them - fill the pits with sand. The lower ends of the wooden racks must be treated with an antiseptic before installation.
The stakes must support the weight of the finished hedge panel. The thicker the rods are used and the taller the building is, the wider and stronger the supports should be.
Weaving a fabric from rods
Sequencing:

Advice. If the vine is laid in bunches, and not one shoot in a row, then the fence will turn out to be more fundamental and reliable.
How to weave a fence correctly: video
Instructions for weaving a vertical fence
With vertical weaving, thick rods and branches are used. The work is carried out according to the following technology:
- Install vertical support poles.
- Tie or nail horizontal branches to stakes. The optimal distance between the bars is 25 cm.
- The vine is consistently stuck into the ground, intertwined with horizontal rods and cut off on top.

Willow twigs take root easily and by next spring the fence will be green. After two years, the hedge will grow, become denser and stronger. The hedge requires maintenance. Overgrown branches must be cut and formed into the correct shape of the wattle.
Ways to decorate hedges: photo ideas
The rustic style will be complemented by the corresponding paraphernalia: clay pots, jugs, figurines of pets.

Wicker baskets that act as a flower bed look beautiful next to the hedge.

Ampelous plants are often planted next to vine products. Petunias and other flowers grow, wrap around the fences, forming a picturesque hedge.

Complementing the landscape composition with a fence are wooden barrels, wagons and other elements from rural life.

At the moment, there are a huge number of different types of fences: with decorative elements or simple fences. One of the decorative types of fence is a wattle fence (in Ukrainian it sounds like “tyn”). Making such a fence with your own hands is not difficult, although somewhat time-consuming.
Wicker fences with their own hands. A photo
The main advantage of a wicker fence is not in its size (it can be anything: high or low, as well as any other type of fence), but in its appearance. So There are two main types of weaving:
- vertical. The rods (vine) are intertwined from the bottom up, which allows you to make a really high and unusual fence of the desired size. In addition, there are craftsmen who not only weave standard patterns, but also make unique and original braids, patterns, drawings.
- Horizontal. The vine can also be woven to any height. But most often the horizontal type of weaving is used for low decorative fences. For example, for flower beds.
In these photos you will see what wattle fence (wicker fence) you can make with your own hands on the site of your house.


In addition to the standard vine (grape, willow, rose or reed), they often use wooden flexible slats. A fence made of this type of wood turns out to be solid, dense, with virtually no gaps, which makes it a good external fence for the perimeter of the site. The most important thing is that any wicker fence looks the same from the outside and from the inside.
Among modern materials there are also polyvinyl chloride (PVC) panels designed for weaving hedges. The advantage of artificial material is that it is the most durable, copes well with the aggressive effects of natural anomalies (be it bright sun, or prolonged rain, snow, wind), and is not susceptible to the appearance of pests.
In addition, it is several times easier to mount than a natural wood vine or rail.
How to make a wicker fence with your own hands
 How to weave wattle with your own hands? First of all, you need to decide what type of material will be used. So PVC vines can be mounted at any time of the year, without prior preparation. If the choice fell on natural material: willow, reeds, grapes, rod, then it must be carefully prepared.
What is needed:
- Stakes with a diameter of 5-7 cm. The budget option is pine. But in terms of its properties, this is not the most durable type of wood. Oak is a durable, but financially expensive material. Regardless of the type of stakes, they must be treated with a special compound for wood (from bark beetles, mold, and also refractory).
- rods for weaving with a small diameter (3-4 cm) even and smooth. It is better to harvest them from the fall, when the growth of plants has already stopped, but the tree sap is still preserved in them. Such rods will be flexible and durable, will not break during installation, and will provide easy weaving. They also need to be treated with a special compound.
Regardless of the type of weaving (horizontal or vertical), it is required to drive the stakes correctly. If artificial material is used, then the stakes are simply driven in or dug into the ground in increments of half a meter. If the stakes are made of natural wood, then it is advisable to pre-drain the soil.
Drainage under the stakes of the wicker fence:
- Dig holes 40 cm deep for stakes.
- Pour in some unsifted dry sand.
 This will keep the wood from rotting quickly. Why is it better to use a step of half a meter between the stakes? This is optimal distance, since this way the fence will not sag, they will tilt. In addition, it is easier to weave a vine, creating any ornament and pattern.
After the stakes are dug in, you can start weaving rods. To make them more flexible, their ends can be dipped in salted water for a few minutes. For horizontal weaving, it is enough to simply twist the rods between the stakes. For the vertical one, it is required to weave several rods horizontally at an equal distance, and then proceed to weaving vertically.
It is desirable that the ends of the rods did not touch the ground(Retreat at least 1-3 cm). So they will be less prone to decay.
If a tight fence is required, then the bars should be pressed as close as possible to each other. So they will not let in a lot of excess light, providing a strong fence. The uneven ends sticking out behind the stakes can later be cut evenly with a secateurs or a small hacksaw.
For braiding from rods, it is better to opt for reed vines, since it is the thinnest and most flexible. A willow vine of small diameter is also suitable for this purpose. A braid can be woven with one, two, three or more rods, depending on skill. It is recommended to first weave the braid, and then weave it between the stakes.
In this video you will see how to weave wattle with your own hands.
In the future, the finished fence can be dyed in any desired color. For example, wood varnish or facade paint. But most often the natural look is the most acceptable.
The lacquer will create additional protection against aggressive natural effects, as well as give additional shine to the structure.
- Blanks for weaving
- Reeds and cattail
- Vine
- Hazel
- detailed instructions
- Required accessories
- Austrian or wattle from the board
Wicker fences are included in their projects by landscape designers, creating a cozy retro style in the courtyard. A wicker fence can be called a fence, a fence, a palisade or a wattle fence. It's pretty easy to make. Almost any material at hand can be used, including modern high-density synthetic bases. Fans of natural, environmentally friendly materials prefer to weave a fence from vines, boards, reeds, branches and other plastic raw materials. Any flexible material that is resistant to the harmful effects of the environment is suitable for weaving.
Blanks for weaving
The most suitable materials from which decorative wattle can be made.
Willow
Twig wattle is durable and flexible, provided that dry material was used in the process. Each type of willow is suitable for such purposes. If desired, willow can be used to make living or non-living fences.. In the first case, we are talking about young shoots planted in the ground, from which a wicker fence is formed in the process of their growth. An inanimate hedge means a wattle fence made of willow branches cut in advance.
It is best to use freshly cut willow shoots for weaving a hedge. Material is harvested from early autumn to early spring. If the branches were cut in advance and became brittle from long-term storage, they are soaked in boiling water for several hours to give flexibility.

Reeds and cattail
These very common plants are not very strong, have a fragile structure, so they are unlikely to be able to enclose the entire summer cottage. Even if you decide to build such a fence around the house, it will have to be changed after a couple of years. It is advisable to weave a miniature low fence from reeds or cattails for edging a flower bed or landscape zoning.
Vine
Grapevine wicker fence is easy to make, thanks to flexible and long twigs that can be wrapped to the desired state. The grape vine is resistant to temperature extremes and high humidity, so a wicker fence made of it will last more than one year.
Hazel
In order to get a beautiful and high-quality fence from, you need to worry about harvesting the material in early spring, until the first buds appear on the plant. At this time, the young hazel shoots are most flexible, which means they will not break during the weaving process.

Materials and tools for horizontal tyn
If you decide to weave a fence of willow twigs, then for its manufacture you will need the following materials and fixtures:
- branches, the diameter of which can be 1–3 cm;
- manual or gasoline drill;
- sharp secateurs for cutting rods;
- wire, with which stiffeners are formed;
- galvanized screws;
- screwdriver or screwdriver for screwing screws;
- knife with a long blade;
- awl;
- a hammer.
After everything you need is collected, you can proceed to the phased implementation.

detailed instructions

When weaving a fence from rods, the vine can be laid one at a time or in bunches, which will give a different effect. The beam version will add monumentality to the fence, and in the case of a single weave, you will get a lightweight openwork pattern.
At the ends of the fence, the branches are cut so that they do not stick out randomly because of the posts, and the fence has acquired a complete look. If you live in a climate zone with frequent and strong winds, screw each shoot to the supports with self-tapping screws or secure them with wire.
Like the side branches, the tops of the supports are cut so that they do not stick out above the spans. If the vine is flexible enough, it can be bent down and threaded through the weave.
When the weaving of the fence is completed, it is worth worrying about its safety and attractiveness. To do this, the product is treated with stain or impregnated with special protective agents. Work is done with a brush or spray gun.

Required accessories
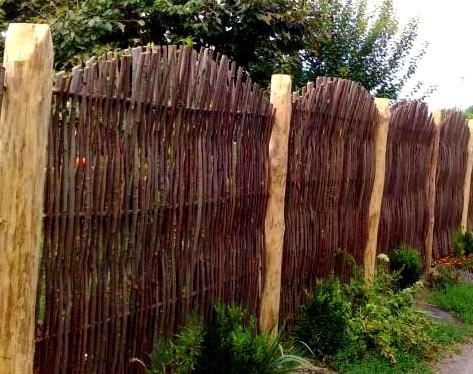
There is an equally interesting way of weaving, which is characterized by a vertical arrangement of branches. A wicker fence made of birch branches looks very unusual, which will protect the courtyard from the penetration of uninvited guests, because it is difficult to overcome a high structure with a sharp top.

Useful for work:
- bars for vertical supports;
- slats 25x45 mm in size for transverse veins;
- birch branches with a diameter of at least 3 cm, and the length depends on the height of the fence (on average 170–190 cm);
- hammer, screws and screwdriver;
- pegs and a strong rope for marking.

- A selection of branches of the same length, from which a wicker palisade will be assembled - birch poles with good flexibility. In the process of harvesting the poles, it is necessary to remove the side branches.
- Installation of vertical supports made of wood. The bars are pre-treated with antiseptic agents, and then dug into the ground in increments of 2.5–3 meters to a depth of about 50 cm.
- On self-tapping screws, transverse strips are fixed to the posts, 10–12 cm in length exceeding the step between the vertical elements. You should get three rows of transverse segments: top, bottom and middle.
- Between the horizontal supports we pass birch poles from top to bottom, while gently bending them in the process of weaving. Each next branch bends opposite to the previous one. And so to the end of the fence. Periodically, the rows are compacted with a hammer to reduce gaps. The raw material will dry, and the woven fence will gain strength.

A wattle fence collected by your own hands in the country will become a real decoration of the yard and hide your personal family space from prying eyes.
Austrian or wattle from the board
A wattle fence made from a board outperforms the more common picket fence in many ways, while its manufacture is not particularly difficult. Real aesthetes choose such a fence for summer cottages, drawing attention to it and causing admiration of others. Instead of wood, MDF panels, plastic siding or peeled veneer can be used here. But what can compare with natural material? How to assemble a wicker fence from boards, and what is needed for this.

For a fence from the boards, you will need:
- a bar with a section of 10x10 cm, the length of which depends on a similar parameter of a wooden wicker fence;
- planed boards 150x20x2100 mm;
- bars for vertical strapping, the length of which is equal to the length of the support bars at the rate of 1 piece per one canvas;
- saw;
- self-tapping screws and a screwdriver;
- bituminous mastic;
- antiseptic;

- Marking and installation of vertical supports are carried out at a distance of 2 m from each other, between which auxiliary posts are fixed. For greater strength, before weaving the fence, the supports in the lower part are treated with bitumen and concreted.
- Cutting lumber. In this case, all elements must have identical dimensions.
- The boards are laid horizontally, bending around the timber, with their ends on the supports. They are tightly screwed to them, while each subsequent element is bent in the opposite direction relative to the previous one.
- When the wicker board fence is fully assembled, it is treated with an antiseptic or varnish intended for outdoor use. So the Austrian wattle will last much longer, and the person who made the wattle will be able to admire his creation for more than one year.

The video shows the process of making a fence from an edged board for a summer cottage.
Recently, the rustic style has become very popular in the exterior of country landscape design. In this regard, many craftsmen began to make wicker fences, wooden arbors, benches and much more with their own hands. Quite often, in order to get the effect of natural naturalness, wattle is used when decorating a summer cottage. Making it yourself is pretty easy. To do this, just look at the proposed photo examples of various wicker fences and carefully study the master class.
Varieties of wicker fences
The eye of any summer resident will be pleased with a decorative wattle fence made with his own hands in one summer. The main value of such a fence is that it can be done practically from any improvised material. For the manufacture of a wicker fence, you can use:
Wicker fences differ not only in the material of manufacture, but also in the method of weaving.
The classic way to weave a decorative hedge is horizontal stacking of branches between supports. However, to make more unusual fences in the country with your own hands, you can use other types of weaving.
All varieties of wicker fences can be seen in the photo.
The choice of material for a wicker fence
The life of the fence will depend on the correctly selected material. So, for example, if the fence will be built from reeds, then you need to be prepared for the fact that it will last no more than four years. A more durable wattle fence for a summer residence will turn out from vine, hazel or willow. It can stand for more than 10 years, especially if the material is treated with antiseptic compounds.
The vine can be purchased from nurseries. For the manufacture of openwork hedges, thin branches with a diameter of up to one centimeter are best suited.
Material for decorative fencing can be prepared with your own hands, keeping flexible bending branches after pruning trees in the garden. For work, you can use twigs of chokeberry, cherry, plum, pear, apple tree. It is best if they are up to two centimeters in diameter. In this case, the weaving will turn out to be dense, and the fence without gaps.
Particular attention should be paid to the base of the hedge, which should consist from stakes with a diameter of more than five centimeters. If you plan to install a high wattle fence, then steel supports will need to be taken as the basis.
Features of the preparation of rods
 For the manufacture of a wicker fence, long, even branches are prepared with their own hands. They must be dried and tied into bundles.
To make the branches more flexible, they can be boiled in water or steamed. In addition to flexibility, "digestion" will give the branches of the vine a brown tint. To obtain a brighter saturated color, potassium permanganate crystals are added to the water.
If possible, the rods can be cleaned of bark and treated with hydrogen peroxide. As a result of the use of such material, a very beautiful white fence will turn out.
With the help of iron sulfate, branches can be given grayish brown tint, and stain can paint the fence in almost any color.
In order to remove the bark from the rods, you can use wire cutters or a special tool - a pincer. It is very easy to remove the bark from branches that have stood for about a week in water.
Do-it-yourself bark removal is a long and laborious process, so it is recommended to prepare a comfortable workplace first.
How to make wattle with your own hands?
Having selected and prepared the material for the wicker fence, you can begin to build it.
First of all, supports are dug in, which can be stakes, metal pipes or wooden posts. The stakes should be deepened into the ground by 30-40 cm. If the prepared rods are very thick, then the pit should be at least 50 cm deep. Step between supports must be done in 50-60 cm.
In order for the fence to stand evenly during work, the support posts in the upper part are fixed with even planks, which are removed after the weaving is completed.
Weaving starts from the bottom row and gradually rises up. The first row is recommended to be placed 5-10 cm above the ground. This will save the wattle from putrefactive processes, and it will last longer. The branches are alternately drawn between the supports so that the result is the number 8.
The ends of the rods are fixed with a wire prepared in advance, and the tails are cut off with a knife. In the last row, the ends of the branches are tucked along the stakes.
To make the appearance of the fence attractive, the ends of the blanks must be positioned only on the inside of the fence.
DIY wattle can be decorated with artificial sunflowers, earthenware pots, or other items that fit the rustic style.
How to make a "living" fence?
 Summer cottages fenced with ornamental shrubs look beautiful. However, they require careful care, which includes the formation of a crown and an annual haircut.
A “living” hedge can be made from an unpretentious and responsive willow. For this, rods are cut in early spring and placed in water. Within 3-4 weeks, the cuttings should give roots and they can be planted. This is best done in May, when the weather is favorable.
For marking a place for a wattle fence, it is recommended use pegs and twine. Since willow is a moisture-loving plant, the best option for planting petioles is a groove from which water will not go to the side. At the same time, throughout the summer season, it will be necessary to ensure that the soil is always moist, but not swampy.
When planting rods, they need to be woven together in the form of a mesh. Such a "live" fence will delight its owners with its appearance all year round.
A do-it-yourself wicker fence will become the pride of the owner and the visiting card of the summer cottage. Of course, such a fence is more decorative, and its fortress is inferior to brick fences, but it gives a feeling of something unusual, kind, ancient.
There are many types of fences from a wide variety of materials. But recently, more and more often you can see a beautiful, eye-catching fence made of intertwined vines - Ukrainian tyn. Such a fence decorates areas near cafes and restaurants, separates zones on a garden plot, or simply encloses flower beds. Tyn can be made with your own hands from a variety of materials.
It looks like a classic fence tyn
Colorful and fashionable wicker fence
Vine is called elastic, long rods from any plant material. It is harvested in early spring before the juice begins to move in the stems or in autumn, from early September until frost.
Properly prepared material is the key to a beautiful and high-quality fence
Most often, long annual branches of willow, hazel or willow shrubs are used. The best time to go to harvest material is an early sunny morning. Cut the vine with a sharp knife obliquely, trying to make the cuts smooth and even. When cutting off the branches of a shrub, they tend to leave 3-4 leaves from the ground. So, the bush will recover faster. 
After clearing the branches of leaves, it is desirable to give them a neater appearance by removing the bark. This is done with a simple tool in the form of a split cone, which is better known as a pinch.
It can be made by hand by splitting a hardwood stake from one end. The unsplit end is strengthened by tying it with a strong rope or wire. The rod is inserted between two chips and stretched from edge to edge. The bark from a fresh vine is easily removed, but if it has lain down a little, then it is better to put it in water for a while.
Wicker fence tyn using logs for poles
If the branches were stored for a long time and had time to dry out, it is best to steam them or soak them for a week in a large container of water. It is very important that the material is completely covered.
When the vine is ready for weaving, it is sorted by stem thickness.
Thicker rods are used at the base of the fence and at the very top. The thinner rods are woven closer to the middle. This trick allows you to build a stronger and more durable wicker fence.
Do I need a foundation for a wicker fence
The place where it is planned to put a tyn in the future must be prepared in advance.

An example of a tyn fence with a foundation
Typically, such a fence does not need, but more expensive options do not exclude stone or brick bases. Such fences are often installed in public places, for example, in open areas of restaurants or cafes, enclosing their territory and creating a unique comfort. They look quite respectable, but they are much more expensive.
It is best to make a pillow of sand and gravel throughout the entire length for better drainage. This, of course, significantly slows down the erection process and increases the cost, but the wattle fence will not get wet in the water during rains. Hence, it will last longer.
The technology of such construction is very simple:
If you simplify the task of erecting a wicker fence with your own hands, you can simply level the site (in order to avoid stagnation of rain or melt water) and drive the bases into the ground to a depth of 30 cm. You must treat with drying oil, resin or any other means that protects them from decay .
Weaving a fence from a vine
Probably, everyone has seen a finished wicker fence at least once in their life, so they have an idea of its essence.
An example of a wicker fence made of vines
Weaving begins from below, using thicker rods for this. The first rod is firmly fixed in front of the initial base with a hand from the butt side and carefully wound behind the second, and so on, in strict observance of the order.
The rod must end on the back side of the next stake. With the next rod, on the contrary, weaving behind the stake begins and the next stake is wrapped around from the front side. And in the same way - to the end of the fence.  It is not difficult to make such a decorative fence, the main thing is to have patience and know some tricks:
- Each rod must begin to be twisted from the butt, thicker side;
- You can not leave the end of the vine in the middle between the stakes, this will make the fence look untidy;
- It is necessary to regularly compact each row of weaving with a wooden mallet for greater strength and a beautiful look.
When the weave reaches the top edge, the top of the protruding stakes can be cut off or, if desired, left as is. Then you can place various decorations on them in the form of clay pots or a hanging flower pot with a climbing plant.
Interesting options for wicker fences
In order to, you can use other, alternative, material options. Some of them can stand for only a few years, while others are very durable.
Reed weaving
For such a tyne, long bundles of reeds up to five centimeters thick are used. You can make this decorative fence with your own hands using the same technique as. If the reed was dried under the influence of sunlight, the tyn will turn golden in color. Light green reeds can be obtained by drying them in the shade of a canopy.
PVC weaving
Now you can. Such fences are sold in a ready-made set, their price is quite high, but they will stand for a very long time. PVC material is not afraid of sudden changes in temperature, does not fade in the bright summer sun, and it is easy to install it yourself.

It looks like a woven PVC fence
If the tyn is made not so much for a decorative purpose as for performing protective functions, you can build it from veneer or thin boards. Such a fence belongs to opaque types.
In addition to decorative functions, it will also reliably protect the site from the prying eyes of strangers.
The bases for this type of fencing should be stronger, and it is installed at a distance of 1.5 meters or more, but not more than two meters.
We also recommend
 Switching power supply: repair and refinement
 Remote control of light
 Swimming lessons for preschool children
 Notes for the master - home household alarms
 Clock propeller on Atmega8
 Device and relay application examples, how to choose and connect a relay correctly Microcontroller and relay simple switching circuits