Soaring cup with flowers with your own hands: master classes and useful tips. Flying cup: different ways of making and photos of the most interesting works Do-it-yourself soaring cup step by step
Recently I caught myself thinking that there are already a lot small cups-pouring on wire I did, but I didn’t draw up a master class on them.
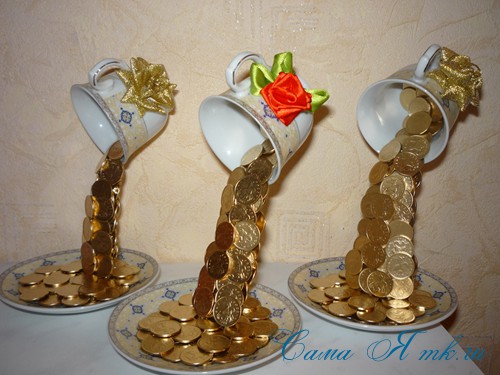
Spill cup or, as it is also called, floating cup, is widely used as a handmade gift, combining extraordinary beauty, originality and ease of manufacture. The most common "waterfalls" are made from coins, coffee beans, or artificial flowers.
We have already considered the coffee and floristic spill, but what about the coins.
For large tea pairs, it is more suitable, since a massive mug is better fixed there. And with a small (coffee) pair, it’s better to do the following way ...
And so, let's get started...
To make small mug-spill on wire we will need the following materials:
- coffee tea couple,
- strong wire (I have a piece of steel hanger),
- coins of the same denomination, preferably ten kopecks (130-150 coins - depends on the length of the wire),
- band-aid,
- spray with quick-drying enamel - gold,
- hot glue gun,
- pliers, round nose pliers,
- scissors
- scotch,
- food bag.
I must say right away that I show my method of making such spills. A lot of them have already been made, and I have already formed my own style, which, it seems to me, is the most successful: in which the craft turns out to be very beautiful, neat, without minor flaws - emerging glue, etc.
Someone paints everything with gold, including the tea pair itself, this is the easiest and fastest way. It seems to me that it is more interesting when the cup and saucer remain in their original color. You can immediately color all the coins, and then start gluing them. But, when we apply hot glue to the painted coin and stick it to the money waterfall, our prints may remain on the coin when heated, which then does not look very nice!
Of course, it's up to you! It all depends on several factors: how quickly you want to do the craft and what result you want to get.
So, my master class on spill on the wire…

In the meantime, the coins are drying, we will prepare a blank, which we will then paste over with coins.
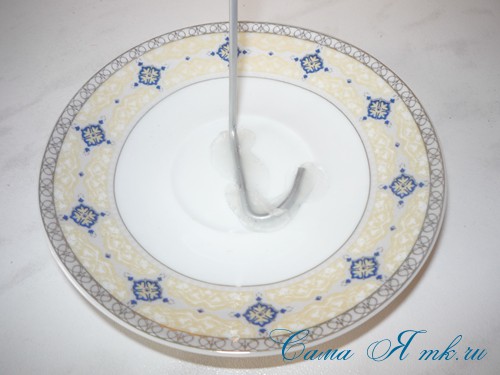
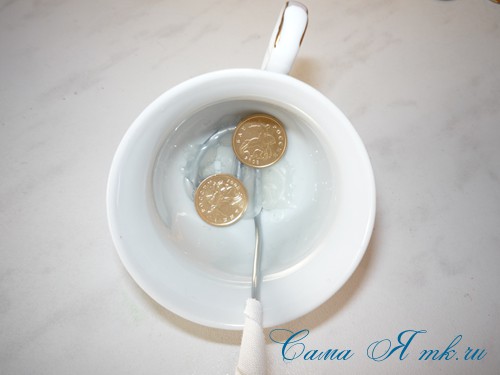
To begin with, we bend a piece of wire as follows (we make loops on both sides to fix them later on the bottom of the mug and on the saucer).

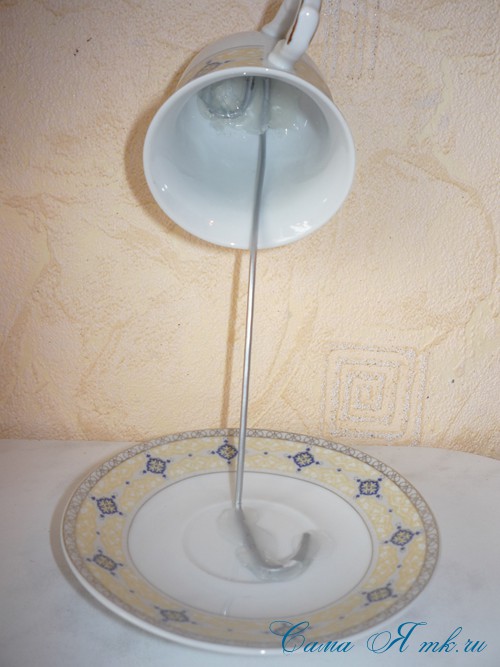
It’s not very clear, but when I show it on a mug, everything will fall into place. We glue the wire to the mug and cup with hot glue.
You can choose the angle of inclination as you like. Since there are coins in the saucer, the craft will turn out to be stable in any case. Just do not take a very long wire for a small cup. It will look awkward.

We close the wire on the cup with unpainted coins, glue them on hot glue, thereby additionally fixing the wire.
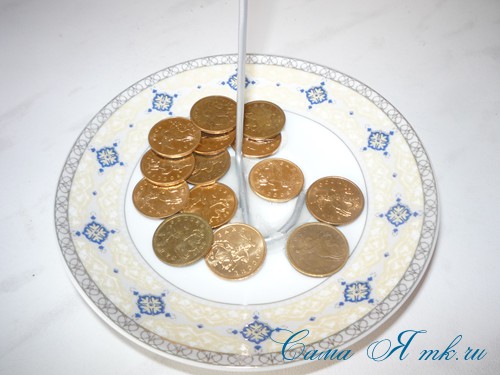
We wrap a free piece of wire with adhesive tape. You can make several layers from below.
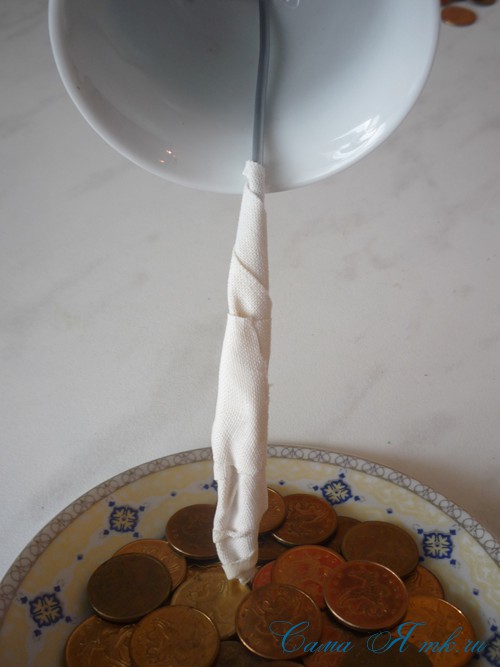
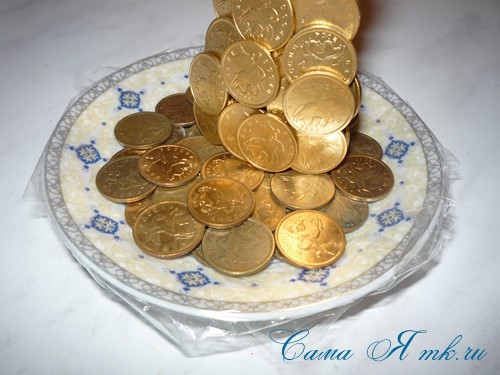
But inside the mugs we will glue with already colored coins ... We will also additionally fix the wire on the mug with them.
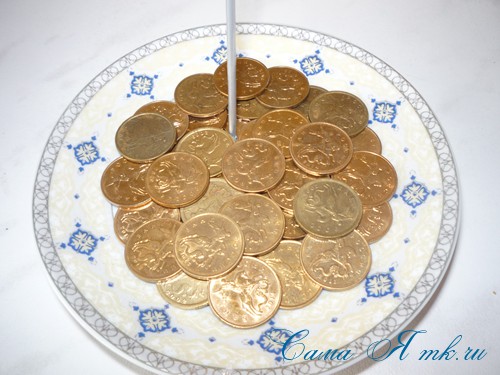
Inside and a couple of rows protruding from the mug (on the front and back of the mug).
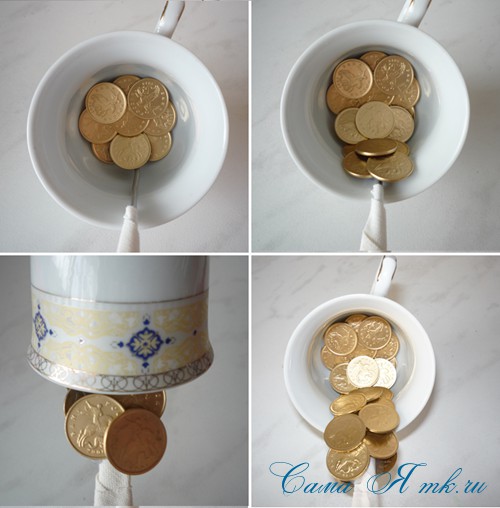

It’s more convenient for me to start from the bottom, so it’s easier to control the shape of the “money waterfall”.

Our spill cup is ready to be stained.


We carefully wrap the mug with an ordinary food bag, tie it.

But over the saucer you will have to try, and cover the entire surface that we do not need to paint with small pieces of adhesive tape. This is, of course, time-consuming, but the result is worth it.
Like this…
Everyone is ready...

Now we paint over everything from the spray can with quick-drying gold-colored enamel.
Immediately carefully remove the bag from the mug, this is important until the paint begins to dry, otherwise an ugly mark will remain at the junction.
Remove the tape from the plate when the paint dries.

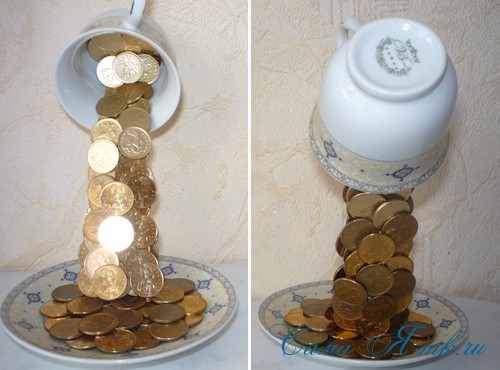
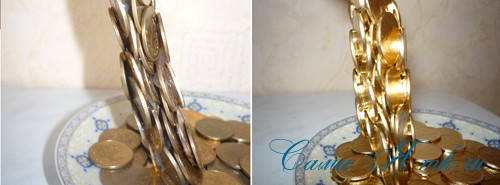
No matter how carefully you glue, the glue will still be visible if it is not painted over. For example, I can show the difference, so let's say "before" and "after". 🙂
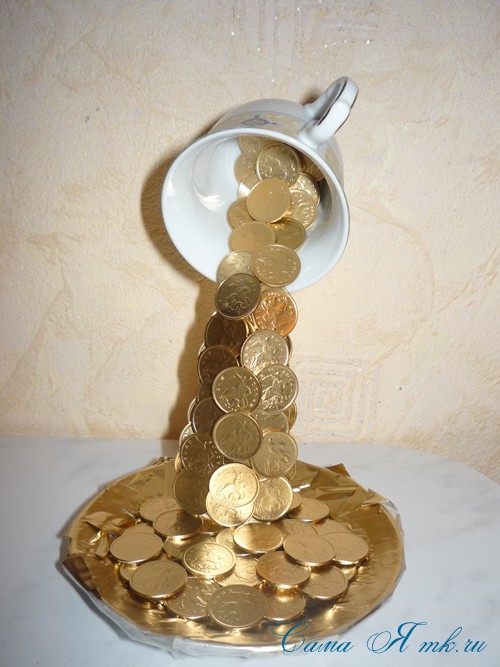
With a little work, an ordinary tea pair turned into a great gift.


Decorating…

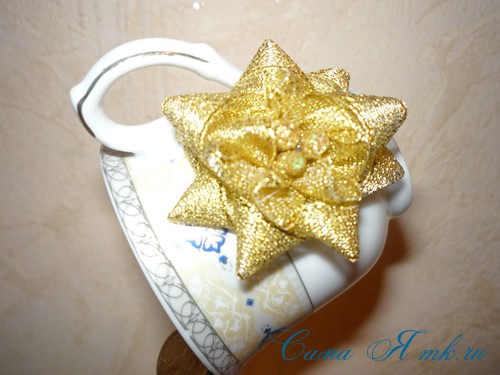

Such pouring cup with a waterfall of coins, will be a wonderful gift. In addition to its attractive appearance, it is a very symbolic souvenir that contributes to the material well-being of its owner. It is very easy to make even for a beginner. The main thing is to dedicate a few hours of your time to this process.
Create with pleasure!
I was glad to help!
A beginner will make a stylish topiary in a few hours. An unusual composition is a wonderful decoration for a residential or office space and an unusual gift. To make it, you will need patience and some materials: coffee beans, twine, glue and a number of tools that can be found in a hardware store. It is necessary to start the creative process with the choice of composition design.
Topiary"Lflowing cups» : looking for inspiration
Coins, seashells, buttons, beads, pearls and coffee beans - the above is used to create creative crafts. When choosing a material, you need to build on your own preferences and available resources. An approaching occasion will serve as another guideline: Easter, birthday or February 14th.
Regardless of the occasion and the materials chosen, the topiary is initially created on paper. Unlike real materials, you can design the composition as many times as you like on the sheet. If thoughts do not go to the head, then a master class will come to the rescue. Watching video fragments will not take much time.

As an additional tool for finding inspiration, it is recommended to use:
- Browsing subject directories.
- Visiting handicraft shops.
- Watch design shows.
- Poll friends and more.
After analyzing the various options, you can choose the one that best fits into the interior. It must be remembered that flying compositions are selected taking into account the color prevailing in the interior. Once the project is approved, work can begin. Before going to the store to buy a list of necessary materials, it is better to think in advance what you will need. Regardless of the size of the composition, it is imperative to purchase a cup and saucer. It is desirable that they are harmoniously combined.
How to make a beautiful topiary magnet is described in this material:
Easter Topiary"Lflowing cup» do it yourself
It is more fun to celebrate a holiday when it is decorated with stylish compositions. One of the most common is the "cup of abundance." It is performed in light colors, using shards or pebbles. Designers urge not to limit the flight of fantasy. The main thing is to adhere to a sense of proportion, otherwise the composition will not stand still.
An Easter floating mug is created in a few hours.

For this you will need the following materials:
- Scotch tape.
- Shards from an old pot.
- Sisal green.
- 20-25 pieces of plastic eggs.
- Roses artificial or set with flowers.
- 3-5 branches.
- Thermal adhesive.
- 3-4 small chicken figurines.
- A fork that needs to be bent with pliers.
In order to avoid accidental damage to the dishes, the place where the bent fork and the cup and saucer come into contact must be pasted over with adhesive tape. Carefully glue the fork with the teeth to the bottom of the saucer. Glue drying time - 35 min. After making sure that it is really dry, you should fix the fork handle on the bottom of the cup.
When creating a composition with your own hands, you need to remember the precautions. Immediately after fixing the cup at the top, it should be supported with a dense tall box. A simple technique will not allow the composition to fall apart until the glue dries. Attention and accuracy will be needed when decorating the lower part of the composition.
It is necessary to choose it wisely - the stability of the base ensures the durability of the composition. For these purposes, decorative pebbles are used, on top of which it is laid out. Masking tape will help to disguise the plug, on which sisal is attached with a glue gun. Using a similar tool, the upper part of the inner surface of the mug is decorated with decorative twigs.
Topiary of money and coins perfectly complement the interior of your home:
The decoration of the saucer includes decorative Easter eggs, which are fixed with a glue gun closer to the rim of the base. The eggs are laid out in such a way that roses fit in the gaps formed. Optionally, the composition is complemented by lace or sequins.
coffee topiary"Lyuschand IXia mug»
Fans of a strong drink will please themselves or loved ones with a stylish interior detail. For its manufacture, you will need materials, as in the previous case. The only exceptions will be a few points related to the main decorative element - coffee beans. You should choose them not in the market, but in the store. In this case, the special aroma will remain for a long time.

Designers do not recommend taking goods that have been lying on the counter for a long time. Such grains are highly saturated with atmospheric moisture and odors. In order for the flying coffee composition to turn out to be really spectacular, 500 - 700 grams of grains will be needed to make it.
The further course of action is as follows:
- Choose the geometric shape of the composition: a ball, a heart, etc.
- Find a stick or pencil to act as a base.
- The craft is installed in any container, the size of which corresponds to the idea.
- Mix the fixing solution in a pot and quickly insert the base of the composition there.
- Make a hole in a pre-selected geometric shape, which is used to fasten it to the trunk.
- Cover the base with masking tape.
- The first layer of coffee beans is applied with a strip down, and the second - up.
For beginners, it will not be superfluous to find out that after each stage of pasting, at least 30 minutes pass before the start of the next one. The specified time is enough for the glue to dry. The creative process is completed by fixing the wire, which is strong in its structure, on the cup and saucer. To do this, it is necessary to bend both ends of the wire by 4-5 cm, wetting them with thermal glue.
Children's topiary"Psteaming cup»
Unusual in form and content, flowing compositions will please both children and adults. For her, light and calm tones are chosen, for example, blue, orange or burgundy. As a basis, topics related to favorite animated characters, literary heroes or a child's hobby are chosen. A few ideas will give a photo of finished options.

- If we are talking about a girl, then samples of princesses or a fairy house are selected as a blank.
- Boys will be easily impressed by a hovering alien flying saucer, a superhero or a plane.
- Does the kid want a pet? Then the figurine of a psi, a cat or a bird is taken as the basis.
How to make a topiary (video)
A mug floating in space is a spectacular addition to the interior and a chic gift. A beginner can do it in a few hours without any problems. Before starting work, you should decide on the design option, size and color style. After that, materials and reliable glue are selected. After the end of work and before the start of use, at least a day must pass.
Topiary for beginners (photo)


Today, topiaries (small trees of happiness) are created by admirers of needlework of various levels. Especially popular is this type of craft, like a flying cup topiary. Such creations are interesting for both experienced craftsmen and beginners. The increased interest is due to the moderate complexity of manufacturing, as well as the most beautiful design of the finished craft, which can delight guests.
Given the popularity of these creations, this article will be devoted to how to make a flying cup topiary with your own hands. Several options for creation will be considered, each of which is suitable for a specific case.
Easter crafts
Based on the name, it can be understood that this floating cup topiary is suitable for celebrating the most popular (after Christmas) religious holiday. This craft can be made for yourself (as a thematic decoration of the interior), and for someone close to you. To work, you will need the following set of tools and items:
- actually a cup (in extreme cases, a mug) and a saucer;
- fork, pre-bent with pliers and a vice;
- adhesive tape (painting type is most suitable);
- pebbles (you can even take sea ones); they will be needed to create a balance of crafts;
- green sisal;
- glue gun;
- 30 plastic testicles (they can be purchased at a specialized store);
- small artificial roses;
- 2 decorative chickens;
- decorative twigs with leaves.
The process of creating a flying Easter cup involves the following steps:
- stick adhesive tape on the future connection point of the cup and saucer with a fork (it is needed in order to protect the surface of these elements from unnecessary damage);
- after that, put the tines of the fork on the surface of the saucer (on the part that is covered with adhesive tape);
- fasten the saucer and fork with a glue gun;
- after 100% glue hardening, connect the fork handle and cup (use enough glue to make the design reliable);
- when the cup is properly seized, put pebbles on the saucer, which will give the craft stability;
- put sisal on top of the pebbles;
- wrap adhesive tape on the fork handle, and then glue it with sisal;
- start gluing the plastic testicles inside the cup (try to keep the testicles snug against each other);
- also glue the fork and saucer with plastic testicles;
- decorate the edges of the craft with a sprig;
- fill the spaces between the testicles with artificial roses;
- at the base of the "trunk" of the topiary, glue two chickens.
After completing the last step, the Easter version of the craft will be ready. By a similar principle, you can make other original floating vases, topiary cups.
For example! You can use the same items, but instead of plastic testicles, decorate the craft with fabric flowers, and instead of chickens, stick hearts near the “trunk”. Thus, you will have an excellent gift for your soulmate on an anniversary or birthday.
coffee option

In fact, this version of the craft is similar in terms of manufacturing principle to the previous creation. However, with this approach, you will get a topiary, in a mug of which there will be fragrant coffee beans. To work, you will need to acquire:
- actually coffee beans;
- glue gun;
- thick copper wire;
- light brown varnish;
- cup and saucer;
- small pebbles;
- satin ribbon.
When you make this do-it-yourself flying cup coffee topiary, the master class will require you to perform the following manipulations:
- pour coffee beans into a separate unnecessary plate and open them with varnish;
- while the varnish is drying, take care of the design of the frame of the future tree; using a glue gun, first connect the wire and the saucer, and then glue the cup as well (you will have to hold the structure manually until the glue is completely seized);
- after reliable adhesion of the frame and drying of the varnish on the grains, start gluing the first layer of grains with stripes down (try to place them as tightly as possible);
- after bonding the first layer, start sticking the second one, but with the stripes up (here also observe the maximum possible placement density);
- if desired, glue the 3rd layer as well (also with strips up);
- when the grains are completely seized, tie a bow of satin ribbon around the cup.
That's all! You have made the simplest coffee topiary, the cup of which is in the air. It should be remembered that the principle of operation described in this master class is the main one. Those. it must also be used when creating other more complex and filled crafts. There are such popular options for complication:
- Craft with two cups - here you need to use two wires and load the saucer more carefully for balance.
- A craft that looks like this - coffee beans are poured out of a cup onto a piece of cake located on a saucer.
It is clear that the main complication here is the cake itself. To create such a masterpiece, you will need to make a plastic cake frame, make a hole for the wire in it, decorate it accordingly and glue it on top of a small hill of stones that will serve as a balance. Of course, you can not bother and just cut out the outline of the foam cake, decorate it and glue it to the saucer.
On a note! In this case, you will have to think about additional weighting for the saucer so that the design is completely stable.
Making a New Year's gift
A topiary cup with a saucer and bright decorations can be an excellent addition to the New Year's interior. To create such a masterpiece you will need:
- thick wire, equipped with white insulation;
- a thread on which multi-colored beads are planted;
- aquarium stones;
- Christmas decorations of small and medium size;
- glue gun;
- silicone;
- decorative stems with leaves.

The master class described below explains how to make a cup and saucer topiary step by step with a photo, so that you understand exactly how to perform specific manipulations and avoid significant mistakes. So, while working, you will need to perform the following actions:
- bend the wire in half;
- bend it so that it looks like a rustic wooden spoon;
- bend the ends of the "spoon" back;
- using a glue gun, connect the two ends of the wire;
- glue the bent ends of the wire to the mug (when doing this task, use enough glue so that the two components are securely fastened together);
- wrap the wire with a thread with beads (when performing this action, fasten certain sections of the thread with the wire using a glue gun);
- melt the silicone and pour it into a saucer;
- properly fix the lower part of the frame in hot silicone; wait until the "foundation" completely hardens;
- using glue, attach aquarium pebbles to the surface of the saucer;
- then decorate the base of the craft and its “trunk” with small Christmas toys (when attaching toys, try not to put pressure on them so as not to accidentally crush them and get hurt);
- decorate the edges of the "trunk" with decorative stems with leaves;
- Place medium-sized Christmas decorations around the edges of the saucer.
After that, the New Year's topiary will be ready. You can use additional decorative elements (angels, roses, etc.). The main thing is to observe the principle of fastening the frame. As for additional decoration, it all depends on your imagination.
We make a money cup
A money topiary with a mug and a saucer is relatively easy to make. At least those who have mastered the creation of previous models will make such a masterpiece without any problems. So, for work you will need the following set of items and tools:
- souvenir coins (although you can use real penny coins if you wish, but before use they must be carefully rubbed to a shine);
- glue gun;
- cup and saucer;
- thick wire;
- double sided tape;
- cream satin ribbon.
When making such a topiary, you will need to perform the following manipulations:
- first bend the wire in half;
- then, using a glue gun, connect it to the cup;
- connect the wire and the cup and saucer in the same way;
- wrap the wire with double-sided tape, over which wrap a satin ribbon (for greater reliability, fasten the ends of the ribbon with glue);
- after that, start decorating the craft with coins - first decorate the inside of the cup, then the “trunk” of the craft, and finally decorate the surface of the saucer;
- Finish off the topiary with a satin ribbon bow tied around the cup.
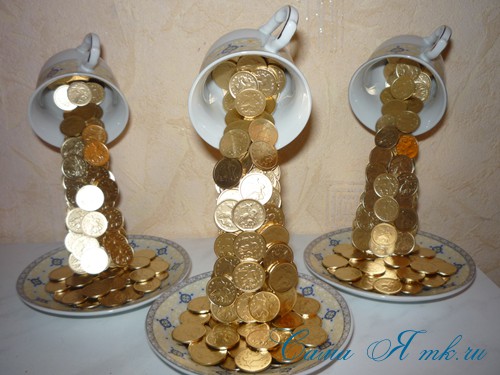
In principle, this is where the creation of the money topiary ends. If necessary (if the cup is very massive), you can add additional weight to the saucer. For this, aquarium pebbles are suitable. As in the case of the coffee version of the craft, you can create a money topiary with two floating cups. This will also require two strong wires and additional weighting.
March 6th, 2015  ale4ka

Do you want to please a loved one with an original gift or add bright notes to your interior? Then you will like the master class that I want to show you today. This wonderful composition will not leave anyone indifferent. If you want to please your loved ones and relatives, then of course you know that the most valuable gift is the one made by yourself.

There are several options for a flying mug, for example, coffee beans, coins or even sweets are used in the composition, but we will make a flower topiary with our own hands. Flowers visually give the design greater lightness, airiness and tenderness, so this option is more attractive to me.

Preparation for work
To make a flying cup topiary we need:

Frame manufacturing
The most difficult thing in making our flying mug is, of course, the frame that will be hidden under the flowers. To make it with our own hands, we need a wire that holds its shape well. We cut off two identical pieces of wire and fix them together in the middle with electrical tape. Don't wrap the wire all the way, as the hot glue works better with the wire and the tape or duct tape will peel off soon.
Now the places where we will glue the wire on the mug and saucer need to be rubbed with sandpaper.

We bend the wire and glue it first to the cup, then to the saucer. We use glue for this - “Moment extra strong”.

Pay attention to the height of your frame, it should not be too short or too long, the length should be approximately 1.5 times the length of the cup itself. Also, the mug should not go much beyond the saucer, otherwise your composition will be unstable.
To keep the frame well, let it dry thoroughly, for this you will have to wait for the mug and saucer to dry all night. In the morning you can return to work.

Flowers decoration
We select suitable leaves and flowers. My advice to you: choose the most beautiful, high-quality flowers, otherwise the product will not turn out the way you would like to see it.

We proceed to the most pleasant process - gluing flowers. We use a thermal gun for this.

It is better to start with large flowers, and after that use smaller flowers, leaves and petals. Glue the buds slightly tilted down so that our waterfall of flowers looks more natural.
Don't forget about the back side of the wire. We also carefully glue it with flowers.
Glue the flowers on the saucer. Try to glue them so that the appearance of the flowers flowing smoothly from the mug into the saucer is created.
NATALIA POGNERYBKO
Somehow on the Internet I saw a photo in which she was depicted « floating bowl» and I was very attracted to this idea. I used to do other crafts, and, of course, I wanted to do the same myself, although I was going to desire for a long time, but the desire overcame the hesitation.
« floating bowl» or whatever it is called "cup - spill", is widely used as a handmade gift. Combining extraordinary beauty and originality, as well as simplicity manufacturing, « floating bowl» can rightly be called a work of art. Such a composition will not leave many indifferent, it will perfectly fit into the interior and will please the eye of the owner and guests.
It is not at all difficult to make, even for a beginner. The main thing is to devote some time to this process.
For manufacturing you will need:
1. Cup and saucer.
2. Hot glue gun.
3. Regular fork - for the base (or wire)
4. Stones - like weights for stability.
5. Flowers and leaves.
6. Butterflies or ladybugs for composition.
What would our bowl "soared" in the air, use a regular fork (I buy the cheapest ones in the store) or a two-core wire and glue it with glue "moment". It is glued alternately, at the beginning the cup, then after drying it is glued to the saucer. Leave it like that for a few hours (I usually do this at night) until the glue is completely dry. Please note that the cup should not be too heavy, otherwise it will outweigh the entire structure. Glue 2-3 stones on the saucer for counterweight and stability. The flower arrangement is already glued with a hot gun.
Start gluing with bowls, first leaves, and then flowers in a variety of sequences and colors.
The photo shows everything consistently, and there is nothing to add. Flowers are glued on the back in the same way as on the front. For decoration, you can add ladybugs, butterflies - this is according to your desire.
So what? It's not difficult, is it? I hope you have the desire to do the same "cup-spill"! By the way, the same cups are made from coffee and with coins. Lots of options. I offer several options for you. "cups - spillers", they delight the soul and cheer up.
And I also offer crafts in a floral version - these are flowers in a wicker shell. It is made even easier - the foam ball is glued in "shell" and pasted over with flowers or berries, or all together - this is according to your desire.


We also recommend
 Switching power supply: repair and refinement
 Remote control of light
 Swimming lessons for preschool children
 Notes for the master - home household alarms
 Clock propeller on Atmega8
 Device and relay application examples, how to choose and connect a relay correctly Microcontroller and relay simple switching circuits