The main types of rocket stoves and do-it-yourself options. Jet furnace: step-by-step instructions for making a home-made design Rocket furnace Kuzminka blueprints
Despite such a loud name, the rocket furnace, of course, has nothing to do with rocket and space technology. And it doesn't run on jet fuel. The stove got its name for a jet of flame escaping from the top tube of camping structures and a sound reminiscent of the roar of an engine.
We’ll clarify right away that the stove will make a strong sound only in case of violation of the operating rules - the roar of the engine is obtained when excess air enters the furnace. Normally, the rocket stove will make a quiet rustle. It works on wood and other fuels and has a high efficiency.
The rocket stove came to us from the USA and is still little known even to professional stove-makers, although it definitely deserves attention.
The principle of operation of the rocket furnace:
- Direct combustion. Fuel gases flow freely through the furnace channels without being stimulated by the draft created by the chimney.
- Flue gases, which are always released during the combustion of firewood, are afterburned. This is called pyrolysis.

The simplest jet furnace would consist of two pipes, one running horizontally and the other going up. You can also use one bent pipe if you have the opportunity, otherwise welding works are applied.
Fuel in the rocket furnace is laid directly into the pipe. In this case, hot gases will tend to go up, along the vertical section. At the cut of the pipe, you can place a container that will be used for cooking or boiling water. Be sure to leave a gap between the tank and the pipe so that the combustion products can freely go outside.

What else you need to know about the jet oven:
- It is both cooking and heating.
- It is quite possible to equip the "rocket" with a stove bench, approximately, as in a Russian stove, but such a design will be much less cumbersome.
- The operating time on one fuel bookmark in the rocket furnace is approximately six hours, and it keeps heat up to 12 hours if the metal structure is finished with adobe plaster.
- Initially, the rocket oven was intended for use in nature, in the field. Portable metal structures still rank first in popularity, but stationary furnaces have also appeared that work on the same principle, made of brick or clay.

Pros of the Rocket Furnace:
- The simplicity of the design itself, which you can do yourself, the materials are available.
- Ability to use different types of fuel. In such a furnace, even low-quality fuel, damp thin branches, and so on will burn.
- Energy independence.
- High work efficiency, lower fuel consumption.

Cons of a jet oven:
- It will have to be managed manually. It is necessary to constantly monitor the combustion process and regulate it.
- Some elements of the rocket furnace can become very hot, especially for the simplest metal structures. That is, there is a great danger of burns when touched, you should be especially careful not to let children near the rocket stove.
- It will not work to use a stove of this design in a bath, since it is simply not able to quickly heat the room to the desired temperature.

Now you can find the simplest schemes for how to fold a rocket furnace of 20 bricks with your own hands without mortar in literally three minutes anywhere. The first row will be solid, with a horizontal protrusion, the second - with a hole above the protrusion for laying fuel, the remaining three rows - a pipe. It will be warm, you can just put a cauldron or pan on top.
However, in more complex and efficient versions, flue gases are passed under the bench, for example, through special channels. The second option is to install a water circuit on a simple rocket furnace.


These are examples of biodesign stoves that work on the “rocket” principle, but much more complex and modernized, with stove benches. The German company Lehm und Feuer is engaged in the construction of such clay ovens.
We state that the rocket stove has many advantages, including ease of installation, the possibility of using it in the field or in the summer in the yard for cooking various dishes on a live fire. It is only necessary to understand the principles of operation and design features.
Among the variety of wood-burning stoves, such a heating device as a homemade rocket stove deserves special attention. It is distinguished by an original design that does not require expensive materials and components in the manufacture. Any person can make such a stove, at least a little bit versed in the drawings and able to work with his hands. Our article should come to the aid of such home craftsmen, where we will talk about the design and principle of operation of the rocket stove. Here, recommendations will be given on its manufacture from various materials.
The principle of operation of the rocket furnace
Although the rocket stove device is quite simple, it successfully uses two whole principles of operation borrowed from other types of solid fuel heaters:
- the principle of afterburning wood gases released during combustion (pyrolysis);
- the principle of free flow of gases through the channels (without prompting from the natural draft of the chimney).
Note. In the simplest rocket stoves for cooking, including those of a portable type, only the second principle operates, since favorable conditions are not created for the pyrolysis process to proceed.
First, we will analyze the design of direct-burning rocket stoves, designed only for cooking food. Here, a short horizontal section of the pipe serves as a firebox, which then turns upward. The design is simple to disgrace, as shown in the figure:

Fuel is put into the pipe and ignited, resulting in an upward flow of hot gases, which tends to rise along the vertical section and go outside. Here, at the cut of the pipe, a container for food or water is installed. Of course, a gap is provided between the pan and the pipe for the exit of combustion products. This is achieved through various metal supports.
For reference. The above rocket furnace device is one of the first. It is because of the nozzle turned up with a flame escaping from it that the device was called a rocket.
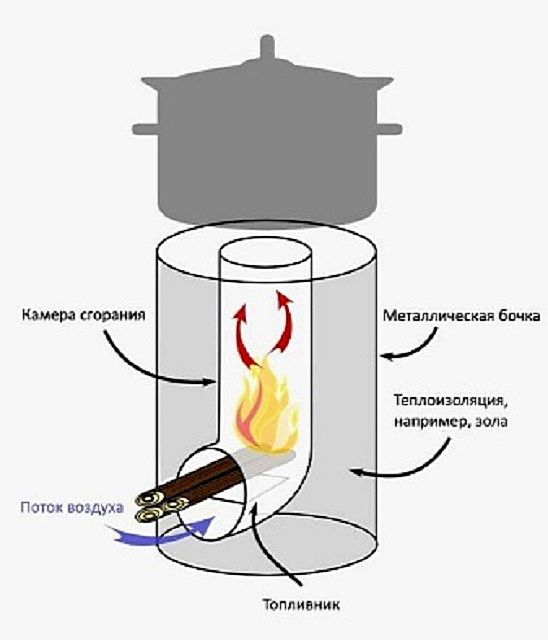
Since it is impossible to heat the premises with such a unit, the design of the heating rocket furnace was supplemented with a heat exchanger and channels for removing flue gases. To keep a high temperature on the vertical section of the pipe, it is insulated with any refractory material. Further, for intensive heat extraction, the nozzle is covered from above with a cap, for example, an ordinary metal barrel. A separate channel for supplying secondary air is made in the lower part of the horizontal fire tube.
Now the principle of operation of the rocket furnace looks a little different. Firstly, at the end of the horizontal fire channel, pyrolysis gases are afterburned due to the inflow of secondary air. Secondly, the products of combustion, which have a high temperature, accumulate under the top of the cap (barrel), creating some excess pressure. As heat is transferred to the outside through the metal walls, these gases cool down and rush down.
Since the cooling gases are supported from below by a new hot stream, they cannot descend in the same way, but pass through the space between the walls of the pipe and the barrel, safely exiting into the chimney channel. The flow of processes is well reflected in the scheme of the rocket furnace:

So, thanks to pyrolysis, the efficiency of wood burning increases, and the use of free flow of gases creates a self-regulating system that limits the flow of fresh air into the firebox. The air mixture is supplied as the combustion products under the hood cool down, making room for its new portion. The excess pressure of hot gases "pushes" the cooled part out, so the operation of the furnace depends little on the presence of draft in the chimney.
Efficient heat extraction
The gases entering the chimney are still at a high temperature. Just throwing them out is impractical, everyone will understand that the efficiency of such an installation will be too low. Taking advantage of the fact that the rocket stove literally pushes the products of combustion out, the craftsmen came up with 2 ways to extract heat:
- passing gases through the channels arranged under the bench;
- installing a water circuit on the furnace.
A rocket furnace with a water circuit is made without a hood, the force of the upward flow of combustion products is used in a multi-pass heat exchanger made of metal. It is not recommended to introduce a coil with water into the gas flow, it will not last long due to too high a temperature. It would be more correct to make a water jacket with metal fins inside the flue, as shown in the diagram:

Another way is to lay out horizontal chimney channels from bricks directly on the floor surface and arrange a chic heated adobe couch on top by connecting a rocket-type stove to it. Here, the correct selection of the length of the channels is important so that there is enough excess pressure to overcome them, otherwise you still have to take care of the organization of natural draft.
Advantages and disadvantages
Homemade long-burning rocket stoves have many admirers, and here are the reasons:
- simplicity and low cost of installation: in order to build such a thermal device, you do not need to incur high costs for the purchase of expensive materials, fixtures and fittings. Experience in the furnace business is also required minimal;
- self-regulation and undemanding to the natural draft of the chimney;
- The efficiency of the furnace-rocket is a variable value and largely depends on the design, the main thing is to take away the thermal energy from the flue gases as much as possible;
- fuel can be added "on the go".
Despite the attractiveness and simplicity of the unit, heating with a rocket stove has its negative points. It is a mistake to think that you can shove firewood of any quality into the firebox. Wet wood will not give the required temperature in the chamber, the pyrolysis process will not proceed. In the worst case, the smoke from the stove can pour into the room. Also, the “rocket” needs constant supervision, especially in terms of fire safety.

Do-it-yourself rocket stoves are of little use for a bath, because they give off relatively little heat in the infrared range, which is very important for a steam room. The surfaces of the stove that radiate heat are too small and it will not be possible to heat the bath properly.
For reference. A factory-made Robinson metal rocket furnace is often used as a portable heat source. The craftsmen were not at a loss here either and quickly modernized this product, having done the same, only with a grate.

balloon stove
This is one of the simplest options, you can use the drawing below to implement it. A propane tank with a diameter of 300 mm will serve as an excellent cap, and a steel pipe with a size of 150 mm will play the role of a firebox and a hopper. The internal vertical channel is made of a pipe with a diameter of 70 mm, and a chimney - 100 mm.

The design is completely welded, the pipes are cut to the required length, and the upper part of the cylinder is cut off. Then the parts are welded according to the drawings, only the opening between the vertical pipes with a diameter of 70 and 150 mm is filled with loose heat-insulating material. Perlite or vermiculite can act as such, in extreme cases - ordinary sand.
If there is an opportunity and desire to make a more powerful rocket furnace, then a standard 200-liter barrel is used as a cap, then the dimensions of all parts also increase. The working inner pipe is accepted with a diameter of 129 mm (or profile 120 x 120 mm), and the outer one - with a size of 450 mm. It is difficult to pick up a pipe of this diameter, so they usually find another barrel of a smaller capacity and cut off its bottom.

The entire rocket furnace from a gas cylinder assembly is not very heavy, so it is not necessary to arrange a massive foundation for it. When the unit is placed on the floor, legs are welded to it, and if a stove bench is subsequently planned, then the structure will have to be coated with a refractory compound, and then the outer lining should be made. Then basalt cardboard and a sheet of roofing iron are laid on the floor from below.
brick oven
In terms of its design, a brick rocket furnace is not much different from a metal one, but it requires a lot of labor. The difference is that all fire channels of the unit are made of fireclay bricks, and the cap is made from the same barrel.

The entire structure, except for the protruding cap, is recommended to be lowered below the floor level, for which a shallow hole is dug. Its bottom is compacted, and then a small concrete foundation 100 mm thick is poured along the formwork. After it hardens, laying begins, using a solution of refractory clay. After the laying is completed and the mortar has hardened, the pit is filled up, and an iron barrel without a bottom is put on top of the fire channel, the cavity between it and the brick is covered with insulation.

The end of the structure is coated with the same solution, and then the largest barrel is put on top - a cap. A chimney pipe is welded to its lower part, drawings of a rocket furnace are used to clarify all sizes.

Conclusion
For all its advantages, a do-it-yourself rocket stove cannot serve as a full-fledged source of heat for heating the whole house. It makes sense to start such construction when it is necessary to organize the heating of a small cottage or other similar building, especially since the “rocket” is not afraid of periodic work.
The rocket stove is widely known throughout as a long-burning solid fuel heating structure. To achieve the maximum efficiency had to work hard. A liquid fuel stove is able to give all its energy, but wood is more difficult to process. To unlock the full potential of the tree, a chamber for afterburning gases was equipped in jet furnaces.
The Shirokov-Khramtsov rocket or jet furnace got its name not because of its connection with space. The point is the shape of the device and the noise that is created during operation, reminiscent of the operation of a rocket. But this sound indicates improper use of the oven.
Types of long-burning rocket furnaces:
- Portable (mobile);
- Stationary (for heating).
The most popular rocket model is the Robinson. It is often used on hikes. Thanks to a small portable apparatus, you can understand the principle of operation of jet furnaces. The shape of the oven resembles the letter "L".
If the oven is too noisy and hums during operation, then this mode is inefficient and expensive. Normally, there should be a quiet sound, a little rustling.
The jet furnace has a receiving hopper. This is the horizontal part of the pipe. A thrust arises in the channel itself, it is it that affects the intensity of combustion, which warms up the body. That is why it is advised to limit the supply of oxygen. Otherwise, the firewood will quickly burn out and all the heat will evaporate.

The stove is powered by jet thrust due to the natural flow of hot air. The higher the temperature of the furnace walls, the better the wood burns. This allows you to quickly heat water in a large container, which is indispensable on a road trip. If you equip the pipe with thermal insulation, then after warming up, you can burn thick logs.
Do-it-yourself rocket stove: advantages, drawings, disadvantages
If desired, the conventional design of the furnace can be improved. So the potbelly stove loses a lot of heat, but by equipping the device with a water circuit or brickwork, these problems can be solved. For all these manipulations, drawings are made.
Advantages of jet ovens:
- Simple and cost effective design. You can use improvised materials, without significant financial costs. All work can be done by hand, special knowledge and skills are not required.
- You can independently control combustion by choosing the desired intensity.
- High efficiency. In general, it all depends on the quality of the installation. The main thing is to take away the maximum energy from the flue gases.
But such a simple and convenient design has significant drawbacks. So you need to select a special fuel for the potbelly stove. Wet firewood must not be used, otherwise pyrolysis will not occur. The furnace may begin to smoke profusely, and all gases will go into the house. In addition, the rocket furnace requires increased safety requirements.
The most popular portable model is the Robinson rocket stove. It was modified and a grate was added.
Homemade jet stoves are not used for heating baths. They are ineffective in infrared light, which plays an important role in the steam room. Surface structures have a small heating area, so they cannot heat the bath.
Drawings of a jet furnace from a gas cylinder and other types
Long-burning furnaces are divided into stationary and mobile. Mobile stoves are used in hiking, picnics, outdoors for heating and cooking. Stationary ones are used to heat the house, outbuildings, greenhouses, garages. In this case, 4 types of structures are distinguished.
Types of jet furnaces:
- Homemade camp stove made of metal pipes, buckets, cans;
- Reactive design from a gas cylinder;
- Brick oven with a metal container;
- Stove with bed.

The portable structure is equipped with pipe sections. The only difference concerns the installed partition for the ash pan. For the lower part, a grate can be used.
A device from a gas cylinder is more difficult to build, but significantly increases efficiency. For installation of the structure, a barrel or a gas cylinder is required. Firewood in the firebox burns out due to the influx of oxygen by loading through a special window.
The gases burn out in the pipe, which is located inside the structure, due to the supply of secondary air. The effect is enhanced by warming the inner chamber. Hot air is placed in the hood, and then into the outer chamber. The products of combustion are removed through the chimney.
To create draft, the top of the chimney is placed 4 cm above the loading window.
The combined brick and metal model is a stationary structure. Due to the high heat capacity, the wood stove accumulates and releases heat for several hours. That is why this design is used to heat residential premises.
A rocket assembly with a bed is an advanced device that is able to retain heat longer. Since part of the heat exits through the chimney, we increased its length. Due to the rapid excision of hot gases and a larger chimney, this problem was solved.
This is how massive stoves with a stove bench are obtained, which are similar to a sofa or bed. These are stationary devices made of brick or stone. Thanks to its unique design, the stove is able to retain heat all night.
Do-it-yourself drawings of the Ognivo stove and other models
It is best to make small portable structures with your own hands: the Flint and Robinson rockets. It is easy to perform the calculation, and the work will require cutting profile pipes and metal welding skills. Dimensions may differ from the drawing, it's not scary. It's important to keep the proportions.
To increase the intensity of combustion, it is advised to add improvised nozzles to the design. Secondary air for afterburning will flow there.
Stationary rocket stoves are made from a gas cylinder or a metal barrel. These elements act as a body. Inside, the stove is equipped with smaller pipes or fireclay bricks. From the cylinder, you can make both a stationary unit and a mobile one.
Scheme of a continuous combustion furnace:
- Chimney;
- Cap;
- insulation;
- loading bunker;
- Burning zone;
- Afterburning zone.
23.jpg)
It can be difficult to calculate a rocket furnace, because there is no exact methodology. You should pay attention to the checked finished drawings. It is necessary to determine the size of the heating equipment for a particular room.
Assembling a do-it-yourself jet furnace for heating
The construction of the furnace begins with preparatory work. First you need to decide on the place of construction. It is chosen based on the requirements that apply to solid fuel structures: wood or coal.
When you have decided on a place, you need to properly prepare it for construction. The wooden floor under the stove is dismantled. They dig a small pit and tamp the bottom.
In a small room, a jet furnace is placed in the corner. The loading bunker occupies one side, and the lounger the other.
The barrel or cylinder must also be prepared for installation. To do this, they cut off the lid and the tap. Then the structure is cleaned. Next, prepare the solution.
Stages of construction of a jet furnace with a bench:
- The bottom of the dug pit is laid out with fireclay bricks. Formwork is made along the contour of the recess. Perform reinforcement.
- Lay out the base and pour concrete. After a day, when the concrete hardens, further work begins.
- The base of the stove is laid out from fireclay bricks. Raise the side walls, make the lower channel.
- The combustion chamber is covered with brick. There are two holes on the sides. One is for the firebox, the second is for the vertical pipe (riser).
- The metal case is equipped with a flange into which the horizontal channel of the stove will enter. All seams must be airtight, well sealed.
- A side outlet is attached to the horizontal pipe, which serves as an ash pan.
- A fire tube is made of brick. As a rule, it is square.
- The flame tube is equipped with a casing. The gaps are filled with perlite.
- Installation of the cap is made from the cut off part of the barrel or cylinder. It is equipped with a handle.
- Equip the furnace body with brick or stone.
- Equip the front of the furnace. Lay out the necessary contour.
- A prepared barrel is placed on the base. The lower part must be sealed with clay.
- With the help of a corrugated pipe, a channel is formed that connects the firebox with the street.
- The pipes of the heat exchanger are connected to the lower pipe.
- Install a chimney. All elements must be sealed using asbestos cord and refractory coating.

Advanced Water Loop Rocket Furnace
A long-burning cauldron can be obtained by equipping a furnace with a water jacket. Water heating may not be efficient enough. The fact is that the bulk of the warm air enters the room and containers on the hobs. To create a rocket cauldron, it is necessary to give up the possibility of cooking on a stove.
Materials required for equipping a stove with a water circuit:
- fireclay bricks and masonry mortar;
- Steel pipe (diameter 7 cm);
- Barrel or balloon;
- insulation;
- Sheet steel and a barrel of a smaller diameter than for the hull to create a water jacket;
- Chimney (diameter 10 cm);
- Details for the heat accumulator (tank, pipes, connecting pipe).
A characteristic feature of rocket furnaces with a water circuit is that the insulation of the vertical part ensures the combustion of pyrolysis gases. In this case, warm air is sent to the coil with a water circuit and gives off heat to the stove. Even when all the fuel has burned out, warm air will still be supplied to the heating circuit.
Do-it-yourself rocket furnace drawings (video)
Jet oven stove benches are widely known among the people. They were used even by Korea, China, England and the population of Japan. The Chinese stove differed from the rest in the ability to heat the entire floor. But the Russian counterpart is in no way inferior. Thanks to useful innovations, the stove is able to keep heat for a long time.
Examples of a rocket stove (photo ideas)


I like hiking. I also like to cook. But I have a negative attitude towards burning non-renewable energy sources.
So what alternatives can you suggest? Obviously, you can just light a fire, but this is not allowed in all places. I use a large amount of wood to simply heat up a pot of food.
So I set myself the goal of making something portable and wood-burning.
I came across the idea of a rocket stove earlier this month, so the choice of device was already made.
Finding a helium tank and cutting it.


The bulk of the portable rocket stove consists of an old helium tank.
I found two from a friend of mine who recently got married.
Empty the balloon. Helium does not burn, but opening a vessel under pressure of 295 atmospheres is not the best idea.
Cut off the top and make a hole on the side. The dimensions of the opening depend on the dimensions of the fuel tank.
Profile pipe preparation


The fuel supply must be arranged in such a way that the flame freely reaches the top of the housing. In the profile pipe, you need to add a cutout so that it is more conveniently connected to the body.
Even when supplying firewood through the fuel bunker, we need to ensure free passage of air into the stove. For this purpose, I used a metal grill removed from an old radio.
Emphasis for construction


For the stability of the structure, it was necessary to make two legs for the fuel bunker.
I glued everything together. Feet and grille to control the flow of air through the walls of the fuel bin using locknuts.
The nylon ring of the nut will not be exposed to excessive heat, as it is far enough away from the firebox.
Spike for stability

To increase the stability of the furnace, add a spike at the bottom of the balloon. To do this, I welded a nut to the cylinder.
I made a hole in the lower part through, so that for ease of transportation, the spike could be fixed inside.
heating surface


In order to put a pan on the stove, you need to make a heating surface under it. I made it from an old baking sheet.
This material is easier to work with and strong enough to withstand even heavy kitchen utensils.
We carry out the first assembly of a camping stove


This is what the assembled stove looks like. I treated its surface with a special paint that can be heated up to 800°C.
We dismantle the furnace


All parts can be detached from the body for transport. All parts are sized so that they can be placed inside the oven and that they do not rattle during transport (except for the heating surface) ...
We use all the space


The sounds made during transportation by the disassembled heating surface seemed irritating to me, so I filled the free space of the stove with firewood. So I came to the conclusion that it would be useful to have some dry wood for kindling.
Enjoy cooking outdoors


I tried frying bacon and eggs. You can even cook a whole pot of beans.
Thanks to the oven, you only need a couple of logs for a complete meal. And the wood will burn out completely, almost without creating smoke.
We increase the stability of the structure (housing)


It's time to improve the result of the work.
The oven came out generally successful, but a little unstable. To improve this feature, I used a cable from a bicycle brake system, adding a hole in the body.
To date, quite a lot of varieties and models of wood-burning stoves have been developed and implemented. In this series, the do-it-yourself rocket furnace built with your own hands, the drawings of which will be presented below, fully justifies all expectations. Such a heating structure, of course, deserves close attention, as it has some specific advantages that are indispensable in certain conditions.
This version of the wood stove is simple and original in design and does not require a large number of expensive components and materials for the manufacture. Probably anyone can install such a stove, having made it on their own, even if they have no experience in the construction of such structures, but who can read the provided drawings and work with some tools.
It is interesting to note that, if necessary, a rocket stove can be made even in 20–30 minutes, for example, from an iron can. However, if you make every effort, it is possible to get a comfortable stationary structure for your home with a heated bench that can even replace an ordinary sofa .. At the same time, the rocket stove does not require complex arrangements, like bell or Russian stoves, which are massive buildings.
The principle of operation of the rocket oven
The rocket stove was originally conceived as one of the functional survival items in difficult conditions. Therefore, its design had to meet certain criteria:
- Efficient space heating.
- Possibility of cooking.
- High efficiency of the device when using various wood fuels of any quality for heating.
- The ability to report fuel without stopping the combustion process.
- In addition, the stove had to keep warm for at least 6-7 hours to enable the owners to spend the night in comfortable conditions.
- Maximum safety of the structure, in terms of eliminating the possibility of carbon monoxide seepage into the room.
- Another condition that had to be met was the simplicity and accessibility of the design for its manufacture by any non-professional.
Therefore, the basis was taken basic principles several types of heating appliances operating on wood solid fuels:
- Free circulation of heated air and gases through all channels. The furnace works without forced blowing, and the chimney creates draft, which draws out the products of combustion. The higher the pipe is raised, the more intense the thrust in it.
- The principle of afterburning the gases released during combustion from the fuel (pyrolysis), which is used in long-burning devices. This principle of operation is extremely important due to the high efficiency of the device, which is achieved by creating special conditions for the afterburning of pyrolysis gases for the most complete consumption of the energy potential inherent in the fuel.
The term "pyrolysis" means the decomposition of solid fuel into volatile substances, under the influence of high temperatures and simultaneous "oxygen starvation". Under certain conditions, they are able to burn out, also releasing a large amount of thermal energy. At the same time, it is important to know that the pyrolysis of insufficiently dried wood takes place for quite a long time in the gas phase, that is, the released pyrolysis gas will require a lot of heat to create a mixture (wood gas) that can burn completely. Therefore, it is not recommended to use wet fuel for the rocket stove.
A variety of rocket stoves - from simple to complex
The simplest design of a rocket furnace
In a simple design of a rocket stove, heated by bundles of branches or torches, the combustion products almost immediately go into the chimney, without having time to form combustible wood gas in the stove body, so it will not be possible to heat the room with it. Such ovens can only be used for cooking. This model is manufactured in stationary and mobile versions; only the principle of free circulation of heated air operates in it, since it does not create the required conditions for a full-fledged pyrolysis process.
In such furnaces, a small section of pipe is used as a fuel chamber. It can have a horizontal position, as shown in the diagram, or be turned up. In the latter case, fuel is loaded vertically.
After igniting the fuel placed in the pipe, the heated gases released from it rush up the vertical section of the pipe to the outside.

On top of the vertical pipe and install containers for cooking or heating water. In order for the gases to freely escape to the outside, and the bottom of the tank does not completely block the draft in the pipe, a special metal stand is installed on top of the stove. She creates a gap of the right size, which helps maintain traction.

Above - a very original stand for a container of heated water
By the way, this simplest type of furnace device was invented first, and because of the furnace opening turned upwards and the flame escaping from it, the furnace most likely got the name rocket. In addition, if the furnace mode is incorrect, the structure emits a whistling “rocket” rumble, but if the furnace is set up correctly, it rustles quietly.
Advanced Rocket Furnace
Since, using the simplest rocket stove with a free exit of gases, it is impossible to heat the room, the design was later supplemented with a heat exchanger and smoke ducts.

After the improvements made, the whole principle of operation of the rocket furnace has changed somewhat.
- To maintain a high temperature of heated air in a vertical pipe, they began to insulate it with a fire-resistant material, and then close it on top with another metal case made from a larger diameter pipe or a metal barrel with a closed top.
- A door was installed on the opening of the furnace, and a separate channel for secondary air appeared in the lower part of the furnace. Through it, blowing began to be carried out (necessary for the afterburning of pyrolysis gases), which previously occurred through an open firebox.
- In addition, the chimney was moved to the lower part of the hull, which forced the heated air to circulate throughout the hull, bypassing all internal channels, and not escaping directly into the atmosphere.

- The products of combustion, having a high temperature, first began to rise to the ceiling of the outer case, accumulate there and heat it, which made it possible to use the outer horizontal surface as a hob. Then, the gas flow cools down and goes down, turns into a knee and only from there goes into the chimney.
- Due to the inflow of secondary air, afterburning of gases occurs at the end of the lower horizontal channel, which significantly increases the efficiency of the furnace. The free circulation of gases creates a self-regulating system that limits the flow of air into the combustion chamber, since it is supplied only as the hot gases cool down under the “ceiling” of the housing.

A very popular scheme - from a metal profile and an old gas cylinder
The stove model shown in the figure works like a “potbelly stove” and has a chimney brought out to the street. However, it is unsuitable for use in residential premises, since in it, with changes in external pressure, a reverse draft may occur, which will contribute to the entry of carbon monoxide into the premises. Therefore, such a stove should always be supervised, and it is most often used for heating utility rooms or a garage.
Rocket stove with warm bed
According to the principle of afterburning pyrolysis gases, a rocket furnace with a stove bench is also arranged, but in this embodiment, the heat exchanger is a structure of combined long channels coming from the stove and laid or formed from non-combustible plastic materials under the stove bench surface.

It should be noted that such a heating system is by no means new, and, in fact, such a rocket stove has a rather rich history. It was invented a long time ago, presumably in Manchuria, called " kan", and is still traditional for peasant houses in China and Korea.

Similar stoves called "kan" have long been used to heat homes in East Asia.
The system is a wide couch made of stone, brick and clay, inside which the air heated in the furnace passes through the arranged channels, which are essentially an elongated chimney. Passing through this labyrinth and gradually giving off heat, the gas flow, cooling down, exits into a chimney 3000 ÷ 3500 mm high, located on the street, next to the house.
The stove itself is located at one end of the bench and, as a rule, is equipped with a hob, which allows it to be used for cooking.
From above, the stone-clay construction "kan" is covered with straw or bamboo mats, or a wooden flooring is arranged there. At night, the couches were used as beds, and during the day - in the form of a seat, on which, traditionally for Asian peoples, a special low table 300 mm high was installed - a meal was held behind it.
This heating system is quite economical in terms of fuel consumption, since it is enough to use an average thickness of a branch to heat it. Such a rocket stove is able to retain heat for a long time, creating comfortable conditions for sleeping throughout the night.

And Korean stoves "ondol" probably became the prototypes of modern "warm floors"
Korean homes use a heating system similar to " kan", which is called "ondol". This heating option, unlike the Chinese one, is not arranged inside the couch, but under the entire floor of the house. In principle, it can be argued that this method of transferring and distributing heat to residential premises seems to have formed the basis for the design of the modern "warm floor" system.
Furnace design with connected pipes to it can be clearly seen in the diagram presented.

In our time, with today's rich variety of materials, the channels in this design of the furnace can be made of metal pipes laid in the form of a coil and well insulated with non-combustible materials. Therefore, the last section of the chimney system can exit from the structure of the stove next to the stove itself or at the end of the stove, and then go through the wall into the chimney installed on the street.
In the presented diagram, you can see the results of design work, which made it possible to achieve a relatively simple circuit with high efficiency, as well as meeting all the requirements for a speech rocket.

Fuel is loaded into the furnace hole vertically. Then it is set on fire, and, burning out, gradually settles down. The air that supports combustion enters the bottom of the combustion chamber through an opening that plays the role of a blower. It must provide sufficient air flow for the afterburning of the released products of the thermal decomposition of wood. But, at the same time, there should not be too much air, since it can cool the initially released gases, and in this case the process of afterburning the pyrolysis gases will not be able to take place, and the combustion products will settle on the walls of the housing.
In this variant, the top-loading furnace has on the furnace chamber blank cover, which eliminate the risk of gases entering the room when creating reverse thrust.
In a completely isolated volume of released gas, thermal energy is generated, temperature and pressure increase, and thrust increases. As the fuel burns, the burning gases go through the channels of the furnace body into the heat exchanger, heating the internal surfaces along the way. Since the channels have a complex configuration, gases are retained inside the furnace for a longer time, giving off heat to the body and channel surfaces, which in turn, they heat the surface of the couch and, accordingly, the room itself.
Over time, any furnace and its channels require cleaning from soot deposits. In this design, the problem area is the heat exchanger pipes located inside the bench. In order to carry out these preventive measures without problems, at the level of the heat exchanger turning from the furnace body into the pipes under the bench, a hermetically closing cleaning door is installed (indicated in the diagram as “Secondary Airtight Ash Pit”). It is in this place that all the unburned products of the thermal decomposition of wood concentrate and settle. The door is periodically opened and the passages are cleaned of soot - this process guarantees long-term operation of the chimney. In order for the door to close tightly, asbestos gaskets must be fixed to its inner edges.
How to properly heat a rocket stove?
To get the maximum heating effect, it is recommended to heat up the furnace before laying the bulk of the fuel. This process is carried out using paper, dry shavings or sawdust, which are ignited in a firebox. When the system warms up, it will change the emitted sound - it may die out or change its tone. The main fuel is placed in the heated unit, which will ignite from the heat already created by heating.

Any firewood and even thin branches are suitable for a rocket stove, but the main thing is that they are dry.
Until the fuel flares up well, the door of the combustion chamber or blower must be kept open . But only when the fire becomes intense, and the stove buzzes, the door is covered. Then, in the process of burning, the access of air from the blower is gradually blocked - here you need to focus on the tone of the stove sound. If the air damper is accidentally closed, and the intensity of the flame has decreased, it must be opened again and the stove will flare up with renewed vigor.
Advantages and disadvantages of a rocket stove
Before proceeding to the description of the manufacturing process of the rocket furnace, it is desirable to summarize the information about its advantages and disadvantages.
Rocket stoves are quite popular due to their positive qualities , which include:
- Simplicity of design and a small amount of materials.
- Even a novice master can make any of the furnace designs, if desired.
- The construction of a rocket furnace does not require the purchase of expensive building materials.
- Undemanding to the forced draft of the chimney, self-regulation of the furnace.
- High efficiency of the rocket furnace with a pyrolysis gas afterburning system.
- Possibility of adding fuel during furnace firing.
Despite the large number of advantages of this design, its work has a number of shortcomings :
- When using the simplest design of a rocket stove, only dry branches and torches can be used, since excess moisture can give back thrust. In a more complex appliance system, the use of wet wood is also not recommended, because it will not give the right temperature for pyrolysis to occur.
- The rocket stove cannot be left unattended during combustion, as this is very unsafe.
- This type of device is unsuitable for heating a bath, as it does not give enough heat in the infrared range, which is especially important for a steam room. A rocket stove with a stove bench can only be suitable for a rest room in a bath building.
Video: dissenting opinion on rocket stoves
Making a rocket stove with a bench
Rocket stoves can be of different sizes, and a variety of materials are used for their manufacture - these are metal pipes, barrels and gas cylinders, bricks and clay. A combined option is also quite acceptable, consisting of pipes, stones, clay and sand. It is he who deserves special attention.

From a gas cylinder, you can make a stove that is simple in design, including using it for the option with a stove bench.
How to make a simple stove in itself is more or less clear from the above drawings and a description of its work, so it is worth considering the manufacture of a heating unit equipped with a stove bench.
Video: homemade rocket stove from a gas cylinder
You may be interested in information on how to do with step by step instructions
To make it completely clear what and where is located in the design of the rocket furnace, this scheme will be used to describe the work.

So, the considered furnace-rocket consists of the following elements:
- 1a- a blower with an air supply regulator, with which the stove is adjusted to the desired mode;
- 1b- a fuel chamber (bunker) with a blind cover;
- 1c- a channel for supplying secondary air, which ensures complete combustion of pyrolysis gases emitted by wood;
- 1g– flame tube 150÷200 mm long;
- 1d- primary chimney (riser), with a diameter of 70 ÷ 100 mm.
The flame tube must not be made too long or too short. If this element is too long, then the secondary air in it will quickly cool down and the process of afterburning pyrolysis gases will not reach the end.
The entire design of the flame tube and riser must be thermally insulated as efficiently as possible. The task of this node is to ensure the complete combustion of pyrolysis gases and the supply of hot masses from the riser to other channels, which will already transfer heat to the room and to the bench.
Here it should be noted that in order to obtain the optimal efficiency from the furnace, the diameter R the aizer should be made with a size of 70 mm, and if the goal is to achieve the maximum power of the furnace, then it should be made with a diameter of 100 mm. In this case, the length of the flame tube should be 150÷200 mm. Further, when describing the installation of the furnace, the dimensions will be given for both cases.
It is impossible to immediately let the heated air from the riser into the heat storage, since its temperature reaches 900÷1000 degrees. High-quality heat-resistant heat-accumulating materials have a rather high price, therefore, most often, adobe (clay mixed with chopped straw) is used for these purposes. This material has a high heat capacity potential, but is not heat-resistant, so the design of the secondary furnace (cylinder body) begins with an air temperature converter, which must be heated to only 300 degrees. Part of the generated heat is immediately given into the room and replenishes the current heat loss.
The described functions are performed by the furnace body, made from a standard 50 l gas cylinder.
- 2a- cover of the furnace body. Under it, heated air enters from the riser;
- 2b- a cooking surface, which is heated from the inside by heated gases leaving the riser;
- 2c– metal insulation of the riser (shell);
- 2g– heat exchange channels. Heated gas enters them, dispersing under the ceiling of the case;
- 2d– the lower metal part of the case;
- 2nd– exit from the housing to the cleaning chamber.
The main task in the arrangement of these parts of the furnace is to ensure complete tightness of the chimney line.
In the housing (drum), at a height of ⅓ from its "ceiling", the gases cool down and already have a normal temperature for their entry into the accumulator. Approximately from this height and to the floor of the room, the stove thermally insulated several layers of different compositions - this process is called lining.
- 3a- the second cleaning chamber, through which the heat exchanger ("hog"), located under the bench, is cleaned from carbon deposits;
- 3b– sealed door of the second cleaning chamber;
- 4 - "hog", a long horizontal section of the chimney, located under the stove bench.
After passing through the pipes of the "hog" and almost completely giving off heat to the adobe stove, the gases escape through the main chimney channel into the atmosphere.
Having dealt with the device of the rocket furnace in detail, you can proceed to its construction.
Building a rocket oven with a stove bench - step by step
First of all, you need to prepare lining compositions. Their components will cost quite inexpensively, since they can often be found completely free of charge, literally under your feet:
- 5a- adobe. As mentioned above, this is clay mixed with chopped straw and mixed with water to the density of the masonry mortar. Clay for making adobe is suitable for any, since it will not be influenced by external atmospheric influences;
- 5 B- kiln clay mixed with crushed stone. This will be the main heat insulator. The mortar should have the consistency of a mixture for laying bricks;
- 5v- heat-resistant lining, made of kiln clay and fireclay sand in proportions of 1: 1 and having the consistency of plasticine;
- 5g- ordinary sifted sand;
- 5d - medium-fat clay for kiln masonry.
Step-by-step work on the design is carried out in the following sequence:
Bed for a couch
Having prepared all the necessary compositions, a bed is made - a wooden durable shield of the desired configuration. Its frame is made of timber with a section of 100 × 100 mm. Frame - with cells measuring 600 × 900 mm under the stove and 600 × 1200 mm under the bench. If a curvilinear shape of the couch is planned, then it is brought to the desired configuration with the help of boards and scraps of timber.

Bed - frame base for further construction of the furnace structure
The frame is sheathed with a grooved board 40 mm thick - it is fixed across the long sides of the frame. Later, after the installation of the furnace is completed, the side facade of the bed will be sheathed with drywall. All parts of the wooden structure of the bed must be impregnated with a biocide, and then stained twice with a water-based emulsion.
Further, on the floor, in the place of the room where the stove will be installed, mineral cardboard (cardboard made of basalt fibers) 4 mm thick is laid, the size and shape are fully consistent with the parameters of the bed. Directly under the stove, a sheet of roofing iron is fixed on top of the cardboard, which will come out from under the stove in front of the firebox by 200 ÷ 300 mm.
Then, the bed is transferred and firmly installed on the selected and made location oven, so that the frame stands stably, without play. At the end of the future couch, at a height of 120 ÷ 140 mm above the level of the bed, a hole for the chimney is arranged in the wall.
Formwork and pouring the first level of adobe mixture
A solid formwork is installed along the entire contour of the bed, having a height (A -40 ÷ 50 mm) and a smooth upper edge.
An adobe mixture (5a) is poured into the formwork and its surface is leveled using a rule. Formwork sides serve as beacons for leveling.
Production of the furnace body
- While the adobe filling will dry, and this process will take 2-3 weeks, you can start making the furnace body from a cylinder. It should be noted that a rocket stove is made from a barrel in the same way.

Cutting a gas cylinder and making a cap with a "skirt"
- The first step is to cut off the top from an empty cylinder to obtain a hole with a diameter of 200 ÷ 220 mm. Further, this hole is closed with a 4 mm thick steel round timber prepared in advance - this surface will play the role of a hob. After that, another cut is made below the hob by 50 ÷ 60 mm in order to get a lid.
- On the outer perimeter of the resulting cover is welded, so-called"skirt" made of thin sheet steel. The width of the skirt should be 50 ÷ 60 mm, the seam of this strip is welded. If there is no experience in welding work, then it is better to entrust this process to a professional.
- After that, along the entire circumference of the skirt, stepping back from the lower edge of 20 ÷ 25 mm, holes are evenly drilled into which the bolts will be screwed.
- Further, the lower empty part of the cylinder is cut off at a height of approximately 70 mm from the bottom. Then, a hole is cut in the bottom of the cylinder for the riser to enter the body.
- After that, it is necessary to fix a well-woven asbestos cord on the inner edge of the lid with Moment glue, and then immediately put it on the cylinder body and press it down with a load of 2.5 ÷ 3 kg from above. The cord will serve as a sealing gasket. Further, through the holes in the metal “skirt”, through holes are drilled in the cylinder body, in which the threads for the bolts are cut.
- After that, you need to measure the depth of the hull, since it is necessary to determine the height of the riser.
- Then the cap is removed from the cylinder to protect the gasket from being completely impregnated with glue, otherwise the asbestos will lose its elasticity.
Production of the furnace part of the furnace
The next step is to make elements from a square pipe (or channel) with a section of 150 × 150 mm: 1a - blower, 1b - combustion chamber; 1d - flame channel.
The riser (1d) is made from a round pipe with a diameter of 70 ÷ 100 mm.
The angle of insertion of the combustion chamber (bunker) into the blower and flame tube can vary within 45 ÷ 60 degrees from the horizontal. Its upper edge is placed flush with the protruding blower element, as shown in the diagram.
In the lower part of the blower and flame tube, it is necessary to separate the secondary air channel (1c). It is separated by a metal plate 3 ÷ 4 mm thick. Its rear edge should end exactly at the level of the front wall of the riser, and the front edge should go ahead of the blower by 25÷30 mm. The plate is pinpointed in four places by welding inside the pipe.
Then, at the end of the flame tube, a hole is cut from above, into which the riser is welded at a right angle, and the end of this channel is closed with a metal square, also fixed by welding.
Must be installed on the blower door - latch to help regulate the air supply. The cover for the combustion chamber is made of galvanized metal. The hopper does not require hermetic closure - the main thing is that the lid fits snugly against the inlet.
After that, the finished structure is coated with a solution of 5v. A solid lining is made only at the bottom, and the sides and top of the blower are left free from the lining. In order for the coating mixture to dry out faster, the structure is put on the pole with a blower chamber. It is necessary to ensure that the mixture from the surfaces does not slip and does not opal, since the lining plays a big role in retaining heat. If this happens, then the coating must be done again, using a fatter clay.
Rocket Furnace Insulation
After the adobe layer has dried, a formwork is installed to equip the heat-resistant thermal insulation for the furnace. It is done only under the location of the furnace. The height of the formwork will be 100÷110 mm together with the adobe layer.

The installed formwork is filled with composition 5b and leveled along the beacons, which will serve as the sides of the formwork. On the main diagram, this layer is marked with the letter B.
Production of the bottom part of the drum and shell
The shell is made from a round pipe with a diameter of 150 ÷ 200 mm or it is rolled from a steel sheet.
The bottom round timber, which will be laid inside the drum, is cut out of sheet metal with a thickness of 1.5 ÷ 2 mm, and a round hole is cut out in the middle of it. The diameter of the circumference of this element should be 4 mm less than the inner size of the cylinder, and the diameter of the middle cutout for the shell should be 3 mm larger than its outer diameter.
Installation of the furnace structure
After the thermal insulation layer has dried in the formwork, a furnace structure is mounted on it. It is installed by controlling the level vertically and horizontally, and then fixed on the heat-insulating layer with the help of pegs. Then, around the furnace, formwork is installed with a height of 350 ÷ 370 mm from the floor. Here it should be taken into account that the cleaning chamber (3a) and its door (3b) must be installed next to the solidified mixture (5b) with which the formwork will be filled. The connection (2e) of the cleaning chamber with the heat exchange channel (2g) will pass over the lining composition poured into the formwork. The mixture is also aligned to the ideal, level with formwork, with regulations.
cleaning chamber
While the mixture is drying in the formwork, you can start manufacturing a cleaning chamber with a door and a transition to a heat exchanger. It is made of galvanized steel, 1.5 ÷ 2 mm thick, and its front part is made of metal 4 ÷ 6 mm. A hole with a diameter of 150 ÷ 180 mm is cut out in the side part of the cleaning chamber to install the end of the chimney pipe, which will pass under the lounger.

The door of the cleaning chamber is made with a size of 160 × 160 mm, also from steel of 4 ÷ 6 mm. Before its installation, a sealing gasket made of mineral cardboard is installed along the perimeter of the inner surface. The door itself is screwed to the chamber box with fixing bolts, for which threads are cut in the drilled holes.
This diagram shows the dimensions of all elements and the place of installation and connection of the chamber with the drum (cylinder). Further, after fitting the elements, a 70 mm window is cut out in the lower part of the furnace drum, into which the connecting channel (2e) will be mounted by welding.
Corrugated pipes under the bench can be located arbitrarily, depending on the configuration of the lounger, it is only important to adhere to the dimensions indicated on the drawing for the manufacture of the cleaning chamber, indicated under the letters A, B and C. How to properly connect the "boar" pipe will be discussed below.
Drum mounting
When the solution in the formwork dries, it is removed. On the riser, on top of the frozen thermal insulation, they put on a combustion system drum made of a gas cylinder. The drum is currently mounted without a cover - its installation is shown in the diagram.

Solution 5b is laid out on the bottom part of the installed drum, and with the help of a spatula, a surface inclined by 6–8 degrees is formed from it, towards the outlet window of the cleaning chamber. Then, on the riser, a round timber from a metal sheet is put on and lowered to the bottom of the drum and pressed against the laid mortar. From the middle hole around the riser, the solution is selected, otherwise it will not be possible to install the shell pipe. After that, the pipe itself is put on the freed space on the riser and slightly screwed into the solution. All gaps formed along the outer and inner contours are smeared with clay (5d).
Fuel structure lining from the inside
After installing the shell and hearth, it is not necessary to wait for the thermal insulation solution to dry, you can immediately proceed to the riser lining. The composition (5g) is poured into the shell, around the riser, in 6÷7 layers. Each of the layers must be compacted as much as possible, while wetting the dry mixture with water from a spray bottle. From above, this space filled with sand is closed with a clay layer (cork) 50 ÷ 60 mm thick, using a solution of 5d.
Cleaning chamber installation
After mounting the drum, you need to install a cleaning chamber. Installing the box is not difficult - for this, a layer of solution 5d is applied to the transition channel and the hole in the drum, as well as to the side and bottom of the box, which has a thickness of 3 ÷ 4 mm. The box is put in place, and the transition channel window (2e) is inserted into the prepared opening of the drum and is well pressed and pressed down. The solution that comes out on the sides is immediately smeared. The entrance of the cleaning chamber to the drum must be well sealed, therefore, if there are gaps left, they must be sealed well.
Laying the thermal insulation layer
Formwork for level G
Further, a formwork is installed along the outer contour of the bed, just as in the manufacture of level A. The height of this level G must be displayed, focusing on the hole for connecting the “hog”. Above the upper edge of the hole, the level should be raised by about 80÷100 mm.
Formwork filling
The next step is filling the formwork with adobe mortar (5a) to the bottom edge of the hole prepared for the installation of the "hog" in the cleaning chamber On the one side, and at the end of the bed - to the lower edge of the outlet for the chimney.
The mixture is laid out and leveled by hand, while making sure that the mass is as close as possible to the previous layer. Thus, from the cleaning chamber to the chimney outlet rise is formed for pipes "hog", the height difference of which should be 15 ÷ 30 mm. This design is necessary so that the couch warms up evenly.
You might be interested in information on how to choose
Installation of a corrugated pipe
The next step is to stretch the corrugated pipe over the entire length of the bed. One end is connected to the cleaning chamber, inserted into the hole to a depth of 20÷25 mm and flaring inside the chamber with a flathead screwdriver through the cleaning door. Then the entrance of the pipe to the ash pan is coated with a solution of 5d, and the beginning of the pipe 150 ÷ 200 mm is coated with adobe. This will fix the rub well in the desired position and prevent it from slipping out of the hole during further work.

After that, the pipe in the formwork is laid in the form of a coil, but it must always be at a distance of about 100 mm from the edges of the formwork and the wall. During the laying process, the pipe is pressed into the adobe layer laid under it. Having laid the pipe along its entire length, its second end is fixed on a clay solution in the outlet chimney.
After that, the entire "hog" is plastered with adobe mortar, which must be well compacted, especially between the bends of the pipe, so that no voids form in it. After the adobe mass fills the space flush with the top of the corrugated pipe, a more liquid solution of adobe is poured into the formwork, and at the end the surface is smoothed out by a rule that is carried out along the walls of the formwork, which act as beacons ..
You may be interested in information about what they are on wood
Cover installation
After that, the covers of the cleaning chamber and the drum are fixed with bolts. They need to be tightened tightly so that they press the gaskets installed inside.
Furnace drum coating
Further, the oven drum is coated with adobe by ⅔ from the bottom of the body. The upper part of the drum is left free from the adobe layer. Thermal insulation is applied with a thickness of at least 100 ÷ 120 mm, and the configuration of the coating is chosen by the master himself.
Furnace finish
After two or two and a half weeks, the adobe layer should dry out and the installed formwork can be removed. Then, if necessary, the right corners of the structure are rounded. In addition, the drum is covered with heat-resistant enamel that can withstand temperatures up to 450÷750 degrees. The adobe surface of the couch is covered with acrylic varnish in two layers, each of which should dry well. The varnish will hold the surface material together, preventing it from dusting, protect the adobe from moisture and give the glazed clay the aesthetics.
If desired, a wooden flooring made of thin boards can be laid on the surface of the couch - it is quite often made removable. The side parts of the couch are sometimes trimmed with drywall or lined with stone. Decorative finishing is carried out to the taste of the owner of the house.
You may be interested in information on how to build
Carrying out a furnace test
A dry oven must be tested. To do this, it is necessary to warm up the structure by laying light fuel in the form of paper in the blower and replenishing it during the combustion process. When heat is felt on the surface of the bed, you can put the main fuel into the combustion chamber. When the stove starts to hum, the blower closes until the sound changes to a “whisper”.
In conclusion, it must be said that the rocket stove can also be made of brick or stone - it all depends on the financial capabilities and creative abilities of the master. The main thing that can attract in this design is the ability to improvise and create using different materials for construction and decoration. Therefore, those who dream of installing a stove with a heated stove bench in their home should take a closer look at this option.
Prices for ready-made rocket stoves
furnace rocket
Video: an example of building a rocket stove with a warm stove bench

Evgeny AfanasievChief Editor
Publication author 18.01.2016
![]()
We also recommend
 Switching power supply: repair and refinement
 Remote control of light
 Swimming lessons for preschool children
 Notes for the master - home household alarms
 Clock propeller on Atmega8
 Device and relay application examples, how to choose and connect a relay correctly Microcontroller and relay simple switching circuits