The optimal size of the veranda of a country house. Veranda and terrace to the house - how to make your countryside vacation comfortable? Purpose - what do you plan to use the summer terrace for?
An important element of a country house is a separate room with a view of the garden, forest, river, etc. This is a veranda. The veranda can serve as a living room, a winter garden, a dining room, an office. Its main purpose is to serve as a transitional link between the surrounding nature and the interior of the house. How to place the veranda relative to the house will be discussed in this article.
Veranda location
It is important to choose such an arrangement of the veranda so that a beautiful view opens from it. Do not turn the veranda towards the street or the border with the neighboring site, fences, outbuildings. If the site is small, and it is surrounded by neighbors' houses, then trees can be planted opposite the windows of the veranda so that greenery is visible instead of other people's walls.
When choosing a place for a veranda, it is worth considering the location of the house relative to parts of the world. South and southwest will suit those who love the sun. Here you can put a winter garden. The southeast direction will make it pleasant to be on the veranda in the morning, in the afternoon there will be shade and coolness. With the western placement of the veranda, you can watch sunsets, it will be nice to sit here in the evening, have dinner, and receive guests. North and northwest for a veranda are good if it is used only on hot summer days, or if the house is located in a warm climate zone, plants are unlikely to grow well on this side.
Types of verandas
Verandas should match the overall look of the house. They can have one or more common walls with the house, be connected to other rooms by a passage, but at the same time be a separate room. The width of the veranda should not be less than 1.8 m. The most convenient for receiving guests will be a 4x5 m or 4x6 m veranda. The windows on the veranda are not higher than 40-60 cm from the floor.
In most cases, the entrance to the house can be through the veranda, but it may not have entrance doors from the street, but only a connection to the interior of the house. If, nevertheless, there is a door, then it should be arranged in such a way that there is more space on the veranda for placing furniture. If the size of the veranda is 3x4 m or less, it is better to place the door at the end.
One of the main elements of the veranda is the windows. They can be both deaf and opening, the builders advise them to alternate. These can be stained-glass windows or windows of standard sizes, but closely spaced. The frames of the windows of the veranda are installed between the window sill and the upper trim (the trim - see below).

Veranda in the corner of the house
You can make a small veranda 2x2 m in the very corner of the house with access to the garden, while the integrity of the building does not change. Since the area of \u200b\u200bthe room is very small, such a veranda will be good for one person, a maximum of two. In order for at least 6 people to be seated on a veranda of this type, its area must be at least 8-9 m2.

Veranda attached to the wall of the house
The veranda is attached to the wall of the house, it is narrow and long (for example, 1.7x5 m). The long side is shared with the inner room of the house. On such a veranda, you can place a desk in one corner, a tea table with narrow chairs on the other. Access to the interior is through two doors. The exit to the garden is located in the middle of the veranda, thus dividing the room into two functional areas - a work area with a desk and a guest room with a tea table. Opposite the front door, you can place a small sofa or a clothes hanger and a cabinet for shoes.

Veranda under the balcony
If the house has a balcony on the second floor, then on the first floor under the balcony you can install a veranda. A round veranda with a radius of, for example, 2 m can become both an entrance hall and a guest room. It is better to place the entrance to the house in one of the edges of the wall adjacent to the inner rooms. Access to the garden can be done in the middle.

square veranda
A square veranda, for example, with dimensions of 2.7x2.7 m, located at one of the walls of the house overlooking the garden. The front door to the veranda can be made from one of the sides, and the front door to the house is closer to the first one, so that there is more living space. On such a veranda will fit a round table with chairs. If the size of such a veranda is 5x4 m, then here it is already possible to place not only a guest table with chairs, but also armchairs, a wardrobe.

Veranda with vestibule
Veranda with vestibule. For example, the long part can be 3.7 m, the narrow part - 2.5 m. In the narrow part of the veranda, in the brightest place, you can place a children's corner. Opposite the door, you can place a sofa and a narrow wardrobe.

Large veranda with vestibule
A large veranda with a vestibule adjoining the house with its long side (for example, 3x6m). On such a veranda it is good to receive a large number of guests; several chairs can also be placed here.

Veranda with grill
On the veranda, you can place the grill in the corner from the side of the outer wall. The dimensions of such a veranda can be 3.5x6.5m. Here you can place a dining room or living room.

Veranda adjoining the corner of the house
Veranda adjoining the corner of the house. The entrance door of the veranda divides the room into two zones. It is very convenient to place a table near the door leading to the house. Armchairs can be placed in another part of the veranda.

small veranda
On a small veranda (for example, 2.5x3m), you can save space by placing the front door close to the front door into the house.
The shape of the veranda can be rectangular, triangular (Fig.) Semicircular, etc. More traditional - a rectangular veranda. The traditional version of the form of the veranda is a room that adjoins the house with its wide side.
Option for the location of the triangular veranda in fig:

triangular veranda
Two adjacent walls can be fully glazed and separated by a corner mullion.
Another option - the veranda can be connected to the house with a narrow end and extend into the garden as an independent building. The fewer planes that are combined with the main house, the more independent the extension looks, as in the figure:

Veranda connected to the house by a narrow end
There are many architectural options for creating verandas - it all depends on your imagination and the ability of the designer and builders to bring it to life.
The veranda could be built-in or attached to the house
Built-in veranda

Built-in veranda
In this case, the veranda has a foundation in common with the main house and is actually another room. The design of the built-in veranda is considered even in the process of designing a house. Such a solution will exclude in the future distortions and other phenomena associated with subsidence and frost heaving of soils. If the house is under development, and you would like to make a solid veranda that could be heated and used as a living room, then you should immediately create a project with a common foundation.
Attached veranda

attached veranda
Most often, the veranda is attached to the main, already existing building. In order for the veranda to serve for a long time, many issues need to be taken into account, the main of which is how to avoid distortions and deformation of the extension.
Arrangement of attached verandas
Builders do not recommend rigidly connecting the attached veranda and the house. This means that the foundations of the veranda and the house are carried out separately and do not have common areas. Between the wall of the house and the mating wall of the veranda there should be a gap of 20-40 mm. In the process of sheathing, this gap is closed with a flashing (board). The floor on the attached veranda should be 60-80 mm lower than the floor level in the house, the level difference is covered with a plinth. The roof of the veranda should also only fit the roof of the main house with a gap that is closed with a steel apron. You can read about the design of the seam between the house and the veranda in the topic.
You can read about the main structures of the veranda and the materials for their construction in the article "Veranda in the house. Structures and materials for the veranda in the house."
Owners of private houses and summer cottages are very fond of equipping such a place on their estate, where one could have a pleasant and comfortable rest, eat food and even work in the fresh air.
Such a place can be a terrace attached directly to the house. And if you still don't have it, it's time to start building.
The most important thing you need to do before an extension terraces to the house, this is its design, taking into account the purpose, location, shape, size and, of course, the material that will be needed for construction. Let's deal with all these points in order.
Purpose - what do you plan to use the summer terrace for?
Before you build a terrace, think about how and why you will use it. If a terrace is needed in a country house for a family vacation, then a small building with a roof that provides protection from the sun and rain is enough. If you have a private country house, where you often receive guests, arrange parties, then you should also plan a place for installing a coal or electric grill in the fresh air. In this case, it would be advisable to build a structure made of brick or stone, paved, for example,.

How to choose the right terrace location
Choosing a place where it will be attached terrace to the house, there are several factors to consider:
- Where the sun rises
If you often relax on the summer terrace in the morning, for example, at breakfast before work, then it is better to attach the terrace to the house on the east side - the sun, rising in the morning, will flood it with its light and cheer you up for the whole day.
On the other hand, if you manage to allocate more time for relaxation in the evening, then the western side, where the sun shines the longest, will be a great place to add a terrace to the house.
Are you planning to hide in the shade of the summer terrace in the sun? Then determine the place where the day is most shady.

- Away from the road.
Roads are not only extra noise, but also exhaust gases, which are very harmful to breathe. In such conditions, the rest will not be complete, so it is better to build a terrace in the country house or on the site of a country house on the side where there is no roadway.

- Conveniently next to the entrance.
It is good if there is direct access to the terrace from the house - from the front door or from the kitchen. Thus, having attached a veranda, it will be convenient for you to set the table for breakfast, lunch, dinner or receiving guests.

What is the best size for a summer terrace?
For a family of 3-4 people, a summer terrace of 10-12 m² is enough. but if you want to put a rocking chair on it or hang it, maybe even make a small play area for children, then you should make a bigger terrace project.
In addition, the size of the terrace depends on the size of the house itself and the surrounding area. Too small a veranda will look ridiculous against the backdrop of a large house, while a large terrace near a small house will also not cause rave reviews.

Summer terrace shape
A terrace attached to a house will look most beautiful in a rectangular shape. Its straight lines, combined with the lines of the house, will look harmonious. In addition, this form will facilitate the construction process itself.
To make the terrace look more original, several levels should be provided during its construction. So, a stone summer terrace can easily take arbitrary shapes. If you build it from wood, you can give it originality by cutting off the edges with a jigsaw.

Country wooden terraces photo
In any case, the most important thing is that the terrace attached to the house was in harmony with its architecture or the style of other buildings on the site.
Of course, the project itself does not end there, and then the stage of adding a terrace to the house follows. But more on that in the next article.
Today there is great demand projects on the one-story houses with a terrace, which is open or glazed. In addition, both summer and winter terraces are popular. Usually, project of a country house with an attic looks great with a covered veranda, allowing you to significantly increase the flow of light into the room. It is not necessary to glaze all sides of the terrace. You can decorate one or two of its sides with climbing plants and then the veranda will certainly become one of the cozy and attractive places in your home.
BASIC REQUIREMENTS FOR THE TERRACE IN THE PROJECT OF THE COUNTRY HOUSE: ITS OPTIMUM AREA
One of the important factors for the comfort of the terrace is reliable protection from sunlight, especially in the afternoon. To do this, you can organize both temporary and stationary roofs, or use the shadow of a large tree (if possible).
Regarding the size, even cheap house project able to be cozy if the terrace is spacious and comfortable. In this regard, it is quite difficult to determine the optimal area of the terrace in finished project of a country house. In addition, equipping it must take into account its purpose. Indeed, for a small table with a couple of chairs and a passage to them, a square of 2x2 meters is quite enough. However, it would be much more convenient to put a large table on the terrace, and replace the chairs with comfortable armchairs. Also, sun loungers will be a very right solution, which will allow you to take sunbaths in comfort. It is for this reason that the optimal size for the terrace, if implemented turnkey house projects, will become an area varying within 10-15 sq.m. This is provided that the width of the site is not less than two meters. Regarding the roof, the lowest place should not be less than 2.3 meters.
Very handy if project of a country house with a terrace provides a cozy fireplace or barbecue. However, their arrangement requires quite a lot of space. Remember that you can place the table to the source of fire no closer than 1.4 meters.
Also, when arranging the terrace, you should pay attention to the level of its floor. It is recommended that it be below the floor level by an average of 5-15 cm. If the basement of your house is low, then the terrace should be 3-10 cm above ground level. If the base is quite high, then it is better not to make steps, but rather to raise the terrace. For these purposes, use pillars or sprinkle soil.
So, trusting professionals in design and construction turnkey cottages, you can also consult with them on the issue of the optimal terrace area with them. Their considerable experience, combined with your ideas, will create the most comfortable housing with a place to relax.
Country rest in the country is, first of all, the opportunity to breathe the fresh air of a garden or forest twenty hours a day. It is impossible to rest and at the same time be in a stuffy box of a country house, therefore, sooner or later, a summer resident who values his health sooner or later equips a full-fledged summer terrace with an awning or a roof at the dacha with his own hands. Building a terrace with your own hands is much simpler than a gazebo or veranda, so arranging a special platform for a table and garden furniture, as a rule, will not require large investments, despite the fact that the effect will be quite impressive.
What is the secret of the terrace
Despite a certain external similarity between the veranda and the terrace, the purpose of these buildings is different, as, in fact, the sizes and designs differ. A veranda is a part of a house with closed walls, windows and a full roof. The terrace is a landscaped outdoor area for relaxing on a sunny day with a canopy, awning or awning. The difference is easier to understand if you look at a photo or drawing of a classic terrace.

When choosing a place and a way to build a terrace with your own hands, you can use the classic techniques for arranging a recreation area:
- In close proximity to the house, using the platform and steps as a porch and platform in front of the entrance to the house;
- Take it out as a separate platform and place it in a cozy, sunny and less ventilated place in the summer cottage. At the same time, a prerequisite is the arrangement of a path, stairs or steps, with which you can quickly get inside the house;
- To build a special type of roof or ceiling for a terrace with your own hands, on which a recreation area will be located.
Important! It is clear that verandas and gazebos are not built this way, so any drawings and recommendations for the construction of terraces can be creatively processed, changing the dimensions according to your wishes. The main thing is that the design is comfortable, durable and safe to use.
The dimensions of terraced areas, as a rule, can be several times larger than the size of gazebos, and even more so, verandas. Almost always, the base of the site is built of wood or composite, raising the structure above the ground so that moisture and dampness do not affect the condition of the boardwalk.

Choose a device, design and dimensions
The terrace is a one-of-a-kind building designed not to create a shadow, but on the contrary, aimed at providing the possibility of a comfortable and safe stay in the sun. Therefore, when choosing a project and a site for the construction of a terrace with your own hands, drawings and dimensions, it is necessary to take into account the following features:
- In the construction of a site of any size, raised above the ground by more than 18-20 cm, there must be a fence and a railing for the terrace. For buildings that include several platforms located at different heights, intermediate steps and handrails are provided;
- Floors, railings and railings should be made of wood or a similar material, such as a polymer composite. The drawing must necessarily indicate the quality of wood processing and the type of coating applied - varnish or protective composition based on epoxy resins;
- In the presence of a canopy or awning, one edge of the roof must be attached to the main wall of the house, the second rests on stationary supports embedded in the ground to a depth of at least 40 cm with pouring a concrete blind area.
Important! Before choosing a diagram of how to make a terrace, it is important to choose the right material that best matches the design in the drawing.
The easiest way is to build a terrace at the corner junction of two walls of the house, as in the photo. In this case, we build a terrace and automatically get a platform in front of the entrance to the house.
Corner terrace design
The simplest option for a terrace would be to build a platform of wood on a primitive foundation of concrete blocks or slabs, as in the drawing. The corner arrangement provides protection of the terrace area from wind and rain from both sides, so there is no need for wind protection with polycarbonate sheets or wooden shields.
If necessary, you can install a fabric awning, curtain or canopy over the terrace, the dimensions of which will be limited only by the dimensions of the walls of the house. The disadvantages of the design include the fact that with an incorrect slope, a wooden platform can affect the distribution of rainwater, so the calculation and size of the slope of 3-4 ° must be immediately fixed on the terrace drawing. The size of the foundation supports for the flooring must be calculated according to the sketch or drawing, according to the measurements of the entrance opening above the ground level.

For a light frame structure of a terraced area, it will be enough to lay 12-15 concrete blocks or several dozen clinker tiles as a foundation. First you need to remove the top layer of soil, sprinkle with fine gravel, tamp and lay a sand cushion. The most difficult thing will be to withstand the size and thickness of the sand base so that the height of the foundation column or tile supports does not exceed the calculated value according to the drawing.

Geotextiles can be laid on the sand, which well prevents the growth of weeds and grass. To fill the floor of the terrace, experts recommend pre-tying the supports with a bar with laying log beams made of wood. But in this case, it is necessary to increase the vertical size of the terrace in height by 20-30 cm, which is not always convenient. In the simplest case, a beam measuring 60x60 mm is laid directly on the tile and fixed with pieces of reinforcement, hammering it directly into the ground.
The most difficult stage in the assembly of a budget terrace structure will be the sheathing of the flooring with boards. An oak or special deck board made of polypropylene and sawdust, 200x30 mm in size, is best suited.

For your information! The appearance and dimensions of the composite material practically do not differ from the processed natural board. High resistance to moisture and absolute insensitivity to insects and pathogens make decking an excellent substitute for expensive oak wood.
When sheathing the frame of the site, it is necessary to carefully follow the recommendations for the installation of the decking given in the drawing. In a similar way, flooring can be made from ordinary boards pre-treated with an antiseptic.
Building a simple terrace on your own
The average size of the site is 4x2 m. We will install the wooden structure on wooden supports in a swinging pattern. Part of the terrace area will rest on pillars made of twin beams 120 cm long and 100x100 mm in size, the second part of the terrace will rest on the plank wall of the country house. Under the installation of the timber, we drill holes in the soil with a diameter of 90 mm and hammer the supports with a sledgehammer.
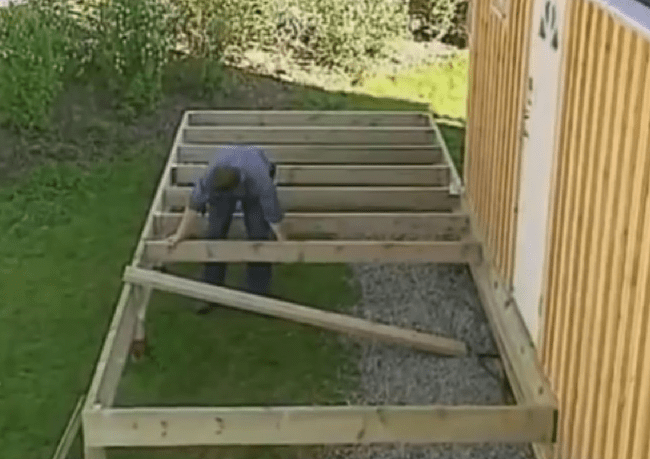
Further, the supports hammered into the ground must be tied with a flat board or a sheet of thick plywood, with a section size of 350x40 mm. When attaching the boards, it is necessary to additionally control the horizontal position of the strapping sheet.
We fasten the side strapping boards directly to the walls of a wooden house, in the supports you will need to wash down for the installation of a longitudinal strapping board.
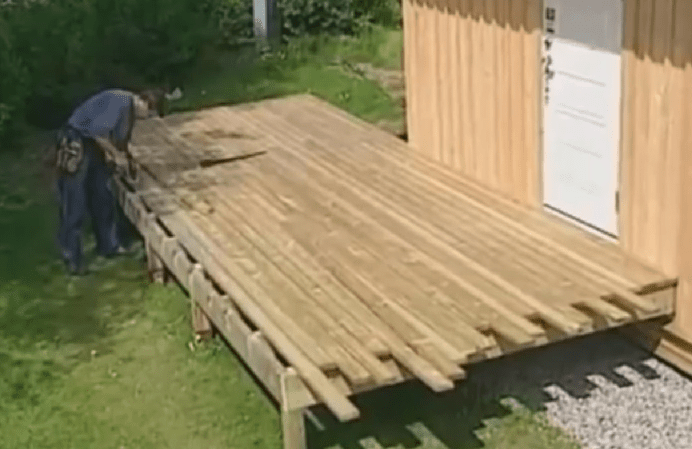
After assembling the strapping, transverse log beams are installed, 2.5 m in size with a section of 100x40 mm, which will increase the rigidity of the base of the terrace area and at the same time serve as a support for the flooring of the floorboards.
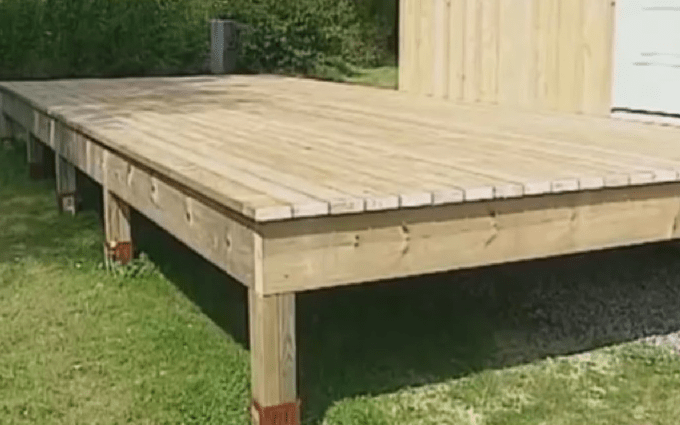
At the next stage, the terrace fence is assembled. Grooves are cut along the outer contour of the site in the floorboards, after which, as in the drawing, the supports under the railing are nailed. A vertical bar or board measuring 100x50 mm, 120 cm high is attached to the bottom strapping board using self-tapping screws. A groove for the crossbars is sawn from the inside of the uprights, after which the lower bar and handrails of the terrace area are installed.

Diagonal struts are stuffed between the posts, increasing the strength of the entire fence structure.
Conclusion
The above terrace design is simple and affordable for do-it-yourself construction. If desired, a small fabric awning or a full-fledged canopy made of polycarbonate or light ondulin can be installed above the terrace area. A wooden structure must be treated with protective antiseptics, and the floor must be periodically treated with wax or paraffin mastics.
Each owner of a private household thinks about adding a veranda to his house. The entrance door to the dwelling, equipped with a canopy or visor, looks uninteresting. Having built a veranda, you can decorate it with curtains, hang flower pots or decorate it in the style you like. Being in such a building, it is pleasant to sit with a cup of tea, not being afraid of hot sunshine or drizzling rain. The sunset will become more beautiful if you watch it from a convenient place. All this will create additional comfort.
The need for a veranda. Functions, advantages and disadvantages
The construction of such a structure as a veranda is often an important condition for creating a comfortable stay and organizing functional areas in it. Structures are open and closed. Each of them has its own advantages and disadvantages. The advantages include the following points:
- the construction of an open-type structure is not particularly difficult and does not require additional costs for the installation of windows and doors.
- for these structures there is no need to lay a deep foundation.
- in a closed veranda, you can place a winter garden that is not afraid of frost, or organize a recreation area where you can be at any time of the year.
Speaking about the disadvantages of types of verandas, it should be noted that:
- closed-type verandas, as a rule, are insulated, heating is installed in them, which entails energy consumption and requires additional construction funds.
- furniture and other interior items on open verandas are quickly covered with dust or damp, so they must be made of moisture-resistant materials.
- an open veranda will not shelter from strong winds or low air temperatures.
The need for this extension is determined by the following criteria:
- First of all, it increases the useful area of a residential building, especially if it is very small.
- Arranging a stove or a summer kitchen in it during the warm months of the year is more practical than inside a home. Additional heat and vapors are not retained, which makes the cooking process more comfortable.
- The location of the dining room in it will move vacationers from the stuffy rooms of the house to fresh air.
- The veranda, with appropriate design, will become an elegant architectural addition and give the house a beautiful look.
- The glazed structure will become an intermediate room between the house and the street. This will keep you warm during the cold season.
The functionality of this structure, depending on the type of building, is as follows:
- due to its design, the veranda protects the house from various atmospheric phenomena;
- the existing fences of the veranda will prevent the direct entry of debris into the premises of the dwelling;
- closed-type veranda designs allow for the placement of a large number of plants and even trees in them in winter;
- the sliding frame of this extension allows you to adjust the areas of shading and shelter from the rain;
- the extension makes it possible to be in the fresh air even in adverse weather conditions.
Design gallery of possible options
This option will serve as a dining room and kitchen at the same time  The fireplace in the veranda will create a special atmosphere
  Adjustable roof allows you to stay in the shade all day long
  Thanks to a convenient sliding system, this design will turn into an open veranda
  It won't get cold here even during the cold months
  Two verandas are attached to the residential building: glazed and without a roof
  The annex serves as an intermediate zone between housing and the street.
  Even in cold weather, this design will warm up with the sun's rays.
  Tall plants in such a structure will be comfortable
How to attach a veranda to the house: preparation
Before proceeding with the construction of the frame of the veranda, you need to decide on the type of future building. Before starting construction work, it is necessary to choose a place for its location, make the necessary measurements, prepare materials and install one of the suitable foundations. In order to accurately calculate the required amount of materials and the area of occupied land for this extension, it should be carefully designed and drawn up.
Suitable foundation types
If you install a log foundation, you should pay special attention to the quality of the wood. For supports, oak and larch species are suitable, which were previously treated with a bituminous mixture or burned. For these purposes, logs with a diameter of at least 25 cm are used. The method of installing these supports is similar to the construction of a columnar foundation: the bottom of the pits is covered with sand and tamped, after which the logs are placed there. For better stability, concrete is poured onto a layer of sand or a wooden cross is installed.
To install a strip base, you will need a lot of concrete and a reinforcing cage. This foundation is solid walls hidden in the ground. It is designed for heavier buildings. The lower part of this base has an extension, which creates additional stability for the entire building. In cases of unstable or loose soil, the strip foundation can be increased. When installing this base, you need to leave holes for summing up the necessary communications.
Tape blocks are very popular. To do this, ready-made concrete blocks are purchased, installed in a shallow (from 20 to 30 cm) trench, the bottom of which is packed with sand. In this case, the block will be deepened into the ground by 2/3 of the slab. He will simultaneously play the role of the foundation and the basis for the floor of the veranda.
The column-piled foundation is a long column. To install it, you need to dig holes with a construction drill. Their depth should be from 40 to 50 cm. The bottom of the pit is covered with a layer of crushed stone or gravel. Then a sleeve with a roofing material rolled into a pipe is inserted into it. Concrete is poured into the resulting cavity. The supporting column is built on top of the resulting base.
The screw foundation provides for the use of metal pile elements, to the ends of which blades of various sizes are welded. This type of foundation is most suitable for unstable ground. Piles are screwed into the ground using manual force or pile-drilling equipment. The strength of the base, in this case, depends on the material of manufacture and the diameter of the pipes. The screwing depth must be below the freezing point. Usually this value is from 70 to 12 cm. The installation of screw piles is convenient because they can be installed in frozen ground.
Project drawings, dimensions
As an example, an open porch with a shed roof, installed on a columnar foundation, is presented.
Materials for this design should be selected taking into account the design of the house.
This design is a square shape, 490x500 cm in size. The height to the ceiling beam is 230 cm. The angle of the roof is 20 °. The distance from the lower trim to the rafters adjacent to the wall of the house will be 420 cm. Since the width of the structure is more than 3 m, intermediate racks of beams with a section of 100x150 mm will be used to strengthen it. The distance between the first and second row from the wall of the house is 277 cm. From the second to the third row - 180 cm. On the front side, the racks are 166 cm apart. The distance between the longitudinal load-bearing beams should be from 80 to 110 cm. roofing material, with a total area of 24.5 m². The height of the foundation pillars, from the ground to the lower trim of the veranda frame, is 145 cm.
On the veranda with such parameters, you can place a couple of chairs with a table, and hang a garden swing.
1 - support board; 2 - longitudinal bearing bars; 3 - transverse beam; 4 - racks; 5 - foundation pillars
Material selection and calculation
The most common material in the construction of verandas is wood. It has a clear advantage over brick, metal and metal-plastic buildings. The material is easy to process, which is not typical of a metal structure. If profile pipes, channels or corners are used during the construction of the veranda, then it is convenient to mount double-glazed windows to such a frame.
A brick extension requires a deep foundation, and these are additional costs. In addition, much more time will be spent on its construction than on a wooden structure. For sheathing closed-type verandas, glass (double-glazed windows) or polycarbonate is mounted. For the roof, metal tiles, bituminous coatings, slate and polycarbonate alloys are used. However, for better sound insulation, you should pay attention to soft tiles.
For the manufacture of a frame veranda made of wood, the following materials are needed:
- For the bottom and top trim:
- four beams with a section of 100x200 mm, 500 cm long;
- ten bars with a similar section, 490 cm long.
For vertical racks you need:
- five bars with a section of 100x200 mm, 430 cm long (racks attached to the wall of a residential building), and the same number - 285 cm each (intermediate racks);
- six bars with a section of 100x200 mm, a length of 230 cm (front racks).
- For longitudinal load-bearing elements (rafters), you need seven bars with a section of 100x150 mm, 540 cm long.
- For flooring, grooved boards with a section of 100x40 mm and a length of 490 cm are required, for a total area of 24.5 m².
- Roof sheathing requires OSB boards.
- Railings require bars with a section of 100x100 mm, with a total length of 15 m.
- For an x-shaped fence, similar bars are needed, with a total length of 40 m.
- Concrete M-300.
- Ruberoid or formwork boards.
- Reinforcing bars with a diameter of 10 mm.
- The roof requires soft tiles to cover 26.5 m².
- waterproofing material.
Required Tools
To build an open veranda structure, you will need the following tools:
- Screw, bayonet and shovel.
- Concrete mixer.
- Water tank.
- Screwdriver.
- Electric jigsaw.
- Grinder machine.
- Electroplaner.
- Hammer.
- Building level.
- Roulette.
- Big square.
- Ladder.
- Cord.
- Pencil.
Step by step instructions: how to build a summer terrace
For the construction of a frame veranda, it is necessary to lay the foundation. When installing it, you should adhere to some construction nuances:
- pits and trenches for the veranda should be at the same depth as the base of the house to which it is attached;
- if the ground under construction is unstable or there is abundant groundwater in it, then a pile-screw foundation will be able to cope with this problem;
- it is necessary to determine the ability of the soil to absorb moisture and the uniformity of the earth at the construction site.
Depending on the composition and quality of the soil, an appropriate basis for the frame is selected. In our case, this is a columnar foundation.
The base is a separate concrete pillars installed in the ground. A grillage or strapping for building walls is fixed on them.
- Make markings for the future veranda, using a cord and wooden pegs.
1 - cast-off boards; 2 - cord; 3 - plumb; 4 - level
- Using a screw shovel, dig holes with a diameter of 40 to 50 cm, to a depth of 60 cm.
- Pour damp sand into the bottom of each hole. It must be compacted to make a sand cushion 20 cm thick.
- To prevent liquid concrete from being absorbed into the sand, a waterproofing layer must be laid. For these purposes, use roofing material.
- Make formwork from boards. The size of each of its walls should be 40x90 cm.
- Place reinforcing bars inside the formwork.
- Pour concrete mixture there so that its level rises 40 cm above the ground.
Reinforcing cage will strengthen the concrete pillar
- To hold the walls of the formwork, use stops.
- Leave the concrete to set.
- When the base is sufficiently hardened and the pillars are formed, remove the formwork.
- Use a spirit level to check the vertical position of each post.
Optimal dimensions for the base under the veranda
- Treat them with bituminous mastic.
- Tamp the soil around the posts and install a fence.
- Lay a waterproofing layer on the finished foundation. To do this, you need to fold the roofing material twice.
- From above, install the lower strapping of the structure. This requires bars with a section of 100x200 mm. They need to cut grooves for installing vertical supports.
- On wooden logs, install a floor made of tongue-and-groove boards, with a section of 100x40 mm.
- Install vertical supports from similar bars in the grooves.
Grooves make the structure strong
- Long supports, with the help of anchors and self-tapping screws, attach to the wall of the house.
- Mount the top trim of the structure. Connections of wooden elements are similar to the bottom trim
- To the upper harness, on the one hand, and the wall of the house on the other, install the extension truss system. Arrange its elements in increments of 50 cm. For this, bars with a section of 100x150 mm are required.
The structure is ready for insulation and finishing
- Attach the frame of the truss system to the upper trim using metal corners or plates.
Metal connections will not be visible after finishing
- Install side railings.
- Fix waterproofing on the rafter system, on top of which fill a crate with a section of 20x40 mm, in increments of 40 cm. Attach OSB-plates to it using self-tapping screws.
Soft tiles are easy to install and repair
- Now you can proceed to the installation of roofing material. Laying of soft tiles is carried out from the eaves from the center of the slope. The first row of this coating must be laid 2 cm from the edge of the eaves. Lay the tile layers with an overlap of 5 - 10 cm. Cover their joints with bituminous mastic. Fix the tiles on four sides with nails.
There are a large number of colors and shades of soft roofing.
Finishing
The selected materials for finishing the veranda should have not only aesthetic value, but also practical. The open design is exposed to the environment. It follows from this that finishing materials must be resistant to high humidity and temperature extremes.
The most common material that meets all the requirements of open structures is wooden lining. This is an environmentally friendly coating that is ideal for wall cladding. A veranda with this finish has a pleasant woody smell. For better joining of wooden elements, their sides are equipped with grooves. To increase the service life, this finishing material is pre-treated with antifungal impregnations.
The lining is easy to install, thanks to the cutouts on the edges
MDF boards are used as finishing for the walls of the veranda. This material is more suitable for closed structures. This is due to the fact that moisture has a detrimental effect on the plates, causing them to deform and lose quality.
Inexpensive and reliable material - MDF boards
The opposite of MDF boards are PVC panels, which are resistant to moisture. This coating is easy to wash, it is fire resistant, it is made with different textures and colors. The installation of these boards is very simple.
Easy to handle and install PVC panels
An affordable and practical material for decorating verandas is siding. Its texture usually resembles stone or wood. It is produced in the form of long panels of various colors and shades. The material is resistant to fire, decay, and has a long service life.
The siding is securely fastened thanks to convenient holes.
Thanks to the variety of shades, it is easy to match it to the color scheme of the buildings on your site. Vinyl siding is often used for this.
To make the exterior of the veranda you need:

How and how to insulate floors and ceilings
When warming the veranda, first of all, you need to pay attention to the floor. This is especially important when the foundation is piled, columnar or does not have a continuous tape. In this case, from below, it is upholstered with penofol, after which all the cracks between the boards are puttied. As a heater for the floor surface, carpet or linoleum on a polypropylene basis is suitable.
If you make high-quality insulation, then it is necessary to equip the subfloor, followed by filling and installing a finished surface with a coating.
The floors on the veranda can be insulated with expanded clay granules. To do this, on the existing surface, wooden logs are installed from beams with a section of 40x150 mm, in increments of 60 cm. Expanded clay is poured between them, the height of which should not exceed the upper edge of the boards. On top of the logs, OSB-plates are fixed, on which the finishing floor is installed.
Granules must be evenly spaced
Also, floors and walls are insulated with mineral wool. For ease of installation, it is sold in the form of rectangular plates of various thicknesses. To insulate the floor with wool, you need to cover it with a waterproofing material. For this, foamed foil foam is used. On top of this layer, wooden logs are installed, with the same section and pitch. Between them, mineral wool slabs are tightly laid. If its thickness is insufficient, then the plates are laid on top of each other, with the condition that they do not rise above the wooden frame. Otherwise, the insulation will collapse and lose its thermal insulation properties. On top of it, to the lags, attach a vapor barrier material. Then the finish is installed.
The form of mineral wool in the form of plates is convenient for installation
As a heater, foam plastic and polystyrene have proven themselves well. These materials have the same base, but the foam has a uniform structure, and the foam tends to crumble. This insulation is available in the form of plates of various thicknesses. Just like in the previous versions, a waterproofing and vapor barrier layer is required for its installation. The plates are fastened in the logs with the help of plastic dowels. The joints of the plates are filled with mounting foam, which serves as an additional adhesive material. OSB-plates or tongue-and-groove boards are fixed from above. The ceiling is insulated according to the same principle.
Lightweight and durable foam material
If the veranda is an open structure, walls of beams are built along its perimeter. Then, according to the above methods, a heater is installed. Double-glazed windows are inserted into the walls.
Video: do-it-yourself veranda
Thanks to a wide range of materials, the appearance of the veranda can be designed in an original and beautiful way. Having warmed this building, you will enjoy the view not only of flowers, but also of the winter landscape. Lunches or afternoon teas will be more memorable thanks to the natural freshness and soft light at sunset, and rainy weather will not ruin an outdoor party.


