Head mount for a flashlight from Aliexpress for a dollar and a half. How to choose an underbarrel lantern for hunting and why you need it Features of underbarrel lighting
You can start a special, street magic. And here we will have to study 2 questions: who is to blame and what to do ... Well, that is, how to adapt the flashlight to tactical use and what other options are there for Expanding tactical flexibility.
I’ll upset you right away: it’s best to put combat lights on military weapons. Airsoft and homemade ones are likely to die and fall apart after a dozen or two shots. This, of course, if the mounts hold up at all. Although, of course, there are exceptions to this rule. Therefore, everything said below will be about the use of flashlights in airsoft.
Mounting a flashlight on a weapon.
There are several ways to attach to a weapon. Let's consider the main ones.Clamp for fixing on the barrel / gas tube. Two halves that wrap around both the barrel of the weapon (or gas outlet) and the lantern at the same time. So-so solution, although relatively works. Both of my lanterns in a similar mount (Chinese, without non-slip inserts inside) turn and slide, so it would be nice to wrap tape around the lantern under them.
Mounting on a picattini bar. It can be as a special one, for example, this is for Surefire's M300 flashlights and their others. The flashlight is attached to the mount, the mount to the picattini rail.
There are lanterns that are attached to this bar from birth. For example, a lantern-combine LLM-01.
Universal ones are also produced, for flashlights with a housing with a diameter of 25 or 30 mm. By the way, this mount is 1:1 the same as the scope rings, although often the mount to the bar is less massive.
There is also a picattini mount that is purely lantern, as a rule, the brainchild of tactical offices, therefore it is plastic. But, for example, this mount is light and quick-release. It is convenient to mount a helmet for a flashlight in this way.
For those drives that do not have straps, there is such an adapter for the barrel / gas outlet.
Well, as an option - fastening with tactical tape. A classic of the genre, an example in the top photo.
Remote button installation.
Simply attaching a flashlight to a weapon is only half the task. It is also necessary to make sure that you can turn on the flashlight conveniently and without unnecessary movements. Remote buttons are the best fit for this requirement.It's good when a flashlight is equipped with such a button from birth. And if not? How and where to connect it?
Actually, there can be two solutions: instead of and together with the switch. Which way can be implemented? Depends on the flashlight, but connecting instead is much easier.
The vast majority of flashlights have a switch in the form of a button under a rubber membrane, most often in the rear end of the flashlight. And in most of these lanterns, it was possible to unscrew the ring from the inside of the shank to remove the board with the spring and the switch. How to install a remote button in this case? Unsolder the switch, solder the wire of the remote button and remove it by cutting a hole in the rubber membrane.
Here is an inside view of the rear derailleur on my Ultrafire 502.
We unscrew the ring from the inside, we see the board inside. We take out the giblets: from left to right on the bottom row of the right photo: a handkerchief with a switch (I soldered the spring, prevented it from being removed), a ring and a crusher. The ring was inserted into the body of the button, the crusher was placed inside, and finally the button. Everything on top was fixed by a ring with two holes. Where and how to solder?
The switch has contacts on both sides, and solder there. You can bring the wire out through the rubber membrane at the end. Of course, the crusher will no longer be used, and cuts must be made in the ring so that it does not press on the wire.
The obvious disadvantage of this solution is that the tightness of the lantern suffers, plus the wire can be torn off. Tightness (to the detriment of collapsibility) is solved with a sealant, and the wire can be fixed with nylon ties. Or pour epoxy directly into the ring.
Connecting the button in parallel with the standard switch requires drilling a side hole in the lamp in the area of the button. It is necessary to drill so that the hole is flush with the switch, between the board and the rubber membrane. Where exactly - you need to look at the specific model of the lamp.
We pass the wire through the hole, solder it parallel to the switch, then we suffer with the assembly and voila - and the wire sticks out to the side, and the tail switch works.
It remains to make a tactical button. They are made from "microswitches". They have many sizes. Large, normal (was not in the stash, took a picture of a piece of the board, circled in red) and very small.
Inside, large and medium buttons have the following design: the pins pass through, that is, there are not four pins, but two. Also inside there is a closing piece of iron that bridges the outputs when pressed. Pressed - two parallel conductors are bridged, which is what we need. Released - the circuit "passed". The main thing to remember is that we solder either to the conclusions on one side, or diagonally. Next will be a photo.
Size matters: if possible, it is necessary to make from large ones, no - from which ones are available. Preference is given to hard buttons, more on this later.
We take a textolite plate or a breadboard blank, cut out the base, solder a button (or buttons, here is a photo for one) to it. It was possible to simply cut a textolite along the board (for a piece of foil textolite).
We solder. The button is ready, you can solder it to the wire, remembering to fix the wire to the base. Note that the wires are soldered "diagonally".
It remains to provide protection. This is where heat shrink comes in handy. Dress over and heat up.
If you overheat a little, then you can use your fingers (yes, you can grab a burn) to “stick up” the ends, ensuring relative tightness.
On the reverse side, you can glue a piece of Velcro.
A few words about the rigidity of heat shrink and buttons. When shrinking the heat shrink, it fits snugly around the button. The buttons in the photos are very wrong. In fact, it was necessary to grind off the protrusion on the button. Also, the rule is that the heat shrink should be relatively soft, otherwise it will simply press the button when shrinking and the lamp will be constantly on. For the same reason (so that the stiffness of the button can compete with the stiffness of the heat shrink), it is necessary to choose the most rigid buttons possible.
Special tricks.
In my opinion, the most successful purchase will be one of the cheapest flashlights that I have ever bought Ultrafire 502:This is a modular flashlight, you can buy modules for different tasks in it (which, in fact, will be discussed), it has a solid construction, is equipped with real glass (many cheap flashlights have plastic in it), has a good module in the base and can hold as one battery size 18650 (18 mm diameter, 65 mm length), and a pair of CR123 batteries or similar batteries (if the driver in the flashlight module allows).
The first plus of this flashlight is the diameter of the handle. It is 1 inch, which means that the vast majority of flashlight mounting accessories easily and naturally accept this flashlight.
Universal picattini helmet mount. This thing will allow you to attach any adapters for picattini to the helmet, for example, for a flashlight. Side-mounted and made entirely of plastic, it's the perfect combination of function and weight. To prevent the lantern from turning in it, I wrapped the lantern body with electrical tape. Another bonus of this solution is that the flashlight can be mounted both on a weapon and on a helmet.
However, few people realize that non-native modules also become part of it. A wild number of different. This is the second (main) plus of this lantern.
The xenon flashlight module is slightly smaller, but it fits well into the flashlight and works (it's a pity that you need to install two batteries, and small lithium batteries are frank guano).
Replaceable powerful lighting module. For tactical applications or parking lot lighting. Replacing a module is a matter of a minute maximum. It is advisable to take modules that can work with wide power ranges. At least from 3.2v to 6v. Preferably before 9th century. This will allow you to put not only one 18650 battery into the flashlight, but, if it runs out, a pair of CR123 batteries or a pair of batteries of this size ... In general, application flexibility is a power.
Replaceable low light module. For lighting a tent or parking lot for a long time.
Replaceable module of a powerful infrared lamp. This thing comes in two types: one and three watts. I recommend a three-watt module. Paired with night vision devices, this thing really, really helped out in buildings at night - it can be seen as during the day. Alas, the crimson light of the backlight is quite visible without night vision devices. And in night vision... Well, that's what maneuvering was invented for. Yes, you need to turn on the backlight less often.
For the operation of firearms in the dark, it is best for a hunter to purchase an underbarrel flashlight for his gun. Such a device will greatly facilitate night hunting and eliminate the need to illuminate the road with an ordinary lantern. For any smoothbore weapon, there is a large selection of lighting fixtures that differ in both characteristics and price. To choose the right option, you should familiarize yourself with the capabilities and functions of each model.
The main difference between underbarrel flashlights and other lighting devices is their resistance to negative effects from adverse weather conditions. It is also worth noting the high performance and consumer characteristics, which include increased luminous flux power, which provides a sufficient level of visibility in any conditions. This parameter is one of the main criteria that you should pay attention to when choosing a grenade lantern. The light intensity is measured in lumens, which depends on the following parameters:
- used lens;
- LED model;
- reflector characteristics;
- battery power and capacity.
If it may be necessary to adjust the focus of the light beam, then it is worth knowing about this possibility in advance. Basically, you can customize the operation of a flashlight for a weapon if the selected model has a focusing lens. The quality and intensity of light is affected by both the battery itself and the material of the reflector, optics. In addition to the flashlight itself, underbarrel lighting fixtures have various fastening systems that allow you to securely fix the structure under the gun barrel.
Given that the experienced owner of a hunting weapon gets used to his gun and its weight, gun lighting is made as light as possible and at the same time reliable and durable.
To prevent this accessory from flying off the barrel during active actions, the lantern mounts are made of lightweight and durable aluminum. Also, tactical lighting can be improved by installing more powerful batteries or connecting a separate tactical button, which will greatly facilitate the operation of additional lighting.
Underbarrel lighting features
One of the main features of underbarrel lighting equipment is the ability to quickly switch between operating modes. This is especially true for hunters, since in different situations both the maximum angle of illumination and a large visibility range may be needed.

So that switching between modes does not take much time, the design of the underbarrel lamp may have a key for hot changing the type of lighting. The precious seconds saved with this feature can be decisive and help you achieve high hunting results. But in the absence of the need for several modes of operation, it is better to buy a simple lighting device. In addition, such opportunities can be useful in everyday life.
In addition to the above features, the underbarrel lantern for hunting can be improved by supplementing it with additional accessories. These include the following equipment:
- various types of mounts (underbarrel, side);
- lanyards;
- high capacity batteries;
- portable tactical switches of an operating mode.
In order to choose the best option for underbarrel lighting and accessories for it, you need to familiarize yourself with the popular models of tactical flashlights from manufacturers that have proven themselves around the world. For each type of weapon there are certain devices and mounts.
Underbarrel lamp for shotgun
One of the most popular models of underbarrel lighting for IZH weapons is the UltraFire WF-501B. This flashlight belongs to the budget model range and has the following characteristics:
- a Cree XM-L diode module from an American manufacturer is installed;
- luminous flux power - 510 Lumens;
- the light beam illuminates the area at a distance of up to 100 meters;
- one glow mode;
- continuous operation up to 3 hours.
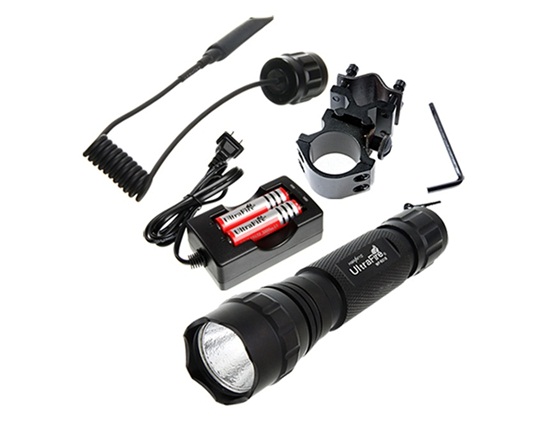
The diodes used in this flashlight have a high margin of safety due to their installation on mono stones R5, XM-L, SST-50. It is possible to install a smooth reflector, which will help to get a more narrowly directed and focused stream of light. Despite the rather low price, this device is not inferior in performance to more expensive branded counterparts. Thanks to this, UltraFire WF-501B is a good choice of price and quality. The power source of this model is a fairly powerful battery with a voltage limit of up to 4.2 volts. The maximum current consumption is 1.4 A.
The body of this flashlight is made of durable material and is protected from moisture inside the device with rubber inserts. The reflector that creates a directional beam is made of smooth and durable aluminium. There is a choice of several shades, which will allow you to choose the right color for IZH 27. The shape of the UltraFire WF-501B underbarrel illuminator allows you to easily attach the narrow body of the lantern to the barrel of a smooth-bore weapon.
The neat dimensions of the device will not interfere with the operation of the gun. The flashlight is fixed to the barrel with a reliable mount, the design itself does not interfere with aiming and can be located both on the side and below the IZH 27. You can protect the underbarrel lighting device from damage and dirt using a protective cover that can be attached to the trouser belt using special fasteners.
A wide choice of colors, reliable material and ease of installation and operation have made the UltraFire WF-501B an excellent choice for any hunter. This lighting fixture can be used on the following models of shotguns:
- IZH-27;
- IZH-81;
- MC 21-12;
- MP-153;
- MC-22
- TOZ-34.
Also, the underbarrel lamp for hunting is actively used in other types of small arms, such as SVD, SAIGA of various modifications, OP SKS and Tiger. It is worth noting that the UltraFire WF-501B is dismantled quite easily, thanks to which it can be used as a regular hand lamp to illuminate the path or inspect trophies. A lighting device of this type will always be a necessary tool on the farm, fishing or camping.
Underbarrel lamp FO-2L for MP-153, MP-155

Owners of the MP-153 and MP-155 model guns can choose a fairly inexpensive version of a domestic tactical flashlight, which, for a small price, will compete well with foreign counterparts. We are talking about the FO-2L weapon lighting device manufactured by NPF LLC. This flashlight is mounted under the MP-153 and 155 barrel using a bracket, which ensures reliability in operation and ease of dismantling. FO-2L consists of the following elements:
- body made of durable but lightweight material;
- optics that controls the light flux and allows you to change the operating modes of the device;
- battery - this model uses a sufficiently powerful power source that allows you to operate the flashlight for several hours;
- shock absorber, due to which overloads on the mounts do not lead to a malfunction of the device;
- a socket with which FO-2L is attached to IZH, MP-153 and MP 155;
- screw for crimping the barrel surface;
- lamp controls;
- cover to protect the optics.
The above model of lighting equipment contains all the necessary qualities and capabilities that will be relevant when operating smooth-bore weapons at night. Complete with the FO-2L flashlight itself, the buyer receives the following:
- charger that can be powered from 220 V;
- camouflage bag;
- passport and operating instructions;
- a remote button that can be installed on a gun type MP 153 and MP 155 in a convenient place for the owner, allowing you to activate the device without being distracted by the tactical light switch.
Also, FO-2L can be independently improved by installing a high-capacity battery. In general, this model provides all the necessary functions for a fairly small price.
Underbarrel flashlight "Zenith 2M"

Another popular domestically produced Zenith underbarrel flashlight is the 2M model. It is also considered a budget option for tactical equipment and comes in a minimal configuration. It has only three main modes of operation:
- For short illumination of the area, it is necessary to hold down the remote button. The flashlight will work as long as it is clamped. In this mode, the luminous flux will be equal to 120 lux.
- Long-term use of tactical underbarrel lighting. To activate it, you need to make three short presses. This mode also uses the maximum brightness of the device.
- Economical use of the flashlight. Allows you to reduce the power of the luminous flux to 40lx, which significantly increases the battery life. To activate, you need to make three short presses of the tactical remote button, and for the fourth time, hold it for 5 seconds.
With maximum luminous flux, the Zenith 2M model will be able to provide good lighting for 3 hours. In the economy mode, the autonomous operation of the device increases significantly and amounts to at least 5 hours of continuous operation. This tactical device is well suited for use on firearms such as IZH 27 and MP 153. The dimensions of the KR-8 mount used for Zenit 2M are 25.4mm, 30mm, 32mm and are suitable for most hunting carbines. Main characteristics:
- the maximum reachable range of light - 120 m;
- with full illumination, the Zenith 2M flashlight can work up to 3 hours;
- several modes of operation, two modes of light intensity at 120 and 40 lx;
- powered by standard CR123 batteries in the amount of 2 pieces.
The Zenit 2M tactical flashlight model is one of the most correct decisions in terms of price-quality ratio among domestic-made analogues for weapons of the IZH 27, MP 153 and MP 155 models.
A very cheap and albeit slightly ambiguous, but in principle useful head mount for flashlights. The seller promises that with his help an ordinary lamp can be turned into a headlamp. But is it?
By tradition, the review is in text and video versions. Video at the end
I bought a mount on Aliexpress from the famous seller Simon, aka Simon Mao. He is not the only seller of such a mount on Ali, but when I compared, he had the lowest price.
I have ordered this set several times. One for myself, others ordered by friends.
DESIGN
Everything is simple here: an elastic strap, a silicone mount for a flashlight and a buckle that allows you to adjust the mount to the size of your head. 

The build quality isn't great, but it's acceptable. Specifically, on this instance there is such a defect, otherwise everything is fine. 
PURPOSE
Why is this thing needed at all? There are two main options.
Option number one- use it as a headlamp mount.
My friends took it specifically for the Skilhunt H02, although it is suitable for other flashlights. Why is this necessary, because the headlamp is already equipped with a mount?
-Firstly, it is possible to purchase a replacement for a native one that has failed. Quite a possible option, although no one from my acquaintances acquired for this purpose. 
-Secondly, you can use it to keep your native mount when doing all sorts of dirty work. The native will lie at home, but this one, which is not so pitiful, will be covered in oil and other dirt. One of the guys works in a car service, and he took the mount for this reason as well. 
-And thirdly, this mount is much more compact than the native Skilhunt one. My friends took it mainly because of this compactness. 
The small mass of H02 makes it possible to do without a second vertical line, at least with quiet use there are no problems - the mount with Ali holds the Skilhunt quite normally. At the same time, the lantern is quite calmly inserted into the silicone mounting rings and is securely held, while maintaining the selected angle of inclination.
I know that many, in principle, do not like attachments with a vertical line, such as "thongs". But in my opinion, the main factor that may be needed is compactness when carrying a flashlight. 

With the native mount, the Skyhunt takes up a lot of space in your pocket, but with this mount it is very compact. 
If compared with the native H02 mount, then the mount with Ali has slightly thinner rings, they are narrower, and in general the silicone part is noticeably more compact. 

The sling is thinner and the quality is worse, but generally normal. Practice has shown that the mount is by no means disposable.
The Skilhunt H03 has a removable vertical strap on the mount, which makes the hero of the review a little less relevant, at least if the purpose of the acquisition is to ensure compactness. But it’s convenient for me to have two mounts, because rearranging the flashlight from one to the other is easier than fiddling with removing and putting on a vertical line 
In general, as a headlamp mount, this thing is quite suitable. 
At the same time, when I have to work with the flashlight for a long time in continuous mode, I prefer the native mount with a vertical strap, because the flashlight sits more securely, and the weight is distributed more comfortably
Option number 2
But it was option number one. And there is also option number two. The seller on his page positions this thing as a head mount for ordinary hand lamps with a body diameter of 22-30 millimeters. At the same time, he means his lanterns Convoy, although it is clear that this does not matter - you can fix any lantern of a suitable diameter. In general, according to the seller's version, the buyer can use this mount to turn an ordinary flashlight into a headlamp. 
As an illustration, I will use the Convoy S2+. There is no problem with threading the flashlight into the mount. On the head, the resulting design looks like this. 

In general, we can say that, in principle, what the seller showed on his page is quite feasible.
Another question: how convenient and generally makes sense?
In the discussions of one of the headbands, they already wrote to me, they say, why do we need a headband? You take such a mount from Simon and that's it! Cheap and cheerful. I do not agree that this ersatz headlamp is a replacement for a full-fledged headlamp. Do you know this old joke? There are "Zaporozhets" and a donkey. Donkey asks: "Who are you?". The Zaporozhets quickly looks around and replies, “Me? I'm Mercedes! And who are you?". The donkey also looks around and replies, “Well, since you are a Mercedes, then I am an Arabian horse!” If this donkey met with this design, then the anecdote would end with the phrase “well, if you are a headband, then I am an Arabian horse!”. Formally, everything seems to be in order - a lantern on his head, his hands are free.
But this is formal, and the devil is in the details, which, by the way, are not so trifles. The difference in weight is still all right, although the S2 is noticeably heavier than the Skyhunt. But the fact that a full-fledged headband allows you to adjust the angle of inclination over a wide range is much more critical, since reading a book, changing a wheel, riding a bicycle, working in a barn and other types of work constantly require adjusting the headband. Moreover, if the work takes place with a change of place (either enter the room, then go outside, then shine on the wall, then consult the documentation), then you have to constantly adjust. And here's a headlamp that makes it easy. Well, here you can adjust the angle only to some extent, by twisting the lines, and even then this is not very convenient and not very stable. And the adjustment angles are limited, and after you lift the edge of the sling higher, it can slip.
Plus, due to the narrow base, a long lamp with active movement tends to sway. That is, you walk, and the light of the lantern jumps up and down. Plus, the location of the light source on the side of the head is not very optimal in terms of the resulting lighting ... 
In general, talking about the fact that by buying this gum, you will turn your flashlight into a headband, and the need for the latter will disappear, is a strong exaggeration and an attempt to wishful thinking. With normal headlamps, I have no desire to use this. This is a palliative.
But, on the other hand, it is precisely as a palliative that it fully has the right to exist, and in certain situations it is fully justified. If you don't need regular and extended headlamp use, but want to be able to free your hands when needed, then this mount may well help out.
Let's show the dimensions again. Such a small bundle may well lie unnoticed somewhere in the glove compartment of a car or in a backpack pocket, and in a jacket pocket too. It takes up almost no space, you can not remember about weight at all. 
But if you suddenly need to put a spare tire on the track at night, in a matter of seconds you turn your ordinary flashlight into ... no, not into a good full-fledged headlamp, but into a device that is more than enough to free your hands and give you light. Here, as they say, it’s not up to fat - the nuances of ergonomics and the comfort of light fade into the background - it’s clear, and okay.
And for such occasional use, I think this mount is quite appropriate. Here you just need to soberly assess your needs. If the need for a browband is very episodic, and even more so hypothetical, just in case, then this mount can be dispensed with. But if you really have to work with a flashlight, then it’s better not to fool your head and take a normal forehead
I plan to buy +18 Add to favourites Liked the review +45 +75
All ways of attaching a flashlight to a fireman's helmet
The profession of a firefighter involves a lot of risk. People of this specialization often have to work in conditions of high temperatures or strong smoke. In view of this, the lantern has become an important part of the firefighter's equipment. This equipment must meet a number of requirements. It is necessary that the lantern for the firefighter's helmet does not melt when exposed to high temperatures, does not fail due to excessive moisture, and well illuminates the surrounding space. This piece of equipment often fails. You can buy it in many places. However, it is better to purchase products in trusted stores, for example, on the website of the Tekhzashchita group of companies.
However, a flashlight is not the only thing that can be attributed to the list of must-haves. The fire brigade officer must be mobile. Hands occupied with a flashlight may be required at any time. In view of this, we recommend that the lighting device be securely fastened to the helmet. So the beam of light will always fall at the right point. How this can be done, we will tell in this article.
Special mount
Most modern manufacturers produce helmets for firefighters, where you can easily change a regular flashlight. This allows you not to buy a new piece of workwear every time the lighting equipment fails. The presence of a special fastener greatly simplifies life. It is enough to purchase a suitable replacement, pull out the old lamp and put in a new one. As a rule, there are no problems with this.
Experienced firefighters advise not to rush to choose a new light fixture. It is better to spend a little more time searching, but to buy a really high-quality product. A good flashlight must meet a number of requirements, including:
- impact resistance;
- immunity to liquids;
- heat resistance;
- correct distribution of the light beam (do not blind);
- a light weight;
- ergonomic shape.
Also, take into account in advance the features of the fastener in which the product will be planted. If you don’t have one yet, it’s better to get one first, and only after buying the flashlight itself.
Folk methods

There is not always a special socket for a flashlight on a helmet. This is especially true for reliable, durable, but not very functional helmets made 10-15 years ago. Modern manufacturers of these products also often upset the buyer with the lack of special mounting equipment in the kit. In such situations, you have to resort to tricks.
If the required fasteners are not at hand, you can do the following. First of all, buy a flashlight. It is better to purchase a professional model. If one is not at hand, then temporarily you can install a regular flashlight. For example, tourist. Recall: this is wrong, since such an accessory must meet a number of requirements. We wrote about them above.
Interesting! Products with a white glow are not suitable for heavily smoky spaces, as the light is scattered (there is a mirror effect). To solve the problem, you can use an impromptu filter. For example, cut a circle from a yellow beer bottle and put it in the space between the outer lens and the bulb.
In the role of a lamp holder, you can use a fastener for a bicycle seat. With one end it is screwed into a special hole in the helmet, and with the other it clamps the light device. Before buying fasteners, do not forget to measure the diameter of the flashlight handle. It should pass into the hole without problems, and what is very important, it should hold well in it after being tightened.
We hope this article was helpful to you. If you know how else you can securely attach the flashlight to a special helmet for firefighters, we will be glad to know about it in the comments.
We also recommend
 Switching power supply: repair and refinement
 Remote control of light
 Swimming lessons for preschool children
 Notes for the master - home household alarms
 Clock propeller on Atmega8
 Device and relay application examples, how to choose and connect a relay correctly Microcontroller and relay simple switching circuits