How to remove water from the site after a downpour. How to make drainage in a site with a high level of groundwater
Owners of plots located in the lowlands often face problems with waterlogging of the soil, leading to the destruction of the foundation of buildings. The fertile layer becomes unsuitable for the growth of fruit and ornamental trees. Humus is washed out, the root system rots, which leads to disease and death of plantings. Water drainage in a summer cottage successfully copes with such agrotechnical tasks. Proper arrangement of the drainage system will provide drainage and reduce the level of groundwater. We will tell you about how to make drainage on the site with your own hands and why we need it in the material. To do this, you must follow a certain pattern.
Purpose of drainage
The installation of an reclamation system is a complex and time-consuming process that requires large-scale earthworks. Many companies in Moscow offer dewatering of sites, with the involvement of special equipment and equipment. Everything will be done quickly, efficiently, but the cost of services does not always fit into the planned budget.
If you do the drainage of the site with your own hands, then you can save the budget. A properly installed system will effectively remove excess moisture from the surface and deep layers of the soil. In areas with clay soils, the presence of water at the base of the foundation, combined with winter freezing, can lead to the formation of cracks and faults. Proper drainage effectively removes water from the basement and basement, which can seep even through waterproofing and building structures. High humidity in a house without foundation drainage leads to the growth of fungus and mold, a persistent smell of dampness, and the destruction of building materials.
The drainage system prevents the septic tank from being squeezed out of wet soil. After the removal of water from the waterlogged area, moisture does not stagnate on it, the fertile layer is not washed out, and the yield of vegetables and fruits increases. Proper drainage is also necessary in the presence of a lawn with an automatic watering system, paths with artificial turf in the form of paving slabs, paving stones, concrete.

How to make drainage in a summer cottage
It is recommended to start an independent drainage device in a summer cottage before planting ornamental and fruit trees, shrubs, beds, greenhouses, and building a foundation. Preparatory work includes the development of an action plan. On the diagram of a plot with a relief, a system of drainage ditches is noted, a height difference is determined, a place for a well at the lowest point, and the depth of the trenches. An effective drainage system is possible with a minimum slope of about 1 cm per 1 running meter. pipes. Measurements should be taken using the building level. The standard set of tools and materials includes:
- perforated pipes of suitable diameter;
- drainage wells;
- connecting elements: fittings, couplings;
- crushed stone, expanded clay, sand;
- geofabric.
 After placing all the elements in place, they begin to dig trenches, maintaining the necessary slope throughout. Their depth should be at least 0.7 m, width - 0.5 m. The bottom is compacted, sand is poured on top and rammed again. In the finished trench, geotextiles are placed with a margin necessary for wrapping pipes, and the level of the slope is additionally checked. Crushed stone is poured on top of the finally assembled system, completely covering the pipes with it.
Water intake wells, designed for cleaning and monitoring the good condition of the system, are mounted below the level of the pipes. For comfortable maintenance, they are equipped with removable covers. The collector well is located in the lower part of the site, the installation is carried out after the completion of the assembly of wells and pipes into a single system. Plastic collectors are easy to install, the flow of water collected in them flows by gravity into a reservoir, pond or storm sewer.
The final stage
 After completing the installation work on the drainage device around the house, you can begin to improve the territory. The backfilled system is covered with turf on top, on which flowers and garden crops with a shallow root system can be planted. With the help of decorative and marble chips, you can outline the location of the ditches, while decorating the landscape design with original materials. If the task is to make the drainage of a summer cottage with a large slope, then the sequence of work does not change. The drainage system combined with drains is connected to a catchment well or storm water inlet.
Do-it-yourself drainage is not an easy, but effective way to reduce groundwater levels. Labor-intensive actions allow you to get an excellent result in the form of a dry foundation, a basement, a healthy garden that will delight the owner for a long time.
Types and arrangement of the drainage system
Before you make proper drainage on the site, you should understand its varieties and features of the device. The drying system is divided into two types:
- superficial;
- deep.
The removal of moisture in the first way is considered the simplest, fastest and least expensive. Along the perimeter of the site, a complex of interconnected trenches is dug. In the lowest place, a water collector is arranged, into which rain and melt water flow under a slope.
Deep drainage is more difficult to install and is recommended for areas with a high level of groundwater, located on slopes, with clay soil. For the device, pipes with holes for collecting moisture, filter materials, drainage wells and other technological elements are used. A deep drainage system completely hidden underground does not spoil the landscape design.
The engineering system of deep drainage consists of various parts and accessories for them: drainage perforated pipes in a geotextile filter, one- and two-layer, elements of shafts of wells, bottom-plugs of wells, polymer hatches, polyester geotextiles, connecting tees, couplings, crosses, bends, plugs, check valves. The price of products is not small, but one-time costs will quickly pay off with a long service life and improvement in the condition of the site.

Groundwater level at the site
You can independently determine the level of groundwater on the site using a dug hole, 0.5 meters deep. If after some time water appears in it, then the level of occurrence is less than a meter and the installation of drainage is mandatory. Visually high humidity confirms the state of green spaces: trees, shrubs, lawns. Rotting and death of adult trees, grass, bushes confirms the close occurrence of moisture. In Moscow and the Moscow Region, you can order a drainage service for a summer cottage to professionals who will do everything right. But with the Lightdrain system, all the work is easy to do with your own hands. At the same time, you will save your budget.
The presence of water is the main condition for the growth of almost all plants, including garden crops. But, if there is a lot of water, then this is already a real disaster. This is familiar to many owners of summer cottages and country houses. And you can’t put up with this: in a swampy area, not only flowers and trees in the garden will disappear very quickly, nothing will grow in the garden, but buildings will soon begin to suffer. The fact is that in the muddy mess, the base of the building will begin to disperse, fall into the depths and, over time, cracks will appear on the walls, which will increase after each prolonged rain. An unhappy prospect. But not a single owner will wait for such unpleasant consequences, especially since there is a way out - you can drain the site.
Drainage is a whole system designed to provide an outflow from a surface water area. But before proceeding with its arrangement, it is necessary to take into account the following factors:
- Terrain relief.
- The level at which the ground water is located.
- The amount of precipitation.
- Communication plan.
- Placement (if any) of a cellar, basement or other recessed buildings.
- Structure, composition of the soil.
- The presence of shrubs, trees and their number.
 Stagnation of water on the site seriously threatens the integrity of buildings
 Now it remains to choose the version of the system that is suitable for the site.
System types
There are two ways to drain the soil - by arranging a deep or surface one. Although both options are designed to remove excess moisture, their laying and work are done in completely different ways.
So, the main purpose of surface drainage is to remove water from the topsoil that collects after floods, rain and accumulates near the building, terrace, and other objects of the site.
Surface drainage
To dry the surface layers, you can equip a linear or point system design. Water intakes in the arrangement of point drainage are installed where water occupies small areas. This:
- various recesses of a natural type;
- the lower parts of the terraces;
- zones at the door;
- entry;
- near waterways.
The design of the point system is so simple that it does not need to create a circuit for its manufacture. To equip the structure, it is necessary to prepare storm water inlets, water conduits, storm dampers, sedimentation tanks, ladders.
 Surface drainage
 So that fertile soil from areas that have a slope of more than three degrees is not washed off, it is necessary to equip a storm system. It is also necessary in the following cases:
- When the water washes away the path.
- To drain the area where the entrance to the garage is located.
- When there are frequent long rains and it is necessary to divert a large amount of water from the foundations of structures.
Linear drainage
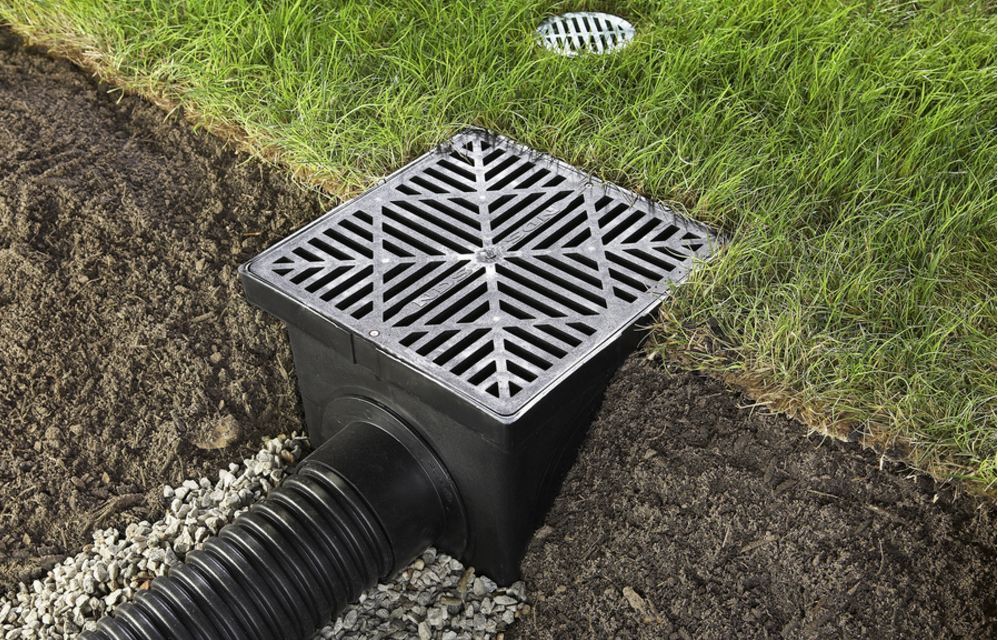
This is the name of the system of gutters buried in the soil. To close the gutters, removable gratings made of metal or plastic material are used.
The main condition is that the gutters must be laid at a slope so that the water masses can move by gravity. Moving along the gutter, moisture enters the sand trap. This element is the simplest filter from which water moves through conduits to storm sewers.
 Linear drainage
 To build a linear drainage, you need to first plan its placement and prepare for laying. In addition, it is necessary to equip a concrete base for laying all the elements of the system. If there is a need to make a larger catchment area, you can additionally concrete the slope.
Attention! To improve drainage efficiency, it is necessary to combine linear and point structures in the same area. Then the volumes of water, even after strong floods, showers, will be diverted from the soil and will not be able to harm either buildings or plants.
deep drainage
This is the name of the system of underground drainage channels. They move excess water masses from the site. To collect them, collector or drainage wells are equipped.
According to how groundwater is collected, the structures are:
- Vertical.
- Horizontal.
- Combined (combines both previous options).
Vertical structures are built like ribbed wells. They are located in aquifers. Filtering and pumping units are placed inside the wells. Because of this, such systems are considered engineering structures that need constant maintenance. Therefore, vertical drainage is rarely used in a private area. For the same reason, combined structures are not built so often.
 deep drainage
 The simplest and most affordable horizontal drainage. And not superficial, but deep type. The main elements for its arrangement are drains. These are perforated pipes intended for laying on gravel filling in prepared ditches. Previously, asbestos-cement products were used for this purpose, but they turned out to be harmful to the environment and were replaced by plastic ones.
Advice. Today, PVC pipes are used not ordinary, smooth, but corrugated. Such products are less time-consuming to install and cost less.
So that sand and soil do not get inside the pipes through the holes, they are wrapped in a special material. This is geotextile or coconut fiber material. The choice of material depends on the type of soil. If it is loamy or sandy, geotextiles can be used; for other types of soil, coconut fiber material is suitable. Interlining, dornite and other soft materials are used as geotextiles, but hard ones should not be taken - they do not pass moisture well.
Work that can be done with your own hands is carried out according to the following scheme:
- Draw up a laying diagram, which will indicate the location of the sewer well.
- Based on the scheme, dig ditches.
- Lay sand on the bottom with a layer of 10-15 cm, and then lay the geotextile. It should be enough to wrap the drains.
- Lay the drains so that they are sloped and lead to the collector.
- Connect individual elements with tees or crosses.
- Wrap the drains and pour rubble on top, and then a layer of earth.
From the collector it is necessary to provide further discharge of water. The nearest ditch, ravine, and if possible, the central storm system can serve as such a place.
Attention! During the laying of drains, it is necessary to backfill using crushed stone. It is best to take crushed stone with a fraction of 2 to 6 cm in size for this. Granite, river crushed stone is suitable, but limestone should not be used: it will be washed out during operation and salinization of the soil will certainly occur.
Maintenance of drainage systems
Although both deep and surface systems, with proper arrangement, do not need frequent maintenance, it is still necessary:
 Don't Forget About Regularly Cleaning Your Drainage System
 - Regularly inspect wells and sewers. If necessary, clean them up.
- To remove deposits from the walls of the drainage pipes, it is necessary to do their capital flushing. This will not be done often - once every 8-10 years.
In order to design and lay drainage on the site, it is imperative to watch a video with instruction materials on the specifics of the work. If everything is done correctly, the drainage will work for more than half a century, ensuring all this time the removal of excess moisture from the site.
Site drainage: video
When you constantly meet with the problem of the appearance of excess water on the site, it is necessary to take measures to remove it. Otherwise, you will not only get into trouble in cultivating the site, but also jeopardize damage to the foundation of the house or nearby utility buildings. The manufacture of drainage, or rather, a drainage structure in this situation, is the only acceptable way out.
In this article, we will consider a simple and economical way to create drainage in a personal plot. 
Preparatory actions
Before you begin the process of assembling and installing a drainage structure, you need to decide what result you would like to achieve. Based on your decision, you need to create for yourself, at least at a primitive level, a project for the future system: determine its location, possible consequences of contact between the system and surrounding objects, dimensions, dimensions. Based on the generalization of all these data, it is already possible to calculate the material costs for the purchase of the entire volume of consumables. It is useful, by the way, to understand that the depth of drainage directly depends on the height of the well intended for drainage. It is customary to place the well a little higher than the elements of the entire structure. 
Now about the design itself: traditional (or “French”) drainage is a trench filled with gravel, separated from the ground by geotextiles (geotextile is used to prevent mixing of soil and gravel, it also passes water through itself and prevents weeds from growing). Gravel together with geofabric helps water to quickly soak into the ground, evenly distributing moisture along its location, thus preventing the collection and stagnation of water in a particular one place.
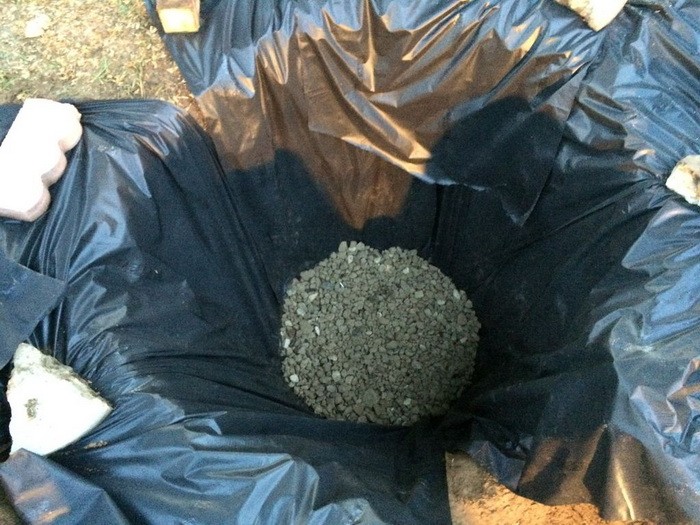
When creating this type of drainage, corrugated pipes are usually used, equipped with longitudinal holes on one side, usually made of PVC. At the end of the entire system, a drainage tank should be located, the task of which is to evenly distribute the accumulated water into the ground around it. To create this well, a two-hundred-liter plastic barrel in the form of a drum is well suited (the rounded shape of the container is more preferable in this case) with multiple holes in the bottom and walls. This well should be placed on a special gravel “cushion” (about 10 cm), the space between the walls of the pit and the tank is also filled with gravel (layer thickness 15 cm). Holes are made in the upper part of the barrel to receive incoming water, and one of the holes is to install a special drainage grate. You don’t need to make many holes, two or three, 5 cm each, are enough. One large hole is made in the upper part of the well wall, designed to enter the drainage system pipe.
The second major element of such a system is a catchment tank, the width of which should be approximately 30x30 cm. The tank must be equipped with a drain grate. personal plot is not a very costly operation. In the manufacture of the system, affordable materials are used and you need a little of them. The most expensive part you will need may be the catchment tank. A PVC pipe will cost much less. Gravel will need about two cubic meters. You will also need to purchase a special fabric - geotextiles.
Digging a drainage trench
Next, you need to dig a trench from the catchment area to the drainage site and a pit to install a well on this side and a reservoir on the other. In the place for the drainage well, the pit will need to be deepened by 15 cm compared to the depth of the rest of the trench, the depth of which, in turn, you will need to independently calculate based on the size of the drainage tank. 


Production of a drainage well
Using a drill with a diameter of 2-3 cm, you can easily turn the walls of the tank into a sieve. Through these holes, if possible, made at equal intervals, the waste water that has entered the barrel must evenly go into the surrounding soil. On the wall of the barrel, at the top, you should make a hole according to the diameter of the drainage pipe and prepare a mount for the pipe. 


trench filling
Then the excavated trench must be covered with geofabric. This will prevent silt and dirt particles from mixing with the gravel. Also, geotextiles will provide better absorption of moisture by the ground. Next, place an already prepared 200-liter barrel on an 8-10 cm gravel bed. Place a small amount of gravel around the barrel and make sure that the tank does not “walk” from side to side. Similar actions should be done with the water collector, which must be made so that its upper edge is along the edge of the earth's surface. The height of the water collector can also be adjusted by adding gravel. 


Make sure that the water collector is also immobilized. Then you need to connect both reserve cars to the drain pipe. It is important to know that the holes in the drainage pipe should be located on its lower side, while the pipe itself is laid down a slope. Fill the trench with gravel. Make sure that the surface of the earth and gravel remains 15 cm. Next, we mount the grate for draining on the tank. Then it is necessary to tuck the geofabric, making sure that the edges of the textile on both sides of the trench overlap, covering each other. 


Backfilling with earth
At the final stage of the installation of drainage, it is necessary to fill the trench well with earth, avoiding soil subsidence and unevenness. If you dig a trench with high quality, then literally in a year it will be possible to guess that a drainage system is located under this place only by the “peeping out” gratings. The installation site of the system can be sown with lawn grass. 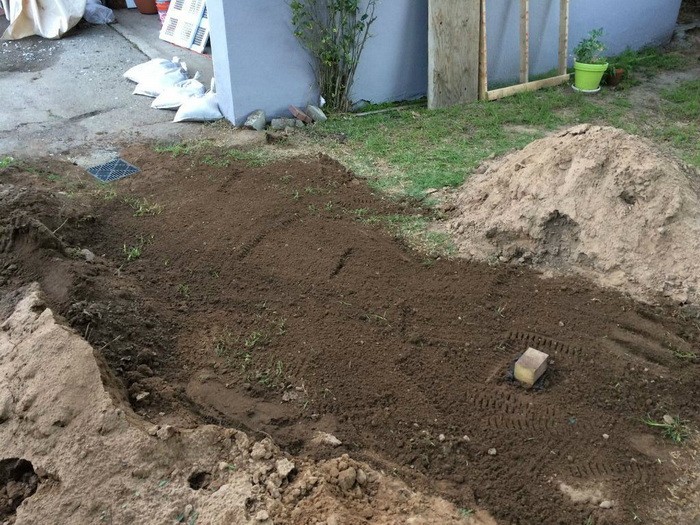

Now you know how you can independently build drainage in just a couple of days at no significant cost. The main thing in this case, as in all others, is careful preparation.
Video How to make drainage on the site with your own hands
Many faced such a common problem as excess moisture in a suburban area. Clay soils do not pass water well, and in the spring, during the melting of the snow cover, they swell. Because of this, the foundations of buildings deteriorate and shift, and road surfaces are destroyed. There is an opinion that it is impossible to do the drainage of a site on clay and loamy soils with your own hands. But this is a myth. Of course, it is better to entrust the drainage of the site to a competent and experienced specialist, but this is not always possible. We will try to figure out how the installation of the drainage system is carried out.
What for?
Excess moisture in the country is a serious problem. Its first clear sign is puddles that may not go away for several weeks in a row. This problem can cause the slow destruction of the house and other suburban buildings, the death of plantings. And few people will find it comfortable to walk in rubber boots or constantly watch puddles.
Excess moisture is an unpleasant phenomenon
Often this problem occurs due to top water. This is the name given to the high level of underground (ground) waters.

The easiest way
So, how to make drainage on the site? Some craftsmen who decide to make drainage in the country with their own hands simply dig ditches (popularly called "drainages") around the perimeter of the site. This is the simplest, most cost-effective and common way to remove excess moisture from the surface. And that sometimes solves the problem.


Unfortunately, if the territory is below the lateral ones adjacent to it, such an arrangement of drainage will not help, only raising the general level of the soil will save here. To do this, you need to bring and add land, level it. But what if the neighbors also decide to raise the level? Nevertheless, it is better to close this issue once and for all and initially to qualitatively perform the drainage of the summer cottage with your own hands, so as not to return to this issue again. Therefore, many people prefer to carefully figure out how to drain the area in order to forget about the problem, like a nightmare.

First of all, plan!
First of all, taking up the device of the drainage system, draw a diagram of the future drainage. At this stage, it is important not to make a mistake and take into account all the features of your landscape. Each territory is unique. For example, drainage is also necessary, as well as on absolutely flat ground. Water flows wash away the fertile layer and unevenly erode the soil. If gross miscalculations are made, then the opposite effect may turn out and the situation will not only not change, but will worsen. This can be avoided if you study the options, rules and principles of installation, and then draw your site drainage project.
First, determine what type of drainage system you will use: surface or deep drainage of the site (pipes will be required to drain the site).
Surface drainage
Performing surface drainage of the site with your own hands is relatively easy. Shallow drainage is arranged when they want to protect summer cottages in the first place, whether it be a cellar, an underground parking lot or a basement. Term shallow due to the fact that the whole system is in plain sight, on the surface. This system consists of various trays and storm water inlets that collect water during rains, downpours and after heavy snowmelt. Surface drainage, in turn, is also divided into two types: linear And pinpoint.
Linear type- this is a chain of trays stacked in a certain way. An analogy can be drawn with a canal, the slope of which is directed towards the well. It is into it that all the water, ultimately taken out of the trays, enters. A similar drainage device on the site is performed along paths or open parking lots, along the perimeter of sheds, garages. But most often, as a rule, it is the drainage of the house. Such a drainage system on the site has been known to us since ancient Egypt. The principle is the same, only the materials are more advanced. Now trays made of reinforced concrete or plastic are used. A grate covering the gutter is built in from above. Also inside the system are built-in special garbage bins to facilitate their care.

dot type is a system of water collectors installed in places where it is necessary locally collect water. Water collectors are usually installed under taps and in deep depressions, but primarily under drains. If this is not done, then the water from the roof will drain to the ground, and then penetrate into the soil, destroying the foundation and underground facilities, if any.

Water collectors are installed in the ground so that they are on the same surface with the general level of the soil. Pipes run from them to the sewer system. From above, the water collector is covered with a grate, which also serves as a protection against debris, and can act as a decorative element. Water collectors require cleaning from time to time. To do this, you just need to lift the grate and remove the accumulated debris.

Both of these types are often used in pairs for the greatest efficiency of the drainage system. The surface type (without pipes) can also be attributed open drainage. In this variant, ditches are dug and left open (in rare cases they are closed with gratings that protect them from large debris). And in order to prevent the walls of the ditch from collapsing and crumbling, they are made at an angle of 30 degrees and laid out with cobblestones or planted with ground cover plants. It is even possible to fill it with rubble dumping to prevent destruction, but this will reduce its throughput. Even a beginner can perform such drainage with their own hands.
deep drainage
It is better to install such a system at the initial stage of improvement, simultaneously with the construction of a house. In this case, it is better to start the drainage of the land plot by determining the direction of water flow during heavy rains. Having solved this problem, purchase drainage pipes and geotextiles.

The scheme of laying pipes from above should resemble a "herringbone".
Formerly drainage pipes ( drains) were made of asbestos cement and ceramics, but in our time they have given way to plastic: HDPE (low pressure polyethylene), PVD (high pressure polyethylene) and PVC (polyvinyl chloride). They are single-layer and double-layer, with a diameter of 100-190 mm. Water-permeable holes up to 3-5 mm are made over the entire surface. To prevent perforation from clogging and silting up, pipes are most often sold already wrapped in geotextile, which performs the function of filtration. On clays and loams, it is better to have such 2-3 fabric layers for reliability, since the particles in such soil are smaller and clog the system faster than on sandy loamy soils. Drains are laid into the soil to a depth of 1.5-6 m, depending on the requirements. The depth of drainage is calculated taking into account the level of groundwater.
In places of sharp turns or connections of several pipes, wells are placed. They are needed for convenient cleaning of the system in case of an unexpected blockage and for inspecting the condition of the drainage pipes. Ultimately, the entire chain of manholes and pipes must lead to a common collector well (at the lowest point on the property), from where the water is sent by gravity to the drain outside the territory or is forcibly pumped out manually.

In order for the water itself to flow in the direction you need, it is necessary to lay pipes under a certain slope. Ideally, you need to make the angle as small as possible, since with a fast flow of water, siltation occurs earlier.
They usually do slope from 0.5 to 3 cm per meter pipes.
You can set such an angle using a level, a water level or from improvised materials - an ordinary board and a building level. In the latter case, the board is laid on the bottom of the trench, and a level is placed on top and measured, if necessary, corrected.
Now let's figure out how to properly install a drainage ditch. To begin with, we dig trenches (drainage ditches) of the required depth, tamp the bottom, observe the correct slope (at this stage, an approximate one is possible). Next, we pour a layer of coarse-grained river sand 10 cm, spill and tamp. We make alignment, observing the exact slope. Then we lay a layer of geotextile on top, with a density not exceeding 200 g per square meter. m. The edges of the fabric should go along the sides of the trench so that they can then be wrapped inside. We pour washed crushed stone onto the geotextile: for clay soils we take a larger fraction (150-250), for sandy loam it can be smaller (up to 150).
Please note: crushed stone should not be limestone, as it is highly susceptible to erosion and deformation under conditions of temperature differences.
We lay the drainage pipe and gradually fill it with rubble in layers and carefully tamp. On top of the drain there should be a layer of crushed stone 10-30 cm. We wrap the geotextile inward so that the overlap of the edges is at least 15 cm. Next, we pour river sand, and at the very end - fertile soil. The drainage ditch is ready.

The device of a drainage ditch requires a certain investment of time and money, but this work is done once and for all, so it makes sense to do it with the utmost quality.
Experienced builders and suburban residents are well aware that "extra" water on the site is bad. Excess water leads to flooding of the foundation and basement floor, washing out of the base, flooding of beds, waterlogging of the territory, etc. As a result, in spring, autumn and even summer, it is impossible to walk through the summer cottage without rubber boots.
In this article, we'll look at:
- How to arrange water drainage on the site.
- How to make a budget storm sewer with your own hands.
- Drainage device. How to make inexpensive drainage and drain a wetland.
What kind of water interferes with the life of the developer and the suburban homeowner
About the types of surface and ground water, as well as drainage and storm sewer systems, you can write a separate book. Therefore, we will leave a detailed enumeration of the types and causes of groundwater occurrence outside the scope of this article, and concentrate on practice. But without the minimum theoretical knowledge, to take up the independent arrangement of drainage and storm sewers is to throw money away.
The point is that even improperly made drainage system functions for the first few years. Then, due to clogging (silting) of a pipe wrapped with geotextile, which was placed in clay, loamy, etc. soil, drainage stops working. And the money for the arrangement of drainage has already been spent and, most importantly, the construction of the drainage is associated with a large amount of excavation work with the involvement of equipment.

Therefore, simply digging and shifting a drainage pipe 3-5 years after its laying is difficult and expensive. The site has already been inhabited, landscape design has been made, a blind area has been equipped, a gazebo, a bathhouse, etc. have been installed.

We'll have to puzzle over how to redo the drainage so as not to turn the entire site around.

From here - drainage construction should always be based on geological survey data(which will help to find a water-resistant layer in the form of clay at a depth of 1.5-2 m), hydrogeological surveys and clear knowledge of what kind of water leads to flooding of the house or swamping of the site.

Surface waters are seasonal in nature, associated with a period of snowmelt and an abundance of rain. Groundwater is divided into three main groups:
- capillary water.
- Ground water.
- Verkhovodka.
Moreover, surface water, if it is not diverted in time, when infiltrated (absorbed) into the ground, turns into underground water.
The volume of surface water usually exceeds the volume of groundwater.
Conclusion: surface runoff must be diverted by storm (rain) sewage, rather than trying to do surface drainage!

Storm sewage is a system consisting of trays, pipes or ditches dug in the ground, leading water from drains outside the site + competent organization of the relief in the backyard. This will avoid stagnant zones on the site (lenses, pools), where water will accumulate, which simply has nowhere to go, and further waterlogging.
The main mistakes that are made with an independent drainage device:
- Non-observance of the correct slope of the laid drainage pipes. If we take the average, then the slope is maintained in the range from 0.005 to 0.007, i.e. 5-7 mm per 1 running meter of drainage pipe.

- Using a drainage pipe in a geotextile wrap on the "wrong" ground. To avoid siltation, a pipe in geotextile is used on soils consisting of clean medium- and coarse-grained sands.

- The use of cheaper limestone rubble instead of granite, which is washed away with water over time.
- Savings on high-quality geotextiles, which must have certain hydraulic properties that affect the quality of drainage. This is an effective pore size of 175 microns, i.e. 0.175 mm, as well as the transverse Kf, which should be at least 300 m / day (with a single pressure gradient).

Inexpensive do-it-yourself storm sewer
The first thing that comes to mind in order to equip a budget option for storm sewers on the site is to lay special trays.

Trays can be made of concrete or plastic, but the price of them "bites". This forces users of our portal to look for cheaper options for arranging storm sewers and drainage systems from the site.

Denis1235 Member of FORUMHOUSE
I need to make an inexpensive storm drain, about 48 m long, along the edge of the fence, to drain meltwater that comes from a neighbor. Water must be diverted to a ditch. I thought about how to make a water outlet. At first it occurred to me to buy and install special trays, but then they will leave “extra” gratings, and I don’t need special aesthetics for storm water. I decided to buy asbestos-cement pipes and cut them along with a grinder, thereby getting a homemade tray.

Despite the budgetary nature of this idea, the user was not attracted by the need to saw asbestos-cement pipes on their own. The second option is the opportunity to buy gutters (plastic or metal) and lay them on a prepared base in a concrete layer of about 100 mm.
Portal users responded Denis1235 from this idea in favor of the first option, which is more durable.
Hooked on the idea of an inexpensive storm drain, but not wanting to get involved with cutting pipes on their own, Denis1235 I found a plant that produces asbestos-cement pipes, where they will immediately be sawn into pieces 2 m long (so that a 4-meter one does not crack during transportation) and ready-made trays will be brought to the site. It remains only to develop a scheme for laying trays.
The result is the following pie:
- Soil base in the form of a bed.
- A layer of sand or ASG about 5 cm thick.
- Concrete about 7 cm.
- Tray from asbestos-cement pipe.

When installing such a storm drain, do not forget to lay a metal mesh (for reinforcement) at the joints and leave a deformation gap (3-5 mm) between the trays.

Denis1235
As a result, I made a budget shower at the dacha. It took: 2 days to dig a trench, two more days to concrete and install the track. I spent 10 thousand rubles on trays.

Practice has shown that the track "overwintered" perfectly, did not crack and intercepts water from a neighbor, leaving the site dry. Also of interest is the option of rain (storm) sewage of the portal user with the nickname yuri_by.

yury_by Member of FORUMHOUSE
Because the crisis does not think to end, then I thought about how to arrange a storm sewer to remove rainwater from the house. I want to solve the problem, and save money, and do everything efficiently.
After thinking, the user decided to make a storm drain for water drainage based on flexible double-walled corrugated pipes (they cost 2 times cheaper than "red" sewer pipes), which are used for laying power cables underground. But, because the depth of the drainage route is planned to be only 200-300 mm with a pipe diameter of 110 mm, yuri_by I was afraid that the corrugated pipe could break in winter if water gets between the two layers.

Eventually yuri_by I decided to take a budget "gray" pipe, which is used in the arrangement of internal sewage. Although he had fears that the pipes, which do not have such rigidity as the "red ones", will break in the ground, practice has shown that nothing happened to them.

yuri_by
If you step on the "gray" pipe, it turns into an oval, but there are no significant loads in the place where I buried it. Only the lawn is laid and there are pedestrian loads. Having laid the pipe in a trench and sprinkled it with soil, I made sure that they keep their shape, and the storm drain works.

The user liked the option of installing an inexpensive storm drain based on “gray” sewer pipes so much that he decided to repeat it. All the nuances of the process are clearly demonstrated by the following photos.
Digging a hole to collect water.

Level the base.
We install a concrete ring.

The next stage is to fill the bottom of the well with gravel of fraction 5-20.

We cast a homemade well cover from concrete.


Paint the manhole cover.


We make a tie-in into the well of a drainage plastic "gray" sewer pipe, maintaining a slope of the route of 1 cm per 1 running meter.

We spill the pipe with a mixture of sand and water so that there are no voids between the walls of the trench and the pipe.

To prevent the pipe from floating up, it can be pressed with a brick or board.
We put the cover, mount the hatch and fill everything with soil.

This completes the production of the budget shower.
Construction of inexpensive drainage and drainage of the wetland
Not everyone gets the “right” sites. In SNT or in new cuts, the land can be very swampy, or the developer has a peat bog. To build a normal house for permanent residence on such land, and not an easy summer cottage, is both difficult and expensive. There are two ways out of this situation - to sell / exchange the site or to drain and bring the site in order.
In order not to engage in various costly alterations in the future, users of our portal offer budget options for drainage and drainage of the territory based on car tires. This option allows you to save the family budget.

Yuri Podymakhin FORUMHOUSE member
Peat soil is characterized by a high level of groundwater. In my area, the water is almost flush with the surface, and after the rain does not go into the ground. To divert the top water, it must be thrown out of the site. I did not spend money on buying special pipes for drainage, but made drainage from car tires.

The system is mounted as follows - a ditch is dug, tires are laid in it, tires are covered with polyethylene on top so that the earth does not fall inside from above. Polyethylene can also be additionally pressed with "unnecessary" pieces of slate in the household. This will increase the overall rigidity of the structure. Water enters the "cover" pipeline and is then discharged outside the site.


But there are also more “heavy” places where much more needs to be done.


Seryoga567 Member of FORUMHOUSE
I have a plot in SNT, with a total area of 8 acres. There is a building on the site that I plan to complete and expand. The place is very low. Because drainage grooves for drainage in SNT are in a deplorable state, where they are buried, littered or clogged, then the water does not go anywhere. The GWL is so high that you can draw water from the well with a bucket, holding it by the handle. In the spring, the water in the country house stands for a long time, the site actually turns into a swamp and, if it dries out, it is only in the very heat in summer. No one wants to put the drainage ditches in order, so everyone swims. Therefore, I decided that it was useless to fight with the neighbors. It is necessary to raise your site and find a way to put all the "unnecessary" water from the site.
We also recommend
 Biogas from manure - production methods, technology advantages
 How to connect a water heater to electricity - mistakes, choice of cable, sockets, machines
 Sewerage from concrete rings Sewerage private house installation of sewerage rings
 Do-it-yourself instructions for connecting a storage water heater
 How to make drainage in a site with a high level of groundwater
 Repair of the submersible borehole pump "Vodomet": fixing breakdowns with your own hands