How to make a fence from a metal euro picket fence. Do-it-yourself fence from a metal picket fence (euro fence)
Do-it-yourself installation of fences from a metal picket fence is an option for fencing that is available for independent implementation.
This version of the fence is widely used not only in the conditions of suburban construction, but also in the urban design of adjacent territories.
Such designs are characterized by durability, visual appeal and simple installation.
The metal fence is currently an excellent alternative to the already traditional profiled flooring. Shtaketins are much lighter and also more convenient in terms of transportation and installation, and the presence of a special coating serves as an excellent protection of the metal from corrosive changes.
The main advantages of fences based on eurostudent are presented:

- reliability;
- durability;
- external attractiveness;
- unpretentiousness in care;
- ease of use;
- fire safety;
- light transmission.
Among other things, the slats are affordable, they can be installed quite easily on their own or, if necessary, replaced.
Having decided to make a fence from a metal picket fence with your own hands, you need to take into account that the presence of sharp corners at the ends of the planks can cause injuries, therefore, if you have children or pets, it is advisable to purchase material with rounded tips.
Preparation and marking of the territory
Due to their attractive appearance, fences based on metal picket fences are widely used in different styles of landscape design, and are also perfectly combined with various building and finishing materials.
The purpose of the fence is the zoning of the territory, the design of flower beds and front gardens, therefore, the preparation and marking of the site for construction must be approached very carefully:

- cleaning of the territory, including the dismantling of the old fence, as well as all interfering outbuildings;
- drawing up a detailed plan of the site, including capital buildings and locations of underground utilities;
- drawing up a scheme for erecting a fence based on a metal picket fence, including marking points for installing supporting structures;
- removal of vegetation and debris, including leveling the site in accordance with the fence construction scheme;
- transfer of a schematic fencing plan to the area.
Support pegs must be installed at each turn, as well as when changing the trajectory of the direction of the fence being installed. In the process of marking, the place for erecting a gate or gate is necessarily determined, and the need for electrical communications to connect the gate lifts is also taken into account.
It is important to remember that in the process of planning a place for mounting a sliding gate, it is necessary to provide the most leveled area suitable for the construction of a standard foundation.
Preparation of pits for support poles
Eurostudent in fence designs is in perfect harmony with a lot of building and finishing materials, which can be represented by stone, brick, wooden and metal elements.

Ways to install support poles
The depth, dimensions and distance between the pits for the poles may vary depending on the material and structural features of the support.
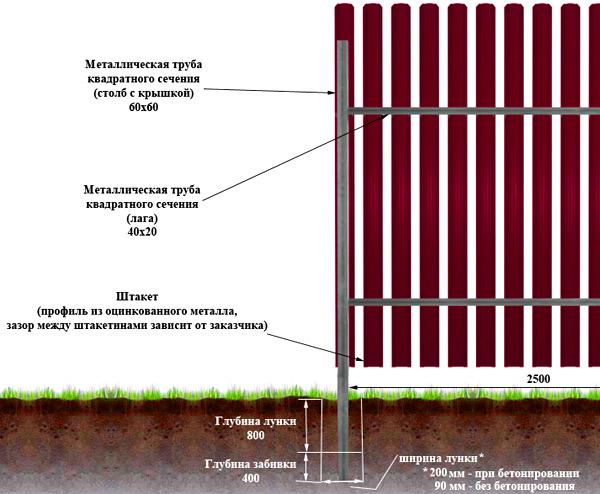
Most often, a metal fence is mounted on supporting structures based on poles made of a profile pipe with a section of 60x60mm or 80x80mm, with a wall thickness of 2-4mm. The installation of a lightweight support structure is possible due to the absence of windage, as well as low wind and power loads.
The technology for preparing the pits, as well as the subsequent installation of support pillars, is as follows:

- preparation of pits by means of a drill or a bayonet and shovel to the depth of soil freezing or approximately 1.1-1.5 m;
- backfilling at the bottom of the pit with a standard sand and gravel cushion;
- installation of support pillars, leveling them in height and vertical with the help of a building level, as well as subsequent backfilling and compaction of the soil.
Installation is required to begin with the installation of corner posts. On too loose or unstable soils, it is advisable to perform standard concreting, which will make the installed support structure as strong and durable as possible.
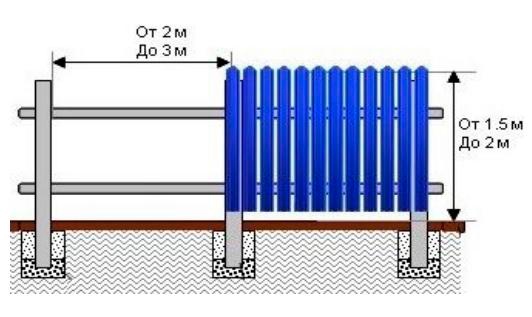
The number of posts required for the installation of a metal picket fence should be calculated based on the distance between the supports of 2.0-2.5 m. There is no need to make the gap larger or smaller, due to the low weight of the metal picket fence.
How to strengthen the lags?
 The basis of the frame for mounting a metal picket fence is not only supports, but also transversely mounted, upper and lower transverse logs.
When concreting the supporting pillars, the procedure for fixing the frame cross members is performed only after the concrete solution poured into the pits has completely hardened.
It is advisable to use standard profiled pipes with a cross section of 20x40mm as crossbars.
The order in which the logs are installed is not of fundamental importance, but it is very important to choose the right place for fixing them, as well as to purchase high-quality fasteners.
 Decking is a versatile and inexpensive material for residential construction. And you can find out how to build a fence from a profiled sheet.
Another good option is a fence from. Of course, it is more difficult to build such a fence, but the result is definitely worth it.
As practice shows, the most reliable is the welding of cross members. However, it is also allowed to fasten the log with galvanized self-tapping screws. In this case, you need to prepare a building level, tape measure, marker and screwdriver.
After installing the frame under the metal picket fence, you need to perform a thorough cleaning, priming and painting with metal paint.
The upper transverse logs are mounted at a distance of half a meter from the upper edge of the support, and the lower cross member - at a height of 30 cm from the ground surface.
Mandatory check of the horizontalness of the crossbars is carried out by the building level.
Installation of a metal fence
 At present, the production of a metal picket fence of the U-shaped and M-shaped type, as well as models with rolling, semicircular and classic shapes has been launched.
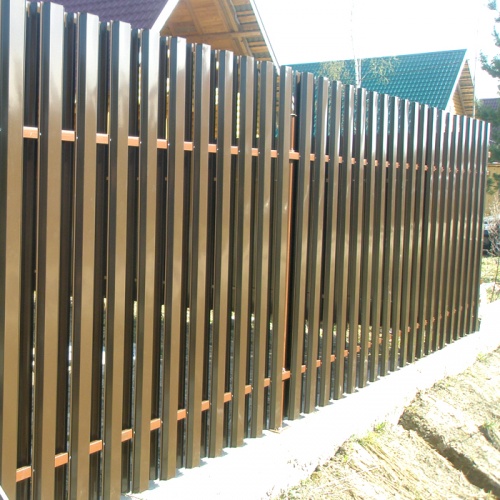
Eurostudent allows you to equip one-sided and two-sided fence. The double-sided construction of metal picket fences is good because the fence does not have gaps, but provides ample circulation of air masses.
On the mounted frame, the planks of the euro picket fence are fixed. To fix each plank, only four self-tapping screws are used, two of which are installed in the upper crossbar, and two in the lower log.
The distance between the shtaketins can be selected individually, but as practice shows, the best is to fasten the planks with a gap of 50-100mm.
The construction of a double-sided type fence involves the fastening of shtaketin in a checkerboard pattern. Most often, for this purpose, M-shaped strips are used, installed with a gap of 35 mm, which makes it possible to give the erected fence a visual effect of “lightness”. It is desirable that the shade of the screws used matches the color of the fence as much as possible.
In the process of screwing in the fasteners, extreme care must be taken, since even a slight violation of the integrity of the polymer coating on the pickets negatively affects the appearance and service life.
Installation of the top fence
Fence elements, including the top bar, are a recommended attribute in the construction of the structure of almost any fence. Most often, in the process of manufacturing fence strips, the method of cold rolling of steel sheets and their subsequent galvanization is used.

Finished metal picket fence
High-quality planks do not have a seam or rivet connection, and a polymer coating allows you to choose the best option for a fence of any color.
A properly selected, high-quality additional element in the form of an upper bar allows not only to decorate the structure, but also is a very good protection of the edge from moisture. Among other things, the edge gives rigidity to the fence.
 Each euro-shtaketin individually is a rather weak element of the fence, therefore, combining by means of a plank contributes to a significant increase in the level of strength and has a positive effect on durability.
The overlapping connection of additional elements is optimal, and the presence of stiffeners allows one-sided trimming during the installation process.
Those who want to stand out should take a closer look at. The translucent material looks rather unusual as a fence, and at the same time it is remarkably durable.
Useful video
Installation instructions for a metal picket fence from the City of Masters project:
Subject to the installation technology, a fence based on a metal picket fence will not require increased attention and will last for several decades, retaining its decorative appearance.
Ways of fastening the euro picket fence to the fence, how to properly fix the picket fence and what fasteners are best used for mounting the picket fence to the logs, we will describe in this article:
How to fix a picket fence
Let's start from the beginning 🙂 On what factors does this or that method of fixing the picket fence depend:
1. The fence is always fastened STRICTLY from the front side
It is very important not to confuse the front and back sides of the metal picket profile (especially in cases where the euro picket fence is the same on both sides: galvanized or coated on both sides).

2. The correct fastening of the metal picket fence to the joists depends on the type of euro picket fence profile..
The metal fence, depending on the manufacturer, can have a variety of profile types. Most often there is a U-shaped picket fence, there is also a Semicircular profile (its fastening is the same as that of the U-shaped one) and an M-shaped profile view.
Below we will consider the correct fastening of all the listed types of eurostudent profile.
Mounting the M-shaped picket fence
M-shaped picket fence is attached in the middle of the profile. This is an outdated type of European fence with a significant drawback: the “wings” of the planks remain loose and will play with gusts of wind. Also, due to this method of fastening, the substructure of the fence from the M-shaped metal picket fence will have minimal rigidity, because at the fastening points there is a single metal thickness and as a result, a weak geometric diagonal resistance of the fence section is obtained.

M-shaped profile of a metal fence for a fence

Fastening the M-shaped fence for the fence to the logs
Fastening of the U-shaped and Semicircular picket fence
The principles of fastening the Semicircular and U-shaped profile of a metal picket fence do not differ from each other. Fastening in both cases must be done in the side edges of the slats where, due to rolling, there is a double thickness of the metal (an unrolled picket fence is traumatic and we do not recommend it for use at all).

Semicircular and U-shaped
fence profiles
There are 2 ways to attach the Semicircular and U-shaped metal picket fence to the logs:
1. The method is less reliable but more economical. The strap fasteners are made 1 pc for each log in a checkerboard pattern:

1 Way of fastening the U-shaped and Semicircular fence (economical)
2. The method is more reliable but less economical. The planks are fastened in 2 pieces for each joist - we always recommend that Clients use this method of fixing the euro picket fence, because. he is the most reliable:

2 Method of fastening the U-shaped and Semicircular fence (reliable)
How to fix the picket fence, types of fasteners
Various types of fasteners can be used to fasten a metal picket fence to the joists of the fence substructure. TPK Metalroofing Center offers its Clients the following most popular ones:
Self-tapping screws 5.5 * 19 roofing with a 6-sided head for a 8mm bit
Roofing screws with a diameter of 5.5 are designed for installation in metal, as indicated by frequent threading and an enlarged drill part. When the self-tapping screw is screwed in, the rubber self-vulcanizes, and thereby completely prevents water from entering the drilled hole. The tip in the form of a drill allows you to work with material up to 2.5 mm thick without pre-preparation of holes.
Diameter (mm): 5.5
Length (mm): 19
Type: Roofing
Color: According to RAL catalog

Fixing the picket fence on roofing screws 5.5 * 19
Pros:
+ convenient and quick to mount with a screwdriver;
+ the most reliable mounting option;
Minuses:
- the cost of a self-tapping screw is higher than alternative options;
- visually noticeable on the finished fence;
Self-tapping screws PShS or “seeds” 4.2 * 16 or 4.2 * 19 for a Phillips screwdriver
Self-tapping screws with a hemispherical head and a press washer (PShS) are designed for fastening a variety of products and materials to metal frames, steel sheets up to 2 mm thick without pre-drilling and up to 6 mm thick with pre-drilling. The tip is galvanized - a drill. The press washer, located under the head of the screw, provides additional fastening strength and resistance to increased mechanical stress. Zinc coating provides long service life and corrosion protection.
Diameter (mm): 4.2
Length (mm): 16 or 19
Color: According to RAL catalog

Fixing the picket fence on self-tapping screws ПШС 4.2 * 16
Pros:
+ low cost of self-tapping screw;
+ visually almost invisible on the finished fence;
Minuses:
- the complexity and inconvenience of fastening (when drilling a picket fence strip and a ferrous metal log);
Blind rivets 3.2*8 (aluminum/steel)
Painted blind rivet 3.2*8 is used for joining thin metal sheets, fastening to substructures. The closed head consists of an aluminum sleeve with a standard head and a steel rod. Before installing the rivet, it is necessary to pre-drill a hole with a drill corresponding to the diameter of the rivet. During installation, the rod pulls the sleeve behind it, which allows you to tightly connect the parts to be fastened. The extra rod is bitten off.
Diameter (mm): 3.2
Length (mm): 8
Color: According to RAL catalog
When choosing a fence, the developer is usually guided by the following parameters:
The above parameters correspond to a fence made of a metal picket fence. Currently, the metal fence is represented by such a variety of shapes and types that even the most demanding consumer will be able to choose the right option for themselves. Due to their diversity, metal fences are used on a wide variety of objects, ranging from fencing a summer cottage or a private house, ending with the arrangement of pedestrian areas and airport fencing.
Types of metal picket materials
Metal picket fences can be made from several types of materials. Let's consider them in more detail.
Metal fence made of profiled galvanized steel
In the production of this type of picket fence, profiled galvanized steel is primed, and then a polymer coating is applied to it, which ensures the service life of the fence up to several decades. This type of fence is called eurostudent.
Main advantages:
- with the help of a euro picket fence, it is possible to make both a deaf and a transparent fence;
- eurostudent has a huge variety of colors, shapes and sizes;
- in its production, high-tech material was used, which has a long service life, and thanks to a special profile, it has high strength;
- installation of this fence can be done even by a person who does not have experience in installing such fences.
Picket fence made of industrial fittings or metal rods
In the manufacture of such a fence, rods with a cross section of a round or square shape are used. They are made from cold rolled steel with hot zinc treatment, which makes them resistant to corrosion. The cross section of the rod for the fence can be 12 x 12 mm, 14 x 14 mm, 16 x 16 mm. The thicker the section, the more solid the fence will look, but its cost will also be higher accordingly. If the fence is based on reinforcement, then its diameter usually ranges from 10 to 16 mm. Individual elements are welded in sections. Then a special coating is applied to the sections. If desired, sections can be decorated with decorative elements.
Main advantages:
- the shape of such a fence can only be limited by the imagination of the designer. This type of fence forms an excellent combination with brick and stone, and the decoration with forged elements makes it individual and unique;
- simple, and as a result, inexpensive installation;
- with proper anti-corrosion treatment and care, this type of fence can serve for more than a dozen years.
Picket fence from profile pipes
When creating such a fence, round and square pipes are used, which are welded to each other and then welded to the frame. Corrosion protection is provided by hot-dip galvanizing and polymer coating. Such fences are strong and reliable, have a modern and stylish look.
The disadvantages of all these types of picket fence include the following aspects:
- compared to the installation of a fence from a profiled sheet, the installation of a picket fence is a longer process, because it requires accurate measurements when attaching each element;
- installing a fence made of metal picket fence requires a large amount of fastening materials.
Do-it-yourself installation of a metal picket fence
Calculation of the necessary materials
- correctly measure the perimeter along which the fence will pass;
- set what will be the distance between the shtaketin;
- calculate the size of the gate and gate;
- decide how the fence elements will be fastened: it will be welding or anchor fasteners, a corner or a mounting clip;
- calculate the required number of poles, lags, as well as consumables (screws, paint, primer). Logs can have a length of 2 to 12 m. When calculating the required amount, it is worth remembering that the supports for the metal picket fence are located at a distance of 2 - 3 meters from each other and that the load on the logs should be uniform. When choosing self-tapping screws, you should not save. They must be galvanized with ergonomic screwdriver caps. To calculate the required number of profiled strips, there is a special formula:
W \u003d W × (1000 mm - Rz) / (133 mm + Rz), where:
W - the number of pickets (pcs.);
Z - fence length (m);
Pz - gap width (mm).
In the case of installing a deaf picket fence in a checkerboard pattern, the resulting number of picket fences must be multiplied by two.
Attention! Purchase only certified goods that comply with GOST R 52246-2004, which regulates the thickness of the metal and the technology for applying a polymer coating. This will ensure the durability of your fence!
Do-it-yourself metal fence installation instructions
When you look at a perfectly smooth fence made of a metal picket fence, you can’t believe that you can install it yourself. In fact, this is not such a difficult task. So, the fencing plan is ready, the calculations have been made, all the necessary materials have been purchased. You can proceed to the direct installation of the fence.
Stage 1. Clearing the area where the fence will be installed. The old fence is being removed. Shrubs, grass and other vegetation are removed. Level the surface on which the fence will be installed. At the corners of the perimeter, wooden pegs are driven into the ground and a string is pulled between them to mark the territory. The places where the supporting pillars will be located are marked. After marking, the twine is removed.
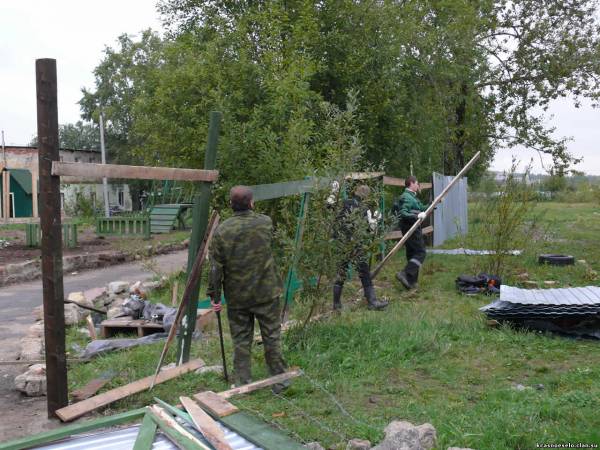
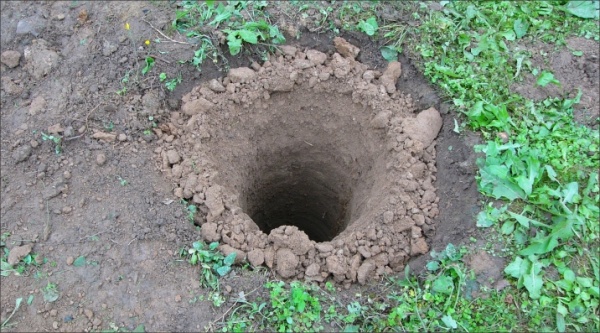
Stage 2. At the second stage, it is necessary to dig holes for supporting pillars. To do this, you can use a regular shovel, but it is better to use a drill. It will be much faster and more convenient. The depth of the pit must be at least 50 cm.
The distance between the supports, as mentioned above, should be from 2 to 3 meters.
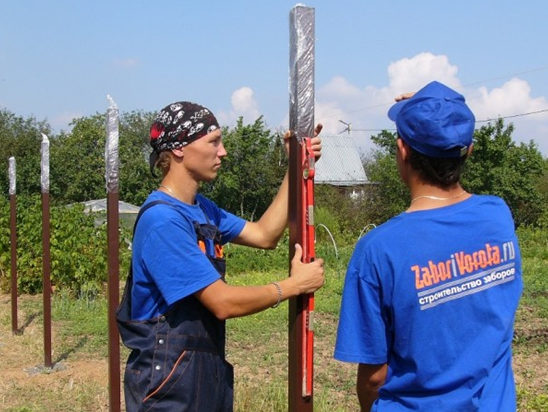
Crushed stone is poured into the bottom of the pit. Then a pole is installed, which should stand perfectly level. To achieve this, use the building level as often as possible when installing it.
You can drive a support into the bottom of the pit with a sledgehammer. Having installed the pole, the pit is poured with concrete. Since the concrete will harden for several days, the pillar must be strengthened with wooden supports.
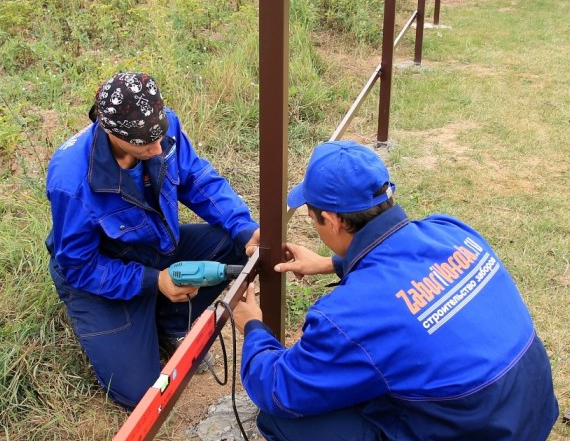
Stage 3. Logs are installed on the supporting pillars. Fastening is done with self-tapping screws. Fastening can also be done by welding, but then the welding points should be treated with an anti-corrosion coating. The frame for the installed fence is ready. If necessary, you can paint it in the color of the fence or choose a different color that matches the tone of the fence. If you purchased the frame parts along with the picket fence, then painting is not required. Next, on the logs, markup should be applied for attaching pickets. This is a rather painstaking work that requires attention, patience and precision.
Stage 4. We fasten the pickets with a screwdriver and self-tapping screws to the logs. The distance between the shtaketins depends only on your desire. But most often it is in the range of 50-100 mm. The main thing is that this distance should be strictly the same around the entire perimeter of the fence. You need to screw it very carefully so as not to damage the polymer coating of the picket fence.

If you decide to make the fence double-sided by attaching picket fences on the inside in a checkerboard pattern, then you should leave a gap of 35 mm between the planks. It will give the fence a look of lightness and transparency.
In addition to the picket fence, you can purchase a cornice that will ennoble its appearance. It is attached in the same way as shtaketiny, using self-tapping screws.

Stage 5 Gate and gate installation. They are fixed on the supporting pillars and all the necessary fittings (latches, bolts, etc.) are installed.

Video of the installation of Eurostudent:
This completes the installation of a metal picket fence. Installing a metal fence is a fairly simple process, and the result is impressive. You get not only a reliable and durable, but also an aesthetically attractive fence for your site.
A fence made of a metal picket fence is quite relevant in the modern construction of country houses, since this type of fence differs from others in that it is not required to spend large sums on material. You can buy all the tools inexpensively. The main advantage of a metal picket fence is its light weight. Positive feedback about it is associated with a long service life of this design.
Classic metal picket fence
Performing the function of protection, the fence has lattice elements, the distance between which is very close, and each of them is equipped with a sharp tip. To carry out the appropriate calculations before the installation of the entire structure, you can use the calculator provided on the site on the topic of construction.
Before you make a fence from a metal picket fence, you should foresee all the main points that will be associated with the fencing device. The planned design of the fence requires appropriate calculations, starting with the perimeter of the fenced area and ending with the appearance of the structure, taking into account its shape, including the quantity and cost of the necessary building materials.

The name of the nodes and elements of the fence made of metal picket fence
Necessary tools and materials
After reading the instructions on how to properly install a metal picket fence, you can begin to build a fence. To do this, you need to buy a complete set of tools:
- Screwdriver.
- Small accessory tool.
- Tool for earthworks.
- Apparatus for welding.
A screwdriver is used to mount the frame for metal pickets. A small auxiliary tool produces additional types of work on the installation of a fence from a metal picket fence. An ordinary shovel or drill is suitable as a tool for working with the earth and digging holes.
Scheme of the arrangement of pits for fence posts
To install transverse logs, on which you need to mount a metal picket fence, should be done using a welding machine. Welding is the best option for this job. To do it right, you should have on hand such types of materials as:
- Self-tapping screws galvanized.
- The picket fence is metal.
- Profile pipe with a section of 20x40 mm.
Galvanized self-tapping screws allow fastening metal pickets to the frame. For a design with a low weight, a pipe from a profile with a cross section of 60x60 mm is suitable. This will allow it to withstand the effects of wind loads. You can buy a metal fence with a thickness of 0.5-2 mm. The metal has an anti-corrosion coating on top, on which paint is applied.

The process of attaching metal pickets to the fence frame
A profile pipe with a cross section of 20x40 mm is necessary for allowing the installation of metal pickets. If you plan to install a fence made of metal picket fence with brick pillars, you will need a brick. Horizontal metal bars can be replaced with a wooden beam, then the fence will be.
Before use, a wooden beam undergoes additional treatment with an antiseptic, and after installation it should be painted. The supports should be at a small distance from each other, since the weight of the wood and the metal picket fence must be taken into account. The longer the timber, the greater the risk that it will not hold metal pickets.
How to calculate the required materials
To ensure resource savings during the construction of the fence, it will be necessary to carry out appropriate calculations of materials. 
To determine the required amount of materials for installing a metal picket fence, you need a calculator that will allow you to:
- Take accurate measurements of the perimeter along which the fence should pass.
- Calculate the size of the gate and gate.
- Choose a method of fastening the elements of the fence (welding, anchor fasteners, mounting clip, corner).
- Determine the required number of logs, supports, consumables (self-tapping screws, paint, primer).
Set the width of the gap between the pickets.
Since the length of one log can be 2-12 m, it should be remembered that it is necessary to place supports for a metal picket fence at a distance of 2-3 m from each other. This will ensure an even load on the logs. If the cost of materials allows you to make a purchase by choosing self-tapping screws, you should not save. 
To determine the number of profiled strips, you can use the formula:
W \u003d W * (1000 mm - Rz) / (133 mm + Rz),
where:
- W - the number of pickets (pcs);
- Z - fence length (m);
- Рz - gap width (mm).
If the project is designed for, it will be necessary to install a deaf picket fence in a checkerboard pattern. In this case, the resulting amount of picket according to the formula must be increased by 2 times. "Chess" happens:
- Wooden.
- Plastic.
- Metallic.
The choice of material is carried out depending on the purpose of the fence device. The most environmentally friendly fencing option can be created from wood, so reviews about it are always positive. However, wood is a cheaper material than metal. There is no need to spend a lot of time and effort to install it: the fence will resemble a staircase.

Possible options for attaching shtaketin to the fence
Construction should be carried out only from certified goods that comply with GOST. If the installation of the fence will be carried out in a checkerboard pattern, then 2 types are provided for such a design:
- Vertical checkerboard.
- Horizontal checkerboard.
Reviews indicate that the first option is more profitable, since the horizontal fence resembles a ladder, and such an obstacle is very easy to overcome.
How to make a metal picket fence
Preparation and marking of the territory for the construction of the fence
After collecting the tools and materials, you can proceed to the installation of the fence. First, on paper, you need to prepare a draft of the future design in order to complete all the work in stages. The resulting structure should be perfectly even in shape. This task is not too difficult to do all the work yourself. You can develop a project that will allow you to create a combined fence.
When the design plan is prepared, the required amount of materials is purchased after the calculations are made, before installing the fence, the area is cleared of debris.
The manufacture of a new design should begin after the dismantling of the old fence. Grass, shrubs and other vegetation are removed, the surface is leveled.

Scheme for installing a metal picket fence
Having determined all the corners of the perimeter, wooden pegs should be driven into them and a rope should be pulled between them. This will make it possible to make appropriate markings before starting the installation work in order to mark the places where the support pillars should be located.
Having marked each point along the entire perimeter of the territory that needs to be protected, the twine is removed and the frame is started to be installed, for example, from materials from Leroy Merlin, which have proven themselves due to the appropriate quality. To do this, it is necessary to dig holes in previously marked places, taking into account the depth of soil freezing.
Preparation of holes for supporting fence posts
The next stage is connected with digging holes for fence supports from a metal picket fence. For this purpose, a conventional shovel prepared in advance is used. The required number of holes should be determined at the stage of calculating the materials. 
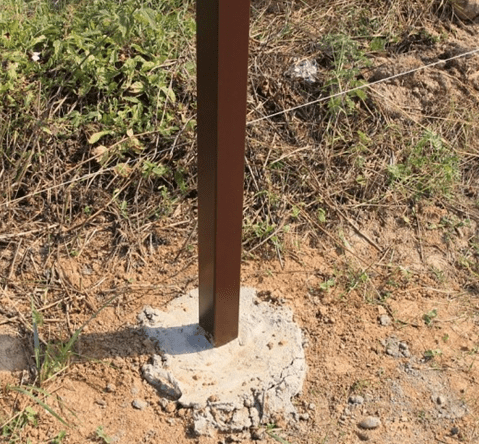
A convenient tool is a drill that can be used. The size of its depth should not be more than 50 cm. Since the fence supports must be installed every 2-3 m, the pits should be dug exactly at this distance from each other. To ensure the most reliable fastening of the post, filling the hole with earth will not be enough. Here you will need to carry out concreting by preparing a concrete solution according to the standard scheme. Mixes can be either ready-made or made from sand, cement and water on their own.
During the installation of the fence, it is necessary to monitor the verticality of the device of each pillar, which involves the use of a building level. It is required to determine the distance between the posts, taking into account the length of the crossbars.
The installed support must be fixed for a certain time, since it will take 2 days for the concrete to dry completely.

Ready mounted picket fence frame
You can fix the vertical supports with your own hands using wooden supports.
How to install supports yourself
If a profile pipe with a cross section of 40x40x4 mm serves as a support, then the depth of the pit under it should be determined by the climatic conditions of the region. The recess can reach 1-1.5 m. It must be treated with an anti-corrosion compound. When installing supports vertically, special attention should be paid to the installation of corner posts, which account for the greatest load.
To firmly fix the pillars in the ground, crushed stone should be used, tamping it well. The internal cavity of the support to increase the duration of the operation of the structure must be filled with concrete. On the top end, so that moisture does not get in. At the corners of the perimeter, the pits for the pillars must be made deeper, since they bear a significant load.

Plugs of different sizes for fence posts
Sand and gravel are laid out at the bottom. The length of the supports should be calculated so that after their installation, the size of the pickets exceeds the level of the crossbars by 100-150 mm. Installation should begin with the posts at the corners of the perimeter, and then you can start pouring the posts with cement mortar, including sand, crushed stone, or pre-prepared concrete from a mixer.
When installing the supports, the places where the crossbars will need to be fixed are preliminarily planned. To this end, the accuracy of the marking should be controlled using a marker, marking the fixation points along the entire length of the fence where the metal picket fence will be installed. It requires patience, attention and precision. These actions are carried out after the pits have already been prepared using a drill or a bayonet shovel, and the supports have been mounted. Fasten the crossbars around the entire perimeter of the fenced area using self-tapping screws.
Making a fence from a metal picket fence with your own hands is a simple task. For many years, galvanized fences have been used in urban and suburban areas, where they have proven themselves to be strong and durable structures. A metal picket fence is a fairly simple structure that you can build yourself with a minimum of money, time and effort. The main thing is to arm yourself with certain knowledge and tools.
Finished fencing option
picket fence
This is the most suitable fence for the house. Fences for giving from a metal picket fence look good.
Its popularity is easy to explain:
- Inexpensive type of fencing, available to any wallet.
- The structure is simple, familiar, concise.
- The metal fence is suitable for urban and household plots.
- Making such an iron fence is easy.
The fence for giving from a metal picket fence should be high enough and strong, and also perform decorative functions. For owners of a residential building, the main thing is protection against penetration and aesthetics. It can be intended for decorative purposes or as a fence for a vacation spot for summer residents.

Yard fencing
Versions
Metal picket fence - a laconic fence without additional decorative elements and design frills.
But the types of metal picket fence and its shape are different:
- Euro picket "Wave". Sections of such a fence are attached so that the top line is first ascending and then descending. This makes for a beautiful fence.
- Euro picket "Gorka" - the top forms an ascending line, which rises smoothly. Considered a classic type of fencing, the design is universal.
- Metal fence "Concave arc" - the upper edge forms a smooth downward line, the width of the gaps is the same. The fence will fit into both urban and suburban landscapes. These fences are universal.
- Metal fence "Herringbone" - the original pattern of the upper edge is suitable for a wooden country house.

Options and forms of a fence made of metal picket fence
In addition to the main types of metal picket fence presented, there are other varieties of it:
- canyon;
- peaks;
- shutters fences.
A short flight of stairs is a relatively new type; fences of this type have a place in any landscape. Blinds from a metal profile are a novelty in the construction industry.

Metal picket fence
Fencing features
The metal fence is made of a rectangular or semicircular profile. The thickness of the metal is more than 0.5 mm. The spans are covered with a layer of galvanized for anti-corrosion effect.
The photo shows a metal picket fence.

Metal picket fence
The fence is lightweight, the foundation for its installation is not needed. You can build a fence without complicated earthworks and strengthening the existing structure, unlike a fence made of profiled sheet.
For strength, it is necessary to concrete the supporting pillars on which the logs are attached.. You can make a more durable structure on piles.
For weather resistance, the metal is coated with protective materials: polyester, polyester. The coating will give a beautiful glossy finish and resistance to fading. How to paint it correctly, the diagram will show.
The fence has a long service life without additional maintenance.
Strength is comparable to welded structures, and it is not difficult to make an inexpensive fence out of a picket fence.
Read also: Wicker fence from boards: a photo of how to make your own hands from wood
The base of the rack fence is made of galvanized steel - a reliable material that will last a long time. Can be inserted into the fences of the gate, if necessary. Gates made of metal picket fence are versatile and durable.

Gate and gate made of metal picket fence
Color options
The fence is painted from a metal picket fence using the method of one-sided and two-sided painting.
The wrong side is covered only with a layer of soil, the front side with paint. This option looks good in summer cottages, it suits lovers of calm tones.
If a bright view of the fence on each side is important, choose options with a double-sided coating.
The painting of the hedge is carried out with a polymer or powder dye, as for profiled sheet products.

painted fence
With a polymer coating, it is necessary to follow the technology. A fence with such protection can withstand almost any mechanical impact. If there is a scratch, then the metal will not rust, as it has additional protection. Reviews about this method of coloring are the most positive.
Powder coating is no less durable if it is done according to technology, but it costs less. The first layer is protective, applied to the fence for the fence, the second is powder. All layers are baked in special chambers.
Powder coating is often imitated by unscrupulous manufacturers whose products rust at the slightest damage. The polymer coating cannot be made in a handicraft way, so it is of better quality. You need to buy a fence only with a high-quality coating.

finished fence
Types of metal picket fences
Fences of this type differ in the installation method, the size of the spans and the gaps between the structural elements. Their device is not the most complicated.
Fence installation methods
The metal fence is mounted on supports, which we install in the following ways:
- concreting;
- crushed stone;
- driving into the ground;
- combined installation.

Scheme of installation of a fence with brick pillars
Concreting is the most reliable way to install support pillars. It is applied at unsteady soils. The height of the support is not less than 1 m.
The photo shows a fence made of euro picket fence.

Distance between planks
Butting with crushed stone occurs on denser soils, when one driving of pillars will not be enough. You can strengthen the support with brick crumbs.
Driving into the soil is used for heavy soils. The supports are dug into the ground to a depth of 1 m and rammed in the holes made. If the soil is not too dense, then it will be more reliable to concrete the supports. The height of the column is at least 1 m.

Installation of a fence in the soil
Dimensions and distances
There are no standards for gaps for fences. The distance is made for decorative and practical reasons. A large gap between the profile is made in decorative fences. The calculation of the distance between the slats is based on the width of one profile. The smaller the size, the more deaf the fence. However, do not make a fence without gaps.
The size of one span is chosen taking into account the perimeter of the fenced area.
The height is chosen taking into account the individual characteristics of the landscape and the preferences of the owner of the house.

Euro picket sections
Infill types
One-sided - the profile is attached only from the front side. The distance between the elements is no more than 5 cm. The picket fence is fastened in a two-sided way with a staggered arrangement of elements.
Read also: Do-it-yourself blinds fence: louvered lamella fence, picket fence photo
The location of the picket fence in a checkerboard pattern is popular despite the high consumption of material. The checkerboard fence seems to be solid, it is impossible to see the territory behind the fence.

Double sided fence installation
The combined (double) filling method preserves the view of the surroundings. Part is filled in unilaterally, part is chess. The size of the gaps is taken the same so that the fence looks organic. A double-sided palisade often encloses summer cottages. You can make a solid similar fence. This type of metal picket fence is shown in the photo below.

Do-it-yourself installation
Do-it-yourself installation features
Expendable materials:
- supports;
- wooden or iron horizontal logs;
- picket slats;
- screws (metal, wood).

Installation Features
If the installation will be carried out by hand, the wizard may need tools:
- drill driver;
- shovel;
- riveter;
- metal scissors;
- roulette.
A feature of the installation of this design is the absence of a foundation for a fence with a height of less than 1 m. Fences with a height of more than 1 m need a foundation, but less strong than the one on which the corrugated fence is installed.
Next, you need to calculate consumables. Then do the marking of the site. To do this, they clear the soil from branches and leaves, install the supports of a metal fence for the fence. Logs are stuffed onto the supporting pillars, galvanized strips are attached to them. All installation work is carried out using the building level to prevent distortion of the structure. How to calculate the amount of consumables, see the video.
Do-it-yourself installation: step by step instructions
The installation of a fence from a pile palisade begins with the installation of supports and stuffing the frame. It is quite easy for a novice master to work on such a design; he will not be puzzled by the question of how to make a fence from a metal picket fence on his own.
The video shows how to install fence posts.
You can read about how to make a fence from a euro picket fence at the link.
Installation of supports
First, markup is made for mounting the support. Dig holes of the required depth and width in accordance with the size of the pillar. Strengthen with columns, as much as the design requires.

Drawing for the installation of the fence
Two profiles twisted together are used as a support. You can make a fence from a metal picket fence on screw piles. Instead of profiles, they take a profile pipe. If desired, masonry is made of brick pillars for a metal picket fence.
Then the foundation supports are set according to the level. Fill the prepared recesses in the soil with a solution of cement, fix the supports. Installation is continued after the solution has completely dried, which is about two days. You can substitute brick supports for fixing.

Scheme for installing a fence
As soon as the supports are concreted, the transverse logs are fixed. A quarter of a meter recede from the extreme upper point of support and make a mark. Carry out similar markings on other pillars using a level.
The fastening fixes the upper crossbar to the base. Similarly, the lower strips are mounted to the metal, the size of the indent from the ground must be at least half a meter. The gate is sheathed separately. You can attach a metal fence.


