How to make a watering can from a 5 l canister. Homemade nozzle-watering can for garden watering
A watering can is a necessary thing for a gardener, but it is not always available where you grow houseplants, watering them from a mug every time. Watering plants under the root does not always favorably affect their appearance, since some plants need to be watered from above, capturing leaves and flowers.
In the article we will look at how to make a convenient watering can from a plastic bottle.
 |
1. Take a half-liter or liter plastic bottle and wash it thoroughly, removing all kinds of stickers, as well as removing any remaining soda or juice. |
 |
2. Use a marker to mark the bottle with dot marks where the holes will be located in the future. The holes on the bottle should not be too close to each other, but also too far apart, since at a close distance, the water will flow in one continuous stream. The optimal number of holes for irrigation is 25 pieces, 5 horizontally and 5 vertically, forming a square on the walls of the bottle. |
 |
3. Take pliers and a small nail. Clamp the nail with pliers in the area of \u200b\u200bthe cap, and bring it to an open fire. For an open flame, you can use a paraffin candle. Only the tip of the nail needs to be heated on fire for 20 seconds. |
 |
4. Bring the heated nail to where the markings are, then pierce the wall of the bottle by slightly pressing on the nail. If, when making holes, the nail has cooled down, then heat it again over a candle. |
 |
5. On the opposite side of the bottle, using a knife, cut a square hole for pouring water into the bottle. You choose the diameter of the square hole yourself, but it should not be lower than the holes for watering, relative to the bottom of the bottle. |
 |
6. For easy watering from a bottle, you can make a handle out of tape. |
 |
7. Fill the plastic bottle with water so that it is 2-3 cm below the hole. |
| 8. Gently tilt the bottle horizontally over the plant as you start watering it. Fill the bottle with water as needed. | |
Articles similar to How to make a watering can from a bottle.:
-
Surprisingly, it is a fact that with a hammer you can make an even hole in the glass, ... -
Solar energy is energy released in the form of light and heat. There are many ways to...
Agree, a watering can is a necessary thing for a gardener, but it is not always at hand when you grow indoor plants. After all, watering simply from a mug under the root is not suitable for every plant and does not always favorably affect their appearance, since some plants need to be watered from above, capturing leaves and flowers.
Today we will look at an example of how you can do without a purchased watering can at home. And make it from a simple plastic bottle.
1. Take a half-liter or liter plastic bottle and wash it thoroughly, removing all kinds of stickers, as well as removing any remaining soda or juice.

2. Use a marker to mark the bottle with dot marks where the holes will be located in the future. The holes on the bottle should not be too close to each other, but also too far apart, since at a close distance, the water will flow in one continuous stream. The optimal number of holes for irrigation is 25 pieces, 5 horizontally and 5 vertically, forming a square on the walls of the bottle.

3. Take pliers and a small nail. Clamp the nail with pliers in the area of \u200b\u200bthe cap, and bring it to an open fire. For an open flame, you can use a paraffin candle. Only the tip of the nail needs to be heated on fire for 20 seconds.

4. Bring the heated nail to the plastic bottle where the markings are, then pierce the wall of the bottle by slightly pressing on the nail. If, when making holes, the nail has cooled down, then heat it again over a candle.

5. On the opposite side of the bottle, using a knife, cut a square hole for pouring water into the bottle. You choose the diameter of the square hole yourself, but it should not be lower than the holes for watering, relative to the bottom of the bottle.

6. For easy watering from a bottle, you can make a handle out of tape.
Many owners of suburban areas and cottages are faced with the fact that by the end of the season they have accumulated a lot of unnecessary canisters and plastic bottles.
Such things should not be thrown away: from them you can create a wide variety of crafts for the garden, cottage or garage, which can perform both a practical and decorative function.
Most of these items can be built with minimal effort in 10-20 minutes, and they can make the area more interesting and original.
 Depending on the characteristics, such containers classified according to the following parameters:
- Volume - from 1-2 to 50-80 liters.
- The form. Canisters can be flat and rounded, oval, rectangular or square in section, have a handle with a lid.
- Colour. Plastic products are most often white or translucent, there are also cans of green, blue, red and other shades.
For creating decorative items and practical devices suitable containers for food, water, fuels and lubricants, fertilizers, other liquid products.
Before you start making crafts, it is advisable to inspect the canister for damage, thoroughly clean and degrease it.
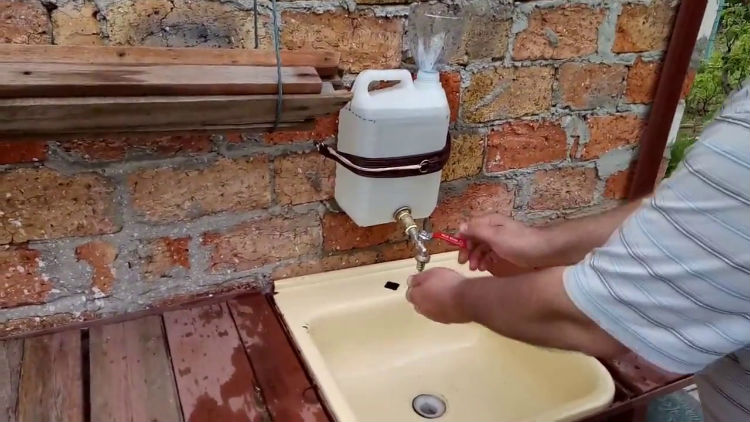
How to make a washbasin?
A 5 liter plastic container is ideal for creating country or camping device for washing.
The filler hole of the canister will be used to fill with water, and in the bottom you need to make a hole and insert a tap or valve.
To do this, you need to use a pair of seals in the form of rubber gaskets and a fixing nut so that the water does not leak out, and the tap is firmly fixed.
Washbasin or washbasin can be hung on a crossbar, hook, attach to a vertical surface with a belt or even tape. A funnel can be inserted into the filler hole for convenience: this way, when filling the canister, water will not spill onto the ground.
If you put a simple faucet, you can adjust the pressure by turning the handle.
Master class on creating a swan
Sculptures of birds to decorate a suburban area are often made of plastic. We present to your attention a small master class on making a swan from an old canister.
For this purpose 5 liter containers required. It is necessary to cut the product so that the body, tail and long neck are immediately cut.
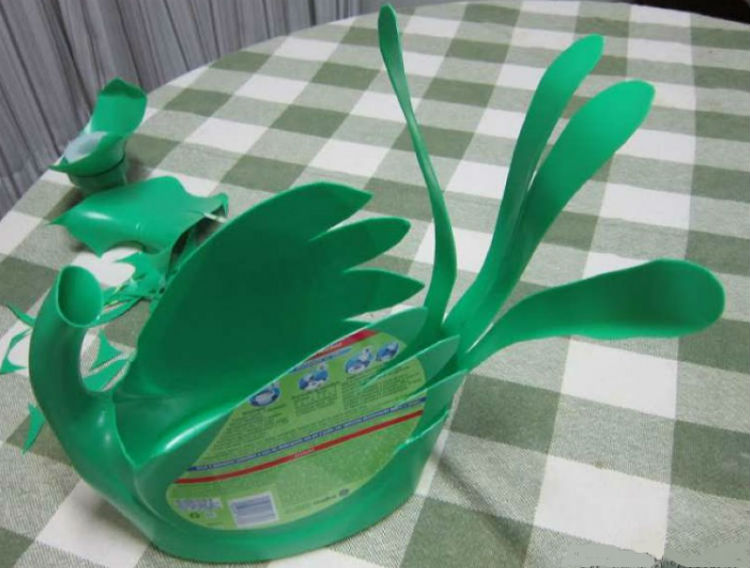
Then you need to prepare the wings from thick cardboard.
Neck worth cover with newspaper and tape, then do the same for the entire workpiece.
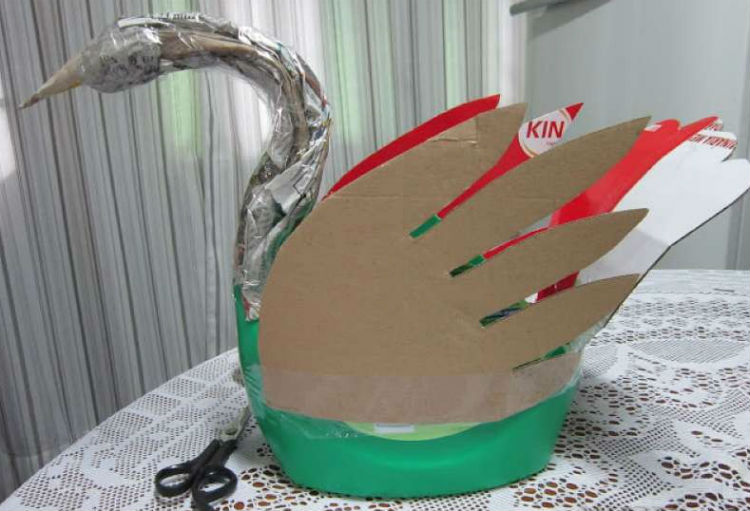
After you need apply a layer of plain napkins and coat the future sculpture with plaster mortar.

As they dry, the surfaces are sanded, painted and decorate with additional elements(for example, the eyes of a bird can be made from colored stones or glass).

Garden flowerbed
Many owners equip flower beds in the garden or front garden, and plastic canisters can be used for two purposes:
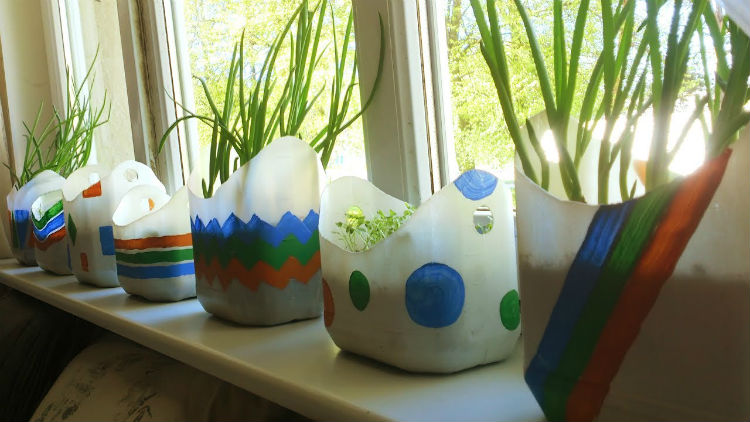
- Container for planting flowers. You will need to cut the product, turning it into two halves, and dig it into the ground, then pour the prepared soil with fertilizers inside and sow flowers. The canisters themselves can be optionally decorated with colored paper, paint, and in other ways. In addition, the mini-flower beds themselves can be lifted off the ground, as shown in the photo below: this is especially true if the soil is initially not suitable for specific varieties or it is too wet.
- fencing for the finished flower bed. The option is great for large flower plantings: canisters are dug around the perimeter, blocking the plants. This design is rather decorative, for her it is better to use colored containers of the same shade or alternate 2-3, then the fence will look aesthetically pleasing.
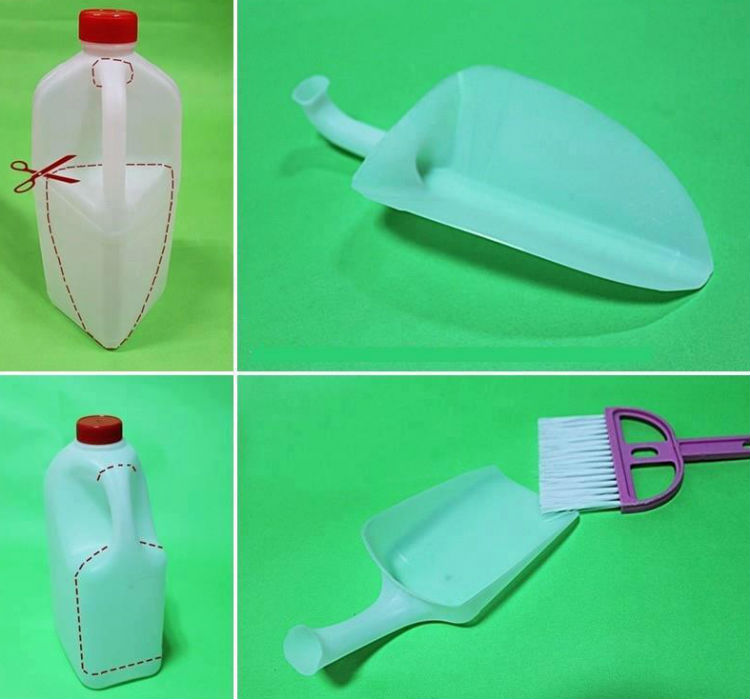
plastic scoop
If the canister is small (1.5-2 liters), a scoop can be made from it for cleaning or garden work.
You will need to mark the future product on the surface and cut it out; the handle matches the container handle. The bow can be made both triangular and square.
In the first case, it is convenient to use a scoop for digging up plants with a small root system from soft soil, and in the second case, for collecting garbage.
Sprayer
A large capacity (10-30 liters) can be adapted for spraying plants with chemicals that protect plantings from pests.
canister equipped with a manual or electric pump for ease of spraying. For carrying, you can adapt the handle or straps to carry it on your back.
The hose, spray nozzles, and rod can be purchased at any hardware or plumbing store.
A rubber nipple can be used to install the valve.
Such a sprayer is suitable for processing small gardens and front gardens, for larger areas an extension may be required.
Most often a device made of a plastic canister used for spraying chemicals against pest beetles, cabbage, as well as mold and fungus. You can also use products prepared according to folk recipes, from soap solution to urea.

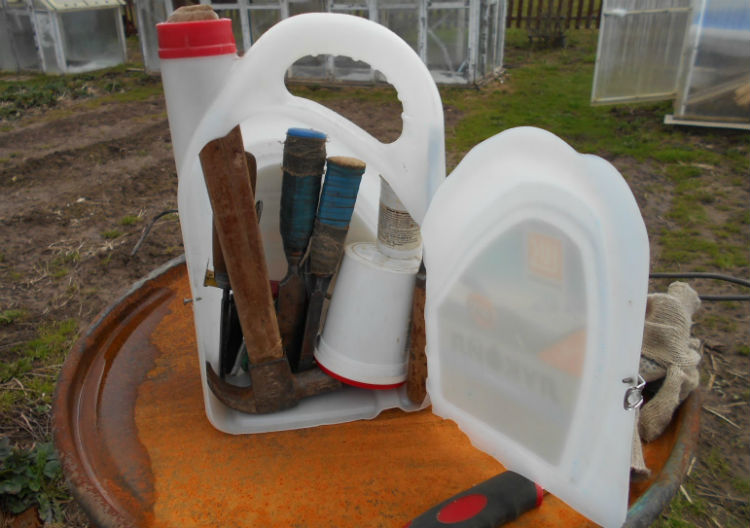
Tool box in the garage
To create such a device, you can use cans of different sizes, the choice depends on how many things you plan to put inside.
The most commonly used containers are 10-20 liters from under water, food, chemical, combustible products. The shape should be rectangular, in the middle at the top is the handle.
Manufacturing instructions:
- make a vertical cut on the side of the neck and handle, leaving the wall intact from the narrow part of the canister;
- bend the resulting "door", opening the container. Inside you can place sections of plastic cups or boxes, any other fasteners. In such a box, you can store small items (nails, screws, paper clips, electrical tape, etc.) or tools directly (hammer, pliers, pliers, etc.).
In order to make the tool box stronger and more airtight, the sides can be reinforced with metal plates, for this, the walls will need to be drilled and fixed with bolts and nuts.
Watering can
For such a product, it is optimal to take a canister from under the detergent or other products that have slightly flattened shape and comfortable handle.
It is necessary to thoroughly wash the internal parts from liquid residues, then drill thin holes in the lid. The optimal size is 1-1.5 mm. Just above the handle, you need to make a larger hole for air supply: if this is not done, it will be more difficult to water the beds due to the pressure drop.
If necessary, you can equip the watering can with a plastic tube, which is purchased in household goods or plumbing stores: it will increase the spray range.
The water is poured through the cork, for this convenient to use a funnel or hose so that the liquid does not spill.
You can also cut a wider lid, then the use of a funnel when filling with a regular bucket is not necessary. However, in this case, care should be taken to ensure that when watering the plants, water from the watering can does not flow to the ground through the lid.

We create a planter
Hanging or stationary flower pots can also be made from plastic containers.
canister can cut in half horizontally, then process the edge of the medium so that it is not sharp: grinding will be required. After that, holes are made 0.5-1 cm from the edge, into which a cord or rope of small thickness is inserted, fastened with an allowance of 20-40 cm (the size depends on which plant the pots will be used for).
Then a single suspension is formed, it can be made in the form of a loop. The planter can be hung on hooks, wire, nails.
If the products are to be placed on a stand, making holes for fasteners is optional.
In any case, small cuts are needed in the bottom: they allow you to create a competent soil microclimate and remove excess moisture.
The surface of finished planters can be braided into knitted covers, decorated with appliqué or painted - a sample of such crafts is shown in the photo below.
fishing box
For this purpose, 20 liter oil cans can be used; side pockets, if necessary, are made from less capacious containers.
The canister is cut off, leaving the height at which the fisherman will sit comfortably for a long time, reinforce the cut with an aluminum strip with rivet fastening.
Inside you need to place a partition made of thick plastic: it not only divides the object into compartments, but also serves as an auxiliary stiffener and prevents the lid from deforming.
The lid is cut out of a thick plywood sheet and attached to the hinges. The top part is usually Lined with soft material for comfort.
A strap is attached to the sides of the canister so that the fishing box can be carried on the shoulder. The inner tool compartment can be divided into smaller segments (for rigging, rods, donks, circles, etc.).

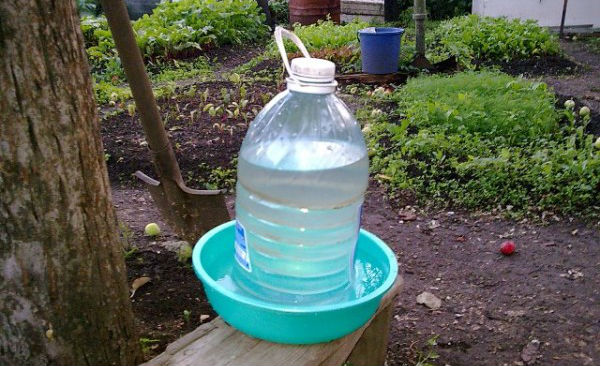
Drinker for chickens
A device for providing poultry with fresh water can also be made from a 20-30 liter canister.
Would need prepare a wide pallet impervious to moisture. Make cuts in the bottom, then put the canister in the pan, leaving a gap between it and the bottom of 1-2 cm (for this, you can make coasters along the edge under the container).
The structure should be fixed so that the water container does not turn over from an accidental push.
After filling the liquid will flow evenly into the pallet where the chickens can drink from.
Such a drinker for chickens is good not only for its simplicity, but also for the absence of the need to manually adjust the water flow.
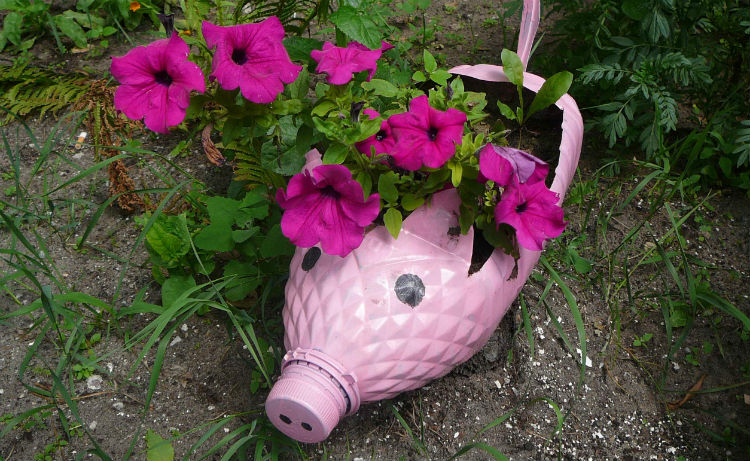
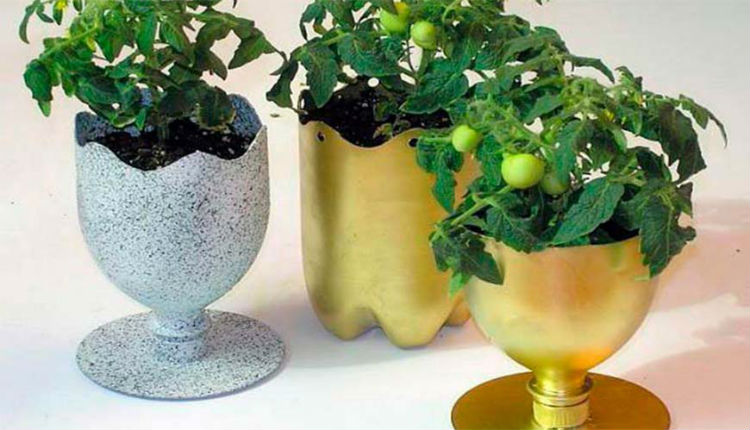
Flowerpots
It is very simple to make such products: just cut off the upper part and make holes in the bottom to remove excess moisture. Canisters are placed on stands, soil is poured inside and seeds or seedlings of flowers are planted.
Such flowerpots can be decorated or processed with moisture-resistant paint, decorated with appliqué.
Most often they are placed on terraces and in gazebos, turning the place of rest into a piece of paradise filled with greenery.
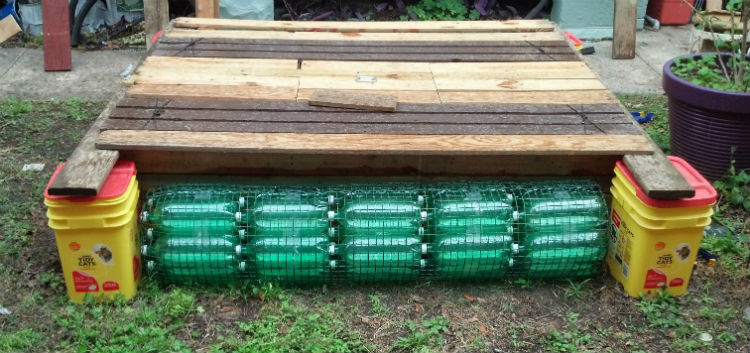
A raft of empty containers
This design is suitable for crossing the river, fishing, mobile bridges on the pond.
The frame of the raft is made from a 3 mm board, knocking it down with nails or screws.
A raft is made from empty canisters with a volume of 40-50 liters, they are attached to the frame with packing tape or a special darkened film.
The second option is interesting in that it protects plastic surfaces from fading under the rays of the sun. The frame must first be coated with antifungal agents and varnish to protect it from decay upon contact with water.
Finished construction can be equipped with the following equipment:
- mooring ladder;
- feeders for luring fish;
- seats, loungers;
- shelter from the sun;
- anchor.
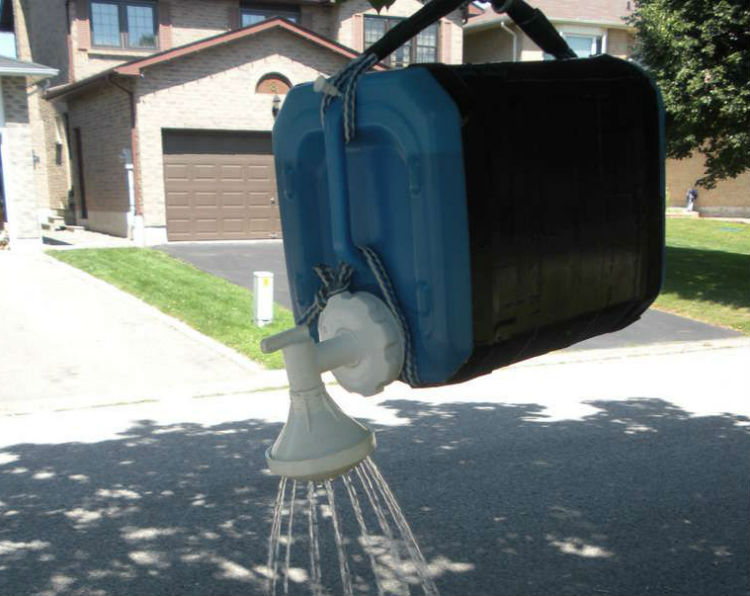
Shower for giving
The procedure for creating such a structure includes the following steps:
- Creating a handle. To do this, you can use a simple rope, passing it through the handle of the container and tying it around a tree or other structure where the shower will be attached.
- Installing the nozzle. A lot of small holes should be made in the lid, blow through them, then insert it into the container faucet. The joint should be sealed so that moisture does not leak.
- Building a stopcock regulating water pressure. Such a product can be found in the plumbing department. Rubber seals are required for installation.
- Cover arrangement where the water will flow. It is better to make it closed so that dirt, foliage and insects do not get into the canister.
- The sides are covered with black tape. so that the water inside warms up faster: black walls absorb ultraviolet better.
Useful video
Another idea for using a plastic canister is the toilet paper holder plus shelf in this video:
Conclusion
If you still have unnecessary plastic canisters and you cannot find a use for them, you should not throw them in the trash.
Recycling plastic with reuse in industry is the best option, allowing rational use of resources without harm to the environment.
In addition, the containers themselves can be used both for decorative and practical purposes - the choice depends only on the owner's imagination.
From the article, you learned what can be made from 10-50 liter canisters for a garden or garage, got acquainted with how to make a washbasin, a swan, a watering can, a raft, garage boxes and other useful tools.
In contact with
A watering can for flowers is an indispensable attribute of a personal plot, a summer cottage plot of land, a cottage house and even an apartment. In order for the watering can not only play its functional role, but also be combined with landscape design or the interior of a newfangled apartment, you need to understand exactly where you will use it.
Watering cans made by hand decorate the interior and are useful to use. Every housewife loves her flowers and takes care of them. Leica is an assistant in this matter.
Watering can for flowers
If the apartment will be a permanent home for the watering can, you can take the watering can you already have or purchase the simplest option, and then paint it in a uniform color. However, you won’t surprise anyone with this option, because you can buy a plain watering can in a store, so why then waste time and effort on painting it?

An excellent and simple option would be a beautiful bright sticker that is applied to the surface of the watering can. You can completely paste over it, but you should understand that paper stickers will quickly get wet and deteriorate, unless, of course, you stick adhesive tape over the paper. This should be done around the entire perimeter of the picture so that there are no gaps left, because water can get into things and seep into the depths.

As you know, they play a very important role. Some of them need special care, they should not be watered excessively, which can happen if you pour water from a bottle in a large jet. It is also possible to damage the stem of the plant, even if you do not notice it, but the plant will suffer.
Many indoor leafy flowers love to be watered from above to create the effect of rain. Droplets form on the leaves, and this also feeds them. This is where a watering can will be useful, which can be combined with a sprayer.

However, it is also worth remembering that this rule does not apply to all home flowers, and for some of them, top watering will be marked by the onset of disease and leaf rotting. Therefore, before using a watering can, read on the Internet how to properly water certain types of flowers.
How to make a watering can
Let's think about how to make a watering can with your own hands so that it not only helps you in watering, but also looks interesting and unusual.
The first and easiest option is to take and make holes in its lid with an awl. So that this option does not look too ordinary and banal, you can take a bottle of an unusual shape, having previously examined the entire range of drinks offered in the store.
It will be difficult to paste over such a bottle, therefore, if its color does not suit you, it is advisable to use paint. However, this maneuver applies to bottles whose surface is dense and does not bend, otherwise the paint will quickly crack.
However, the option of cracked paint is also not bad, because it is also interesting and unusual, but it is suitable for you if you use a watering can, for example, in the country. This is not suitable for an apartment option, because peeling paint underfoot is a bit different from what we are trying to achieve.

Do-it-yourself watering can from a glass
A watering can can also be made from a glass. It will be more difficult to process, but this version of the watering can will last much longer and will look much more aesthetically pleasing. For such a device, you need to take some kind of glass or even a ceramic mug, as well as a drill.
You should be very careful with a drill, because while working on creating a hole, the mug may burst or small cracks will appear on it. To prevent this from happening, the hole should be drilled carefully and slowly.
- we take the plastic tube that we prepared, according to the thickness of which we created the hole;
- paint the tube and the glass itself in one color;
- insert the tube into the glass under the watering can for flowers;
- We fix with glue so that there are no gaps through which water could leak.
It is advisable if you choose a mug that has a narrow neck, since a wide top opening will be inconvenient to handle, and to prevent water from pouring out of it, you will need to pour too little water into an already capacious mug.

Unusual watering can with your own hands
If the option with the original small watering can does not suit you, and your plans include watering a large number of flowers planted in open ground, the idea of a large original watering can will certainly come in handy for you.
Take a bottle of some detergent, apply chaotic lines to it using ordinary paints. You will get an interesting avant-garde-style watering can, on which dirt will not be too noticeable. To prevent the pattern from being washed off, cover the watering can with varnish. Such a watering can can also be left in the yard, if you have one, near which decorative elements look great.

However, a watering can can be a simple decoration of the interior or landscape design of the site. Even if you only have one, it doesn’t matter, you can put a watering can near them, this will only decorate and add aesthetics to the atmosphere.
Hello DIYers, as well as summer residents and gardeners! This August has finally taken revenge on the previous two abnormally cold and rainy summer months. He has already managed to pamper us with real summer warmth and even heat, but at the same time, the situation turned out to be the opposite with rains, since there were practically no rains this August. Therefore, we had to again take on waterings and watering cans and water the garden beds. And then, in the midst of watering work, we completely broke down the purchased nozzle-watering can for a plastic watering can. I must say, it was rather flimsy from the very beginning, and even earlier it had to be rewound with electrical tape. But then a whole piece broke off from her, and she became completely unsuitable for irrigation.
We actually have two old metal sprinklers with strong metal nozzles, but they are quite heavy and not very comfortable to use. Moreover, it is especially difficult for women to use them. From this point of view, a modern plastic watering is of course much more convenient and therefore used most often. Therefore, I decided to quickly make a homemade nozzle for this watering, literally from what was at hand.
From the materials for this I needed:- Empty plastic shampoo bottle;- A piece of old rubber hose. Of the tools needed:- Cordless drill-driver;
- Drill for metal with a diameter of 2.5 mm;
- Knife;
- Shilo.

Irrigation making
First I cut off a small piece of rubber hose.
This hose is very well suited to the neck of the shampoo bottle, as it is put on it very tightly and firmly, and no additional fastening is required.

However, in order to put the other end of this piece of hose on the sprinkler spout, it is required to remove a certain layer of rubber from the inside with a knife.


And now this piece of hose is already quite easy, but at the same time it is very tightly put on the watering spout.

Now you need to modify the shampoo bottle by drilling holes in it.
To do this, you first need to mark and prick the centers of future holes with an awl.

And then drill them out with a drill.

After that, it remains only to cut off with a knife from the surface of the bottle, the pieces of plastic left after drilling the holes.

Then you need to rinse this bottle from the remnants of plastic chips that got inside, and put on the previously prepared piece of rubber hose. And now our nozzle is ready!

Now you can put it on the spout of the watering.
We also recommend
 Switching power supply: repair and refinement
 Remote control of light
 Swimming lessons for preschool children
 Notes for the master - home household alarms
 Clock propeller on Atmega8
 Device and relay application examples, how to choose and connect a relay correctly Microcontroller and relay simple switching circuits