How to make a hammock chair from a hoop. How to weave a macrame hanging chair with your own hands master class How to sew a swing from a hoop
With the advent of summer, many city dwellers tend to get out into nature at least for the weekend, and if there is a summer cottage and circumstances allow, then for the whole summer. There is probably no such person who would not like to take a nap in the fresh air to the singing of birds, swaying in a hammock or chair. To save on the purchase of this simple, but rather expensive furniture element of the interior, a do-it-yourself hanging chair can be made in several ways, which will be discussed later.
For the manufacture of some options, the simplest materials are used, which even, perhaps, simply litter the barn. For others, you will have to prepare material in nature or purchase it in a store. Making may require the "mobilization" of one's abilities in needlework - weaving or knitting, so that there is work not only for men, but sometimes even more so for housewives.
Varieties of hanging chairs
Hanging chairs began to be widely used in the 50s of the last century - then they were at the height of fashion. Many designs of these idiosyncratic "luxury" items have been developed, made from a wide variety of materials.

- A chair with a rigid frame made of rattan, wicker, metal, plastic or acrylic. In this case, the base can be covered with a durable fabric or braided with wicker rods, rattan or leather strips.

- A chair with a soft frame, made according to the principle of a hammock. The main difference between these seats can be called the size and method of suspension. If the hammock is fixed on two supports located at a certain distance from each other, then one is enough for a chair.
 Cocoon chair - for those who like to spend time in solitude
 - The cocoon chair is made on a rigid frame and has wicker walls. The difference between this type of product and other types of chairs is that its internal space is half hidden from the outside world. Such a place is ideal for people who love privacy.

- The drop chair is mainly intended for children's rooms, as it is more like a hanging little house that you can hide in or even sleep in. In addition, it has enough space to take your favorite toys with you.
Making simple hanging chairs
In this section of the article, several options for making hanging chairs will be considered, which should be quite feasible for most skilled owners.
Hanging hoop chairs
The easiest way to make a hanging chair at home is from a regular hula hoop, which can be found in almost every home or purchased at a sporting goods store. Moreover, there are two options for manufacturing such a piece of garden furniture. One of them will require one hoop, the other two, slightly different in size. Both options will be shown - you can choose the one that seems easier to manufacture.
Prices for hanging chairs Kvimol
Kvimol hanging chairs
First option

- To make such a chair, you will need the following materials:
- one hoop from a pipe 20 ÷ 30 mm in cross section, with a diameter of 700 to 1100 mm, depending on how large the chair should be;
- two identical pieces of fabric measuring 1200 × 1200 mm or 1600 × 1600 mm. A strong fabric is selected, you can take the lining material on the padding polyester, which already has a stitching;
- a cut of the same fabric 200 mm wide, 3500 ÷ 4000 mm long (several pieces can be);
- colored dense fabric for sewing pillowcases for two ÷ three pillows;
- synthetic winterizer, also having a width of 200 mm, and a length of about 3500 ÷ 4000 mm (several pieces can be);
- synthetic winterizer for stuffing pillows;
- border for processing cutouts in the case - 800÷1000 mm;
- zipper with a length of 700 ÷ 1100 mm;
- durable nylon cord with a thickness of 6 ÷ 8 mm or a linen rope with a diameter of 10 ÷ 12 mm, a length of 10500 mm (10.5 m);
- two powerful metal carabiners and rings for hanging the chair.
- From the tools you need to prepare:
- threads and needles for hand sewing;
- sewing machine;
- scissors;
- marker;
- tape measure or centimeter.
- The manufacturing process of such a chair is presented step by step in the table:
| Illustration | |
|---|---|
 | In the first step, the fabric is spread on the table, and then a hoop is placed on it in the center. |
 | Further, with the help of a centimeter around the hoop, a circle is measured and marked with a marker, with a radius of 250 mm more. |
 | A circle is cut out of the fabric along the marked line. Such parts need to prepare 2 pieces. |
 | The finished elements of the future cover should look like this. |
 | The next step is to fold one of the cut out round blanks in half and then cut it. |
 | Further, along the line of the central cut of the circle, a lightning is pinned, and then a lightning is attached. 250 mm recedes from the edge of the cut, and from this point the lock is fixed, that is, it must be clearly along the length equal to the diameter of the hoop. |
 | After the lock is attached, the two halves of the cover are sewn around the circumference, and then it is turned inside out and laid out on the table. |
 | Further, in order to make it convenient to make markings for cutouts, the finished cover should be put on the hoop. The markup shown in the presented drawing is made. The places where cutouts should be made are marked with a marker. |
 | According to the marks made, four cutouts are made through which cords or ropes will be attached to the hoop. |
 | To make the cut holes look neat, they need to be sheathed with braid. Having finished work on the cover, you can proceed to the preparation of the hoop. |
 | The hoop is wrapped with synthetic winterizer. In several places, the metal can be slightly smeared with polymer glue so that the wrapped material does not slip during its stitching. Next, comes the sheathing process itself. It is done by hand, stitches over the edge. |
 | The next step is to sheathe the hoop wrapped with synthetic winterizer with a cloth. Well, in order for it not to slip, first its edges are wrapped inward and chipped off with pins. |
 | The fabric is also sewn by hand, over the edge. As you sew, the fixing pins are pulled out. |
 | The sheathed hoop is inserted into the case through the hole into which the zipper is sewn, which is then fastened. |
 | Further, two pieces of 2200 mm each and two of 2800 mm each are cut from the cord. |
 | Then, the cords are folded in half and their ends are tied together. After that, they are threaded into the cut holes, under the hoop. |
 | The cords are fastened to the hoop by threading the knotted ends into a loop formed on their other side. |
 | Lastly, pillows of suitable size are cut and sewn, and the chair is hung in the place chosen for it. How to carry out the process of fixing the chair on the ceiling or in the yard will be discussed below. |
Second option
 The second option - two hoops in an openwork weave
 In the second version, in the manufacture of a hanging chair, slightly different materials are used, in contrast to the first model. Such chairs are made in the same way as macrame hammocks, but can be made in another way, accessible to everyone, since not everyone knows the art of weaving.
- So, to make this chair, you need to prepare:
- two metal hoops (ready-made or self-made, for example, from a metal-plastic pipe) with a cross section of 30 ÷ 35 mm, with a diameter of 700 mm for the manufacture of the seat frame, and 1100 mm for bypassing the back;
- in this case, a nylon cord for weaving is used, 4 mm thick and it will take 900 m, but a linen or jute cord with a diameter of 5 ÷ 6 mm or strips of thick leather can be used instead;
- nylon cord with a cross section of 6 ÷ 7 mm for hanging a chair - 12 m;
- 2 wooden bars with a section of 20 × 35 mm, or 2 metal tubes with a diameter of 20 ÷ 25 mm. Instead, you can use two pieces of rope with a cross section of 10 ÷ 12 mm.
The manufacturing process of this version of the chair includes the following operations:
| Illustration | Brief description of the operation to be performed |
|---|---|
 | The first step is to wrap both hoops with a cord. Every 20 turns, a tightening is done so that the loops do not slip. Sometimes a small amount of polymer glue is used to secure the rope to the metal, which, of course, should not come out. The cord must be laid very tightly, otherwise the finished product will look sloppy. |
 | The next step is to braid the hoop, which will serve as a seat. For this, a checkerboard pattern can be used, consisting of various knots. |
 | This illustration shows a variant of the checkerboard braid made with diagonal flat knots. |
 | In this photo shows the same drawing, but in a direct version. |
 | For those home craftswomen who find it difficult to master the art of macrame, or just want to work on the braiding of the hoop quickly, we can recommend using the technique that is used for weaving rugs. But, if, after finishing the rug, it is removed from the hoop, then during the manufacture of the chair, the resulting weaving remains on the round frame. To make the weaving strong, for the base, which is fixed on the hoop, you need to choose high-quality cords. |
 | The next step is to connect the two prepared hoops together with a cord, tightly wrapping it in front of the future chair. |
 | For the rigidity of the back, two supports are made of bars, tubes or a thick cord, which are tightly braided with a thin cord. These two jumpers (in the illustration above they are shown in green lines) are fixed to the back and seat hoop using weaving. |
 | Next, you need to perform weaving on the back of the chair - in the remaining gap between the two hoops. Braiding can also be done using the macrame technique, the above presented technique for creating rugs, or the simplest crochet - whichever is more convenient. |
 | It should be noted here that the installation and braiding of the supports of the back of the chair can be done both before and after weaving the back. |
 | It is also better to braid the slings for hanging the chair with a cord - so they will be much stronger and more reliable. The slings are fixed on the back hoop in four places, but their length is adjusted to the desired size already when hanging the chair in the chosen place. |
It should be clarified that for the manufacture of chairs instead of a hula hoop, you can use plastic (polyethylene) pipes for plumbing - they are light in weight and have sufficient strength. The advantage of this material is also that the braid will look much more profitable and more aesthetically pleasing on a larger diameter pipe. In addition, plastic is warmer and softer than metal. Pipes are sold in the construction markets in the form of bays and already have a suitable shape, so you just need to select the desired ring diameter and fasten it correctly.

Suitable for creating frame and pipe hoops. They are somewhat more expensive, but also stronger, since their walls consist of several layers. Metal-plastic pipes, just like plastic pipes, are easy to cut with a hacksaw.
The length of the pipe section required for the hoop is determined by the formula for the circumference:
L = π × D ≈ 3.14 × D
- where D- this is the required diameter of the hoop,
— S is the required pipe length.
For example, if you need to make a hoop with a diameter of 1100 mm, then this will require 3.14 × 1100 = 3454 mm, or when rounding 3.5 meters of the pipe.
You do not need to purchase rigid polypropylene pipes, since when bent they can behave quite unexpectedly.

The ends of the pipe are connected to each other using a special insert of a smaller diameter than the pipe, but tightly fitting into it. Such an insert is usually made of wood or dense plastic. It is inserted into the ends of the pipe, then they are tightly shifted and fixed with stainless steel screws 15 ÷ 20 mm long, depending on the diameter of the pipe. This circumstance is important to take into account so that the screws do not pass through.
Wicker hanging chair
 Task of increased complexity - wicker chair
 The traditional option is hanging wicker chairs, which can be made from specially prepared flexible rods of willow, bird cherry, rakita, rattan or bast. In central Russia, the easiest way to find broom or willow, which grows densely along the banks of rivers.
 Weaving material - long and flexible wicker
 In order to make a wicker chair, you need to purchase and prepare the following materials:
- Long willow rods with a diameter of 10 ÷ 15 mm - they will need about 400 ÷ 450 pieces. It is better, of course, to use rattan, especially for those who first try their hand at the art of basket weaving, as it is more flexible and easy to work with.
- For the front of the chair, a metal hoop, metal-plastic pipes can be used as a frame, or the base can be created from several vine rods woven obliquely.
- Strong twine and glue will be needed to tie the frame.
- A secateurs, an awl, a knife and a ruler are necessary for measuring the material and cutting it.
- A cord with a section of 4 mm made of nylon is close in color to the shade of the rods - it will be needed for weaving the back. If there are skills in weaving, then the back is made from a vine.
- Cords, chains or ropes for hanging the chair. Their length will depend on the height of the ceiling of the room or other suspension point.
The pattern of weaving can be different, and its complexity depends on the experience in this art.
The simplest option for making a hanging cocoon chair involves the following operations:
- The cut vine is steamed and cleaned of bark, and then beaten off - this is necessary so that it is more pliable in weaving.
- To begin with, the frame of the chair is formed. If a hoop is used for the front part, and an oval shape in the form of a cocoon is planned, then the hoop will have to be slightly flattened. However, it is best to use a metal-plastic pipe for this frame element, which can be easily shaped and connected to its ends with an insert.
- Then, the rest of the frame elements are fixed to the pipe. The rods must have a cross-sectional thickness of at least 6 ÷ 8 mm, and a length greater than the height of the chair by 250 ÷ 400 mm, if they are fixed vertically. If, however, rods of this length were not found, then the frame can be made of horizontally fixed elements.
- Mounting the rods vertically, they are fixed on the upper part of the frame, in its middle, so that they gradually move apart from each other, and in the middle of the chair back, the distance between them should be 20 ÷ 25 mm.
- The rods bend, creating the shape and depth of the chair, and in the lower part they gather again towards the middle. So it turns out a kind of basket-frame, which will be ready to be in a vertical position.
- There is another way to form the base, when horizontal rods are fixed on the sides of the frame. They are also mounted every 20÷25 mm, and the shape of the future chair is also created from them.
- The frame vine is fixed on the base by bending it through the pipe from the inside of the chair to the outside. Then the bent end is intercepted with a twine.
- Further, the frame rods are braided transversely with a thinner vine, starting from the bottom and gradually rising up. If weaving goes along a horizontally arranged frame, then it necessarily starts from the middle of the back to the sides. On the pipe, the end of the rod is bent and twisted around the main vine. Each rod is closely pressed against the previous one.
 An example of compacting the laying of a vine when weaving along vertically installed frame elements.
 - The entire basket of the chair is woven in the same order. The end of the last rod is bent, tucked in and secured in weaving.
Since in such an armchair in the seat area there is no reliable support due to the oval shape, a foam rubber pillow of sufficient thickness is inserted into the lower part as it - this can be tried on in place.
Find out how by studying a master class on making chairs for a veranda or terrace in a special article on our portal.
Hanging chair from the board
Another type of hanging chairs can be made from boards, in several versions. Installation of such a design is quite simple, even for those owners who do not have carpentry skills. It is enough to be able to carefully handle the surface of the boards and drill even holes in them.
First option

This option is ideal for a summer cottage - such a chair is easy to hang in the shade of trees, where it will be very pleasant to relax in the fresh air.
- To make such a design, you must have the following materials on hand:
– Boards, size: length 600÷700 mm, width 120÷150 mm, thickness 10÷15 mm. These elements will require 16 pieces. Boards should be well processed, it is desirable to round the ribs on them. Some masters use boards from standard euro pallets.

- Nylon cord-paracord - 10 m.
— Water-based varnish for outdoor work.
- To work, you will need the following tools:
- Hacksaw or jigsaw.
- Drill and drill bits for wood with diameters of 6, 8 and 10 mm.
- Sandpaper.
Work on the manufacture of such a chair is carried out as follows:
| Illustration | Brief description of the operation to be performed |
|---|---|
 | If the chair will be made from pallet boards, then it will need to be carefully disassembled, while not allowing cracks to appear or expand. Then, also very carefully, nails are pulled out of the boards. After that, the edges of the boards with holes from the nails are sawn off evenly. All surfaces must be carefully processed to perfect smoothness, otherwise you can easily get a splinter, and in the most inconvenient place. |
 | The processed boards are marked out, folded in two or three pieces and through holes are drilled in them at a distance of 50 mm from each other. Here it should be noted that the holes can be drilled along the edge, with an indent from it of 15 ÷ 20 mm, or in the middle of the board in two rows, at a distance of 30 mm from each other. |
 | Next, the boards are stacked side by side, and a cord is inserted into the holes, as shown in the illustration. |
 | The next step, the cord is pulled through the holes across the previous connections. When assembling, it must be remembered that the cord should not be tightened too much, since the boards must be sufficiently loose in relation to each other. This is necessary so that the resulting design can take the form of a chair. After pulling the cord, it is tied with a double knot on the back of the structure. |
 | Further, in the upper board and in the second board from the bottom, with an indent from the edge of 35 ÷ 40 mm, in the middle of the board on its two sides, two holes symmetrical relative to the center are drilled. They will be required to pull the cords of the desired length, for which the chair will be suspended. |
 | In order for the cords not to converge pyramidally upward, but to be stretched at the required distance, in the upper part, just below the suspension point of the structure, they must be fixed with a wooden frame. After passing through the frame, all the cords are connected and woven into one rope. |
 | The result is a comfortable chair, which can be additionally equipped with a foam mattress or pillow for comfort. |
Second option
The second version of the wooden chair is even easier to make than the first, but it is more suitable for giving as a dacha. However, taking the proposed design as a basis and strengthening it, even a hanging sofa can be made according to this principle.

In order to make just such a chair, you will need:
- 14 well-finished boards 500 ÷ 700 mm long, 50 ÷ 60 mm wide, 15 ÷ 20 mm thick.
- Nylon cord with a diameter of 10 mm, length 10 m.
- Self-tapping screws with wide caps (press washers) 10 mm long.
Of the tools, you will need, in principle, only if the lumber is pre-processed and coated with protective compounds.
- In the first step, the boards are evenly laid out parallel to each other, face down, a distance of approximately 10 mm is maintained between them.
- Next, you need to determine how long the cord will be required on each side - for this, a fitting is performed.
- Between the laid boards, at a distance of 40 ÷ 50 mm from the edge, a cord is laid with a snake, and then it is laid in the opposite direction in the same way. Thus, each of their parts on both sides should be “dressed” with cords. The cords are twisted among themselves in the gaps between the boards, pulling them up so that the distance between the crossbars is approximately 8 ÷ 10 mm.
- When the cord is completely intertwined on one side of the chair, on the bottom board, on the wrong side of the chair, both ends of the cord are aligned and securely pressed with a wide-headed self-tapping screw.
Prices for hanging swing chair
hanging swing chair
After that, the same thing is done on the other side of the chair.
- Now, on each crossbar, on its two sides, on the back of the chair, the installed cords are fixed by screwing in self-tapping screws.
- Everything, the chair is ready, and it remains only to fix the slings and hang it in the chosen place.
How to hang a chair

The suspension chairs discussed above can be fixed indoors or outdoors. If the decision is made to hang the finished chair to the ceiling, then it is necessary to carefully prepare the place for this. The ceiling must be strong enough to securely hold a mount with a load of at least 120 kg.

- If the ceiling is concrete, which does not have voids, then, as a rule, there are no problems with mounting the mount. It is enough to drill a hole for a powerful anchor with a hook, and then fix the hanger.

In the assortment of hardware stores, you can even find a special kit designed for this application - an anchor, a hook, a metal chain.
- If the ceiling plates have voids, then a hole is made in the place necessary for hanging the chair, through which the cavity is filled with a special solution. These mixtures are called differently and they are made on the basis of high strength polymers. Such compounds are usually sold in special packages (tubes) for building syringes.
 Special composite polymer composition - "chemical anchor"
 When the hole in the ceiling is filled, the metal anchor itself with a hook or ring is already mounted into it, and then left for at least two days until the solution is completely polymerized and hardened. Only after that it will be possible to hang the chair on the mount.
- If the ceiling has guaranteed reliable, durable ceiling beams, then fasteners specially designed for hanging the chair are mounted on them with bolts.

- If the main ceiling is closed by a suspended structure, then another mounting option is used to hang the chair, having a connecting section of the required length, ending with a threaded coupling. Such a bracket is fixed in the concrete ceiling and exits through the surface of the false ceiling, and then a ring or hook is screwed into it, usually having a decorative cuff. Further, a chair can already be hung from the ring.

- You should not come up with your own mounting structure, as it may simply not withstand a large load. It is recommended to purchase a special ceiling mount made of high-strength metal alloys and designed for the appropriate load.

- Slings for hanging a chair can be chains, cords, ropes, ready-made or woven independently from durable fabrics. It is desirable that the ropes correspond to the chosen style solution, harmonize both with the chair itself and with the general interior of the room.
Other interesting hanging chair options
There are other options for hanging chairs that can be made at home. Perhaps someone will find one of these designs easier or more interesting.
- Such a model of a swing chair can be made not only by those who own the macrame weaving technique. Those who have the simplest sewing skills can also do it, as the back and seat are weaved, knitted or sewn.

For manufacturing, you will need slings and four wooden or plastic parts. A kind of frame is fastened from wooden elements, which will become a frame for the seat and back, and slings are also tied to it for hanging the chair from the ceiling.
Find out how to do it by reviewing the several options available in the article on our portal.
Such a chair is quite comfortable for adults, but most likely not suitable for small children, as it is not safe enough.

- This version of the chair can be made independently by those who own the welding craft, since the frame for such a design is made of steel reinforcement and a metal sheet. The seat of the chair is made of plywood, on which foam rubber is laid and fixed, and then sheathed with leatherette or leather.
 Frameless chair - only fabric, foam rubber and strong cords
 - For this swing chair, you will need a dense fabric, foam rubber, which will give the seat and back a shape, a nylon cord and a wooden spacer for the slings. To make such a chair, you only need a sewing machine, a centimeter, scissors and the ability to work with these tools.

- Another interesting variant of this not quite ordinary piece of furniture. The most difficult element in this design is the frame part of the back. In this case, it is made of bent wood, but it can be replaced, for example, with two metal-plastic pipes. They are fastened together with construction tape, and then, they are decorated with a nylon cord strapping, or they are first sheathed with padding polyester, and then with dense fabric or leatherette. Slings are also made of rope or cord, and the seat and back are cut out of durable fabric and fixed to the frame back in four places, in the same place where the slings will be fixed.
From the examples considered in the article, it can be seen that making a hanging chair on your own is not such an impossible task, it is feasible for any diligent person. Therefore, you can choose the option that is most harmonious for a particular interior and is most suitable for the complexity of the work and the level of your own skill, and then feel free to get to work.
At the end of the article - a detailed demonstration of the manufacture of a country hanging chair-hammock.
Video: Making a hammock chair yourself
Good afternoon, today we will continue to talk about swings. We have already figured out what different (both simple and complex) swings you can make with your own hands to give in our article. And today I decided that this topic should be continued, because I found more 15 WAYS to make a garden wooden swing. They are even more luxurious than those that I have already spoken about ... And now I will show them to you and explain what is what.
We will start with the simplest garden swing options - and then slowly start all cooler and cooler tinkering. You yourself will be stunned by the realization - that “how everything, damn it, is simple and easy, I can do it too.”
If mothers are reading us, then do not rush to run away - there are options for garden swings that your gentle hands can handle ...
Better yet, show this article to the father of the family - believe me, then he will be than IGNITE... And in your yard - GARDEN SWINGS will appear very quickly ... with interesting architectural gadgets
But I won't get ahead of myself. Let's start in order...
I'll start with a non-standard way ...
MODEL ONE - garden swing
from a hoop and a rope.
For this method, even male hands are not needed. Patient women will do…

What do you need:
- steel hoop for gymnastics...
- foam rubber for wrapping a hard hoop (which was more comfortable and softer) -
- and a rope (the laundry of their household store will do).
What to do I described the whole process of creating a swing and drew everything step by step in the picture (so as not to explain on the fingers - but there was clarity).

Then when the whole macrame web is done - the rim can still be additionally wrapped with a rope - between the knots - so that the knots do not slide along the hoop and do not bunch up in a heap - and overlay it with a foam pad on top - so that the solid rim does not stick into the body ...
But in the photo below we see weaving from thinner ropes - and in the center our ropes are not randomly intertwined - but threaded in a small metal ring…

You can also buy such garden swings ... They are on sale ... they are made on factory equipment. And you don't have to do anything by hand.

And here is one photo gave me a wonderful idea…
And what if .... find a tub or basin - which would just fit inside our iron hoop - then you don’t need to weave anything from the ropes. I put a basin inside the hoop - and ride to your health on a garden swing ... And then, when the children grow up and lose interest in this fun - you can break a wonderful lush garden flower bed in the basin ...

MODEL TWO -
garden swing-board on ropes.
Everything is simple here - there is a wooden board + there is a rope.
And only one task
HOW TO FIX THE ROPE on this very board.

Method one- we drill holes in the seat board of a wooden swing - we thread a rope into them - so that it goes into one hole and out of the other.
To strengthen this design (so that the board does not break in place of the drilled holes) - we also add seats under the board - from two edges - along a small plank (also with holes). So that the rope passes through the seat board - and through the duplicate board pressed against the seat board.
Method two- this is when the garden swing seat looks like a wooden frame-frame. We tie ropes to the frame (right and left) (as in the left photo below) - and we bridge the middle part of the frame with planks.
Method three- this is when the seat looks like half a cylindrical log (cut lengthwise). A very durable option (only such a log must be well planed and polished so that the splinter is not in a soft spot).

Method four- you can screw through metal fasteners to the board ... They come in different forms - look in stores or in a shed.
And that's not all the tricks ... In my article you will find several more ways to attach the rope to the board ... There, too, everything is in clear pictures.
MODEL THREE - garden swing
canvas on chains
Here, too, everything is simple - there is a chain + there is a metal triangle + there is a piece of dense tarpaulin.

We hang iron triangles on a chain - we pass a piece of tarpaulin through the triangles - we bend its edge to the bottom and put 2 large rivets. Ready.
If there are no rivets, you can simply thread the bolts and wrap them with nuts - and so that the bolt does not break through the hole, then lay wide metal gaskets from both edges. And with your own hands, you quickly and easily made a soft garden swing out of fabric.
MODEL FOUR - garden swing made of chairs.
There is three different ways- to strengthen our rope to such a "chair-like" seat.

Method one (blue chair from the photo above) - under the seat of the chair - we put 2 thick metal rods (one under the seat of the chair from the back side - the other from the front under the seat). We cut round holes in the corners of the chair - we thread ropes into them - and we tie the ends of steel rods with these threaded ropes. Thus, we get a rigid structure of our swing
Method two (yellow swing from the photo above)- we nail 2 boards to the bottom of the chair - we drill holes in them - we put ropes into the holes and fix it with a fastener.
Method three (pink swing-chair) - We knock together a small shield from the planks. We drill holes in it. I put it under the chair seat. We drill grooves in the chair seat (not holes - but grooves, that is, vertical saws along the edge of the seat) 2 through grooves from the front corners of the seat + 2 grooves from the back side of the seat.
The ropes pass through the front slots - go under the seat towards the backboard - there they go into the front holes on the backboard - out of the rear holes on the backboard - and go into the back grooves of the seat of the chair - and go up to the support on which they hang.
Such a groove design is very durable - remember? .. we have already made such groove fasteners for swings in the article.
MODEL FIVE -
garden swing for kids.
If your child is still very small (so much so that it is dangerous to leave him alone even on a stool), then ... you can add one more to the classic swing-board protective structure, which will not let your baby fall out of the swing.
The design of such children's wooden swing is very simple. Look here... Let's say you have a swing board... And you want to make them swing-with-protective-barrier. Here's how we do it..
- Need 4 tubes(metal or plastic, or even cardboard tubes from paper towels great, or a piece of hard watering hose).
- And still needed 4 boards with holes at the ends(the length of the boards should match the width and length of our board - that is, 2 boards equal to the length of the board + 2 boards equal to the width of the saddle board. Drill holes in them so that the rope can crawl through.
And then everything is simple.
- We thread the rope into the harness board - it comes out of 4 holes in our seat.
- We put a tube on each rope - and then we put our planks on top of each tube through the rope - in the order that is visible in the photo.
Like this - Easy and quick to make a children's garden swing for kids with your own hands.
Or… you can do it like this ... I will talk about this in detail in the article "Children's swing - do it yourself"

Or you can sew these children's swings from fabric and wooden sticks.

I will also tell about this ... but separately ... How, step by step, to sew such a children's swing myself, I will tell in a special article "Children's SWING - for the little ones SEW YOURSELF" There will be all sizes and a detailed pattern and sequence of actions. That is, this will be an article for moms ...
And at the moment papas read us…And therefore run further… Now it will be the most interesting.
Of course, you are already ripe question…
QUESTION:
And on what SUPPORT can such a swing be hung?
LET'S RIGHT NOW AND LOOK...
Good woman Klishevskaya Olga (that's how we met), dug for you as many as 3 options for support structures for garden swings.
And now I will tell you in detail and show in the photo how and what to do, and what is the feature of each such support system.
SUPPORT for garden swing - with crossed bars
Support in the form of the letter X
Two beams are placed to each other in the form of the letter X ... fasteners are driven into the place where the beams cross (piercing through both beams and fixed at each end with a Nut with wide round gasket between the nut and the beam (as seen in the photo below)

And on these crossed pillars of the support another beam is placed - horizontally. He is also fixed with the same fastener.
And then to this horizontal lying beam we drive fasteners with rings into which we will thread the rope.


and I also have a step-by-step lesson on creating EXACTLY THE SAME swing with a bench, as in the photo below - ARTICLE "How to make a swing - STEP-BY-STEP LESSON with a photo." There, one Korean dad just makes such a hanging bench, step by step.
As you can see in the photo, such a garden wooden swing with a bench can be hung as on the ropes so on a chain- I have already talked in great detail about the methods of fastening the swing and special carabiners-holders.
The same swing models can be made from a BENT timber.


QUESTION - what kind of seat should such a swing with a bench have.
ANSWER - so that there is somewhere to sit on it and where to lean on it ... And the design is at your discretion ...

The variety is great… so much so that I realized ONE thing: I would have to create a separate article for this topic.
I invite everyone who needs a garden swing-bench to go there ... to Aida's article ... to learn from the experience of foreign craftsmanship
This article was written (and in some places painted) by a woman.
Because ... only a woman can inspire a man to create beauty. What I actually did these five days, for 38 hours.
So go and create (and I will go and finally sing ...)
And when you succeed (and you definitely succeed)… and you will inflame me with a reciprocal feeling of well-deserved gratitude - here are the addresses of my electronic wallets
webmoney R172889385212
YAD 410012568032614
(I accept even the smallest gifts)))… Motivation is a great thing.
An encouraged author will always find the strength and perseverance to create good and useful articles again and again.
but That's not all…
I decided to continue this topic, and I will tell you about other ways to make a garden swing for a summer residence.
- article
- article
- article
-
Olga Klishevskaya, specially for the site
Take care of family heaps... These are your legs and arms.
These are your ears and eyes ... and a source of warmth and affection.
To take a break from everyday life in a quiet and cozy environment, as well as to please your children, we suggest you build a swing with your own hands. After all, they not only play the role of an element of relaxation, but also have a positive effect on family relationships.
Kinds
All swings can be classified according to the number of rotation axes:
- With one axis of rotation. Such swings are easy to perform and are the easiest option. The movement of the seat occurs exclusively back and forth perpendicular to the beam on which the structure is placed. The minimum height from the ground to the seat in this case is 35 cm.

- With multiple axes of rotation. In this case, the movement of the seat from side to side is added. Such a design is quite laborious. Suitable for older children. The distance from the seat to the ground is the same - 35 cm.

- With one hanging point. The elements with which the swing is set in motion - a chain or a rope - converge at one point under the crossbar. In this case, the distance from the ground to the seat and from the seat to the supports of the structure will be 40 cm.


They are also divided by purpose:
- Mobile. This version of the game building has a simple lightweight construct, making it easy to transfer from one place to another. For example, in any place convenient for the game: even in the house, even on the street in the shade.
- Family. They have a huge heavy structure. At first glance, it is a bench without supporting elements with a large back. The whole family can fit on such a swing. For its fastening, a U-shaped design is used, and as a fixation, chains or cables that are distinguished by excellent strength are used. This type of play building can be covered with an awning or a roof over it - and ride even in the rain.
- Baby. This category of swing is made in the form of boats or hanging chairs. Children will only be able to ride them when adults are near fastened seat belts.

Differentiation by type of construct:
- Hammocks. Fastening takes place using a metal crossbar. It can, of course, be exchanged for a sturdy lower branch of the tree, provided it is fairly straight. The weight that the hammock structure can withstand is about two hundred kilograms. When using this construct, you can feel the flight above the ground. This option is very popular with book lovers.
- Single. They have a variety of designs. No need to install an additional crossbar. Feature - ease of installation, so this type of swing can be installed anywhere. Various materials are used for the construction.
- Sun loungers. Such a system accommodates three people: one child and two adults. The configuration of the swing is such that its fixation is necessary only at one point, so it can also be installed in an apartment. The strength of such a product, despite the apparent lightness, is quite high due to the metal alloy.
- Suspended. The design of this version of the swing is usually made from a seat and several cables or strong chains. Cable elements are fastened from each side. The dimensions of such a product are varied: they depend on the materials used. Distinctive qualities of the design are strength, lightness and comfort.

7 photos
Required Tools
Before proceeding with the manufacture of the swing, you must first prepare the required tools and materials. So what we need:
- File and sandpaper for metal.
- Welding plant.
- Electrodes.
- Container for the preparation of the solution.
- The components for the manufacture of the solution are crushed stone, water, cement, sand.
- Fasteners - bolts, nuts.
- Metal pipes.
- Wrenches.
- Shovel.
- Grinding machine with discs on a metal surface.

We prepare drawings
After all the preparatory moments are completed, it is necessary to translate the idea on paper. To do this, you need to understand what swing design we will do.

Having decided on the design and type of the swing, mentally imagine it in reality, as if you are already swinging on it. And now it's time to draw them. After completing the sketch, we recommend looking for similar options on the Internet. After all, the drawings can be both unique and those on which work has already been completed. It’s better to “not reinvent the wheel”, but to take ready-made options - this way you will save time and effort.

Below are several options for the drawings, with which you can independently complete the construction in the form of a swing for the guys.
How to make an outdoor swing
from wood
For the manufacture of wooden swing elements, the following material will be required:
- Glued laminated timber 8x8 or 10x10 cm.
- Thicker plywood.
- Solid wood.
- Boards.
- Chains, nuts, bolts, screws, self-tapping screws, studs.


Manufacturing process:
- Using a drill, we pull out 2 holes 1-1.5 deep and 20 cm in diameter.
- We make cases of pits from roofing material.
- We throw the remains of bricks or large stones into the pits and fill them with concrete.
- As soon as the concrete sets, we mount the metal corners for the installation of supports.
- The above-ground component of concrete bases must be sanded and painted in a bright shade.
- We tighten the base with screws (120 mm). To do this, first make a cut in the beam and install the studs. Using a hacksaw, we cut out the spacers and fasten them to the structure with the help of studs.
- Using self-tapping screws, we make a seat from thick plywood. We cover with varnish and fasten on the sides of the chain.
- We make cuts in the pillars and install them on the mounted corners.
- We hang the seat.
You can learn how to make a wooden swing with your own hands from the following video.
Wooden swing is ready.

metal
In order to lay the supports we need:
- 74th metal pipe - 2 pcs.
- Bearings - 2 pcs.
- 15th pipe - 1 pc.
- cement mortar.
- Shovel.
- Sand.
- Welding machine.
- Iron strip 7 cm - 1 pc.


Support installation process:
- In thick pipes we make special holes on top. This is necessary so that the crossbar lies on them.
- We prepare cement mortar.
- Digging holes for supports.
- We dig in the pillars and concrete.
- On the crossbar we install 2 bearings with steel strip limiters. They must be welded to limit the movement of the bearings from side to side.
- We install the crossbar on the support. We also weld it.

The list of necessary materials and tools for organizing a seat for a new swing: Welding machine.
- Hammer.
- Screwdriver.
- Angle grinder.
- Pipe bender.
- Roulette.
- 32nd pipe - 8m.
- Chain - 6m.
- Board 314x25 cm.
- Steel strip 341 cm long.
- Carabiner for chains - 2 pcs.
- Bolts for carabiners - 2 pcs.
- Coloring composition and water-repellent liquid.
- Small screws - 42 pcs.


Seat manufacturing process:
- We bend the pipes as necessary and cook the frame using a welding machine.
- We process the wooden surface with a water-repellent liquid and paint with ordinary street paint.
- We insert a wooden surface into the frame and fix it in such a way that it holds tightly. This can be done with a metal strip, welded in several places at the back of the seat: on the sides and horizontally along the seat.
- We fasten chains with carbines with bolts.
- Bearings and chains are also fastened with bolts through iron strips specially bent with a hammer for this purpose. The size of the strips is about 20 cm.

Suspended
The configuration of such a swing can be varied. Here are a few of them:
- bungee is the simplest design. It is made from a rope tied at both ends. There should be a solid crossbar on top, and a plank or round crossbar on the bottom.
- Tire swing- an option similar to the previous one. Can be hung both vertically and horizontally. From them you can create bizarre shapes, which gives impetus to the creative process of creating a unique swing design.
- Another option - a plank or piece of canvas is hung symmetrically on both sides of the edges on two ropes or chains.
- With wide seats. This option is usually attached with four ropes or chains. Instead of a wide seat, you can use old chairs without legs, pallets and even benches.
- Soft swing. Their design resembles a hammock. They can also be made from a fabric base and wooden sticks, or woven from rope.


One of the hanging swing options will be discussed in the next section of our article.
on a spring

Manufacturing process:
- We purchase a truck spring with a height of at least 35 cm at the metal market - this will be our spring.
- Dig a hole for our spring.
- We assemble the anchor: for this we need a cross (rebar with a diameter of 20 mm can be used) and a pipe 50-60 cm long. These two elements must be welded.
- We fasten the anchor and spring with the help of the boss.
- We lower the anchor into the pit, level it and fill it with concrete.
- We weld the boss to the spring. This is necessary for attaching the swing body.
- We take whatman paper and draw the necessary configuration of the body - everything here depends on your imagination. Do not forget about the handles that the baby will hold on to while riding.
- We transfer the drawing to plywood and cut it out with a jigsaw.
- We fasten the case to the boss using metal strips measuring 30x4 mm and bolts.
- We paint the swing in bright colors.
You can also learn more about how to make a swing on a spring with your own hands from the video below.
Now the swing can be used.
We do for houses and apartments
Any homemade design that is used by children at home must meet some safety requirements. This also applies to swings made with your own hands.

7 photos
Requirements:
- Material. It must be environmentally friendly. It is advisable to use natural materials. For example, a tree is perfect. And at home it is also a good microclimate that will positively affect the health of your children.
- Order. After the child has ridden on the swing, they must be removed. Stay close to him while riding.
- Elements of the swing should not be traumatic. Hands and feet should not be confused and stuck in them.
- Manufacturing quality. The entire surface of the swing should be smooth - sand it in the best possible way and free it from knots.

Before proceeding with manufacturing, you need to decide on the space where the swing will be located, and prepare all the materials necessary for this.
Materials that we need to make a skating device:
- Plywood (board) with dimensions of 400x400 mm for the manufacture of seats.
- Limiting bars with dimensions 400x65x20 mm 5 pcs.
- Copper tubes 4 pcs. with a diameter of 20 mm: two 65 mm long and 2 125 mm long.
- Rope 6 m long.
Manufacturing process:
- The seat board and planks must first be processed with a planer. Sharp and protruding parts must be removed.
- We drill holes in 4 corners of the seat at a distance of 40 mm from the edges. The diameter of the holes should be 6-10 mm. The limiter bars also need to be drilled with the same distance to the edges. Recall that there are only 5 of them: 2 go to the back, 2 to the sidewalls and 1 to the front.
- We collect the entire structure. To do this, we push the rope through all the holes and fix it with reliable knots.
- We hang swings and paint.
The swing for the house is ready.

Child safety rules
Here are a few rules to keep your child safe while riding:
- If the swing design implies one suspension point, then the fastening of its elements must be made in such a way that the rope or chain does not twist during the swing.
- If a chain is used as a hanging component, then it should be sheathed. Unused garden hoses can come to the rescue. This is necessary so that the child's fingers do not get caught in the chain.
- Placing two swinging devices on the frame is not allowed. In this case, collisions of children during swinging are possible.
- Secure the landing area. Cut bark or sand will soften the blows in case of possible falls.
- Make sitting easy. For this, plastic, rubber or wood are suitable.
- The seat should be springy. The sides, beaten off with rubber, are quite an acceptable option. This is to protect children from swing hits.
- The perimeter of the landing area must be free of plants that could harm the child.
- Carefully process all wooden components with a planer, sand and apply varnish on them. So children will be warned against getting splinters and scratches.
- Drive all protruding parts in the form of bolts and nails, as well as other metal parts, into the tree.
- Of the safer swing designs, L- and A-shaped forms stand out. This is due to the fact that in this case the load on the structure is less than with other forms. The greater the distance between the vertical supports, the more reliable the design and the less wear of parts during the use of the swing.
- Hanging swing carabiners tend to wear out quickly - they need to be changed once a year. Use carabiners with plastic inserts, so they will be reliably protected from wear.
- Do not use hooks instead of carabiners. In the process of active rocking, they can break, and the child will suffer.
- The place where the rope and the attachment point come into contact is best lubricated with machine oil. From this, its service life will increase.
- The location of children's swing options must meet safety requirements. These should be places outside any vertical barriers: walls, fences, trees and all kinds of buildings. With a strong rocking, there is a high probability of injury to the child. Additionally, inspect the nearby area for the presence of sharp and cutting elements - they should not be.

Children's hanging swing for the street in terms of design does not differ in variety: several frame options, suspension on a chain or rope, plus a seat.
So the masters make up for lost time, inventing the most unusual swing seats, most of which can be made with your own hands from improvised means (lumber residues after building a swing: boards, slats, beams, logs).
Do-it-yourself baby seat for a swing - a set of ideas
In this article, we will look at how to make a swing seat so that it is comfortable, beautiful, inexpensive and reliable.
1. The choice of material for the seat device
What can you make a seat on a swing-balancer?
- from solid materials - plywood, board, timber, log, plastic;
- from soft materials - foam rubber, felt laid in a case;
- in general, leave it without a seat, because it is quite convenient to accommodate yourself on the balance beam made of wood (yoke).
What to make a seat for an outdoor hanging swing?
Made of plastic
The plastic swing seat is the most affordable. A plastic seat is purchased ready-made and installed on a swing. The disadvantage is fragility and low strength. If several children sit on the seat (and they manage to fit two, three, four), then the plastic will not stand up and break. In addition, any plastic deteriorates under the influence of ultraviolet radiation and low temperatures. They rarely buy it for the street, because. under these conditions, his life span is very short;
metal
The metal seat is suitable for metal swings that are installed in public playgrounds. However, a swing with a metal seat does not attract children at all when it is hot (the seat is very hot) or cold (in winter). Therefore, for a home swing, this option is not acceptable;
Made of rubber
The rubber seat is suitable for intensive use. Sitting on it is not very comfortable, and riding while standing is simply dangerous, so only a few parents give preference to it;
From fabric
A cover with a filler (pillow, mattress) cannot act as a seat on its own, but they are placed on top of the main structure so that the child, especially the baby, is comfortable. The soft seat ensures that the baby does not hurt himself while on the swing. However, the fabric is afraid of water, therefore, it must not be forgotten to bring it into the house;
From a hoop, rope and elastic
From the hoop you can make a swing-nest (web). For manufacturing, a hoop 120 cm in diameter is used and twisted with a rope using macrame technology. The round web seat looks very stylish. Usually this material is used to make hanging garden swings;
From a car tire
Old tires can be tied up as a ready-made element or they can be formed into different shapes. It should be noted that the strength of the figured seat of the tire is much lower than the whole;
from wood
The simplest and most convenient material for arranging a seat, since on the one hand it is accessible and easy to process. On the other hand, it provides unlimited scope for imagination. After all, a carved seat for a children's swing made of wood can become a work of art;
From plywood, OBS, chipboard
A more budget-friendly option for wood-based seating materials. Their common drawback is that they are multi-layered. As a binder, formaldehyde is used, which is a dangerous carcinogen, and they also swell from moisture, so they are not suitable for outdoor swings.
2. The choice of suspension material for the swing
Suspension is what keeps the seat on the swing frame. For the device of suspensions, the following materials are used:
For flexible hangers:
- chain. You need to choose a chain with solid links, not bent ones. Otherwise, the links may unwind (bend) and the seat will break;
- rope (cord). It is better to use a climbing rope, as the most durable;
- metal cable;
- belts of sufficient strength.
For rigid hangers:
- wood;
- metal.
3. Calculation of the number of swing hangers
The mounting method depends on how many suspensions will be used:
- one hanger. Such hanging swings require a well-developed vestibular apparatus in order to maintain balance and swing;
- two hangers. The most convenient option for the child, because. Suspensions located on both sides of the seat are comfortable to hold and swing.
- three hangers. It requires the ability to maintain balance when riding on such a swing. Used for arranging a round seat.
- four hangers. Good for attaching a wide garden swing seat, and also for the case when a swing seat with a back is installed.
How to make a swing seat with your own hands
wooden seat
The easiest way to make a swing seat is to saw off a piece of board and sand it down. The size can be taken with a margin or taking into account the parameters of the child.
Sitting-log
Two well-polished logs are tied together. This is a convenient way to make the seat quickly and at the same time secure it to the suspension.
Board seat
Wooden planks of a certain size (of the same length and width) are cut, longitudinal holes are drilled through which the rope is passed.
Swing seat from an old chair
A chair with a back without legs is used, suspended on ropes. If the design allows, the chair can be suspended by drilling holes in the seat, if not, two crossbars must be added from below. Attach a chair to them and hang them.
Unusual wooden swing seat
Such a purely functional product as a seat can be a place for the realization of the creative imagination of parents. A carved or original seat-an airplane, or a ship - all this will only please the kids. For those who doubt, users are advised to cut out a test seat template from cardboard, and then transfer the drawings to wood (or make a stencil from cardboard elements).
Tire swing seat
The old tire can be hung in its original (whole) form or cut out of it the figure of an animal (horse, swan). The tire cutting diagram is shown below. This is an easy and affordable way to make a swing seat from a tire on chains for a summer residence.
Round seat made of mesh and hoop (swing-nest)
The first way is to weave a web of rope using the macrame technique. In order to make a swing in the form of a round wicker nest (net), you need to prepare a strong hoop (or two different diameters, 120 and 60 cm, if the back is planned), foam rubber (so that the rim is soft) and a coil of rope. The do-it-yourself technique for making a "nest" swing is shown in the diagram.


The second way is to use fabric instead of cobwebs.
 Scheme of a hanging swing "nest" from a hoop and fabric
 Hanging swing "nest"
 Master class on making a hanging swing "nest"
 How to make a nest swing
Pallet swing seat
A seat made of a wooden pallet can become a full-fledged sleeping place, provided that the suspensions are properly attached.
metal seat
Metal seats for summer cottages are usually not made. First, they are hot in summer and cold in winter. Secondly, manufacturing is labor intensive. Thirdly, exploitation is more dangerous. Therefore, most often they make a metal frame swing and a wooden seat.
Baby seat for toddlers
A seat for children under 3 years old must be made with a back. As a rule, the backs of the swing seats are made of fabric or boards. Fabric seats are designed for the little ones, but a swing with a wooden seat is designed for those who are confidently “in the saddle”. And if you install the board in the foreground of the swing, you can combine the seat and the table for feeding.
Advice. To prevent the child from slipping out of the swing, it is necessary to provide a stop bar in front. In addition, for the convenience of the child, the handles (armrests) should be rigid.
How to fix (hang) the seat of a children's swing
- cut corners in a wooden seat from opposite sides and “put” the seat on a rope suspension. In this case, the seat is not attached to anything and is suspended under the weight of the child. You can make a double wash down, this will avoid tipping the seat;
- drill four holes in the prepared wooden seat and thread the ropes through them. So that the rope enters one hole and exits the other. To avoid cracking the seat to the edge from the drilling site, you can strengthen the knot with an additional bar or wooden lining (then it needs to be drilled out). This method of fastening is also suitable for sitting with a back. Suspensions can be brought from above and tightened from below into a knot;
- attach two eyes to the prepared seat and insert suspensions into them. The method is universal, it allows you to mount both wooden and any other seat. The only possible way to fix the seat on the chains as a suspension. Well proven when attaching tires;
- drill a hole in the seat and tie a knot at the bottom.
Conclusion
As you can see, there are many options for making seats for children's swings, from the simplest to the original. But, when working, you need to remember that the appearance of the structure is a task of secondary importance, the safety and comfort of the child when riding is in the foreground.
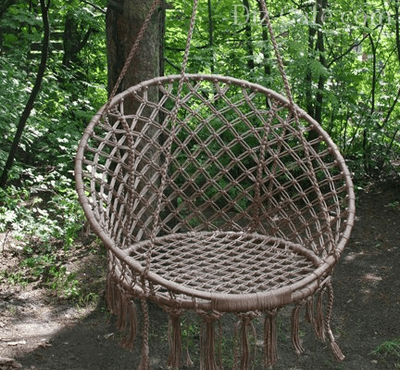
It is hardly possible to meet a person who would not feel the desire to settle down in a comfortable chair and feel the smooth swaying movements of the suspended structure. Comfortable swings have always been very popular. Today, the number of hanging seats has been significantly expanded: hanging sofas and armchairs adorn many suburban areas, easily fitting into landscape design.
The basis for the manufacture of suspended seats were ordinary rocking chairs. Wicker structures made of rattan or wicker have become the most promising for furniture experiments, because they weigh quite a bit, but at the same time they have excellent strength.

As a result of such furniture experiments, designers created hanging chairs that resemble half a ball in shape.
Semicircular structures are attractive in that they allow you to evenly distribute the entire load. In addition, it is convenient to hang them by installing the device at the highest point.
The frame of hanging chairs can have several options.

Wicker chairs made of wicker, rattan, transparent acrylic or plastic have a rigid body. For comfort, they are complemented by decorative pillows and soft mattresses.

The hammock chair is a softer version of the suspended structure. On swaying soft pillows, you can always pamper yourself in moments of relaxed rest.

Closed on three sides with wicker walls, the cocoon chair is ideal for seclusion and abstraction from external fuss
Instead of traditional rattan or wicker, synthetic materials are increasingly being used in the design of hanging chairs, thanks to which the structures become lighter, more flexible and quieter.
As you can see, there are many options. We will specifically analyze 2 examples.
It is not difficult to build such a chair. It is only necessary to master the basic technique of weaving macrame.
Such a hanging chair will allow you to create a special atmosphere on the site, conducive to peace and tranquility.
To make a chair, we need:
- Two metal hoops of different diameters (for seat D=70 cm, for backrest D=110 cm);
- 900 meters of cord for weaving;
- 12 meters of lines;
- 2 thick cords for connecting rings;
- 2 wooden bars;
- Scissors, tape measure;
- Work gloves.
To equip the chair, it is better to use hoops made of metal-plastic pipes with a cross section of 35 mm. Metal-plastic pipes of this thickness have a metal braid inside and are able to provide sufficient strength to the suspended structure.
To make a hoop from a pipe, we first determine the length of the segment using the formula S = 3.14xD, where S is the length of the pipe, D is the required diameter of the hoop. For example: to make a hoop D = 110 cm, you need to measure 110x3.14 = 345 cm of the pipe.

To connect the ends of the pipes, wooden or plastic inner inserts of the appropriate diameter are perfect, which can be fixed with ordinary screws
For weaving, a polyamide cord with a 4 mm thick polypropylene core is ideal, which can be purchased at a hardware store. It is good because it has a soft surface, but unlike cotton fibers, when knitting, it is able to create denser knots that will not “spread” during operation. To avoid discrepancies in the color and texture of the material, it is advisable to purchase the entire volume of the cord at once.
Stage # 1 - creating a winding for hoops
Our task is to completely cover the metal surface of the hoops. It takes about 40 meters of cord to decorate 1 meter of the hoop in dense coils. We make the turns slowly with good tension, applying the cord evenly and neatly.
To make the winding tighter, tighten every 20 turns, twisting them with force in the direction of the winding until it stops. As a result, we should get a smooth and dense braid surface. And yes, to protect your hands from calluses, this work is best done with gloves.
Stage # 2 - mesh weaving
When creating a grid, you can use any macrame pattern you like. The easiest way is to take a “checkerboard” with flat knots as a basis.
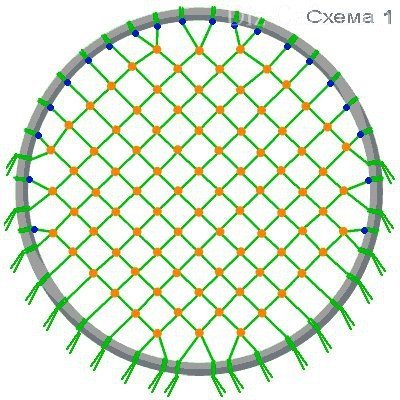
Weave the mesh with a double polyamide cord, attaching it to the braided hoop with double knots
During weaving, watch the tension of the cord. The elasticity of the finished mesh will depend on this. The free ends of the knots should not be cut yet. From them you can form a fringe.
Stage # 3 - assembly of the structure
Braided hoops are assembled into a single structure. To do this, we fasten them from one edge, wrapping them together with one cord.
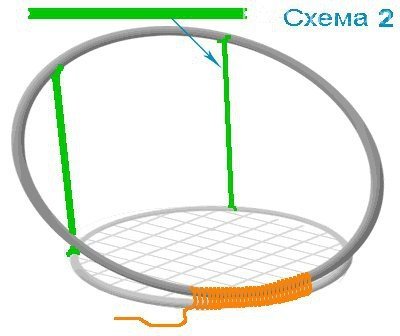
From the opposite edge of the rewind, we vertically place two wooden rods that will serve as a support for the back of the structure.
The length of the support rods can be any and is determined only by the selected backrest height. To prevent the hoops from slipping, we make shallow cuts at the four ends of the wooden rods.
Stage # 4 - decorating the back of the chair
The pattern of weaving the back can also be any. Weaving starts from the top of the back. Gradually lowering to the seat.

We tighten the free ends of the cords on the lower ring, collecting their hanging edges into loose brushes
When the pattern is braided, we fix the ends of the threads in the lower part of the back and decorate them with a fringe. Strengthen the design will allow two thick cords that connect the back to the seat. An elegant hanging chair is ready. It remains only to attach the slings and hang the chair in the chosen place.
Hanging chair with cover
If you don’t feel like weaving, or for some other reason, the first option didn’t suit you, then this one may be suitable.

A cozy, gently swaying nest is an ideal place where you can relax, forgetting about your problems, or just take a nap
To make such a hanging chair, we need:
- Hoop D=90 cm;
- A piece of durable fabric 3-1.5 m;
- Interlining, dublerin or trouser tape;
- Metal buckles - 4 pcs.;
- Sling - 8 m;
- Metal ring (for hanging the chair);
- Sewing machine and the most necessary tailor's accessories.
You can make a hoop from a metal-plastic pipe, which is sold in the form of a folded bay, or from bent wood. But when using a tree, you should be prepared for the fact that under the influence of a temperature difference, the hoop can quickly dry out and deform.
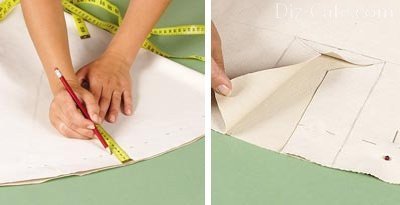
Stage # 1 - cutting the cover
From a three-meter cut, we cut two equal squares, each measuring 1.5x1.5 meters. Each of the squares is separately folded four times. To make a circle out of it, draw a circle from the central corner with a radius of 65 cm and cut it out. By the same principle, we make and cut a circle from another square. On each of the resulting circles, stepping back from the edges by 4 cm, we outline the inner contour with a dashed line.
We outline the holes for the lines: fold the circle in four and iron it so that the folds are guidelines. The first pair of lines will be located relative to the bend at an angle of 45 0, the second - 30 0. Having marked the corners for the slots for the slings, lay out both circles again and iron them.
We make rectangular cuts 15x10 cm in size along the four axes. We make cuts along the contour of the Y-shaped markings made inside the rectangles
To make the same cuts on both circles, we connect the fabric cuts and cut them off with pins. Along the contour of the finished cuts of the first circle, we make cuts on the second piece of fabric.

We bend the petals of the slots inside out, gluing the edges with interlining. Only after that we make a full cut, stitching it along the edge, stepping back 3 cm
Stage # 2 - connecting elements
We grind both circles together along the previously marked dashed line, leaving a hole for inserting the hoop. Cut out the free allowance with cloves. We turn the finished cover inside out and iron it.

From the filling material we cut out strips 6-8 cm wide, with which we sheathe the hoop. Sheathed frame is inserted into the case
Stepping back 5-7 cm from the edge, we sweep both sides together. Turn the edges of the hole left under the insert of the hoop inside out.

We cut off the unsewn allowances from the front side with pins, and sew the edges, departing from the edge by 2-3 cm. Using the same technology, we process the entire edge of the cover
We fill the cover with padding polyester, stretching the filler strips and fixing their edges with a hidden seam. To strengthen the cover on the hoop, we quilt the fabric in several places.
Sling mode for four cuts 2 meters long. To prevent the threads from unraveling, we melt the edges of the slings.

We stretch the melted ends of the lines through the slots, form loops from them and sew 2-3 times
To be able to adjust the height and angle of the hanging chair, we put buckles on the free ends of the slings. We collect all the slings into one suspension, fixing it on a metal ring.
Methods for arranging a suspension system
Such a chair can be placed in the garden, hanging from a thick branch of a sprawling tree. If you are planning to make a hanging chair a functional decoration of a veranda or gazebo, you will need to build a hanging structure.
The suspension system must support not only the weight of the chair itself, but also the weight of the person who sits on it.

To fix a simple hanging chair, the weight of which, together with the person sitting in it, is no more than 100 kilograms, it is enough to install a simple anchor bolt
With this method of fastening, one should take into account the maximum load on the ceiling ceiling, which is measured in kg / m 2, because the entire suspension system will act on this area. If the allowable load is less than the weight obtained in the calculation, it is necessary to distribute the load across the ceiling by constructing a power frame that combines several anchor bolts.
Make such a chair, and you will get a great opportunity to relax at any time, enjoying pleasant swaying movements, while gaining peace and a philosophical attitude to all troubles.
We also recommend
 Switching power supply: repair and refinement
 Remote control of light
 Swimming lessons for preschool children
 Notes for the master - home household alarms
 Clock propeller on Atmega8
 Device and relay application examples, how to choose and connect a relay correctly Microcontroller and relay simple switching circuits