How to make a bath at home. Do-it-yourself bathhouse in the country: a project, materials and a guide on how to build a bathhouse
When designing baths, many factors should be taken into account - from location to area. Financial opportunities also play a significant role, if the bath is planned primarily as a place for family recreation, then it is not necessary to build a palace.
For full functioning, 2-3 rooms are enough - a dressing room, a steam room and a washing room. The last two rooms are sometimes combined into one in order to save space.
Small bathroom layout
In an effort to reduce the area occupied by the bath, do not be too zealous - there are certain standards. So in the steam room two people should fit freely, given that they use brooms. If it is very crowded, then the pleasure of going to the bath is unlikely to be obtained.
Features of the layout of the bath with a small area

Small log bath
The layout of a small bath begins with the choice of material for its construction - it can be a log, timber, brick or foam blocks. The wooden structure is the most preferable, as it breathes easily and freely, the balance between humidity and high air temperature is naturally maintained.
What should be paid special attention to:
- Foundation - the weight of the structure does not require the construction of a powerful foundation, the best option is a strip or pile foundation. Under them will not have to carry out significant earthworks;
- The convenient location of the rooms inside - this will facilitate the process of visiting the bath itself, and preparing for it;
- It is advisable to install the stove in a dressing room so that it is possible to melt it without interfering with the others to go to the steam room or washing room. The firebox must be protected from the possibility of arbitrary ignition;
- An important point is ventilation. It is carried out through windows and doors. It is better to give preference to wooden window structures - this is an environmentally friendly material that emits a pleasant aroma. In addition, it is a source of natural air exchange;
- Small baths are built according to the same rules as their large-scale counterparts - the shelves are located along a blank wall, the door threshold is high, and the box is low. This is important so that less steam comes out when opened;
- There should be no locks, and all doors in the bathhouse open outwards.
The useful area of the bath cannot be less than 10 square meters. meters, otherwise it will be impossible to bathe in it, and wash comfortably.
Comfortable sauna layout for two people

Bath project from 3 rooms
It is not always possible to build a spacious bathhouse and you have to be content with modest dimensions. But even if two people cannot be in the steam room at the same time, then the presence of a separate washing room will allow the facility to be used for its intended purpose.
Competent design of the interior space makes it functional:
- Dressing room - the area will be 2.7 square meters. meters. It can be used both as a dressing room and as a rest room. But its main purpose is to prevent the penetration of cold air;
- The plan of a small bath necessarily includes a washing room - an area of \u200b\u200b1.7 square meters. meters. There are two options - install a shower or equip a simple shower. The second is to put stools and basins, and pour water into them from a tank located behind the stove. With such a volume, you can fit everything you need in it. It will be heated by a stove chimney;
- And the most important room is the steam room. Its area is 1.14 sq. meters. The heater is placed in a corner, so it will give off some of the heat from the washing room. It will not be possible to place a sunbed, so you will have to bathe on a stool or bench.
Note! If a bathroom or shower is not provided in a residential building, then a small bath is an excellent way out. She combines the pleasant with the useful.
The project of a small bath from two rooms

A small frame bath from a bar
If there is no desire to huddle in tiny rooms, then by combining the steam room and washing room, you can get a good result. The external size of the bath can be 3.6 * 2 meters - this is quite enough.
How to build a small bathhouse with your own hands on a land plot, this is possible only if you have a carefully thought-out project:
- Dressing room with a total area of 2.4 sq. meters - here you can already turn around. Dimensions allow you to put a tiny table at which it is pleasant to drink tea. The role of the locker room remains;
- The steam room and washing room are combined, and a room of 3 square meters is obtained. meters. The shower will have to be sacrificed, but now there will be a full-fledged sunbed and a bench for washing. Basins with water are placed on it. Excess moisture from the shower is not needed, it will make the air heavier and make it difficult to breathe.
In order not to reduce the benefits of bath procedures in this project, the following instructions must be observed:
- Put a more powerful stove that can heat two rooms at once;
- Do not spray water over the steam room - this will increase the humidity;
- Bathing procedures begin with a steam room, and only then proceed to washing.

Photo of a small bathhouse on the lake
In both layout options, the door should open outward, and the building itself is installed no less than 5-10 meters from the capital house. These are mandatory fire safety requirements. The ceilings in the bath should not be more than 2.2 meters, and the door frame should not be more than 1.5 meters. Otherwise, it will not keep warm.
The stove can be any - electric, wood or gas. But the latter is not very desirable. Electric is easy to install, it is easier to control the temperature level with it.
But the best of all is wood burning. It creates a unique spirit and aroma of the bath.

The price of a wood stove is not so high
Bath - the dream of almost every owner of a suburban area. But not always the size of the site allows you to build a large and spacious structure, and then you have to be content with the small. But this does not make the bath less functional.
With the right approach to planning, it turns out to be useful and convenient. The video in this article will talk in more detail about small baths and their benefits.
Small bathhouse: how to build with your own hands, layout, video instruction, plan, photo and price
How to build a 3 × 3 bath with your own hands

The primary task facing every owner of a suburban area is the construction of a small bathhouse, located not far from the country house. In our article, we will talk about how to build a 3 × 3 bath with your own hands, which would fit perfectly into the space of a small household plot.
The starting material used for the construction of such a structure is most often a traditional wood beam. For those who want to deviate from established traditions, such common building materials as brick, silicate and foam blocks or natural (artificial) stone can be offered.
Structural features
The 3×3 m bath is a small one-story building that can accommodate 2–3 people inside at a time. Its usable area usually does not exceed 8‒8.5 m² and is distributed as follows:
Note that the dressing room in such a bath is also used as a rest room. Despite the limited size of the room, it is usually possible to place a small table and 2-3 benches in it. The table can be made folding, which allows you to maximize the space in the dressing room during the kindling of the stove and cleaning the room.
When choosing the design of a bath building, one should not exclude from consideration the option of a small-sized structure, which is simply attached to the main residential building.
From what to build a bath?
The simplest and cheapest way to make a wooden bath from a bar is to use a standard frame structure installed on a lightweight tape-type foundation.
A bathhouse made of traditional “round timber”, which is well-sanded and selected according to a suitable diameter, also looks good. As a heater in these structures, forest moss is usually used, which is laid between individual crowns.
In addition to timber and round timber, profiled or glued timber can be used to equip the bath. In any case, the material you choose must be well dried (that is, subjected to a shrinkage procedure in advance). Thanks to this, you can begin to operate the bath building immediately after finishing it.
Note! When erecting a structure made of brick or stone, the strip foundation for the bath must be designed for a large load.
Work procedure
The construction of a bath from the material of your choice is carried out, as a rule, in the following order:
Foundation preparation
Basically, the type of foundation is not a whim of the customer, but is selected based on many factors. Often, a pile or column foundation is made for the construction of a bath. In some cases, a slab foundation may be required. We will consider only one type of foundation, which is more versatile and applicable in most cases.
The strip foundation for a log house from a three-meter beam is made shallow, which is also acceptable when using rounded logs. The order of its preparation is as follows:
- First, a square of appropriate dimensions is marked out, after which trenches 10–15 cm wide are dug to a depth exceeding the soil freezing mark.
- The bottom of the dug trench is covered with a layer of sand about 15 cm thick, which is then spilled with water and thoroughly compacted. At the end of tamping, the bottom of the trench is covered with rubble, after which it will be possible to proceed to the preparation of the formwork, assembled from an ordinary unedged board.
- Imported or self-made concrete mixture is poured into the finished formwork, which should include moisture-resistant cement.
- The foundation is waterproofed using a suitable roll material (roofing material, for example).
Walling
When assembling a box from 100 × 100 bars for the lower rims, it is advisable to use larch or aspen blanks with a larger cross section (150 × 150 cm, for example). The base frame is attached to the foundation by means of special plates, the counterpart of which is fixed on the lower beam of the frame.
The construction of the base is carried out by one of the well-known methods, which involves the use of the method of joining beams (logs). With the relative lightness of three-meter bars, the assembly of the frame is most often done manually and without assistants.
For reliable connection of the crowns to each other (without gaps), pre-prepared wooden dowels and a special jute sealant are used.
Roof, ceiling and floor manufacturing
When arranging a roof for a 3 × 3 meter bath, preference is usually given to one of the simplest structures: single-pitched or gable. The optimal angle of inclination of the roof is selected taking into account the brand of material used as roofing (for these purposes, inexpensive roofing material or slate is most often used). You can get acquainted with a sample of the arrangement of the roof in the photo located at the end of the article.
At the next stage of work, a ceiling is mounted, made in the form of a flooring, laid directly on the walls of the building. The flooring is fixed on special logs placed directly on the foundation.
Interior decoration of the building
Before finishing the bath, the walls and ceiling of the building are reliably insulated; while special attention is paid to the pair room. To finish it, it is advisable to use natural types of insulating material (mineral wool, for example), followed by applying a layer of foil to it. Note that the foil in this case is used as a reflector capable of retaining heat inside the steam room.
At the end of the installation of insulation and foil, the walls and ceiling of the room are sheathed with clapboard made from special types of wood (linden or aspen).
As for the dressing room, it is not at all necessary to use expensive materials for its decoration; the walls of this room can simply be impregnated with special waterproof varnishes that perfectly emphasize the texture of wood.
How to build a 3 × 3 bath with your own hands - building a small bath
Learn how to build a 3×3 bathhouse with your own hands. The article describes how and from what materials to build such a small bath.
Small do-it-yourself bath

A small do-it-yourself bath is a great option when the area near the house or in the yard of the cottage is limited. In addition, with such a solution, you can significantly save the budget, but as a result, get a full-fledged vacation spot that will not only allow you to relieve stress after a hard day, but improve your health and have a good time with family and friends.
Project examples
Ideally, the bath includes 4 rooms in its design:
You can expand the functionality of some rooms by combining them with each other. At the same time, the comfort of the stay is not lost. The overall size of the building will largely depend on how many people will be inside at the same time.
- 1.20 mx2.50 m Very compact solution. In this case, the bath consists of only two rooms: a steam room and a dressing room. The dimensions of the first are 1.20 m × 1.50 m, the second - 1 m × 1.20 m. There is no rest room, and you can change clothes in the dressing room. Washing can be combined with a steam room. This size will be enough for one person.
- 2.50 m × 2.50 m. By the number of rooms - like the first option. The size of the steam room is 2.50 m × 1.50 m, the dressing room is 1 m × 2.50 m. At the same time, it will be possible to organize additional space for storing firewood. In such conditions, two people can easily fit.
- 3 m × 3 m. This option can be planned in different ways. If there is a desire that three people fit in the steam room, then it can be made 3 m × 1.50 m in size, the washing room can be made separate by placing a shower stall there. The size of this room will be 1 m × 1.50 m. There is also a dressing room 2 m × 1.5 m. You can combine a washing room and a steam room, then there remains a space that can be used as a rest room, which will also serve as a dressing room.
- 4 m × 3 m. In this case, 4 m 2 can be separated for the steam room (for example, 2 m × 2 m). The washing room will occupy 1 m × 1.50 m, 2 m × 3 m remains for the rest room. In such conditions, four people can easily fit. They will be able to stay in the steam room at the same time, as well as enjoy communication in the dressing room.
- 4 m × 4 m. In such a territory it is already possible to turn around well. The steam room can be left 2 m × 2 m in size. Make a separate dressing room 2 m × 1.50 m in size. In this case, the relaxation room is 4 m × 2 m (one of the sides will be 2.50 m). The washing room can be combined with a rest room, for this an electric boiler and a shower cubicle are installed. They can be placed in one of the corners of the room, which does not take up much space.
These are indicative examples. You can easily vary the size of the rooms within the available limits. You may want to make the steam room smaller, as there is no need for 4 people to be there at the same time. At the same time, it will be possible to expand the space of the rest room.
Choosing a material
Various materials can be used to build walls. Much will depend on which project you have chosen, as well as the planned amount of money. For example, you can use an ordinary brick. How to build a brick bath, you can read here. In this case, the following points will be positive:
- availability;
- ease of delivery;
- relative ease of construction;
- long service life (with proper care - up to 150 years);
- ease of maintenance;
- the possibility of combining with the main structure;
- when using a new brick, there is no need for cladding;
- freedom to choose the form of construction.
The negative aspects include:
- the high cost of the material;
- the need for good ventilation, tk. brick has poor vapor conductivity;
- kindling such a bath takes more time than wooden buildings;
- high costs for interior decoration.
Along with brick, foam block is often used. This is a more progressive material; it has properties characteristic only of it:
- light weight with large size;
- high laying speed;
- ease of fitting block shapes;
- good thermal insulation;
- relatively low price;
- excellent sound insulation;
- environmental friendliness;
- subject to the recommendations - a small consumption of glue.
There is also a fly in the ointment:
- uneven pores can be a problem when hanging furniture;
- shrinkage may occur within a few months;
- poor bending stability.
The most favorite way of manufacturing is rounded logs. There is a lot to be said about its benefits, here are just a few:
- high environmental friendliness;
- pleasant appearance;
- low heat capacity;
- no need for interior and exterior decoration;
- nice interior atmosphere.
The negative side is:
- unprofitable to use in small buildings;
- some complexity of construction;
- the high cost of the material;
- long shrinkage time.
One of the cheapest and fastest options is the construction of a frame structure. This method will require minimal building skills. The advantages are:
- no need for a massive foundation;
- availability of materials;
- relatively low cost compared to other options;
- ease of care;
- very fast heating of the steam room with good insulation;
- ease of laying communications;
- seismic resistance;
- no shrinkage.
Of the minuses, one can note the need for good sound insulation. A high level of boominess is the transmission of various vibrations, which can cause inconvenience. It is also important to take care of good ventilation so that moisture does not accumulate inside, which will lead to the development of fungus and mold.
Strip foundation
In the case when a really small bath is planned, it makes no sense to sink the foundation to the level of soil freezing. This will only increase the overall cost of the project. With proper manufacturing and waterproofing, you don’t have to worry about the walls being cold. This type of foundation will be relevant for any of the listed building options.
- The first thing to do is to clearly define the territory that will be allocated for construction.
- The next step is to clean up the debris. In addition, you will need to remove the top layer of soil with grass to make it easier for you to carry out further tasks.
- With the help of pegs, the boundaries of the future building are marked.
- Special holders are made to make it easier to navigate with excavation. To do this, two pieces of a board 50 × 50 cm (or whatever is at hand) are sharpened on one side and connected using a transverse crossbar from a board 10 cm wide, its length should be about 70 cm. Such structures will need 8 pieces. They are installed two at each corner of the house. Between them, two fishing lines are stretched to the width of the future foundation. Be sure to check that all angles correspond to the value of 90 °. Thus, clearly defined lines are obtained, which will be difficult to move, even hitting them.
At the stage of laying the foundation, the necessary communications are provided. This may be a water supply and a sewer drain for water from a washing.
pile foundation
There are several ways to build a foundation. Piles can be bored and driven. In the first case, a well is drilled, formwork is made, reinforcing rods are lowered, and the entire space is poured with concrete. In the second option, ready-made concrete, wooden or metal posts with a pointed end are immediately clogged. The most suitable options for a small bath will be screw. They consist of a metal base in the form of a pipe and blades, which contribute to the immersion of the supports into the ground. You can buy them or make your own. If you chose the second option, then you need to act like this:
- The first step is to find out how deep the soil freezes. To do this, you can contact the appropriate service.
- Pipe blanks with a diameter of 110 mm are purchased. Its wall thickness should be more than 3 mm. The total length should be such that it can be sunk below the freezing level by 50 cm and at the same time, so that it is 30–40 cm above the ground. Additionally, you can buy blanks for screws. It is also necessary to make a square hat on the pile. It should be 25 x 25 cm in size and 5-6 mm thick.
In each of the options described, separate support elements for the stove should also be provided, especially if you plan to use a heater. This is very important, because its weight can be large, which can damage the floor and lag.
Building brick walls
For a bath, it is better to use red brick, which has undergone heat treatment and has a lower thermal capacity. To calculate the amount of material needed, you need to calculate the area of \u200b\u200beach wall. To do this, the width is multiplied by the length. Then you need to divide this number by the area of \u200b\u200bone brick. The area of the masonry seams can be neglected, because you still need to make a reserve in case of a fight or marriage.
The wall can be built using several methods:
- in two bricks with external insulation.
- with air gaps, they are about 6 cm;
- with a layer of insulation between two rows of bricks.
Work begins with the construction of corners. This is an important process because it is they who will subsequently ensure the correctness of the entire structure. To maintain the vertical level of future walls, two metal profiles 5 × 5 cm and a length equal to the height of the future walls are dug in at the corners. They are leveled and secured with braces. Between them, a fishing line is stretched to the height of one row. After it is laid, the fishing line is rearranged to the height of the next one. The thickness of the seam should be about 20–25 mm. It must be applied at a distance of no more than a meter so that it does not have time to dry. Additionally, the plane is checked using a bubble level. If the second and third type of masonry is chosen, then it is necessary to provide a dressing between the two walls. This is ensured by the transverse laying of two bricks opposite each other at certain intervals. Also, each row should go with an offset of half a brick, so that the overall weave of the entire plane is ensured.
A lintel must be installed above windows or doorways. Usually it is reinforced concrete. You can buy it ready-made or fill it directly on the spot. It should go beyond the openings by at least 25 cm. Supports are installed, a wooden board is mounted on them. Two rows of bricks are laid out on edge. Between them are reinforcement bars, which should also go beyond the opening by 25 cm, while it is better to bend them in order to intertwine with the existing masonry. Concrete is poured inside. After complete solidification (usually 10-12 days), the lower supports can be dismantled and the logs removed.
Walls made of foam blocks
The general principle of laying will be the same as in the previous case. You should also start from the corners, which must be accurately and clearly set.
In the same way, guides are made of profiled pipes. But there are some nuances:
- In order to achieve the best adhesion, the row-base is laid on a cement mortar. The ratio with sand is better to make 1:3. It is very important to maintain a horizontal plane so that all other rows also lie correctly.
- All other rows are fixed with special glue.
- The thickness of the adhesive layer should not exceed 5 mm. Only in this case will it be possible to achieve ideal thermal insulation.
- Every 3 rows, a metal mesh is placed in the seam, which serves to give additional rigidity.
- Foam blocks are placed on the edge.
- Lintels over doors and windows are made in the same way as in the case of brickwork.
Log walls
It is this option that pops up in the imagination when it comes to the bath. For its manufacture, you will need to stock up on rounded or profiled logs. It is better to make external walls from this material. Because the design is small, it is good if the partitions are frame.
After the construction of the walls is completed, the primary caulking is performed. During which the hanging insulation is simply hammered into the joints. Complete shrinkage of the building can last more than 1.5 years.
Frame walls
After the foundation has been erected, an additional foundation is made for such a structure. It is performed according to the example of the grillage, which was mentioned above. For the corner posts, we need exactly the same beam as for the base. In addition, it will be necessary to stock up on an edged board with a length equal to the height of the future walls, a width equal to the width of the grillage and a thickness of 5–10 cm.
- At the base, it is imperative to check the diagonals so that they are the same. It is attached to the concrete foundation with anchor bolts. It is desirable to drown the head. To do this, a groove-potai is made in advance. Under the grillage, on a concrete foundation, waterproofing from bikrost or roofing material is laid.
Roof erection
For small buildings, a pitched roof is the ideal solution. It is necessary to plan its production at the design stage. It is very important to be able to raise one wall higher than the other. When this is done, then in the case of a wall of brick and foam block, waterproofing from bikrost or roofing material is laid on the upper end. Additional beams are mounted on it, which will serve as a Mauerlat. They are attached to the base with anchor bolts or walled studs. Beams are laid on top, on which the crate will be stuffed. They can be fixed to the Mauerlat using metal corners.
In another version, the walls are made the same. Ceiling beams are laid on the Mauerlat. On one side, vertical boards are installed that will form a pediment, rafter legs are lowered from them to another wall. At the junction with the Mauerlat, they are cut to the required angle. Fastened with metal corners. To make it easier to support the roof in one plane, two extreme elements are first installed. A string is stretched between them, which will serve as a level.
The ceiling must be insulated. A vapor barrier is attached to the ceiling beams from above. In this role, dense foil can act. Insulation in the form of mineral wool is placed in the space between the beams. Additionally, it is covered with plastic wrap. From the inside, filing is done using a wooden lining or a polished edged board.
finish line
An integral part of each bath is a stove. It can be made independently from sheet material or a metal pipe of large diameter. In another version, it is laid out of brick, but in this case it can take up a large space. For a small space, it is better to use electric options that are purchased ready-made.
Shelves are mounted inside the steam room. For him, it is better not to use coniferous wood, because. when heated, it may release resin, which will cause burns. A good material for it would be aspen, larch, linden or oak. With a small space, a width of 40 cm will suffice, it is more convenient when there is a footrest. The fixing material must be recessed flush so as not to burn the skin (it must also be made of stainless material). It is better if the whole structure is assembled on dowels.
For wiring, a double-braided cable must be used. It is better if it is non-flammable (usually there is a prefix “ng” in the marking). Be sure to lay the conductor in the corrugation. Switches are not mounted in the steam room itself. Luminaires are used waterproof with index IP68.
Take care of good ventilation. To do this, you can install an adjustable supply valve, as well as anemostats with an outlet to the gable through the roof. This will be enough for all the moisture to be removed after taking a steam bath.
As you can see, there are no restrictions on what you can build a small bath from. Choose the option that best suits you.
A small do-it-yourself bath - how to build
This article tells you how to build a small-sized bath. Learn more about preferred materials, sizes and more.
From what and how to build a simple bath in the country?
 Washing in a country bath is a pleasure available to everyone. Its construction does not require large financial investments. In the minimum layout, such a structure is being built in a few days.
In this article we will consider the topic of how to build the simplest bath in the country quickly and inexpensively.
Let's start by studying ready-made options, we will discuss the designs of walls, floors, stoves and sewers that are popular among masters.
Design features
The main conditions for the comfort of any bath are:
- Walls, floor and ceiling well protected from heat loss.
- Reliable isolation of structures from water and steam.
- Compact fast heating oven.
- Efficient sewerage and ventilation.
Examples of country baths
In photo No. 1 we see the simplest bath, reminiscent of a barrel of Diogenes. You can only steam in it. It will not be possible to wash here, because there is no sewerage in the building. However, if desired, it is easy to do. To do this, you need to install a standard shower tray in the corner of the bath and bring the drain pipe into the septic tank.

An important advantage of this design is its low weight, which allows it to be placed on a wooden terrace.
The device of the simplest bath from the container category is shown in photo No. 2.

It consists of one steam room. For washing, the owner needs to attach a canopy with a summer shower or supplement the room with sewage, and the stove with a tank for heating water.

Improvising on the theme of a barrel-shaped bath, let's pay attention to cellular polycarbonate. From it you can quickly and easily assemble the original design. In order for it to keep heat well, you will need two large sheets of this material and a frame made of metal or wooden bars. Between them, a mineral wool insulation, 10 cm thick, is laid.

The ends of the structure can be made of boards by stuffing them onto a wooden insulated frame. Put such a bath anywhere: in the country, on a polar ice floe or on the top of Everest, and you will always be comfortable in her steam room (photo No. 5).

A small Russian bathhouse made from timber scraps can be installed on oak posts. We see an example of such a structure in photo No. 6.

Larger structures need their own foundation. There are three options here:
- Concrete tape.
- Brick pillars.
- Piles from asbestos-cement pipes.
Do not forget that the type of foundation affects the choice of material and the design of the walls. Pile and column bases are used to install a wooden frame, as well as for baths made of timber or logs (photos No. 7 and No. 8).


The "tape" of rubble concrete is suitable for any walls (from gas silicate blocks, logs and frame).

A cheap, reliable and simple version of the bath is obtained using a technology called "clay". For such a structure, you will need a little: a firewood truck, a cart of straw and a clay dump truck (photo No. 10).

The best shape of a wood-burning structure is round. It eliminates the need to reinforce the masonry corners, looks aesthetically pleasing and original.
Borrowing from birds the technology of building nests from branches and clay, you can build just such a simple and warm bathhouse (photo No. 11).

Recommendations for the choice of finishes, insulation, sewerage, floor, roof and stove
For the exterior of the frame bath, you can recommend the following materials:
- Wooden blockhouse.
- Metal tile or profiled sheet.
- plastic siding.
- Cement particle board (DSP).
- OSB board.
- Flat slate.

As a heater, it is best to use ecowool. It does not accumulate moisture, does not rot and does not burn. If there is no ecowool in your area, then you can buy a regular mineral insulation in the form of a semi-rigid slab. It is easily and simply placed in the gaps between the racks of the frame.
To protect the mineral wool from water vapor and reduce heat loss, the walls are lined with sheets of foil polyethylene. After that, a frame of slats is attached to them and trimmed with wood: alder, linden or pine clapboard (photo No. 13).

We do not recommend installing OSB board indoors. This material releases toxic gases when exposed to high temperatures.
Variants of steam and heat insulation of the walls of the frame structure, as well as a bath built from blocks or logs, are shown in Figure No. 1.

Building a simple do-it-yourself bath includes a sewer. It can be made from standard plastic pipes led into a cesspool or drainage well.
The water intake funnel is placed in the center or in the corner of the room, and the floor is made in the form of expanded clay concrete screed with a slope towards the drain. Before concreting, it is necessary to compact the soil and cover it with several layers of waterproofing. Wood flooring is a great option, but in a bath it rots quickly and needs to be replaced. Instead, we recommend making gratings from wooden slats and laying them on a concrete screed. After washing, they can be removed, taken outside and dried.

The design of the bath ceiling is standard. First, a vapor barrier film is “shooted” to the rafters and counter-rails (3x4 cm) are stuffed. They fix the lining of the lining. The gaps between the rafters are filled with insulation and covered with a roofing film. It protects it from weathering and atmospheric moisture (Fig. No. 2).

A counter-lattice is stuffed onto the film, creating a ventilated gap between the roof and the insulation. The work on the installation of the ceiling and roof is being completed by installing the main lathing and laying the roofing material (slate or metal tiles).
The main "detail" of any country bath is a stove. It should provide rapid heating of the air and maintain a high temperature. The metal stove heats up the fastest.
To accumulate heat and create steam, it must be equipped with a compartment for stones. There are a lot of options for stoves for simple baths, so we will not dwell on them in detail. Let's just say that the easiest way to make a heat generator is from a steel pipe of large diameter, an old gas cylinder or a barrel (photo No. 15). Another easy-to-use material is a steel sheet 3-5 mm thick (photo No. 16).

Knowing the simplest welding techniques, you can assemble such a structure without outside help.
A simple do-it-yourself bath - options and features of construction
Options for simple baths from various materials, photo examples and their description. Recommendations for the construction of a simple bathhouse in the country with your own hands.
Sauna - with its powerful heat that makes the body work in an enhanced mode, tart coniferous or birch smell, amazing healing effect - is loved by almost everyone.
The relaxation that comes after visiting it can be compared with a good rest. Unfortunately, in the metropolis there are very few opportunities for visiting a bath or sauna - both the lack of free time and the long distances to the nearest public institution interfere.
Let's try to figure out whether such an option as a sauna at home in the bathroom is possible, what legal documents will be required and whether it is possible to make a home steam room with your own hands.
We will talk about a city apartment, because with suburban housing everything is a little simpler. A bathhouse is usually built on a summer cottage - a detached house with several compartments, one of which is just occupied by a sauna or steam room.
Urban housing rarely implies the presence of your own land (unless you are the owner of a cottage in the private sector), so the only place where you can place a sauna or steam room is your own apartment
As a rule, typical housing is equipped with a bathroom with a shower or bath. Usually this is enough to monitor their own hygiene: those who like to soak in some water choose a bath, and those who are constantly in a hurry choose a shower.
It seems that everything suits, why then do we need a sauna? Why is there a separate room in almost every second Finnish apartment with a temperature reaching 100ºС?
In fact, a sauna is a place where you can put your body, thoughts, and emotions in order. The relaxation that comes after visiting the steam room can be compared with a professional massage: all muscles and organs rest.
It has been scientifically proven that steam bathers have stronger immunity, a positive attitude, excellent physical shape and are much less likely to get sick. Even the above is enough to understand why many cannot imagine life without a "hot" vacation.

A visit to the sauna is a great opportunity to meet a friend or relative whom you have not seen for a long time, or, on the contrary, a great place to be alone
Choosing a place: bath, kitchen or balcony?
When you live in a private house, you don’t have to make such a strict choice - you can use the basement, the attic, the annex, and one of the free rooms with equal success.
In a city apartment, everything is different: the attic and basement are public (although in Finland, it is these premises that are equipped as a sauna for the whole house), it is forbidden to use them for your own needs (only for storing things, and even then not in all houses).
It is possible to build an extension - but this applies only to residents of the 1st floor, and construction on the central streets is prohibited, and for peripheral houses a lot of approvals will be required, which means money.

There remain premises that are parts of the apartment, the so-called "living" area. Balconies, loggias and glazed verandas have recently also been referred to as "residential" meters.
Let's turn to legal documents and see what is allowed by law. It turns out that it is strictly forbidden to place saunas in living rooms and kitchens (by the way, the ban also applies to the basements of high-rise buildings). Remain - a balcony (loggia), a corridor or a bathroom.
If you live in the north, the balcony will require high-quality thermal insulation, since the outer wall of the house usually freezes through. The corridor needs redevelopment, and even then, if it has sufficient area. The pantry, as a rule, is used as a dressing room - this frees the living space from bulky cabinets.
Thus, a sauna in the bathroom should be considered a more rational solution, provided that the footage and legal regulations allow, which you will have to get to know better.
Are permits required?
When refurbishment work is planned in an urban residential area, you need to remember about regulatory documents that dictate special conditions. This also applies to the sauna - its construction is allowed, but there are a number of regulatory norms and restrictions.

You can refer to documents such as "Residential Buildings" or "Architectural and Planning Solutions for Multi-Apartment Residential Buildings", where you will find a list of rules and recommendations for the design and construction of saunas
There is a lot of useful information, without knowing which in the future you can get an administrative penalty.
In wooden apartment buildings (1-2-storey), the construction of a sauna is strictly prohibited, and in monolithic or brick buildings with reinforced concrete floors, regardless of the number of storeys and the number of entrances, it is allowed.

Particular attention is paid to the type of stove - a necessary device for sauna equipment. It is recommended to use a factory-made unit, with a passport and technical specifications, including automatic shutdown after 8 hours of operation and when heated to 130ºС
The stove should not be gas or wood-burning, but must be electric - this is also a necessary condition. Accordingly, it is necessary to conduct a three-phase power cable into the room.
Any violation (burning firewood, lack of protective shutdown) is punishable by a fine, followed by correction of shortcomings.
A number of requirements apply to the premises themselves. For example, if you have a studio apartment of less than 38 m², you can say goodbye to the idea of a home sauna.
The area regulations apply to "kopeck pieces" and "three-room apartments": a two-room apartment - at least 54 m², a three-room apartment - 68 m². The area of the steam room itself is small.

For example, Moscow legislation regulates a “patch” up to 2 m³, designed for a maximum of 2 people. Such a strict restriction was introduced due to a weak ventilation system, which is sufficient for living quarters, but not enough to serve a steam room.
One of the requirements relates to the materials from which the sauna casing is made. It should be environmentally friendly wood treated against fungus and mold.
Preference is given to aspen, linden, oak, that is, hardwoods. The wooden frame must be equipped with a fire-fighting device. Usually this is a pipe with many holes, fixed like a cornice (along the perimeter of the ceiling).
It is assumed that, in the event of a fire, spraying water from the holes should extinguish the fire and prevent a fire in the apartment.
In addition, it is necessary to fix a fire detector on the ceiling, in the event of force majeure, transmitting a signal to the Ministry of Emergency Situations.

Before visiting the BTI, you need to collect a package of documents, which includes copies of documents for an apartment, a floor plan, an extract from the house book with a copy of the personal account, a drawing of redevelopment or other design changes (usually performed by a licensed construction company).
Get ready that it will take a lot of patience, time and effort to visit the following instances (without guarantee of approval):
- fire service;
- HOA or other housing office responsible for your home;
- housing inspection;
- department of Rospotrebnadzor;
- inspection of architectural and construction supervision.
This list is not final, as the number of approvals depends on the specific region. Remember that a conversion permit will be required even if you want to install a purchased sauna cabin instead of a shower cabin.
Which sauna is best for an apartment?
At first glance, it seems that apartment saunas are not in demand, therefore, the choice is not so great. In fact, thanks to hot steam and dry heat lovers from the Scandinavian countries, the range of factory models is quite diverse.
Let's start with the fact that all designs can be divided into 3 large groups:
- ready-made prefabricated prefabricated models (from lining or panels), with a technical passport, warranty and professional installation;
- frames made to order according to the provided sketch (indicating dimensions, type of stove, number of seats, etc.);
- buildings made independently according to ready-made or personally drawn up drawings.
The manufacturer is responsible for the operation of the first type along with you, and the remaining two points are solely on your conscience.
If a flood or fire occurs, as a result of which the residents of neighboring apartments suffer, the administrative violation will smoothly turn into a criminal case - we advise you to consider all possible risks.
It is much easier for residents of the private sector - if anyone suffers, then only the owner of the premises and his family.
Types of saunas for urban residents
Considering in detail the technical nuances of each type, we can name more than 10 varieties of apartment saunas, but we will focus on the four most popular ones.
Cabin with electric oven

Outwardly (both in shape and in size), the design of this type resembles a shower stall. It can be installed both against the wall and in the corner - front and corner models are sold
The installation of such a cabin (as well as another type of sauna) is considered as a re-equipment of the bathroom, since modernization of communications will be required. Accordingly, the collection of permits cannot be avoided.
There is a tricky way to simplify installation: instead of reinstalling pipes, use flexible hoses - then visits to the authorities are not required. All technical guarantees, as mentioned above, are assumed by the manufacturer.
infrared model
The last few years have shown that this is the best solution for in-house use.

IR radiation is gentle thermal rays that do not burden the cardiovascular system, safe for humans and surrounding objects
Like the hot moist air of a steam room, they remove toxins and excess fluid from the body, stimulate the work of all organs.
Compact mini-sauna ("barrel")
A great alternative to the classic version if there is a shortage of free space in the bathroom.
Any free corner is suitable for installing a mini-sauna in the bathroom: its height is not higher than human height, and its area does not exceed 1 m³. The power of the heating device is approximately 2 kW.
Distributed models of cedar wood, equipped with a built-in steam generator.

Convenient compact designs are often purchased for health purposes: strengthening the heart muscle, immunity, restoring skin elasticity, fighting cellulite
Despite the small size and simple operation, it is better to entrust the installation to a company that sells compact saunas.
Management is facilitated by a convenient remote control, some models are equipped with additional devices that make the procedure more enjoyable, for example, a balm sprayer.
Hamam - steam room in Turkish
Not every apartment is suitable for the construction of a hammam, exotic for our country. We don’t even consider standard 2-3-room options, however, bunk housing with a separate entrance and a large area will do just fine.

The fact is that one of the features of the Turkish bath is a domed ceiling with a height of at least 2.7-3 m. The main “working” apparatus is a steam generator, the floor covering is heated using the “warm floor” system
The room must be completely isolated from other rooms, equipped with a good exhaust, sewerage, hot and cold water supply.
This is a good option for detached cottages for 2-4 families with free space.
Making a steam sauna with your own hands
To build a sauna in the bathroom, you will need 1.5-2 m² of free corner area, wooden beams and lining, an electric stove or an infrared heater, an electric cable, and fixing material.
First of all, even before assembling the frame, it is necessary to carry out a separate line of electrical communications, more precisely, two lines: one is designed to power the stove, the second - for the lighting device. It is better to place all wires on the outside of the structure, in a specially insulated sleeve.
Make sure that the wires are new, even, without twists and kinks - this is a guarantee of safety. The power of the infrared heater is 1.5-2 kW, electric furnaces - from 3 kW.

The cost of electric furnaces for a home sauna directly depends on the power. For example, models with a power of 6-9 kW can be purchased for 9-10 thousand rubles - this is quite enough for use on an area of 1.5-2 m²
Bright lighting is not required, as rest and relaxation involve calm, soft light. For a small area, one built-in lamp of 40-60 watts is suitable.
In addition, take care of ventilation in advance. The hood is recommended to be inserted into the wall opposite the one where the stove is located.
A hole in the ceiling on the opposite side would also work.

The first thing to build is a strong frame, which forms the basis of the entire structure. Externally, the frame, both in shape and size, resembles a corner cabinet
You will need thick support bars measuring 50 x 50 mm, some of which are installed vertically, others horizontally (for tying and fixing). Neighboring supports are connected by 3-4 transverse parts.
For the ceiling perimeter, boards are used instead of bars. The door frame is also assembled from beams, leaving room for lining in the upper part. To finish the floor, either hardwood or ceramics are used (as in the whole room).

The next step is the thermal insulation of the cabin. One of the practical and inexpensive options is rolls or mats of universal mineral wool for interior work, at least 50 mm thick
Styrofoam or polystyrene foam is not used as a heater for a home sauna, since when heated, volatile components that are harmful to health can be released.

To make the thermal insulation better, aluminum foil is attached to the top of the mineral wool layer. Thin sheets of foil are attached to the beams using a construction stapler.
The walls and ceiling, lined with insulation, are covered with a crate of thin bars 20x40 mm. The crate will serve as the basis for finishing the clapboard.

Coniferous trees are not suitable for a sauna, so it is better to use aspen or linden, which, moreover, does not heat up much and is ideal for building benches.
After facing the outer and inner parts, you can proceed to the equipment of the door.

The perimeter of the door is made of the same material as the walls, the central part can be decorated with impact-resistant glass - transparent, matte or sandblasted
At the end of construction work, they proceed to the manufacture of benches, which are located along one wall like a ladder. For a small cabin, two benches are enough.

Linden is recognized as the best material for benches - it has a fresh light yellow hue, can be processed well, does not heat up much at elevated air temperatures
Pay attention to the location of the fasteners - all self-tapping screws and bolts must be fastened from the bottom side, since the metal can cause burns when heated.

The height of fixing shelves or benches is chosen based on the size of the booth and your own convenience, however, the top shelf is usually mounted at a height of 1 m 10 cm
For safety reasons, the electric oven is surrounded by a wooden grate.

As you can see, a small sauna in the form of a cabin takes up very little space and perfectly complements the interior of a bathroom in a city apartment.
If you still don’t have a compact and comfortable sauna at home, it’s time to take care of acquiring it, and if you have enough skills and experience, then build it yourself.
Washing in a country bath is a pleasure available to everyone. Its construction does not require large financial investments. In the minimum layout, such a structure is being built in a few days.
In this article we will consider the topic of how to build the simplest bath in the country quickly and inexpensively.
Let's start by studying ready-made options, we will discuss the designs of walls, floors, stoves and sewers that are popular among masters.
Design features
The main conditions for the comfort of any bath are:
- Walls, floor and ceiling well protected from heat loss.
- Reliable isolation of structures from water and steam.
- Compact fast heating oven.
- Efficient sewerage and ventilation.
Examples of country baths
In photo No. 1 we see the simplest bath, reminiscent of a barrel of Diogenes. You can only steam in it. It will not be possible to wash here, because there is no sewerage in the building. However, if desired, it is easy to do. To do this, you need to install a standard shower tray in the corner of the bath and bring the drain pipe into the septic tank.

Photo No. 1 Build such a “barrel bath” in the country and take a steam bath
An important advantage of this design is its low weight, which allows it to be placed on a wooden terrace.
The device of the simplest bath from the container category is shown in photo No. 2.
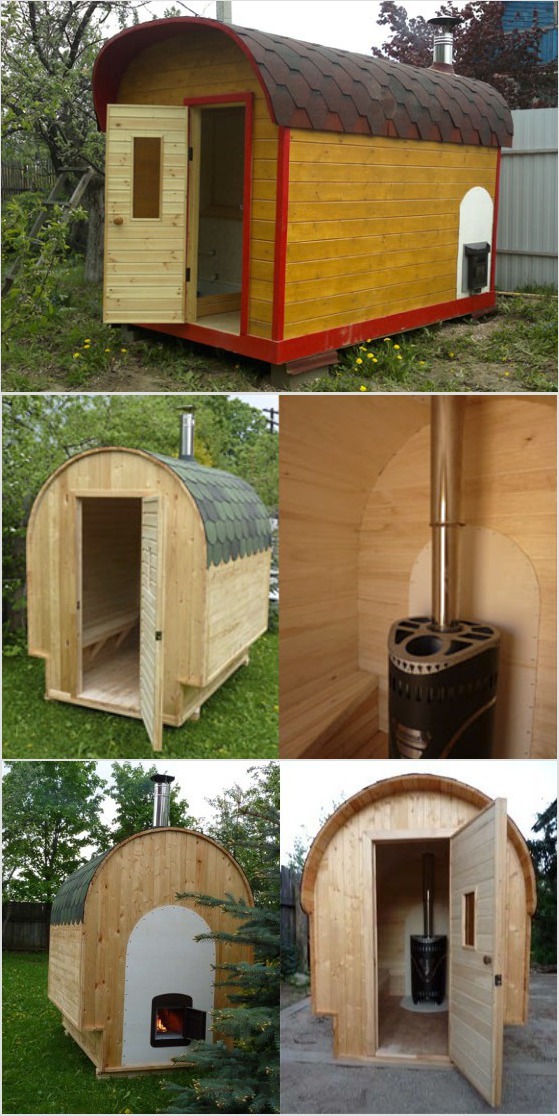
Photo No. 2 Option container country bath
It consists of one steam room. For washing, the owner needs to attach a canopy with a summer shower or supplement the room with sewage, and the stove with a tank for heating water.

Improvising on the theme of a barrel-shaped bath, let's pay attention to cellular polycarbonate. From it you can quickly and easily assemble the original design. In order for it to keep heat well, you will need two large sheets of this material and a frame made of metal or wooden bars. Between them, a mineral wool insulation, 10 cm thick, is laid.

The ends of the structure can be made of boards by stuffing them onto a wooden insulated frame. Put such a bath anywhere: in the country, on a polar ice floe or on the top of Everest, and you will always be comfortable in her steam room (photo No. 5).
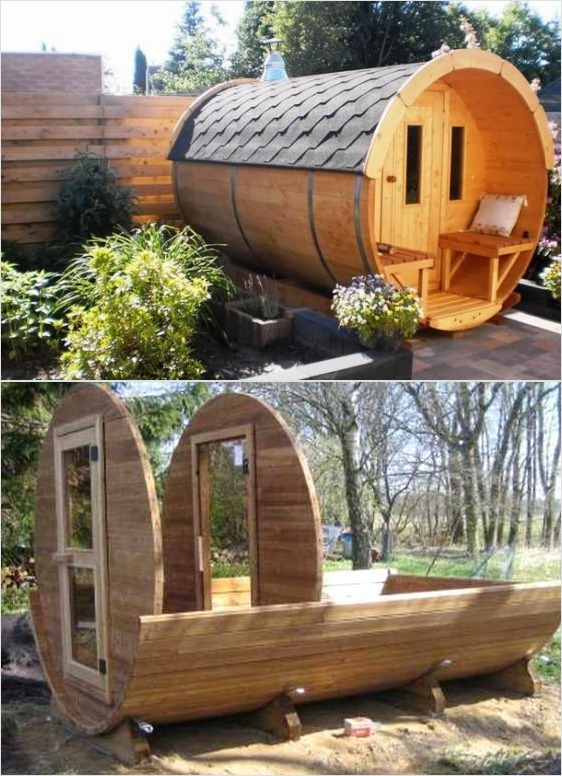
Photo No. 5 A simple barrel-shaped bath
A small Russian bathhouse made from timber scraps can be installed on oak posts. We see an example of such a structure in photo No. 6.

Photo No. 6 Oak posts - an excellent support for a small wooden bath
Larger structures need their own foundation. There are three options here:
- Concrete tape.
- Brick pillars.
- Piles from asbestos-cement pipes.
Do not forget that the type of foundation affects the choice of material and the design of the walls. Pile and column bases are used to install a wooden frame, as well as for baths made of timber or logs (photos No. 7 and No. 8).

Photo No. 7 Sauna from SIP panels on screw piles

Photo No. 8 Brick columns - the best option for timber, log and frame structures
The "tape" of rubble concrete is suitable for any walls (from gas silicate blocks, logs and frame).

A cheap, reliable and simple version of the bath is obtained by technology. For such a structure, you will need a little: a firewood truck, a cart of straw and a clay dump truck (photo No. 10).

The best shape of a wood-burning structure is round. It eliminates the need to reinforce the masonry corners, looks aesthetically pleasing and original.
Borrowing from birds the technology of building nests from branches and clay, you can build just such a simple and warm bathhouse (photo No. 11).

Photo No. 11 Wicker frame coated with clay - "know-how" of an inexpensive bath design
Recommendations for the choice of finishes, insulation, sewerage, floor, roof and stove
For the exterior of the frame bath, you can recommend the following materials:
- Wooden blockhouse.
- Metal tile or profiled sheet.
- plastic siding.
- Cement particle board (DSP).
- OSB board.
- Flat slate.

Photo No. 12 A simple, but at the same time very nice version of the exterior of the bath with the help of unedged boards
As a heater, it is best to use ecowool. It does not accumulate moisture, does not rot and does not burn. If there is no ecowool in your area, then you can buy a regular mineral insulation in the form of a semi-rigid slab. It is easily and simply placed in the gaps between the racks of the frame.
To protect the mineral wool from water vapor and reduce heat loss, the walls are lined with sheets of foil polyethylene. After that, a frame of slats is attached to them and trimmed with wood: alder, linden or pine clapboard (photo No. 13).

Photo No. 13 Steam and heat insulation of the walls of a country bath built from any material
We do not recommend installing OSB board indoors. This material releases toxic gases when exposed to high temperatures.
Variants of steam and heat insulation of the walls of the frame structure, as well as a bath built from blocks or logs, are shown in Figure No. 1.

Building a simple do-it-yourself bath includes a sewer. It can be made from standard plastic pipes led into a cesspool or drainage well.
The water intake funnel is placed in the center or in the corner of the room, and the floor is made in the form of expanded clay concrete screed with a slope towards the drain. Before concreting, it is necessary to compact the soil and cover it with several layers of waterproofing. Wood flooring is a great option, but in a bath it rots quickly and needs to be replaced. Instead, we recommend making gratings from wooden slats and laying them on a concrete screed. After washing, they can be removed, taken outside and dried.

The design of the bath ceiling is standard. First, a vapor barrier film is “shooted” to the rafters and counter-rails (3x4 cm) are stuffed. They fix the lining of the lining. The gaps between the rafters are filled with insulation and covered with a roofing film. It protects it from weathering and atmospheric moisture (Fig. No. 2).

Fig No. 2 Design of the ceiling of a country bath
A counter-lattice is stuffed onto the film, creating a ventilated gap between the roof and the insulation. The work on the installation of the ceiling and roof is being completed by installing the main lathing and laying the roofing material (slate or metal tiles).
The main "detail" of any country bath is a stove. It should provide rapid heating of the air and maintain a high temperature. The metal stove heats up the fastest.
To accumulate heat and create steam, it must be equipped with a compartment for stones. There are a lot of options for stoves for simple baths, so we will not dwell on them in detail. Let's just say that the easiest way to make a heat generator is from a steel pipe of large diameter, an old gas cylinder or a barrel (photo No. 15). Another easy-to-use material is a steel sheet 3-5 mm thick (photo No. 16).

Photo No. 15-16 A simple pipe stove and a ferrous metal stove
Knowing the simplest welding techniques, you can assemble such a structure without outside help.
- This is a difficult, but quite feasible undertaking. First of all, the owner must choose the right material for the construction of the bath.

Choosing a place to build a bath
Start by choosing a suitable location for the building. The following recommendations will help you with this:

Before starting any construction activities, prepare a bath project.

Determine the optimal size of the structure. One vacationer should account for at least 5 m2 of the total building area. For example, if you are building a bathhouse for 4 people, its area must be at least 20 m2.

The standard bath consists of a steam room, a washing department, a dressing room and a rest room. Set the dimensions and features of the spatial placement of the listed premises that are convenient for you.

Prepare the following drawings:

You can make all these drawings yourself or find them in an open source. In general, the projects of log baths remain almost the same. If you have the desire and sufficient budget, order the preparation of drawings by a professional.

Materials for building a bath
To build a bath from a bar, you will need a whole set of different materials and devices, namely:
- beam. Traditionally, a material with a section of 150x150 mm is used;

- floor boards. The best option is a four-meter edged board 15x5 cm;

- ceiling boards. Usually used lining with a width of 10 cm and a thickness of 2 cm;

- materials for interior decoration. Lining is perfect;

- vapor barrier material. The best option is modern vapor barrier films;

- waterproofing material. If possible, use penofol. Polyethylene film is also suitable;

- ceiling heater. Mineral wool materials are well suited;

- sheet asbestos. With it, you isolate the wooden elements of the building from high temperatures. Insulation sheets must be fixed to the walls near the sauna stove. Also, wooden elements installed in close proximity to the chimney need insulation;

- bulk materials for arrangement. The set is standard: cement, sand and gravel;

- material for finishing the roof. Focus on your preferences. The main thing is that the roof of the bath looks good surrounded by the roofs of other buildings on the site;


- insulation for interventional space. Use jute. Tow and moss are also suitable.

It is best to start building a bath in the spring, because. after the completion of the main activities, the wood will need to be left for a six-month "wintering". During this time, the material will dry and give the required shrinkage.
Buy cement immediately before construction begins.
Bath construction guide
The work is carried out in stages - from preparing the construction site to equipping the bath with various accessories.
First stage - Site preparation
Clear the construction site of all sorts of debris, shrubs, large roots and, in general, everything that can interfere with the foundation construction stage.


The second stage - Pouring the foundation


Attach the batten boards to the rafters. Lay hydro, heat and vapor barrier materials, the insulation of the bath is one of the most important elements of its construction, the quality of the built bath will directly depend on this. Install your chosen roof finish.
Prices for various types of timber
Fourth stage - Interior fittings
Start by arranging the necessary communications.

You should take care of the installation even at the stage of creating the foundation. To do this, create a pit or drainage well outside the bathhouse, connected to the bathhouse by a pipe laid with a slope.

After completing the arrangement of the sewer, make the floor. It can be concrete or wood. Concrete floors are usually tiled. This coating is more durable.
The wooden floor is traditionally made leaky. The technology is extremely simple: logs are installed, floor boards are nailed to them with some clearance. You can also create a small hatch for drains and close it with a perforated grate. The floor in this case should be made with some slope. As a result, moisture from the floor will enter the hatch, and from there it will be discharged through a pipe into a drainage well or pit.


In order for the wood to last as long as possible, carefully ventilate the bath after each visit.
Insulate the ceiling and walls of the building using suitable moisture, heat and vapor barrier materials. Install doors and windows. Connect plumbing and electricity to the bath. Install the necessary electrical appliances.


Prices for thermal insulation materials
Thermal insulation materials
Fifth stage - Furnace and shelves
Choose the design of the shelves at your discretion. They are built in the same order: first, a support frame is mounted from a strong beam, after which boards are nailed to the supports.
The oven is also up to you. You can lay out a traditional one, install a convenient metal unit or a modern electric heater.

Heavy furnaces require the mandatory arrangement of an individual foundation. At this point, everything is also determined in a separate order, taking into account the characteristics of a particular furnace.
Prices for various types of stones for furnaces
Stones for stoves
Step Six - Optional Accessories


In conclusion, you will only have to supplement your country bath with various kinds of accessories, namely:
- brooms;
- wooden mug for adding water;
- buckets;
- various kinds of wooden gratings, etc.
The internal arrangement of the additional premises of the bath is at your discretion.

Successful work!
Prices for bath and sauna accessories
Bath and sauna accessories
Video - Do-it-yourself bathhouse in the country
It is hard to imagine without an indispensable attribute - a hot bathhouse, raising vitality with the aromas of birch broom and eucalyptus steam. Bath procedures cure many diseases, relieve stress and provide an opportunity to spiritually communicate with loved ones. So, whatever one may say, one cannot do without it, dear. The topic of our study is a do-it-yourself bath. , photos, important nuances and invaluable experience of practitioners - all this is in this material.
Read in the article
What is the basis for choosing the optimal place for the construction of a bath
Perhaps for someone it will be news that the bath can not be placed anywhere. There are many official and practical principles to follow. Moreover, the wrong choice of location can lead to sad consequences. Let's look at all the rules.
The location of the bath at their summer cottage
In planning the location of the bath complex on the garden plot, there are three main requirements:
| Distance from the boundary of the plot | The distance from the bath complex to - at least three meters. The building should not obscure the territory of the neighboring site. Such a gap will protect the buildings from a possible fire, because the bath is a fire hazardous object. Another important aspect is drainage. A three-meter zone, even if your bath has the most primitive drainage system, will not allow dirty water to penetrate into an adjacent area. For reliability, you can lay along the fence filled with gravel. And a couple more significant points: the distance to the neighbors' residential building should be at least eight meters (six - if the bath is brick). When deciding where to build an object, keep in mind that the smoke from the sauna stove should not reach the windows of the neighbor's house. |
| Distance to the reservoir | On the one hand, the location of the building on the banks of a river or lake is very advantageous. And it is easier to get water, and pleasure is guaranteed after a steam room with a running start to dive into the cool waves. On the other hand, one should strictly follow the rules that keep the reservoir from negative. To do this, the building should be located no closer than 15 meters from the shore. This distance, moreover, will protect the structures from being washed away in the flood. The coastline should be strengthened with your own hands using wooden or concrete frames. |
| Gap to residential building | Russian is located on the leeward side of the house at a distance of at least twelve meters. So smoke will not enter the rooms. It is desirable that there are no other flammable structures near the building. Experts recommend keeping a four-meter distance to or barn. |

There are situations when, with the purchase of a summer cottage, a bathhouse gets, as they say, by inheritance. In this case, of course, it is not always possible to move it to a new location in accordance with the above rules. But, with the help of competent reconstruction, fire safety standards can be achieved.
How to attach a bath to the house without damaging the main structure
Not always the size of the site allows you to meet all of the above requirements. There is only one way out - to attach a bath complex directly to the house. Consider the advantages and disadvantages of such a solution:
- land area savings;
- in winter, it is more convenient to use a home bath, since there is no need to go outside;
- you can save a lot on, since one wall will be internal;
- you can use common and .

- it may be difficult to connect the structure of the bath to the house. Special measures will be required when erecting and connecting wall planes;
- combining the drainage system can lead to an excessive load on the local sewer;
- the fire hazard of the object poses a certain threat to a residential building.


 Bath project 3 × 4 meters
  Bath project 3 × 5 meters
  Bath project 3 × 6 meters
 Advantages and disadvantages of a columnar foundation:
| pros | Minuses |
| It can be built with your own hands, without the involvement of special workers. Installation of a frame structure on the foundation does not require special skills. | Not suitable for brick and block buildings |
| Suitable for almost any soil (including heaving) | |
| Compensates for height differences on the site, does not require alignment | |
| Installed in one or two days | Does not provide for the arrangement of the basement or basement |
| Doesn't need | |
| Has a long service life | |
| Does not require capital investment |
According to the depth of installation, the bases differ in:
- buried, installed below the soil freezing mark;
- shallow - from 40 to 70 centimeters deep;
- not buried - installed directly on the soil with backfill.
Step by step installation algorithm:
 | The area must be cleared of debris and weeds. | |
 | The future foundation is marked with a rope and pegs | |
 | At a distance of one and a half meters from each other, holes are drilled with a garden drill with a knife of diameter corresponding to the diameter of the pillars | |
 | Cut-off concrete pipes are installed in the holes. The height above the ground level is leveled using a laser level, the excess pipe is cut off | After the concrete has hardened, it is installed - metal or wooden. |
Advice! For a lightweight construction, you can use not concrete pipes, but plastic or wooden poles treated with resin to protect against decay.
Detailed video material on how to build a foundation for a 4 × 4 bath with your own hands
Bath with a shower in the country: how to bring and drain water
A well-thought-out drainage system is an important point in the design of a bath complex. Proper draining in the bath will not only protect the base of the building from mold and rot, but also save you from problems with neighbors in the area.
Where can you take the sewer:
- into a drain hole lined with brick or concrete rings The drain system for the bath is laid at the stage of foundation formation
It is necessary to dig a trench for sewer pipes in advance and bring them to the drain from the steam room and washing room. Pipe laying should be carried out with a slope of five degrees. To prevent the drain from freezing, you can insulate it with your own hands using heat-insulating materials.
A step-by-step guide to arranging a sewer well in the following video and photo material:
Another significant point is the arrangement of floors in the steam room and sink. The easiest option is leaking floors. Water simply seeps through the gaps between the boards. Under them there is a sealed receiving plane with a drain hole.

Advice! In non-leaking floors, the drain must have a water seal, otherwise unpleasant odors will spoil the pleasure of bathing procedures.
You can also make completely concrete floors, close them with ceramic tiles.

But it should be noted that it is easy to slip on the tile, and in the steam room the ceramics heat up quickly, so you can’t enter it barefoot.
It remains to solve the issue of water supply. In a separate building, it is better to conduct water supply underground, in a protected housing. If your area has severe winters, it is worth considering heating the water supply to prevent emergencies. How to install such a system, photo reports will tell you, which are not difficult to find on the net.

Article
We also recommend
 Switching power supply: repair and refinement
 Remote control of light
 Swimming lessons for preschool children
 Notes for the master - home household alarms
 Clock propeller on Atmega8
 Device and relay application examples, how to choose and connect a relay correctly Microcontroller and relay simple switching circuits