How to properly cover the roof with a professional sheet with your own hands. Do-it-yourself corrugated roof
Every mistake made during the roofing will inevitably make itself felt in the future.Samplelemmascan beinsignificant, eliminatethemnotwill belabor, butmeetsvery rarely. More oftenTotalarisemedium and sometimes criticaldamageroofing system.Developersshouldunderstandthat to preventmistakesis lostmuchlesstime than forliquidationthemconsequences. This is not to mention the material side of things. The cost of repairs in some cases may exceed the cost of building a new roof, and this does not take into account possiblerepair damage to internalpremises.
The quality, durability and reliability of a corrugated roof depends on several factors:
- accuracy of compliance with recommended technologies, building codes and regulations. Only experienced roofers can make changes to generally accepted technologies and only to increase the stability of the truss system;

- experience and responsibility of roofers. It is impossible to take on complex work if even the simplest roofs were not covered in practice General recommendation - inexperienced developers can only cover the roofs of outbuildings and outbuildings with corrugated board. Residential is better not to deal with, these works should be done by professionals. No need to take an example from the heroes of numerous videos that describe the successful first experience of roofing. None of them publish the results of their work in 3–5 years, and for the most part they are very sad;

- quality and completeness of roofing materials. A very important factor that requires a careful approach. The fact is that you can spoil the roof from the most expensive metal profile for roofing, or you can make a very high-quality coating from cheap profiled sheets for wall decoration. There are several building secrets on how to save financial costs and at the same time increase the tightness and durability of the roof, we will talk about them a little below.

Important factors - the quality and completeness of roofing materials
The coating technology should take into account the features of the roof: the type of truss system, the purpose of the building, the type of attic space.
Prices for corrugated board
Decking
To make the right decision, you need to have objective information about profiled sheets and the impact of each characteristic on performance properties. All profiled sheets are conditionally divided into three large groups: for vertical structures (wall), universal (for walls and roofs) and roofing. This is a very conditional classification, if there is certain knowledge, then each type of corrugated board can be used for any of the above purposes.
| Sheets option | Impact on performance |
|---|---|
| The linear parameters of the sheets are regulated by the provisions of GOST 24045-94. For roofing sheets (H) and universal (NS) length for 3–12 m is a multiple of 250 mm. For wall (C) length 2.4–12 m multiple of 300 mm. Width 800–900 mm. The longer the sheet, the less overlap, the tighter the roof. But it must be borne in mind that it is quite difficult to work with very long profiled sheets due to their large windage. In addition, there are risks of sharp bends and fractures, and in these places anti-corrosion coatings are violated and oxidative processes are significantly accelerated. For the roof of the house, it is recommended to buy sheets no more than three meters long. Another advantage of long sheets is the minimization of material loss by reducing the number of overlaps. |
| The thickness of sheets for roofing (H) 0.6–1.0 mm, universal use (NS) 0.6–0.8 mm, and wall (C) 0.6–0.7 mm. The physical parameters of bending stability with the same thickness are corrected due to different types of profiles in height and width, the presence of additional elements to increase mechanical strength. Please note that standard sheet metal thicknesses cannot be less than 0.6mm. In fact, modern manufacturers produce profiled sheets with a thickness of 0.45 mm. In order to avoid problems, they write out special technical conditions for their substandard products, approve them in higher organizations and sell non-standard products to consumers quite officially on legal grounds. |
| The profile height of roofing sheets is 57–114mm, universal 35–44mm and wall sheets 10–21mm. You can immediately see the difference between the requirements of the standard and the actual technical parameters of profiled sheets. For some manufacturers, the profile height starts from a few millimeters. Why do manufacturers do this? The lower the profile height, the less the metal is deformed. This means that it is possible to degrade the quality of the metal (use cheap alloys), the thickness of galvanizing and paintwork. The small thickness of the metal and the height of the profile should be compensated by the truss system - reduce the step of the rails or make it solid. Experienced builders claim that such a roof will be much cheaper than buying thick and very high-quality roofing profiled sheets in all respects. |
| The highest quality sheets have modern aluminosilicon anti-corrosion coatings, electrolytic zinc protection is allowed. The mass of zinc on both sides must be at least 414 g, aluminum zinc must be at least 170 g. with each one square meter. Pay the most attention to this parameter. It is from him that 80% depends on the operating time of the roof. |
| The type and thickness of the paintwork is regulated by the provisions of GOST 30246, in some cases the parameters may change after agreement with consumers. The duration of operation depends on the quality of the paintwork by about 15%. We do not recommend choosing matte and rough paints. The fact is that dust accumulates faster on such surfaces, its rainwater does not completely wash it off. As a result, after a few years, mosses begin to grow on the roof, their roots penetrate the thickness of the paint and destroy it. Water enters the microcracks with all the negative consequences. |


Unfortunately, theseimportantdata cannot be obtained frommarkingssheets.It indicates only the literal conditional classdestination specification (C, HC, or H), profile height, useful width and thickness of the metal sheet.For instance,C15-800-0.6.Race Informationencrypted as follows- fromshade sheet withprofile height 15mm, usable width 800mm and thicknessmetal 0.6mm.

Roofing and wall corrugated board S-15 (useful width 1120 mm)
Other very important technical parameters haveon the certificates of conformity,Andx alwaysnecessarydemand fromseller.

An experienced roofer can roughly determine the thickness of the sheet by touch, sometimes micrometers are used for this.But this way you can find outbto the totalnno, but freezeindividually the thickness of the metal,cinca coatingI and a coat of paint canonlyin specializedlaboratoriesIX.As we mentioned above, it is these parameters that I provideTmain influence on qualitymaterialroofing, do not be shy to demand documents. If for some reason the sellers do not show the technical passport of the sheets, thenaboutbetter byAndfromkat othersthe shops.
Preparatory activities
The roofing process will be quick and successful if you prepare for it in advance. What should be done for this?
- Count the number of sheets. If the roof is an ordinary gable, then the calculation is simple. Find out the length and width of the slopes. The length must be increased by about 30 cm - the value of the overhang of the sheets. Calculate the area of the roof. Divide the resulting value by the effective width and length of the sheet, they are indicated in the material designations. A complex hip roof is divided into separate slopes, the area of \u200b\u200beach is calculated taking into account its geometry. Such roofs require an increased supply of sheets, in most cases it is 10% of the total area. The more complex the roof, the greater the amount of waste.
Important. If the calculation of the roof area is done in meters, then the area of \u200b\u200bthe sheet should be converted into the same units.
- Find out the number of metal end (wind), cornice and ridge slats. It must be remembered that each joint should overlap by about 10 cm and buy elements with a margin in length. For a complex roof, you need to have planks for valleys (internal and external).

- If there are square or round chimneys on the roof, then you should buy special elements for sealing joints at the junction.

Prices for roofing master flash
Roofing master flash
- Count the number of elements and decide on drainage system nomenclature. Some elements must be fixed before the sheets are installed, it is very difficult to do this after the roof is covered, in some cases it will be necessary to dismantle already fixed sheets. Any dismantling has negative consequences, you should remember this and plan your actions several steps ahead.

- When arranging a warm roof, you need to buy thermal insulation materials, steam and wind protection.

Of course, it is necessary to prepare the tools and make an audit of their technical condition.
List of required tools and fixtures
For work, you will need measuring tools and fixtures, metal scissors, a screwdriver, a hammer, a marker, a stapler. If you need to cut a large footage of sheets, then many roofers use grinders with metal discs.

Prices for popular models of angle grinders (grinders)
Angle grinders
You should not pay attention to warnings about the appearance of rust at the cut site, as incompetent "specialists" who have never done anything themselves write. Why?
- Firstly, the cut is never located in open space, it is always hidden under whole sheets or additional elements of the roof. It is dry and oxidizes very slowly.
- Secondly, working with a grinder is much faster and easier than with hand scissors. This is very important, especially if, due to the peculiarities of the roof, many sheets have to be cut.
- Thirdly, it is very inconvenient to cut with scissors - hands and handles rest against the metal, it bends, fingers hurt. It is especially difficult to work across or at an angle to the waves of the metal profile.
- Fourthly, the overlap of sections is at least 10 cm, even if it starts to rust, it takes several decades to damage such an area. This is much more than a guarantee of coverage.
- Fifth, if concerns remain, then the cut point can be covered with paint.
Step-by-step instructionpreparation for installationprofessional sheets
Consider the most difficult option for arranging the roof - warm.

If the width of the rafter legs is insufficient for insulation, then slats must be nailed to the rafters in such a way that not only the insulation layer is placed, but also between it and the wind protection there is at least 4–5 cm for ventilation.


Otherwise, the natural processes of getting rid of excess moisture will be disrupted, the mineral wool will become damp and lose its original heat-saving properties. But this is not all the negative consequences. Wet wool has an extremely negative effect on all nearby wooden structures of the truss system. If the lumber was not treated with antiseptics before the construction of the truss system began, then this mistake must be corrected.
Practical advice. The quality of impregnation is much improved if color is added to the solution. It allows you to detect gaps and eliminate imperfections.


First, you should make a warming cake, it consists of several layers.
Step 1. Nail the vapor barrier on the inside with a stapler, do not forget to overlap about 10 cm. The joints must be glued with double-sided tape. As a vapor barrier, you can use expensive modern materials or an ordinary cheap plastic film. The physical effect is the same, but the savings are tangible. The film has another advantage - large size. There are sleeves with a width of 3 m, if they are cut, it turns out 6 m.Such a wide material speeds up the installation process and minimizes the number of joints. The fewer joints, the more effective the protection of mineral wool from steam.


Step 2 Nail horizontal slats to the rafters. They will hold the mineral wool and provide natural ventilation between the roof and attic wall finishes.

Step 3 Lay mineral wool. You can use both rolled and pressed types. Each has its own styling features, but this does not affect performance.


Step 4 Nail the windscreen. You can find various names for this layer: hydroprotection, hydro-steam protection, membrane protection, etc. But the correct name is wind protection.


She performs two tasks.
The first one does not allow the weathering of warm air from the wool, otherwise the effectiveness of roof insulation decreases sharply. Minvata has many positive characteristics. Unfortunately, there are also three negative ones. The first is the cost, there's nothing to be done about it. The second is permeability. Mineral wool easily passes air and almost does not interfere with natural ventilation. And it carries away warm air into the atmosphere and supplies fresh cold air. The third is a negative reaction to an increase in relative humidity.
The second task of wind protection is to prevent an increase in the moisture content of cotton wool, with an increase in humidity, thermal conductivity increases dramatically. A modern membrane is used that allows steam to pass through, but does not allow the wind to remove warm air, and the condensate to drip back into the mineral wool.


Advice! To make it easier to fasten the boards, it is worth using a template - a piece of rail. The template is placed between two horizontal boards before fixing the top one.


On this, an insulating cake is made, you can nail the gable boards and start laying the roof.
Prices for windproof membranes
Hydro windproof membrane
YingfromTlaying guideprofessional sheets
The main thing here is to correctly lay the first row. In the future, all sheets are aligned to it. We have already said that the presence of markup greatly facilitates the process, do not be too lazy to do it.
Step 1. Attach the gutter fixing brackets. Before this, a metal bar should be installed, and the brackets should be screwed to it.

The tide can be made from sheet steel. Steel strip is bent with hammer blows

Finished plank (low tide)

Fixed metal bar
The slope is about a centimeter per linear meter. More is not recommended. Why? If you make a slope of 2 cm, then on a slope 10 m long, the difference in height will be 20 cm This is very bad - the gutter will be too low from the edge of the sheets, rainwater will flow past it. How to properly prepare the mount? Lay all the parts on a flat area, mark a difference of 10 cm between the first and last (for our example), draw a line at an angle through all the brackets.

Now it remains to carefully bend the metal bar along this line. In order not to confuse the brackets during installation, number the elements.


Step 2 Screw on the cornice strips. These are not only decorative elements, they protect the under-roof space from oblique rain and snow. Remember to overlap about 10 cm.

Important. The minimum dimensions for overlaps should be strictly maintained, due to this, the boards are protected from moisture. If the overlaps are insufficient, then water will enter the gap and wet the board. And it dries under the bar for a very long time, which increases the risk of fungal diseases and rot.
Step 3 Raise the first sheet onto the crate and accurately position it according to the marks.

Practical advice. In order to facilitate the installation of profiled sheets and make it safe, it is recommended to make a special ladder. It is fixed with two legs to the ridge and allows you to safely move along the slope to screw in the screws.
Start the screw in the center so that the sheet can be rotated slightly. Position selected - add a few more screws, but do not forget to leave free space to overlap the waves of the profiled sheet. You can start installation from any side, alignment is done along the eaves. For a guarantee, it is recommended to pull the thread along the line of the future installation of the gutter.

Step 4 Lift the second sheet of corrugated board, put it in place and check the position. If everything is normal, then you can fix both. Self-tapping screws should be screwed in a checkerboard pattern at the rate of 10 pcs. per 1m2.

Important. It is recommended to start the second row with half of the sheet, due to this, four corners will not converge at one point. This rule is mandatory for thick sheets, thin sheets can not be displaced. The decision is made by the master on the spot.
Self-tapping screws are screwed through a wave, if the thickness is about 0.8-1.0 m, then it is possible after two. But such thick profiled sheets are very rarely covered with roofs, they are too expensive. At the ridge and at the eaves, each deflection is fixed.

Practical advice. The work will be much easier if you fix the wind strips immediately after attaching the first row of sheets, and finish the skate as the worker moves along the slope. Moving on already installed profiled sheets is difficult and unsafe. In addition, there is a high probability of their mechanical damage.
Each chimney is finished, the sheets are cut. For sealing joints and decorative design, special metal strips are used.

All additional elements must be purchased simultaneously with the sheets and from the same manufacturer. This ensures that the ridge, wind and eaves strips all have the same appearance.


If everything is done slowly, responsibly and taking into account the recommendations, then the roof of profiled sheets will serve for a long time and reliably.
Video - Installation of corrugated board
This article is useful for those who want to make a roof from corrugated board with their own hands. We will give step by step instructions that will help you make the roof covering yourself without spending extra money on hired workers.
- If the slope of the roof is more than 15 degrees, the sheets of corrugated board should be laid on top of each other, which will be 200 mm.
- If the slope is from 15 to 30 degrees, the overlap must be done the same or 50 mm less.
- It is advisable to use silicone sealants, especially if the roof slope is up to 20 degrees.
Before you begin to strengthen the corrugated sheets on the roof, you need to make a crate.
It is most convenient to make it from wooden bars. They are easier to mount, and their price is much lower than metal counterparts.
For the manufacture of crates, you can use bars made of alder, oak, aspen, spruce or pine. Before starting the installation of the bars, they must be treated with an antiseptic so that in the future a fungus does not appear on the roof. Also, the boards must be impregnated with a refractory composition. At this stage of construction, special membranes can be mounted that will protect against steam and moisture penetration.
Beginning of installation
First you need to install the upper and lower bars, located across. You can assemble the structure with nails or self-tapping screws if metal elements are included in it. If the bars have to be fixed to concrete, then dowel-nails can be used. It is most convenient to start installation from the bottom, gradually rising up. The step between the bars should not be more than 50 cm.
vapor barrier
Vapor barrier is usually done on the roof of the building that will be heated. It serves to prevent moisture from accumulating under the roof. Most often, a vapor barrier is a special film that has special membranes that prevent the passage of moisture and release steam. This film is mounted before you start laying the profiled sheet. Vapor barrier sheets are overlapped, sticking to the roof with special self-tapping screws. You can make a lap on the wall.

When the crate is ready and the insulation is done, you can mount the sheets of corrugated board.
What is corrugated board?
These are stamped sheets of steel coated with zinc. They are quite light, able to bend, but at the same time durable. Thanks to these qualities, the sheets are excellent for roofing. The corrugated board is suitable for any type of roof, regardless of how many slopes the roof has and what its slope is. They can cover residential and commercial premises.
Sheets of a professional flooring are issued various. They have different ribs and can be covered with special enamel, or they can be without it. Don't forget to let the film sag a little. This is necessary to be able to ventilate the room. It is better to take a film along with which it will be possible to use bituminous mastic.
If you are using rolled material, it's okay, but the sheets will need to be placed very tightly in relation to it. The laying of the material will need to be done perpendicular to the location of the sheets of corrugated board.
How is a corrugated roof installed?
Before starting work, you need to take care of your safety, as work takes place at a height. In order to avoid accidents, you need:
Use cables for insurance and use special belts for mounting.
If the slope of the roof is large, you need to make a protective fence.
Use shoes with non-slip soles.
Do not mount sheets in the rain, they can become very slippery.
Shoes should not have hard elements. Stepping on the sheets may damage their protective coating. If possible, do not step on them.
The damaged coating can be covered with a composition that is sold in hardware stores to restore the protective coating of sheets.
Direct installation
Most often, sheets of corrugated board are attached to each other with special self-tapping screws, which have a wide hat with a rubberized skirt. If you use nails, then they must be special: they are distinguished by a wide hat and rubber skirt. It is needed so that the metal body of the nail does not scratch the sheet of corrugated board, and also in order to prevent moisture from entering the hole. The gasket can be made of polymers, but rubber is considered more reliable. It is best to process the place where the screw is screwed or the nail is driven in. sealant. The same is done with the seams, which are formed from the imposition of sheets of corrugated board on top of each other. This is done in order to prevent moisture from getting under the sheets, even at the molecular level.
If the corrugated sheet is too large and does not fit, the excess can be cut off with a hacksaw. You can use scissors for metal, but they rarely cut accurately. It is convenient to cut small parts with scissors, but not a large sheet. Great if you have an electric cutter at your disposal. They can quickly cut perfectly even pieces, giving the sheet the desired shape. A circular saw is also suitable for this purpose, but you need to choose the right disk.
When cutting a sheet, do not use a grinder. This saw heats up the corrugated material too much, causing the steel to become brittle and may rust over time. Using this tool will destroy the protective layer of the sheet and spoil the insulation layer applied by the factory. This will cause the corrugated board to quickly fall into disuse, and you will have to repair the roof, which will start to leak.
Sheet fixing point
How to fasten sheets of corrugated board to each other?
Start installation from the bottom corner of the roof end. The bottom row is laid in such a way that its edges hang from the roof by about 4 cm. The first row is fastened with self-tapping screws. The point where you need to screw in the screw is the bottom of the wave. Screw the screws into the waves through one.
When working with the sides of the building, you need to use the wind corners that sew up the boards from the end. You can mount sheets both along and across, it depends on which method is more convenient for you personally. The sides need to be sewn up with a special sheet after you lay the entire row. All sheets of corrugated board should be overlapped.
If the direction of the sheets is vertical, then the top sheet should cover the bottom one by at least 20 cm. If the wave pitch does not allow this, you need to overlap more, but in such a way that the waves coincide.
With horizontal placement of corrugated sheets, the sheet located on top should overlap the bottom sheet by a wavelength. If you use a gasket seal, then it is better to overlap for a length of two waves.
If the angle of the roof slope exceeds 16 degrees, it is necessary to use a sealant.
What is a sealant?
This is a special gasket that is needed so that snow does not clog between the sheets of corrugated board. It also protects from wind and rain. The point is that the sealant makes the sheets of corrugated board fit snugly against the crate. Seals are sold ready-made. You need to choose them relative to the waveform of your corrugated board.

Sealant for corrugated board - photo
How to properly fix corrugated sheets on the roof?
Laying sheets should start from the edge. From the center of the edge, one sheet is attached with self-tapping screws. It is better to fix it on one self-tapping screw for now. This is done for the purpose of being able to correct the sheets. The following sheets are attached to it with an overlap and are also fixed with one self-tapping screw. This is done in order to be able to correct the row if it turns out to be uneven. Then you can fasten the sheets securely.
After the row is corrected, it is necessary to fix the sheets along the crest of the wave, and the joints are fastened with one self-tapping screw for two sheets. This is done in each depression of the wave.
The fastening of the first sheet is done in the following way: the longitudinal connection is made along the crest of the wave, the pitch is 500 mm, and the vertical joints are fastened in each day of the wave.

The places in which the screws are screwed are indicated in the figure.
For one meter squared, you will need about five self-tapping screws. This consumption is the most optimal.
Installation of the ridge and end strip should be carried out only after the main canvas has been securely fixed.

The most difficult thing is to mount corrugated board in places of contact with the wall. This part of the work is carried out last, as well as the installation of chimneys.
Pay attention to how the self-tapping screw is twisted. Don't let it hang loose, but make sure it doesn't bend the sheet. The correct location of the screw is shown in the picture.
Video - do-it-yourself roofing with corrugated board
Building a country house is not an easy task. But what could be more reliable and cozier than a home built with your own hands?
When the walls are ready, it's time to build the roof. This is a crucial stage of construction, on which a lot depends. One of the modern and practical roofing materials, corrugated board, is easy to install and reliable in operation. How to independently build a roof from corrugated board?
Material selection
The professional flooring represents sheets of stamped galvanized steel. They are relatively light weight and bend easily. The profiled sheet can be coated with a special polymer composition that protects it from corrosion. Outside, the new sheets are covered with a protective polyethylene film, which is removed after the installation of the roof.
Important! The resistance of the metal to corrosion provides a protective zinc coating. According to Russian GOST standards, its indicator should be at least one hundred and twenty grams per square meter.
When mounting the truss system with your own hands, you need to know in advance what kind of roofing material you plan to cover it with. This is important because each coating requires a certain type of sheathing and rafter step.
When choosing a corrugated board, it is important to take into account the peculiarities of the local climate. For example, in regions with severe snowy winters, you need to choose a coating with a wave of at least 20 millimeters. The angle of inclination of the roof in this case must be at least fifteen degrees, otherwise the snow mass will linger and may deform the corrugated board.

The profile has several markings:
- corrugated board C - with a wave height of 8 to 44 mm, used for light roofing or for decorative purposes, for the construction of temporary protective objects;
- corrugated board NS - with a wave height of 35 - 44 mm, used for roofing, wall construction;
- corrugated board H - wave height up to 114 mm, has additional stiffeners and is used for mounting ceilings between floors and capital roofing.
For the construction of the roof of a private house, the grade of corrugated board HC44 and HC 35 is considered optimal.
How to calculate the consumption of corrugated board
When calculating the consumption of material for building with your own hands, you need to take into account that the sheets are overlapped vertically and horizontally. In this case, the vertical overlap is equal to the wave, and the horizontal one depends on the slope angle. An angle of up to fifteen degrees requires more than twenty centimeters of overlap, up to thirty degrees - fifteen centimeters, more than thirty - ten centimeters.

Important! If the angle of inclination of the roof is less than 12 degrees, during installation, all seams must be treated with a special sealant.
The size of the cornice overhang depends on the brand of corrugated board. For HC8-10, it remains within 5-10 centimeters, HC 35 - H60 can reach 30 centimeters.
To calculate the consumption of corrugated board, you can use special programs that can make calculations for complex geometric shapes of the roof.
How to correctly calculate roofing materials:
Tools and materials for installation
Do-it-yourself installation of corrugated board does not require complex and professional tools. For this purpose you will need:
- level, tape measure and rope;
- knife, scissors for metal;
- marker or chalk;
- screwdriver, drill, stapler;
- sealant in a tube with a gun.
Important! The metal profile is not resistant to high temperatures, so it is cut and installed without welding.

If there are no scissors for metal at hand, you can cut the corrugated board with a hacksaw or electric jigsaw. To protect the cut edge of the sheet, it must be covered with a special primer.
Self-tapping screws are used to fasten the corrugated board to the crate. They are made of galvanized steel and equipped with a rubber gasket, which will not allow moisture to penetrate through the mounting hole, and protect the wood from decay, and the corrugated metal from corrosion.

Advice! In order not to deform the sheets when they are lifted to the roof, you need to use logs. They are installed from the ground to the roof.
Logs will also help to avoid damage to the material during unloading and transportation.
Insulation and sheathing of corrugated roofing
Vapor barrier of corrugated roofing is carried out with a specialized film. You can use for this purpose and the usual roofing material. The main task of the vapor barrier material is to prevent excess moisture from accumulating under the roof. Sheets of hydro and vapor barrier are overlapped, attaching them with a stapler to the rafters.
Important! The installation of the film must be started from the lower edge of the roof, so that the upper row lies with an overlap on the lower one.

A crate is fixed to the insulating layer. Its density depends on the profile brand. If the profiled sheet is thin (grade C), the crate is made solid. For denser material, the pitch of the crate varies between five to ten centimeters. All wooden roof elements are treated with special protective compounds against fire, decay and insects.
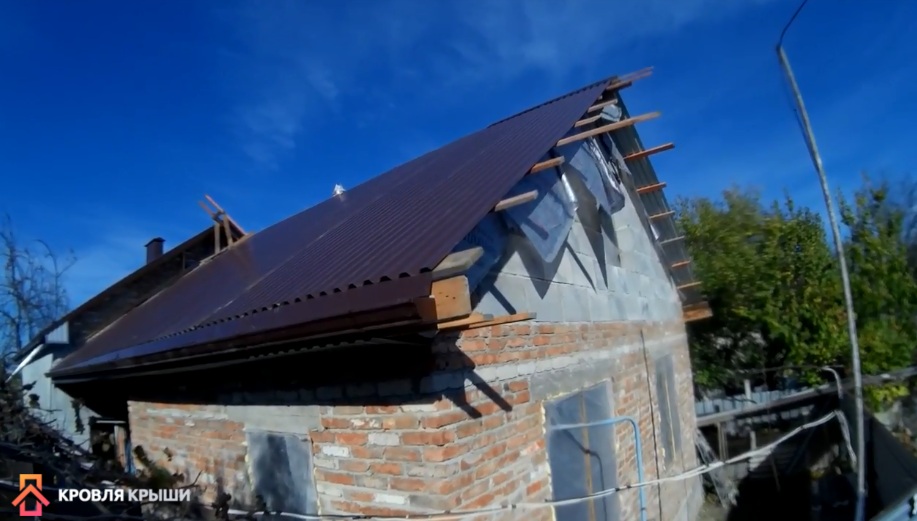
Do-it-yourself installation of a profiled sheet
The laying of the profiled sheet begins from the lower edge of the roof, from the corner. The edges of the material should hang down by about 4-10 centimeters, depending on the brand of corrugated board. The first row is fixed on the crate with self-tapping screws. The fastener is screwed into the bottom of the wave. About five self-tapping screws are consumed per square meter of material.
At the corners of the roof, wind corners are used.
The overlap of the profiled sheets is done so that the waves match. The optimal horizontal overlap is twenty centimeters. If the roof angle is more than fifteen degrees, a sealant must be used. It is a gasket that does not allow snow, rain and wind to clog into the seams. The sealant must be selected depending on the waveform of the profiled sheet.

After mounting the main part of the roof surface, end and ridge strips are attached. Lastly, the corrugated board is attached to the walls and the chimney.
Important! Self-tapping screws on the sheet should not hang out. Properly installed fasteners do not deform the wave and are tightly fixed in the crate
If it is planned to install an organized drain on the roof, the eaves, gutter and plank are installed first. A perforated soffit is installed for roof ventilation.
The ridge on the roof must have two ventilation gaps. The ridge element is fixed with self-tapping screws with a distance of forty centimeters.
What is important to remember when installing a corrugated roof with your own hands
Any work at height requires special care and compliance with safety measures:
- you need to use safety ropes and belts;
- with a large slope of the roof, it is important to install a fence;
- use shoes with soft, non-slip soles;
- do not work in wet and rainy weather (profiling becomes slippery);
- all work must be carried out with protective gloves, the sharp edge of the metal sheet can injure hands;
- raising and lowering the profiled sheet should be carried out only along the logs with the help of three people, preventing the free fall of the material.

For a comfortable stay in the house, it is important to make a high-quality and reliable roof with a good coating. To date, one of the best roofing is corrugated board. It reliably protects the roof from leaks, collapses, provides tightness in the under-roof space. And the most important thing is that it is environmentally friendly. However, the correct installation work plays an important role. Only in this case, the corrugated roofing will serve you for many years. This article will provide detailed instructions on how to cover the roof with corrugated board with your own hands, as well as video and photo materials.

As mentioned at the beginning of this article, corrugated board has a lot of advantages, which makes it an indispensable roofing material. You can also note other positive aspects of this material:
- The profiled structure of the sheet has a high bearing capacity.
- The lightness of the material greatly simplifies the work with it.
- After laying the sheets on the roof, no joints are formed. This ensures the tightness of the coating.
- Due to the special polymer coating, the material does not corrode, and as a result, its service life increases.
Note! Laying corrugated board on the roof should not cause any special problems, and at first glance, everything may seem extremely simple. However, during installation work, no flaws and inaccuracies should be allowed.
![]()
For the transportation of corrugated board, specialized transport is required. Sheets must only be laid horizontally. It is also recommended to tighten them with slings, after laying them on a hard and even surface. There are also special requirements for the driver. It is necessary to drive the car without sudden braking and turns. Failure to do so may result in damage to the material on the way to its destination.
In addition, it is important to ensure high-quality storage of corrugated board. The base must also be level and firm. If it's time to lift the sheets to the roof, then you need to do this with the help of a log. Their length should correspond to the height of the roof from the ground. You can lift several sheets at once.
Note! If the weather is windy, then it is impossible to lift the sheets onto the roof.

Today, such types of corrugated boards are known:
- Mark C. The canvas has a sinusoidal or trapezoidal shape. If you decide to perform a decorative roof finish, then this option is just the way.
- RS brand. It is used both for laying on a roof, and on walls.
- Mark N. This model is equipped with additional stiffening ribs.

It is very important to know what slope angle is allowed for a particular product. Each manufacturer develops individual instructions. Therefore, when buying, you should ask for instructions, which is called the so-called "Installation of the roof from corrugated board instructions." Based on this, it is important to consider the future slope of the roof. Knowing the slope will help you calculate how much overlap each sheet should have. Below are some calculation options:
- A slope of less than 15° will provide an overlap of 200 mm or more.
- A slope of 15 to 30 ° will provide 150–200 mm and no more.
- If the slope is less than 12 ° or the roof is flat, then each seam and joint should be carefully sealed. Otherwise, the roof will not cope with its functional responsibilities.
Payment

Before buying material, it is important to calculate the number of sheets. This requires information regarding the width and length of the slope, as well as what brand of corrugated board will be used. To calculate, you can use a special program or draw a roof on a reduced scale. This will help to perform almost accurate calculations. It should not be forgotten that the sheets are overlapped. Depending on the angle of the slope and the grade of the profiled sheet, the overlap will differ. So you will find out how much the length and width of the sheet will be “eaten up”. Moreover, do not forget to add an overhang to the cornice, which can be up to 30 cm.
Note! It is necessary to purchase all additional elements in advance, for example, valleys and slats. They will be fixed in places where the slope has a certain kink, from the end, on the ridge and in other similar places.


Each sheet is attached to the crate with self-tapping screws. This is the only way to ensure reliable coverage. Fasteners are subject to special requirements. So, they must be made of galvanized steel. In this case, each self-tapping screw must have a special gasket made of elastomer or neopreon rubber. This rubber will provide a hermetic docking of the self-tapping screw with the profiled sheet. Due to this, moisture will not penetrate the wooden elements of the roof, which means that rotting of the supporting structure will be prevented.
The following technical parameters are presented for self-tapping screws:
- Size 4.8x32mm, 4.8x60mm and 4.8x80mm.
- The presence on the cap of a protective and decorative coating in the form of powder paint and a layer thickness of 50 microns.
- The surface is treated with electrolytic galvanization with a thickness of 12 microns.
- The presence of a protective gasket made of elastomer for profiled sheets and for valleys made of aluminum sheet.
- Self-tapping screws should contain stabilizers that do not allow the negative effects of ultraviolet rays.
Note! When buying coating sheets, purchase one color and self-tapping screws. This will give the aesthetics of the entire roof.
It should also be mentioned about special seals, which are made of foamed polyethylene and polyurethane foam. The sealant is placed between the sheet and the crate. It is believed that a strip seal with a rectangular cross section is universal. But it will be much more effective to use those seals that repeat the shape of the profiled sheet.

The presence of a seal reduces the noise of a metal roof, increases the quality of the thermal insulation of the cake and increases the service life. A special adhesive is applied to the strips of the seal on both sides, so its installation is greatly simplified. It is very important that the sealant be perforated for ventilation in the under-roof space.
Note! The presence of a seal eliminates the large gaps resulting from the fit to the roof structure of the sheet. Birds, insects and cold air often get into these gaps. The special properties of the sealant material make it bioresistant and moisture resistant.

Immediately before the installation of profiled sheets, hydro and vapor barrier is laid. To make a vapor barrier, you can purchase a special film or roofing material, in extreme cases. The vapor barrier is attached to the crate. It is recommended to lay it from the lower edge of the roof. Due to this, each subsequent layer will be lower and moisture will not penetrate to the wood.
Note! If the brand of corrugated board S-8, S-10 or S-20 up to 0.5 mm thick is used, then the crate must be continuous. In all other cases, the step of the crate is selected individually from the characteristics of the roof.
Separately, it is worth mentioning about the layer of insulation, which will save 25% of heat. Those roofs on which corrugated board is mounted are advised to use matte insulation. The result is a roofing cake:
- A layer of vapor barrier film.
- Insulation.
- The final waterproofing layer.

When making this “pie”, a “cold triangle” should be organized. Its presence will ensure a good passage of warm and cold air through the cracks in the cornice and ridge. So, natural ventilation will be created, which will prevent the formation of condensate.
The laid waterproofing layer will retain all the properties of the insulation. Otherwise, with strong moisture on the roof, an ice crust, dampness will form and, as a result, the process of wood decay is inevitable. For this reason, the material for each layer of the cake must be chosen carefully. It must be of high quality.

In order for all the work to go smoothly and without failures, take care of the availability of the necessary tools in advance:
- rope;
- roulette;
- screwdriver;
- hammer;
- metal scissors;
- construction gun with sealant;
- marker or pencils;
- construction stapler;
- drill.
Note! Profiled sheets are cut cold, as the polymer coating is not resistant to high temperatures. It is better to use scissors for metal or a jigsaw. At the same time, treat each cut with an anti-corrosion primer. This will increase the life of the coating.
Laying scheme

The sheets are overlapped on the lower edge of the roof, and the screws are twisted into the bend of the wave. Compliance with a specific installation scheme will create a reliable roof. First of all, under the valley plank at the level of the crate, a dense flooring is made from the groove at a distance of 60 cm from both sides. The lower boards of the valley are mounted with an overlap of 20 cm. The bottom plank is fixed from the edges with nails, and the final fastening is carried out together with the roof. If the slope is gentle, then sealing mastics should be used here.
Under the ridge, the bottom bar is wound up by 25 cm. A profiled or universal seal should be laid between the profiled sheet and it. As for the installation of end boards, it is better to fix them above the crate, then it will be possible to fix the end plate. This structure will be called the wind corner. After that, a cornice strip and filing with corrugated board are installed. It is mounted below the profiled sheet.
Installation of sheets will depend entirely on the type of roof. For example, if the slope is gentle, then a longitudinal seal is used and overlapped by one wave. If the slope is a steep compactor, it is not necessary to use.
Note! If you have a hip roof, then the installation begins with the hip itself. A cord is stretched along the cornice and each subsequent sheet is aligned along it. It is unacceptable to do this at the end of the ramp.

There are two methods for laying sheets of corrugated board on the roof:
- Vertical direction. In this case, the first sheet with temporary fastening is laid below. Similarly, the sheet is mounted on the second row. Next, two sheets are stacked side by side, a square of 4 sheets is obtained. More sheets are stacked to it and so on. This method is in particular demand if the roof is equipped with a drainage groove.
- Another method of stacking sheets is to make a block of 3 sheets. First of all, 2 sheets are laid on the first row. Between themselves, they are securely fixed, and the 3rd sheet of the 2nd row is joined last. This block can be fixed while aligning with the eaves.
Note! No matter which sheet stacking method you choose, it is important to pay special attention to each docking point. It is on this that the reliability and quality of the roofing will depend.

For each sheet of corrugated board, 7-8 self-tapping screws are required. They need to be twisted into the bottom wave. As mentioned above, the material is overlapped both vertically and horizontally. The overlap will depend on the angle of the slope. From what place should the sheets be laid? If the roof slope has a rectangular shape, then it is possible from any end along the cornice line. If the shape is a trapezoid and a triangle, then first of all it is important to think over the laying scheme. However, the first sheet is mounted in the center, and then the sheets are stacked symmetrically on both sides.
If a drainage system is planned, then the corrugated board is mounted along the eaves with an overhang of 60 cm. If it does not exist, then the overhang is carried out according to the material grade:
- NS-20 - up to 10 cm.
- S-44 and NS-35 - up to 30 cm.

So, align the first sheet along the cornice and the end of the roof. After that, it is fixed with a self-tapping screw at the top. Each next sheet is fastened along the longitudinal side of the sheet. It is pre-aligned with the eaves, and then fastened with the crate. According to this scheme, row after row is assembled.
The installation of the material is carried out so that a frontal overhang 7 cm wide is formed. At the eaves, the sheet is fixed at a distance of 30–40 cm, and the remaining rows of self-tapping screws can be staggered in increments of 1 m. . On a longitudinal overlap, fasteners are located at the top of the profile at a distance of 300 to 500 mm.

The next step is to install the ridge and the end plate. According to the standard, the end plate is 2 m long. If the length is not enough, then it overlaps. The fastening of the strap is carried out from the roof overhang to the ridge.
Note! When mounting the end strip, make sure that it overlaps at least one wave of the sheet. Self-tapping screws are twisted in steps of 1 m to the profiled sheet.
After that, it remains to make the last node of the roof - the ridge. Only smooth ridge elements should be used here. A number of experts recommend laying a special ventilated seal between them. If the sheets are corrugated, then a ridge seal is used.

At the end of the roofing work, a junction bar is installed with profiled sheets. They are an element with a length of 2 m. They overlap up to 20 cm. The fasteners are made with self-tapping screws from the side of the roofing sheets. Mounting pitch 40 cm.
Note! When organizing the adjoining of the roof to the wall, a special sealant should be used. It is laid between the joint strip and the upper edge of the corrugated board.
To prevent snow and rain from getting into the cracks, a longitudinal seal is also laid to the side junction. If the roof is steep, then such a seal is not needed.

In conclusion, let's summarize:
- It is very important to pay attention to the transportation of roofing material.
- The sharp edges of the sheets can cut your hands, so you need to work with protective gloves.
- It is necessary for three people to lift the sheets to the roof. It uses two guides.
- The installer must wear shoes with soft soles so as not to scratch the surface of the sheets.
- If the surface is accidentally scratched, then these places must be treated with paint for polymer coatings.
- You can step on the sheets only in places of the crate.
So, we are convinced that corrugated board is an excellent material for roofing. However, it is important to remember that it can serve for a long time and with high quality only if the installation and calculation technology is followed. If you have your own experience in this construction industry, then write comments at the end of this article. It will be equally useful to pay attention to the photos below. On them you can consider the intricacies of performing work on overlapping the roof with profiled sheets.
Video
In the video provided, you can learn more about the intricacies of installing corrugated board on the roof:
A photo
In the photographs you can see roofs made of corrugated board in various forms:


Schemes
Below is a series of photographs and tables from which you can get the details of installing corrugated roofing:


The roof is one of the most important elements of a building. The reliability and longevity of the entire building depend on the correctness of its installation. The trade network of building materials has a large selection of products for roofing. Profiled flooring is in the lead. The technology of laying corrugated sheets is not difficult. Before starting work, you need to familiarize yourself with the features of this material and the rules for mounting it.

Profiled flooring is a versatile material that has found its application in the construction of fences, light structures, finishing wall and roofing. Blanks are used even in bold experiments in the absence of experience in the construction of the roof.
Material Description
The corrugated board is made of steel raw materials of cold rolling, covered with polymer protection. The height of the workpiece profiles can be 8-75 mm. Wave-shaped, rectangular and trapezoidal shapes provide additional rigidity. Decking can withstand mechanical stress and high loads.


Advantages of a profile flooring:
- Optimum thickness allows you to withstand intense wind loads.
- Resistant to rain, snow, corrosive stains and the damaging effects of aggressive substances due to paint and galvanized coatings.
- Lack of difficulties during installation work.
- Convenience in transportation.
- Light weight, exerting a small load on the foundation.
- The ability to choose from a palette of shades of polymer coating, gives individual appeal to the roof.
- Low price compared to other coatings used for roofing.
After cutting the blanks to the specified dimensions, it is necessary to treat the sections with a special anti-corrosion primer to extend the service life of the covering corrugated board.
Lightweight roofing with a slight slope is covered with blanks HC 35 or C 44 with a trapezoidal or sinusoidal profile.


The length of one sheet is 2-6 meters or you can order the production of corrugated board with individual dimensions of 0.5-12 meters.
The pitched roof is covered with elements of the most common brand NS 35 - profile height 57-114 mm. The letter "H" denotes the flooring used for load-bearing structures.
To get a more detailed idea, you can watch the video:
Required additional items
The selection of self-tapping screws with a polymer coating is carried out according to the color of the main corrugated board and its structure. The tip in the form of a drill makes it possible to use it in working with metal structures with a thickness of not more than 2 mm. Self-tapping screws are sold complete with sealing washers made of neoprene rubber.
You can get tips on choosing the right self-tapping screws by watching the video:
When sealing the under-roof space, in particular, for sealing the ridge, a special sealant is used that repeats all the curves of the corrugated board. The function of the ridge is to protect the docking joints, as well as to create a decorative roof decoration. The ends of the skates are inserted into special plugs.
Installation of corners is carried out in order to connect corner parts.

Selection of tools


Before you do it yourself, you need to prepare a mandatory set of tools:
- laser building level;
- long tape measure;
- construction knife;
- marker or pencil;
- metal scissors;
- high power screwdriver;
- construction stapler and staples to it;
- electric drill;
- hammer;
- sealant gun;
- fixture.
Ensuring the slope of the roof
Buildings are made with a mandatory roof slope of at least 12˚. Depending on the value of the angle of inclination, laying is carried out with overlapping edges of adjacent parts: - less than 15˚ - overlap is 200 mm;
- less than 30˚ - 150-200 mm;
- over 30˚ - 100-150 mm.
In places of overlap, mandatory sealing of the seams is carried out with the help of mastic or sealing tape.
Preparatory design work
At the first stage, measures are taken to measure the roof:
The length of the slopes along each diagonal is determined, the planes are checked in parallel using a level.
The estimated length of the workpiece must correspond to the slope of the roof plus 40 cm for the overhang.
The required number of profiled sheets is determined using simple mathematical calculations, while not forgetting to add tolerances for the amount of edge overlaps (overlaps).
With complex roof geometry, the calculation is made for each unique figure, and then the sum of the results obtained is determined. When calculating the amount of corrugated board, you need to remember about skates, pipes, windows, ends, etc.
Roofing pie device

In addition to the covering layer, the roofing composition has several mandatory elements:
- thermal protection;
- waterproofing;
- vapor barrier layer;
- ventilation.
The calculation of each layer is carried out by a method similar to determining the number of profiled sheets.
Features of laying corrugated board

Laying profiled flooring is carried out in compliance with simple rules:
- When raising the flooring up, wooden logs are used.
- Work is carried out in calm weather to prevent damage to the sheets if they accidentally fall.
- It is possible to move along the profile only along the deflections of the waves in the area of the battens.
- Places of cuts or other violations of the integrity of the corrugated board are treated with special enamel to prevent metal corrosion.
- It is recommended to use thick protective gloves to avoid injury from sharp edges.
- The remains of debris after installation work are swept away with a brush or washed using a soapy solution.
- The laying of the roof covering is completed by the obligatory removal of the packaging film.
Algorithm for roofing with profile decking
The elements are laid on a crate, which has a continuous or step character. The step size may depend on the degree of roof slope. When the bevel is less than 15 °, the distance between the planks made of metal or wood is from 300 to 400 mm, above 15 ° - the step is increased to 600 mm.
To prevent rain or snow from getting into the gaps between the sheets, installation is carried out from the bottom layer, gradually moving up.
Important! Decking having a wavy profile is laid from the side subject to the least wind blowing.
With a sufficient length of the slope, a solid profiled sheet is used, while it is laid from the end part. Alignment is carried out, focusing on the eaves, providing an additional 40 cm for overhangs.
The installation of the coating is carried out very carefully, step by step referring to the plan drawn up in advance:
- The installation of the first element is accompanied by fixing with a self-tapping screw in the middle.
- When laying the second part, the edge overlaps (overlap) on the previous fragment. The fastening method is repeated.
- After preliminary laying of the parts completely over the entire roof, they are aligned, focusing on the horizontal of the eaves.
- The connection of the elements of the corrugated board with each other at the very ridge, falling into the deflection of the wave through the step.
- Final fastening. On a vertical line, self-tapping screws are installed in the crate through one board, along a horizontal line - with an interval of two waves. At the ends, the crate layer is fixed at each step. At the top near the ridge and at the bottom at the cornice, self-tapping screws are inserted in each deflection.
- The joints are strengthened at all mating points.
- Excess parts are to be trimmed with scissors on all sides.
- Installation of end plates. Starting from the lower level towards the ridge, an increase in length is made, creating an overlap of 50 mm. Mounting self-tapping screws are installed one meter apart.
- After laying the self-adhesive sealant on the corrugated board, the ridge element is attached. The overlap of the edges of the ridge strips should be 100 mm, the distance between the fasteners should not exceed 300 mm.
Watching the video will give a more accessible idea about the installation of the roof:
Features of installation in difficult areas


Difficult areas are characterized by the presence of internal corners, they are called valleys. Difficult places are the joints of two slopes, the areas of ventilation outlets and chimneys. Internal joints need careful sealing to protect the places under the roof from moisture penetration. The crate here has a solid appearance.
The joints of the profiled flooring and the planks need to be sealed with a sealant or mastic. The slats of the valleys are fixed together with the profiled sheets. The top bar is installed on the profile to close the edge joints and protect them from rain and snow.
The distribution network has additional elements that have non-standard shapes to avoid the difficulties associated with covering a complex roof.
A video in a more visual form can demonstrate the process of laying corrugated board:


