How can I decorate with adhesive tape decorative Vlad. Blog What can be made from decorative tape? Ideas
When repairing an apartment or a separate room, the issue of wall covering is very important, because it will serve as the basis for the design of the entire room. In this article, we will focus on painting the walls on our own. But here we will consider a more interesting way - applying patterns on the wall of the apartment with our own hands.

On the walls of an apartment or room, using paint, you can create drawings or abstract patterns that reflect your style and create homeliness.
When painting walls, there are several main questions that need to be answered:


What paint is right for you?
Color, of course, choose at will, this is your personal design decision. But the type of paint will depend on its resistance to water, heat, and in general, how long it will last. We recommend using water based paints, they tolerate heat and humidity well, do not exfoliate, the surface covered with them can be washed, they are suitable for all rooms in the apartment.

How do we paint: brush or roller?
Before applying, you need to make a solid background.
- Roller: for this it is better to use a roller, it is much faster to cover large flat surfaces, the paint lays down evenly, without leaving streaks.
- tassel you will spend much more effort and time. It is suitable for smaller objects, reliefs, where the roller will not reach hard-to-reach places (furniture: high chair, wardrobe, etc.).


TIP: When painting walls, it is convenient to use a brush in the corners, as an addition to the roller, it is also useful when working with stencils.
How to properly prepare a wall? What kind of surface can be painted?
If you have bare walls and you decide to paint them, then initially need to level the surface, since all the irregularities are very visible on the painted walls.
- Suitable for this sandpaper(with a grinder, of course, it will be much faster than by hand).
- If there are cracks or scratches on the wall in that area, you need to make putty and then level again.
- Then wipe off the dust and Apply a primer, preferably two coats.
By putty, it is not advisable to paint old paint and ordinary old wallpaper, paint can go badly and lag behind.
- In order not to throw money away and make really high-quality and durable repairs, before painting remove the old cover(using special solutions),
- and then do everything described initially.
ATTENTION: An exception is special wallpaper for painting, the paint falls on them easily and evenly, as they are intended for this.
The main 3 methods of applying patterns:
- Using masking tape (geometric shapes are obtained)
- Using stencils (flowers and other drawings)
- Roller pattern
Let's look at each of them in detail.

With masking tape
The essence of the method is that a special masking tape is glued to the wall (just lines or combinations of them), then paint is applied, and when the tape is removed (without leaving marks on the wall), a geometric pattern is formed.


Master class: Stepped forms
Here we will create patterns on the walls - steps. To paste the adhesive tape evenly and evenly, use a cardboard stencil.

Instruments:
- adhesive tape, thick cardboard (you can cut the box),
- paint, small roller.
Drawing technique:


- Cut out a stencil from cardboard and glue it with tape (so that the edges do not tear). For example, let the first step be 5 cm high, and the second and third 10 cm each, each step 10 cm wide.
- Make straight, parallel lines with masking tape. Then apply the stencil, glue it with masking tape and repeat this action, shifting the stencil each time at the same distance. And so on, level after level.


The result should look like in the picture:


- Before proceeding with color painting, it is better to apply white paint. This is necessary in order to be sure that the colored paint does not get under the adhesive tape and a neat pattern is formed.
- Now with a roller we apply paint of different colors on each level.
- Carefully remove the adhesive tape and get a beautiful even pattern with clear lines, without mixing colors.


Master class: Triangles on the walls in the style of ombre
Triangles that vary in color from base to top from bold to progressively lighter hues will make a room look sleek and modern.

You will need the following materials:
- Ruler
- Stationery knife
- Rollers and brushes
- paint tray
- 4-5 shades of the same paint color (one can each)
- 1 can of paint in a contrasting color
- masking tape
Execution instruction:
- Stick masking tape on the wall, forming triangles with it. Make sure all lines are straight.
- Carefully trim the corners of the triangles with a clerical knife, tape is applied from different sides in them and can protrude beyond the lines. It is very important not to damage the wall!


- With the lightest shade, start painting the top of the wall, continue until a quarter is covered. Then take the paint a tone darker and paint from the place where you left off before. And so on to the darkest shade, that is, to the bottom of the wall.
- After the previous step, the wall does not look very neat, the colors go too sharply, you need to smooth it out. With a dry brush, blend the lines where the different shades converge.


- Wait for the paint to dry (according to the instructions for your specific paint)
- Remove the masking tape, leaving only those parts of the triangles that you will paint over with a contrasting color. To do this, grab the corner of the triangle and pull towards you at an angle of 45 degrees.


- Apply contrasting paint to the remaining glued areas of the triangles.
- Wait for the paint to dry and remove the masking tape as described above.


Master class: Optical patterns
This painting method will require a little more calculations and preparatory steps than the previous ones. But the resulting drawing with a 3D effect is worth it.

You will need the following materials:
- masking tape
- Paint in different colors (3-5 will be enough)
- paint tray
- Roller
Stages of creating a drawing:


- Draw on the leaf a rough sketch of the pattern that you will apply to the wall.
- Choose a base color (whose elements will occur most often) and paint the entire surface of the wall with it.
- Apply painter's tape to any surfaces that may be exposed to paint to protect them. For example, skirting boards, tiles.
- Based on the sketch, evenly apply marks with a pencil and a ruler, creating a pattern grid.
- Indicate a color on each section, this will facilitate and speed up the work, eliminating confusion.

- Decide which paint you want to apply first and cover those areas with masking tape. Apply paint and wait until it dries (about a day). Remove the tape by pulling it towards you at a 45 degree angle.
- Tape the areas for the second color with tape and repeat the steps from the previous paragraph. The same goes for the rest of the flowers.
- Make sure there is no tape left anywhere and your pattern is complete.
Thus, you can paint both the entire wall and part of it, then there will be a 3D effect of the picture.


Master class: Geometric shapes on the wall
Triangles, squares, circles and other geometric shapes scattered on the wall will create an original composition.

Materials:
- masking tape
- Paint in two colors (for the background and patterns, the first one needs more)
- paint tray
- Roller
- Stencils for shapes with jagged lines (such as circles and ovals)

Working process:


- Paint over the shapes with a different paint color.
- Let the paint dry for 24 hours.
- Remove the tape by pulling it towards you at a 45 degree angle.


Using stencils
The stencil method allows drawings of varying complexity, regardless of artistic abilities. You can create even a very complex ornament, just by purchasing the appropriate stencil.


And it will take much less time to create a stencil drawing than with hand painting. The range of drawings obtained by this method is very wide: flowers, trees, animals, insects, abstraction, and the list goes on.

For inspiration with this painting method, we offer a master class on creating a floral ornament.
Master class: Floral print
To somehow diversify the walls and not leave them just white, decorate them with a contrasting floral pattern created using stencils.

For this you will need the following materials:
- Stencil
- Paint (white for the background and contrast, in this case bluish with a sheen, for the picture)
- Brush (a small one with short, stiff bristles works best)
- Masking tape (only to stick the stencil to the wall for the duration of the job, not to ask someone to hold it)

Working process:

- Clear the room by providing a comfortable approach to the wall. Apply white paint, thus creating a field for the picture. Wait until dry.
- Attach the stencil to the wall and attach it with masking tape. It must be well fixed, since when sliding after the start of painting, it will be difficult to return it exactly to the previous place.

- Dip the brush in the paint, then shake it well or wipe it a little with a towel so that the paint does not drip, otherwise it may flow under the stencil and the drawing will be damaged. The brush should be practically dry. Start sketching the stencil.


Important: when painting, be careful with your free hand so as not to leave fingerprints with paint on the white wall.


- When the stencil is sketched and the paint has dried, move it to the next place and repeat the previous steps. Continue until you cover the entire wall.
- When the last paint is dry, put the furniture back in place and enjoy your design.


Roller with patterns
This method of painting allows you to quickly create patterns on the wall, while requiring a minimum of effort. Its essence lies in the fact that initially you apply background paint on the wall with an ordinary roller, and then paint the wall with a different color with a special roller with patterns.
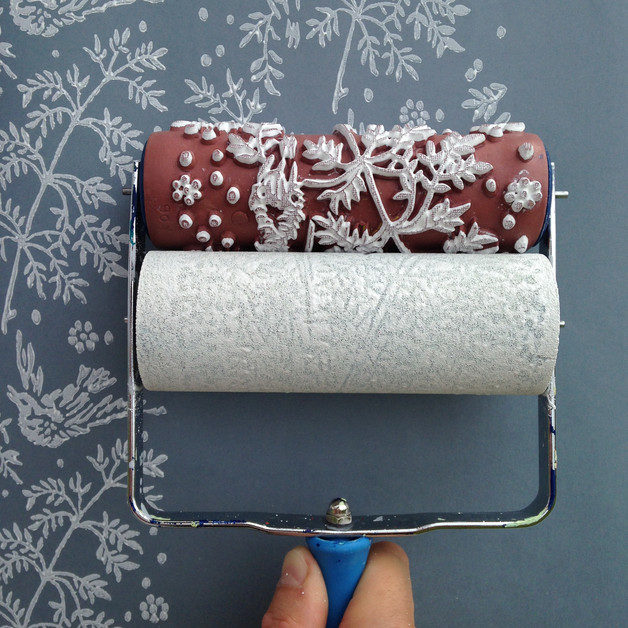
Of course, the colors must be chosen so that everything looks stylish and harmonious together.
Working with such a special roller is the same as with a regular one:
- pour the paint into the tray, dip the roller into the paint,
- walk along the wall and repeat these steps until the entire wall is painted.
If you don’t want to bother too much, but also want something more original than the usual plain color of the walls, this method is exactly what you need.


It often happens that you want to change something in the interior, but, as always, there is not enough money. In this case, you can make accents in certain places, and the rooms will sparkle with new colors. Decorative tape can help out here. We have collected 18 interesting ideas on how to transform the interior with the help of multi-colored duct tape.
1. Race track

Colored tape can be used to create a toy race track right on the floor of a living room or children's room.
2. Prints on the wall

Using black or colored adhesive tape, it will be possible to coolly transform one of the empty walls of the apartment. Graphic and abstract patterns made using decorative adhesive tape will help hide imperfections in the finish and transform a boring interior.
3. Striped tabletop

Strips of colored tape will help transform a worn dining, coffee or desktop tabletop.
4. Bright chest of drawers

Multi-colored strips of colored tape of different widths, pasted on the doors of drawers, will turn a classic chest of drawers into a stylish interior detail.
5. Markers

Strips of decorative tape in different colors will help you conveniently mark the wires so that you never confuse them with each other.
6. Frames

Thin, thick strips of colored tape can be used to create creative frames for posters, paintings, and photographs. Such frames will perfectly fit into the interior of a teenager's room or a living room decorated in a modern style.
7. Decoration of chairs

Small pieces of colored tape can be used to decorate individual parts of the chairs. In this way, you can decorate legs, backs or seats.
8. Clock

Buy a regular watch and decorate the faceless dial with strips of colored decorative tape. The updated clock will become a cheerful detail of any interior.
9. Keyboard

Transparent adhesive tape with bright patterns is suitable for decorating the keys of a boring laptop or computer keyboard.
10. Switch

The frame of the switch or its keys can be decorated with strips of bright decorative tape.
11. Lockers

An amazing shelving unit made of light wood, the cabinets of which are decorated with black and white decorative tape.
12. Little touch

A faceless IKEA nightstand can be decorated with thin strips of colored tape. Such a minor touch will make a boring nightstand a unique piece of furniture.
13. Calendar

Using beautiful decorative tape, you can create your own monthly calendar that will help you plan your meetings and tasks.
14. Steps

Using decorative adhesive tape with peas or stripes, you can coolly transform the risers of the stairs of a private or country house.
15. Exclusive binders

Even such a trifle as binders can be bright and original if you decorate their bases with bright stripes of colored tape.
Decorative tape is a popular element for decorating personal diaries, notebooks, planners, and other surfaces. You can buy it in stationery stores, or you can make it yourself. In the second case, it will be not only beautiful, but also unique. Moreover, the process of its manufacture is simple and fast. So how do you make decorative tape?
Work materials
To make decorative tape with your own hands, you will need a simple set of tools: a double-sided tape of the desired width and scissors.
The following can be used as a decorative layer:
- lace of small width (preferably synthetic);
- printout on ordinary office paper;
- sheets of colored thin cardboard;
- wrapping paper;
- long strips of fabric (it is better to take cotton with a polka dot pattern, a cage or a strip, such material will bloom less along the edge and will not spoil the look of the finished tape);
- napkin with a pattern (decoupage or plain);
- foil for creativity (food is not suitable, as it is too thin and non-plastic).
How to make decorative tape?
The work process consists of five steps that must be repeated for each desired decorative layer:
- Prepare the material for the decorative layer. Fabric and lace need to be ironed. If there are wrinkles on the wrapping paper, it is also better to iron them. Separate the two lower layers from the napkin, leaving only the one on which the pattern is applied.
- Unwind the required amount of tape.
- Apply decorative material to the adhesive side and smooth it gently.
- Cut to desired length.
- Repeat steps as many times as needed.
When making decorative tape from foil and wrapping paper, it is better to apply the adhesive side of the tape to the material itself, and not vice versa. This will help avoid wrinkles and air bubbles.

Printing for decorative tape is best done on a laser printer. Such drawings will be more resistant and will not spread if water gets on the adhesive tape. To give such a tape endurance, you can cover the decorative layer with a finishing adhesive. It is also advisable to do with a tape made of napkins and thin cardboard.
The special finishing adhesive is replaced by an ordinary transparent office adhesive tape, which is glued over the decorative adhesive tape.
Second manufacturing method
There is another way to make decorative tape. To create a more artistic and beautiful adhesive tape, you will need:
- white napkin;
- stamps for creativity with a small pattern;
- stamp holder (if necessary);
- stamp pad of any color (preferably archival quality);
- sponge or very soft brush;
- pencil glue;
- adhesive double-sided tape;
- decoupage or any finishing glue (optional).
On a napkin, you need to stamp the design with an ink pad and let it dry. Before use, separate the bottom layers from the napkin. Glue the patterned layer to the desired surface using stick glue. For greater durability, the pattern can be covered with a layer of finishing glue.
As in the first method, you can glue the top layer of the patterned napkin to double-sided tape and cover it with decoupage glue to add strength.
How and where to store homemade tape?
Now that you know how to make decorative tape, it's important to know how to properly store it. The main task is to maintain the stickiness of the adhesive tape, so you should protect it from direct sunlight. In addition to bright light, adhesive tape is afraid of heat from the battery and other heating devices. With prolonged exposure to temperature, it can simply "melt".

It is better to store the finished tape in a folder file or by twisting it into a roll and securing the tip with a paper clip. After that, it should be removed in the closet. You can also store it in a special tape dispenser, which is sold in stationery stores. Such a device has another plus - it is equipped with a special cutting edge that will simplify the work with adhesive tape.
There are many ideas for decorating various useful little things. A beautifully designed coffee or candy box can be used in the household or as a gift decoration. The idea that will be presented in the article is work with decorative tapes, suitable for kindergarten teachers, parents for creative work with kids, and just lovers of fantasy by doing their own fantasy. And what could be better than creativity, to which a part of energy and love is applied. This thing will simply radiate and give a good mood.
Fabric adhesive tape is used for all kinds of small parts, flags, arrows, angels, kisses, borders.
The use of such colorful adhesive tapes will decorate a children's party, and school supplies, making them individually beautiful. And how beautiful handout cards will look for work in kindergarten or at school in the classroom.

You can arrange a children's room for a playground, with all sorts of "bumps", for moving through an imaginary swamp. Or squares, for playing "third wheel" at a birthday celebration.

In winter, it can be glued squares for playing "hopscotch" for a girl, or "fortresses" for a boy.

The idea of sticking and developing a project is good to offer to children aged 3-4 years. Children have much better thinking than adults, and they will offer you a lot of interesting things!

Toddlers love to trace their hands and feet, let them do it on scotch tape and hang it in a frame in the nursery. Then, after two years, repeat and compare how the palms have grown with the baby. It's so interesting and memorable for a long time.

It is good that there will be no marks on the floor or on the walls. On the walls, you can make panels of adhesive tape with any theme. It could be a fairy tale scene, or a season-appropriate landscape! All figures can be cut by children under the supervision of an adult, and together with older brothers or sisters.

In elementary grades, counting sticks are used, from boring they can be made bright, with which you can count and build different geometric shapes in an interesting way.

A beautifully designed plastic container from ice cream or yogurt can be turned into a sewing box by decorating with colorful ribbons of adhesive tape, you can add strips of lace tape along the edges. Such a gift can be made to mom, grandmother, teacher. And every time, picking up a gift, they will remember and thank the person who gave it.

You can also make an original and beautiful vase from a jug or bottle.

For bookmarks in a diary or textbooks, you can make bright bookmarks by attaching a strip of beautiful tape with a paper clip or pin. Ingenuity, creativity and a little work!

Simple stearin candles can turn into fabulous ones for any holiday, if you use ingenuity and colorful tapes.

You can arrange your letters beautifully.

Or bring brightness to your diary.


Make a gift for loved ones, use decorative tape on a postcard, or create a beautiful frame.

Give originality to ordinary paper clips.

Make a designer case for your phone.

Decorate also the headphones.

Create a bright and colorful atmosphere in your home for the holiday.
Japanese invention washi tape is a translucent sticky tape made from rice paper. It comes in various widths and any color, but the most beautiful ribbons are with a pattern or pattern. Such adhesive tape is useful not only - for example, scrapbooking, but even for decorating the interior.
Party Ideas
1. Wrap the ribbon around the toothpick and cut off the ends in a triangular shape to make a flag - ready to decorate for snacks and cakes.
2. Plain plastic cups will be a bright party accent if you wrap a colored ribbon around the neck.
3 . Decorative tape will transform ordinary white candles.
4 . A translucent tape will turn glass glasses into original candlesticks.
5 . You can make colorful "medals" for guests to present at competitions. Look for instructions on ohmyhandmade.com.
6 . Wrap colorful pieces of ribbon around strings or beads to create colorful party garlands.
7 . The car track will become entertainment for children and adults, and you can make it right on the floor of the room in 15 minutes. Get inspired by the idea lejardindejuliette.blogspot.be.
8 . With the help of bright ribbons, you can make personalized gift tags, as a key ring or to mark your luggage while traveling.
Ideas for the interior
9 . Simple furniture from IKEA will get a personality if you decorate it with lots of colored stripes.
10. A wide bright adhesive tape can be glued even on the fan blades or, for example, on a lampshade. This is the easiest and most budgetary way to instantly change the interior.
11 . Choose geometric patterns if you want to decorate cabinet doors or drawers.
12. A spectacular but time-consuming idea is to decorate the spines of books and magazines with decorative tape. So bookshelves can become a creative accent or, on the contrary, merge with the interior of the room.
13 . A thin strip of bright tape will make
14 . Pleasant little things always cheer you up, like these cute colored clothespins.
15 . Why buy new photo frames when old ones can be instantly transformed with duct tape?
Ideas for study and work
16 . Semi-transparent rice paper washi tape is even suitable for decorating a laptop keyboard.
17 . A few colored ribbons will turn a boring notebook into a creative idea generator.
18. Bright flags can mark cables - and forget about the mess.
19 . If you combine a simple paper clip and colored ribbon, you get a wonderful bookmark.
20 . Japanese ribbon will transform a pencil case or phone case.
A photo: thenaturalweddingcompany.co.uk,ucreatecrafts.com , pinterest.com , landeeseelandeedo.com , inmyownstyle.com , allwashitape.blogspot.com , shelterness.com , aprilfosterevents.com .
We also recommend
 Switching power supply: repair and refinement
 Remote control of light
 Swimming lessons for preschool children
 Notes for the master - home household alarms
 Clock propeller on Atmega8
 Device and relay application examples, how to choose and connect a relay correctly Microcontroller and relay simple switching circuits