What is the best way to insulate a wooden house from the outside or from the inside. Insulation of wooden houses from the outside
We will send the material to you by e-mail
Thermal insulation of houses is carried out not only to reduce heating costs and reduce heat loss. High-quality insulation of a wooden house from the outside allows you to keep a comfortable cool indoors in the heat. This reduces the need for and, accordingly, the consumption of electricity. It is proved that external thermal insulation is much more effective than internal one.
Wooden houses also need to be insulated. And
Insulation of a wooden structure can be done in two ways:
- create a screen that can protect from the wind;
- use an additional layer of insulation.
The use of the first option can significantly reduce costs during the heating period. For this, lining is often used, the connection of the elements of which creates an integral canvas. But such material is subject to cracking and deformation. In addition, it is difficult to install, and also has a rather high cost.

The most common options for thermal insulation of a house that protects against cold and bad weather is siding, equipped with an additional base for insulation.The efficiency of the material will increase significantly if a layer of insulation is placed under it.

Overview of high-quality insulation for the home: how to choose the right insulation
Modern manufacturers offer a huge selection of all kinds of materials that allow you to insulate external walls:
- loose heaters;
- fiberglass wool;
- basalt wool;
- foamy polymers such as expanded polystyrene, penoizol, polystyrene.

Related article:
Loose heat insulators for warming a wooden house from the outside
They are environmentally friendly, as they are not capable of releasing toxic substances during operation and are made from natural materials:
- vermiculite - formed during the processing of rocks, has the form of porous granules with air layers;
- expanded clay - burnt clay having a different grain fraction;
- crushed perlite - porous granules of volcanic glass, with a density of up to 100 kg per cubic meter.
The characteristics of these materials for the insulation of wooden houses from the outside can be found in the table below.
Table 1. Characteristics of materials for warming wooden houses
| Image | Type of insulation | Vapor permeability, Mg/(m*h*Pa) | Thermal conductivity, W / (m * C) | Filling density, kg/m3 |
|---|---|---|---|---|
 | 0,28 | 0,16 | 251 | |
 | 0,28 | 0,13 | 200 | |
| 0,22 | 0,22 | 801 | ||
 | 0,4 | 0,09 | 101 | |
 | 0,28 | 0,13 | 200 |
As you can see, the thermal conductivity of bulk heat insulators is almost the same, the difference between them is only in price. All of them have excellent vapor conductivity, which contributes to the free exit of moisture from the walls. In addition to steam conductivity and high environmental friendliness, these materials have the following qualities:
- resistance to high temperatures reaching 1100 degrees;
- the durability of materials is equal to the life of the building itself;
- not attractive to rodents;
- resistant to moisture;
- do not fade with time.
The disadvantage of bulk materials is poor thermal conductivity, which provides for the insulation of houses in regions with a warm climate.
Mineral wool
The material is the result of the processing of metallurgy waste or rocks such as dolomite or basalt. It differs:
- environmental friendliness;
- durability of operation;
- incombustibility;
- high strength;
- sound absorption;
- elasticity;
- ease of installation;
- affordability.

For thermal insulation, rolled material or basalt slabs are used. Such a heater is ideal for brick, gas and foam concrete, as well as wooden buildings.

You can work with the material at any temperature, which is very convenient for insulating external walls. The most common application is the insulation of wooden houses outside with mineral wool for siding.

For your information! Practice shows that finishing with mineral wool seams can provoke the formation of condensate due to the circulation of warm air.
Styrofoam (expanded polystyrene)
Refers to modern polymeric heaters, and is widely used in construction. This material is characterized by:
- low thermal conductivity, not more than 0.051 W per m2;
- weak water absorption;
- high windproof and soundproof performance;
- durability, its operational period is more than 50 years;
- ecological purity.

It is also worth noting the low weight of the material, which reduces transportation and installation costs. Thanks to this quality, the walls are not stressed, which eliminates the need to strengthen the foundation.

Another advantage of the material is its low cost, which makes it possible to insulate external walls. In this video, the insulation of the house from the outside with polystyrene foam is carried out by one person due to the lightness of the material:
Extruded polystyrene foam
Innovative heat-insulating material, in the manufacture of which graphite nano-particles are used, which increase energy saving and durability of the product. The thermal conductivity of expanded polystyrene is 0.029-0.032 W per m2.

In addition, the material is resistant to chemicals and mold, has high sound insulation and is not afraid of rodents. These qualities make it possible to use penoplex for external insulation of a wooden house.

Note! When insulating wooden houses with siding, the use of a material with air permeability is envisaged. This excludes additional protection of the seal against moisture.
Related article:
Penoplex: technical characteristics. By choosing plates of suitable thickness, you can ensure a sufficient level of thermal insulation of walls, floors, ceilings. Let's talk about this heater in more detail in our review.
polyurethane foam
The material has a cellular foamy structure filled with air. This significantly reduces the thermal conductivity to a maximum of 0.042 W/m2.

Due to the high adhesion of the material to any surfaces, an airtight coating is formed, which guarantees excellent hydro- and vapor barriers. High elasticity, combined with seamless technology, make it indispensable in the insulation of frame walls and blown thermal insulation, as well as for complex configurations. The insulation is applied at any temperature, and the durability reaches 30 years.
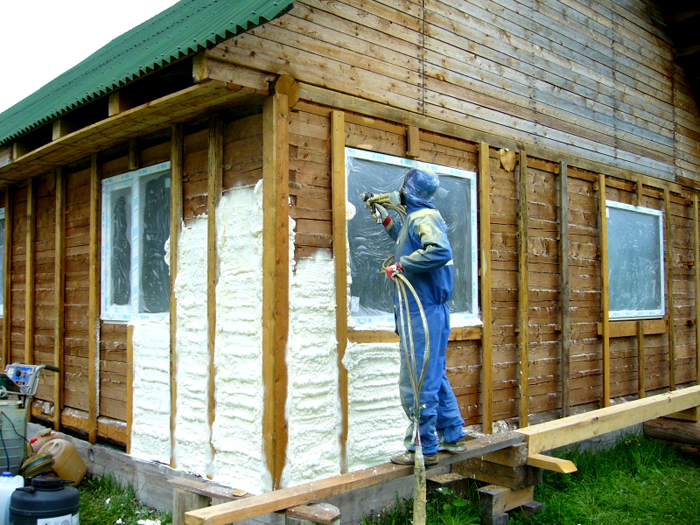
The disadvantages include the too high cost of polyurethane foam, as well as the need for special equipment.
Calculate the thickness of the insulation
In order for the insulation of a wooden house from the outside to be effective, it is necessary not only to choose a heat-insulating material, but also to correctly calculate the required thickness, which will depend on the ability to resist heat.

This is the opposite indicator of thermal conductivity, the coefficient of which is indicated by the manufacturer on the packages. To calculate the heat transfer resistance coefficient, there is a formula:
R=d/k where
d- corresponds to the thickness of the material, and k- its thermal conductivity. The larger the value obtained, the higher the thermal insulation efficiency will be.

Insulation reduces the loss of heat energy through floors, walls, roofs. The insufficiency of the thickness of the insulation can lead to a displacement of the dew point inside the room, which leads to the formation of condensate, which provokes the appearance of fungi, as well as dampness. Too much layer of material is not able to lead to significant temperature changes, however, it imposes significant financial costs, which is irrational. To save money by providing optimal conditions, it is necessary to correctly calculate the thickness of the insulation.

Often there are situations when the walls in a wooden house lose one of their tasks, such as heat retention. In this case, they resort to warming the walls of the house from the outside. The insulation becomes a protection against cold air.
This approach also has several other advantages: the wall of the building gains additional protection from sunlight and moisture and will last longer.
Advantages of external thermal insulation
External insulation of the house has several advantages:
- The main one, of course, is the preservation of heat. This type of insulation prevents a sudden drop in temperature. The wall, reinforced from the outside, retains high thermal protection.
- Unlike internal insulation, with external insulation there are no zones in which there is no heat, the so-called "cold bridges" since with this type of insulation it is possible to install heat-insulating material at the junction of the ceiling to the outer walls.
- Also, external insulation prevents the penetration of moisture into the walls of the house.
Do not forget about the shortcomings of external insulation. Such a process of warming wooden houses is quite complicated and time-consuming.
Warming methods

There are several types of insulation:
- The insulator is attached to the wall with adhesive solution.
- Facade ventilation. The wall is protected by waterproofing, a heater is attached on top, a windscreen is installed, after which the sheathing with siding or other material is installed on the frame.
- Three-layer non-ventilated wall. The insulation is fixed with mortar, the outer wall is mounted in one brick, while observing the air gap.
It is natural that for each type of material there are subtleties in execution. It should not be ruled out that there are combined insulating materials on the market of insulating products or such materials for which it is necessary to adhere to the technology developed in-house.
What material is better?
There are several types of materials for thermal insulation, and before deciding which insulation would be best for you, you need to know their characteristics.. So, let's figure out how you can insulate the walls of a wooden structure.
Mineral wool

The most common material. It has a fibrous structure, which is formed as a result of spraying molten glass, rocks, slag.
The advantages of mineral wool insulation include good throughput, heat resistance, high stability index, guarantees noise protection, high service life.
But this type of insulation has a significant drawback - mineral wool can release phenol dangerous to humans.
Windproof plates Isoplat

Isoplat is a fibreboard made from softwood fibers without the addition of chemical components and glue. Such plates are natural and effective as the tree itself. In terms of thermal insulation properties, 12 mm board = 44 mm solid wood. Plates are available in various thicknesses. In addition to excellent insulating properties, they provide additional sound insulation.
The advantage of Isoplat is that the material does not deform over time, does not wrinkle or tear. In addition, being a "breathable" material, Isoplat protects walls from fungus and mold.
Installation of plates is very easy - press against the wall and nail. Above is a ventilated façade. Such insulation of a wooden house can be easily done with your own hands without the involvement of specialists.
polyurethane foam
A type of plastic filled with gas. It has a cellular structure and is filled with carbon dioxide, air or other gases.
The advantages of PPU are high thermal conductivity and vapor permeability, high waterproofing properties, high safety, non-toxicity. The disadvantages include low fire resistance. Also material is quite expensive and ages over time, which has a bad effect on its heat-insulating properties.
Basalt slabs

Manufacturing method - molten rocks. Advantages - high vapor permeability, the presence of water-repellent properties, chemical and biological stability, sound insulation.
The big plus is safety. Such a heater is environmentally friendly. The only downsides are high price.
Styrofoam
A material filled with gas, like polyurethane foam. It is obtained from polystyrene and its derivatives. Such material is vapor permeable, absorbs water well, biologically stable, long service life. These are definitely positives.
Of the minuses - highly flammable, which makes it a rather dangerous material.

The most popular material for external insulation of wooden houses. It has a cellular structure. cells are isolated, polystyrene has good thermal insulation, which is definitely a plus.
Styrofoam insulation also provides good sound insulation, no need for additional waterproofing, ease of installation and durability.
Like all materials, polystyrene also has its drawbacks: it is unsafe. when burned, caustic substances are released, has low strength.
When choosing a thermal insulation material, you should pay attention to its service life, safety. The choice of material for insulation should be approached responsibly, to study all the pros and cons. Preference should be given fireproof and environmentally friendly materials.
We warm a wooden house with our own hands
The insulation technology begins with the installation of a frame on which the insulation will lie.
Bars are nailed to the wall being processed made of wood measuring 50x50 mm, keep in mind that the distance should be no more and no less than 580 mm of security. The material must be laid so that there are no gaps between the wall and the bars.
Next stage - providing vapor barrier. For this, aluminum foil, polyethylene film or vapor barrier film is used. The need for vapor barrier is eliminated if the house is made of round timber.

When the plane is smooth, then the slats are stuffed, on which a layer of vapor barrier is mounted. It must be taken into account that between the slats from below and above there should be a stomata of 20 cm in diameter for ventilation. The fastening points of the vapor barrier material are sealed with adhesive tape in order to protect against moisture.
The stage of vapor barrier is followed by the stage of thermal insulation. The material must be installed so that there are no gaps or gaps between the frame boards. The material is laid in two layers of 50 mm each. so that the joints of the first layer are aligned with the middle of the second.

For the secondary layer of thermal insulation bars are nailed across walls, perpendicular to the main row of the frame.
Next is waterproofing. The waterproofing film must easy to pass steam and hold water well. The waterproofing layer is superimposed on the heat insulator layer. It is nailed to the frame.

Next is the stage of installing a secondary layer of the frame. On the first layer (on top of the waterproofing layer), slats 50 mm wide and 30 mm thick are stuffed.
The installation of the next layer of the frame is carried out for free air movement between the vapor barrier layer and the skin, so that the moisture that has fallen on the waterproofing layer is dried.
The space formed below must be closed with a dense metal mesh from the penetration of rodents and insects.
At the last stage, the house is sheathed with appropriate material (siding, wall paneling, facade panels, and others). It should be taken into account that wall thickness will increase by 20-25 cm and accordingly, it is necessary to think over the protection of the insulation from the window openings.
How to insulate the walls of a wooden house outside with your own hands and what is better?
How can you insulate a wooden house from the outside? How to do it yourself? Varieties of material.
Proper insulation of a wooden house from the outside
Before insulating a wooden house from the outside, you need to correctly select all the materials. The building made of wood has its own characteristics. First of all, it is worth remembering why wood still retains its popularity. There are several reasons for this:
- good thermal performance;
- providing a comfortable microclimate in the building;
- environmental friendliness;
- security;
- the ability to pass air (the tree "breathes").
The insulation of a wooden house from the outside should be chosen so that all materials do not reduce the useful properties of wood. But sometimes it is difficult to do so. To choose a good insulating material, you will need to spend your time and study the basic information on the issue.
pie wall
Before insulating a wooden house from the outside, it is recommended that you familiarize yourself with the composition of the wall. After that, you can begin to select all the necessary materials. The technology of warming a wooden house from the outside provides for the following layers:


Vapor barrier and waterproofing are required to protect the material from moisture. Many types of thermal insulation are destroyed or cease to perform their function when exposed to water.
The choice of insulation
What is the best way to insulate a wooden house from the outside? The most popular materials in the construction market are:
- mineral wool;
- Styrofoam;
- extruded polystyrene foam or Penoplex.
Each of these options has its own advantages and disadvantages that you need to consider before deciding how and with what to insulate your own home.
Insulating a wooden house from the outside with your own hands in this case will be the cheapest. It can be bought almost everywhere. There are different types depending on the strength. Polyfoam has good thermal insulation performance, but the disadvantages include:
- combustibility;
- low strength;
- resistance to mechanical damage.
Insulators for the walls of a wooden house of this type are not recommended for one reason: the foam practically does not let air through. This means that all the useful properties of wood, for which it is so valued as a material for building cottages, are coming to naught.

Insulating a house made of wood with polystyrene foam is a rather pointless procedure. Yes, the room will be warm, but at the same time, the temperature and humidity regime will be disturbed due to lack of ventilation. The natural air exchange in the room is blocked, the arrangement of forced ventilation or air conditioning is required. Both options involve additional (and not small) costs, both during the construction process and during the operation of the building.
Also, the foam needs careful protection from moisture. Manufacturers claim that the insulation of wooden walls with foam plastic does not absorb water, but this is not so. The polystyrene beads themselves are resistant to moisture, but it can accumulate in the space between them. Freezing water expands. The well-known law of physics does not apply here: water is the only substance that increases in volume with increasing temperature.
As the water expands, the pressure inside the material increases. This will eventually cause the styrofoam to crumble into individual balls in the first or second winter. To replace the external insulation will have to make a lot of effort and spend money.
For all the above reasons, insulation of walls outside a wooden house with foam plastic is not recommended. But you can consider using it for other structures, for example, basement and attic floors. In this case, special attention should be paid to waterproofing. The reason for this recommendation has already been stated.
Extruded polystyrene foam
To perform the insulation of the walls of a wooden house from the outside, you can consider using Penoplex. It is the closest relative of polystyrene, but is devoid of most of its shortcomings.
First of all, the insulation of wooden houses with such material has greater strength. Penoplex is resistant to stress and mechanical damage. The second positive property is moisture resistance. The material is not afraid of moisture. This insulation for walls and ceilings can be used even without vapor barrier and waterproofing.
The benefits can also include:
- high energy efficiency;
- ease of installation;
- ease of processing;
- safety and environmental friendliness.

But the disadvantage again becomes poor air permeability. Without additional ventilation, the greenhouse effect in the house is guaranteed. Read more about the insulation of a wooden house with Penoplex.
It is not recommended to use Penoplex for houses outside, but it will be an ideal option for floors. Such material is not afraid of loads. On top of it, it is enough to make a cement screed with a thickness of 30-50 mm. It can be used both for the floor of the first floor and for the attic floor. Also, very often expanded polystyrene is bought for floor insulation on the ground.
 Scheme of floor insulation with Penoplex
Due to the resistance to moisture, insulation can be dispensed with. But for wet rooms (bathroom, bathroom) it is recommended to put waterproofing. Such additional measures will protect the ceiling and insulation from water during various leaks. We recommend that you familiarize yourself with the principles of floor insulation with Penoplex in more detail.
Mineral wool
What kind of insulation is better to protect the walls of the building? The answer here will be unequivocal. For both an old wooden house and a new one, mineral wool will be the best option. It not only allows you to save the beneficial properties of wood, but also smoothes out its shortcomings.
If you insulate the walls of a wooden house from the outside with mineral wool, you can prevent a fire. Most of the materials in this group are non-combustible. This property distinguishes cotton wool from polystyrene and polystyrene foam.

Wall insulation in a wooden house outside with mineral wool conducts air well. When using it, you do not need to resort to additional ventilation measures: with the right choice of finishing material, the walls will continue to “breathe”. But this very finishing needs to be given special attention, otherwise you can ruin everything at the last stage.
The main area of application of the material in a wooden house is walls and roofing. It is strongly not recommended to lay cotton wool in ceilings. It has a fairly low strength and shrinks over time. This will lead to a decrease in thermal insulation characteristics and damage to floor structures. It is possible to insulate the structure of the attic floor with mineral wool. It will also be very effective to insulate the roof with mineral wool.
You can insulate the walls of a wooden house using different types of material:
- Stone (the most common option is basalt). It is produced in plates and has the highest rigidity compared to other types. It is quite convenient to work with this type of insulation. It is safe and easy to cut.
 stone wool
- Glass. Is issued in rolls (mats). Its rigidity is not so high. The disadvantages include inconvenience during installation. Glass fibers can cause a lot of inconvenience to workers: they penetrate the lungs and get on the skin, causing severe itching and irritation. Before insulating an old wooden house (or a new one) with such material, you need to prepare a set of protective clothing: a suit, mask, gloves.
 glass wool
- Slag. The cheapest and most undesirable option. Thermal insulation of this type is made from industrial waste. Poor-quality cotton wool or a fake will pose real harm to the health and life of the inhabitants of the house, as it may contain hazardous substances. Such a heater for the outer walls of a wooden house should be bought only from trusted responsible suppliers who are responsible for the quality of their products.
 slag wool
Vapor barrier and waterproofing
How to properly insulate a wooden house from the outside? It is important to firmly remember one thing: the vapor barrier is laid on the side of warm air, and the waterproofing is on the side of cold air. Both the outer and inner material can be produced in the form of films and membranes. For a building made of wood, it is recommended to choose the latter option. The films practically do not let air through, and the membranes “breathe”.
 Arrangement of steam, wind and moisture insulating layers
Before insulating an old wooden house from the outside, it is worth checking the condition of the walls, ceilings and roofs, and if necessary, reinforcing them and protecting them from mold and fungus. A combination of such measures will extend the life of the building. Also, the insulated structure must be cleaned of dirt and dust.
How to insulate a wooden house from the outside: not difficult and not expensive
Proper external thermal insulation of the walls of a new or old wooden house requires strict adherence to technology. We will talk about it in this article.
What is the best way to insulate a wooden house from the outside?
KakPostroit.by > Exterior decoration > How to insulate a wooden house from the outside?
 The popularity of houses made of wood is only increasing every year. And for good reason. This is due to the ease and speed of construction work, as well as the excellent thermal insulation properties of the material. However, the latter fact does not at all exclude the expediency of warming, especially in areas with a harsh climate. How to properly insulate a wooden house from the outside and with what? The advantages and disadvantages of popular materials, as well as important nuances of doing this kind of work with your own hands will be revealed further.
Insulation options
Warming a wooden house from the outside has a lot of advantages:
- the dimensions of the interior rooms remain unchanged;
- lack of debris and dust inside the room;
- there is no need to rearrange the furniture or perform any internal work;
- additional protection of the structure from environmental influences;
- for old houses that have lost their attractiveness, insulation is an opportunity to ennoble, transform the appearance of the building.
Note! Improper performance of work on the insulation of a wooden house from the outside can lead to mold, damage and decay of the wooden structure. Therefore, only a competent, comprehensive approach to business guarantees a high-quality, desired result.
Despite the constant discoveries and developments in the field of construction and building materials technologies, 3 options for insulation materials have confidently gained a foothold on the market:

All of them have excellent insulating properties. However, each material has its own characteristics and disadvantages, which are extremely important to consider. A detailed consideration of each material will allow you to decide how best to insulate a wooden house.
Mineral wool, features of insulation
 Mineral wool is compressed particles of artificial stone, basalt and slag. It does not support combustion, which is commendable for a log house, and does not undergo deformation. This material has proven itself in construction and is widely used to insulate the walls of a wooden house.
The advantages of mineral wool with confidence include:
- ease of installation;
- environmental friendliness of the material, its harmlessness;
- guarantees additional protection against fire;
- democracy, affordability;
- durability;
- the structure does not deteriorate, does not change under the influence of temperature changes;
- the material has a high melting point, therefore, in terms of fire safety, it is better than many.
Mineral wool also has disadvantages, although there are few of them:
- the need for additional protective equipment (respirator, gloves) for construction work;
- does not protect the surface of the log house from the development of fungus and mold;
- hygroscopic, easily absorbs moisture, so high-quality hydro and vapor barriers are required.
When choosing mineral wool as a heater, consider the following tips:
- Before warming, be sure to treat the walls of the log house with a special antiseptic solution.
- Completely exclude the possibility of moisture penetration to the mineral wool. To do this, a layer of vapor barrier is laid, then a heater and a layer of waterproofing.
- It is necessary to mount the material with a call to half of the previous sheet of material, spaces between the elements are not allowed.
- Additionally, you can limit the shift of mineral wool using anchors.
- You can use not only mineral wool, but also its varieties (for example, glass wool).
Styrofoam as a heater
 If it is impossible or unwilling to use mineral wool, you can insulate a wooden house with your own hands using foam. Outwardly, it is an accumulation of a large number of air, foam balls of plastic mass. In terms of insulating qualities, polystyrene (expanded polystyrene) is in no way inferior to mineral wool.
The advantages of this material include:
- ease and convenience of installation;
- lightness of the material;
- dense surface that is not exposed to moisture and fungi;
- increased soundproofing qualities;
- resistance to temperature changes and precipitation;
- significant service life.
The main disadvantage of the building material is unnaturalness and low fire resistance.
Warming the walls of a wooden house with polystyrene foam is no more difficult than with mineral wool. Rather, on the contrary, a sheet of material is easily transferred, adjusted to the required dimensions by trimming. The nuances of working with such an insulator include:
- It is necessary to lay the material end-to-end.
- To process gaps at the joints of polystyrene sheets, a diffusion membrane is used. It is attached to the surface with a stapler directly to the light.
- The diffusion membrane must be at least 10 cm wide to ensure complete insulation of the foam joints.
- Use tape to connect the membrane pieces.
- Despite the stable ratio of foam to moisture, a waterproofing layer is still necessary.
Note! Many builders are categorically against the use of foam as a heat insulator. Because if the work is not properly organized, it will accelerate the development of the fungus on the walls of the house. To avoid this, be sure to provide a good gap between the structure wall and the vapor barrier to ensure sufficient air ventilation.
Foam insulation (polystyrene)
 Penoplex is a colleague of polystyrene. It is also a cellular, honeycomb surface filled with polystyrene balls, but exceeds its predecessor in technical characteristics.
Penoplex allows you to easily insulate a wooden house with your own hands. For this, the heat insulator has a lot of prerequisites:
- increased technical characteristics;
- good surface strength;
- does not rot and does not absorb moisture;
- perfectly retains internal heat;
- does not respond to changes in external temperatures;
- ease of installation;
- environmentally friendly material;
- does not burn;
- enjoy a long service life.
The disadvantages of penoplex are as follows:
- The cost of the material exceeds the cost of mineral wool or polystyrene.
- The need for high-quality protection from ultraviolet exposure to sunlight. They destroy the structure of the heat insulator.
- Sensitive to solvents and similar substances.
- Easily damaged by rodents.
As for the insulation process, it is identical to foam.
Note! A prerequisite for foam insulation is the presence of a ventilation space between the vapor barrier and the wooden wall.
Log house insulation technology outside
Now consider how to insulate a wooden house from the outside, in stages:
- Prepare the surface of the walls of the house. To do this, clean them of dirt, and treat them well with a special antiseptic solution or primer.
- Seal gaps, holes and cracks in the wall with mounting foam. When the foam dries, cut off the remnants with a sharp knife.
- Wet walls are not suitable for insulation. Wait until the surface is completely dry.
- To lay the vapor barrier layer, make a crate of wooden slats. The step between the slats should be 1 m. The crate should guarantee the presence of a ventilation space within 20 mm. This is necessary to prevent the accumulation of moisture drops on the tree, followed by decay, damage to the wall surface.
- Install vapor barrier material. It can be isospan, polyethylene or roofing material. Fix the vapor barrier on the rails, and seal the attachment points with adhesive tape to seal the coating.
- Make a frame for the heat insulator, also using wooden planks 40 × 100 mm. A heater will be mounted in its grooves. Therefore, in order to achieve maximum joint density, the distance between the laths should be 15 mm less than the width of the sheet of material used. Wooden planks are installed only on the edge.
- Using the building level, monitor the evenness of the crate to avoid the appearance of bumps, gaps and other shortcomings.
- Lay the insulation in the resulting grooves, taking into account its individual characteristics.
- The next stage of the "pie" is the laying of a layer of hydro-windproof membrane. It must be fastened with nails or a construction stapler to a wooden frame. Again, treat the joints with adhesive tape for tightness.
- The final stage is the installation of decorative trim on the facade of the house. Use siding, lining, brick or other building materials for this purpose.

Insulation of a wooden house from the outside: how to properly and the better to insulate
Instructions for warming a wooden house outside with various materials. How to make it with your own hands, and the better.
How and with what to insulate a wooden house from the outside - the choice of materials and installation rules

It would seem that the question is quite simple - and the methods have long been worked out, and the choice of thermal insulation products is significant. But this is not about any building, but about a wooden house. Regarding its insulation, there are a number of nuances that cannot be neglected.
It's all about some features of such a building material as wood. First of all, it is its susceptibility to decay, the ability to "breathe" and retain heat well. The last two properties allow you to maintain comfortable conditions in the premises, as a rule, without significant additional costs. For example, for the purchase (and professional installation) of climatic equipment, due to the increased consumption of en / resources (including fuel for the boiler). At least, the indicated devices are not used as intensively in wooden houses as in brick or cellular concrete buildings. So, let's consider in detail how and what is the best way to insulate a wooden house.
Useful information
To make the technology of work clearer, it should be explained why insulation from the outside for a wooden house is the only right solution. This method of reducing heat loss is the main one for any buildings, as it has a number of advantages. For example, does not reduce the usable area. This is one of the disadvantages of arranging this protective layer from the inside. But for a log house, something else is more relevant.
It's all about the so-called "dew point". The external installation of the insulation takes it outside the perimeter of the house, and condensate forms in the ventilated space. Consequently, in cold weather, the tree does not freeze, and in warm weather, the process of decay does not begin. If the insulation is laid on the walls of the premises, then the “point” shifts inward. As a result, the logs (beams) remain unprotected, and the condensate settles in the thermal insulation material, which initiates the development of mold and fungus not only in it, but also in the rooms.

How to insulate a wooden house
If you delve into the details, then the choice of materials is not so big.
Styrofoam boards
They differ not only in the correct geometry, but also in "rigidity". Therefore, to fix them, it is necessary to carefully align the base. It is still acceptable for a beam, especially if the walls were erected by professionals. And what about logs? In addition, foam plastics do not let in not only moisture, but also air. Therefore, the main attraction of a wooden house - climate control - will be completely leveled.

Spray formulations
Usually polyurethane. There are even more disadvantages, besides, special equipment will be needed. But the companies providing this service (for PU insulation) are silent about another rather significant disadvantage - the low maintainability of the layer. After all, it sticks to the surface on which it is applied. If, in the literal sense, it can still be “picked out” from a brick or concrete goods, then what about the tree? After all, it is quite malleable to mechanical stress, and damage to logs or timber in this case cannot be avoided.

There are other types of insulation for wooden buildings, which are advised to use the authors of some articles. But all the listed materials (chipboard, flax fiber, etc.), taking into account the specifics of the log house and in terms of durability, hardly deserve attention.

Warming the house from the outside - how to do it

Surface cleaning
This is where any repair or finishing work begins. For a wooden house, the initial inspection is especially important. It is necessary to identify all foci of damage to wood, determine their nature, methods and means to eliminate defects.
Processing with special / preparations
For a wooden house, both are equally relevant - flame retardants and antiseptics. Features of their use and formulation are indicated on the packaging. It is clear that it is desirable to do this in positive weather and clear skies.

Installation of a vapor barrier layer
Its main purpose is to ensure the ability of wood to self-regulate the microclimate and at the same time protect the material from direct contact with moisture. There are many varieties of films and membranes on sale. If the first option is chosen, then it must be taken into account that all samples differ in their execution, and therefore, in the specifics of use. The film is cheaper, but the usual modification of polyethylene cannot be used for vapor barrier. It is hermetic, and together with water does not let air through. It is worth considering when choosing products.
Mounting on the outside of a wooden house is quite simple - using a construction stapler (staples). It is only necessary to take into account that the strips must be mounted with a slight "overlap", and the joints must be closed with adhesive tape (adhesive tape).

The construction of the supporting frame
It is also called a crate. What is its peculiarity in relation to a wooden house? The coefficients of thermal expansion of the materials to be bonded should be taken into account. Metal slats are much more convenient for installation, but since the house is made of wood, it is not advisable to use them. Only wooden bars of the appropriate length and section.
The dimensions of the seats (cells of the crate), as well as its design, are selected based on the geometry and design of the insulation. Mineral wool is sold in slabs or rolls, so it is not difficult to draw up a sample laying pattern.
Another nuance concerns fasteners. Self-tapping screws or screws should not be used for fixing elements of the crate. They "tightly" grab the supporting structure, and this should not be. A wooden house “plays” somewhat under the influence of external factors (a feature of the material), therefore, fastening the crate to it is only with nails.

What to consider
The reliable position of the insulation is ensured by the fact that during the laying in place, the samples are slightly compressed. Then, due to their elasticity, they straighten out somewhat, which determines their reliable "hitch" with the slats of the supporting frame. When calculating its parameters, it is necessary to choose the cell sizes so that they are slightly smaller than thermal insulation products. Then you do not need any of their additional fastening on the outside of the house.

Laying insulation material
There is nothing complicated about this, especially if the scheme is drawn up correctly. Mineral wool is well cut with an ordinary knife, they bend, so there will be no problems.
- On problem areas of the walls (complex configuration, slope, etc.), it is worth additionally fixing the thermal insulation with special nails - anchors.
- The gaps at the junction of the insulation to the frame rails are sealed with the same construction tape.
- Installation of thermal insulation is carried out in the direction from the bottom up, in rows.
- In regions with frosty winters, insulation (depending on the thickness of the samples) can also be laid in 2 layers. In this case, the plates for the second are cut so that after installation their joints in the rows do not match. That is, a mount with a slight offset.
Calculator for calculating the amount of insulation
Hydrowind protection layer
Since we are talking about a wooden house and mineral wool, traditional waterproofing is clearly not enough. It is advisable to mount a membrane (or a film of the corresponding modification) on top of the insulation. The order of laying (which side is inside) depends on the version of the product and is indicated in the accompanying documentation.
Using a conventional p / e film will lead to the fact that moisture will begin to accumulate in the insulation. There is nothing to comment here.

Control grille
It is necessary to create the so-called ventilated space. In most cases, it alone is enough to ensure effective removal of liquid due to the natural circulation of air currents.
Details of the counter-lattice are rigidly fixed on the rails of the supporting frame. Their elevation above the latter, as well as what exactly to use as these structural elements, depends on the finishing material of the wooden house. It can be both cutting bars and a metal profile. In this case, thermal expansion is unimportant.
- Warming the walls of the house from the outside is only a partial solution to the problem of reducing heat loss. We must not forget about such parts of it as the basement and the foundation (if it rises above the ground). This is where expanded polystyrene comes in handy, and spraying can be done, given the small coverage area, with your own hands. There are special devices, and they are not so expensive. And although in fact they are one-time use (despite the fact that the manufacturers claim otherwise), given the reasonable price, it is possible to implement such an option for warming outside the lower part of a wooden house.
- When choosing a variety of mineral wool, it is advisable to focus on products of the "eco" category. From all points of view, for houses made of wood - this is the best option.
How and how to insulate a wooden house from the outside - from materials to installation
Do you have a wooden house? Do you want to figure out how and how it is better to insulate it from the outside? This article explains everything in detail, step by step and gives a number of useful recommendations.
Wooden houses are much warmer than their concrete or brick counterparts, they breathe and look great. Alas, even the tree is not so warm that you can completely abandon the insulation. What to do when you want to preserve the unique features of a wooden house, but at the same time make it even a little warmer? Do you really have to say goodbye to the beautiful look of wood? Put an end to the ability of a tree to breathe? And is it necessary to insulate or logs at all? Maybe it's all just imposed by companies selling heaters? We will try to give answers to all these questions and figure out which insulation for a wooden house is better to choose.
No. 1. Is it necessary to insulate a wooden house?
Probably, it would be superfluous to list all the advantages of wooden houses. They conquered the people once and for all environmental friendliness, beauty, warmth and strength. Wood has a lower thermal conductivity than or even. If the climate in the region is warm and mild, and the house is used for recreation or temporary residence, then a minimum set of measures can be dispensed with. It will be enough to insulate the seams with interventional insulation and.
In regions with cold winters, a wooden house without insulation will require more serious heating. Over time, the wood under the influence of external adverse factors will begin to rot, dry out and crack. The seams are also deformed, too many cold bridges form from shrinkage, holes are made, and the microclimate in the room deteriorates greatly. If the house is located in a region with a harsh climate and is used for permanent residence, sooner or later it will have to be insulated. The best time for this is a couple of years after the construction, when the walls have settled. 
Warming a wooden house provides many advantages:
- the service life of the house will increase;
- inside the house will become warmer;
- wood will be protected from all adverse factors: temperature changes, frost, humidity, pests, condensation, mold development;
- heating costs will be reduced, and the house will become warmer.
The main thing is not to turn the building into a nondescript and non-breathing box. Therefore, care when choosing a heater for a wooden house and during its installation will not hurt.
No. 2. What should be the insulation for a wooden house?
We emphasize once again that wood is a breathable material, she is able to absorb and give moisture, regulating the microclimate of the room. That is why it is especially easy to breathe in wooden houses. If we close the tree with a vapor-proof material, we will not only lose the main advantage of the log house, but also harm it, because a violation of air exchange can lead to the accumulation of moisture in the tree, its swelling, and appearance. Where will the moisture come from? Yes, even from inside the house. To avoid such problems, it is necessary that the insulation be vapor-permeable. In addition, damp walls cannot be insulated, it is important to use, and it is very desirable to use the ventilated facade technique. 
The following requirements are put forward for the insulation of wooden walls:
- vapor permeability;
- low thermal conductivity, the lower it is, the better the material retains heat;
- incombustibility. Everyone knows that wood is highly flammable and burns, so when paired with it, it is better to use materials that are as resistant to fire as possible;
- low weight. The lighter the material, the easier it is to install. If the insulation is too heavy, you will need a stronger frame, and this time and extra costs.
It is clear that not every existing insulation is suitable for a wooden house. However, many consciously make the wrong choice. For thermal insulation, the following materials are usually used:
- all mineral wool(stone wool, slag wool, glass wool and ecowool), they have high vapor permeability;
- solid polymer insulation(expanded polystyrene and polystyrene) is not prohibited, but you deliberately cut off the breath of the house. Yes, these are easy-to-install and practical heaters, but you will have to organize a very serious one, and this is a considerable expense in the arrangement and operation. It is advisable to use such materials unless for insulation of concrete plinth and foundation;
- bulk insulation(vermiculite crushed stone, perlite crushed stone) pass air and moisture well, are not afraid of high temperatures, are not interesting for rodents, but they have a low coefficient of thermal insulation, so they are suitable only for warm regions, but they have not gained much popularity there either;
- interventional heaters are used when it is necessary to preserve the original appearance of the house.
Instead of a heater to protect the house from precipitation and winds, they are also used. When treated with antiseptics and flame retardants, the material really slightly extends the life of the house. It turns out that they are externally lined with wooden panels. Wouldn't it be better to just sand the existing walls and seal the seams? But finishing with wooden clapboard is a good option when using a layer of insulation. Outwardly, you will get the same wooden house, only warmer.
A wooden house is recommended to be insulated from the outside. Internal insulation takes up a lot of usable space, negatively affects the microclimate, but it is also allowed provided that there is a continuous vapor barrier inside the house. 
No. 3. Mezhventsovy heater for a wooden house
The most gentle way of warming is the use of interventional insulation. The process itself is called caulking. Ideally, a wooden house should be caulked first a couple of months after its construction, and then after 6-8 months. The gaps between logs or timber are filled tow, jute, sometimes even moss is used.
Caulking the walls starts from the lowest crown of the house. Each crown is first caulked around the perimeter, outside, and then inside. Only after that do they move on to the next crown, and so on until each slot is filled from the outside and from the inside. After caulking, the house can become 5-8 cm higher, but then it will sit down a little, pressing down on the insulation and forming windproof walls. 
Tow or jute is pushed into the cracks with a hammer, chisel, caulking shovel and rubber mallet. The process will be laborious and long. If you are not confident in your own abilities, it is better to entrust the work to specialists.
A more modern way of caulking involves the use acrylic sealants type "warm seam". They allow air to pass through and well protect cracks from moisture and temperature extremes. It's a little easier to work with them. Some people prefer to close the not quite aesthetic seams of caulking with a twisted cord, at least from the inside.
In any case, the wood itself will have to be protected with antiseptics, fire retardants or.
No. 4. Mineral wool for insulation
The group is most suitable for warming a wooden house. However, each material from this group has its own distinctive properties, which should be considered separately.
Stone (basalt) wool
They are made from rocks, basalt is most often used, hence the name. Various binders and additives are introduced into the composition, as a result, a roll or tile material coated with foil, kraft paper or fiberglass comes out and with such benefits:
- fire resistance. Stone wool tolerates temperatures up to 600 0 C, which is not surprising, given the production process and the raw materials used;
- low thermal conductivity (0.038-0.047 W / m * C);
- high vapor permeability;
- hygroscopicity;
- resistance to microorganisms;
- light weight and correct shape facilitate installation;
- the material does not shrink due to its density and rigidity;
- basalt fibers do not irritate the skin.
From cons the fragility of the material can be distinguished. Stone wool is more expensive than other mineral wools. 
glass wool
It is produced on the basis of rocks with a high silicon content, but more often from glass waste. The raw material is melted, limestone, dolomite, borax and other components are added to it. The finished insulation consists of fairly long fibers, which explains its rigidity, elasticity and strength, but these fibers are glass, which means they are sharp. Available in rolls and slabs, may be coated with foil or reinforced fiberglass.
pros:
- excellent vapor permeability;
- low coefficient of thermal conductivity (0.029-0.046 W / m * C);
- high strength at low density;
- resistance to fire, withstands up to 450 0 С;
- resistance to temperature extremes, aggressive substances.
Main minus- the fragility and causticity of glass fibers, which easily penetrate the skin and respiratory tract. All work is carried out only in the presence of comprehensive personal protective equipment. When wet, glass wool loses a significant part of its thermal insulation properties, so high-quality waterproofing is required. It costs less than basalt wool, but more expensive than slag wool. 
slag wool
For production, waste from blast-furnace production is used. Since they are available to manufacturers almost free of charge, the insulation is inexpensive. Mats and slabs have a slight rigidity, sometimes they are coated with foil on one side.
pros:
- low cost;
- resistance to high temperatures, but according to this indicator, slag wool loses to stone wool, as it can withstand heating up to 250-300 0 С;
- excellent vapor permeability;
- good soundproofing properties;
- slag wool is not interesting for rodents;
- low rigidity of mats and rolls allows finishing curved surfaces.
Minuses:
- hygroscopicity;
- sensitivity to temperature changes;
- the worst thermal conductivity in the class (0.46-0.48 W / m * C);
- when wet, sulfuric acid can be released, which adversely affects wood and metal;
- the fibers are slag rather sharp, so it is impossible to work without means of protection.
Of the entire class, slag wool is the least suitable for insulating a wooden house, but is actively used due to its low cost. 
Ecowool
The material is produced on the basis of waste paper industry. 80% of its composition is cellulose, the rest is additives that make the material more resistant. Flame retardants and antiseptics are added to it.
pros:
- low coefficient of thermal conductivity (0.032-0.041 W / m * C);
- environmental friendliness and vapor permeability;
- ecowool, although it can absorb moisture, but at the same time its thermal insulation properties hardly change;
- ability to absorb noise and vibrations;
- resistance to rodents and insects.
Main disadvantage is in the installation. Ecowool is a loose material that is sold in bags. Before application, it is loosened with a mixer, and then applied manually or mechanically to the wall. The denser the layer, the better, since an insufficiently dense layer quickly shrinks, and here it’s not far from cold bridges. The manual method of installation is a long time, and there are no guarantees of quality. Installation with a pneumatic installation is expensive, as you will have to hire specialists. 
The order of work when insulating with mineral wool (plates and rolls)
It is not so difficult to install a slab or roll insulation. Experts recommend starting insulation when the house has already shrunk, i.e. about two years after its construction. For work you will need tape measure and, hacksaw, stapler, for wood, a membrane for waterproofing and the insulation itself. The calculation is easy to make, just calculate the perimeter of each side of the house, sum up the indicators and add 7-10% margin. If a double layer is needed, then the result is multiplied by 2. For the crate, a beam of 50 * 50 mm will go, for a double layer - 100 * 40 or 100 * 50 mm.
The order of work is as follows:
- foundation preparation. Clean the walls from mold, dust and dirt, if there are voids in the crowns, re-seal them with a sealant, and then seal the seams with a sealant. Cracks in wood are also best repaired. The wood must be dry, so it is best to work in the summer after a long period without rain;

- padding. If the wood absorbs quickly, a second layer is applied;
- frame installation. The bars are fixed in increments of 10 mm less than the width of the insulation. The first beam is mounted near the corner of the house, 5-10 cm from it. Fasten the crate;

- installation of insulation boards in the resulting recesses, it is desirable that there are no gaps. The slabs should lie tightly, but dish-shaped dowels are used to guarantee. If a second layer of insulation is needed, it is laid so that the joints between the plates of the first layer are closed;

- installation of a protective membrane using a stapler and adhesive tape. Each next strip should overlap the previous one by 10-15 cm, it is better to glue the joint with adhesive tape;

- installation of a counter-lattice on self-tapping screws, in the future a wooden lining is attached to it or. This is a ventilated facade technique.
There are other ways. Mineral wool can be mounted on U-shaped metal hangers. They are placed along the entire length, cuts are made in the plates, with the help of which they are put on suspensions. Next comes the membrane layer, and the suspensions also serve to mount the finish. 
Another way– gluing mineral wool boards on the wall with additional fixation with dowels. Next, a cement mortar is applied for leveling, it is reinforced with a fiberglass mesh. It remains only to prime the wall, apply a layer (only non-acrylic compositions). This is the wet facade method., which the not particularly suitable for wooden houses, because plaster is a static shell, and a tree is mobile. Cracks may occur. 
The procedure for work with ecowool insulation
If you decide to mount ecowool manually, you will have to follow this procedure:

It will be easier with using a special installation. The pitch of the crate is 1-1.2 m, water is added to the cotton wool before spraying to form a sticky mass. The cotton wool is sprayed with a dense even layer, allowed to dry, then the excess is cleaned off, the membrane is mounted and the facing work is started. 
No. 5. Polymer heaters
The hand does not rise to recommend this group of materials for warming a wooden house. Polymer materials do not breathe, which means that all the advantages of wooden walls go down the drain. When using such heaters, you will need a serious ventilation system. It is justified to use them when insulating concrete slabs and stone plinths.
Styrofoam
It is popularly called. The material consists of a mass of balls that are interconnected to form small cavities.
pros:
- low weight and ease of handling;
- good thermal conductivity (0.036-0.051 W / m * C)
- low price;
- durability;
- soundproofing.
Minuses more significant:
- combustibility;
- vapor tightness;
- rodents like to make minks in polystyrene foam;
- water can accumulate in the cavities between the foam balls. The water absorption index by volume for 24 hours is 2%, for 30 days - 4%. Not so much, but the accumulated moisture during freezing can destroy the structure of the insulation.
Too much work will have to be done to protect the material from fire, rodents and moisture, and to provide ventilation in the house, so what is better than wooden walls in this way not to insulate- the low price of polystyrene is not justified by other expenses. 
Extruded polystyrene foam
This is already a more advanced insulation, a material related to foam, but the production method is completely different, hence the difference in properties.
pros:
- low thermal conductivity (0.028-0.034 W / m * C). If the house is beyond the Arctic Circle, then this is the best solution;
- light weight;
- ease of installation;
- moisture resistance;
- sufficiently high strength.
Of the serious disadvantages are vapor tightness, flammability and high price. 
PVC foam
The insulation is made on the basis of polyvinyl chloride (PVC). The result is a lightweight cellular material with an impressive set of advantages:
- high strength, higher than that of extruded polystyrene foam;
- low coefficient of thermal conductivity (0.035-0.07 W / m * C)
- resistance to burning;
- good vapor permeability, the highest in this class of materials;
- biostability.
Everything would be fine, if not for the price. The material is very expensive, and when burned, although it is prone to self-extinguishing, it emits hydrogen chloride, which, when combined with water, gives hydrochloric acid. 
No. 6. Polyurethane foam for insulation of a wooden house
This type of insulation has recently been used more and more often, and it is its sprayed version. There is another option in the form of plates. Sprayed requires the use of special equipment, but it fills all the cracks well, creates a solid coating.
pros:
- low coefficient of thermal conductivity (0.019 W / m * C);
- resistance to temperature extremes, durability;
- resistance to fire, rodents, decay;
- light weight;
- water resistance.
The main disadvantage is vapor permeability, according to this indicator, the material is 50 times worse than mineral wool. In addition, for spraying you will need special equipment, which must be managed by a professional, and this affects the price. Polyurethane foam is afraid of sunlight. Frankly, it is not very suitable for wooden houses, but if the goal is not to maintain the ability of the structure to breathe, then this insulation can be used. 
No. 7. Calculation of the thickness of the insulation
To count what layer of insulation is needed, you can use special calculators or the services of specialists. This takes into account the presence of windows, the required temperature in the house and other parameters. You can also do the calculation yourself:

Properly selected and installed insulation will make a wooden house more durable and comfortable, and externally the walls can be sheathed with a block house so as not to lose the unique look.
Wooden buildings retain heat much better than concrete or brick ones. But they also need extra insulation. Everyone knows that wooden buildings eventually give shrinkage. At the corners and at the seams of houses, cracks and crevices form, through which cold from the street enters the house.
To prevent all this, it is necessary to insulate the outside, how and with what to do it - read below. It is also worth noting that proper thermal insulation will help home owners save on heating. But in order to maintain the desired microclimate indoors and extend the life of the tree, it is necessary to choose the right materials for insulation.
Choosing wall insulation, keep in mind that any tree absorbs moisture well. Therefore, it must be processed impregnations. In order for the room to have a favorable microclimate, it is necessary to take care of good ventilation in the room.
If the air exchange in the room is disturbed, then this will lead to the swelling of the tree and the formation of fungi and mold on it. To prevent the above problems, you must:
- Insulate only dry walls.
- Choose vapor-permeable thermal insulation materials.
- Make and waterproof walls.
- Leave an air gap between the insulation and the finish.
Before you start warming, prepare well all work surfaces. They should be free of mold and dirt. If they need repair, do it in advance. And check that there are no harmful insects on the tree.

Attention: if you plan to paint wood in the future, then the sealant and paint must be vapor-permeable.
 Also, before warming the house, you must carefully read wall composition.
Keep in mind that the technology of warming a house made of wood provides for the presence of:
- vapor barrier;
- insulation;
- waterproofing;
- exterior cladding (read:).
It is hydro and vapor barrier that will protect the tree from excess moisture.
How to insulate a wooden house?
An unusually large range of heaters is provided on the modern construction market. But keep in mind, not all of them are vapor permeable. As a rule, for wooden buildings use:
- extruded ;
- polyurethane foam.
You can choose what kind of insulation it is better to insulate a wooden house from the outside by reading the characteristics of each of them below.
How to properly insulate with mineral wool
Mineral wool is an excellent choice. If you opted for this material, then you will not need special skills and abilities to apply. Since the whole workflow will be quite easy and simple.
To perform quality work, you only need to stock up on free time, the necessary tools and consumables. Before work, carefully prepare the surface and properly calculate the right amount consumable.
note
Wooden houses are subject to shrinkage. Therefore, they need to be insulated only a few years after the construction.
 Considering specifications mineral wool is worth highlighting:
- incombustibility of the material;
- no deformation;
- ease of installation;
- harmlessness and environmental friendliness;
- affordable cost;
- long service life.
If you have chosen mineral wool to insulate your home, please note that this material:
- requires additional protective equipment during work (respirator, gloves, glasses);
- absorbs moisture, so you must first make high-quality hydro and vapor barrier;
- will not protect the tree from the formation of mold and fungi. Therefore, the walls will have to be additionally treated with special antiseptics.
When choosing mineral wool, you need to consider that it happens:
- Basalt.
- Glass.
- Slag.
Each individual option has its own characteristics. Basalt cotton has a high degree of rigidity. This material is available in slabs, it is easy to cut with any tools and it is a pleasure to work with it.
Concerning glass cotton wool, it is produced in rolls. It is not always convenient to work with it, as glass fibers strongly irritate the skin.
slag cotton wool is the most inexpensive. If you choose this particular material, carefully consider the choice of the manufacturer. Since unscrupulous companies can use raw materials harmful to people in the manufacture of their products.
The benefits of foam
 You can also insulate your home with foam. This material also has a lot of advantages. The main ones include:
- ease and simplicity in work;
- light weight of the material;
- excellent heat and sound insulation qualities;
- resistance to negative factors;
- long service life.
On the surface of the foam will not form no mold or fungus. It is fireproof, harmless and perfectly copes with sudden changes in temperature and high humidity.
Important: this material is laid butt to butt. Make sure your home is well ventilated to prevent mold from growing on the walls.
Extruded polystyrene foam and its positive qualities
Expanded polystyrene is also in great demand and popular for home insulation. This material is:
- durable and reliable;
- durable;
- easy to work;
- environmentally friendly;
- affordable in terms of price.
Continuing to list the positive aspects of extruded polystyrene foam, it is worth highlighting such technical qualities as: resistance to burning, excellent heat and sound insulation qualities, high specifications. Expanded polystyrene is also resistant to mechanical damage and heavy loads.
note
Expanded polystyrene must be protected from ultraviolet rays. It can also be damaged by rodents.
But the main distinguishing feature of the material is its moisture resistance. Thanks to this, when warming, you can not even do steam and waterproofing.

How to insulate with polyurethane foam?
Polyurethane foam also has a wide range of applications in the external insulation of buildings. This material has benefits, how:
- low thermal conductivity;
- light weight;
- high thermal insulation qualities;
- resistance to mechanical deformations and heavy loads;
- resistance to the appearance of fungi and mold;
- durability;
- environmental friendliness.
This material is completely non-toxic and does not harm human health in any way. It does not burn under any circumstances and is universal. It is used not only for wall insulation, but also for attics and other similar premises.
Calculation of the thickness of the insulation
 For effective insulation of a wooden house, it is necessary to correctly calculate heat insulator thickness.
Otherwise, an incorrectly selected thickness of the material will lead to condensation and dampness appearing on the walls of the building.
And too large a heat insulator will lead to a violation of the air circulation inside the room. Each manufacturer indicates the necessary information for the consumer on their packaging.
note: the lower the thermal resistance of the wall, the larger the layer of heat insulator should be.
The main ways to insulate a wooden house from the outside
Technology Well
This technology can be called the most effective, but rather labor intensive and costly. It is most often used for brick buildings. This method consists in the fact that the heat insulator is attached to the facade in any convenient way, and a wall is attached to it.
This technique is used in places with harsh climatic conditions, where the air temperature drops below 50 degrees. Recently, this method has been used quite rarely, but it can also be used to insulate a wooden house.
Wet adhesive technology
This technology is most suitable for houses built from round logs and timber. For this, it is necessary to use external plaster in several layers.
This method is carried out in sequences:
- We carry out preparatory work.
- We fix the heater.
- We apply an adhesive mixture to the heat insulator and fasten the reinforcing mesh.
- We plaster the surface several times.
- We apply the finishing decorative layer.
TO benefits such a method is worth mentioning.
The popularity of houses made of wood is only increasing every year. And for good reason. This is due to the ease and speed of construction work, as well as the excellent thermal insulation properties of the material. However, the latter fact does not at all exclude the expediency of warming, especially in areas with a harsh climate. How to properly insulate a wooden house from the outside and with what? The advantages and disadvantages of popular materials, as well as important nuances of doing this kind of work with your own hands will be revealed further.
In contact with
classmates
Insulation options
Warming a wooden house from the outside has a lot of advantages:
- the dimensions of the interior rooms remain unchanged;
- lack of debris and dust inside the room;
- there is no need to rearrange the furniture or perform any internal work;
- additional protection of the structure from environmental influences;
- for old houses that have lost their attractiveness, insulation is an opportunity to ennoble, transform the appearance of the building.
Note! Improper performance of work on the insulation of a wooden house from the outside can lead to mold, damage and decay of the wooden structure. Therefore, only a competent, comprehensive approach to business guarantees a high-quality, desired result.
Despite the constant discoveries and developments in the field of construction and building materials technologies, 3 options for insulation materials have confidently gained a foothold on the market:
- Mineral wool.
- Styrofoam.
- Penoplex or polystyrene.
All of them have excellent insulating properties. However, each material has its own characteristics and disadvantages, which are extremely important to consider. A detailed consideration of each material will allow you to decide how best to insulate a wooden house.
Mineral wool, features of insulation
 Mineral wool is compressed particles of artificial stone, basalt and slag. It does not support combustion, which is commendable for a log house, and does not undergo deformation. This material has proven itself in construction and is widely used to insulate the walls of a wooden house.
The advantages of mineral wool with confidence include:
- ease of installation;
- environmental friendliness of the material, its harmlessness;
- guarantees additional protection against fire;
- democracy, affordability;
- durability;
- the structure does not deteriorate, does not change under the influence of temperature changes;
- the material has a high melting point, therefore, in terms of fire safety, it is better than many.
Mineral wool also has disadvantages, although there are few of them:
- the need for additional protective equipment (respirator, gloves) for construction work;
- does not protect the surface of the log house from the development of fungus and mold;
- hygroscopic, easily absorbs moisture, so high-quality hydro and vapor barriers are required.
When choosing mineral wool as a heater, consider the following tips:
- Before warming, be sure to treat the walls of the log house with a special antiseptic solution.
- Completely exclude the possibility of moisture penetration to the mineral wool. To do this, a layer of vapor barrier is laid, then a heater and a layer of waterproofing.
- It is necessary to mount the material with a call to half of the previous sheet of material, spaces between the elements are not allowed.
- Additionally, you can limit the shift of mineral wool using anchors.
- You can use not only mineral wool, but also its varieties (for example, glass wool).
Styrofoam as a heater
 If it is impossible or unwilling to use mineral wool, you can insulate a wooden house with your own hands using foam. Outwardly, it is an accumulation of a large number of air, foam balls of plastic mass. In terms of insulating qualities, polystyrene (expanded polystyrene) is in no way inferior to mineral wool.
The advantages of this material include:
- ease and convenience of installation;
- lightness of the material;
- dense surface that is not exposed to moisture and fungi;
- increased soundproofing qualities;
- resistance to temperature changes and precipitation;
- significant service life.
The main disadvantage of the building material is unnaturalness and low fire resistance.
Warming the walls of a wooden house with polystyrene foam is no more difficult than with mineral wool. Rather, on the contrary, a sheet of material is easily transferred, adjusted to the required dimensions by trimming. The nuances of working with such an insulator include:
- It is necessary to lay the material end-to-end.
- To process gaps at the joints of polystyrene sheets, a diffusion membrane is used. It is attached to the surface with a stapler directly to the light.
- The diffusion membrane must be at least 10 cm wide to ensure complete insulation of the foam joints.
- Use tape to connect the membrane pieces.
- Despite the stable ratio of foam to moisture, a waterproofing layer is still necessary.
Note! Many builders are categorically against the use of foam as a heat insulator. Because if the work is not properly organized, it will accelerate the development of the fungus on the walls of the house. To avoid this, be sure to provide a good gap between the structure wall and the vapor barrier to ensure sufficient air ventilation.
Foam insulation (polystyrene)
 Penoplex is a colleague of polystyrene. It is also a cellular, honeycomb surface filled with polystyrene balls, but exceeds its predecessor in technical characteristics.
Penoplex allows you to easily insulate a wooden house with your own hands. For this, the heat insulator has a lot of prerequisites:
- increased technical characteristics;
- good surface strength;
- does not rot and does not absorb moisture;
- perfectly retains internal heat;
- does not respond to changes in external temperatures;
- ease of installation;
- environmentally friendly material;
- does not burn;
- enjoy a long service life.
The disadvantages of penoplex are as follows:
- The cost of the material exceeds the cost of mineral wool or polystyrene.
- The need for high-quality protection from ultraviolet exposure to sunlight. They destroy the structure of the heat insulator.
- Sensitive to solvents and similar substances.
- Easily damaged by rodents.
As for the insulation process, it is identical to foam.
Note! A prerequisite for foam insulation is the presence of a ventilation space between the vapor barrier and the wooden wall.
Log house insulation technology outside
Now consider how to insulate a wooden house from the outside, in stages:
- Prepare the surface of the walls of the house. To do this, clean them of dirt, and treat them well with a special antiseptic solution or primer.
- Seal gaps, holes and cracks in the wall with mounting foam. When the foam dries, cut off the remnants with a sharp knife.
- Wet walls are not suitable for insulation. Wait until the surface is completely dry.
- To lay the vapor barrier layer, make a crate of wooden slats. The step between the slats should be 1 m. The crate should guarantee the presence of a ventilation space within 20 mm. This is necessary to prevent the accumulation of moisture drops on the tree, followed by decay, damage to the wall surface.
- Install vapor barrier material. It can be isospan, polyethylene or roofing material. Fix the vapor barrier on the rails, and seal the attachment points with adhesive tape to seal the coating.
- Make a frame for the heat insulator, also using wooden planks 40 × 100 mm. A heater will be mounted in its grooves. Therefore, in order to achieve maximum joint density, the distance between the laths should be 15 mm less than the width of the sheet of material used. Wooden planks are installed only on the edge.
- Using the building level, monitor the evenness of the crate to avoid the appearance of bumps, gaps and other shortcomings.
- Lay the insulation in the resulting grooves, taking into account its individual characteristics.
- The next stage of the "pie" is the laying of a layer of hydro-windproof membrane. It must be fastened with nails or a construction stapler to a wooden frame. Again, treat the joints with adhesive tape for tightness.
- The final stage is the installation of decorative trim on the facade of the house. Use siding, lining, brick or other building materials for this purpose.

Insulation of a wooden house from the outside: video instruction in 3 parts
The video shows in detail how the process of warming a wooden house goes, the consistent progress of work with a note of important points.
In contact with
classmates
kakpostroit.by
Insulation of a wooden house from the outside - 2 most effective modern technologies
Insulation of a wooden house from the outside allows not only to provide comfortable living conditions, but also to save on heating in winter. However, it is necessary to deal with this procedure competently, since a violation of technology can lead to the fact that the walls of the building will become unusable very quickly. Therefore, further I will describe in detail how external insulation is performed using two modern technologies.

Log house insulation
Features of insulation
First of all, it should be noted that there are two technologies for external insulation of wooden houses:
- hinged (ventilated) facade - the principle of this technology is to mount the frame on the walls, which is subsequently sheathed with siding, clapboard or other finishing material. The insulation is located in the space between the wall and the finishing material. This technology is the most preferred, as wet work is excluded. In addition, the facade is stronger and more durable;
- wet facade - in this case, the walls of the house are pasted over with insulation, after which they are plastered using a special technology.
Below I will tell you how to properly insulate the house in both cases.

Scheme of the device of a hinged facade
hinged facade
The installation process of the hinged facade includes several main stages:

The main stages of installation of a hinged facade
materials
First of all, we will consider how and how to insulate a wooden house from the outside using the hinged facade technology. For this you will need the following materials:
| materials | Features and purpose |
| insulation | The optimal solution is mineral wool. I must say that people are often interested - is it possible to insulate the walls of a wooden house with foam plastic? In principle, the use of polystyrene foam is allowed, however, it should be borne in mind that this material is quite combustible, and besides, it does not allow steam to pass through, which will negatively affect the microclimate inside the room. Therefore, it is better to overpay a little, but still use mineral wool for these purposes. |
| Racks for the frame | As a rule, bars or even boards are used. You can attach them to the wall using metal corners or brackets. I must say that as an alternative to boards or timber, you can use the profile that is used for the installation of drywall. |
| Vapor barrier film | Protects the insulation from getting wet. |
| Finishing material | It can be lining, block house, siding or any other facade material. |
| Mezhventsovy heater | Jute tow is usually used, however, gaps can be filled with special foam or other suitable materials. |
| Wood preservative | Protects walls from the negative effects of moisture, decay and other biological influences. |

Mineral mats
You can insulate the basement of the house with penoplex with your own hands. This material is quite durable, resistant to various negative influences, and also has the property of self-extinguishing when ignited.

Filling gaps at home
Facade preparation
Before insulating a wooden house from the outside, perform the following preparatory work:
- dismantle all attachments that may interfere with work - these are ebbs, visors, window sills, antennas, etc .;
- after that, treat the walls with antiseptic impregnation;
- at the end of the work, it is necessary to fill all interventional gaps with insulation, if any.
You can start warming a wooden house at least a year after its construction, so that the building has time to shrink.

Framework example
Installation of the frame insulation
The next step is the installation of the frame. The instruction looks like this:
- installation of the frame, start with the arrangement of the ventilation gap. To do this, attach boards about two centimeters thick to the walls. You can arrange them both vertically and horizontally, the main thing is that later you can attach racks to them;
- further, a vapor barrier film is attached to the boards with a stapler. It must be overlapped and stretched so that a space forms between it and the wall. It is advisable to glue the joints of the film with adhesive tape. I must say that the network offers many schemes for wall insulation without a ventilation gap, however, in this case, moisture can accumulate in the space between the wall and the insulation, which leads to negative consequences;
- after that, the installation of racks is carried out. You should start with the installation of two extreme racks, between which ropes are stretched, serving as beacons for intermediate rails. The end posts are installed at the same distance from the wall, strictly vertically. If you use boards as racks, then fix them to the walls with metal corners and self-tapping screws, as shown in the photo above. After that, install intermediate rails, which are located in increments of one or two centimeters less than the width of the mineral wool slabs.

Laying mineral wool in the space between the racks
Then, heat-insulating material should be laid in the space between the racks. The mats should fit snugly against each other and against the posts so that there are no gaps in the insulation;
- then a vapor barrier film is attached to the frame. As in the first case, it must be overlapped. You can fix the film with the help of horizontal rails, which will additionally hold the insulation;
This completes the insulation of the facade with your own hands.

Siding installation
Frame sheathing
The final stage of work is the sheathing of the frame. As mentioned above, there are several options for finishing. If you don’t know what material is better to sheathe the facade, then focus primarily on cost, practicality, individual preferences, etc.
For example, lining is an environmentally friendly material, and it also allows you to maintain the attractive appearance of a wooden house. Vinyl siding is more practical, easy to clean and requires no maintenance.
So, if you decide to use siding for sheathing, then the work is carried out in the following sequence:
- before attaching the panels to the wall, it is necessary to install the starting profile, which is located horizontally around the perimeter of the house. In this case, you should leave a distance from the ground or blind area to the profile of about 10 cm;
- then corner profiles are installed at the corners of the house;
- after that, the first row of panels is installed. The lower part of the siding is inserted into the starting profile, and from above it is attached to the crate with self-tapping screws;
- according to this scheme, the whole house is sheathed with siding;
- before mounting the last panel, fix the finishing profile;
- at the end of the work, additional elements are installed - slopes, ebbs, etc.
This completes the facade cladding with siding. I must say that the lining is attached approximately according to the same principle, the only thing is that a profile is not used for its installation.

Scheme of the device of a wet facade
Wet facade
The installation process of a wet facade includes several main steps:

Preparation of materials
Choosing which insulation is better to perform thermal insulation of the walls, in this case it is also better to give preference to mineral wool. Of course, in addition to insulation, some other building materials should also be purchased:
- glue for mineral wool;
- dowels-umbrellas;
- fiberglass reinforcing mesh;
- perforated corners
- decorative plaster;
- primer;
- facade paint.
After preparing all these materials, you can get to work.

Bonding mineral mats to the wall
Wall insulation
As in the previous case, work begins with the preparation of the facade. This procedure is performed according to the scheme described above.
Then the walls are pasted with mineral wool for plaster:
- first of all, you should prepare the glue, according to the instructions on the package;
- then spread the adhesive on the mineral mats with a notched trowel. If the walls are uneven, the mortar should be applied with “blunders”, which will allow you to adjust the position of the plates relative to the wall.

Applying glue to mineral wool
In the process of gluing the mats, use the building level, and also stretch the beacons so that all the plates in each row are located in the same plane;
- according to this principle, all the walls of the house are pasted over;
- then the mineral wool is additionally fixed to the wall with dowels-umbrellas. To do this, drill holes in the wall directly through the insulation and hammer the dowels into them with a hammer. Umbrella hats should be slightly recessed;
Dowel installation
- after that, you need to paste over the window openings with mineral wool. This procedure resembles the installation of slopes - cut the cotton wool on the panels of the desired size and paste over the openings with them. Dowels are usually not installed on window slopes, but they must be installed on door slopes.
- then you need to check the quality of the work done by applying the rule to various sections of the walls. If there are bumps on the wall, they can be eliminated with a special grater;
- then stick perforated corners on all outer corners using the same glue;
- at the end of the work, glue all the dowel caps with glue so that in the end the facade has a smooth surface.
When working with mineral wool, use personal protective equipment, as it causes irritation when it comes into contact with the skin.
In the photo - gluing the mesh to mineral wool
Reinforcement
The next step is reinforcement. In fact, this is a rough plastering. It is carried out in the following sequence:
- prepare the mesh by cutting it into sheets of the desired size. At the same time, keep in mind that on the wall it should overlap by about 10 cm;
- then cut the canvases for the slopes;
- then glue the mesh to the slopes. To do this, the glue should be applied in an even layer a few millimeters thick on the surface of the mineral wool, after which the mesh should be immediately applied. To “drown” the mesh in the solution, run a spatula over it from above, as shown in the photo above;
- after reinforcing the slopes, according to the same principle, the mesh is glued to the walls;
- after the surface has dried, the adhesive is applied again in a uniform thin layer. At the same time, use a wide spatula to eliminate all existing irregularities on the surface of the walls. This procedure is performed on the same principle as puttying.
People are often interested in the forums - how is it better to insulate an old wooden house? If the building has lost its geometry, then brick cladding would be the best choice. At the same time, mineral mats are laid between the facing wall and the wooden walls.

Application of decorative plaster
Decorative plastering is much easier and faster than reinforcement. The main thing is to follow a certain sequence of actions:
- First of all, you need to treat the surface of the wall with a primer. To do this, pour the liquid into the pan and then apply it to the wall with a paint roller. To achieve maximum effect, the primer is applied in two layers;
- then prepare the solution according to the instructions on the package;
- then decorative plaster should be applied to the walls with a small or wide spatula. The layer should be as thin as possible;
- when the plaster begins to set on the walls, it should be rubbed with small, making circular or reciprocating hand movements. This will create a specific pattern.
I must say that the application of decorative plaster within one wall must be done in one go, otherwise the border along which you interrupted work will not be visible on the wall.

Facade painting
Painting
Painting is also a simple and quick procedure:
- start work with the preparation of the paint - the composition should be stirred and, if necessary, tinted;
- then pour the paint into the paint roller tray;
- after that, dip the roller into the paint, squeeze it slightly on a special platform in the bath, and treat the wall with it;
- use a paint brush to touch up hard-to-reach areas;
- after drying the surface of the walls, apply the paint with a second layer.
Output
Warming a wooden house from the outside, as we found out, can be done in two ways. However, in any case, in order to achieve a high-quality result, it is necessary to strictly follow the above instructions.
For more information, see the video in this article. If you have any difficulties in the process of work, ask questions in the comments, and I will be happy to help you.
 Subscribe to our channel in Telegram September 4, 2016 If you want to express gratitude, add a clarification or objection, ask the author something - add a comment or say thanks!
 Latest replies on the forum
obustroeno.com
Insulation of wooden houses from the outside - 2 simple and effective ways
At all times, wooden houses and log cabins are considered the warmest types of individual housing, since natural wood, due to its porous internal structure, has high thermal insulation properties. However, despite this, the constant heating of a large wooden house throughout the winter period entails quite high costs, especially considering that the price of natural gas and electricity is constantly increasing. Therefore, the insulation of wooden houses outside has now become very relevant.
In order to reduce heating costs and ensure a comfortable temperature inside their home, regardless of weather conditions, many owners of wooden houses resort to insulating the outer facade of the building using modern heat-insulating materials.
 Insulation of the facade of a wooden house
 Features of external thermal insulation of a wooden house
In addition to energy-saving functions, such insulation of a wooden house from the outside under plaster helps protect the wood surface from the harmful effects of weather factors, and allows you to finish the building with any facade paints for outdoor work.
In order for the reader to be able to independently deal with all the features of performing such work, this article will consider a detailed instruction that indicates the main aspects of self-insulation of log cabins and frame-panel houses made of wood.
 The diagram shows how to insulate a house from a bar
 The choice of thermal insulation material
The energy-saving properties of log walls, as well as the durability and preservation of wood, will largely depend on the correct choice of heat-insulating materials and the competent implementation of all technological stages of this process. In most cases, the technology for insulating a wooden house from the outside involves the use of mineral wool panels for these purposes, as well as EPPS (extruded polystyrene foam) or foam boards.
- XPS and foam panels have high thermal insulation properties, do not absorb moisture and are not blown by the wind, while XPS is much more expensive than conventional sheet foam.
 Styrofoam slabs
 - The use of rigid foam panels greatly simplifies the work on insulation and exterior decoration of a wooden house, moreover, it does not require the installation of an additional crate. At the same time, expanded polystyrene does not allow air and water vapor to pass through, which can lead to condensation on the wooden facade, moreover, the foam is combustible and can be eaten by mice, rats or other rodents.
- Rigid mats and slabs made of mineral wool are free from such shortcomings, they have a high thermal insulation capacity, they pass air and water vapor well to the outside, providing normal ventilation of the wooden facade, they do not rot and do not contribute to the development of mold fungus, and they are also not used as housing by rodents and insects. pests.
- The main disadvantage of using mineral wool for these purposes is a more complicated installation process, which requires the preliminary installation of a wooden crate, as well as the use of vapor and waterproofing materials.
- With the help of special glue, the foam plates must be glued to the facade in such a way that their joints are not in the same line, but are staggered.
- After the adhesive solution has dried, it is necessary to additionally fix each panel in five places (in the corners and in the center) using long galvanized self-tapping screws, using wide plastic washers for this.
- If there are large gaps or cracks at the joints of the panels, they must be sealed with narrow strips of foam or blown out with mounting foam.
- Thus, the entire facade should be sewn up, after which the material for insulating a wooden house from the outside should be smeared with special building glue, and then pasted over with fiberglass reinforcing mesh.
- After the glue has hardened and dried, the walls must be plastered and painted with exterior paint in any suitable color.
Pay attention! In most cases, the insulation of the basement of a wooden house from the outside using polystyrene foam is performed in a similar way, however, after gluing the reinforcing mesh, it must be coated with a layer of sand-cement mortar, which should have a thickness of about 20 millimeters.
Method 2. Mineral wool insulation technology
In order to properly insulate a wooden house from the outside with mineral or basalt wool panels, you must first install a vertical and horizontal crate made of timber or a galvanized profile, the cross section of which must be equal to the thickness of one layer of thermal insulation.
- First of all, the entire area of \u200b\u200bthe facade must be covered with a vapor barrier membrane, after which vertical bars should be fixed on it from the roof to the basement, keeping the distance between them 22-32 mm less than the width of the insulation.
- The resulting vertical openings between the bars must be filled with mineral wool, leaving no air gaps between the plates.
 Installation of a wooden crate
 - Similarly, horizontal bars must be nailed to the vertical crate, after which the space between them is also closely filled with insulation boards.
- After installation, the insulation for a wooden house from the outside must be closed with a special waterproofing film with micropores, which freely passes water vapor and air from the inside to the outside and prevents water from entering back.
- Finally, a finishing finishing material is attached to the wooden frame. Most often, metal or plastic siding or plastic panels with imitation of various building materials are used for these purposes.
 Finishing exterior walls with siding
 Note! To increase durability and protection against decay, all bars of vertical and horizontal battens, as well as other wooden structural elements, must be treated twice with antiseptic and antifungal impregnation before installation.
Conclusion
Mineral wool can absorb moisture, which will lead to a decrease in its thermal insulation properties, therefore, when performing external insulation of a wooden house using this material on your own, small gaps must be left in the lower and upper parts of the facade, which are necessary for free air circulation.
In order to study in detail the technology for performing such work, it is recommended to watch the attached video in this article, or read similar articles that can be found on this site. If the reader has any comments or questions, I suggest discussing them in the comment form.
stroimsamydom.ru
Insulation of a wooden house: step by step instructions
Recently, a trend has become more and more clear - people, in an effort to get closer to nature, are moving from city high-rise buildings to private wooden cottages. Downshifting is explained not only by fashion and a subconscious craving for natural and natural, but also by a well-founded desire to live in a healthy atmosphere. It is known that wood is a natural heat insulator, but this does not mean at all that a house built from this material does not need to be insulated. Today we will talk about how to insulate a wooden private house with your own hands from the outside and from the inside.
Material selection
The practice of building houses from wood dates back thousands of years, and earlier people used exclusively natural materials for insulation: tow, moss, straw, etc. Unlike the old solid buildings made of solid logs, modern wooden cottages are lightweight and need thorough insulation. According to all experts, the best option is external insulation, but in some cases internal insulation is also acceptable. In any case, it is necessary to conduct a study and identify which areas require special attention. So, if the house is on piles, drafts will constantly walk on the uninsulated floor, but if the base is of a different type, it is necessary to insulate the foundation of a wooden house with your own hands, otherwise up to 40-50% of heat will go through it.

The second area that requires the closest attention is the roof - up to 50-60% of the heated air can escape through it. The article "Insulation of the roof with your own hands" will help you with this. And, finally, the walls of the house occupy the largest area, and besides, they are subject to wind loads, and it is impossible to neglect their insulation. Thus, several stages of work can be distinguished: insulation of the floor, roof and walls. To save money, you can use the old proven "old-fashioned" caulking methods using sawdust mixed with earth or clay, moss, jute, hemp, tow. The floor can be insulated with expanded clay or ecowool.

In order to qualitatively insulate a wooden house with your own hands, you can use any materials, but it is advisable to focus on their naturalness, otherwise the whole meaning of the environmental safety of the home will be lost. Also in wooden houses there is a high risk of rodents, so it is better if the insulation is strong enough or “tasteless” for mice. Also, it should not interfere with steam exchange, otherwise the wood will begin to rot and rot. Also, do not forget about fire safety. Taking into account all the above requirements, it turns out that a wooden house can be insulated with ecowool or stone wool, expanded clay or sawdust. Styrofoam and its derivatives, such as polystyrene foam and polyurethane foam, are best not used, as they are not environmentally friendly and do not allow water vapor to pass through.
Warming technology
Insulation of a wooden house is necessary not only to maintain a comfortable microclimate inside and save fuel (electricity), but also to extend the life of internal coatings, furniture and structures that form the house itself. So, if temperature and humidity fluctuations are constantly observed inside, the wooden elements will narrow and expand, begin to rot and deteriorate much ahead of schedule. To prevent this, first of all, it is necessary to pay attention to the places with the largest heat losses: the floor and the roof.

Warming outside
Before you insulate a wooden house from the outside with your own hands, you need to prepare all the tools and materials. If the house is two- or three-story, one step-ladder will not be enough - you need to build scaffolding. It is optimal to use stone wool as a heater, since it perfectly copes with its task, is not subject to damage by rodents and does not interfere with the microcirculation of moisture. The obvious advantage of the material is non-combustibility and easy installation.

How to insulate a wooden house with your own hands (with video):

The video instruction will summarize how to insulate a wooden house from the outside with your own hands:
Useful advice: In most cases, mineral wool slabs 5 cm thick are used to insulate wooden houses from the outside. The bars from which the crate will be built should be approximately the same thickness (preferably exactly the same).
Warming from the inside
Before telling how to insulate a wooden house from the inside with your own hands, I would like to note that this method is undesirable and can only be used in cases where external insulation is unacceptable for some reason. Internal insulation is inconvenient not only because it takes up the useful area of the walls, but also because it moves the dew point inside the skin. This means that the wall that is not insulated from the outside begins to freeze, the cold moves deeper and deeper inside, and when it collides with the back side of the insulation attached from the inside of the house, condensation appears due to the temperature difference.

It is much easier to insulate the ceiling in a wooden house with your own hands, the floor or the foundation. To do this, you do not need special equipment, and it is more convenient to work inside than outside (you can do this in any weather).
There are several thermal insulation techniques for the interior walls of a house, depending on the insulation used:
- Warm seam - such sealing of seams and joints is used in cases where the inner surface of a wooden wall will be preserved in its original form, that is, without finishing with decorative plaster and other materials. A warm seam significantly reduces the thermal conductivity of the masonry. Synthetic sealants on a silicone, rubber, latex or acrylic base, as well as traditional materials such as flax, tow, linen tow, can be used as a heater. Such insulation can be easily carried out with your own hands without special skills, it does not violate the natural attractiveness of the wooden masonry, does not violate the microcirculation of air and moisture inside the room. It is also impossible not to note the economic benefits with fairly high efficiency rates.
- Mineral wool - this material is suitable for both external and internal insulation of walls, ceilings, walls and ceilings of a wooden house. First, in the wall, you need to cover all the cracks with sealant and treat the surface with an antiseptic, then build a crate, as described above, and proceed in exactly the same way until the finish. In this case, it will need several other materials: wood panels, wall paneling, drywall, plaster, etc.
- Styrofoam - this material is very rarely used to insulate wooden houses, since it does not allow steam to pass through, which inevitably leads to condensation inside the wall. However, if you properly organize the hydro and vapor barrier layers, this technology will completely protect the house from frost and save money, since the foam itself is very inexpensive. Working with it is easy and simple, and low thermal conductivity with a small thickness of the material makes it possible not to sacrifice free space for the benefit of insulation, as is the case with mineral wool.
- Sprayed thermal insulation is a relatively new way of insulating walls from the inside and outside. Unfortunately, you won’t be able to do this with your own hands, since special equipment is needed to apply (spray) the heat-insulating material onto the wall. As a result, an absolutely seamless coating is formed, which does not allow moisture or cold to pass through, but at the same time does not interfere with vapor exchange.

To insulate the floor in a wooden house with your own hands, you can use the same mineral wool in slabs, polystyrene foam or bulk materials (expanded clay, vermiculite). To do this, logs of at least 50x50 mm beams are equipped on the draft floor, waterproofing material (roofing material or building polyethylene) is laid on top of them, after which insulation is placed. From above, waterproofing is again laid and sewn up with boards or plywood, after which they proceed to the finishing (lay parquet, laminate, lay linoleum, carpet, etc.).
Insulating a wooden house means not just attaching heat-insulating material to its walls, floor and roof, but carrying out a whole range of work related to arranging a comfortable microclimate inside. All this will ultimately affect not only the well-being of the residents, but also affect the life of the building itself. That is why it is necessary to carefully select materials and strictly adhere to the chosen insulation technology.
We also recommend
 Switching power supply: repair and refinement
 Remote control of light
 Swimming lessons for preschool children
 Notes for the master - home household alarms
 Clock propeller on Atmega8
 Device and relay application examples, how to choose and connect a relay correctly Microcontroller and relay simple switching circuits