Make a table for giving with your own hands. Independent production of an outdoor wooden table for a summer residence: the simplest and most interesting options
In the country there are very important items, but which you can do on your own, so as not to overpay too much, so our today's topic is do-it-yourself table for giving. You are free to make it of any size you want to get both a small headset table and a large one so that the whole family can fit behind it with guests, as well as folding models, functional, original, which are used as decor, and so on. Below we will give you examples of each of the above groups, as well as see how difficult or easy it is to make this important item.
Do-it-yourself wooden table for giving
Wood is relatively affordable and inexpensive, depending on what kind of material you want to use to create do-it-yourself wooden table for giving. In the vast majority of examples, we are talking about wooden planks of varying thickness that make up the table top, and wooden beams are used for the legs and supporting structural elements, an ideal material for this task.
We can talk about the advantages of boards for a very long time, but, first of all, this is the availability of the material, its cheapness, and, which is very important for home craftsmen and those for whom even simple responsible tasks - woodworking does not require many complex, expensive tools and no technical knowledge is required. In principle, assembling a stool has been a mandatory program for boys since school days and we assure you that assembling do-it-yourself wood table not much more difficult.

But before choosing among models do-it-yourself table for giving, drawings and schemes, you will need to decide which one you need, for what purposes. The degree of success of the design can greatly depend on this, since the table itself will be good, but it will not be suitable for the task at hand. So, if you need a portable model, then you should not make it with logs or similar heavy material, since it will not be easy to move such a colossus. Round varieties look very interesting, but they are best used for filling, the same round shapes. After all, although the circumference allows you to seat guests, all the same, on the surface of such a countertop there will be significantly less space than on a round one. It is also important what the legs will stand on, if it is an absolutely flat concreted area, then you can choose models with four even legs. They look very elegant and are quite easy to make. But if you want to arrange a feast on the lawn or you do not have confidence in the absolute evenness of the floor surface, then it is better to choose more stable options for the legs, for example, oblique ones, which will also allow maintaining the stability of the structure in this situation.
Do-it-yourself street table
Is wood the ideal material? do-it-yourself street table? Many doubt this, because in this case, water will constantly drip onto its wooden surface, both from rain and, for example, from watering, and this can adversely affect the wood. But, since all the positive aspects of just such a design are already very numerous, it is worth thinking about the special compositions with which the tree is painted. They do not change its structure, on the contrary, they can emphasize it, make it even brighter, even “more expensive”, but at the same time, they prevent the absorption of water into the surface and the appearance of all the negative phenomena that are associated with it. Therefore, just after the end of production, do not be lazy and do not save money - cover the finished product with a high-quality paint and varnish composition.

There may be several zones on the street where it would be appropriate do-it-yourself wooden table for giving, drawings which you can see above. First of all, it is a summer terrace or a place for eating, located near the summer kitchen. There you will need a large, wide tabletop, which, ideally, is completed with benches or chairs of exactly the same design, so that it all looks like a single set. But not only for eating, we may need a table, but also for gardening and gardening. For example, in a garden, it is best to install it in some picturesque clearing, fit it into landscape design. He is also needed on the made one, because behind him it will be possible to draw, and sculpt, and play board games.
We want to talk a little about special tables, which are gaining more and more popularity among the owners of suburban areas. The fact is that a new variety has been added to the traditional set - a bar counter. This is a countertop of an unusual shape - it is located on very high legs so that the person who sits behind it and who stands behind it are of the same height. Such entertainment as a country bar, decorated, for example, in a beach style, decorates the site very much. In the photo you can see what it might look like. do-it-yourself wooden street table.

In that, in the bar counter format, there are no particular difficulties, you will only need to understand what its size, height and width will be most comfortable for you. Another essential element of the design will be the presence of a large number of shelves and drawers where you can put dishes and all other devices for creating cocktails. The material for the construction can be both boards and pallets - boxes that are in great demand today, although you will have to work with it no less than when knocking down do-it-yourself table boards for giving. The fact is that in these boxes there is not only their expiration date, but also the initially good or poor quality of wood, therefore, chasing ease of assembly, you can get a product of poor quality, crooked and with an uneven table top. And all because after one season of use, the boards begin to “lead” in different directions, so you should not only buy high-quality pallets initially, but also let them stand for some time before work.

Continuing the theme of the bar counter, we want to show you a few more high varieties. These are auxiliary cart tables, mobile and convenient for moving within the entire area. They come with small wheels to make them easy to carry, but think about the material you're making them from to make them as light as possible. In addition, developing the idea of a bar counter, you can do something much larger by making a circular tabletop, for example, on a fence framing a barbecue area. And the idea with the design of a round stand that goes around a tree is not only practical, but also very beautiful. Previously, we could only see benches that were placed in a similar way, but it turned out that they would cope with this task no worse.
How to make a table for a summer residence with your own hands
To develop the theme of useful furniture, we will briefly show you the process of creating an auxiliary table. In this case, when solving the problem, how to make a garden table with your own hands, two main stages are used - this is the creation of the frame and the design of the countertop.

To create a frame, an appropriate drawing is selected, the length of all the boards and timber that are part of it is marked, and then they are successively knocked together. You see a ready-made, assembled frame, decorated with a pergola element on a high back. This will not only decorate the craft, but such a perforated plane can be used to store kitchen utensils. From above, on the recess, you need to lay a countertop made of even material, for example, a laminated wide board, so that there are no gaps between the boards in the surface, since dirt will easily clog there. A technical hole is cut for a metal sink purchased at a plumbing store, as well as all the holes for communications, taps, pipes that you will need. When installing the sink, the edges of the hole are carefully sealed, this will fix the element in the countertop and prevent water from penetrating inside. It remains only to connect the structure to the country water supply system, and bring the drain into a septic tank or into a cesspool.

If you want to do everything yourself, a traditionally shaped table, this will give you some advantages, as you can provide a table top with very useful features. For example, make a small hole inside, in the center, where you can insert a large umbrella if necessary, protecting everyone who will sit around it from the scorching sun.

And in the case when there are special requirements for the functionality, you can go even further towards creativity. For example, make a recess in the middle of the table, inside which there is a cooler bag. Ice is poured inside it and bottles of beer are installed - for a long summer feast. For those who do not like beer creativity, moss or unpretentious garden plants can be placed in such a niche, which will simply decorate the appearance with their presence.
Do-it-yourself table for giving a photo
When we are using pallets, as we have already mentioned, it is best to use a combination of them with other materials, or a non-standard form for the finished product. How beautiful it can look to improve your country life, you can look at the example of creating do-it-yourself tables for giving, photo which is located below.

And also examples of more traditional tables with a "zest" - a folding element that makes such furniture extremely convenient to use. If they are not needed, then you can easily halve their overall size or, in general, remove them away until the moment when they are needed.

DIY table and bench
The ideal option, if you feel a sufficient degree of skill in yourself, is a whole set consisting of do-it-yourself tables and benches for summer cottages.


The examples above show that these sets can be of different shapes and sizes, but at the same time they look very stylish and expensive, precisely because they are made in the same style and their designs overlap with each other.
This piece of furniture is one of the most versatile in use. The table can be a dining table, household table, installed in a living room, on a veranda, territory, in a workshop, and so on. In a word, it is impossible to do without it. But purchased products do not suit many for a number of parameters - size, design features, shape, or for another reason.
Given that the tree is relatively easy to cut, grind, make a table out of it according to your own drawing, with your own hands for a good owner is not a problem. Yes, and it will be much cheaper. Plus - satisfaction from such work.
room
This is ideally an extension, a barn, an empty garage, although a small area under a canopy is also suitable. To work with a tree on a site, in the open air, means to be completely dependent on the vagaries of the weather. If there are “square meters” suitable for making furniture, then you should worry about high-quality ventilation in advance. Natural is sometimes not enough (besides, it depends on the change in wind direction and pressure), and an exhaust hood is installed.

Arguments that if you use protective equipment, then you can work in a closed space, do not stand up to criticism. Wood dust will immediately settle on everything, including the sample with which some actions are performed. Neither an accurate cut along the line, nor a high-quality surface treatment of wood (not to mention the impregnation and finish coating with a paint and varnish composition) can not be obtained.
It is impossible not to take into account the fact that many preparations used for wood processing contain toxic components. For example, varnishes, paints, impregnations, if they are not natural, then harmful fumes are guaranteed.
Instruments
Their set depends on the extent to which it is planned to “ennoble” a simple wood structure, what shape to give it and a number of other nuances. If the master does not claim the elegance of a wooden table, does not aim to achieve its originality, then the usual carpentry set will be enough.
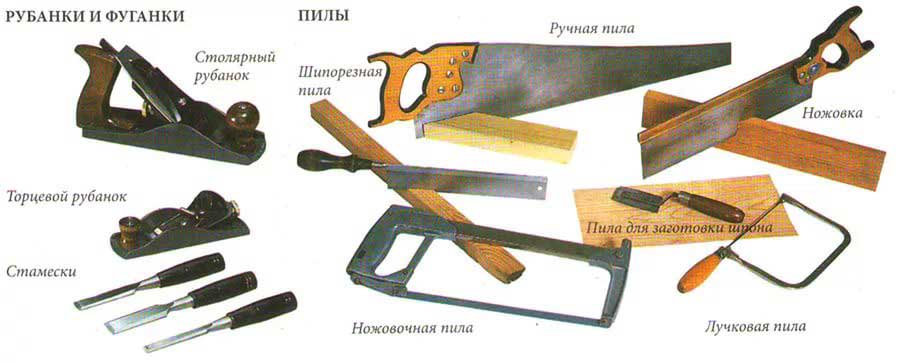
For more “fine” work in the process of making a table of unusual shapes, external design, special devices will be needed.
El / jigsaw. With a conventional saw, it will not work to make an inclined vertical cut, accurately maintaining the angle. The canvas will “play”, and therefore the quality of the work will be extremely low. The electric jigsaw is universal in application, besides it gives high accuracy in cutting wood or cuts in it.


Many of the listed fixtures can be rented if furniture making is not a hobby, but a necessity.
Impregnation and other compounds
Rotting protection:
- Working off engine oil is an effective, moreover, free tool. But not for dinner tables.
- Linseed oil. A natural and effective product that penetrates deep into the wood structure and protects it from mold and mildew. Minus - high cost. But if the table is intended for eating - a great option. The drug has no color, therefore, after processing the lumber, it does not leave any traces in the form of darkening, stains, streaks, unlike mining.
- The emulsion is water-polymer. It is characterized by duration of action and safety for health.
- Acrylic varnishes. They practically replaced their predecessors of the "NC" category, as they are harmless and in many respects better than compounds that are diluted with solvents.
- PVA, bone glue and a number of others. More detailed information about carpentry compositions -.

To decorate a tree:
- Colorless varnishes are used not only to protect the material from moisture. With their help, you can save the texture of the tree, shade it.
- Wood stains.
- Varnishes with a coloring effect (toning).
- Paints (but only for wood!).
- Putties.
Using a colorless varnish and pigments, you can make a coloring composition, and of any shade. It is enough just to correctly determine the proportion of components. This is easy to do by experimenting with mixing and applying a sample to a rejected board. This will allow you to choose an acceptable tone. More than expedient, since it is not always possible to buy exactly what you need on the market.
Fasteners
All tips for assembling a wooden table with nails (the argument is simple, fast and cheap) are best ignored. The reasons are as follows:
- A nail easily pricks a dry tree (and this is exactly what is taken; more on that below).
- Correctly directing his leg (strictly vertically) is quite difficult. In some cases, it is even more difficult to redo your oversight.
- A tree, even the most protected from rot, eventually succumbs to it. The maintainability of a table knocked down with nails is extremely low. Practice shows that it is rarely possible to remove such fasteners without damaging adjacent structural parts. As a result, instead of the planned replacement of one element, 2 - 3 will have to be changed.
- When assembling a wooden table, if one glue is not enough, you should use only self-tapping screws.
- Sometimes its individual parts (at the joints) require reinforcement. It is not advisable to strengthen the strength with a hardware with a thicker and longer leg. The reason is the same - the probability of splitting the tree. For these purposes, metal strips, brackets, corners are used.

Features of the choice of wood
Someone focuses on the cost of lumber, another is important for the resistance of the tree to decay, for the third - its texture. What can you recommend to a novice furniture maker? Do not use for the table, unless it is intended to be installed somewhere in the back room or garage, the same type of wood. This is exactly what many novice "craftsmen" do, picking up the same type of boards and bars from what is left of the construction or repair and gathering dust in the barn.
When making a wooden table for living quarters, verandas, and so on, you need to take into account the properties of individual species. Naturally, if there is not enough experience in assembling furniture, you should pay attention to cheaper wood. The first table (chair, stool) in life is just a kind of training in manufacturing, gaining experience.
Tabletop. Here in the first place - strength and minimal absorption of moisture. It is on this part of the table that something is constantly spilled. The best choice is pine, larch, oak (although the latter is more expensive). Thickness - at least 3 cm.If the dimensions of the countertop are small, then wood-based slab products (OSV and the like) can be used. But only with lamination to prevent swelling of the material when liquid enters the surface of the table. For example, LDSP.

In the furniture industry, low-grade lumber is not used. This is not economically feasible, since pre-treatment of wood increases the duration of the production cycle. But in the manufacture of something, wood of lower grades, substandard - just right. The same pallets left after using stacks of foam blocks or bricks.
And not just because it's free or relatively cheap. Many of the disadvantages of such wood with a competent approach can be turned into pluses. For example, after coating with a colorless varnish, the countertop acquires a unique original look.

The main thing is that the boards do not have obvious defects in the form of rot, cracks, falling knots and wormholes.
If pine is chosen for the countertop (this also applies to many other conifers), then you need to pay attention to the location of the annual rings. These arcs are called humpbacks. The cuts of the boards show how they are oriented, and this is taken into account in the process of laying them in a row. Samples obtained by the tangential sawing method are arranged in alternation (top top down, the next one up); radial cutting - the same way (with arcs in the same direction). The nuance is insignificant, but it is the observance of this recommendation that eliminates the risk of warping and splitting of the boards.

For furniture, if you think about its durability, you should take only dry lumber. During the drying of the wood, it will deform; this is a natural process, and its consequences in the form of twisting, warping, bending are inevitable. Such a table will quickly begin to warp, and you will have to deal with its repair. And here you need to decide whether to purchase high-dry wood or rid it of moisture yourself. The first option is simpler, but such a tree is more expensive. The second will cost less, but there are a number of purely technical difficulties.
- Firstly, it is necessary to ensure a stable temperature regime in the place where the blanks are stored. Changes in its value will lead to uneven evaporation of moisture, which will negatively affect the strength of the tree.
- Secondly, good ventilation must be organized.
- Thirdly, and, perhaps, this is the most unpleasant moment - you will have to wait, up to about six months, depending on the initial moisture content of the tree. But this is not a guarantee that the result will be expected; Even this takes practice.
This once again confirms the idea that when starting to make wood furniture for the first time, one should focus on the simplest table for household needs from cheap lumber, without pretensions to its sophistication and originality of design. For example, for a barn, garage and the like.
Variants and schemes of wooden tables
It should be noted right away that any work related to the design and self-assembly is a creative process. There are no stereotypes in this business, so you can only take the model you like as a basis, and everything else - linear parameters, shape, manufacturing specifics - depends on the purpose of the product and your own imagination. Here are just a few examples of what wooden tables can be. For example, for summer cottages, small utility rooms, it is worth choosing structures whose geometry can be easily changed - folding, hiking, hanging, garden, level, and so on.
Tables that are supposed to be used for eating, playing games, as coffee tables for installation in living rooms for a specific purpose, are made stationary, that is, of unchanging size. These assemblies are more “solid”, since all articulated parts are fixed rigidly; no articulated joints.


Features of the assembly of wooden tables
If a person undertakes to make something, then he knows how to use the tool, read the drawings and work with lumber. Such a home master does not need to be taught the basics of carpentry. But a number of nuances in the manufacture of a wooden table will be useful to note. These notes will only help in the process of work.
Let's start with the types of connections. There are quite a few of them, but for a table that is assembled with your own hands, the following are quite enough.
On dowels
In this case, the parts are fastened by landing on the adhesive composition (Fig. 1 - 3).

The nuance is that for the manufacture of "cylinders" that are inserted into pre-drilled "channels", a tree of a denser structure is taken than the elements of the table. This is what ensures the strength of the connections. Before installing them, chamfers are removed from the edges of the dowels and holes.
These round sticks are commercially available, in any furniture store, in several sizes. To grind them, even with a carpentry machine, is a waste of time. It is not recommended to purchase plastic dowels for the table; they are used for collapsible connections. For example, frame furniture (walls, multi-level racks, etc.).
Nails should not be used to fix table elements (Fig. 4). Metal and wood differ in the degree of thermal expansion. Such a connection will not last long - a “shat” will begin, especially if the table is intended for installation on the territory or in an unheated room.
On the tsargs
It is advisable to make such connections if the table has to be either periodically disassembled, or without it it cannot be moved through the doorway. Although not all kings involve the dismantling of the structure. The most practiced options are shown in the figures.


Bolted
Such connections are mainly used for garden or outbuilding furniture; for utility tables. An example is shown in the figure.

The nuance of working with fasteners
In order for the self-tapping screw to be easily screwed in and “go” in the right direction, a hole is first made at the point of its installation with a drill, with a diameter slightly smaller than the fastener leg. The main thing is to maintain the coincidence of the center lines, that is, to prevent skew. In this case, for the "landing" of the self-tapping screw, you can do without a screwdriver.

Features of wood processing
Everyone knows that a planer is used first, an abrasive with a large grain, and then a fine one. But sometimes it turns out that the last stage, grinding, has to be done repeatedly. Here much depends on the type of wood and the degree of its drying. After applying the first layer of varnish, the villi may “stand up”. Nothing wrong with that. You should wait for the workpiece to dry and repeat its processing with an abrasive. The work is painstaking and takes time. But it is by this technique that you can bring the "problem" wood to the ideal "smoothness".
To eliminate the risk of injury to a person, all edges and corners of the table should be slightly rounded.
Features of the exterior
- Minor defects in the form of cracks, chips are eliminated with a putty composition.
- After sanding, all wood dust must be removed. In this case, an ordinary household vacuum cleaner with an appropriate nozzle will help out. After such cleaning, it is recommended to wipe the entire table with a slightly damp cloth, let it dry and repeat the cleaning of the remaining dust. After that, you can safely proceed to applying stain or varnish - there will be no “pellets” on the tree.
- You can give originality to the table not only with the help of curly cutouts, an unusual shape of the tabletop or legs, a combination of textures of different species, and so on. One of the good options is art painting.
And finally. Work on the independent manufacture of something from wood (the same table) is just the initial stage in mastering the skill of the “assembly designer”. Having worked out the technologies, techniques on wood, having acquired the necessary skills, it is enough just to switch to other materials - metal, plastic, glass. So the benefits of a wooden table made according to even the simplest drawing (apart from the pleasure of working and saving money) are obvious - not wasted time.
If you dream of having a good time on your personal plot, then you just need a large table that can accommodate a company of your friends and relatives. And you can do it yourself, spending quite a bit of time on it. In some cases, you may need an assistant, sometimes an extra pair of hands will not hurt.
This article is a detailed step-by-step instruction for making a wooden table for a summer residence.
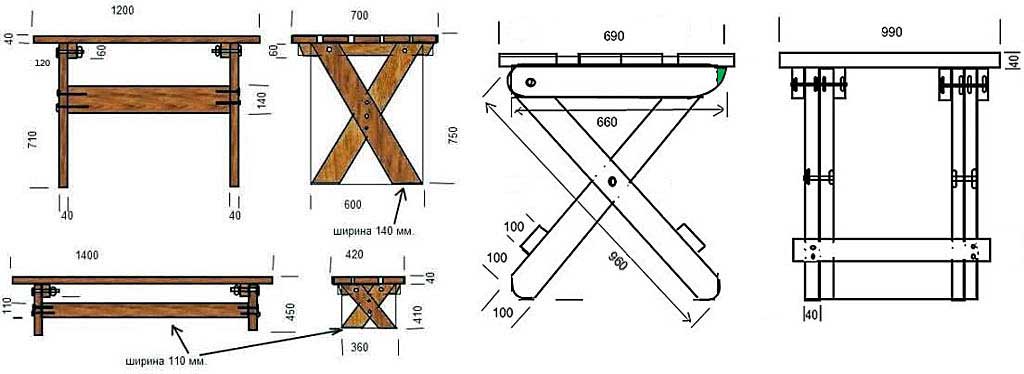
So that you have a choice, we offer you four options for country table projects at once - two ordinary picnic tables, a table with benches, which are a single structural unit, and, finally, a round table. You must think through all the details in advance and choose the type and size of the table that suits your needs and matches the style of decoration of your backyard.
Folding picnic tables - mobility is paramount
Folding tables are very convenient, and most importantly, practical and simple. They don't take up much space. At any moment, such a table can neatly fit folded into the garage, and if necessary, move again to the street. Furniture mobility is especially appreciated in small areas.

How to make a garden wooden table with your own hands
A dacha is the place where a master wakes up in a person, a carpenter, a carpenter, a gardener, in general, a master. Buying furniture for a suburban area is a simple matter, but not everyone can make a wooden table for a summer residence with their own hands. You should immediately be ready to make a garden table with your own hands for several days. But the tips below will help you make a solid table yourself.
Today we will design a fairly simple country table with our own hands in the Provencal style. Such tables not only look great, but also have a fairly reliable design. It is worth paying attention to the boards. They must be even, since the appearance of our country table will directly depend on this.

When designing a table for a summer residence, it is necessary to prepare lumber in three dimensions:
- Bearing frame - section 38 X 90 mm.
- Tabletop - section 38 X 140 mm.
- Supporting bars - section 19 X 64 mm.
- Drawing
Before starting work, the most important thing is to find it on the Internet, or to independently make drawings of a table for a summer residence with your own hands. An accurate schematic designation will allow you to select lumber that will be most suitable in cross section to the dimensions indicated on the diagram. It doesn’t matter if the dimensions don’t exactly match each other, because you can always make an adjustment with an electric planer.

- Material preparation
When deciding how to make a garden wooden table, approach the issue responsibly, as the life of the furniture will depend on this:
- purchase of blanks. Professionals advise to purchase lumber from coniferous trees, which was previously well dried. Its main advantages are:
- price;
- simplicity and ease of processing by hand;
- beautiful structure;
- glue for furniture;
- 4 X 65 mm screws;
- 3 mm drill;
- drill;
- tape measure, pencil, sandpaper for grinding.
- Further actions
We will need:
- two upper transverse beams, dimensions 38 X 90 X 978 mm;
- four legs for a country table with your own hands, size 38 X 90 X 695 mm;
- two bowstrings - 38 X 90 X 921 mm;
- one longitudinal lower and one upper beam - 38 X 90 X 1575 mm and 38 X 90 X 1473 mm, respectively;
- two pieces of braces of 38 X 90 X 772 mm;
- blanks for countertops - seven pieces, size 38 X 90 X 2337 mm;
- six support bars - 19 x 64 x 432 mm.
Tip: Start work on a level surface. It is imperative to observe the angles of joining parts. The blanks, which will later become the legs of our country table, should be cut on both sides at an angle of 10 °. The slices must be parallel. But the blanks of the bowstring, which are similarly cut at the same angle, should be cut one towards the other.
Stage 2. The legs of our country table should be attached to the cross beams and fasten this entire structure with screws. Each connection has two screws.

We fasten the bowstring diagonally to the leg from the inside, fastening the structure with two screws in the same way.
The lower beam must be connected to each other by both bowstrings. As mentioned above, with the help of screws.

Further, in the upper longitudinal and transverse beams, holes are first made for a fastener, called a dowel, after which we again diagonally connect the blanks of our country wooden table with the available screws.

Tip: when connecting all the elements, use glue for extra strength. Remove excess immediately.
We plant the braces on the screws.

Tip: workpieces intended for braces should first be cut at an angle of 45 degrees
Do-it-yourself blanks for the table top are fastened with screws to the transverse beams.


How to make a rectangular table for a summer residence
After developing a work plan and approving the drawings of a table for a summer residence, purchase all the materials needed for this project. Choose outdoor woods such as pine, cedar, mahogany, or pressed wood. When buying, check each board: they must be perfectly even and without any visible defects. Do not save on the quality of lumber, because your structure will have to withstand all the weather.

There are several important points that you must take into account if you want the result to be of a high professional standard. Do not forget about the accuracy of measurement and the use of professional tools when cutting boards and bars and drilling holes. To increase the reliability of the design, you can additionally use waterproof glue to fasten the parts. Round open edges with a router or sandpaper.
Attention! Sizes are converted from inches and may not match metric measurements. Choose lumber that is as close as possible in size. Or just customize yourself.
Tools needed to implement the project:
- hacksaw, jigsaw;
- milling cutter;
- drill and drills;
- chalk cord, tape measure, spirit level, pencil;
- safety goggles and gloves.
Time:
- From one day to a week, depending on the chosen project. If you have power tools at your disposal, you can finish the job even faster - in just a few hours.

Adviсe:
- A milling cutter will help smooth the edges of wooden bars and boards.
- Before screwing in screws and self-tapping screws, drill guide holes in the wooden structural elements.
- The heads of the screwed self-tapping screws should not protrude above the wooden surface, and for this the inlet parts of the holes must be countersinked.
- Do not use cracked or warped lumber.
- Do not apply excessive force when tightening the screws, otherwise the wood may crack.
DIY picnic table. Step-by-step instruction
Materials:
- A - Legs: bars 5×10 cm, 106 cm long (2 pcs.), 43 cm long (2 pcs.) and 56 cm long (2 pcs.);
- B - Frame: bars 5 × 10 cm, 87 cm long (2 pcs.);
- C - Table top: boards 5×15 cm, length 180 cm (6 pcs.);
- D - Table top base: boards 5x15 cm, length 87 cm (2 pcs.), bars 5x10 cm, length 62 cm (2 pcs.).
The first stage of the project is the manufacture of table legs. Saw off the bars of the required size. To speed up the process, you can use a circular saw. Smooth out the edges of the bars and saw-off lines with sandpaper.
Connect the bars so that you get an X-shaped structure, and fasten them with 60 mm self-tapping screws, remembering to pre-drill the pilot holes. Lubricate the joints with glue. Make sure there are no cracks or gaps left.
Fasten each pair of legs with a horizontal bar using 60 mm self-tapping screws for this purpose. Cut off the ends of the bars, as shown in the figure.
Lay the boards intended for the manufacture of countertops on a flat surface. We advise you to place pieces of 6 mm plywood between them, this will allow you to form uniform gaps. Place the assembled table sides on the table top and secure them by screwing in the self-tapping screws at an angle of 90 mm. Before fixing, make sure that the legs and the tabletop are perpendicular using a spirit level.
Place the sawn pieces of 5x15 cm board on the underside of the table top and fix them with 60 mm self-tapping screws.
Saw off the ends of the bars, which will act as reinforcing supports for the structure, at an angle of 45º. Install the supports in their place and secure with 90mm self-tapping screws at an angle.
And finally, last but not least: check if the heads of the screws protrude above the wooden surface, and fill all the cracks and holes with wood putty.
Tip: To protect wood surfaces from the damaging effects of atmospheric moisture, coat them with several coats of exterior paint or stain.
Table with benches. Instruction with drawings
Materials:
- A - Legs: bars 5x10 cm, length 95 cm (4 pieces);
- B - Crossbeams: bars 5 × 10 cm long 160 cm (2 pcs.);
- C - Tabletop fastening: bars 5×10 cm, 75 cm long (5 pcs.);
- D - Inclined supports: bars 5 × 10 cm long 84 cm (2 pcs.);
- E - Worktop: boards 5×10 cm, length 180 cm (14 pcs.).
It is worth starting work with the manufacture of legs. Since the legs of this table will be inclined, the ends of the 100 cm long bars should be cut at an angle of 30º. Connect the elements with 90 mm bolts.
Make sure the surface you are working on is fairly level. The mounted sidewalls of the table must be identical, only in this case you can hope for an excellent end result.
When the sides of the table are ready, you can start making a wooden table top. We recommend that you put it together on the ground (floor), and then fasten it to the legs with self-tapping screws.
Tip: Remember to check the verticality of the side walls of the table with a spirit level, otherwise the end result of your work is unlikely to satisfy you.
Rigidly fix the entire structure with inclined supports. Their ends must first be cut at an angle of 26º.
Now it remains only to build benches. Saw off the boards of the desired size, place them on both sides of the table and, having previously drilled several pilot holes at a distance of at least 1 cm from the edges, secure with self-tapping screws.
Tip: To keep the seat boards evenly spaced, place studs or pieces of plywood between them before fixing them. Thanks to this little trick, all the gaps will be the same.
At the end of the work, pay attention to small, but very important touches. Fill all cracks and holes with wood putty. After the putty has dried, sand the wooden surfaces with medium-grit sandpaper.
Tip: Be sure to apply several coats of paint or stain to protect wood surfaces from water and sunlight.
Round table. We do it on our own in the country
Materials:
- A - Base: bar 5x10 cm long 102.5 cm (1 pc.) and 47 cm long (2 pcs.), bars 2.5x10 cm 9 cm long (4 pcs.);
- B - Racks: bars 10 × 10 cm, 60 cm long (4 pcs.);
- C - Tabletop base: 5x10 cm bars 82.5 cm long (1 pc.) and 52.5 cm long (2 pcs.), 2.5x10 cm bars 47.5 cm long (4 pcs.) and 60 cm long (2 pcs.) ;
- D - Tabletop: boards 2.5×15 cm long 195 cm (9 pcs.).
The first stage of the project is to create the base of the table. To articulate its constituent elements, use waterproof glue and self-tapping screws. Make sure that the corners formed by the joined beams are straight. To protect the assembled table base from rotting from rainwater, place it on small stands made from 2.5x10 cm board scraps.
Now you need to attach four posts made of square bars to the base. Before fixing, make sure they are vertical with a spirit level. The height of the legs may differ from those proposed by us, in this case, you should, first of all, focus on your own needs.
The most difficult stage of the project is the manufacture of countertops. Place the boards on a flat surface and mark the center of the square. Fasten one end of a 60 cm rail at this point. Rotating the second end of the rail, mark the outlines of the circle. A jigsaw with a sharp blade will allow you to make circular cuts at a high professional level.
After sawing the boards of the future tabletop, we recommend that you fasten them together with waterproof glue and additionally fix them with a few clamps. Attach the bars that serve as the base of the tabletop, as shown in the picture (yellow elements should be made from 5x10 cm bars, green - from 2.5x10 cm bars).
Tip: Use waterproof glue and galvanized self-tapping screws (30mm self-tapping screws for 2.5x10cm bars and 50mm screws for 5x10cm bars) to fasten the bars to the countertop.
After the glue has dried, you must attach the legs to the base of the tabletop with 90mm self-tapping screws, pre-drilling pilot holes. Use a spirit level to check the perpendicularity of the legs and the tabletop.
To ensure that the result of your work corresponds to a high professional level, make sure that the heads of the self-tapping screws are recessed deep enough. Cover all cracks and holes with wood putty, after it dries, sand the surface with sandpaper.
Tip: Apply several coats of outdoor paint or wood stain to protect the table from moisture damage. To ensure that the base supports are also untouched by water, place the table on a concrete surface and insulate them hermetically.
Now you know how to make your own picnic table. One has only to make a little effort, which will subsequently be rewarded with enthusiastic exclamations of friends and pleasant summer evenings spent with the family at a large table.
How to make a table for the country. DIY garden table and benches. We will talk about installing a new table with benches in the garden at the dacha. To unite the family, it was decided to carry out the installation of a new table by collective efforts. The old wooden table, according to the rapidly erected scheme, ceased to suit, it had to be updated every 5-7 years. In the construction of the table and benches, new and traditional building materials were used - metal and wood. The table turned out to be reliable and, in comparison with the previous options, it will last a long time. Detailed step-by-step instructions with photos and videos are provided.
How to make a table with benches with your own hands

The design of the table has been worked out by collective efforts, taking into account material possibilities, skills and the availability of tools. The table is made and probably the choice of design option is no longer worth discussing. The old table was built of wood. Raw poles were buried in the ground in the open air and bench boards and tabletops were attached to them. The lifetime of the pillars is 5-7 years, depending on the thickness, the boards withstood up to 10-12 years. The table and benches were actively used from April to early October. The table and benches were exposed to precipitation in the form of snow and rain all year round. The new table is made on a metal frame, and the flooring of the table and benches is made of boards. The boards are dismantled in October and removed to a protected place, and in the spring they are fixed back to the frame. In this way, the life of the flooring and the entire table is extended. For critics, I want to say that there is a place to rest under a canopy in the garden ( ).

 Pile "Juventa"
Materials for the construction of the table and benches:
- Six screw piles "Yuventa" for installing a fence, 2400 mm long, head with a section of 50 × 50 mm;
- 10 - 12 edged boards 2000 mm long with a section of 150 × 50 mm, to speed up work it is better to purchase planed ones, pay attention to the thickness of the boards - it should be the same;
- metal pipe of square section 60 × 60 mm, 4 m long;
- metal corner with a shelf 40-5o mm 3.5 m long;
- paint for metal 1 liter;
- yacht varnish 1-4 liters;
- paint brush;
- solvent for paint and varnish 0.5-1 l;
- self-tapping screws for fixing boards 50 pieces;
- cement, sand
Table structure construction tool:
- welding inverter;
- a circular saw;
- laser level, tape measure, bubble level;
- electric planer;
- grinder with cutting and cleaning discs;
- screwdriver with a set of drills and bits.
Instructions for making a table with benches with your own hands


A drawing was prepared to install the table. See photo. The width of the table is 1100 mm (6 boards 150 mm wide and one 200 mm wide). When changing the width of the table, pay attention to the distance between the posts of the bench and the table.
- The location of the table was chosen long ago, under the crowns of apple trees and next to artificial pond with fish. Places of installation of piles are marked with pegs.
- We install piles "Juventa". For this, a device for wrapping was made from a piece of pipe 60 × 60 mm. See photos and videos. In view of the peculiarities of my area, which are detailed during construction on sandy soil, I had to make recesses for each pile. Without this deepening, the pile would have collapsed before it was completely twisted. recess done petrol drill
. The recesses for the piles of the bench are dug at a right angle. And for two table piles at a certain angle towards each other. This is done deliberately for greater stability of the table.

 Digging a hole with a drill
 Piles "Juventa" for the table
 - The twisting of the Juventa piles took place according to the standard scheme. Watch the video. Be sure to control your efforts so as not to destroy the pile until it is completely twisted. In my case, it was a team effort. When twisting, you must try to observe the intended location of the pile and their slope. Small flaws in accuracy can be compensated for during subsequent assembly. See details of work video example
.


 Pile "Juventa" twisted
 - After twisting the piles of the pit covered in layers of sand with humidification and tamping.
- For a long service life of piles, the internal space of the pile is necessary; small-scale mechanization was used. After concreting, we close the heads from the effects of precipitation and let the concrete harden. Immediately it is necessary to clean the piles from contamination.

 Pile concreting
 - We cut square pipes 60 × 60 mm into 4 pieces of 550 mm and 2 pieces of 900 mm.
- We insert the pipes into the pile heads at a distance of 10-20 mm from the ground.
- We weld pipes 60 × 60 mm on the heads, while using the mounting gap, we eliminate the inaccuracies in the installation of piles. Try to install the racks of the benches strictly vertically, and the racks of the table coaxially to each other. Welding was carried out at 6-8 points at the points of contact between the head and the rack. We immediately clean the welding spots from scale.

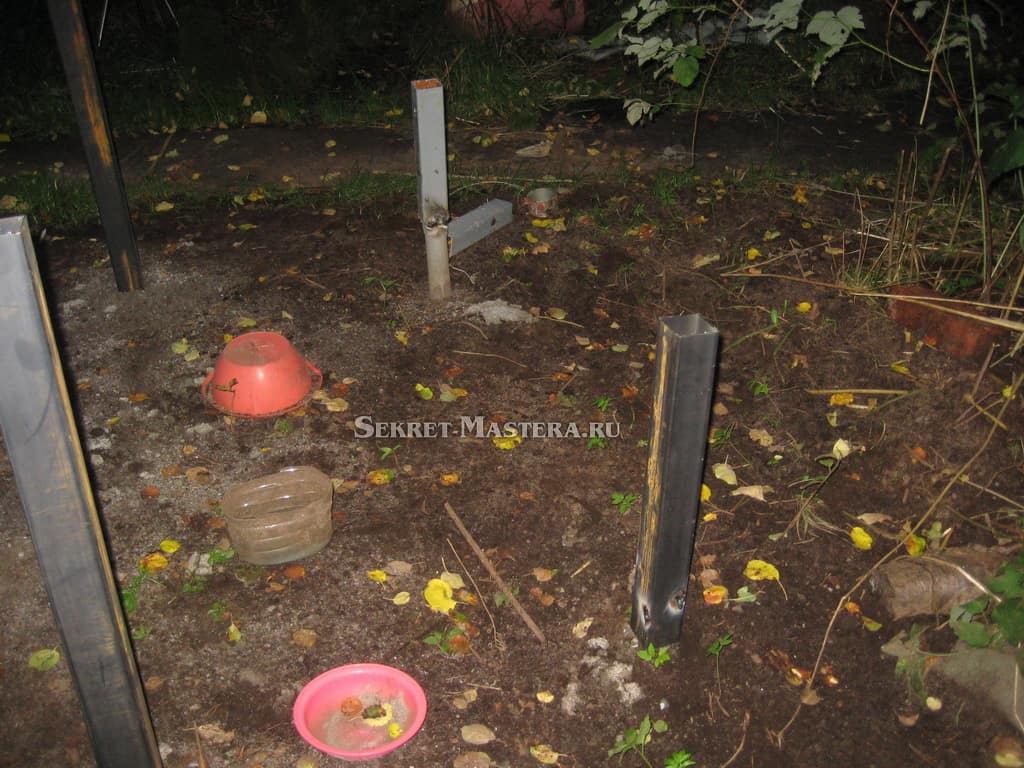 Racks welded to piles
 - mark the pipe cutting lines. Do it exactly. The cutting level from the ground surface of the bench legs is 500 mm, the table legs are 760 mm.
- We cut the racks according to the marking with a grinder with a cutting disc. Cut carefully and accurately. The surface of each cut must be horizontal. Corners will be installed and welded on the ends of the racks.


- We cut corners. The size of the corners for fastening the boards of the bench is 250-300 mm, only 4 pieces are needed. The table will require two corners of 1000-1100 mm (determined by the selected table width). The edges of the corners in the vertical plane are cut into a cone, and all edges are rounded. The surface must be smooth and free of burrs.
- We weld the corners to our racks, controlling the horizontal plane of the shelf along two axes using a bubble level. Just in case, scarves are welded to reinforce the place of welding to the rack. When welding the corners of the benches, you can slightly shift the center of welding of the corner to compensate for errors in the installation of the pile (distance of the table post from the bench post).

 Welding corners
 Corners welded to posts
 - I used boards for the table and benches from the remains of the construction of a frame house. The boards were uncut. Therefore, half a day was devoted to partial planing and sanding of the boards.
- We try on the boards, put them on the corners. The boards of the benches should be parallel to the boards of the table. Boards are marked for subsequent assembly. The position of the boards on the corners is also marked.

 Trying boards
 - We mark holes on the corners for the screws for fastening the boards. A total of 14 holes per table corner and 4 holes per bench corner. We drill holes.

 Drilling holes in the corner
 Holes in the corner of the bench
 Holes in the corner of the table
 - The boards are impregnated with an antiseptic and, after drying, covered with paint or varnish. I covered the boards with yacht varnish.


- Simultaneously with the varnishing of the boards, the racks and corners are painted with a protective paint. To avoid water ingress into the racks, plugs (mounting foam) are made on the ends of the pipes.
What could be better than a summer vacation in your own country house? Indeed, the popularity of this kind of recreation from year to year not only does not decrease, but also attracts more and more people with its accessibility. The dacha for many has turned from a backyard plot with beds and greenhouses into a full-fledged place of rest, a full-fledged culture of country rest is being formed in society. And, you see, what rest without convenient and comfortable furniture? The dacha has already ceased to be a place where all the junk from the apartment is brought, and the arrangement of the dacha requires full-fledged functional furniture created specifically for the dacha.
Advantages of making outdoor furniture

The choice of furniture for a summer residence, of course, will not be difficult, given the variety of furniture that manufacturers offer. But besides the trivial purchase of the items of country interior you like, there is another way out - the independent production of country furniture.
This approach to arranging a country house will not only save you money, but also bring a lot of positive emotions. If you like to do something “with your own hands”, then making furniture yourself will help you realize your creative inclinations, enjoy working with wood, and the result of the work done will be a useful and necessary thing in the household. You can rightfully be proud of the result of the work done, because there is nothing better than to see the thing you personally created. If you are already on fire with the idea of \u200b\u200bmanufacturing country furniture on your own and firmly decided to try yourself in this matter, then, for sure, you are now tormented by a lot of technical issues. But first things first. Let's try to conditionally divide all the questions that concern you into 2 large groups: "what to do?" and “how to do?”.

The answer to the first question is actually the most important. This is the area of strategic planning. You should not take on work that you cannot do, otherwise, instead of the pleasure of work and an excellent result, you will get another headache. If you do not have special work skills and a special tool, you should not take on very difficult work.
An indispensable attribute of a country house is a large wooden table with a set of chairs attached to it. A large comfortable table, at which all family and friends could gather, will never be superfluous - this, one might say, is the basis of a set of country furniture. It is his creation that can be dealt with in the first place.
Material selection

Now it's time to answer our second question. And first of all, you should decide on the choice of material for the future table. Naturally, a person comes to the dacha to take a break from the bustle of the city, to spend some time in nature, so in our table you will refuse all artificial materials that are used in modern furniture. Our table will be comfortable, beautiful and environmentally friendly, and the most environmentally friendly material is, of course, wood. It is from wood that it is best to make a table for giving with your own hands, because in addition to environmental friendliness, wood is also very convenient for processing. After choosing the material, you should focus on creating a table design. To create a table, you can use ready-made design solutions or spend a few hours creating your own original design project. Alternatively, you can use the simple table design shown in the diagram.

Materials and tools for work

After choosing a table model, you should calculate in detail the need for materials to create a table: the number of boards, timber, fasteners and paint. The required materials, of course, are best purchased with a small margin. Before starting work, you must acquire all the necessary tools, preferably electric. Your tool list should look something like this:
- Electroplaner. For primary surface treatment of boards.
- Electric grinder. For "finishing" the surface of the boards, sanding the board.
- Drill driver. It is used for installing fasteners, drilling holes.
- Electric jigsaw. For curved surfaces, cross cutting boards.
- Roller and brushes for painting, hammer, set of chisels.

The assembly order will look something like this. First of all, the tabletop boards are cut and prepared. They can be installed close or leave a distance of 3-4 mm, which is somewhat easier. We fasten the processed boards to two bars with self-tapping screws or special furniture bolts, while the heads of the self-tapping screws must be recessed into the tree. For the manufacture of cruciform racks, we cut the ends of the boards at the right angle, docking the boards is done in half of the board. To select the docking grooves, we perform cuts limiting the groove, and select an extra tree with a chisel or a milling cutter with a “barrel” type cutter. We securely fasten the assembled supports to the tabletop, after which we measure the required length of the longitudinal stiffener. It is desirable to fix the finished and processed stiffener on furniture self-tapping screws, which will allow you to adjust it in the future if necessary. It is desirable to cover the finished product with a natural stain on a water or oil basis.


