Do-it-yourself gander for a well. Do-it-yourself roof for a well
As soon as a well appears on a suburban area, then you need to make a house for it, which would decorate the site and protect the water from dust and dirt. But this way of decorating a structure for some may seem quite expensive, and it is for this reason that sheds for wells are being built.
What can be canopies for wells
In such designs there are no restrictions.
Canopies can be of various shapes:
- Round.
- Square.
- Rectangular.
The roof can be:
- Peaked.
- Rivne.
The flat roof of the canopy may have a slope in one direction or another.
Peaked roofs can be:
- Shed.
- Gable.
- Multi-slope.
- The height of the canopy can be any. As a rule, a height of 1.20-1.50 m is considered the best option. If the canopy is mounted on, then the height may be greater.
Advice. If there is no house around the well, then the height of the canopy should not be large, since there is a possibility of dirt and dust getting into the source if it is not protected by a lid.
The canopy over the well can be installed on the house or built into the ground around the well.
Components of a canopy over a well

The canopy over the well consists of several parts:
- Base.
- Pillars.
- Roof structure.
More:
- The base serves to firmly fix the pillars in the ground.
- The pillars support the roof structure, which is also made from various materials.
The roof is made with modern finishing materials that are resistant to weather and climatic conditions.
Canopy pole base

There are several types of bases that are able to securely fix the posts in the soil:
- Monolithic.
- Columnar.
- Pile.
So:
- A monolithic base is the most durable and rather laborious way to fix the pillars. It is made of concrete mortar and poured around the entire perimeter of the well.
- Formwork is preliminarily constructed and recesses are made in the form of a trench around the source. The depth in this case can reach 30-40 cm.
Advice. The depth of the monolithic foundation depends on what material the canopy is made of. If it is quite heavy, then it is best to do more depth.
- The column base is more economical. It represents pillars that are poured around the entire perimeter at a certain distance from each other.
As a rule, four pillars at the corners of the structure will be enough. They must be connected to each other. Metal pipes or wooden planks are used for this.
Advice. To ensure high-quality dressing of each concrete pillar of the base, special metal fasteners in the form of hooks must be mounted in them.
- Metal pipes are attached to them by welding, and wooden planks can be screwed using special fasteners.
- Pile-screw foundations are very practical. They are able to withstand quite large loads. For this, metal pipes of different diameters or a channel welded together are used.
Such pipes are deepened into the ground by 80 cm.
Advice. It will be mandatory to pour concrete into the recesses of the pillars with a solution to ensure their reliable fixation in the ground.
In order to pour concrete with metal pipes, crushed stone must be added to it. It will increase the hardness and strength of the solution.
All pillars before such work are set strictly according to the building level in order to make an even roof structure for the canopy.
Poles for a canopy and decorative decoration of the structure

Any canopy with different sizes can be made from:
- tree.
- Metal.
- Brick or other stone.
Note. All these materials differ not only in their strength, but also in the duration of operation.
Wooden structures of canopies over the well

A canopy for a well made of wood was built in past centuries. It has a rather attractive appearance.
Used for this:
- Rounded bar.
- Profiled bar.
So:
- Canopy poles are mounted on any base. Their surface can be flat or have various designs in the form of wood carvings.
It is also possible to make a decorative dressing around the entire perimeter of the structure and very often a wooden mesh is used for such decoration. Planks can also be used. - Wooden structures are very durable and practical. They are able to withstand quite large loads. It cannot be said that the tree will be moisture resistant and fire resistant.
Advice. To protect this type of surface from the effects of weather and climatic conditions, it must be painted or varnished.
- It will be mandatory to pre-prepare the wood. It must be well dried and well treated with special means to impart fire resistance and moisture resistance.
Advice. For such structures, it is best to choose a tree that has gone through a natural drying process, as it will have much less internal deformation than artificial drying.
- The wooden structures of the canopy need to be very well looked after. They require quality and regular care. Renewal of paint and varnish layers is carried out every year in the spring.
Advice. For the winter, wooden sheds are best covered with foil or any other moisture-resistant material. In this way, they are protected and they can last a longer period of time.
It is very easy and simple to build a wooden canopy for a well with your own hands and for this you will need:
- Wooden bars.
- Finished wooden elements with various surface finishes.
- Self-tapping screws and nails.
- Electric jigsaw.
- Building level.
Metal structures of canopies
This type of canopy can be presented in the form of free-standing poles, which can be tied together with decorative elements, or can be completely forged using metal rods of various diameters.
The poles of the canopy are mounted with the base by welding. The ligation is done at the top of the structure and can be simple.
Structures of this type:
- Moisture resistant, since the surface and structure of the metal is not able to absorb moisture.
Advice. In wet conditions, metal structures are very susceptible to corrosion. To prevent this from happening, they must be coated with varnish or paint without fail.
- Fire resistant. The metal is not able to respond to the impact of a direct source of fire.
- Wear resistant. They are not able to change their structure under any influence of weather or climatic conditions.
- Practical. The only thing that will need to be done in the care of such structures is regular updating of the paint.
- Very durable, as they can withstand very significant loads.
They have one drawback - the price, which is quite high. This is due to the cost of the metal.
Brick or other stone pillar structures for a house canopy

How to make a canopy over a well with stone pillars?
Everything is very simple. Here you need to initially prepare a fairly solid foundation, since the weight of the entire structure will be very large.
So:
- The laying of stone or simple building bricks is carried out in the usual way. All works are similar to the construction of walls of any design.
To do this, you can use natural stone of various shapes and sizes (rubble) or brick, which can also be of different shapes.
Advice. For the construction of pillars of a rectilinear shape (square or rectangular), a simple type of building brick is used.
For the construction of rounded pillars, special types of bricks are used, which have a certain radius.
- Masonry is carried out using a concrete mortar, which is very easily and simply prepared from sand, water and cement, and there is a specific instruction for this (proportions 2 to 1 or 3 to 1 - sand / cement).
- You can use not only simple building bricks, but also facing bricks, which have similar dimensions and parameters. Then additional finishing will not need to be carried out on the pillars.
- At the top, this type of structure can be tied with metal pipes or wooden beams. It all depends on what material the frame for the roof of the canopy is made of.
You can watch the video in this article with the construction of stone pillars for a well canopy.
Roofing materials for a canopy
To date, there is a huge range of roofing materials that are widely used for the construction of sheds for various purposes.
This is:
- Polycarbonate, which has many options for shades and types.
- Sheet slate, which is a very practical and durable material, and at the moment it is possible to choose its specific shade.
- Metal tile, which is now in great demand and has a similar appearance to a simple ceramic tile.
- Decking - sheet metal, which is also quite popular among roofing materials and is distinguished by its practicality and durability.
The installation of these materials is very different, as they all have different structures. As a rule, self-tapping screws and building brackets are suitable for most of them.
Tiles are laid one on one or may look like sheet metal. It is already mounted a little differently.
When choosing a roofing material for a canopy, it is best to focus on the strength of the structure so that it can withstand the load of the entire roof.
The well house above the water source performs protective and decorative functions. Let's talk about what designs are, how to make it with your own hands from wood and beautifully decorate a well house in the country. We have accompanied the article with drawings, photo and video materials.
Wells are fresh, cool water, as well as decorating the site, especially if the headband is decorated with a beautiful house or canopy. When choosing a design, one should build on other structures: houses, fences, paths, arbors, etc.
Types of well houses
The house above the well can be of open and closed construction.
In a closed one, all sides are protected by walls and ceilings that prevent accidental ingress of precipitation, leaves or other foreign objects into the water. Access to the gate and water is closed by a door that can be locked if desired. Such structures are sometimes insulated from the inside, especially if the winters are harsh and the water level in the well is high.

An open structure is a canopy with open or partially open sides. For safety and protection of water from debris, it is desirable to cover the mouth of the well with a removable cover.
Design and finishing
For the manufacture of well houses, various materials are used:
- wood, straw, bamboo;
- metal;
- stones;
- decorative tiles;
- polycarbonate.
Often several materials are combined in one structure. If after the main construction there are facing, building or roofing materials, then their use will not only make it possible to save money, but also combine the buildings on the site into one ensemble.
Some compatible compositions, see the photo:
 The roof of the house and the shed are made of the same material.
 Holistic composition with a paved platform
 Rustic version, unpainted wood in all buildings
 Imitation under the frame
 Tikhvin Assumption Monastery
 For such a well, you need a castle in the background
 Unified color scheme and style
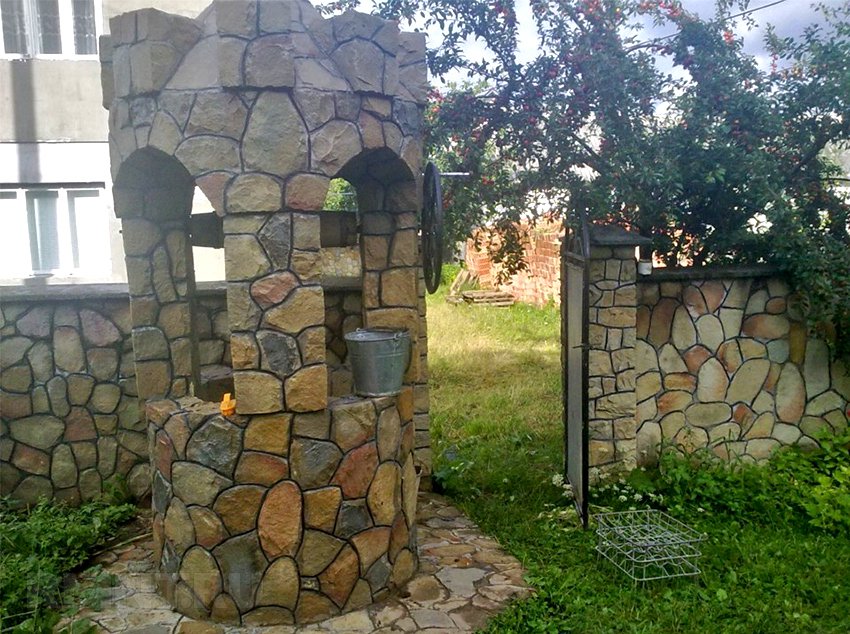
The main material is stone
Most often, the headband is trimmed with stone, and the canopy is made of wood and metal. In this case, the stone can be natural and artificial, as well as stone imitation made of concrete. Sometimes the well tower is entirely made of natural stone, such as sandstone.


wooden houses
Well houses made of wood are the most common and fit into most household plots. For their construction, lumber, logs, driftwood and branches without bark as a finish can be used. Wood is hygroscopic, so it would be right to treat such materials with some kind of hydrophobic agent and an anti-rot agent.


Well houses made of metal
To decorate the well, you can use forged, openwork structures or sheet metal - galvanized, stainless or varnished. Forged products will not be obtained by every owner of a country house, but it is quite simple to make a closed house from sheet steel yourself.


Polycarbonate for well houses
Polycarbonate is appropriate to use when a garden gazebo, porch or awning over a car is made using this material. It pairs well with a metal frame, and can create a certain mood thanks to its color and relative transparency.


Original well houses
The fantasy of designers and craftsmen is sometimes simply amazing. We have prepared for you a selection of the most unusual well houses.


Specific style
If the entire site is designed in a certain, rare style, it can be difficult to find a well house to match it, because most often you can find ideas for Russian or pan-European style. We will give some design options that will be appropriate in such specific styles.
 "Provence"
 "Japan"
 "Middle Ages"
 "Africa"
 "Greece"
 "Fairy Tale" (concrete, Anapa)
Gate design
Russian mine wells are equipped with a gate with a bucket fixed on a chain or rope with a displaced center of gravity (for ease of scooping). The movement of the gate is transmitted by a rotating handle or wheel. Also, the log can be supplemented with “fingers” - protrusions on its surface that serve as levers for turning. The larger the lever arm, the less effort will have to be expended to pull out a full bucket.
For deep wells, it is desirable to equip the gate with a band brake that controls the speed of lowering the bucket.
 Gate with a handle (a) and "fingers" (b)
A gate with a handle is made of a thick log, at least 20 cm in diameter. On the one hand, a hole is drilled exactly in the center along the axis for a blind rod fixed on a support, and on the other, a deeper hole for a metal pin connected to a wheel or a curved handle. The ends of the log can be reinforced with metal plates that are mounted on opposite rods. The log should be tightly planted on the axis.
 Metal parts of the gate with a handle
 Metal parts of a gate with a wheel
 Photo with handle assembly
Making a well house with your own hands
You can make both an open and a closed well house with your own hands. Let's take a look at some easy-to-make designs.
open house
When building an open house, it is important to remember that the canopy should be wider than the opening in the well and protect it from rainfall, which may not be as clean as in the old days.
 Asymmetrical tent over a well
 Symmetrical tent over a well
Let us consider a canopy over a stone well, representing the supports laid down during the construction of the head, and the truss structure, reinforced on the bases with spacers. The larger the area of the canopy, the larger the cross-section of lumber must be chosen during manufacture. The structure is covered with a waterproofing layer in the form of roofing material and finishing or roofing material to taste.
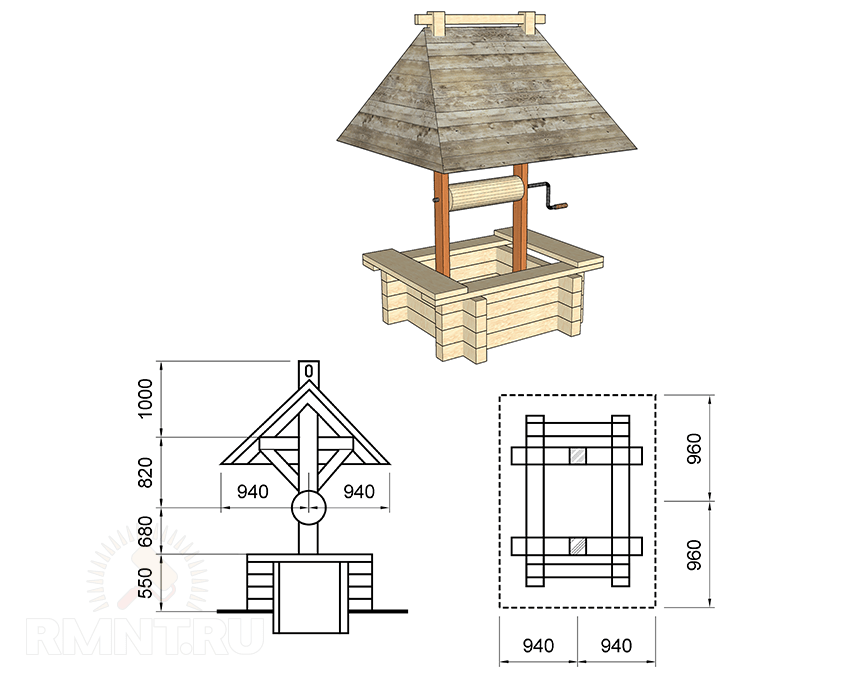
 Drawing with dimensions - a tent over the well: 1 - laying the base; 2 - rafters; 3 - strapping rafters; 4 - clamp for roofing material; 5 - struts; 6 - sheathing rafters; 7 - roofing material; 8 - tiles; 9 - skate; 10 - end post; 11 - end screed rafters; 12 - double rafters under the strut; 13 - columnar support
closed house
We will make a closed house of a simple gable design, with a minimum finish. To do this, consider the drawing.
 Frame drawing with detailing
First you need to prepare all the details, then proceed to assemble the frame according to the attached scheme.
 Frame assembly: 1 - supports made symmetrically (see previous drawing); 2 - jumpers (2 pcs.); 3 - strips forming a square platform (8 pcs.); 4 - skate (pay attention to gashes)
From the ridge to the corners of the site we mount the edges of the future gable roof. Having assembled the frame, we install it on the head.

We sew up the central part, leaving a hatch for access to water. We mount the assembled gate on the supports.

First, we sew up the end walls with a board, and then the roof slopes, in one of which we mount a rectangular door with a handle on hinges. We protect the edges of the roof with waterproofing material.

We decorate the house with carved overlays. You can cover it or other suitable material.
 Finished house
A slightly more complex design and decor during the construction of a fabulous well house in the video below.
Part 1
Part 2
Currently, a well in the country is not a mandatory attribute. If earlier it was the only source of water outside the city, today many owners refuse from the well.
- Building wells requires a lot of manual labor., such work cannot be mechanized. In addition, at present it is very difficult to find experienced and professional craftsmen, and contacting amateurs is at a loss. They may not dig in places where there is groundwater, stop working when dirty subcutaneous water appears, etc.
- Wells require periodic maintenance. Depending on the debit of water and its physical properties, the well must be periodically cleaned of silt and dirt, fallen leaves, branches and other debris. Before cleaning, the water should be completely pumped out, the dirt removed with buckets. The work is dirty and unpleasant, takes a lot of time and effort.
- The quality of water in wells does not meet the requirements of sanitary authorities. Why? For two reasons. The first is that the state of ecology is so depressing that many chemical compounds enter the upper aquifer. And it is from here that water enters the traditional well. The second is that the climate has changed dramatically, in many regions of our country there is a sharp decrease in the amount of natural precipitation, subcutaneous waters are disappearing.

In addition, modern household appliances are installed in the dachas, which work only if there is running water. Moreover, not only its consumption and purity are regulated, but also the working pressure. The solution to the problems that arise is simple - to equip a small well. This gives a guarantee of high-quality water with a practically unlimited debit, the well takes it from a depth of several tens of meters, and there are more underground rivers and lakes. Downhole pumps are installed on the wells, they create the pressure and volume of supply necessary for the functioning of household appliances.
Such features have become the reason that at present, wells are extremely rare near new country cottages. But they still exist, and they need to be ennobled.

To cover the roof of the well, both traditional and modern roofing materials are used.
| Type of roofing | Brief description of physical and operational characteristics |
|---|---|
| Due to the low cost and high manufacturability, soft tiles are very popular with many developers. About 10-15 years ago, this material occupied a leading position among all existing in the construction market. Currently, the number of people who want to have a roof with such a roof has significantly decreased. The reason is that dust accumulates on the surface of bituminous tiles, after 4–5 years mosses and other vegetation begin to grow. Removing it from the roof is very difficult, sometimes almost impossible. The roots of plants destroy the integrity of the base of the bituminous tile and the waterproofing layer, as a result, the tightness is lost, the appearance of the structure is significantly deteriorating. |
| Highly demanded roofing materials. Roofs over wells under metal tiles or profiled sheets are very common. All structures fully meet the expectations of consumers and are recommended by experienced builders. The main disadvantage of metal roofs is a lot of noise during heavy rain or hail. Noise can create certain troubles for those living in houses; for wells, this disadvantage does not matter. The light weight of metal coatings makes it much easier to open / close the doors above the well, and this increases the comfort of use. |
| The traditional roofing material, despite the long and aggressive anti-advertising, asbestos-cement slate still holds a pretty good position. The roof under the slate has many disadvantages: heavy weight, ugly appearance, insufficient indicators of physical strength. Another disadvantage of slate is that it is difficult to work with it, there are difficulties in cutting and fixing. And the last. The surface of the cipher has a lot of nervousness, which causes a rapid accumulation of dust with all the negative consequences. |


Prices for popular brands of shingles
Flexible roof tiles

It is impractical to seriously consider rolled soft coatings, natural stone, piece ceramic tiles and a splinter due to very rare use.
Step-by-step instructions for making a roof for a well
The roof is gable, the total area of the slopes is 2.4 m2, the strapping for fastening vertical elements from a board 50 mm thick. You need to start with the base for the roof (strapping).
Step 1. Measure the diameter of the reinforced concrete rings of the well, give a margin of 1–2 cm.

From a beam 5 cm thick and about 10 cm wide, prepare four pieces, the length of each should be equal to the diameter of the rings in the outer circle.
Step 2 Knock down a square from the segments.

It is recommended to first fix the boards with ordinary nails, and then try on the square on the well. The fact is that concrete circles do not have an ideal shape, you will have to hammer the base into place with a hammer, the nails will allow the dimensions to increase slightly. After fitting, it is necessary to make marks for the position of the base and proceed to increase its strength.

Important. During the strengthening of the strength of the base, carefully ensure that the original dimensions are not violated.
Step 3 Fix the base on the rings of the well. This is a very important technological operation. The fact is that not only the weight of the roof will be supported at these points, they must withstand additional wind and snow loads.

For fixing it is recommended to use durable dowels for concrete. Diameter not less than 10 mm, length must be 50 mm greater than the thickness of the rails. In total, you need to use 8 dowels, two on each side of the square. Once again, we pay attention that the fastening should be as reliable as possible. If in doubt, then it is necessary to provide additional vertical supports in the lower part, fix them with dowels to the rings, and rest the upper end against the structure.
Step 4 Hammer boards approximately 20mm thick on the upper surface of the carrier frame, align it in the same plane with the edge of the ring.

This completes the manufacture of the base, you can proceed with the installation of the roof. The roof consists of several elements, each is made separately and according to its own rules.

Roof assembly
Step 1. Fabricate the vertical supports of the roof frame. The height of the elements is approximately one meter. They should be made from the same powerful beam as the strapping. In the upper part of the supports, a cut is made at an angle of 90 °, 45 ° in each direction from the axis of symmetry. The slats of the frame will lie on the planes of the gash.

The lower part of the supports is attached to the base with metal squares; to increase rigidity, you can drive in nails about 100 mm long on the sides. Drive the hardware carefully, do not allow cracks to appear in the lumber.

Step 2 Attach the sloped roof frame rails to the vertical supports. They must have the same length, fixed with nails or screws.

Step 3 Attach the rail to the roof ridge. It is installed in special slots between the side ones, it is also fastened with self-tapping screws or nails.
Practical advice. After fixing each new frame element, the strength of the structure should increase significantly. Check it with your hands, make significant efforts from various sides.
As soon as staggering is detected, the cause must be immediately identified and eliminated. There is no need to hope that the roof will then become stable on its own, miracles do not happen.
Step 4 Decide on the dimensions of the well doors, at the required distance, fix two stop rails on the facade slope of the roof. On the reverse side, it is enough to nail one bar to fasten the roof lathing. Install it in the middle of the slope.
Step 5 The roofing of the roof will be made of bituminous tiles, a solid crate is required under it, we recommend using a moisture-resistant OSB board. Immediately cut a piece and make a door, you will have to make a special frame for it. Choose sizes such that it freely enters the opening prepared in the ramp.

Practical advice. OSB boards have a smooth surface on one side and an ordinary rough surface on the other. A smooth surface is considered moisture resistant, it is recommended to turn it to the roofing. In wells, such recommendations are not suitable.
The fact is that moisture constantly evaporates from the water surface, when the temperature changes, condensation appears on the roof slopes. Nail the slab in such a way that its smooth lacquered side faces the well, and the rough side under the roofing. There is nothing wrong with violating the recommendations of manufacturers, you must choose the lesser of two evils. In the future, the rough surface of the slab will be carefully and hermetically closed with bituminous tiles, this will not affect the duration of the operation of the structure.


Board nailed over door
Prices for OSB (Oriented Strand Board)
OSB (Oriented Strand Board)
Installation of bituminous tiles
Buy a package of soft tiles. As a rule, it has three square meters, and we need only 2.4 m2 for the roof of the well. It is easy to work with bituminous tiles; an ordinary mounting knife is used for cutting. In terms of the manufacturability of installation, it is superior to metal coatings, it is in connection with this that the material is preferred in our particular case.
Step 1. Open the package of shingles, take one shingle and estimate its position in the first bottom row. Prepare the first shingle. To do this, you need to cut off the petals from it, leaving only a flat strip.

By the way, the same strip then needs to be nailed to the ridge of our roof, you can immediately cut out two parts.
It is necessary to cut bituminous tiles under a metal ruler and preferably from the reverse side. The fact is that due to this position, the knife blade becomes less blunt, it does not constantly scrape over the stone dressing.

Step 2 Start laying shingles according to the manufacturer's instructions, which are included in every package.
To increase the durability of the roof of the well, you can finish the base with any bituminous mastic. But if it is not there, then the roof will serve for a long time, the main thing is not to violate the recommended technology.


Step 3 Sew up the gables with clapboard, take measurements for each board. The roof was made without special respect for accuracy, deviations of 1–2 cm are permissible. During the sheathing of the gables, the gaps close and become completely invisible.

Step 4 Nail wooden windshields along the ends of the roof.

It is advisable to close these places with metal strips and fasten them before starting the installation of bituminous tiles. So the ends of the OSB are more reliably protected from the negative effects of moisture. If there are no metal strips, then slats can also be used, but before fixing them, it is necessary to treat the open ends of the OSB with any waterproof impregnation. It can even be ordinary vegetable oil.
Step 5. Paint wooden structures with durable outdoor paint.

Painting lining and planks
Step 6 Carefully cut the cover along the contour of the door. Do not rush, the cut should be as even as possible.
Step 7 Screw the handle onto the lid.

This completes the process of manufacturing an elementary roof for a well. We have given an example of the simplest execution. You can, of course, make a complex roof with decorative elements, high and large, from expensive lumber, etc. If the well is located in front of the house and plays an important role in landscape design, then such significant material costs are justified. And if it is located behind the house or household outbuildings, then you can pay secondary attention to the design, and give priority to the cost and functionality of the structure. The article gives advice on the manufacture of the second version of the roof for the well.
Prices for popular models of screwdrivers
Screwdrivers
Video - Do-it-yourself house for a well
The roof of the house should protect it from atmospheric precipitation and look beautiful. Bituminous tiles cope with such tasks, which have a number of advantages: reasonable price, variety of shapes and shades of shingles, ease of installation. On our website you can find out that it has served for more than one decade.
It costs a lot of money. In this regard, for most people, information on how to make a house for a well with your own hands will be useful without spending a lot of money.
House functions
Before you build a house for a well with your own hands, it is important to understand its purpose. Its main function is to protect the water in the well from the effects of pollution and direct sunlight. Insects, debris, dust, precipitation, chemicals, or excess heat can render water unusable and roof house allows you to prevent this. Also, the proper arrangement of the house will protect the water from freezing in winter.
The house protects animals and children from accidents that can occur with open wells. In this sense, such structures can be considered as protective structures.
Another function of the house is decoration. garden. If you arrange it, focusing on the rest of the objects of the suburban area, you can achieve the creation of a holistic composition. Such harmony of the external environment always contributes to the appearance of internal harmony, which favorably affects human health.
Design Options
There are several options for the design of the house for the well. Their shape depends on the original design of the well and the materials used. According to the form, all the houses can be divided into several types:
- The easiest to build is a roof house, which is represented only by a gable roof triangular in cross section.
- More difficult to build are houses in the full sense of the word, which look like a quadrangular log house and a decorated roof. In the variant when the well is not made of logs, but of concrete rings, the base may have a round shape.
- The original buildings on the site can be houses - gazebos when the design is open and not completely closed. In this embodiment, the roof rests on two high racks. In this case, the door is made out at the very base, and not in the roof, as in the previous options. The base of such an arbor can be of completely different shapes: an ordinary round ring looks beautiful, and a log house with a square base, and an octagonal house on a well.
Even typical log cabins for houses can look completely different due to different roof shapes. They can be either gable (symmetrical or asymmetrical), or in the form of a pyramid with a different number of faces or in the form of a cone.
The drawing of the house for the well, as well as its further construction, will depend on the chosen configuration. The dimensions of the well house should always correspond to the structure of the well itself: a series of concrete rings or a log structure. Too small a roof will not protect the water in the well from dust, debris and other unnecessary things, and too large a structure can make it inconvenient to use the well.
- In some cases, apply a rock for the foundation. It can be natural or decorative, and the roof in such houses is usually made of. The buildings take on a medieval look and blend particularly well with other similarly designed buildings on the site.
Some well owners prefer to use galvanized steel to create a house. Such buildings are carried out quite simply, but they are not always pleasing with their appearance. It should also be borne in mind that a galvanized house on a well without additional insulation will not be able to protect water from freezing.
Any well is worthy of decoration in the form of carved elements on wooden products, ceramic sculptures on stone buildings or an interesting pattern on galvanized structures.
Instructions for creating a house
When it is decided to build a simple house for a well with your own hands, the step-by-step instructions will look like this:
- Structure frame. They begin to erect it after measuring the diameter of the well from concrete rings - this will become the distance between the sides of the frame. If the well is rectangular or square, the house will be a continuation of the walls. A base frame is made from a bar with a section of 80 * 100 mm. If the house is being built from the ground, and not from the upper ring, then it is necessary to make two identical base frames, which are fastened together using 4 racks of timber. It is better to use nails with a length of at least 100 mm so that they firmly fasten all the details of the structure together. From the center of the upper base frame, two racks of timber are erected, the height of which will become the height of the house. Next, install the rafters from the timber, cutting the ends of the bars at an angle of 45 ° and making cuts in those places where the rafters will be connected to the upper base frame. For the strength of the roof, crossbars and jibs are installed. It is imperative to provide a door in the frame, and it can be on the side walls of the roof (if there is no gate in the well), and on the slopes themselves. For the door, it is necessary to install two beams parallel to the rafters and two beams horizontally.
- Base sheathing. If, in addition to the roof itself, there is a base in the construction of the house, it is necessary to sheathe it with boards, which is easy to do thanks to the already installed frame. Further, the side triangular surfaces of the roof are sheathed with the same boards.
- Log gate. The gate in the well is needed to raise a bucket of water. It is made from a log, from which the bark is first removed, after which the surface is polished. The length of the log should be 30-40 mm less than the distance between the uprights. This is necessary so that the gate does not cling to the side walls when scrolling. Holes with a diameter of about 20 mm are drilled on each side in the center of the end of the gate (log). The same holes are drilled in the side walls. To prevent the wooden parts of the structure from coming into contact with the metal bars, on which the gate will then be held, it is necessary to install metal plates and bushings. Next, one rod is inserted into the wall on the left side, installing the gate, and one on the right, and on the right side, the rod must be bent in a zigzag for ease of use. After that, a chain with a bucket can be attached to the gate.
Owners of private houses and summer cottages often strive to create the most comfortable atmosphere in their yard and use a variety of decorative elements for this. Do not bypass the well. It is ennobled with the help of a house. But the house is not only a decorative element. It performs an important function - it protects the contents of the well from the penetration of various sources of pollution. We bring to your attention detailed instructions (with drawings and dimensions of parts) for creating a house with your own hands (photos and videos are attached).
Since well water is used exclusively for drinking, it should not be contaminated. That is why wells are equipped with special houses that prevent rain and melt water from entering them. These waters can contain garbage, various kinds of waste, such as animal feces, bacteria, fertilizers, and just dirt.
In addition, the house will be an excellent protection against strangers if you close the door of the house with a lock (for example, if the well is located outside your house and you would not want strangers to use it), and it will also protect small family members from a possible threat .
 wooden well house
 In general, houses for wells can be divided into two types: open and closed. The first option can be attributed to the budget. In this case, it is enough to finish the well ring with stone / wood, but metal or wood is suitable for the canopy and cover (depending on how much you are ready to “be generous”). There is only one caveat - in the winter, the water in such a well, most likely, will simply freeze.
If you plan to use drinking water from a well in winter, then you should take care of warming the well house.
Advice. When choosing a design for a well house, follow one rule: its appearance must match the style of the residential building and the design of the site.
To cover the roof of the house, some use wood, others prefer metal. Let's say right away - if you use a tree, then at least once a year you will need to update its protective coating, otherwise the material will darken and become rather unsightly. If you do not want to fool yourself with caring for a tree, then give preference to metal.
The process of creating a structure
Consider the simplest model of a well house, which is quite easy to make with your own hands.
Preparation of tools and materials
Whatever project you choose, it is important to make sure that not only all the necessary materials are at hand in sufficient quantities, but also the necessary tools:
- hacksaw or jigsaw;
- a woodworking machine (if it is not at hand, then a circular saw is quite suitable);
- a hammer;
- screwdriver;
- level, tape measure;
- edged boards;
- timber;
- slate;
- self-tapping screws, etc.
When choosing the right materials, do not forget that the design of the house should not “stand out” from the overall picture: the house and the site. The type of wood or stone should match the materials used to decorate the house. You can use leftover building materials or buy similar ones that were used in the construction of the house.
 Construction of a house for a well
 Construction of the frame and roof
Before starting construction work, it is necessary to take all the measurements and make a drawing of the future house, or find a photo of the finished drawings on the Internet. Remember that even the simplest design should contain the following elements: frame, gables and sheathing, rack, ridge, gate and roof slopes.
It is worth noting that many do not use the frame - the roof is placed directly on the well ring. But for a more complete and aesthetic look, it is better to choose a frame structure, especially since it is quite simple to build it. Consider step by step the process of creating a frame base:
- We make all the necessary measurements. Be sure to measure the outer diameter of the well ring.
- We start cutting down boards and timber: we prepare 4 racks 10 cm wide and the same number of boards for strapping (width about 14 cm).
Advice. You should not use both a massive timber and a board - the structure will turn out to be very bulky, and very thin - the structure will turn out, on the contrary, fragile and unreliable.
- After you finish washing down, attach the strapping parts with self-tapping screws to the racks. Please note that self-tapping screws must firmly connect all the parts together, so use fasteners with a length of at least 10 cm.
- We make roof trusses (we use durable boards, about 4-5 cm wide and at least 1.6-1.8 m long), we use 8 jibs and 3 crossbars. So, we cut the rafters (it is possible at an angle), at the top we connect them with each other with self-tapping screws.
- On the rafters we make small cutouts at the attachment points with the upper garter and fasten them to the frame.
- We install jibs, thereby strengthening the structure. We connect the finished roof trusses with a ridge of two boards.
- We lay roofing material on the finished roof, we mount slate on top. We close the corner joints with wind boards.
Preparation of parts: door and gate
For the gate (spindle) we need a piece of log. Its length should be 4 cm less than the distance between the uprights. In the center of the ends, it is necessary to drill two holes about 5 cm deep. At the ends of the gate, we fix metal plates with self-tapping screws.
We insert a metal rod about 10 cm long into the left hole in the end (its part should protrude outward), into the right hole - a bent rod so that it is convenient to take it with your hands.

We make holes in the racks, insert bushings there and thread the ends of the gate rods. The bushings must be lubricated with grease to prevent squeaking.
Making a door for a house is as easy as shelling pears: we only need a few boards about 20 cm wide (the length is chosen based on the overall dimensions of the house), from which we will make some kind of shield. We connect the boards to each other with small blocks about 2.5-3 cm wide (two will be enough). To give the door rigidity, we fix an additional bar diagonally. It remains only to attach the handle, the latch to the door and put the door on the hinges.
The final stage is the processing of the entire structure with special protective compounds that will preserve the appearance of the house and prevent the wood from rotting.
We examined with you in detail the process of creating a well house with our own hands using a minimum amount of materials and tools. We wish you inspiration and high-quality work results. Good luck!
Well house: video
We also recommend
 How to make a healthy banana smoothie
 Harvesting asparagus for the winter recipes for cooking at home
 Chicken pie with zucchini and cottage cheese Dukan's recipes zucchini pie with cottage cheese
 Gingerbread with icing
 How to cook a salad with crab sticks and carrots
 Cabbage salad with bell pepper - the best recipes