Wooden patterns on the wall. Wood panels for your home: choose the right option
So I want the interior of the house to be cozy and attractive, to have a unique decor. It’s great if your warmth and individuality will be felt in this. Original panels made from improvised materials will decorate the bedroom, children's room, kitchen. It will not be difficult to make them if you arm yourself with decorating ideas and master the technology.
How to make a panel with your own hands from improvised materials
Those who want to make their apartment unique, should make a panel on the walls with their own hands. You will get a lot of pleasure from the process, and the result will exceed expectations. Exclusive decoration will delight not only the household, but will delight friends and acquaintances. To realize your fantasies in the creative process will come in handy:
- wood;
- Photo;
- paper napkins;
- wallpaper;
- threads;
- shells;
- natural stones;
- plastic;
- bottle caps;
- shreds of fabric, leather;
- plaster putty;
- beads.
Use all your imagination by making panels on the walls of your apartment with your own hands. The materials at hand will help you with this:
- pasta of various shapes - decoration of the kitchen;
- artificial flowers and fruits - three-dimensional compositions;
- polymer clay - everyday scenes, bouquets;
- matches - mosaic canvases;
- plant seeds - kitchen panels;
- coins;
- sackcloth.
Photo panel on the wall
You do not have to wonder how to decorate the wall in the room with your own hands if you have a lot of photos in the family album. Travel reports are helpful. They can decorate the living room, children's room, corridor. A panel made as a photo collage in the shape of a heart will look original in the bedroom. For it you will need:
- a piece of white thick cardboard;
- pencil;
- PVA glue;
- stationery knife;
- photo set.

A simple manufacturing method will help create a unique panel, reminiscent of the wonderful moments of life. To make it:
- take a piece of cardboard;
- draw the outline of the future collage;
- cut;
- arrange the photos in the right order;
- first glue the elements along the contour with a slight overlap;
- fill the inner space of the panel with photographs.
Decorative panel on the wall
The original wall decoration with your own hands is easy to do using newspapers. You need a little patience to make tubes - the basis for making panels. Decide in advance how many circles and what diameter you need, choose a color scheme. Of the materials and tools you will need:
- stationery knife;
- ruler;
- PVA glue;
- strong twine;
- acrylic paints.

We begin to make panels in the following sequence:
- we take a newspaper;
- cut into 4 parts in height;
- apply glue diagonally to the sheet;
- twist each strip into a tube;
- fix the end with glue;
- paint the tubes in the desired color;
- twist tightly in a spiral from the center, well smearing with glue;
- alternate colors according to your imagination;
- we make circles of the required sizes, the required quantity;
- fasten together with twine.
A very beautiful and original triptych can be made with your own hands from a piece of elegant fabric. It will decorate the wall of the living room or bedroom, create an atmosphere of comfort and peace. You will need 3 stretchers of different shapes and a piece of fabric. The material should be cut so that the overall composition is obtained. It is necessary to stretch the fabric over each element of the panel and fasten it from the back.
The kitchen is a special place in the apartment, where a cozy atmosphere is especially valuable. To create such a decoration will help, created with your own hands from what is in the cabinets of the hostess. An exclusive composition will decorate the wall and delight the household. Take a wooden frame for its manufacture. Decorate the base with colored paper or burlap. Paste using your imagination:
- biscuit;
- Bay leaf;
- dried fruits;
- seeds;
- pasta of different types;
- cereals;
- used corks;
- coffee beans;
- whatever is in the boxes.
After repairs, small pieces of wallpaper often remain. Mistresses put them aside just in case that never comes. Meanwhile, beautiful bright pieces can form the basis of a wall panel. Made by hand, it will give a unique flavor to the room. To complete you will need:
- foam baguette;
- stationery knife;
- glue for foam and wallpaper;
- acrylic paint;
- ruler;
- pencil;
- level;
- plumb.

Determine the place, and then, using a level and a plumb line, draw the outline of the future panel on the wall in size. Produce in the following order:
- cut off the length of the baguette pieces for the frame with a knife;
- make a 45 degree angle at the edges for docking;
- paint a baguette;
- gently stick on the wall according to the markings;
- measure a piece of wallpaper along the inner contour of the frame;
- glue.
Panel of nails and threads
Decorate the room of a young girl can panel in the form of a heart. You can make it with nails and thread. The base can be cork, wood, plywood or foam. To make a wall panel with your own hands, you will need:
- thin carnations or pins with a beautiful head;
- a hammer;
- pliers;
- acrylic paint;
- glue;
- threads (any quality - wool, floss, iris);
- pencil;
- scissors;
- paper.

The process begins with choosing a base, determining the size of the future panel. The plane is covered with paint, and it is lighter than the tone of the threads. The following actions:
- on a sheet of paper, draw the outline of the heart in proportion to the size of the picture;
- cut out;
- attach the template to the base, circle;
- evenly hammer nails along the contour - the smaller the step, the better;
- tie a thread to one knot;
- stretch it to the nail from the opposite side;
- circle around him;
- continue wrapping in any order;
- glue beads, decorative elements on the base.
from wood
To make an original panel on the wall with your own hands from wood, the base is not required. The openwork design will be fixed on driven nails, its dimensions are about half a meter per meter. To implement the idea, you must have:
- hacksaw;
- cardboard;
- adhesive thermal gun;
- skin;
- wooden bars with a diameter of 0.6 cm, a total length of 5 meters;
- gold paint;
- skewers 30 cm long - 100 pieces;
- black matte spray paint;
When making a panel, follow the following sequence:
- determine the dimensions of the product;
- cut bars of arbitrary length;
- sand the ends;
- glue the bars together - the more connections, the stronger the structure;
- cut out circles with a diameter of 3 cm (flower blanks) from cardboard, one at a wooden end;
- cut skewers of different lengths, 20 pieces per flower, clean the ends;
- stick on cardboard;
- fix the flowers on the rods with a thermal gun;
- paint the entire structure black;
- after drying, highlight the centers of the flowers with gold.

From photos
Original compositions can be created from framed photographs. When creating such panels, it is necessary to take into account important points:
- use only high-quality photographs;
- place large frames in the center of the composition;
- apply different photo sizes;
- frames should match the style of the photographs in shape and color;
- design material should be one.
To create a panel from photos with your own hands, you need:
- determine the place and dimensions of the design;
- think over the composition;
- pick up photos;
- buy frames;
- make a preliminary markup on a piece of old wallpaper;
- cut out the outlines of the frames on them;
- attach wallpaper to the wall, fix with masking tape;
- move the markup of the frame position;
- hang a photo.
Using photographs, you can make a great many different options for decorating walls. For the base, it is good to use boards, plastic panels. You can hang photos in frames using ropes, original fixtures. To make such a panel, you will need to fix:
- a metal tube on the wall;
- photographs within frames with fixing elements;
- the entire composition on the handset.

To begin with, my husband and I bought our first apartment in our life and began to gradually settle in it. Ecodesign inspires me a lot, but we live in a big metropolis, so I wanted to add a piece of nature to the new interior. The first thing that needed to be done for a more or less comfortable stay was to equip the kitchen. After scrolling through a lot of beautiful pictures, I really wanted to make a panel of wood cuts on the wall above the dining table.
Training
I re-read a bunch of sites on how to dry a tree at home, since no one uses fresh saw cuts - they crack badly and can become moldy. To be honest, there is very little information on the Internet on this subject, it is poorly verified, scarce and contradictory. Basically, all the advice boils down to the fact that you need to do this in a production environment. As a result, I chose and decided to try out the two most realistic methods for me: boil saw cuts in oil or in a very concentrated salt solution. I outlined the general procedure: file, dry, process, sand. So, vacation came, we went to the village, and I began to act.
Step 1
Pine trees mainly grow in our area - we used them. Everything is simple here: we saw saw cuts of different diameters and shapes by eye. Something was sawn with a hand saw (it turned out more accurately), something with an electric saw (so the saw cuts along the cut turned out to be very “wavy”). They adapted to cut medium and small diameters with a circular saw: it gave the best result - the saw cuts were very smooth and even - but did not “take” large diameters.
Step 2
Then I selected test cuts and boiled a couple of pieces in oil. I didn't get anything useful out of it. The oil was ordinary sunflower oil: they say you should use linseed oil, but it was not at hand. The saw cuts burned and turned black, but also dried up. The photo shows several ordinary cuts and one black, after oil treatment.
I had no choice but to cook saw cuts in salt. I took a large old vat and boiled saw cuts in a very concentrated salt solution in several batches. Cooked for a long time - from an hour to two, stirring occasionally. All resins rise to the top during boiling, in the form of a black film.
Be careful: one of my pans was damaged - its bottom was corroded by salt in the place of a small wormhole. So use ceramic dishes with a solid bottom or one that you don't mind. And keep a close eye on the process!

Some saw cuts crack badly during cooking, sometimes in half, but there are not many of them. In any case, make preparations in reserve - the marriage will be one way or another.
Step 3
When the cuts were still wet after cooking, I removed the bark - it becomes soft and can be perfectly removed with a knife. Then I laid the blanks on the fabric and dried for a long time (about a week or two) at room temperature for a long time, and then on a warm oven. As a result of this long process, the saw cuts really dried up, and all the resins and moisture were removed from them by salt.

Step 4
When all the blanks were made, I made an approximate version of the panel and selected the necessary ones for polishing. Sanding took 3 days. The husband removed the upper layers with a grinder, and then I brought the saw cuts to mind with a grinder installed in a vise. The work is very dusty, we did it in the garage and on the street. Then all saw cuts were treated with a special impregnation for wood from bacteria.


Saw before and after grinding.
Step 5
For the base of the panel, I used plywood. The sheet was taken of medium thickness: not too thin, so as not to lead, but not too thick, so as not to weigh down the structure. Then I painted the plywood in the same color as the wall where the structure will be attached. In addition, I decided to process the saw cuts again so that the dust does not settle on them so much. I did not want a varnish coating, so for the most natural effect I purchased a natural water-based wax so that the tree “breathed”.

Step 6
I spread the waxed saw cuts on a sheet of plywood, and then glued them one at a time.
Step 7
We fixed the finished panel with self-tapping screws, above the dining table. We really liked the result. I hope you will appreciate it too, and my modest experience will help you if you want to do something similar.


The faster industry develops, the more man tries to get closer to nature. He surrounds himself with nature not literally, but by creating the illusion of being in the air, even if he is relaxing in the living room. This desire is not just to live in a house that is built from natural raw materials, but also to come up with an appropriate interior design. Therefore, everyone strives to use hand-made wood decor in their home in order to feel like a real owner.
The fashion for wood appeared a long time ago, but now not everyone can furnish their own home in the style of the Twin Peaks series. The room should not be oversaturated with wooden furniture, furs and animal heads. This already speaks of the bad taste of the owners. These blanks are available for the forest area, but for the steppe - decorating a house in this style will cost a pretty penny. There is an option to dilute the familiar environment with rare interspersed with wooden saw cuts, which pour into absolutely any image. You can create such a design yourself, spending only on fasteners.
Advantages of decorating the interior with wood saw cuts
Wood saw cuts surprise at the same time with their external attractiveness and the complexity of creation from a technical point of view.
Now let's figure out what advantages wood trim has:
- Durability. If the wood lends itself to proper processing, and is protected from moisture and various mechanical damage, then it will last a long time. If it is a whole wooden wall or floor, then you can save on annual repairs.
- Thermal insulation. Firewood is a source of heat not only in a fire. Raw materials have the ability to keep the temperature, so for a cold concrete apartment this is the best type of insulation, albeit partial. In winter, such an insulated floor will warm any legs.
 decorative tree from branches
 - Uniqueness. You can, of course, glue wallpaper with the image of tree cuts, or lay a laminate, but in such pictures a pattern is used - a simple repetition of one module. Natural saw cut is a composition where each element is unique. The pattern on the saw cut and its shape are unique.
Create a design wall
For decoration, it is advisable to choose one side of the room. The design of all planes is a sign of bad taste, and the room will look overloaded. Any room needs to be given air, and it's not about the windows. It should breathe space, and this effect is given by light empty planes. Only one “woody” facet of the room will become a kind of accent that will become its mood. You can lay out the "tree puzzle" yourself, and now let's talk about how it's done.
Everyone in the yard has an already withered tree that needs to be removed. Now it's time to cut it down. We take a branch, saw it into bars of medium thickness. From the resulting "pancakes" you can remove the bark, and then polish it. Thanks to this, you will not drive the thorn by touching the wall. The resulting wood layers should be treated with a special insect repellent, and then planted on glue. It is advisable to varnish the resulting relief - varnished wood can last a long time.
On a note! Create a composition from branches of different sizes, starting from a massive trunk and ending with the thinnest branches. The composition breathes due to the formed voids between saw cuts of different sizes.
Wall panel - a piece of nature in the interior
You can meet a panel from any components, but you have not seen a canvas made of pieces of wood, right? Here, contrasts are welcome, so feel free to use even hemp. The picture should not look like a pattern, but a full-fledged composition with a dominant and secondary elements. Do tonal gradations, and place accents with the help of tone. Specifically for the proposed product, it is better to leave the bark - it will make it more attractive. The careless terrain will create the atmosphere of an endless forest, and move you into it.
It is advisable to sketch a rough sketch, but if you like to improvise directly in the course of work, then go ahead. For a bright contrast, assemble the frame of the canvas from simple planks, this will give the picture lightness. The saw cuts are sanded from the side that is adjacent to the wall for better bonding. Leave the other side untouched - this will give naturalness to the overall picture. Framed tree cuts in the interior will look like a window overlooking the forest. The frame collects the composition into one whole, and groups it.
Difficulties in laying out a modular floor
This type is quite complicated, so it is better to be patient and get to work. Choose thick trunks to avoid creating large voids when laying out circles. For the manufacture of the floor, hardwood logs are selected, because the floor is exposed daily.
There are two reasons that will make you sweat:
- Solution. If you put all the parts on glue, then the floor will not last long, even if you cover it all with varnish. Modules will fall off due to constant pressure. You will have to use a solution, possibly based on cement.
- Surface leveling. If the thickness of each element does not play a big role in the design of the vertical plane, then this is the main condition for the floor. It is necessary to adjust all the modules to the total thickness, and start grinding after installation. The procedure will take a lot of time, because it is not easy to achieve a smooth surface.
Next, start varnishing the finished surface. It will protect it from pests and external influences. The floor is easier to clean, and it will last longer in a “protected” state. An unprotected surface can be attacked by pests or simply begin to rot due to excessive moisture.
Creating home comfort with homemade furniture
Furniture looks completely different, depending on the type of raw materials available. Tables and chairs are made, since the silhouette of the cut itself already resembles a small table or chair.
There are two main principles for creating furniture:
- Modular - assembly of an element from small parts (modules). Actually, we are already familiar with this method. It allows you to create a product of absolutely any shape. It is also necessary to achieve a perfectly flat surface. Dishes will be placed on the table, and so that it does not turn over, the surface of the table must be perfectly sanded.
- Solid - a solid element is taken as the basis. This option is much simpler than the previous one in technical terms, but it is more difficult to find a bar with a large diameter. Things are better with chairs, and if you want a table at which the whole family would have dinner, you will have to tinker with finding a large diameter saw cut. The price of the overall cut is quite large.
It doesn’t matter which principle you apply in creating a product, the main thing is to immediately evaluate your capabilities so as not to spoil the material. Any method is good, because wooden furniture is famous for its strength and durability.
Ideas for the kitchen based on semicircular cuts
Such a figure is an unusual piece of decor and a reliable assistant in the kitchen. The material withstands high temperatures and does not heat up so much. From saw cuts, you can create simple solid coasters and modular ones, the material of which is easier to find. Everyone saw such coasters in the store, and thought “No, you can’t do this yourself” - an erroneous opinion. Why pay more if you do it yourself?
The kitchen will be complemented by fancy semi-circular shelves that can be put together from solid wood cuts, dividing them into two parts. An illusion is created that the "kruglyashek" is in the process of sinking into the wall. The reception is interesting if the shelf is round, thanks to this, visual movement is created. The effect is achieved due to the dynamic relief on the bark. The shelves will harmoniously accommodate cookbooks, or personal collections of recipes by the hostess. And the product will withstand a sufficiently large weight, even if its dimensions may not inspire confidence.
Remember! If this is a stand specifically for dishes, then it is better to make it whole. Connecting small parts involves gluing, and glue is not compatible with high temperatures. The stand will simply fall apart into several pieces.
Wooden detail as an accent in the interior
Small inclusions of "forest" in the familiar environment mentally bring you closer to nature. Saw cuts in the interior are used as a decor, and perform certain functions.
We create fancy accents with our own hands:
- Clock. The unusual use of a wooden saw cut in any interior looks cute. Especially if it is an uneven circle with bark on the surface. The bark is fixed, because it is able to deteriorate over time. The more casually the wooden “pancake” looks, the more interesting the watch will turn out.
- Flower vases. Let your imagination run wild and use different types of branches. An ornament made of small twigs created by oneself looks expensive, and no one will guess that the vase cost you a penny. It will be in harmony with the design, and will find a response in things with a similar decor.
Remember! There should be few things created from identical material in the room. They should overlap with each other, but not look like "brute force".
- Frames for mirrors. In creating a product, it is important to adhere to rhythm or metricity, but chaos will be inappropriate. Alternate large tree cuts with small ones, or make the entire frame from circles of approximate size. Either option will be correct.
It is quite possible to make a floor from saw cuts with your own hands. Not to mention small interior items that are made in a minute with wood, glue and your imagination. Surprise your friends with a tastefully decorated home and make your life more comfortable. It is an environmentally friendly product that will benefit your health. If the product is made of needles, then a slight coniferous aroma can even help you with the treatment of a cold.
If you can handle the floor, then decorating an entire wall with wood will seem like a matter of five minutes. You will need to use your own taste, and your knowledge of composition, although most people trust their instincts.
Everything will work out, it’s enough just to “assemble” these products and fix them with glue, or just cut out a solid object. Create an image in your head, and try to bring it to life. You do not need special knowledge or skills, follow the basic rules for choosing materials and processing tools. After all, why spend a lot of money on the work of a designer, if you are able to cope with this task on your own without spending a dime.


Most designer interiors are united by one drawback - the lack of warmth and homeliness. Of course, over time, the new interior will take on a habitable look and trifles pleasant for the owners will appear in it, but only hand-made decor can become a real decoration.
In this article, we will tell you how to make a wooden wall panel and describe two ways to make it, and you can already choose which option is closer and more pleasant to you.
Two different wall panels

Wall panels are a decorative element designed to create thematic and semantic accents in the interior. Sometimes even the smallest panel can say more about its owner than a carefully crafted design.
You can make a panel from any materials at hand: paper, glass (see Glass panel on the wall: how to make and hang it correctly) and even pieces of wallpaper. Much more important is the soul invested in the product, and of course, a sense of style. In fact, there are no restrictions on the appearance of the panels, but we will tell you about two ways how you can make them yourself and not infringe on the family budget.
All the wooden wall panels presented below do not require any specific knowledge and skills from you, moreover, you do not even need an ingenious set of tools. Everything you need, for sure, will be found at your place, and even if not, then in a hardware store the price will be no more than a hundred rubles. So, let's start in order.

A very original and stylish wood panel on the wall, which can be made in just a few hours.
To make it, we need the following set of tools:
- Hacksaw. It is advisable to use a hacksaw with a blade for metal work. She has smaller teeth and, accordingly, there will be no chipping video.
- miter box. A tool that allows you to cut workpieces at an angle of 45 degrees. We will need to make a frame or baguette.
- Hot glue gun. By the way, you can do without it if you use not thermal glue, but simple PVA.
- Brushes for varnish or paint. It is advisable to take more expensive brushes, since hairs do not come out of them during work, and you won’t have to, then carefully choose them.
Well, that's basically it. Although you can also include a drill or a puncher in this list, we will need them not to make a panel, but to mount it on the wall.
Now that we have figured out the tool, it's time to prepare the materials we need, and here is a complete flight of fancy:
- Branches of different thickness. It is important that the branches are as diverse as possible. The originality and appearance of our panel will directly depend on this.
- As a basis for our panel, we need a sheet of thick cardboard or chipboard. In fact, it does not matter what the substrate is made of, since it will completely hide under the decorative layer.
- Wooden slats with decorative carvings or baguette. We need them to make a frame. If you have any ideas of your own for its manufacture, feel free to use it. Originality is very interesting.
Advice! If you are using a chipboard sheet as a substrate and PVA as an adhesive, use the side of the sheet that does not have a glossy finish. So the glue will grab much better, and the decorative elements will not move out of the base.
So, first of all, we need to make a frame. What size your wooden panel on the wall does not matter at all. It all depends on personal preference.
A miter box will help to cut the corner evenly. Just put a rail in it and use a hacksaw to cut it along the tool limiters. Thanks to the miter box, the corners will turn out to be even, and the diagonal of the frame will be accurate.
Now lay out the frame face down, and apply glue to the joints. It will take a long time to dry, and at the same time, the parts will have to be constantly held, so it is more convenient to use hot melt adhesive, which hardens in just a few minutes after application.


When the frame is dry, we attach the substrate to it from the inside. This can be done with a construction stapler or small nails.
The foundation is ready, and it's time to take on the most important thing. And first of all, we need to cut nickels from branches of different sizes. It is not necessary to strictly observe the thickness of the heel, the more diverse they are, the more natural the panel will look.
First of all, we place the largest nickels on the canvas. They should not stand close to each other, it is advisable to place them in different parts of the canvas. Now we take smaller nickels, and arrange them just as randomly. Last of all, there are the smallest sections that completely fill all the voids on our canvas.
Look at the work of your hands from the side. All good? Then you can start gluing them. Carefully take each patch and apply glue to it, after which we return it to its place.
After all the elements are glued, it remains only to wait until the glue dries, and as an additional decoration, you can apply a layer of transparent varnish to the entire composition, which will emphasize all the nuances of the tree and make the picture glossy and shiny. That's all, our panel is ready, it remains to hang it on the wall and enjoy the result, and in the meantime we move on to the next, no less interesting option.
Panel-ikebana

Ikebana is the Japanese art of creating artistic compositions from various plants. Strictly speaking, our panel cannot be called an ikebana, since it implies a three-dimensional composition, and a wall panel is a two-dimensional composition. But this is not so important, the main thing is that we will use tree branches as materials, and such a work looks very original.
So, we need a frame or baguette. We have already described its production in the previous section, there will be nothing new here.
Any material can be used as a base, and it can be painted to give a certain style. We will not give any advice on this, as well as on the placement of branches in the composition.
It all depends entirely on your imagination, but there are some general tips and recommendations that you need to follow when making such a wooden wall panel:
- Be sure to cover the branches with paint or varnish. So they will last much longer, and most importantly, they will not lose their appearance.
- If you use bark-covered branches in your composition, be sure to clean the small area where the glue will be applied.. This is necessary in order to ensure reliable adhesion to the surface and so that our work simply does not crumble.
- If you decide to paint the substrate, do not use nitro paint for this.. It will quickly lose its color and the panel will peel off. A good option would be automotive paint in aerosol cans.
- Shoe nails can be used as fasteners instead of glue. They themselves are very small, and when clogging their hats will not be visible.


Important! Never work with spray paint indoors and without personal protective equipment. It is best to go outside for this work, but if this is not possible, then at least put on a respirator and open all the windows in the house for ventilation.
As you can see, the process is very simple, but it is difficult to describe it in words, so we invite you to watch the video in this article, which shows instructions and a master class for making wooden wall panels.
And in conclusion

In fact, this is only a small part of what can be made from wood. A wooden wall panel can be so diverse that your imagination is not limited at all. And most importantly, don't hold back. The more extravagant your work is, the better, the more invested soul will be felt in it, and this is the most important thing for any work of art.
By the way, do not forget to involve your child in the process. This will not only give you the opportunity to spend time doing something together, but will also help the baby better feel the process of creating a work of art, and who knows, maybe one day he will become a famous artist, and it was you who initiated his path.
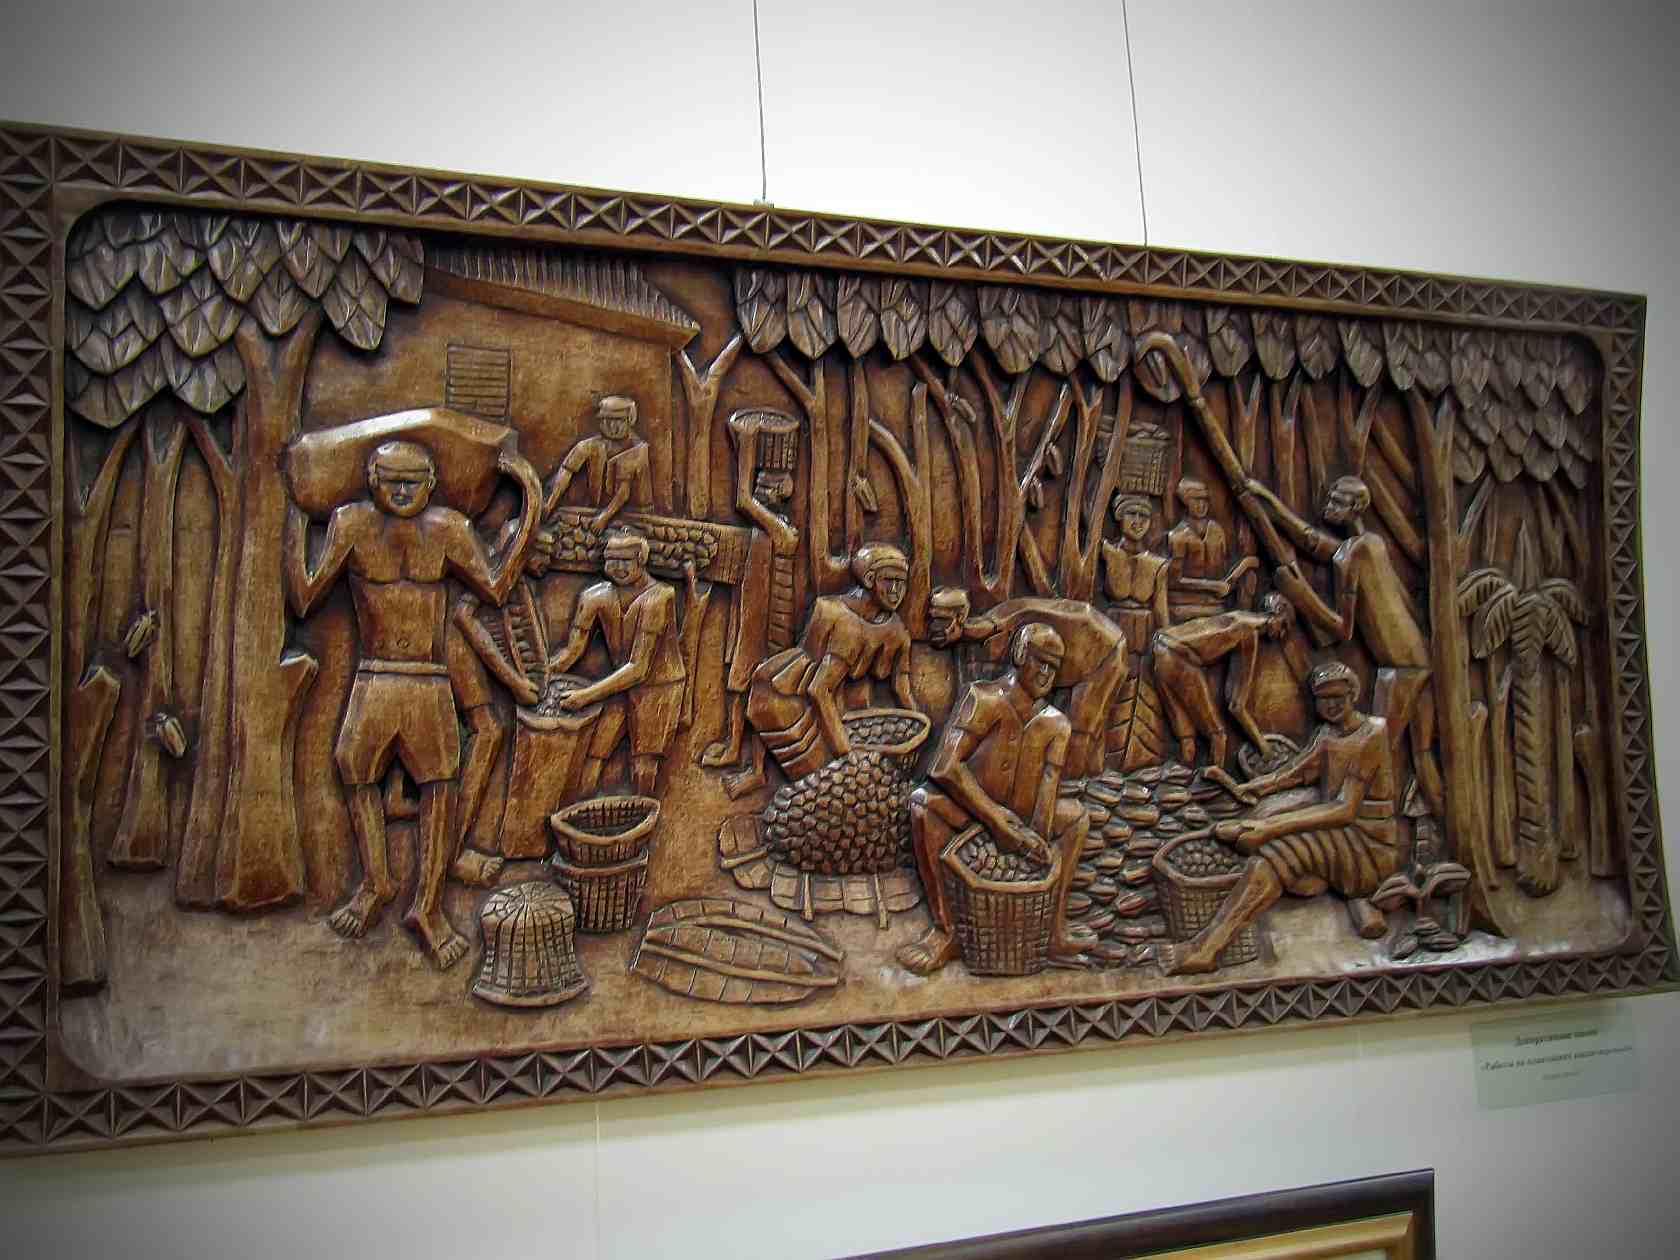
Such products are gaining popularity every year, since it is with their help that you can create the most comfortable, elegant and original design. It is worth noting that if a wooden panel is made according to all technologies, then it can be safely purchased for any interior and regardless of the purpose of the room. For example, it can be hung in the hallway, living room and even in the bath. Modern designers often use exclusive carved wooden panels to decorate offices and halls.
Carved decor paintings made of wood are considered one of the most popular decorations for rooms. By carving a pattern on a wooden plate, craftsmen create the most beautiful three-dimensional images.

In order to make high-quality crafts, you will need to use only durable and noble wood species.
for example:
- Pine;
- Birch;
- Alder.
In the old days, such carved teak or pine paintings were made exclusively with their own hands, and they depicted only pictures from life, as well as images of animals and plants.
A good option is to paint a wooden panel using an ornate painting or a variety of ornaments that use rocks of different shades.

Often, amber and silver are used to decorate carved panels. It is worth noting that the creation of such a product as carved wood panels for a bath and at home is not just a hobby, but a whole art that requires skill, talent and, most importantly, the soul that is invested in work.
Wooden panel from a saw cut of a tree
If it is not possible to buy or create a carved wood panel, then you can choose wall paintings created on a saw cut of trees and branches as decor.
It is much easier and faster to create such paintings on your own, and for work you will need to use a sheet of plywood and frame in the form of wooden branches.
The sizes of such paintings can be very different, from the smallest to the largest.

It all depends on the taste and preference of the customer, or on his own wishes. For example, if there is an opportunity, then it is quite realistic to make a carved panel clock that is suitable for both the hallway and the kitchen and will delight you with the fact that this is a hand-made product.
A panel from a cut tree in the interior of an apartment (video)
Carved wood panels in the interior
It is not so easy to work with wood and create a wide variety of products from it, as you need skills, artistic taste, the ability to correctly emphasize the side and texture of the material, and also create a real masterpiece from it. A carved panel is a picture with a finished image that can be brought into any house and room. Previously, it would seem too easy to use wooden paintings for the interior, but now they are so popular that they can even be found in the design of enterprises and companies.
Naturally, it is worth considering the fact that if carved panels are used in the design of the room, then the rest of the design should be appropriate.
Some of those who prefer to decorate their home with wooden products order a lot of paintings at once and the corresponding decoration of the house.

If you combine such interior items as a massive wooden table, paintings from carved panels and add all this with pleasant warm lighting, then this will be the most attractive solution for creating a beautiful composition.
Esotericists believe that the use of wood products, especially handmade, can create not just a living atmosphere, but fill it with positive energy, comfort and aura of creativity.
How is a carved wooden panel made?
The technology of making a carved wooden panel is not as simple as it seems, therefore, those who wish to immerse themselves in such an activity should fully study in order to avoid oversight.

What should be done:
- Initially, it is worth choosing the necessary picture, according to which the layout will be created, or in other words, the image is detailed using the marquetry technique, in which it is necessary to mark each detail of the picture with its own specific shade.
- After that, you need to pick up veneer and wood. Tracing paper, on which the sketch is applied, is fixed on the veneer, which will become the basis of the canvas with the selected composition.
- The general background is created using details of various types and types of wood, on which the layout of the drawing is transferred.
- With the help of a knife, you need to cut out every detail in order to exclude breakages, chips and notches, and the selection of veneer species is carried out according to the shades and corresponding details of the future picture.
It is worth noting that the details must be cut in size larger than they should actually be. After that, all the elements of the future panel are placed for firing in heated sand or salt, where they are saturated with color and its certain depth.
A selection of parts for the required dimensions is carried out, and each edge of the veneer is smeared with contact glue and a complete picture is assembled.

In order to make a three-dimensional carved image, you will need to use a special cutter, which is used on a finished wooden canvas. At the end of the work, the picture is covered with varnish or special wood paint.
How to decorate rooms with carved wood panels
A carved panel, as well as a three-dimensional picture made of wood or glued veneer, is a great way to create an individual style in the decor of a room. It can become a worthy picture in the living room or office, including in the bedroom, dining room and country houses.

Housewives who prefer to spend most of their time in the kitchen will be able to appreciate such elements as wood panels, as only with them you can achieve the very coziness and comfort. If you add carved wooden stools, benches or a huge round handmade family table on twisted legs to the room, then this will become the most attractive place in the house.
Modern carved wood panels allow even such banal rooms as baths to be made the most unusual and creative, as they cheer up and create a special atmosphere in which everyone will be pleased to be.
The panel for the bath is made of solid wood, and therefore they are not afraid of moisture and high temperatures.
3D wood panel (video)
A carved wood panel is a modern unique decoration that can be made to order and according to your preference. It is important to note that a wooden panel will last for many years and will please with its appearance for many generations of the family in which it will be purchased.
Examples of carved wood panels (photo in the interior)


We also recommend
 Switching power supply: repair and refinement
 Remote control of light
 Swimming lessons for preschool children
 Notes for the master - home household alarms
 Clock propeller on Atmega8
 Device and relay application examples, how to choose and connect a relay correctly Microcontroller and relay simple switching circuits