Frame decor: do-it-yourself secrets of magical transformation (50 photos). How to make a photo frame from improvised means - step by step instructions, decorating tips, photo ideas Do-it-yourself designer photo frames from waste material
A well-taken picture is able to preserve pleasant life moments in memory. Your favorite photo, placed in the original frame, will decorate any interior. A good alternative to purchased frames, the choice of which is huge on the market, can be a unique, one-of-a-kind product that you make yourself.
As a basis for the future masterpiece, you will need thick cardboard, as well as scissors, a brush and a pencil, paints (acrylic, gouache or oil), universal glue and polished peas (whole or in halves).
Creating a do-it-yourself cardboard photo frame is best to start by determining the size of the future frame, which will be 1.5-3 centimeters larger than the picture itself. Cut out two identical blanks from cardboard. Put the photo in the center of one of them and circle around the perimeter with a pencil. Make the inner window a little smaller than the picture: mark and cut it out about 0.5 cm along each edge. On the resulting blank, you need to glue peas (in any convenient way), then decorate the frame in the selected colors and varnish it. From the same cardboard, make a leg for support or an eyelet if the photo will be placed on the wall and glue the prepared element to the back of the frame. Then the two halves (upper and lower) must be carefully glued together.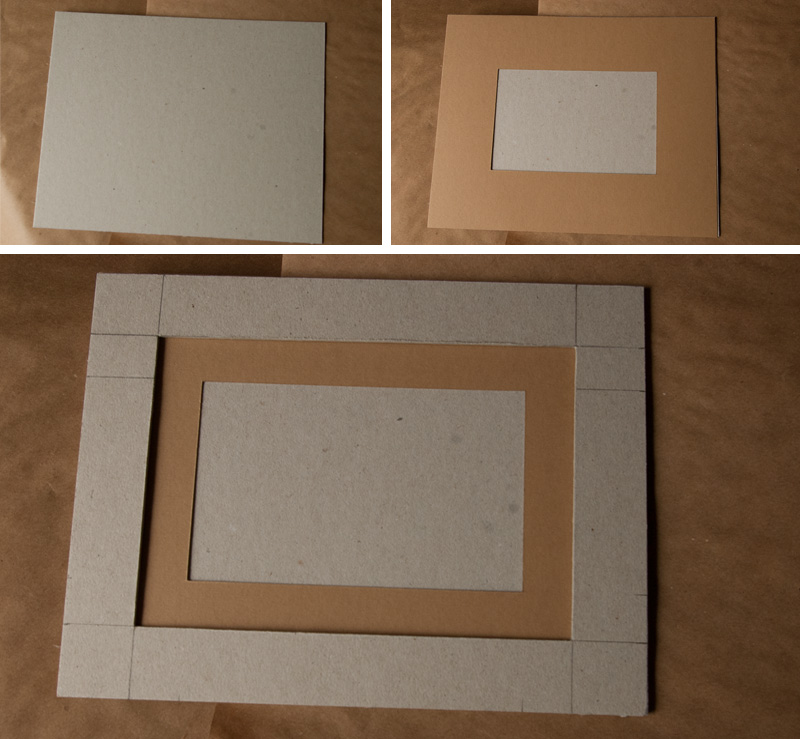
Want to hang your favorite photo on the wall, but don't have the right frame?
The easiest way is to buy it in the store. However, this is not interesting.
Why not make your own photo frames? This is a useful and creative activity that does not require special tools and materials.
About everything in order.
Cardboard photo frame: tools
Creating beautiful frames without the appropriate inventory is problematic. Therefore, collect a minimum set of tools. It should include:
large scissors; stationery knife; PVA glue; simple pencil; adhesive tape; small scissors; fine-grained sandpaper; ruler.
Note: it is advisable to get a cutting mat, it is much easier to mark the details of the future frame with it.
If the color of the cardboard for the frame does not suit you, purchase a can of spray paint. To decorate photo frames, use shells, pebbles, glass, rhinestones, beads, etc.
In addition to the basic tools, the following will come in handy: a paint brush with soft bristles, a spray bottle, water and tongs. They will be required to prepare the material for use.
Photo frames: material preparation
The best material for making DIY photo frames is cardboard. Why? It is cheap and malleable in processing. Every home has at least one cardboard box and glue and scissors.
In its raw form, cardboard is of little use for making a frame for a photograph. Its preparation comes down to the following - separate the top layer so that the corrugated part appears.
Sometimes this is not easy to achieve, since different types of cardboard are made with different amounts of glue and they have different thicknesses.
Learn how to quickly peel off the top layer of cardboard:
- Moisten the part of the paper to be removed. Spread the moisture evenly over the surface with a brush. Wait 2-3 minutes until it is saturated. Use your fingers or a knife to pry off the edge of the layer and try to remove as large a piece as possible. Cut off the remnants. Clean off the dried glue with sandpaper.
The method described above is applicable to large pieces of cardboard, for small ones it is sometimes enough to rub the top layer.
Note: spray water more carefully. If you overdo it, the cardboard will get wet. At best, you have to wait until it dries. At worst, start over.
How to make a cardboard frame: instructions
First you need to decide for which photo the frame is created. What matters is not the content, but the size and orientation of the card (vertical or horizontal). Based on this, proceed:
Step #1. Cut out the base.
From a large piece of cardboard, cut out the base of the frame. Its dimensions should exceed the size of the photo at least twice. Further you will understand why. Using a ruler and a pencil, mark the contours of the future part. Then cut it out with scissors.
Step #2. We make a compartment for photography.
In the middle of the base, draw a rectangle slightly smaller than the photo for which the frame is made. Gently trace along the contour with a clerical knife and cut out the window.
Cut out a rectangle that will cover the photo hole on the back of the frame. Tape the door on one side.
Step #3. We complete the preparation.
Make several cardboard strips of different lengths. Glue four of them around the photo compartment. Use the rest to create the structure of the front. For clarity, look at the figure below.
To make the frame fit snugly against the wall, glue triangles at the corners of the back. They compensate for the thickness of the door and allow the photo frame to hang more evenly.
Making triangles is easy. Cut out one, outlining the outlines with a pencil, and then use it as a stencil.
Step number 4. Decor.
Everything we did before had little to do with creativity. It's time to turn on the fantasy to its fullest. Here is one of the frame design options, but this is just an example, you can come up with your own version.
So, to decorate the photo frame, we use the same cardboard. Take the prepared material with bare corrugation and cut into ribbons. Divide several of them into elements as shown in the figure below.

Probably each of us has photos that we want to keep forever. It is for such photos that you can make a beautiful photo frame with your own hands.
You can decorate your home with a handmade frame or just give it to loved ones.
How to make a photo frame out of cardboard
1. Cut out a rectangle of any size from cardboard.

2. In the middle of the cut out rectangle, cut out another rectangle. Its size should be slightly smaller than the size of the photo.

3. Decorate the frame however you like.
You can use stickers and/or draw something.


You can also draw animals on colored paper, for example, then cut them out and glue them to the frame.
4. Prepare another sheet of paper and cut a rectangle out of it. Its size should be equal to the frame size.

5. Glue this rectangle to the back of the frame, leaving one side untaped so you can insert your photo through it.

6. It remains only to insert a photo!
DIY photo frames. Frame from the pages of a magazine.

This frame not only looks original, but you also don't have to pay a penny for it, since its main element is the pages of a magazine, and any that you can only find at home.
You will need:
Cardboard
Old (unnecessary) magazines
Thread for sewing
PVA glue
Scissors
Utility knife (or scalpel)
Ruler
Pencil

1. Prepare a sheet of thick paper or cardboard about 20x25cm in size. Measure 5cm from the edges of the sheet and draw a 10x15cm "window" in the middle.

2. Cut out the "window" with a utility knife.

3. Start rolling the magazine pages as tightly as you can. To fix them and prevent unwinding, use glue.

4. Prepare your colored sewing thread and start winding it around the twisted magazine pages. Continue until you have many of these blanks.

5. When the blanks are made, start bending them at an angle of 90 degrees in the right places and attach them to the cardboard frame with glue.


6. Prepare a small piece of cardboard for the legs. Also cut out two cardboard strips and glue them to the back of the frame so that you can insert a photo between them.


How to make a beautiful frame. Frame as a gift.

You will need:
Simple inexpensive wooden frame
piece of cloth
PVA glue
Ruler
Glue brush
Scissors
1. Prepare a piece of fabric on which to lay the frame. Cut as much fabric as you need to cover the edge of the frame on the front and back.

2. Now you need to cut out the excess fabric from the middle of the sheet.
3. Lay your frame on a rectangular pattern and cut out squares from the corners, this way you will provide yourself with neat corners.
4. Gently, using PVA glue, stick the fabric on the 4 sides of the frame, but just be careful not to wrinkle it. This must be done on both sides of the frame - front and back.

5. Now make diagonals at the corners of the frame. To do this, cut each corner inside your photo frame. Next, you need to fold the fabric and glue it to the inside.
* There is an option to paste over the back side of the frame with a cloth.
When the frame is dry, you can decorate it with ribbon.
How beautiful to make a frame on a spring theme

This frame is made in the spring theme. She looks gentle and romantic.
You will need:
simple frame
Artificial flowers
Glue gun (can be replaced with PVA glue).
1. Divide the flowers into inflorescences.

* If you wish, you can make flowers with your own hands. To learn how, check out one of our tutorials:
2. This example uses small petals that have been cut out of colored paper. These petals need to be glued to the frame with a glue gun or PVA glue.

* To make it more convenient, try to start gluing the petals from the corner of the frame. Next, gradually fill the frame with petals.
* It is worth noting that the petals need to be glued tightly to each other, so your flower bouquet on the frame will seem more magnificent.

3. Use ribbon, lace, or pretty paper to wrap around the edge of the frame.

How to make photo frames. Painting from photographs.

If you have a lot of favorite photos, but you just don't want to buy a separate photo frame for each, then you will like this project.
Just one large photo frame that can fit multiple photos at once (the size of the frame depends on the number and size of photos)
You will need:
Large picture frame (wooden or plastic; choose your size)
* In this example, the frame size is 40x50cm.
Small nails (can be replaced with push pins)
* You can choose a set of multi-colored push pins.
Hammer
Jute (or any rope to which you will attach photos)
Measuring tape
Clothespins
* You can look for sets of small multi-colored decorative clothespins, or use regular ones, as in this master class.

1. In this example, space was measured for 5 rows of small photos, similar to those taken with Instagram. You measure the distance you need between the photos, both vertically and horizontally.
2. After that you have measured everything, nail the carnations in the right places of the frame on the right and left (or insert push pins) and pull the rope.

3. Gather your favorite photos and attach them to the string with clothespins.

The photo frame is ready!
DIY frames. Flower photo frame.

You are free to choose the color and shape of the flowers, just use your imagination.
You will need:
simple photo frame
acrylic paint
tassel
Dense material (fabric) from which you will cut flowers
Multi-colored buttons, thread, needle
Scissors
Pen
Super glue

1. Prepare the frame and paint it with two coats of acrylic paint. Choose the color yourself.

2. With a pen or pencil, draw the shapes of the flowers on a dense fabric and cut them out. You can decorate them with colored thread and sew a button on top.

3. Now it remains to glue all your blanks to the frame using superglue.


4. Add a photo!
DIY photo frames. Thread wrapped frame.

Another option for a beautiful and inexpensive photo frame.
You will need:
Simple photo frame with smooth sides
PVA glue
Several threads of different yarn colors
Scissors
1. Prepare the frame and put some glue on it. You need to do this in parts, i.e. a little glue should be applied to a small part of the frame and then wrapped around this part with a thread.

2. Start winding the frame gradually with multi-colored threads.

3. Add a photo!
Children's photo frame. Carousel.

You will need:
5 disc cases
10 photos of sizes approximately 12x17cm
10 unnecessary disks
PVA glue
Ruler
Pencil
Scissors
Scotch tape (duct tape is better)
Disc stand
Decoration tools (stickers, colored paper, glitter, etc.)

1. Take the disc out of the case.
2. Insert 2 photos on the left and right into the case. If necessary, crop the photos so that they fit well and look good in the disc case.


3. Using electrical tape or tape, connect several cases as shown in the picture.


4. Get your unwanted discs ready and slide them onto the stand (more specifically, the stem of the stand), shiny side up, to create a slippery surface for your photo cases.
5. It remains only to put a "flower" from the cases with photos on the rod of the disc stand.


DIY photo frame. Ideas.


How to make a photo frame with your own hands (video)
How to make a frame with your own hands
How to make a paper frame
DIY paper frame
DIY children's photo frame
It is difficult to find such a house or office where there would be no place for paintings and photographs. But just attaching a picture or a masterpiece of art to the wall will be ugly, and ridiculous. It was in order to arrange photographs and paintings that frames were invented. With their help, you can ennoble the interior and add comfort to the premises. Now there are millions of options for frames in stores, but it is not always possible to find one that suits your home. That is why we will tell you how to make a frame with your own hands, while spending a minimum of money and effort. You need to start by choosing a design for future crafts.
Deciding on a design choice
What you need to pay attention to when choosing a frame design:
- will it fit the overall interior of the room;
- the frame should be in the same color scheme with the image, and not with the walls;
- the frame should complement the image.

To achieve the desired result, you need to carefully consider the material from which the frame will be made.
Material selection

There are no special restrictions on the material. The only thing that is unchanged is the base on which the decorations will be glued. It should be dense, strong and not soak from the glue. Thick cardboard and, of course, wood are well suited for the frame. Moreover, the wooden frame itself is already a complete craft. It can be opened with varnish and it will be appropriate for any interior.You can decorate the product with any improvised means. It can be pasta, pebbles, clothespins, buttons, beads. But do not forget that the selected material should complement the picture. So, for example, shells are suitable for the seascape, and a pasta frame with the addition of cereals is perfect for the kitchen.


Let's focus on the two main materials from which frames are most often made - wood and polyurethane foam.
wood frame
Wood is a classic material used to make picture frames. Such designs are durable, suitable for almost any picture and room design.

To make a wooden frame, it is not necessary to go to the forest for wood, then process it and cut out the planks. You can go to a hardware store and buy wooden skirting boards there. They are perfect for a product like this.
What you need:
- Wooden plinth. Its length and width should correspond to the size of the picture. Therefore, be sure to measure the picture before buying a skirting board and do not forget that the frame will be longer than the canvas.
- Well sharpened knife.
- Scissors.
- Sandpaper.
- Glue for furniture. PVA will do.
- Hacksaw.
- Little nails.
- Hammer.
- Ruler. Better if it is angular.
- Cardboard or plywood.
What to do:

For a richer look, carved wooden skirting boards can be used. Their price matches the look, so for such material for the frame you will have to pay a decent amount, but at the end of the work it will be worth it.

PU foam frame

For women, "polyurethane foam" sounds threatening, but do not be afraid, because it is ordinary foam, only stronger. Ceiling plinths are made from it, which are now used to renovate apartments. Their price is low, but the variety of patterns is impressive. There is no difference in manufacturing with a wooden plinth. But do not forget that this is not a tree, so polyurethane foam should be handled with care. Any blow can lead to dents, or even completely break the entire structure.
What you need:
- Ceiling plinth.
- Hacksaw or sharp knife.
- Glue.
- Ruler.
- Plywood or cardboard (depending on the size and strength of the katrina).


