What is a BIOS and how to set it up on a standard computer. Bios - description, installation, configuration, options
Good day.
You work at your computer, you work, and then ... bam 😢, and you need to reinstall the system, or enable function keys, or disable USB ports, etc. You can't do without BIOS setup...
I often touch on the BIOS topic on the blog (since a number of tasks simply cannot be solved without setting it up at all!), but there is no generalizing topic in which all the main terms and parameters would be analyzed.
So this article was born...
Note: The BIOS settings are based on Lenovo B70 laptop.
A lot of parameters, names of sections and tabs will be similar to other brands and models of laptops. I think that to collect all the variety of brands and all kinds of versions in one article (or even a section of the site) is simply unrealistic...
How to enter the BIOS
I believe that the first thing to start this article with is the question of entering the BIOS (otherwise there will be nothing to configure).
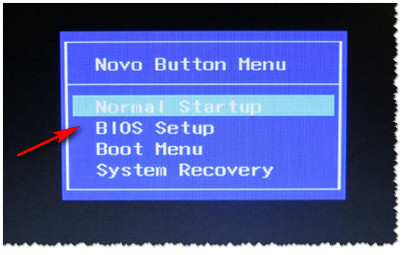
In most PC / laptop models, you need to press the button to enter the BIOS F2 or Del(sometimes F1 or Esc) immediately after turning on the device. Some laptops (Lenovo for example) have a dedicated button Recovery(which is pressed instead of the power button). After that, usually, a plate appears (as in the photo below) - to configure the BIOS, select the item.
Control buttons
In the BIOS, all settings have to be set using the keyboard (which is somewhat scary for novice users who are used to doing everything in Windows with the mouse). It is also worth noting that all settings are set in English (however, most of the settings are easy enough to understand what they mean, even for those who did not learn English). So, about the buttons...
I draw your attention to the fact that in almost every BIOS version at the bottom of the screen (or on the right) all the most basic control buttons are written, with which it is configured.
Control buttons on the bottom of the window // Dell Inspiron laptop
Generally speaking, the buttons are as follows:
- arrows →↓← - used to move the cursor (change parameters);
- Enter - the main key for entering sections (as well as for selecting certain parameters, switching items);
- Esc - exit BIOS without saving settings (or exit from a specific section);
- +/PgUp or -/PgDn - increase/decrease the numerical value of a certain parameter, or switch it;
- F1 - quick help (only for settings pages);
- F2 - hint on the selected item (not in all BIOS versions);
- F5 / F6 - change the parameters of the selected item (in some BIOS versions they can also be used to restore changed settings);
- - save all changes in the BIOS and exit.
Important! In some laptops, in order for the function keys (F1, F2 ... F12) to work, you must press the Fn + F1, Fn + F2 ... Fn + F12 button combination. Usually this information is always indicated at the bottom (right) of the window.
Sections and tabs
The main tab in the laptop BIOS that you see when you log in. Allows you to get basic information about the laptop:
- its brand and model (see photo below: Product Name Lenovo B70-80). This information is extremely necessary, for example, when searching for drivers;
- BIOS version (if you decide to update the BIOS, the information is extremely useful);
- the serial number of your device (not available everywhere, and the information is almost useless);
- processor model (CPU - Intel Core i3-5005U 2.00GHz);
- hard disk model;
- CD/DVD drive model and other information.

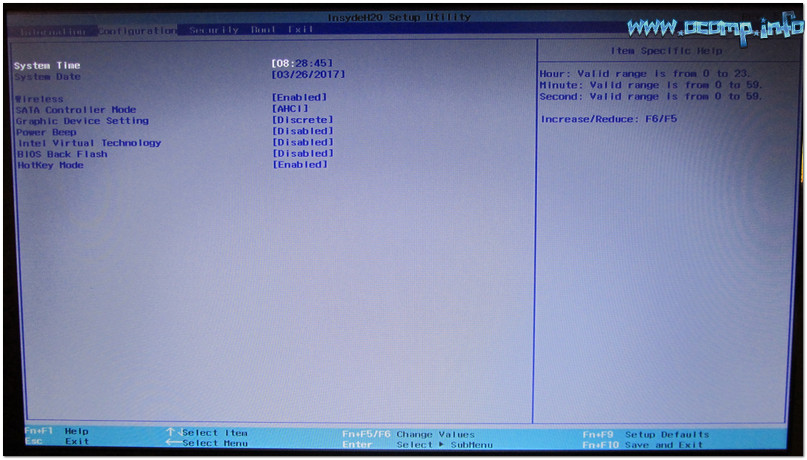
One of the main tabs for setting many parameters. In different laptops, the tab contains different settings, the main parameters can be distinguished:
- System Time/Date- setting the date and time (often in Windows the time gets lost, and sometimes it cannot be set at all until the corresponding tab in the BIOS is configured);
- Wireless- Wi-Fi adapter, you can turn it off here ( note : Enabled - enabled, Disabled - disabled). If you do not work with Wi-Fi networks, it is recommended to disable the adapter, as it consumes a lot of battery power (even when you are not connected to a Wi-Fi network);
- Sata Controller Mode- hard drive mode. This is a pretty broad topic. Here I will say that the operation of your hard disk (for example, its speed) significantly depends on the selected parameter. If you do not know what to set - then leave everything by default;
- Graphic Device Settings- a parameter that allows you to configure the operation of video cards (in laptops that have two video cards: integrated and discrete). In some cases (for example, when working with Windows XP, or when you want to save battery power as much as possible), you can disable the discrete graphics card here (note: there will definitely be performance degradation in games);
- power beep- enable / disable the speaker-tweeter. In my opinion, for a modern laptop in everyday use, this is a useless thing (it was relevant earlier, about 10 years ago);
- Intel Virtual Technology - hardware virtualization, which allows you to run multiple instances of operating systems (guest OS) on one physical computer. In general, not for novice users;
- BIOS Back Flash- if you want to update your old BIOS to a new version (i.e. flash) - enable this option;
- Hot Key Mode- operating mode of function keys. If the option is enabled: instead of the usual, say, F1-F12 to refresh the page in the browser or get help, you can use multimedia features - add or turn off sound, brightness, etc. To use the usual F1-F12 values, you need to press them together with the key fn.
Tab for setting security (for some users - one of the main ones). Here you can set an administrator password to access the BIOS settings or to access the hard drive.
The main settings of this section:
- Set Administrator Password - set administrator password;
- Set Hard Dick Password - set a password to access the hard drive;
- secure boot- secure boot (enabled/disabled). By the way, Secure Boot is only displayed if you have UEFI boot mode set.

Boot
Download section. Also, one of the most frequently used partitions, it is almost always necessary for editing when installing Windows.
The boot mode is also set here: UEFI (new standard - for Windows 8/10), or the old boot method (Legacy, for Windows 7, XP). New items for editing the download queue will appear after saving the settings and entering this menu again!
Note: if support for the old mode is enabled, then it is possible (even necessary!) to change the boot priority from devices (for example, first check USB devices, then try to boot from CD / DVD, then from HDD).
Basic settings in this menu:
- boot mode: boot mode, UEFI or Legacy (described the difference above);
- fast boot: fastboot mode (no logo will be shown, only built-in devices will be supported during boot: keyboard, display, etc.). Works only with Boot Mode: UEFI.
- USB Boot: Allow/Prohibit booting from USB devices.
- PXE Boot to LAN: option enables booting the computer over the network (initially, an attempt will be made to boot the operating system from the server using the local network. In my opinion, for most users, a useless feature).

Note: it is worth noting that, in the new version of UEFI, the ability to raise menu items using the F6 button has stopped working, but it remains possible to lower another item with the F5 button.
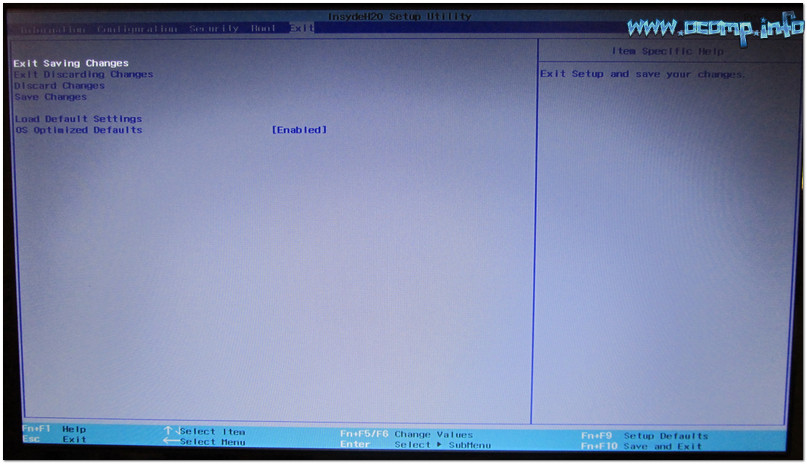
exit
I think everyone knows this word - it is translated from English as output. Also, this section is used in almost all laptops (and PCs) to reset the settings to optimal (or safe).
Main points:
- Exit Saving Changes- exit and save the changed settings in the BIOS;
- Exit Discarding Changes- exit the BIOS without saving the settings;
- Discard Changes- cancel all settings changes made during the current session;
- Save Changes- save settings changes;
- Load Default Changes- load the default BIOS settings (as they were when you bought your laptop). Usually used in case of unstable operation of the device, or in cases where the user has changed something and no longer remembers...
- OS Optimized Defaults- settings optimized for specific operating systems (not all laptops have this option. It somewhat simplifies and speeds up BIOS setup).
How to choose which device to boot a laptop from (Boot Menu)
In order not to climb into the BIOS settings and not select (not set) the boot queue, it is very convenient to use the boot menu, calling it only when you need to boot from a USB flash drive (for example). Here is a reference article on this topic (link below).
Hotkeys for entering the BIOS menu, Boot Menu, recovery from a hidden partition -
By calling the Boot Menu, you will see the usual list of devices from which you can boot. Most often in this list there is (example in the photo below):
- HDD;
- USB flash drive, disk;
- the ability to boot over the network (LAN).

To select a device to boot, use the arrows and the Enter key. In general, as in the usual BIOS setup.
This concludes the article.
The BIOS is a system program embedded in a special chip located on the motherboard of any computer. The bios setting allows you to slightly adjust some parameters of your PC and increase its performance.
There is a misconception that the bios setting will fail in the absence of voltage. To prevent this from happening, a lithium battery or a special battery is placed on the “motherboard” that supports the BIOS settings on the computer by default. This program is an intermediary and ensures the interaction of devices with the OS. But how to enable bios?
BIOS settings on the computer by default
After connecting your personal friend (computer) to the network, the main OS starts loading, then the hard drive is connected, from which Windows or another OS is loaded. Bios settings are not enabled automatically on a personal device.
To enter this settings mode, after turning on the computer, wait for a single beep or the beginning of the boot message, and then press the “F2” or “DEL (Delete)” button several times (depending on the “motherboard”). The correct option is displayed at the bottom of the screen.
After that, the BIOS settings on the computer are turned on by default. The number and names of the main menu items located at the top of the bios settings table may differ. We will consider the main sections and subsections of one of the options for such a menu, which consists of items:
- Main - select the date, time, hard drives and connected drives.
- Advanced - selecting this item will allow you to select and change modes:
- processor (for example, overclock it);
- memory;
- ports (inputs-outputs) of the computer.
- Power - change the power configuration.
- Boot - change boot parameters.
- Boot Setting Configuration (Boot) - selection of parameters that affect the speed of booting the OS and the detection of the mouse and keyboard.
- Tools - specialized settings. For example, updating from a "flash drive".
- Exit - Exit. You can save the changes and exit bios or leave everything as it was (by default).
Video guide to properly setting up your computer's BIOS
How to set up BIOS - main sections
MAIN - section for:
If you want to rebuild the hard drive modes, then after pressing the "Enter" button you will be taken to its default menu. For normal operation, it is necessary to set the “arrows” and the “Enter” button in the points:
- LBA Large Mode - Auto;
- Block (Multi-Sector Transfer) - Auto;
- PIO Mode - Auto;
- DMA Mode - Auto;
- 32 Bit Transfer - Enabled;
- Hard Disk Write Protect - Disabled;
- Storage Configuration - it is desirable not to change;
- SATA Detect Time out - undesirable to change.
- Configure SATA as - set to AHCI.
- System Information - data about the system that can be read.
ADVANCED - section for direct settings of the main components of the computer. Figure 2. It consists of subsections:
- JumperFree Configuration - from it (by pressing the "Enter" button (Enter)) we get to the Configure System Frequency / Voltage menu, which allows you to configure the memory modules and the processor. It consists of the following items:
- AI Overclocking (Auto and Manual modes) is used to overclock the processor manually or automatically;
- DRAM Frequency - changes the frequency (clock) of the memory module bus;
- Memory Voltage - manual voltage change on memory modules;
- NB Voltage - manual change of voltage on the chipset.
- CPU Configuration - Pressing the Enter button opens a menu where you can view and change some of the CPU information.
- Chipset - it is not recommended to change.
- Onboard Devices Configuration - change the settings of some ports and controllers:
- Serial Portl Address - change the address of the COM port;
- Parallel Port Address - change the address of the LPT port;
- Parallel Port Mode - change the modes of the parallel (LPT) port and the addresses of some other ports.

POWER - change power settings. For normal operation, it is necessary to set the “arrows” and the “Enter” button in the points:
- Suspend Mode - Auto.
- ACPI 2.0 Support - Disabled.
- ACPI APIC Support - Enabled.
- APM Configuration - undesirable to change.
- Hardware Monitor - correction of general power supply, cooler speed and temperature.
BIOS setup - other sections
BOOT - direct boot options management. Consists of:
- Boot Device Priority - selection of a priority drive (hard drive, floppy drive, flash drive, etc.) during operation or when installing any OS.
- Hard Disk Drivers - setting a priority hard drive if there are several.
- Boot Setting Configuration - select the configuration of the system and computer at boot. Pressing the Enter button opens a menu:

- Security Setting
- Supervisor Password -
the main points of setting for the normal operation of the BIOS were described.
Continuing the topic - "how to properly configure the BIOS", in this article we will look at more subtle options with which you can:
- increase computer boot speed
- configure external and integrated video cards.
- configure the processor (cache memory).
And now about everything in more detail.
POST examination.
During the computer's POST (Power-on Self-Test) -initial check of the equipment, most often, instead of the results of the check, we see a splash screen BIOS.
Although for the transparency of the state of your PC, it is very important to be aware of certain errors,discovered during testing.
To see how your system is being tested, you need in the section"Advanced BIOS Features" find item "Full Screen LOGO Display"and put the value"disabled".
Speed up PC boot
PC booting always starts with testing the devices three times. Such testing is necessary only if some component of the system may be unstable (for example, after overclocking or a voltage drop).
If you have no problems with this, then you can safely reduce testing from 3 to one. This is done simply, just go to the section "Advanced" or "Advanced BIOS Features" and in option "Quick Power On Self Test" or "Quick Boot" put value "Enabled".
Now your PC will be scanned many times faster. If the PC is unstable, you need to change the option to " Disabled ", this will identify the problem and take action to solve it .
Graphics card settings
Many motherboards come with an integrated graphics card.
In addition to the built-in, you can install a separate video card for more powerful. However, the default setting bios checks which of the video cards is involved.
To disable additional checking, you need to find an option in BIOS Setup called"Init Display First",also depending on the version BIOS she might be calledPrimary VGA BIOS or VGA Boot From.
Next, select the setting corresponding to the installed video card, that is, if the video card AGP, choose "AGP", if PCI - Express, then set "PEG Port/Graphic Adapter Priority" or simply "PEG".
Clock frequency and voltageAGP andPCI Express
With an increase in the frequency of the system bus, the processor, RAM and video card are overclocked. To avoid overclocking the video card through the BIOS, you need to set the bus clock frequency for it.
To do this, find the option "AGP Clock" or "PCI Clock" in the BIOS and configure it as you wish. You can set the frequency to a fixed value (option ”FIX”), as well as increase or decrease it.
To increase stable operation, you can increase the voltage to the video card in steps of 0.1 V.
These options are only available in motherboards designed for overclocking, very good settings for biosad overclocking are present in GIGABYTE motherboards, so I recommend it for consideration.
Also remember that an excessive increase in voltage and frequencies can lead to failure of the video adapter. How to increase the frequency of the system bus, read the article -effective ways. You can find out the details of overclocking through the program in the article about.
CPU Cache Tuning
In addition to overclocking, there is a much safer way to speed up your computer. This is the activation of the 3rd level cache in the processor.
To use the additional potential of the CPU, you need to go to "Advanced BIOS Features" and set the option ”CPU L3 Cache” into meaning "Enabled".
Of course, this option is only available if your processor contains a L3 cache.

2 BIOS setup
It's no secret that any RAM has its own timing parameter.
In another way, they are also called delays, by default BIOS reads the timings programmed into the chip. But if there is a desire to change them, then in BIOS this can easily be done.
First you need to find the options System Performance, "Memory Timings" or "Configure DRAM Timing".
Perhaps the option will have a different name, you can determine it by value, by default it is always By S.P.D. To access changing timings, set the value "disabled" or "User Defined".
Theoretically, changing the timings down should increase the speed of the memory chip, but in fact, you will only be able to achieve stable operation when changing the timings if you have a high-quality memory chip installed.
If the memory chip allows you to change the timings, then this is basically meaningless, because:

1) the manufacturer initially sets the maximum performance and stable timings.
2) when changing timings, performance increases by an average of 2-3%.
Disable extra ports
Often, the BIOS includes many ports that are never used in practice. Therefore, it is desirable to disable them in order to reduce the number of IRQ interrupts. After all, as you know, the less, the better. Let's get started:
1. Have you ever connected an old joystick to your computer via MIDI?
- No? Then go to the menu "Integrated Peripherals" and set the value of the item "Game Port" in "disabled".
2. COM1, COM2 and LPT ports are a thing of the past, if you do not know what to connect to them, you can safely disable them in the BIOS.
For this, in the section "Integrated Peripherals" options "IO Devices, Com-Port", but may also be called "Serial Port ½", assign a value "disabled".
LPT port is disabled in option "Parallel Port"(also need to put "disabled").
3. FireWire (IEEE1394) - this port is also for a narrow purpose, if you need to download video from a camcorder or connect peripherals with a FireWire interface, then the port is required. In other cases, it is replaced by USB.
If you purchased an assembled computer or laptop, then its BIOS is already configured properly, but you can always make any personal adjustments. When the computer is assembled on its own, then for its proper operation, you must configure the BIOS yourself. Also, this need may arise if a new component was connected to the motherboard and all parameters were reset to default.
The interface of most BIOS versions, with the exception of the most modern ones, is a primitive graphical shell, where there are several menu items from which you can go to another screen with already configured parameters. For example, the menu item Boot opens the user the parameters for distributing the priority of loading the computer, that is, there you can select the device from which the PC will be loaded.
In total, there are 3 BIOS manufacturers on the market, and each of them has an interface that can vary significantly in appearance. For example, AMI (American Megatrands Inc.) has a top menu:

In some versions of Phoenix and Award, all section items are located on the main page in the form of columns.

Plus, depending on the manufacturer, the names of some items and parameters may also differ, although they will carry the same meaning.
All movement between items occurs using the arrow keys, and selection - using Enter. Some manufacturers even make a special footnote in the BIOS interface, which says which key is responsible for what. UEFI (the most modern type of BIOS) has a more advanced user interface, the ability to control using a computer mouse, as well as the translation of some items into Russian (the latter is quite rare).

Basic settings
The basic settings include time, date, computer boot priority, various settings for memory, hard drives and drives. Provided that you have just assembled the computer, you need to configure these parameters.
They will be in the section Main, Standard CMOS Features and Boot. It is worth remembering that depending on the manufacturer, the names may differ. To get started, set the date and time according to these instructions:

Now you need to make a priority setting for hard drives and drives. Sometimes, if you do not do it, the system simply will not boot. All the necessary parameters are in the section Main or Standard CMOS Features(depending on the BIOS version). A step-by-step instruction using the Award/Phoenix BIOS as an example is as follows:

Similar settings need to be made for BIOS users from AMI, only here the SATA parameters change. Use this guide to get things done:

AMI BIOS users can complete the standard settings on this, but the Award and Phoenix developers have a few more additional items that need user participation. All of them are in the section Standard CMOS Features. Here is their list:

This completes the standard settings. Usually half of these items will already have what they need.
Options "Advanced"
This time, all settings will be made in the section "Advanced". It is in the BIOS from any manufacturer, however, it may have a slightly different name. Inside it may be a different number of items depending on the manufacturer.
Consider the interface on the example of AMI BIOS:

Now let's proceed directly to the parameter settings from the item :

Award and Phoenix do not need to configure these parameters, since they are configured correctly by default and are located in a completely different section. But in the section "Advanced" you will find advanced settings for setting download priorities. If the computer already has a hard disk with an operating system installed on it, then in "First Boot Device" select value "HDD-1"(sometimes you have to choose "HDD-0").

If the operating system has not yet been installed on the hard disk, then it is recommended to set the value instead. "USB FDD".
Also at Award and Phoenix in the section "Advanced" there is an item regarding the settings for entering the BIOS with a password - "Password Check". If you have set a password, then it is recommended to pay attention to this item and set a value that is acceptable to you, there are only two of them:

Setting up security and stability
This feature is relevant only for owners of machines with BIOS from Award or Phoenix. You can enable maximum performance or stability mode. In the first case, the system will work a little faster, but there is a risk of incompatibility with some operating systems. In the second case, everything works more stable, but slower (not always).
To enable high performance mode, from the main menu select "Top performance" and put a value in it "Enable". It is worth remembering that there is a risk of disrupting the stability of the operating system, so work in this mode for several days, and if there are any failures in the system that were not previously observed, then disable it by setting the value Disable.

If you prefer stability to speed, then it is recommended to download the secure settings protocol, there are two types of them:

To download any of these protocols, you need to select one of the items discussed above on the right side of the screen, and then confirm the download using the keys Enter or Y.
Setting a password
After completing the basic settings, you can set a password. In this case, no one except you will be able to access the BIOS and / or the ability to change its parameters in any way (depending on the settings that were described above).
In Award and Phoenix, in order to set a password, you need to select the item on the main screen "Set Supervisor Password". A window will open where you enter a password up to 8 characters long, after entering a similar window opens where you need to enter the same password for confirmation. When typing, use only Latin characters and Arabic numerals.

To remove the password, you need to select the item again. "Set Supervisor Password", but when the window for entering a new password appears, just leave it blank and click Enter.
In AMI BIOS, the password is set a little differently. First you need to go to the section Boot, which is in the top menu, and there already find "Supervisor Password". The password is set and removed in the same way with Award/Phoenix.

Upon completion of all manipulations in the BIOS, you need to exit it while saving the previously made settings. To do this, find the item "Save & Exit". In some cases, you can use the hot key F10.
Setting up the BIOS is not as difficult as it might seem at first glance. In addition, most of the described settings are often already set by default, as is necessary for the normal operation of the computer.
AMI BIOS versions 2.5x/2.6x are also often found on modern ASUS motherboards. The main difference from most other manufacturers is the modified interface of the BIOS Setup utility. Therefore, it makes sense to consider it separately.
A similar implementation of AMI BIOS versions 2.5x/2.6x can also be found on motherboards from some other manufacturers. First of all, this, of course, is a subsidiary of ASUS - ASRock. But a similar BIOS Setup interface is sometimes used by Biostar.
Main menu
Unlike the previously reviewed AMI BIOS versions, the implementation of AMI BIOS 2.5x/2.6x on ASUS motherboards does not have a separate screen with the main menu. The main menu is a line at the top of the screen that allows you to navigate to any item with a minimum of costs.
Main
After calling BIOS Setup, the item is activated. Main(Fig. 1). With the options in this section, you can:

Rice. 1. Main menu item of AMI BIOS version 2.5x/2.6x on ASUS motherboards
Advanced
Advanced- this is probably the richest BIOS section for settings (Fig. 2). It consists of several subsections, including options similar in purpose:

- additional features of the motherboard, such as, etc.
power
In chapter power(Fig. 3) concentrated all the options responsible for advanced power management and system monitoring:

Boot
Chapter Boot(Fig. 4) contains options that determine the boot order:

exit
The last section is exit(Fig. 5) - allows you to save the changes made and exit BIOS Setup, discard the changes made and exit BIOS Setup, cancel changes made or load BIOS Setup parameters that are guaranteed to ensure normal operation of the computer hardware.
There may also be options responsible for , .

Rice. 5. Item Exit
Additional menu items
Mid-range products often have a section AI Tweaker, which has moved most of the options, . On top-level motherboards, another name for this section is used - Extreme Tweaker- with a corresponding increase in the number of available settings.
Control
BIOS Setup on ASUS motherboards uses the following conventions. The choice of one or another item of the main menu is carried out by the cursor keys <влево>
and <вправо>
. In this case, options specific to this section will be displayed. Selecting a Specific Option: Arrow Keys <вверх>
and <вниз>
. If the option contains several values at once (say, date or time), the transition between individual fields is possible using the key
The keys are used to change the option value. <+>
and <->
on the extended keyboard. If you want to see all available values for a given option, click
If there is a triangle symbol to the left of the option name, selecting the option and pressing the

Rice. 6. Submenu Primary IDE Master item Main
If there are too many options in a given section or menu and they do not fit on the screen, a vertical scroll bar appears to the right of them, signaling this fact.
Key
We also recommend
 Switching power supply: repair and refinement
 Remote control of light
 Swimming lessons for preschool children
 Notes for the master - home household alarms
 Clock propeller on Atmega8
 Device and relay application examples, how to choose and connect a relay correctly Microcontroller and relay simple switching circuits