What can be made from paper for the table. Origami table
In interior decoration, paper furniture is in demand - you can make simple figures with your own hands. Another area of application of these items is toys for children. Every child will want to have a dollhouse with beautiful handmade paper furniture. To make such products, you will not need additional origami skills, you just need to follow the instructions provided.
Origami furniture is an interesting area that requires special attention. The manufacture of such figures does not take much time, and the resulting result pleases adults and children with its appearance. The main feature of the products is the maximum similarity with real items of sets: sofas, tables, cabinets, armchairs and chests of drawers.
It is unlikely to be possible to use such furniture in real life, however, the items will be a good option for creating a layout for a future room or designing a dollhouse. To achieve similarity with real furniture, textured paper is used in the design, imitating various surfaces: stone, leather, fabric, wood and metal. When creating objects, it is better to use paint, which does not completely impregnate the material, but only gives it color.
The following materials are used for manufacturing:
- Base material - matchboxes, a little corrugated cardboard, colored thick paper;
- Pieces of fabric, decorative film and texture paper for finishing finished items;
- Scissors;
- Pencil or black pen;
- PVA glue or any other for working with paper.
You can work with paper on your own, or you can connect loved ones to the process. Then the resulting products will be diverse, but together they will form a single ensemble.

How to do the following options
You can make anything out of paper. You just need to show imagination and perseverance. Consider master classes in the manufacture of popular types of furniture. Based on detailed instructions, you can make other types of interior items. The most popular are:
- Sofa;
- Dresser;
- Armchair;
- Closet;
- Table.
To find out how paper furniture is designed correctly, you need to consider each option separately.
Sofa
A paper sofa will look great both in a dollhouse and in a miniature copy of a real interior. Before you start, pay attention to the paper sizes:
- For miniature options, you should choose colored paper 10x10 cm;
- For execution in medium sizes, you need to give preference to a workpiece of 20x20 cm;
- To create a large-sized sofa, the dimensions of the material increase proportionally.
The color of the paper is chosen at will, but it is better that it fits into the future interior or imitates real furniture. Having picked up the materials, you can start manufacturing:
- A square sheet is folded in half, after which it is opened and folded perpendicular to the first;
- The next step will be an additional hem. The bottom edge is wrapped to the middle fold line, then folded again. The output is 3 fold lines, not counting the central one;
- The lower thin strip is wrapped on the first fold, after which two identical triangles are laid by bending the side parts diagonally;
- The accordion is folded to the end, and the upper part of the workpiece is bent to the middle. The workpiece is turned over;
- The lower corners are folded up in turn, and the upper ones are folded down diagonally;
- The workpiece is turned over again, bending one corner inward. This is how the back is formed.
Turning the product over, it is necessary to form the legs of the sofa and it will be ready. Such a beautiful and original item will become a real decoration of a toy living room or an original art object.

Fold the sheet in half

One more time in half

We make three bends from the bottom

Making corners from below

Raise up the bottom

Making side folds

Aligning the back

Making legs

Ready product
Dresser
The most optimal and profitable way to create a paper chest of drawers is to use matchboxes. They are conveniently put forward, so making an item is not difficult. If you want to make a chest of drawers out of paper, then you should use paper blanks. It is convenient to store small light things in this chest of drawers. Beads, beads, locks, clips and other little things for creativity and needlework will perfectly fit here. The top of the chest of drawers can be painted with colored felt-tip pens, giving it an original look.
The design of a chest of drawers from paper consists of the following steps:
- Drawing a diagram for creating boxes: this step is skipped if ready-made matchboxes or other blanks are used;
- Cutting diagrams along the lines, as well as assembling boxes for future chest of drawers;
- The entire chest of drawers is glued with cardboard for strength, however, it is not necessary to glue the front part where the boxes will be inserted;
- The facades of the boxes are pasted over with any material - fabric, film, leather, and a bead or button is attached as a handle;
- Legs for a chest of drawers can be made from pushpins - for miniature furniture or pipes from toilet paper - for overall products.
Such a chest of drawers is also a good gift for a girl with a lot of jewelry: all the jewelry will fit in the drawers.

Making boxes

Creating drawer elements

Connecting elements

We decorate the coverings with patches

We glue the facades of boxes

Create pens

Finished chest of drawers
Armchair
Making a stylish chair out of colored paper is also not difficult. To create it, you don’t even need glue and adhesive tape, you only need a sheet of paper of the required color. It is worth noting that cutting blanks from beautiful textured paper will give a better result than furniture from ordinary plain material. In addition, if you find diagrams that show pieces of furniture made in different styles, you can make an armchair that is as similar as possible to real furniture. For work, you need one sheet of paper in the shape of a square. Its dimensions are selected depending on the dimensions of the future product:
- Bend the square sheet in half, then open it and press one of the halves to the center fold line;
- Press the second part of the square to the center of the workpiece. Next, go over all the fold lines with your hand to clearly outline the lines formed. Open the workpiece and turn the front side towards you;
- One part of the 4 lines obtained must be cut off: this is done with scissors or a metal ruler;
- Fold the workpiece across the resulting lines, visually marking the center, bend the triangle to the right. Do the same with the left side, you should end up with two triangles superimposed on each other;
- The middle strip, remaining at the bottom, is bent over the triangles. Each fold line is additionally smoothed with fingers;
- The strip, which was previously bent up, is bent - it will serve as a seat. The side parts will become handholds, they must be glued from the inside to the seat.
It turns out an original and easy-to-make chair made of paper. To diversify its surface, you can stick decorative paper imitating leather on the seat.


Closet
The design of the cabinet is similar to the manufacture of a chest of drawers, which was described earlier. The difference will be that the frame should be higher, and in addition to drawers, shelves are needed. Some of the nuances of making a paper cabinet:
- For the blank, it is necessary to use a scan from a rectangular sheet of thick paper;
- The ideal size would be A4 format, if you need a larger product - the dimensions increase proportionally;
- After you draw a diagram, it must be cut out: first, the main elements are cut out along the lines, after which they proceed to cutting overhead valves;
- The frame of the model is glued without doors;
- The doors are cut out of the same paper. Later they can be decorated with a film: the adhesive layer of such material will allow you to apply it to the base without any problems.
Finally, decorative handles are glued to the doors. For this, buttons or beads are suitable. The legs are made from thick cardboard.

Table
Assembling a paper table is not difficult, especially if you already have experience with this material. There are many options for creating tables, but beginners should choose a less complicated way. It consists of the following actions:
- For work, a square sheet of paper is used;
- All sides of the square fold inward, forming mini-squares;
- Each square folds inward to form triangles;
- The triangles curve outward;
- The final step is the formation of the legs.
To ennoble the tabletop, stick beautiful decorative paper on it or paint it with colored felt-tip pens and acrylic.

decoration
A separate step is to highlight the decoration of finished products. Do-it-yourself furniture, the schemes of which can be found in this material, is decorated as follows.
| Material | Peculiarities | What is suitable for |
| Self-adhesive paper for furniture | You can use this material in the manufacture of any type of furniture. Such a film is ideal for beginners, because it is easy to cut, and the adhesive layer allows you to decorate the surface without any problems. | For countertops, chair seats, sofas and armchairs, for decorating cabinet doors and chest of drawers. |
| Use of paints | Paints allow you to show creativity, move away from the standards. Using paint, you can draw any pattern and pattern. When choosing a product, pay attention to the fact that it does not damage the paper base. Acrylic or water-based formulations are preferred. | For all kinds of crafts, especially for decorating the front parts of products. |
| Fabric Application | The fabric allows you to imitate the structure of the furniture as much as possible. | Suitable for sofas, armchairs and chairs. |
If gouache is used for decoration, you need to mix it with PVA glue (1: 1). After drying, the paint will not be imprinted on the hands, and the product will receive additional rigidity.
Do-it-yourself paper furniture will be an excellent option for a dollhouse or designing layouts for a future interior. Making miniature items is a fun activity that everyone in the family can get involved in.


Drawings and diagrams

Probably, there is no such girl in the world who would not dream of having a toy house for dolls with furniture. A real headset, of course, will not fit in it, but it is easy to make paper figures on your own. Our detailed master class will help in this, after studying which you can easily assemble origami furniture.

For work, we need a square sheet of paper (white or color). When choosing a size, be guided by the required dimensions of the future chair.  Scheme:

To learn how to make an origami chair, we suggest using a video tutorial. Follow the step-by-step instructions of MK and the entire manufacturing process will take you no more than 10 minutes.
Video: Origami Chair Workshops
We form an origami table
An origami table is a simple paper craft, a necessary thing in any home, even though it is a toy. It will make a great set with chairs. The work will not take you much time, and the result will certainly please you.
Assembly scheme for beginner craftsmen: 
Video: Origami Table Tutorial
origami cabinet
We suggest you make a wardrobe with drawers - crafts for storing small accessories. Children put doll clothes in it.
 To work, you will need 2 square sheets of paper (20 * 20 cm), which must be folded sequentially, as in the video instructions.
Video: Origami cabinet assembly workshop
Origami bed
The bed is the main subject of home interior, we will try to make this thing out of paper. The assembly process is simple, so both a child and an adult can master folding skills. For work, you need a square sheet of medium density (20 * 20 cm). Please take other sizes if you wish.
Schema-template:  Step by step description:
- We arrange the sheet in half, in different directions (crosswise) and outline the center.
- We bend the side edges to the center, 1/3.
- Then fold again to make a rectangle.
- We lower the side parts to the fold line and open the pockets, wrapping the corners along the contours.
- We bend the corners away from ourselves - we make legs.
- We get a great bed.

Video: MK creating an origami bed
If in the process of folding there are difficulties or you do not understand some points, then look at the hint of an experienced craftsman.
origami sofa
It is hard to imagine a living room without a sofa. For a guest, this is a great place to sit down, for the owner - to lie down to rest after work. Let's make a sofa out of paper using origami technique, as in the photo:  Scheme:
Step-by-step instruction:
- Fold the paper in half (twice) and unfold. Get a cross fold.
- We bend 1/6 of the page along the dotted line (see photo).
- We wrap the sheet along the fold opposite this strip.
- We wrap the side parts of the resulting rectangle, 1/3 on each side.
- Bend the corners forward (in the places indicated by the white arrow). We do not touch the back side of the sheet.
- We fold the opened white rectangles in half.
- Raise the part of the craft marked with a dotted line.
- Bend the half of the raised part down.
- Bend the sides forward.
- Pull the front (back) forward.
- We get a paper sofa.
Video: Origami sofa formation lesson
Schemes for folding furniture using the origami technique


Today we offer you to replenish your collection of paper furniture and household items with a simple but pretty table. The assembly scheme for such a craft can be easily mastered by a beginner in origami, and even a child. In addition, today we have selected for you both a scheme (for those who fold origami only in this way), and a video master class (for those who are better off seeing it once).
For work, you will need one square sheet of paper. With color - decide for yourself, because it depends on whether your origami table will be in harmony with other paper objects. The assembly will take only some 5-10 minutes of time. And if you're ready, we can start right now.
To begin with, we present a printed assembly diagram, which consists of two stages. The first is the basic form of a catamaran, and then we will show how it can be transformed into an origami table. After you complete all the folds, you just need to bend the legs so that the paper table takes on a finished look.


And now the promised video master class, in which all assembly steps will be shown simply, in detail, and therefore as accessible as possible. Happy assembly!
KARTOGRAPF Treasure hunt, hidden maps are exactly what you need if you crave adventure and feel the thrill of new sensations. Here you will find what to do with yourself, and in what direction to direct the energy that is raging and rushing out, because the search for treasures is a very interesting adventure that you must have been fond of the last time in your childhood. Now you can experience it live!
Today we offer you to replenish your collection of paper furniture and household items with a simple but pretty table. The assembly scheme for such a craft can be easily mastered by a beginner in origami, and even a child. In addition, today we have selected for you both a scheme (for those who fold origami only in this way), and a video master class (for those who are better off seeing it once).
For work, you will need one square sheet of paper. With color - decide for yourself, because it depends on whether your origami table will be in harmony with other paper objects. The assembly will take only some 5-10 minutes of time. And if you're ready, we can start right now.
To begin with, we present a printed assembly diagram, which consists of two stages. The first is the basic form of a catamaran, and then we will show how it can be transformed into an origami table. After you complete all the folds, you just need to bend the legs so that the paper table takes on a finished look.

And now the promised video master class, in which all assembly steps will be shown simply, in detail, and therefore as accessible as possible. Happy assembly!
KARTOGRAPF Treasure hunt, hidden maps are exactly what you need if you crave adventure and feel the thrill of new sensations. Here you will find what to do with yourself, and in what direction to direct the energy that is raging and rushing out, because the search for treasures is a very interesting adventure that you must have been fond of the last time in your childhood. Now you can experience it live!
Probably, there is no such girl in the world who would not dream of having a toy house for dolls with furniture. A real headset, of course, will not fit in it, but it is easy to make paper figures on your own. Our detailed master class will help in this, after studying which you can easily assemble origami furniture.

For work, we need a square sheet of paper (white or color). When choosing a size, be guided by the required dimensions of the future chair.
Scheme:

To learn how to make an origami chair, we suggest using a video tutorial. Follow the step-by-step instructions of MK and the entire manufacturing process will take you no more than 10 minutes.
Video: Origami Chair Workshops
We form an origami table
An origami table is a simple paper craft, a necessary thing in any home, even though it is a toy. It will make a great set with chairs. The work will not take you much time, and the result will certainly please you.
Assembly scheme for beginner craftsmen: 
Video: Origami Table Tutorial
origami cabinet
We suggest you make a wardrobe with drawers - crafts for storing small accessories. Children put doll clothes in it.
 To work, you will need 2 square sheets of paper (20 * 20 cm), which must be folded sequentially, as in the video instructions.
Video: Origami cabinet assembly workshop
Origami bed
The bed is the main subject of home interior, we will try to make this thing out of paper. The assembly process is simple, so both a child and an adult can master folding skills. For work, you need a square sheet of medium density (20 * 20 cm). Please take other sizes if you wish.
Schema-template: Step by step description:
- We arrange the sheet in half, in different directions (crosswise) and outline the center.
- We bend the side edges to the center, 1/3.
- Then fold again to make a rectangle.
- We lower the side parts to the fold line and open the pockets, wrapping the corners along the contours.
- We bend the corners away from ourselves - we make legs.
- We get a great bed.
Video: MK creating an origami bed
If in the process of folding there are difficulties or you do not understand some points, then look at the hint of an experienced craftsman.
origami sofa
It is hard to imagine a living room without a sofa. For a guest, this is a great place to sit down, for the owner - to lie down to rest after work. Let's make a sofa out of paper using origami technique, as in the photo: Scheme:
Step-by-step instruction:
- Fold the paper in half (twice) and unfold. Get a cross fold.
- We bend 1/6 of the page along the dotted line (see photo).
- We wrap the sheet along the fold opposite this strip.
- We wrap the side parts of the resulting rectangle, 1/3 on each side.
- Bend the corners forward (in the places indicated by the white arrow). We do not touch the back side of the sheet.
- We fold the opened white rectangles in half.
- Raise the part of the craft marked with a dotted line.
- Bend the half of the raised part down.
- Bend the sides forward.
- Pull the front (back) forward.
- We get a paper sofa.
Video: Origami sofa formation lesson
Schemes for folding furniture using the origami technique


During his life, almost every person faced a move or carried out repairs on their own, after which there was a lot of thick cardboard left. A large amount of paper material should not be thrown away immediately; practical applications can be found for it. In this article we will look at how to make a paper table with your own hands.
Cardboard furniture - is the idea worth the time?
An alternative to ordinary furniture is a self-made cardboard table. Which we very often throw away without thinking that this material can be used to create an unusual product. In order for the piece of furniture to be durable and not to bend under the weight of the thing placed on it, for this it is necessary to properly process the cardboard. How exactly - we will tell a little lower in the text.
Paper furniture has a lot of positive advantages:
- Stylish design. For your apartment, you can design any table, based on your preference and taste.
- Profitability. In the manufacture of such a piece of furniture, the costs are minimal, because they are only used to purchase the necessary tools.
- Mobility. When you move, you don't have to go through the whole nightmare of packing. Easily foldable furniture does not cause any trouble.
- Ergonomics. There is no need to walk through the expanses of shops in search of a suitable piece of furniture that would fit perfectly into the interior and be very comfortable.
- Security. Cardboard furniture does not contain any harmful elements. And since you make it yourself, you can easily check all the components.
- Environmental friendliness. If a piece of furniture has lost its attractiveness and former appearance, or for some reason you want to change the design, then you can simply disassemble and throw it away, since the cardboard material is not capable of harming the environment.
- Strength. Proper processing of cardboard allows you to extend the life of the manufactured piece of furniture.
Important! Despite many advantages, cardboard structures have one unpleasant drawback. Prolonged exposure to a humid environment causes significant damage, and the furniture becomes further unusable. Therefore, you should always remove the paper structure from the street.
Making a table using origami technique
A paper toy table that is made using the origami technique cannot withstand much weight, since it is made of plain paper. If you print paper that imitates wood on a printer, then the appearance of the paper cannot be distinguished from the real one, and it looks quite believable. Such a table looks great complete with chairs, which you can also make with your own hands using the origami technique.
How to make a paper table using origami technique with your own hands:
- We prepare a sheet of paper, which should be folded in half.
Important! To make a table, you need to use only a square leaf. If you have standard A4 paper, then you need to bend it in half diagonally. The result is a double triangle and a single rectangle. It is this that needs to be cut off to get a square-shaped leaf.
- Next, you need to open the folded sheet.
- The sides of your part must be bent to a vertical line.
- After that - bend it in half down, open the workpiece.
- Bend the top and bottom of the workpiece to a horizontal line.
- Now expand our workpiece.
- Diagonally, you need to roll up the right side and bend it to the side.
- On the left side, do exactly the same procedure.
- Roll the lower part of the workpiece up.
- On the top section of the paper, repeat exactly the same steps as with the bottom.
- Now we need to expand our shape.
- The right corner, which is at the top, must be bent down diagonally.
- Next - open the middle of our figure.
- Now the side parts need to be rotated so that a square is formed.
- With the rest of the corners, you need to carry out exactly the same actions.
- Next, we work with one square, in which the sides must be wrapped to the diagonal line (the bending of the sides resembles the method of folding an airplane).
- Now you need to open the workpiece.
- From the resulting workpiece, bend a figure that would look like a rhombus. In the end, we should have four diamond shapes that will be placed under the large square from the corners.
- Now you need to bend the resulting rhombuses in half up.
The paper table is ready! It can be used to play with dolls. The child will be delighted with such a new acquisition for his toys.
How to make a paper doll table?
Consider another option on how to make a paper doll table that will bring joy to your child:
- Bend the workpiece in the shape of a square three times, then turn it in the opposite direction twice, and then turn it over. Thus, we get the very first workpiece with the outlined fold lines.
- Then bend the middle of each side of the square to the center. As a result, the corners of the square rise up, thus forming the legs of the table.
- All folds are recommended to be carefully ironed with your hands so that the legs of the table are clearly marked.
It remains to turn our manufactured product over and decorate the puppet interior with it.
Paper laptop stand
Currently, almost every user has an indispensable tool for work and communication, which is a laptop. In addition to the computer itself, all sorts of peripheral devices are attached to it. The presence of removable hard drives, mice, flash drives and other necessary elements makes you want to purchase a table for convenience. Who does not want to run to the store, but wants to have a convenient laptop stand, there is a great solution - to make a paper table with your own hands.
Materials and tools:
- a laptop, the presence of which will allow you to correctly measure the future stand;
- yardstick;
- sheets of paper or newspaper to be used for the stencil;
- cardboard of a dense base, from which the stand itself will be made (an unnecessary box may come up);
- long line;
- pencil or marker;
- utility knife or large scissors.
How to make a paper laptop table:
- Newspaper or paper should be spread on a horizontal surface. Next, carefully carry out the steps to measure the size of the table and make a stencil.
Important! If the measurements are taken incorrectly, then at best the table will turn out to be crooked, and at worst, the stand will not withstand the laptop.
- First of all, we will make a proleg, which is a crossbar between the legs of the stand to make the table more rigid. With a tape measure, you need to measure the length of the computer device along the keyboard from one corner to the other. On paper, mark half of this length, using a marker. Next, you need to draw a line that will be half the base of the proleg. This detail should not be drawn completely, because if the slightest inaccuracy is made, the laptop will stand crooked.
- From the edges of the segment, you need to measure 4 cm and 7 cm upwards, after which you should draw a rectangle. Mentally divide our figure into 3 parts. The first third is almost a straight line at a height of 4 cm, for the second third of the part you need to make a bend to the line 7 cm at an angle of 45 degrees, using a template, or simply draw by hand. At the point of contact of two broken lines, you need to make a narrow sleeve, which will be a cutout to match the parts.
- We proceed to the design of the stand legs template. You can choose any angle of the table, depending on your personal preferences. The height of the left and right sides of the leg will depend on this.
Important! When you draw a template, you need to pay attention to the protruding clove. It will subsequently serve to prevent the laptop from falling. In height, it should be about a third of the thickness of the laptop.
- The slot in the leg that will engage with the prog should not be in the middle, but about ⅓ from the far edge. This affects the stability of the product.
- We draw bends in any form at your discretion. The slots that will be in the legs and the prog should be no more than 3.5-4 cm in height. Depending on the thickness of the cardboard, they should be about 4-5 cm wide. Both parts should be the same.
- We turn to cutting out paper templates. An unnecessary box having a relatively thick cardboard may be suitable as a starting material.
- With the lower cut, you need to attach the template of the first part to the perfectly even edge of the cardboard, otherwise the stand will swing.
- With one side, you need to carefully circle the template, then flip the template to the other side and circle it in the same way. As a result, one symmetrical detail was formed, which is a proleg.
- Now we draw the legs. On another cardboard, you need to lay out the second template and draw the legs, which should be completely the same.
- Cut out all the details with scissors or a clerical knife.
If you cut everything correctly and carefully combined all the details, then the table in the form of a laptop stand is ready. It remains only to install your digital friend on the table.
Plain cardboard table
A self-made table brings an original touch to your apartment. With proper processing of cardboard, your table can withstand certain loads. Consider another option for manufacturing an interior item.
Necessary tools and materials:
- packaging cardboard;
- regular and colored tape;
- paper tape;
- double sided tape;
- stationery knife;
- sharp scissors;
- dull knife;
- iron ruler or tape measure;
- simple pencil;
- eraser;
- wallpaper glue or PVA;
- sandpaper;
- kraft paper and tracing paper.
How to make a paper table with your own hands:
- First you need to design a countertop. For strength, it is best to make a two-level. Using a clerical knife, cut out three blanks from cardboard, the shape of which would resemble the designed tabletop. The first part is the top level, and the second and third will be the bottom level.
- Then cut strips of cardboard that need to be bent with an accordion and fixed with glue to the lower parts of the countertop. The strips must be the same in width, otherwise dents will appear.
- Next, we fix the second part of the bottom tabletop.
- Now we make the upper level, on which we also glue cardboard strips.
- When the glue is completely dry, you need to connect both parts of the countertop.
- To increase the strength of the countertop, with the help of adhesive tape it is necessary to fix the cardboard strips and corners.
- Now let's move on to building the base. For a corner table, you only need to make two legs. To increase the functionality of the table, you can additionally design several shelves.
- To build the legs, you need to prepare 4 identical sheets of cardboard. They can be either rectangular or square, as it all depends on the size of the legs. You can attach them with glue. At the junction, grooves are made without fail, which are fixed with glue.
Important! If the table leg is deaf, then in this case a single-layer cardboard is sufficient for the stiffening ribs, only they must be very tightly next to each other. In order to have a more reliable result, it is best to glue the stiffeners and shelves in 3-4 pieces at a time.
- To strengthen the edges of cardboard furniture, it is necessary to use kraft paper, which has a dark color. Using wallpaper glue, you need to glue all the seams with it.
- Next we do the finishing. First, all the elements must be pasted over with old newspapers, then the surface must be leveled with tracing paper, wrapping paper or kraft paper.
- White paper (or tracing paper) is glued to the entire piece of furniture, since it is much easier to decorate the furniture in this way.
Important! Before gluing kraft paper and tracing paper, they should not be cut, but should be torn by hand.
- And only now, after a layer of paper, you can apply acrylic paint. Thus, the basis for decoration is ready. Now the work of your imagination begins, the main thing is that after finishing work the designed table harmoniously fits into your interior.
Important! Also, the tabletop can be made from newspaper tubes. This option will create a special flavor in your room. In this case, you will have to acquire additional weaving skills.
How to make a cardboard table more durable?
- If you made a paper table with your own hands, then in order to give strength to the cardboard and protect it from moisture, you can use parquet varnish, which must be applied to the finished parts.
- When making furniture, make sure it is symmetrical. In the case of creating an asymmetrical piece of furniture, it is necessary to add additional supports to it, which would strengthen the structure.
- The presence of a large number of transverse supports makes the piece of furniture more stable.
- In the manufacture of a piece of furniture, various cardboard is chosen, which can be single-layer, two-layer or three-layer. The thicker the material, the stronger it is.
In principle, even from cardboard you can create practical furniture for domestic use. And what can we say about the arrangement of the dollhouse - there is no limit to the imagination. Use such a simple and affordable material to create various crafts - beautiful, original, applicable not only for decoration, but also in everyday life.
If you are tired of creating ordinary flat animal and plant crafts using the origami technique, then we suggest you create a voluminous table for small dolls. It can be of any size, because it depends on the parameters of the paper sheet that will be used in the work. The color can also be chosen to suit your taste or the interior of the doll kitchen.
So we get a beautiful dining table of your dreams from such a simple and affordable material. So you can make several pieces of furniture in a short time and complement them with a small dollhouse and a veranda.
Necessary materials:
- square sheet of paper;
- scissors.

Stages of making a three-dimensional table using the origami technique:
We prepare a square sheet of any size from paper. Also, the color of the paper can be chosen any. If you want to make an original shade, then use designer paper or multi-colored scrapbooking sheets.

Fold a square sheet of paper in half. To do this, take the right side of the sheet and transfer it to the corners of the left. We pass along the fold so that it turns out to be even and beautiful.

We open the folded blank to create a paper table. The sides should be folded to the resulting vertical fold. This should be done carefully and slowly so that the lines of the future table are the same and even.

We return to the starting position. You should walk along the central fold line with scissors in order to then get two identical parts for folding crafts using the origami technique.

At the same time, we bend the upper and lower corners to the central fold lines.

We fold in half along a vertical line two parts of the workpiece to create an origami table. We get two table blanks with legs.

We place the right blank in the middle of the left.
 Next, bend the upper and lower parts of the workpiece, which have table legs.

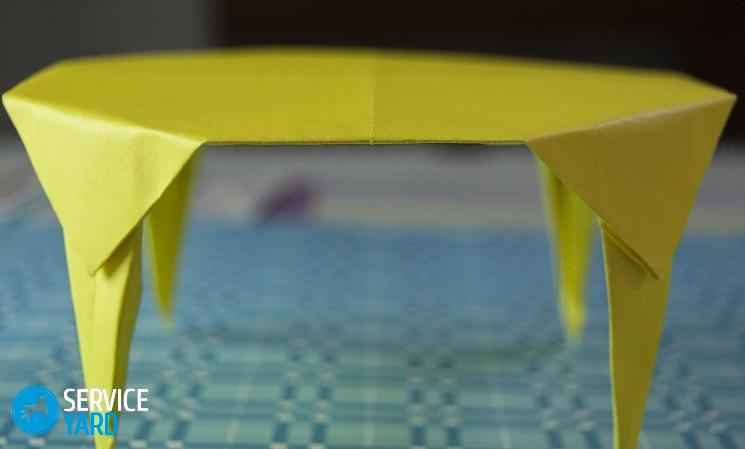
Slightly raise the bent upper and lower sides. We turn over and get a finished volumetric table using the origami technique from plain paper.

In interior decoration, paper furniture is in demand - you can make simple figures with your own hands. Another area of application of these items is toys for children. Every child will want to have a dollhouse with beautiful handmade paper furniture. To make such products, you will not need additional origami skills, you just need to follow the instructions provided.
Origami furniture is an interesting area that requires special attention. The manufacture of such figures does not take much time, and the resulting result pleases adults and children with its appearance. The main feature of the products is the maximum similarity with real items of sets: sofas, tables, cabinets, armchairs and chests of drawers.
It is unlikely to be possible to use such furniture in real life, however, the items will be a good option for creating a layout for a future room or designing a dollhouse. To achieve similarity with real furniture, textured paper is used in the design, imitating various surfaces: stone, leather, fabric, wood and metal. When creating objects, it is better to use paint, which does not completely impregnate the material, but only gives it color.
The following materials are used for manufacturing:
- Base material - matchboxes, a little corrugated cardboard, colored thick paper;
- Pieces of fabric, decorative film and texture paper for finishing finished items;
- Scissors;
- Pencil or black pen;
- PVA glue or any other for working with paper.
You can work with paper on your own, or you can connect loved ones to the process. Then the resulting products will be diverse, but together they will form a single ensemble.

How to do the following options
You can make anything out of paper. You just need to show imagination and perseverance. Consider master classes in the manufacture of popular types of furniture. Based on detailed instructions, you can make other types of interior items. The most popular are:
- Sofa;
- Dresser;
- Armchair;
- Closet;
- Table.
To find out how paper furniture is designed correctly, you need to consider each option separately.
Sofa
A paper sofa will look great both in a dollhouse and in a miniature copy of a real interior. Before you start, pay attention to the paper sizes:
- For miniature options, you should choose colored paper 10x10 cm;
- For execution in medium sizes, you need to give preference to a workpiece of 20x20 cm;
- To create a large-sized sofa, the dimensions of the material increase proportionally.
The color of the paper is chosen at will, but it is better that it fits into the future interior or imitates real furniture. Having picked up the materials, you can start manufacturing:
- A square sheet is folded in half, after which it is opened and folded perpendicular to the first;
- The next step will be an additional hem. The bottom edge is wrapped to the middle fold line, then folded again. The output is 3 fold lines, not counting the central one;
- The lower thin strip is wrapped on the first fold, after which two identical triangles are laid by bending the side parts diagonally;
- The accordion is folded to the end, and the upper part of the workpiece is bent to the middle. The workpiece is turned over;
- The lower corners are folded up in turn, and the upper ones are folded down diagonally;
- The workpiece is turned over again, bending one corner inward. This is how the back is formed.
Turning the product over, it is necessary to form the legs of the sofa and it will be ready. Such a beautiful and original item will become a real decoration of a toy living room or an original art object.

Fold the sheet in half

One more time in half
We make three bends from the bottom

Making corners from below

Raise up the bottom

Making side folds

Aligning the back

Making legs

Ready product
Dresser
The most optimal and profitable way to create a paper chest of drawers is to use matchboxes. They are conveniently put forward, so making an item is not difficult. If you want to make a chest of drawers out of paper, then you should use paper blanks. It is convenient to store small light things in this chest of drawers. Beads, beads, locks, clips and other little things for creativity and needlework will perfectly fit here. The top of the chest of drawers can be painted with colored felt-tip pens, giving it an original look.
The design of a chest of drawers from paper consists of the following steps:
- Drawing a diagram for creating boxes: this step is skipped if ready-made matchboxes or other blanks are used;
- Cutting diagrams along the lines, as well as assembling boxes for future chest of drawers;
- The entire chest of drawers is glued with cardboard for strength, however, it is not necessary to glue the front part where the boxes will be inserted;
- The facades of the boxes are pasted over with any material - fabric, film, leather, and a bead or button is attached as a handle;
- Legs for a chest of drawers can be made from pushpins - for miniature furniture or pipes from toilet paper - for overall products.
Such a chest of drawers is also a good gift for a girl with a lot of jewelry: all the jewelry will fit in the drawers.
Making boxes

Creating drawer elements

Connecting elements

We decorate the coverings with patches

We glue the facades of boxes

Create pens

Finished chest of drawers
Armchair
Making a stylish chair out of colored paper is also not difficult. To create it, you don’t even need glue and adhesive tape, you only need a sheet of paper of the required color. It is worth noting that cutting blanks from beautiful textured paper will give a better result than furniture from ordinary plain material. In addition, if you find diagrams that show pieces of furniture made in different styles, you can make an armchair that is as similar as possible to real furniture. For work, you need one sheet of paper in the shape of a square. Its dimensions are selected depending on the dimensions of the future product:
- Bend the square sheet in half, then open it and press one of the halves to the center fold line;
- Press the second part of the square to the center of the workpiece. Next, go over all the fold lines with your hand to clearly outline the lines formed. Open the workpiece and turn the front side towards you;
- One part of the 4 lines obtained must be cut off: this is done with scissors or a metal ruler;
- Fold the workpiece across the resulting lines, visually marking the center, bend the triangle to the right. Do the same with the left side, you should end up with two triangles superimposed on each other;
- The middle strip, remaining at the bottom, is bent over the triangles. Each fold line is additionally smoothed with fingers;
- The strip, which was previously bent up, is bent - it will serve as a seat. The side parts will become handholds, they must be glued from the inside to the seat.
It turns out an original and easy-to-make chair made of paper. To diversify its surface, you can stick decorative paper imitating leather on the seat.

Closet
The design of the cabinet is similar to the manufacture of a chest of drawers, which was described earlier. The difference will be that the frame should be higher, and in addition to drawers, shelves are needed. Some of the nuances of making a paper cabinet:
- For the blank, it is necessary to use a scan from a rectangular sheet of thick paper;
- The ideal size would be A4 format, if you need a larger product - the dimensions increase proportionally;
- After you draw a diagram, it must be cut out: first, the main elements are cut out along the lines, after which they proceed to cutting overhead valves;
- The frame of the model is glued without doors;
- The doors are cut out of the same paper. Later they can be decorated with a film: the adhesive layer of such material will allow you to apply it to the base without any problems.
Finally, decorative handles are glued to the doors. For this, buttons or beads are suitable. The legs are made from thick cardboard.

Table
Assembling a paper table is not difficult, especially if you already have experience with this material. There are many options for creating tables, but beginners should choose a less complicated way. It consists of the following actions:
- For work, a square sheet of paper is used;
- All sides of the square fold inward, forming mini-squares;
- Each square folds inward to form triangles;
- The triangles curve outward;
- The final step is the formation of the legs.
To ennoble the tabletop, stick beautiful decorative paper on it or paint it with colored felt-tip pens and acrylic.
decoration
A separate step is to highlight the decoration of finished products. Do-it-yourself furniture, the schemes of which can be found in this material, is decorated as follows.
| Material | Peculiarities | What is suitable for |
| Self-adhesive paper for furniture | You can use this material in the manufacture of any type of furniture. Such a film is ideal for beginners, because it is easy to cut, and the adhesive layer allows you to decorate the surface without any problems. | For countertops, chair seats, sofas and armchairs, for decorating cabinet doors and chest of drawers. |
| Use of paints | Paints allow you to show creativity, move away from the standards. Using paint, you can draw any pattern and pattern. When choosing a product, pay attention to the fact that it does not damage the paper base. Acrylic or water-based formulations are preferred. | For all kinds of crafts, especially for decorating the front parts of products. |
| Fabric Application | The fabric allows you to imitate the structure of the furniture as much as possible. | Suitable for sofas, armchairs and chairs. |
If gouache is used for decoration, you need to mix it with PVA glue (1: 1). After drying, the paint will not be imprinted on the hands, and the product will receive additional rigidity.
Do-it-yourself paper furniture will be an excellent option for a dollhouse or designing layouts for a future interior. Making miniature items is a fun activity that everyone in the family can get involved in.


Drawings and diagrams
During his life, almost every person faced a move or carried out repairs on their own, after which there was a lot of thick cardboard left. A large amount of paper material should not be thrown away immediately; practical applications can be found for it. In this article we will look at how to make a paper table with your own hands.
Cardboard furniture - is the idea worth the time?
An alternative to ordinary furniture is a self-made cardboard table. Which we very often throw away without thinking that this material can be used to create an unusual product. In order for the piece of furniture to be durable and not to bend under the weight of the thing placed on it, for this it is necessary to properly process the cardboard. How exactly - we will tell a little lower in the text.
Paper furniture has a lot of positive advantages:
- Stylish design. For your apartment, you can design any table, based on your preference and taste.
- Profitability. In the manufacture of such a piece of furniture, the costs are minimal, because they are only used to purchase the necessary tools.
- Mobility. When you move, you don't have to go through the whole nightmare of packing. Easily foldable furniture does not cause any trouble.
- Ergonomics. There is no need to walk through the expanses of shops in search of a suitable piece of furniture that would fit perfectly into the interior and be very comfortable.
- Security. Cardboard furniture does not contain any harmful elements. And since you make it yourself, you can easily check all the components.
- Environmental friendliness. If a piece of furniture has lost its attractiveness and former appearance, or for some reason you want to change the design, then you can simply disassemble and throw it away, since the cardboard material is not capable of harming the environment.
- Strength. Proper processing of cardboard allows you to extend the life of the manufactured piece of furniture.
Important! Despite many advantages, cardboard structures have one unpleasant drawback. Prolonged exposure to a humid environment causes significant damage, and the furniture becomes further unusable. Therefore, you should always remove the paper structure from the street.
Making a table using origami technique
A paper toy table that is made using the origami technique cannot withstand much weight, since it is made of plain paper. If you print paper that imitates wood on a printer, then the appearance of the paper cannot be distinguished from the real one, and it looks quite believable. Such a table looks great complete with chairs, which you can also make with your own hands using the origami technique.
How to make a paper table using origami technique with your own hands:
- We prepare a sheet of paper, which should be folded in half.
Important! To make a table, you need to use only a square leaf. If you have standard A4 paper, then you need to bend it in half diagonally. The result is a double triangle and a single rectangle. It is this that needs to be cut off to get a square-shaped leaf.
- Next, you need to open the folded sheet.
- The sides of your part must be bent to a vertical line.
- After that, bend it in half down, open the workpiece.
- Bend the top and bottom of the workpiece to a horizontal line.
- Now expand our workpiece.
- Diagonally, you need to roll up the right side and bend it to the side.
- On the left side, do exactly the same procedure.
- Roll the lower part of the workpiece up.
- On the top section of the paper, repeat exactly the same steps as with the bottom.
- Now we need to expand our shape.
- The right corner, which is at the top, must be bent down diagonally.
- Next - open the middle of our figure.
- Now the side parts need to be rotated so that a square is formed.
- With the rest of the corners, you need to carry out exactly the same actions.
- Next, we work with one square, in which the sides must be wrapped to the diagonal line (the bending of the sides resembles the method of folding an airplane).
- Now you need to open the workpiece.
- From the resulting workpiece, bend a figure that would look like a rhombus. In the end, we should have four diamond shapes that will be placed under the large square from the corners.
- Now you need to bend the resulting rhombuses in half up.
The paper table is ready! It can be used to play with dolls. The child will be delighted with such a new acquisition for his toys.
How to make a paper doll table?
Consider another option on how to make a paper doll table that will bring joy to your child:
- Bend the workpiece in the shape of a square three times, then turn it in the opposite direction twice, and then turn it over. Thus, we get the very first workpiece with the outlined fold lines.
- Then bend the middle of each side of the square to the center. As a result, the corners of the square rise up, thus forming the legs of the table.
- All folds are recommended to be carefully ironed with your hands so that the legs of the table are clearly marked.
It remains to turn our manufactured product over and decorate the puppet interior with it.
Paper laptop stand
Currently, almost every user has an indispensable tool for work and communication, which is a laptop. In addition to the computer itself, all sorts of peripheral devices are attached to it. The presence of removable hard drives, mice, flash drives and other necessary elements makes you want to purchase a table for convenience. Who does not want to run to the store, but wants to have a convenient laptop stand, there is a great solution - to make a paper table with your own hands.
Materials and tools:
- a laptop, the presence of which will allow you to correctly measure the future stand;
- yardstick;
- sheets of paper or newspaper to be used for the stencil;
- cardboard of a dense base, from which the stand itself will be made (an unnecessary box may come up);
- long line;
- pencil or marker;
- utility knife or large scissors.
How to make a paper laptop table:
- Newspaper or paper should be spread on a horizontal surface. Next, carefully carry out the steps to measure the size of the table and make a stencil.
Important! If the measurements are taken incorrectly, then at best the table will turn out to be crooked, and at worst, the stand will not withstand the laptop.
- First of all, we will make a proleg, which is a crossbar between the legs of the stand to make the table more rigid. With a tape measure, you need to measure the length of the computer device along the keyboard from one corner to the other. On paper, mark half of this length, using a marker. Next, you need to draw a line that will be half the base of the proleg. This detail should not be drawn completely, because if the slightest inaccuracy is made, the laptop will stand crooked.
- From the edges of the segment, you need to measure 4 cm and 7 cm upwards, after which you should draw a rectangle. Mentally divide our figure into 3 parts. The first third is almost a straight line at a height of 4 cm, for the second third of the part you need to make a bend to the line 7 cm at an angle of 45 degrees, using a template, or simply draw by hand. At the point of contact of two broken lines, you need to make a narrow sleeve, which will be a cutout to match the parts.
- We proceed to the design of the stand legs template. You can choose any angle of the table, depending on your personal preferences. The height of the left and right sides of the leg will depend on this.
Important! When you draw a template, you need to pay attention to the protruding clove. It will subsequently serve to prevent the laptop from falling. In height, it should be about a third of the thickness of the laptop.
- The slot in the leg that will engage with the prog should not be in the middle, but about ⅓ from the far edge. This affects the stability of the product.
- We draw bends in any form at your discretion. The slots that will be in the legs and the prog should be no more than 3.5-4 cm in height. Depending on the thickness of the cardboard, they should be about 4-5 cm wide. Both parts should be the same.
- We turn to cutting out paper templates. An unnecessary box having a relatively thick cardboard may be suitable as a starting material.
- With the lower cut, you need to attach the template of the first part to the perfectly even edge of the cardboard, otherwise the stand will swing.
- With one side, you need to carefully circle the template, then flip the template to the other side and circle it in the same way. As a result, one symmetrical detail was formed, which is a proleg.
- Now we draw the legs. On another cardboard, you need to lay out the second template and draw the legs, which should be completely the same.
- Cut out all the details with scissors or a clerical knife.
If you cut everything correctly and carefully combined all the details, then the table in the form of a laptop stand is ready. It remains only to install your digital friend on the table.
Plain cardboard table
A self-made table brings an original touch to your apartment. With proper processing of cardboard, your table can withstand certain loads. Consider another option for manufacturing an interior item.
Necessary tools and materials:
- packaging cardboard;
- regular and colored tape;
- paper tape;
- double sided tape;
- stationery knife;
- sharp scissors;
- dull knife;
- iron ruler or tape measure;
- simple pencil;
- eraser;
- wallpaper glue or PVA;
- sandpaper;
- kraft paper and tracing paper.
How to make a paper table with your own hands:
- First you need to design a countertop. For strength, it is best to make a two-level. Using a clerical knife, cut out three blanks from cardboard, the shape of which would resemble the designed tabletop. The first part is the top level, and the second and third will be the bottom level.
- Then cut strips of cardboard that need to be bent with an accordion and fixed with glue to the lower parts of the countertop. The strips must be the same in width, otherwise dents will appear.
- Next, we fix the second part of the bottom tabletop.
- Now we make the upper level, on which we also glue cardboard strips.
- When the glue is completely dry, you need to connect both parts of the countertop.
- To increase the strength of the countertop, with the help of adhesive tape it is necessary to fix the cardboard strips and corners.
- Now let's move on to building the base. For a corner table, you only need to make two legs. To increase the functionality of the table, you can additionally design several shelves.
- To build the legs, you need to prepare 4 identical sheets of cardboard. They can be either rectangular or square, as it all depends on the size of the legs. You can attach them with glue. At the junction, grooves are made without fail, which are fixed with glue.
Important! If the table leg is deaf, then in this case a single-layer cardboard is sufficient for the stiffening ribs, only they must be very tightly next to each other. In order to have a more reliable result, it is best to glue the stiffeners and shelves in 3-4 pieces at a time.
- To strengthen the edges of cardboard furniture, it is necessary to use kraft paper, which has a dark color. Using wallpaper glue, you need to glue all the seams with it.
- Next we do the finishing. First, all the elements must be pasted over with old newspapers, then the surface must be leveled with tracing paper, wrapping paper or kraft paper.
- White paper (or tracing paper) is glued to the entire piece of furniture, since it is much easier to decorate the furniture in this way.
Important! Before gluing kraft paper and tracing paper, they should not be cut, but should be torn by hand.
- And only now, after a layer of paper, you can apply acrylic paint. Thus, the basis for decoration is ready. Now the work of your imagination begins, the main thing is that after finishing work the designed table harmoniously fits into your interior.
Important! Also, the tabletop can be made from newspaper tubes. This option will create a special flavor in your room. In this case, you will have to acquire additional weaving skills.
How to make a cardboard table more durable?
- If you made a paper table with your own hands, then in order to give strength to the cardboard and protect it from moisture, you can use parquet varnish, which must be applied to the finished parts.
- When making furniture, make sure it is symmetrical. In the case of creating an asymmetrical piece of furniture, it is necessary to add additional supports to it, which would strengthen the structure.
- The presence of a large number of transverse supports makes the piece of furniture more stable.
- In the manufacture of a piece of furniture, various cardboard is chosen, which can be single-layer, two-layer or three-layer. The thicker the material, the stronger it is.
In principle, even from cardboard you can create practical furniture for domestic use. And what can we say about the arrangement of the dollhouse - there is no limit to the imagination. Use such a simple and affordable material to create various crafts - beautiful, original, applicable not only for decoration, but also in everyday life.
We also recommend
 How to make a healthy banana smoothie
 Harvesting asparagus for the winter recipes for cooking at home
 Chicken pie with zucchini and cottage cheese Dukan's recipes zucchini pie with cottage cheese
 Gingerbread with icing
 How to cook a salad with crab sticks and carrots
 Cabbage salad with bell pepper - the best recipes