Large gazebo with your own hands. How to quickly and cheaply build a gazebo in the country with your own hands: step-by-step instructions
The gazebo is one of the popular types of small architectural forms. Sooner or later, every owner of a suburban area thinks about building such a vacation spot for his family and guests.
Gatherings in the fresh air, at the same time, regardless of changeable weather conditions, will be the best pastime.

Choosing the type of gazebo for giving
Before choosing a place on which a gazebo will be built, it is necessary to decide on its purpose. You should think through everything to the smallest detail - how many people will be in it, its purpose (rest, place for children's games), etc.

The type and material of the gazebo will depend on personal preferences, on financial capabilities. The decisive role is played by the size of the suburban area. It is clear that a large gazebo in a small area will look out of place.

Garden gazebo should be combined in style with a country house. Many summer residents are considering closed-type houses so that even in winter you can have fun with family and friends.

There are several basic types of gazebos: open, closed, live, barbecue gazebos.

open
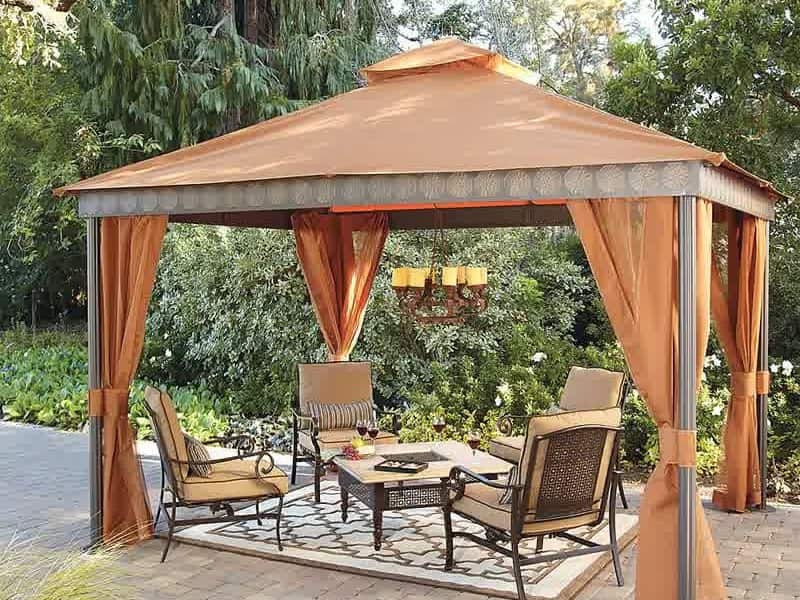
A simple, inexpensive and easy type of building that can be purchased ready-made or built with your own hands. The basis of such arbors is four pillars and a roof. This is the best summer option, which is suitable for a small area. It should be located near the house or in the shade.

Such arbors have small disadvantages:
- use only in the warm season;
- lack of protection from wind gusts;
- does not protect against insects.

Closed
This type of arbor can be considered almost a full-fledged house. They are equipped with windows, doors, as well as lighting, heaters, shelves, etc. It is easy to install a summer kitchen in them, and a barbecue (mandatory presence of a chimney), other accessories for a comfortable stay.

Closed gazebos will look great in large areas.

"Live gazebos"
A living gazebo does not require almost any financial outlay. This type is a natural construction consisting of real plants. Such a gazebo will be truly a work of art. Live gazebos are the realization of your most unimaginable ideas.

Barbecue gazebos
These are modern and sought-after projects, as they are able to fully satisfy the needs of homeowners who love to eat outdoors. It is a paradise for gourmets who prefer flavorful charcoal food.

Basically, they are made in the open, but if you install a high-quality chimney, you can also do it in a closed form.

The choice of material for building a gazebo
One of the stages of choosing gazebos is the material. This is an important point to take into account. Main materials: wood, metal, stone, brick, cloth

Wood
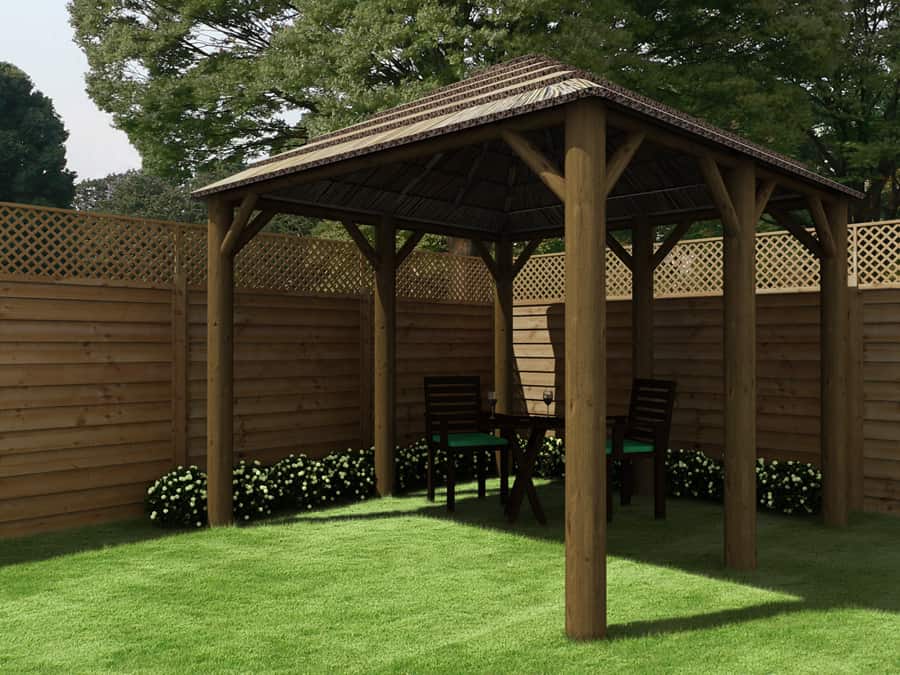
Arbors made of wood are the cheapest and most practical material. Wood is an environmentally friendly material, so it is necessary to protect the material from decay. The type of log gazebo will look perfect if the house and other buildings are made from solid pieces of wood.

Wooden gazebos for summer cottages, together with a house made of wood, will create a single style and unite into one composition.

stone or brick
This type of gazebo is strong, durable and aesthetically pleasing to the eye. They need a solid foundation of concrete blocks or tape. Very often this type of gazebo is combined with.

It is good to eat in it, arrange various festive events. And, of course, brick gazebos look advantageous against the backdrop of a brick house. The material is not combustible, therefore it is safe in terms of fire. In brick or stone arbors, coolness is well preserved.

Metal
Metal gazebos for summer cottages are simplicity, reliability and durability. There are a great many variations. Decorated with artistic forging, openwork gazebos will be a noticeable element of style in a summer cottage. This type of gazebo can be attributed to a stationary view, so the place for them must be chosen very carefully.

Textile
The fabric perfectly hides from the weather, muffles the noise of the street, relieves the invasion of insects and closes from prying eyes. The most popular is tarpaulin - wind-resistant and moisture-resistant material.

Garden awnings can be supplemented with mosquito nets. In order for such a gazebo to be in harmony with the style, it stands, decorated in the same style.

What shape to choose?
The shape of the gazebo also plays a huge role, so its choice should be approached responsibly.

Rectangular
This form of gazebo is very common. Buildings can be wooden and metal. Also, rectangular buildings can be built of brick.

Round
Such a gazebo is made of wood, polycarbonate with a small area for recreation. Walls can be made using willow weaving technology. Such a structure will be a real decoration of any suburban area.

Polygonal
This is a complex form of gazebo. For its construction, it is necessary to think over schemes and drawings. As a rule, such gazebos have six or eight corners. Such a complex building will give solidity to the personal plot.

Choosing a gazebo style
In order for the gazebo to be in harmony with the surroundings of the adjoining area, it is necessary that the style and decoration are combined with the architecture of the house, and the dimensions correspond to the dimensions of the site.

Classic style
The classical style has a rich, restrained and austere style. As a rule, the gazebo has graceful, straight lines, strict forms, a simple and uncomplicated roof, precise outlines. A variety of decor in this style is inappropriate.

East style
This style captivates with incredible roofs, beautiful patterns and other decorative elements. Such arbors can be made of wood, brick, stone or glass. Sometimes gazebos in this style are divided into two recreation areas, which are separated by additional seats.

forest style
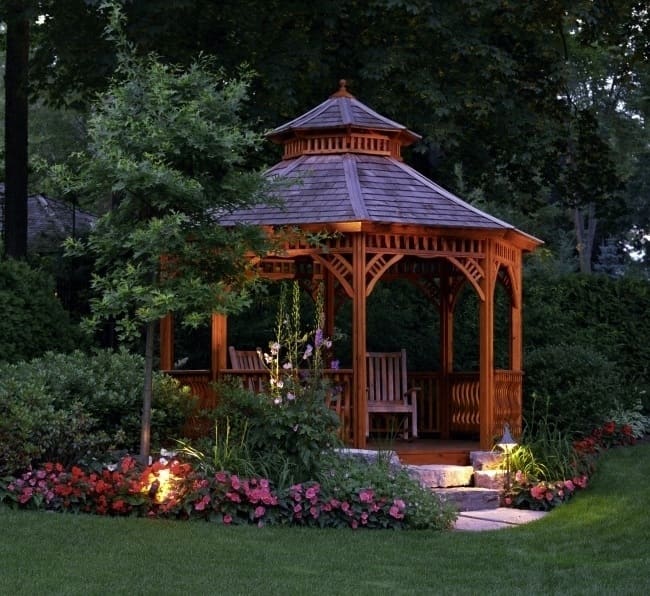
Arbors in the forest style will look best in the garden. You can decorate the gazebo in the form of a bird's nest, created from intertwined branches, or in the form of a hermit's hut. In this style, it is worth including imagination and fantasy.

Country style
Arbors in a rustic or country style are made of wood. For design, there are truly huge opportunities here, because the gazebo can be in the form of a village house or a forester's hut. You can remember fairy tales and arrange it as a hut on chicken legs or the house of Winnie the Pooh.

Detailed instructions for making a gazebo
The fastest and least expensive option, a simple rectangular shape with a wooden shed roof.

Site preparation
When choosing a place for a building, you need to take into account its location in accordance with the existing architecture, the possibility of supplying communications, if necessary, lighting.

The direction of the roof slope so that precipitation falls to a certain place. Take into account the approaches and the review from the open areas of the gazebo.

Foundation
Using pegs, twine and tape measure, we make markings, align the diagonals.

Foundation blocks are installed around the perimeter of the gazebo. There should be as many blocks as there will be supporting pillars that will stand on them, it depends on the size of the gazebo and a few more for the middle.

We cover the blocks with waterproofing material - roofing material.

Bottom trim
The timber is supplied for sale with a size of 6 meters, it would be optimal to make the size of the gazebo, taking into account this factor, so that there are fewer scraps. The beam of the required length is fastened around the perimeter with corners, and the diagonals are also checked in parallel.

Rack installation
Racks made of timber are placed at the corners, and at the places where the foundation blocks are installed, along the back wall of the rack, they are sawn off 20 centimeters less than the front ones, to create a slope of the roof. The size of the entrance is outlined along the front and racks are also installed on both edges of it, fastened with corners, reinforced with jibs. During installation, we constantly check the level from two adjacent sides so that the racks do not collapse.

Top harness
Connects the structure, mounted with a beam, similar to the bottom.

Floor
Stages floor and roof can be reversed in sequence, if the weather is going to turn bad, then after the framing go to the roof, but on the finished floor, it is easier to work.

The floor joists are attached to the bottom harness with the help of the corners of the floor, the step size depends on the thickness of the floorboard, the thinner the board, the smaller the step. If you choose the optimal board with a thickness of 40 ml, then the distance can be made 1 meter.

Then the floor boards are nailed to the joists with nails. It is better to sand the boards in advance and cover them with impregnation so as not to wipe them during operation.

Roof
A simple rafter system is arranged. Rafters are made from boards. For overhangs, the elements of the supporting structure of the roof are made longer on each side, for example, 25 cm in front and 20 cm in the back, this is done so that precipitation does not fall on the walls and into the gazebo itself.

While the rafters are attached to the sides and the structure is re-calibrated, the railing can be installed.

Depending on the choice of roofing material, a solid crate is made of planed dry boards or a crate of unedged boards, at a distance of 30 cm from each other. Using a metal tile, the boards for the crate are stuffed with falling under the wave, otherwise the tile will not fall.

The material for the roof is thrown over, leveled and fixed with roofing nails.

The frame and roof are built, there are still works on sheathing the gazebo.

In the classic version, the sides are sheathed to half and the back wall is completely. A beautiful log look is acquired by finishing from a block house.

For harmonious contrast, the frame and walls can be painted in different colors, for example, dark racks and light walls. You can also use decorative elements made of wood.

Such a gazebo, installed with your own hands, will bring comfort and pleasure from its use for many years. We hope the article was useful, and you will make the gazebo of your dreams, which will please the eye every day!
Photo selection of beautiful gazebos for summer cottages


“A good gazebo, but rarely poured!” And if there is also no gazebo in the yard, then the guests will be completely dissatisfied with the event. The first problem can be easily solved by making a small investment in a few boxes of "combustible material", but with a gazebo it's not so simple. Here you have to be moderately rich or hardworking enough.
Many construction companies and individuals offer to build gazebos at a price from 60,000 rubles for a simple wooden structure 3 by 3 meters. Beautiful and exclusive gazebos are already from 450,000 to 3-3.5 million rubles, an important role in pricing is played by area and materials (a log house and metal are always more expensive). But not everyone can pay such an amount for some small architectural form in their yard.
It is far from a secret that the materials for building a gazebo cost a penny (compared to its market value) and up to 85% of the money is taken for the work itself. Also consider the cost of foundation and ground work. Now we will consider a detailed guide for building a gazebo with our own hands and with its help we will make a high-quality wooden product that will not be inferior to the “factory” options in any way!
Choosing a place to build a gazebo
The gazebo is built to solve many problems. It must simultaneously receive a large noisy company and serve as a place for a romantic dinner, so the owner himself must choose its location on his site. In most cases, this is the most secluded place that is not visible from all sides and where there are no drafts. It is also necessary to take into account the following points:
- The construction of wooden arbors should be carried out away from septic tanks, sewer channels and septic tanks in a private area. Nothing should interfere with your rest, especially unpleasant odors.
- It is necessary to take into account not only the upcoming stages of the construction of the gazebo, but also what will happen next. A brazier or tandoor can become a problem in the future if the building is next to the house. It is better to retreat at least 3 meters from all buildings.
- You will certainly want to take a look at the pond or forest after a hearty dinner. It is better to place it in the most picturesque corner of the yard.
- Pay attention to drainage. Recesses in the yard should be excluded - there is a high probability of undermining the foundation.
- A sheltered place from the wind. Sit quietly - you will continue.
We figured out the basics of choosing a location, now let's move on to the phased construction of a gazebo and consider how to make an excellent design from inexpensive materials without throwing a lot of money down the drain.
Do-it-yourself garden gazebo foundation
Is it necessary to make a foundation? No, you can do without it, if you are not worried about skewed structures and periodic spring restorations of arbors. Without a foundation, the supports will sag under the weight of the roof and the entire structure, they can be washed away by spring waters or simply go to the side after glaciation / thawing of the soil in spring. In any case, it must be done - so right. Consider several options for how to install the foundation without extra costs.
. Making it is easy enough. We take a drill with a diameter of 50-60 centimeters (it’s easier to borrow from a neighbor) and start making a wooden gazebo with our own hands. We make markings (for example, 4 by 4 meters), drill 4 holes 1 meter deep, pour concrete. You can use cement M300, the proportion with sand and gravel - as for foundations. After 15-20 days, you can safely build the ground part of the structure.
Brickwork
. A very simple method that suits everyone who knows how to wield a shovel and trowel. The essence of this method is as follows: dig a hole 60x60x60 cm, then pour 1-2 buckets of concrete on the bottom, lay 2 silicate bricks along and 1 side by side across. Lay all subsequent rows of bricks in a checkerboard pattern until the “column” is about 20 centimeters above ground level. So lay out 4 columns (or 6 pieces, if you are planning to make a hexagonal wooden arbor with your own hands), after 15-20 days you can proceed with further construction. 
Buried block
. We take a shovel and go to bury the treasure in the yard. An ordinary concrete block 50-90 centimeters long will do. It is necessary to dig an appropriate hole, pour 10 cm of rubble (if you manage to ram it, it’s generally excellent), 5 cm of sand and lower the block. Repeat this for each column. 
All of the above methods are suitable if you are making a simple gazebo with your own hands (up to 30-40 square meters). Heavier structures (including those with multi-level roofs) are installed only on strip and deep column foundations, since the mass of the structure can deform brickwork, blocks, or poorly made concrete. In some cases (for example, two-story gazebos), even drainage systems will be required. 
According to all SNiP and recommendations, the foundation must stand for at least 24 days, but the actual period of its hardening is much less, since it will not be affected by heavy loads until the roof is built and all furniture is installed. You can start "light" work as early as 5-10 days after pouring it - nothing will happen to it. Now is the time to consider the features of mounting a gazebo with your own hands, drawings and dimensions of the structure, materials.
Making a wooden frame
Let's start with the racks. Actually, you can't start anywhere else. We will use a wooden beam 30 by 30 centimeters, since it looks much better (massive details are always in fashion) and it will be easier to attach a body kit to it. The minimum dimensions of the beam are 10 by 12 cm. Now you have 4 supports that need to be fixed on concrete posts, and this can be done in several ways.

When implementing the construction of wooden gazebos with your own hands, you should use the level as often as possible, especially in the case of concreting supports, because it will be impossible to fix it. It should form a right angle with the concrete base and be perfectly level with respect to the plumb line.
Now you can move on to the lower strapping of the supports and laying the lags. It is necessary to make the most stable surface that can easily withstand the weight of the flooring and the large number of people who will be on it. Consider the process of building a gazebo floor for a summer residence with your own hands step by step.
STEP 1: strapping. We use a beam 10 by 15 cm (this is with a margin), which must be laid between concrete columns and screwed to the supports below. It should go strictly horizontally, measure with a level. When the angle deviates, something must be placed on the support, which is lower in level. 
STEP 2: we make a central jumper-reinforcement. We fasten a bar 5x10 cm exactly in the middle of the two sides of the harness of the gazebo. It will prevent subsidence of boards or any other flooring in the gazebo. If the structure has sides greater than 3 meters, the number of jumpers must be increased. Approximately 1 gain per 120-150 centimeters. 
STEP 3: we stuff the boards on top. You can use boards 250 wide and 3-4 cm thick - the best option for solid loads. The length can be chosen as full (through the entire gazebo and fasteners to the reinforcements), and partial (only between the reinforcements). It is better to use short boards, they will last much longer and will be cheaper to replace if damaged. You can use both nails and screws, it doesn't matter. 
STEP 4: open with anti-corrosion protection. An ordinary inexpensive impregnation will do. A good varnish can be processed after all work is completed, its consumption will be much less after the initial impregnation of the tree, which you will do now. 
When fixing floor lags and all reinforcements, it is better to use metal corners with perforated sides. You can find them in every hardware store. It is better to choose the height of the clamp according to the height of the wooden beam in order to fix it as best as possible. It would be appropriate to have a powerful screwdriver, since you will have to screw in a lot of large screws, you can do this with a screwdriver, but it is quite difficult.
Additional support posts with a gazebo length of up to 4 meters can not be used, but if the structure is larger, then it is necessary to strengthen the upper harness. In the middle of the wooden beam of the lower trim, you need to fix a metal rack (a 30-45 mm square will do) and level it, it will “support” the upper wooden trim, which we will install in the next section of the article.
Do-it-yourself gazebo roof construction - step by step instructions
Now let's move on to a more complex process - the construction of the roof. There are a lot of options on how to make it, up to the construction of multi-level Chinese structures with curved corners. But our main goal is a do-it-yourself gazebo from improvised materials that can be found in any market or in the warehouse of a thrifty owner, so we will make a simple and reliable design.
STEP 1: top harness. Everything is exactly the same as below, only now we use a beam of 10x10 centimeters. The load on it will be much less than on the floor, so it makes no sense to make the structure heavier and transfer money. If the roof is made of flexible tiles or roofing felt, you can put a bar at all 50x60 mm. In the middle we twist with additional support posts, which we considered in the previous section. 
STEP 2: main rafters. A wooden beam of 80x30 mm is suitable for a gazebo with parameters of 4x4 meters or less. Install from the corners of the top trim to the middle of the room, it would be better to use a plumb line and a professional level to set and secure all 4 rafters equally. Cut the upper edge of the bars at an angle of 45 degrees so that the rafters converge in the center of the room without gaps and protrusions. 
STEP 3: auxiliary rafters. We find the center at each side of the upper harness and from it we lay auxiliary bars (40x30 mm) up to the center. They will support the roofing material, prevent subsidence of the roof. Be sure to lay everything in level, maintain the same value. Check the evenness of the structure, if nothing protrudes anywhere, you can twist everything with screws and fasten it with metal clamps at the top. 
STEP 4: lay sheets of plywood or OSB. Everything is simple here, if the rafters are well aligned beforehand. Screw every 20 centimeters to the main and auxiliary rafters. You will definitely need to cut sheets, make it easier on the ground, after marking the necessary lines. 
STEP 5: roofing material. Now you can lay anything you want, but euroroofing material or flexible tiles will look beautiful. We begin to lay it from below, or from above, slipping each next sheet under the bottom of the previous one with an overlap of 4-5 centimeters. From above, you can make a "skate" to prevent moisture from entering. On the main rafters, you can easily tuck the edge of the material and screw it in to avoid unsightly metal protection against water. 
We looked at how to build a gazebo with our own hands and you only need to additionally varnish the whole tree so that it does not corrode. It is better to do this at the end, because during the construction process the materials are always damaged and will have to be repainted.
If you want to decorate the structure, you can install wicker panels on the bottom trim or lay a wooden beam - it will be much more comfortable and tidy inside. But if you are looking for a way to make a gazebo with your own hands with minimal investment, then you will have to give up such decorations. One panel (400 by 80 centimeters) of woven wicker or planks will cost at least 4,000 rubles.
Having their own house outside the city, many people think about building such a cozy and useful house next to it. After all, you must admit that a chic garden, well-groomed beds and neat paths with impeccable fences do not create a complete picture of a garden plot without a cozy gazebo on it. Today, it is a rare case when a country house does without a full-fledged recreation area on the territory or a small garden gazebo. The construction of a country gazebo is a great way not only to decorate landscape design, but also to create an additional place for complete unity with nature. In the gazebo you can have a great breakfast with the whole family in the early morning, enjoy evening tea, or accommodate guests invited to a picnic. Under the roof of a cozy building, you can hide from the scorching sun or shelter from the rain. The design of the gazebo is another chance to show the talent of the designer and give comfort to your possessions.
The main types of gazebos
Let's look at the main options for making gazebos located in the territories of a country house.
An open gazebo is the easiest to assemble. The simplicity of the design allows you to meet in the shortest possible time and create a full-fledged recreation area. An open gazebo for a summer residence is assembled from supporting posts and a hinged roof, after which it is decorated with decorative elements and partitions between the posts. Inside the gazebo, you can place a comfortable table, benches or chairs with pillows and blankets, and next to organize an area with barbecue and grill.


In an open gazebo in warm weather, it is very pleasant to enjoy the singing of birds and the gentle sun, this is the best option for family meetings.
However, in cool weather there is a risk of freezing in the open air, so in winter this design loses all its relevance.


A closed gazebo is a house, closed on all sides by walls. In such a gazebo, bad weather and insect raids are not terrible. You can sit up in it until late at night and not disturb those who went to sleep.
However, closed space will not allow you to fully enjoy nature and in order to breathe fresh air, you will have to periodically go outside.


Particular attention should be paid to the design, which should not only shelter people from rain, snow and sunlight, but also be aesthetically attractive.

A gazebo with a barbecue area - solves the problems of cooking on an open fire. Such a gazebo is equipped with a special barbecue and a high-quality chimney.
It can be equipped with a full-fledged kitchen area with a stove, cabinets, a table for cooking and a separate dining area.


A living gazebo is a lightweight structure, the main part of which is climbing plants that create dense green walls (hedges). In such an arbor, a complete feeling of unity with nature is preserved, it is pleasant to enjoy the smell of plants and invite friends. With proper care, such gazebos can please the eye for more than one season.
Also, such an arbor can be decorated with grape seedlings, the fruits of which will hang in beautiful clusters, while creating a natural shadow.

Materials for manufacturing
Wooden gazebo. Wood is the most popular material in the construction of buildings of this type. It is easy to make a structure from it with the desired design and various shapes, the main thing is to correctly determine its dimensions, and impregnation with water-repellent agents will make it possible to preserve the original appearance of wood for a long time.
Usually, spruce or pine is used for the construction of wooden arbors, less often oak. Wood is a fairly light building material, so it is not necessary to build it for construction.


A stone or brick gazebo is a great option for building any type of gazebo in which you plan to place a barbecue. Brazier and barbecue can be placed on a special stand or podium made of stone and brick.


Fabric gazebos for summer cottages will become your favorite place to relax. A gazebo in the form of a tent looks very interesting, attracts attention and allows you to diversify an ordinary yard.
It can be equipped with soft pillows and then it will become a real decoration for your site.


Metal gazebos - you can buy relatively inexpensively from manufacturers, both in finished form, and make it yourself, while realizing your dreams and fantasies.
Usually these are very simple, not overloaded with details designs made of wrought iron, which gives them a special charm.
Choosing the right style for summer construction
Classics - nothing superfluous, everything is concise and strict. A gazebo of a regular shape, a rectangle, without additional decor, furnished with the simplest pieces of furniture. This is a simple option for giving, where it is planned to spend little time and not arrange frequent long gatherings.


Rustic style is an interesting design with carved windows, shutters, a real stove and various details like a samovar, tablecloth, dried herbs and candles instead of lamps.

Building a gazebo in a rustic style is a rather complicated process that requires special flair and certain knowledge.

Oriental style - an exotic design for a country gazebo. The basis can be a real Chinese pagoda with light walls and a multi-tiered roof. The decor welcomes the presence of pillows and a lampshade, as well as many Chinese lanterns.


You can decorate a country house for relaxing on the territory of your site in any style that the owner of the estate likes.
There you can put a rocking chair, a table with your favorite books, an old gramophone with records. In any case, the presence of such a house will sometimes allow you to feel in complete harmony with nature and spend some time alone with yourself.
A gazebo in the country should be a must, because it serves not just as a decoration, but is a place of rest for the whole family and guests. In the hot summer, it will become a real oasis where you can hide from the merciless sun and breathe fresh air. And for all this to become a reality, you need to know how to build a gazebo in the country with your own hands. The process is not the easiest, but pleasant.
If you decide to decorate your summer cottage in this way and are ready to make it yourself, then the variety of arbors today is simply huge. Which one is best for your cottage?
Country gazebos: what are they?
Before you begin to study the stages of building a gazebo, you need to decide on its shape. It is important that in its style, design, it is in harmony with other buildings on the site. For example, polygonal structures can easily fit into any exterior, and it is desirable to complement round ones with flower arches, it is desirable to decorate rectangular ones with forged elements. In open arbors of a rectangular shape often place a brazier, a barbecue.
The shapes and designs of modern gazebos amaze the imagination of even experienced people in these matters. But you can still classify according to the form:
According to the type of construction, 3 types of arbors are distinguished:

The size of the gazebo depends on the site itself and the free space on it. For a small family, a 3 * 3 polygonal design may be enough, and those who like to spend time outdoors will like rectangular arbors with an area of 6-12 sq.m. It should not only fit into the overall architectural ensemble and landscape, but also meet the owners' ideas of beauty and functionality.
What materials are considered the best for a gazebo?
What materials are chosen depends on how much it costs to build a gazebo. Building materials for the gazebo can be used the same as for building a house. The difference between these buildings in most cases is only in size, so there are no restrictions.
If you are interested in how to build a gazebo, then in choosing a material it is better to focus on building skills.
We suggest considering the most common materials:
Wooden gazebos
wood is a versatile material, moreover, it has a natural origin, is clean and safe. It is not difficult and pleasant to work with a tree, so any home master will be able to cope with this work. However, wood has a significant drawback - it needs constant care, treatment from pests and exposure to atmospheric phenomena. Arbors are built from wood in such styles as Provence, Japanese, Italian classics, chalets, rustic and Mediterranean.

Metal gazebos
Metal is a durable material, so buildings made of it will also last a long time. They look attractive, are fairly easy to make, and usually don't need a foundation. The main disadvantage of metal is that it can get very hot from sunlight, and it also needs to be protected from rust and corrosion. Pergolas made of metal usually have a light pitched roof and a rectangular shape.
Brick gazebos
Brick is the most suitable material for the construction of a solid structure. From brick, you can create a full-fledged summer house with windows, doors, heating, a stove, furniture for relaxation. Among the shortcomings can be called the cost of bricks and the need to lay the foundation.

All these materials can and should be combined to create a functional, beautiful gazebo. Some craftsmen manage to use rather unusual materials for construction, for example, plastic and glass bottles, old tree trunks, vines and reed mats, cement, wooden pallets. There are even "live" arbors, which are created only from plants and shrubs.

General rules for building a gazebo with your own hands
Most often, summer gazebos are built from wood, because this is the most affordable material in terms of price and installation. If it is necessary to make the structure as light and simple as possible, then it is made without walls, it can be supplemented with railings. Walls can be made lattice, and climbing plants planted nearby will cover what is inside. On a large courtyard, you can make a stone or brick gazebo and it is advisable to put them in an open space. Graceful forged structures can be arranged in small areas.
The construction of the gazebo must necessarily begin with leveling the ground or building a stone, concrete or brick platform. If you plan to make a heavy roof, then you need to make a foundation at least for the supports. Only light wooden structures can do without a foundation, and then if they have a light roof. If the surface of the site is flat, then a wooden flooring with a slight slope can be used as a base to drain precipitation.
The construction of gazebos involves the arrangement of the floor, and it can be wooden or garden tiles. Wooden roundels buried in the ground look interesting. The poles are installed in the same way as for fences: wooden poles must be burned and treated with a bitumen composition before being buried, metal poles can simply be dug into the ground or concreted.

When choosing a material for a roof, it is better to give preference to light ones, for example, shingles, metal tiles. Some summer residents like natural materials - wood or reeds. Sometimes, in order to create a single ensemble, the gazebo is covered with the same material as other structures.

Stages of building a gazebo
You can, of course, order the construction of turnkey gazebos, but your own creation will be much better. True, you will have to spend a little time, but the result of the work will please. construction is carried out in several stages, which we will discuss later.
Stage 1 - foundation preparation
The foundation is made for any building in order to make it durable and strong. It is necessary to start studying the question of how to build a gazebo by studying the types of foundation. For such structures are usually used:
- columnar foundation, which is suitable for light structures, such as wooden ones;
- piles are recommended to be erected on marshy soils;
- slab foundation is considered universal and is laid on any soil;
- tape is best suited for buildings made of brick and stone.

The technological process of building a foundation in this case is much simpler and easier than for heavy buildings, but the scheme of work is not very different:
- creation of a project and scheme;
- calculation of materials that are necessary for the construction of the foundation;
- preparatory work, which consists of cleaning the territory and marking;
- remove the fertile layer of soil along the main contour of the foundation. For pile and columnar types, this work does not need to be done;
- formwork installation;
- arrangement of a cushion of crushed stone or sand, followed by tamping, compaction;
- to fasten all sections of the foundation, a reinforced frame is installed;
- fill the frame with cement-concrete mortar and level the surface;
- after drying (at least a week), the formwork is removed;
- if necessary, waterproofing of the foundation walls is carried.
Pile and columnar foundations are done a little differently. Under the pillars, it is necessary to dig holes and lay sand cushions on their bottom. You can refuse to build a foundation at all if you prefer portable structures.

Stage 2 - construction of the gazebo frame
If we are building a frame-type gazebo, then the supporting function is assigned to the frame, which can be made of metal or wood. The frame consists of vertical braces, racks, which provide structural rigidity, upper and lower trims. For an open type of gazebo, it is not necessary to sheathe the frame.

There is nothing complicated in mounting the frame, but it is important to observe accuracy and accuracy, to make the connections correctly. If a frame made of timber is chosen, then it must be treated with special protective compounds and it is imperative to follow the rules for installing a wooden beam. If you follow the rules, the structure will last for many years.
Start working on the frame from the timber should be done with the bottom stroke. Then you can proceed with the installation of corner and intermediate racks, and then - the upper trim. The lower harness is assembled on the foundation, the bars are joined by cutting. Details of the lower strapping can be fastened with self-tapping screws, nails. You can strengthen the structure with the help of metal corners.

The metal frame is constructed from profiled pipes, a channel, and corners are needed for braces. Assembly requires a welding machine. It will be interesting to look at natural wood trim, forging decoration, plastic panels. According to the drawn up drawing and dimensions, cut the channel for the base. Next, weld vertical racks consisting of pipe sections to the base. In the upper part, weld pipe sections that will act as rafters.

Stage 3 - arrangement of the roof
Even if it is decided to build a gazebo with improvised materials, the roof should be its highlight. In fact, it is this element that is the main decoration, so its creation must be taken seriously. Roofing material can be chosen in accordance with the overall style of the gazebo. The roof can be:
- shed (mounted on square and rectangular arbors);
- gable (suitable for rectangular structures, it needs hanging or inclined rafters);
- tented (consists of 4 triangles, crowned with a ridge knot);
- multi-pitched (suitable for arbors of complex configuration, according to the principle of the device, it is similar to a hipped roof);
- domed (designed for round buildings).
The material for the roof should be light, moisture resistant, withstand strong gusts of wind. Roofs made of soft materials, such as bituminous shingles, look beautiful. Polycarbonate is often used for roofing. When fastening it, rubber gaskets are used, which will prevent the expansion of polycarbonate from high temperatures. Fasteners do not need to be tightened very tight. A polycarbonate roof can be single or gable, and round ones also look great.

Metal roofing is another common material. The first bar of the counter-lattice is attached to the end of the ramp itself, and the next bar is attached in increments of 28 cm, the ones following it are placed after 35 cm. The sheets are joined by overlapping and screwed to the crate with screws.
Option - gazebo-extension to the house

It is good to have a separate area for outdoor recreation next to the house. A gazebo attached to the house is much cheaper than a detached building. In addition, it will require less space. For small areas, this will be the most suitable solution.
If it is glazed and heating is installed, then this room can become a full-fledged room.

From a purely practical point of view, it is recommended to place such an arbor not against a blank wall, but where there is a window, a door. This will greatly simplify the service of guests and serving dishes on the refectory table. The construction of such a gazebo consists of the same stages. The work is not difficult, so you can cope with them yourself.
Do you want to make something with your own hands, so that it pleases you and your loved ones for a considerable amount of time?
A good choice would be a small design like a gazebo. Building a gazebo with your own hands will be the best option.

Just imagine how, with a proud look at a joint dinner at their summer cottage, you tell your friends and family how you yourself made this cozy corner.
How to make a gazebo with your own hands
For the first steps in this matter, you will need your imagination. Decide on the place where your creation will stand. Prepare it by clearing excess debris.

Find a photo of the desired gazebo or imagine it yourself and think it over to the smallest detail (arbor dimensions, shape, additional details, color, style). Well, if you have the opportunity to sketch your thought. This will help you concentrate on the product and not be sprayed on trifles. Significant savings in time and effort.

Also finish the scenery to make the finished gazebo better. Create a more accurate drawing with all measurements, a gazebo project. Width, length, distance between supports. Choose the material from which you would like to see your gazebo.

After choosing the form, the foundation is laid and the frame of the building is erected. The final step will be decorating the structure.

Take your gazebo drawings and get down to business. This will simplify the entire assembly process of the building, as well as the availability of all necessary tools and parts.
Wooden gazebos
This type of arbor is found most often in the plots. Such structures are famous for their comfort in cold weather, in comparison with arbors for summer cottages made of metal or other material.

Wood is an environmentally friendly material, which plays an important role if you take children with you to the country house.

You don’t have to worry about pests or fungal diseases, since the gazebo can be treated once with special preparations.

In the future, their presence evaporates, and only those against whom they are intended will feel them.

The tree implies the ease of construction of parts, as well as their fastening. With proper care of the raw materials, it will serve you for a very long time. The nice and natural appearance of the gazebo will not leave absolutely anyone indifferent and will only emphasize your site from favorable angles.

For a long period of operation of the building, prepare the most durable frame and foundation. This will save the gazebo from subsidence on the ground and skewing it in all possible directions. Thoroughly treat the surface with an antiseptic. This will kill all unwanted germs and infections on it.

It is best if your gazebo design does not look pretentious against the background of the rest of the site. Minimalism in detail has never made things worse.

Roofed pergola
This type of structure will allow you to enjoy your vacation with your family at any time of the year in any weather.
A variety of summer buildings implies the absence of both a roof and a pair of walls, is limited only by partitions or is covered with an awning. It can also be supplemented with a net against small insects if you plan to spend evenings in it.
Note!


In the process, prepare sand, cement, wooden blocks, piles and nails. Tools such as a hammer, planer, grinder and saw will become your indispensable helpers.

It is better to divide all the work into a couple of stages. So you will approach the task more carefully and it will be easier to track what and how much you have left to do.

Location of gazebos
It is contraindicated to build gazebos in recesses. Since all the moisture will be absorbed into the raw material and after a while it will begin to rot.

Note!


The most reliable option is the foundation on the columns. Place the walls on the base of the foundation, not the floor.

The best solution for the location of the partitions will be when some are protected from the wind, and some are open. Avoid building blank walls, this will create an echo effect. Select the material for the roof in relation to the residential building.
DIY gazebo photo


Note!


