Concrete floors in the washing room in a wooden bath. How to insulate the floor in the washing department of the bath? Video: a variant of the organization of draining water from the bath
How to process the floors in the bath? This worries many. The problem is complicated by the fact that the most common material for finishing these structures is wood, which has low moisture resistance. Many building materials undergo accelerated destruction at high humidity and temperature. Even concrete requires special protection.
Problem Features
The floor in the bath during constant operation is in rather difficult conditions, especially for the coating in the steam room. Here, the material is exposed to water, saturated water vapor, which condenses on the walls and floor, and the temperature rises sharply to 60-70°C in a Russian bath and almost 100°C in a sauna.
The floor in the bath during constant operation is in rather difficult conditions
In the sink, the temperature is lower and there is no steam, but the chemical action of detergents is added. In addition, the soil also has a rather serious effect: water, especially during the flood period, is able to penetrate from below and flood the floor. It should also be mentioned that there is a huge difference in temperatures inside the room and under the floor. Under such conditions, various microorganisms, fungi and mold actively develop, which causes the process of decay of the material.
The need for special protective measures is not in doubt. The problem is not whether it is necessary to protect the material, but how to treat the floors in the bath from decay. This task is complicated by the same specific bath conditions. The products used should not decompose when exposed to temperature and hot water, releasing substances harmful to humans. Many fillers become dangerous in the steam room: you can not use chipboard, plywood, polystyrene, many paints and varnishes.

 The products used must not decompose when exposed to temperature and hot water.
 How can you solve the question of how to process the floor in the steam room of the bath? The most popular material is wood, and it is it that undergoes active decay in wet conditions.
On a note! To protect the material, the most effective impregnation with maximum penetration of the antiseptic composition deep into the wood.
It is also possible to use external protective coatings, which give good results in other bath rooms except for the steam room.
It should not be assumed that other floor materials do not require protection. Concrete in a bath is able to collapse quickly enough, so the task of how to process a concrete floor in a bath is no less relevant than protecting wood. When strengthening the concrete screed, the necessary additives are introduced at the stage of preparing the mixture. They increase the water resistance of concrete, and exclude the destruction of metal reinforcement.
Principles of protection of wooden floors
When deciding how to process a wooden floor in a bath, the following goals are set:
- Ensuring moisture resistance. All impregnating compositions provide a different level of such protection, but all are based on blocking internal channels, which prevents water from penetrating deep. An important indicator is the depth of penetration of the substance into the wood.
- Antiseptic, antibacterial effect. Rotting wood is caused by the vital activity of fungi and wood-destroying microorganisms. The introduction of an antiseptic into the material does not allow these pests to develop.
- Fire protection. Wood is considered a flammable material, and taking into account the presence of a sauna stove and firebox, increasing resistance to fire becomes a necessary condition for arranging a sauna floor.
- Aesthetic properties. A side, but very important task of the impregnating composition is often the change in the color tone of the wood. It can emphasize the beautiful structure of the tree, darken or, conversely, whiten the material. Decorating abilities are invested in most modern protective mixtures for processing wood products. Of course, when considering how to process the logs of the bath floor, this property does not play any role, which means that you can choose a more economical option. But when choosing how to process the floor boards in the bath, which make up the top coating, it is advisable to take into account this possibility.

 A side, but very important task of the impregnating composition is often the change in the color tone of the wood.
 The choice of compositions for a wooden floor
To protect the wooden elements of the floor bath covering, the following means can be used:
- Lacquer products. In bathing conditions, they can be used in all rooms, except for the steam room. Antiseptic ingredients are introduced into their composition to prevent decay.
- Impregnation agents. Their protective properties are based on the presence of phytoicides in the composition. With their help, logs and boards are processed.
- Antiseptics. These products are available in the form of solutions based on fungicides. Some compounds have increased toxicity, and therefore they must be coated with special varnishes or paint.

 To protect the wooden elements of the bath floor covering, various means can be used.
 In construction, impregnating compounds are widely used, with which it is necessary to process all, without exception, wooden elements at the construction stage of the bath. These funds are available in 4 categories:
- oil;
- water soluble;
- based on organic solvents and with a combined base.
On a note! Often, drying oil is used as an impregnation, which penetrates well into the wood, and after drying and polymerization forms a protective film.
Among branded compositions, such means are popular:
- Tikkurila;
- Texturol;
- Drevotex;
- BioZ;
- Pinotex;
- Senezh Ognebio;
- Neomid;
- Aquatex.
 Film-forming composition Natura (Teknos)
 The following compositions designed to protect wooden elements in the bath are distinguished by high environmental cleanliness:
- Water-soluble Sauna, made on an acrylic basis. With its help, a water-repellent polymer layer with heat-resistant properties is formed. At the same time, the film is able to pass air through itself. The composition has antimicrobial properties, destroying pathogens of infectious diseases.
- Waterproofing impregnation Schwartz prevents the development of fungi and the formation of mold.
- Natura (Teknos) film-forming compound creates a translucent coating that can reliably protect wooden surfaces.
- The Supi Arctic (Tikkurila) protective agent has high water-repellent characteristics. At the same time, the composition provides an attractive appearance, spectacular shine.

 Protective agent Supi Arctic (Tikkurila)
 A large group of protective agents are oil-based formulations. The following mixtures stand out: Supi Laudesuoja (Tikkurila), Sauna Natura (Teknos) and Rogneda. They are applied to dry and cleaned wooden surfaces with a brush or sponge. Drying time is 23-25 hours, after which you can heat the bath.

 Impregnation Aquatex
 Features of concrete floor processing
The concrete floor screed in the bath is subject to serious damage under the influence of humidity and temperature. To strengthen concrete, special additives and impregnating compounds are used. The following groups of such funds are distinguished:
- Strengthening compounds. By impregnating the surface layer of the material, such agents increase its strength. The principle of their operation is based on the filling of pores and microcracks, which ensures the solidity of concrete.
- Elimination of dust formation on the surface. The formation of cement dust on the concrete floor is considered their major drawback. This effect is enhanced after exposure to bath conditions. Special means form a protective layer that prevents dust formation.
- Moisture-repellent additives. Such impregnation significantly increases the water resistance of concrete. At the same time, resistance to various chemical influences of detergents and cleaners increases.
What compounds are used to protect the concrete floor in the bath? There are 2 main types: organic and inorganic impregnating compounds. Organic type products have an epoxy, acrylic or polyurethane base. Such substances have universal properties, ensuring the simultaneous implementation of all the above tasks. The most common polyurethane impregnation of concrete.
On a note! Inorganic-based products work on the principle of turning soluble components into insoluble substances, which makes it difficult for moisture to penetrate and wash out the concrete ingredients.

 The concrete floor screed in the bath is subject to serious damage under the influence of humidity and temperature.
 It is this type of impregnation that provides resistance to aggressive substances. When using these products, it should be remembered that when they are used, a chemical reaction occurs on the concrete surface, which can change the appearance of the floor. When assessing the degree of such changes, you should first test the acquired composition in a small area. A complete floor treatment is carried out if whitish spots and stains do not appear.
The floor in the bath is in extreme conditions. As a result of the influence of high humidity and temperature, both wood and concrete are destroyed. Modern impregnating compositions make it possible to effectively deal with the destructive process, primarily with rotting. It is important to choose the right product and carefully treat the floor. This procedure is carried out during the construction of the bath or during its operation.
Treatment of the floor in the bath: choose the impregnation for wooden boards
The quality of wood allows you to create an optimal microclimate for a steam room and effectively retain heat, making it the most common material for the construction of bath facilities. But such shortcomings as easy flammability, high susceptibility to moisture, susceptibility to damage by microorganisms and insects (fungi, rotting, etc.) dictate the need for processing boards, timber, logs with special protective compounds.


Types and characteristics of various compositions
All the compositions used are a special chemical liquid that has a disinfecting effect on the treated surface, eliminating mold and dirt.
- Acrylic-based, water-based formulations impart dirt-repellent qualities to wood, moisture resistance and reduce the likelihood of biological damage. These funds are preferable to use in the rest room and dressing room.
- Organic impregnations are characterized by high moisture resistance and strength of the protective film they form.
- Compositions based on natural wax and urethane oils are absorbed to a considerable depth, perfectly protect against the destructive effects of water, and give the surface a pleasant velvety. The disadvantage is the need to ventilate the room from a strong smell for 2 days.
- Combined products increase not only the moisture resistance of the material, but also its fire safety.
Important! Impregnations used for bath floors should be odorless and emit toxic substances.
Supporters of the use of absolutely natural materials can use waste products from the production of sunflower oil for wood processing. They are impregnated twice, with a three-day break. This is a fairly effective tool, but somewhat inferior in quality to synthetic compounds, but significantly superior to them in terms of environmental safety.
The use of impregnations at the stages of construction and operation of the bath
The use of antiseptics during construction allows you to extend the life of the building by 5-7 years. They pre-process all wooden elements - boards, logs, timber.


Attention! The only way to refuse the use of impregnations is to use a more expensive material that has undergone heat treatment.
During the operation of the bath, the need for antiseptics remains. To wash surfaces, you can use products that are harmless to humans with them.
Bath floor processing technology
Depending on the tasks, you can choose compositions with a tinting effect. The main thing when carrying out internal work is the absence of harmful components in the composition of the product that can be released into the atmosphere. Impregnation for floors of saunas and baths should not give the surface a slip effect. Before starting work, you must carefully study the instructions, in their process, for safety reasons, use protective gloves and goggles.
Wood processing procedure:
- Cleaning the floor surface from dirt and dust;
- Sanding wood if it has darkened;
- The optimum temperature for work is above + 5 ° С;
- Application of impregnation in at least 2 layers with a roller, brush or spray gun in the direction along the fibers;
Advice! Slots and end faces require especially careful processing - here moisture is absorbed most actively.

- After finishing work, the bath must be heated and well ventilated.
The acquisition of unknown products due to their low price in the future may result in harm to health due to the release of toxins by wood when heated - dubious quality may be hidden behind cheapness.
When buying impregnation for a bath floor, you need to pay attention to the following factors:
- Material condition:
- Fresh lumber;
- Wood without lesions;
- Partially damaged material;
- Surfaces with significant lesions.
- Purpose for internal work;
- Availability of a sanitary-epidemiological conclusion on harmlessness to people;
- Suitability for the treatment of the bath floor - when the skin comes into contact with it in conditions of high temperature and humidity, there should be no discomfort.


The compositions of Finnish production, in particular, Tikkurila, are considered the most effective. High-quality impregnation can increase the service life of the flooring in the sauna by 10 years.
How to process the floors in the bath - the question is attached if the tree is already selected
No, there is no negative attitude towards the use of wood as floors in the bathhouse. It’s just that in advance it is necessary not only to plan and saw, but to be aware of how this or that decision can affect the further course of events.
Wood in a sauna, where external temperature and humidity influences will be great on the material, is prone to very large and unpleasant surprises if you do not take care of it. The construction market will come to the rescue if the situation has not yet been brought to an extreme.


Responsible for previous decisions


Moreover, at your disposal a huge amount of means for processing floors in the bath.
What do we choose from
All these means are subject to two indispensable requirements - they must, on the one hand, be ecologically impeccable, and on the other hand, successfully fight organisms that love the wooden structures of baths so much with us.
From this, the manufacturers of the following products proceed:
- Antiseptic "Sauna". Diluted with water, it is produced on an acrylic basis and creates a waterproof, polymer coating on the treated surface. The created film, however, does not interfere with good air exchange and has an antimicrobial character, and this is already the protection of the bath visitors themselves.
- Waterproofing "Schwartz". The penetration of this agent into the very structure of the tree effectively protects it from the effects of temperature and moisture. "Schwartz" helps to keep the shape of the treated surfaces of the bath and prevents the appearance of fungus.
- Protective composition Natura. The main advantage of this tool is its transparency, so it does not change the tone and pattern of wood. The protective capabilities of Natura are no worse than those of competitors.

- Supi Arctic is from Finnish Tikkurila. The Finns know a lot about baths and woodworking, and this tool they offer also has a water-repellent effect. Do not be afraid that SupiArctic gives the wooden surface a very pleasant sheen - it is completely harmless and does not increase the degree of sliding of the surface.
- Well, and, finally, a whole parade of oil products that successfully absorb into the tree, but at the same time do not cause an increase in surface temperature. Among the oils at your disposal are Supi Laudesuoja from the Finnish Tikkurila, Sauna Natura from Teknos, Eurotex Sauna. Before applying oils, the surface must be thoroughly cleaned and dried. After a day, the bath is heated, and the excess oil that has appeared is removed.
Helpful advice!
All of the above tools will perfectly fulfill their task of protecting the tree.
The only question is whether you want to use the bath after that.
Therefore, the most important and strict rule is that when using them, you must carefully follow all the rules of application, and if you wait 24 hours after application and at a temperature of 25 degrees, then wait just that much and not an hour less.
Only in this case will you be able to successfully overcome the widespread belief that there is no place for wooden floors in baths.
Still, the tree needs help
Whatever means of wood protection you use, if special design solutions are not applied in the manufacture and use of the bath, then no means will be able to correct our mistakes.

To help impregnation
Among these solutions, we highlight the following:
- Careful preparation of the foundation, if possible - ventilated;
- Mandatory use of waterproofing when creating a multilayer structure of the bath floor;
- The use of wood species that are resistant to moisture and microbes - oak is the best fit here;
- Accurate design study and implementation of the entire process of waste water removal and in no case under the foundation of the bath building;
- Complete ventilation and drying of the entire bath after its next use.


Helpful advice!
But still, we advise you to take seriously the organization of tiled floors in the bathhouse, covered without fail with wooden removable panels.
Only this approach, which provides complete control over the situation, will allow you to keep the floor in perfect order.
findings
Strictly speaking, with a responsible attitude to business, there is no reasonable explanation - why, when choosing the floors in the bath, preference was given to wooden floors over tiled ones. Neither in laboriousness, nor in convenience, nor in safety, they give any advantages, but they require constant care.
Nevertheless, if the tree on the floor is the fate of your bath, be prepared for periodic maintenance of the floor. Moreover, there can be no other options: the question is put very directly - either the floor or no bath.

Watch the attached video in this article - we're talking about wood flooring, of course, but look ahead and make an informed decision when choosing the flooring itself.
How and with what to process the shelves in the bath - proven means for processing
When starting the construction of a bath, many beginners believe that the entire range of work will be completed after the interior finishing of the steam room, but this is not entirely true, because the steam room must be treated with special compounds that protect the wood from heat and moisture. In this article we will tell you about the best way to process a bath inside.


Do I need to treat wooden surfaces in the steam room
If you built a bathhouse following the right technologies, then you probably isolated the steam room from external cold, as well as moisture. Having taken care of the wood from the outside, do not forget to process the internal components of the steam room, because this will increase the strength and durability of any structure in the bath.
The center of the steam room is the shelf where visitors spend most of their time, so it must be strong and secure. Despite the fact that wood is a material that is unstable to moisture, it is customary to use it to build a shelf, which, with the wrong approach, will last no more than a year.
To achieve the strength and long service life of the shelf, it is necessary to choose the right wood, as well as treat the finished product with a suitable impregnation, which can be made on the basis of natural or artificial components.


First, let's talk about the choice of wood. The following types of wood are excellent for structures inside the steam room:
- Alder- an ideal material for a steam room, but it is difficult to find it on the market;
- Linden- inexpensive, but high-quality material with a soft texture, great for a steam room;
- Aspen- it is also an excellent tree for a bath with high moisture resistance (for more details: "Which aspen is best for a bath - planning a log house");
- Oak, ash, saddle abash, ofram and miranti- expensive types of wood, rarely used for finishing the bath.
There are cheaper alternatives, such as pine or spruce, but they have several disadvantages and the savings are small, so it is recommended to use the above wood, which has good moisture resistance and is easy to process.
Next, it is worth talking about the processing of the regiment with special compounds. Before processing the shelves in the bath and sauna, you should think about whether it is worth doing. It is impossible to give a definite answer, so we will help you solve this issue by providing some facts:
- Long-term contact of human skin with poor-quality impregnation can lead to unpleasant consequences, such as a rash;
- If excellent ventilation is made in the steam room, then the shelves can be simply sanded;
- An untreated shelf can quickly turn black, and mold will appear on its surface.

Everything that has been said about the shelves and their processing also applies to other elements of the bath, such as doors, benches and walls.
Means for processing elements of the steam room
All means by which wood is processed inside the bath are divided into two groups: impregnating and covering means. They are also often divided into colored and colorless, for example, wax, varnish and some impregnations.

Less often, bleaching agents are isolated, which are used in cases where the shelves have already darkened. Next, we will talk in detail about specific types of processing agents.
Lacquering
When thinking about how to cover the shelves in the bath, most often lacquer comes to mind, which refers to covering agents. Varnish is in demand due to its moisture resistance, but for a bath this is not always the best remedy. The problem is that at high temperatures, the varnish begins to release toxins and crack, after which, the surface fragments will stick to the body, and the water will again fall on the wood.
If you decide to use a varnish, then you should apply special acrylic varnishes from companies: Tikkurila, Belinka or Supi Saunasoja. Such varnishes for steam rooms are distinguished by a natural base that does not emit harmful substances.

The hardened surface perfectly withstands temperature extremes. Using varnish, you do not have to additionally apply antiseptics, because they are already part of the varnish. Taking care of how to process the doors in the bath, you can safely use a special acrylic varnish.
How to apply varnish on the surface:
- Before painting the shelves in the bath, it is necessary to prepare the wooden surface. Take sandpaper of different grain sizes and sand the shelves, starting with coarse grain and ending with the smallest (read also: "How to paint the floors in the bath - how to choose the best coating");
- Rinse the surface of the shelf, then dry it;
- Apply the first coat of varnish with a brush or roller;
- After the first layer has dried (drying time is indicated on the package), apply the second and wait for it to dry.
If you are using colored polish, you can thin it down for the first coat to get a more even color.


It is necessary to carry out work in a warm (from + 5 ° C) and dry room. Remember that it will be problematic to remove dirt from under the varnish, so make sure that there are no small debris on your hands and the tool.
Impregnations and bleaches for the shelf
Bleaches and impregnations are quite popular on the Russian market, but they are used much less often, despite the fact that they are not inferior to varnish. Among all the impregnations, one can single out such brands as Belinka-sauna from a Slovenian manufacturer, Prime Thermo, etc.
Special impregnation for a shelf in a bath or sauna has the following advantages:
- It is colorless and does not change the shade of the wood;
- Impregnation is easy to apply;
- The composition is quickly absorbed and hardens;
- Provides good protection at a low price.
It is not recommended to replace special solutions with improvised means. For example, instead of bleach, some use a bleach solution, but this is a big mistake. Chlorine, when heated, releases many chemicals into the air, which negatively affects human health and well-being. Also an unpleasant consequence of such treatment is a second-degree burn.

Proper application of impregnation:
- Clean, sand and rinse the surface;
- Before soaking the wood in the bath, wait for the surface to dry and apply the first layer;
- After the impregnation dries, apply a second layer;
- Just need to apply 2-3 layers.
It takes about 40-50 minutes to dry each layer, and you can see an example of the correct processing of wood in the photo.
Separately, it is worth highlighting the wax for the sauna. It can be applied with a cloth or a disc machine. It allows you to create heat-resistant protection against moisture and mold. Wax has two significant advantages: it takes only 24 hours to dry completely, and the protective layer that it forms is highly breathable, which allows the wood to “breathe”.

Next, it’s worth talking about how to process the shelves in the bath if it has already begun to collapse. If the shelves or other wooden surface of the bath has begun to rot, then you can prevent complete destruction by using the Nortex tool. The composition is applied with a sponge to damaged areas.
Any safe bleach designed for wood, for example, "Doctor for Wood" from Belinka, will help get rid of darkening. The solution is also applied with a sponge only to damaged areas. It will take about 2 hours to whiten, but once may not be enough.
The subtleties of applying protective compounds
If you don’t know how to impregnate the walls in the bath, then this article will also be relevant for you, because special impregnations for the bath will suit any wooden surface, but you should also remember some subtleties:
- It is much easier to handle an unassembled structure, therefore, if you have such an opportunity, impregnate the elements of the bath before assembling them;
- Protective products can adversely affect the skin, therefore, to eliminate this trouble, you can not treat the side of the shelf in contact with the person. You can process the rest of the tree in the bath without fear for your health, because only the shelves can affect the skin;
- Carry out work in the summer to make it easier to dry the steam room;
- It takes at least 4 days to completely dry the varnish and impregnations, after which you can relax in your bath;
- In no case do not use highly toxic products, such as stains, because they negatively affect your health not only through the skin, but also through the respiratory tract;
Do not save on protective solutions, because your health and longevity of wood structures depend on their quality.
How to cover the lining inside the bath
No one doubts that the best finishing material for a bath is wood. And almost everyone uses lining for interior decoration. But here it is necessary or not to process the lining in the bath, everyone decides for himself. Opinions are divided here: some say that without treatment with special means, the wood darkens, loses its attractiveness, rots and is affected by diseases. All this is so. But their opponents are definitely right: the combination of high temperature and humidity in the steam room, to which fumes from processed boards are added, cannot be called a healing effect. But people come to the bathhouse for their health.


For the most part, lovers of baths and saunas make a compromise: they leave the lining in the steam room without processing, and for the rest room, the washing room uses special tools. Lining without processing, of course, becomes unusable over time, but it will have to be changed no more than once every 2-5 years (depending on the type of wood and the intensity of use of the steam room). These are not such big costs, especially since rarely anyone has a steam room that is large. For those who decide to process wood in the steam room, there are several folk recipes or special (mandatory !!) compositions for a bath / sauna.
How to process the lining in the washing and dressing room
The most popular ready-made products are special impregnations and oils. Finns are the favorites in this segment: Sauna (by Belinka), Supi Saunasoja (by Tikkurila).


Domestic producers also try to lag far behind world manufacturers.

 The product of the domestic company "Usadba" - "U-409"
- impregnation for baths, saunas, wet and residential premises. All these compositions are made on the basis of natural ingredients. They create a thin film on the surface, which makes the removal of contaminants easier.
The product of the domestic company "Usadba" - "U-409"
- impregnation for baths, saunas, wet and residential premises. All these compositions are made on the basis of natural ingredients. They create a thin film on the surface, which makes the removal of contaminants easier.
Also, the impregnation contains fungicidal and insecticidal additives that prevent the formation and reproduction of fungus in the bath.
"Eurotex Sauna" - antiseptic with wax for saunas and baths. This is a colorless coating that creates a protective film on the surface of the wood. The composition is ideal for benches and shelves (for those who decide to process them).
Impregnation EURO 
 TEX-sauna can be purchased in various packaging sizes. A bucket with a capacity of 2.5 liters (per 35 square meters) costs about 450 rubles.
Given the cost of lining and other wood products, the cost of impregnation does not seem very high. In addition, it should be noted that after processing, the wood looks much more attractive, it is easier to clean and does not darken for a long time. However, there are also disadvantages: for 3-5 visits to the bath there is a not very strong, but rather obvious specific smell.
In the rest room, you can use the composition "UnicaSuper" from the same Tikkurila. But this composition changes the color of the wood, so for lovers of "natural", Supi Saunasoja is again suitable.
Impregnation and oils for the steam room
Most fans of the bath agree that there is no need to cover the lining inside the steam room. But if there is such a need, then you can use natural oils and wax. Some connoisseurs advise soaking the boards with linseed oil, to which you can add natural aromatic oils of your choice. You can use hemp oil, and, the cheapest option, sunflower oil, but refined, with a minimal smell.


Such treatment will create a greasy film on the surface of the wood and will not allow dirt to penetrate deep into the wood. But you need to be prepared for the fact that for some time, parts of the body from contact with the processed shelf will be greasy. After a while, the oil will be absorbed (or wiped off), but the protective film will remain.
Similarly, you can treat the steam room with melted natural wax. Before applying the wax, the surface must be carefully sanded and only then the melted wax should be applied.
There is a fairly large selection of impregnations for industrial shelves. For example, in the same Russian firm Manor there is oil for shelves, there is a similar composition of Eurotex-sauna. Of course, Tikkurila also has them - this is Supi Laudesuoja oil.
Important! What definitely cannot be done is to use ordinary varnishes or paints for a bath or sauna. The tree must "breathe", first absorbing excess moisture, and then giving it away. When using conventional compositions, wood is completely deprived of this property, in addition, evaporation of the chemicals included in the composition is added, which are very dangerous to health at high temperatures and humidity. It's like covering a steam room with linoleum or siding: the materials are good, but not for these purposes.
If you use the steam room correctly, ventilate and dry it in time, then fungi and bark beetles will not start in it. They die at high and low temperatures:
- At a temperature of 70-80 ° C, spores of all fungi and protozoa die within 10 minutes.
- At -15 ° C, young larvae of the shashel perish, and if the temperature is below -15 ° C for a week, then adult larvae also die.
- Temperature + 60 ° C is the upper limit at which bark beetles survive.

If you then heat the bath to high temperatures, then freeze it, then no misfortunes are terrible for it, and you can deal with the remaining problems quite simply: clean or cover the most used surfaces with natural compounds more often.
The floors in the bath are not at all a trifle, as it might seem initially. The way they are installed differs from the technologies used in residential premises, primarily in that bath floors are part of the sewer system. With proper installation, the bath compartments will be dry, despite the constant humidity in these rooms. And this means the absence of mold, fungus and a long service life of this institution, which is cult for all Russians. There are different methods of flooring in the bath, so you need to choose an acceptable one and adapt it to your building. Bath floors can be made independently, you just need to have a general understanding of the principles of their installation and the differences between the schemes.
Laying floors in the washroom
Washing area, perhaps, the main room of the bath. Here, between short visits to the steam room, visitors spend most of their time.
In the washing compartment, water constantly flows in large volumes, which is why maximum attention should be paid to the arrangement of this bath area. Especially when laying floors, since they are the most exposed to moisture and temperature changes, it depends on them whether the washroom will be comfortable and warm or uncomfortable and cold.
There is always a lot of water in the washing room, so the floors should be well ventilated and dry quickly.
The high humidity of this room puts forward special requirements for flooring so that they do not collapse in a fairly short time. Washroom floors should:
- resist thermal shocks and do not let in a draft;
- be breathable and dry quickly;
- ensure normal ventilation, free outflow of water, acceptable temperature of the floor covering.
With these requirements in mind, the owner of the bath must consider all types of floors and choose the most suitable one. Moreover, it is necessary to decide on the materials for the floor even before pouring the screed.
Floor structures for washing
The surface temperature of the sauna floor rarely exceeds 30 °C, because the floor should be warm, not hot, pleasant even for bare feet, and not so that even bath slippers will melt. Therefore, you can use any material for its assembly - wood, tile, clay, concrete and others.
Do not use synthetic coatings. Chemistry has no place where high temperature and humidity are present.
Every floor covering has its pros and cons:

Consider the most common options for bath floors.
Wooden floor in the washroom
Hardwood and coniferous lumber is suitable for its arrangement: cedar, spruce, oak, ash, larch, fir. It is better to choose softwoods, since the resin they produce significantly increases the life of the floors. In addition, the tree has a healing effect on the body, and wet wooden flooring does not slip, and this is additional safety for visitors.
The advantages of wooden floors include:
- simplicity and ease of installation;
- naturalness, environmental friendliness and durability;
- low labor cost.
The disadvantages are the following:

If you settled on wooden floors, then you should know that, depending on the drain device, they are of two types: leaking and non-leaking structures.
In turn, leaking floors differ in the laying pattern:

Consider the sequence of work for the installation of leaking floors.
- A hole is dug in the middle of the basement.
- A trench breaks from its bottom in the direction of the drain cuvette, in which a sewer (drainage) pipe is laid with an inclination towards the water collector by about 3–4 ° (approximate difference in height over the entire trench is 5 cm per linear meter).
The sewer pipe for draining water is laid with a slope towards the water intake
- The foundation of the bath is being erected and waterproofed.
- After that, along the entire border of the subfloor, from the walls of the base (or pillars), the earth is again taken out with a slope of 10 ° towards the dug hole.
- Then the slope slopes are covered with crushed stone and well compacted (for greater strength, a reinforcing mesh with cells of the order of 80x80 mm can be laid on top of the crushed stone). Everything is poured with a dense concrete mortar, which is leveled and smoothed. To reduce the cost of work, well-mixed clay can be used instead of concrete. It is laid out with a 10-centimeter layer, leveled and, as it dries, moistened with water and smoothed.
- Further, the walls of the foundation, if this is provided for by the technology, are tied with a metal belt and beam structures treated with an antiseptic are mounted. The lower coronal rungs are attached to the harness, and if there is none, then to the walls of the base with the help of anchors or studs).
Sexual logs in the bath do not need to be cut into the crown crown, then they can be easily replaced if necessary
- Floor boards with gaps are laid on the floor beams. The thickness of the boards depends on the distance between the joists, but should not be less than 20 mm.
Simple and reliable floors with slots for draining water are quickly installed and easily replaced with new ones
Often, the boards are not attached to the beam vault, but are connected to each other with a bar and ready-made shields are simply placed on top. The beam must be located among the floor beams. Such shields are very convenient to take out to dry.
The scheme of equipment for non-leaking floors is not much different from the one described above in principle, although it is more difficult to implement. The difference is that the boards are laid without gaps on the rough flooring, for which second-grade wood is quite suitable.
For such floors, the logs are deepened into a concrete or clay layer (possibly into the soil itself), waterproofing is laid on top, sealed with a sealant. The space between the lags is filled with insulation. The draft floor is made with a slope towards the grated drain hole, through which water from the washing room enters the sewer network or sewage pit and is covered with polyethylene, then a wooden flooring is mounted.
In the arrangement of non-leaking floors, water flows into a specially equipped hole along an inclined plane
It is impossible to disassemble such floors for drying, so you need to provide excellent ventilation so that the wooden floor of a leak-proof structure does not rot ahead of time. This is its minus, but the non-leaking assembly is more durable and durable and provides for the possibility of a heating device to ensure maximum comfort from water procedures even in severe frosts.
Under the finish coating of a non-leaking floor, heating can be arranged
The choice of materials for the drain device
Let's say right away that it is impossible to save on materials for arranging floors in a washroom. You need to choose the best, modern ones that will be effective for years. To create a sewage system, it is necessary to use plastic building materials that do not corrode, are resistant to getting wet, are easy to assemble and operate without losing their qualities for more than 50 years.
These can be pipes made of PVC, HDPE, PVC (chlorinated polyvinyl chloride), polypropylene or corrugated polyethylene products. Any of them are perfect for an internal drainage device in a bath.
The diameter of the pipes is selected according to the intensity of use of the bath:
- if a steam room, sauna, toilet (i.e., several drain points) are provided, then pipes Ø 100–110 mm will be required;
- without the use of plumbing, only pipes Ø 50 mm are enough to drain water.
Material calculation and tools
To organize an internal drain in the washing department, you need:
- pipes Ø 110 or Ø 50 - the amount is calculated depending on the length of the drainage network;
- adapters from Ø 50 to Ø 110 for connecting pipes of different diameters;
- tees 110x110x90 and elbow 90° - 3 pieces each;
- vertical pipes for water inlets (Ø 110 or Ø 50);
- cement, crushed stone and sand.
Materials are purchased according to the chosen installation method. The same applies to tools. But in any case, you will need:
- building level;
- Bulgarian;
- bayonet shovel.
Concrete floor in washroom
Concrete flooring is the most common due to its low cost and ease of installation.

After hardening, you can make flooring from cork slabs or wooden gratings and install a drain.
For safety reasons, it is better not to cover the concrete floor with tiles or lay wooden lattice panels on top.
Other types of floors in the washroom
Those who revere old bathing traditions equip an earthen floor in the washroom. The process of laying it is extremely simple - cut off the top layer of the earth by about 15 cm around the entire perimeter of the room and tamp the remaining earth.
If you really respect the customs of your ancestors, then you need to dig a foundation pit half a meter deep and fill it with a mixture of fine sand and gravel. If desired, boards can be laid on top.
Previously, the floors in the bath were arranged directly on the ground, after cutting off its top layer and ramming the base
We have already talked about the clay floor, but despite all the advantages of the clay itself, such a floor has a big drawback - the clay dries poorly, and when it dries, it forms cracks into which water seeps. As a result of this, a persistent unpleasant marsh odor appears in the washing room over time.
In a word, wood would be the best choice, although it can be combined with other materials.
Video: do-it-yourself correct floors in a washing bath
Floor covering in the washing room
The floor is ready, it's time to think about protecting it. Everyone knows about the antiseptic, you should not neglect it and save on it. They process wooden elements even before the start of the main work, otherwise the wooden flooring can be ruined. The antiseptic does not change the texture of wood, does not contain heavy metals and harmful salts, and perfectly protects wooden components from biological damage.
It is also recommended to use a good varnish. Before applying it, you need to prepare the surface well. It must be clean, free of grease, polished to a mirror finish and dry. The varnish is applied in several layers, after it has completely dried, the bath must be heated and ventilated.
Lacquer must be applied to a previously sanded and well-cleaned surface.
Floors can be painted. Only the paint must be of the highest quality and absolutely harmless when heated.
In addition, there are folk remedies for flooring - the use of waste after processing sunflower oil. They are applied with a roller on a thoroughly cleaned and dried surface. Repeat 2-3 times at intervals of three days. Such a coating is safe, gives the wood a beautiful shade, and besides, it will cost almost free.
If the floor in the bath is concrete, then it must be covered with a finishing material, since by itself it looks unattractive. They cover the concrete floor with a massive floor board, porcelain stoneware or ceramic slabs, parquet, cork products.
In principle, any material is suitable, as long as it meets all safety rules. And the rest, it all depends on the intended design, on the personal preferences of the owner of the bath and on his financial capabilities.
Laying the floor in the steam room
Although the steam room is the heart of the bath, the floors in it, surprisingly, are the least significant segment of the entire bath project. The main thing here is the wall partitions and the ceiling. Remember how primitive everything was with our great-grandfathers. They threw plank blocks or split logs on the ground, and this was enough to take a bath with pleasure even in areas with severe winters. Cold feet? Splashed hot water and everything. No one complained and health was excellent.
Therefore, too much attention should not be paid to laying the floors in the steam room. Some advise equipping floors with insulation, vapor barrier and rough flooring in the steam room. Of course, this is very modern, but for a steam room it will be a waste of money.
As practice shows, a simple scheme for arranging floors in a bath is the best
And why drive moisture deep into the wood. It is much better and easier to create conditions for the free passage of water, and then take care of drying and ventilation. And it is much more important to make the floors in the steam room non-slip to avoid injury.
If the steam room is combined with the washing department, then there is no structural difference between them, everything is common and the same, the floors in this case are equipped according to the methods described above.
When the steam room is a separate area and there is no need to drain a large amount of water, then the floor is laid from an edged board with small chamfers (deck board). The slots may be slightly narrower.
The deck board is made from larch and therefore resists moisture well.
It is much easier with concrete floors - they are made in the same way as in all sections of the bath. A wooden ladder is certainly laid on top, since a bare bare concrete slab is not very pleasant.
The arrangement of the floor in the steam room, as, indeed, in the entire bath, is an excellent indicator: if it is cold in the bath after laying it, then look at the ceiling, most likely, there are problems with vapor barrier there.
What to make the floor in the steam room from: choosing the best material
Of course, wood is out of competition:

And what absolutely cannot be used for floors in a steam room is linoleum, chipboard and fiberboard. Wood boards ignite easily, and non-natural materials are capable of releasing hazardous substances at high temperatures.
Concrete floor equipment in the steam room
It is advisable to purchase all the necessary building materials from one manufacturer. This will add strength to the entire structure as a whole. Need to buy:
- edge tape;
- sand, cement M200 or 300 and gravel;
- primer, roofing felt and dry mix of self-leveling screed.
Tools for the job
To complete the entire process of equipping the floor in the steam room, you will need:
- protective equipment for eyes and hands;
- bayonet shovel and building level;
- a basin for mixing a solution or a bucket;
- concrete mixer and mixer;
- rollers (needle and primer);
- rules and construction trowel;
- gas burner for soldering roofing material.
Step-by-step instructions for laying a concrete floor in a steam room
- Solution preparation. You will need a concrete mixer in which the components of the solution are placed - sand, cement grade 200 or 300 and gravel in a ratio of 2: 1: 3. It does not make sense to use other brands of cement (higher ones), this will only increase the cost of the work. Add water and bring to the desired consistency.
To prepare the solution, sand, gravel, cement and water are used.
- Subfloor fitting. The soil in the steam room is covered with roofing material cut into sheets, and the seams are soldered with a gas burner. It is needed as a waterproofing agent. A 10-cm concrete layer is applied over the roofing material with a construction trowel, after which the entire screed is leveled to the level using the rule. When the solution is completely dry, proceed to the next step.
After the pouring is completed, the concrete layer must be leveled with the rule
- Final alignment. Literally to the millimeter, the final leveling of the concrete layer is done. For this, a self-leveling compound is used. Before laying it, the surface is cleaned of debris and dust, and then primed. The primer is applied with a conventional roller.
- Application of self-leveling screed. Along the entire length of the steam room, the bottom of the wall is glued with edge tape. This is done so that the screed does not stick to the wall and does not burst in the future. The dry self-levelling mixture is diluted with water in the proportions indicated on the package and mixed with a mixer until smooth. Following this, it is evenly poured over the entire surface and leveled with a spiked roller to remove air bubbles.
- Finishing work. The floor filled with a self-leveling screed is left to dry and only then proceed to the finishing work.
Video: pouring the screed in the bath with your own hands
Floor covering in the steam room
Some people believe that no impregnation should be used in the steam room, arguing that the bath should give health, and not emit harmful fumes at high temperatures. It's hard to disagree with this. But there is another side of the coin - physical wear and tear and decay.
Not only the wood with which the steam room is sheathed needs protection, but even the concrete floor screed loses its properties over the years. Plus, untreated, it accumulates dust that lovers of hot steam breathe.
If this is of little concern to the owner of the bath and he is ready to change the lining of the steam room (including replacing or repairing the floor) every 5 years, then, of course, no impregnations and oils. Otherwise, it is necessary to do the processing of the steam room and it is advisable to use natural wax and oils for this, specially designed for saunas and steam rooms.
Linseed oil emphasizes the structure of wood, creates a protective film on its surface and does not emit harmful substances when heated.
Concrete floor screed can be treated with organic and inorganic impregnations. This will increase the wear resistance of concrete, prevent excessive accumulation of dust. But it is necessary to apply impregnations in a steam room thoughtfully, carefully studying the instructions and composition.
There are many schemes for arranging floors in the washroom and steam room. All of them are accessible and understandable. They can be implemented independently. You can even apply several technologies at the same time, such a combination will give good drainage and a flat surface. But as practice shows, the technology that is simpler is better. Good luck and light steam.
The floor in the washing room is always made with a mandatory slope of the surface to the drain hole. This allows you to effectively remove water from the room and does not allow moisture to linger on the floor for a long time. The task of arranging the slope of the entire plane to one point is solved in various ways and the choice of a method depends on the design of a particular bath. If this is a building on a strip foundation, then a warm concrete or insulated wooden floor with ceramic granite tiles is more often used. In baths on screw piles and columnar foundations, it is more preferable to use a wooden pouring floor.
Concrete floors on the ground in the washing
If a tape structure is used as a base, then both a wooden pouring floor and concrete floors on the ground can be made. Consider an example of making a warm floor based on a screed finished with ceramic tiles.
Preparation of communications for draining is carried out even at the stage before pouring the concrete tape. The main thing here is to observe the slope of the pipe at least 2-3 cm per meter. The optimal location of the drain hole is in the center of the room, since the water drain organized at this point will provide the most efficient collection of drains from the entire floor surface.
If there is a fertile layer of earth under the future floor, then it should be completely removed and sprinkled with a layer of sand 15-20 cm thick. Then this layer is spilled with water and compacted with a manual rammer. When the surface is leveled and dense enough, a 50 mm thick extruded polystyrene foam (EPS) insulation is laid on top of the sand.
Small sections of heat-insulating plates are installed along the perimeter, after which foil waterproofing is laid on them. The joints between the strips of material are glued with foil waterproofing tape so that the waterproofing layer is completely sealed and does not let moisture into the insulation.
Further, low objects are laid out on the hydrobarrier, on which a metal mesh is installed to reinforce the future concrete slab. A heated floor heating tape is attached to the grid with a wire and this entire structure is poured with a concrete solution 10 cm thick.
As a finishing coating on a concrete screed, porcelain tiles are usually glued.
Thanks to the active underfloor heating system installed in the concrete slab, it will be comfortable to use such a sink even in the cold season.
Pouring wooden floor in the bath on stilts
The floors in the bath on piles require careful observance of the installation technology, since improper ventilation of the underground space leads to the rapid decay of wooden structural elements.
Let us first consider the scheme for arranging a concrete screed, as a more complex, but also more durable solution to the issue of organizing a floor for a bath on a columnar or pile foundation.
First of all, at the level of the lower plane of the wooden beams, the subfloor flooring is attached.
If you look closely at the beams, you can see that the boards are not nailed to the bottom of the joists, but are installed on a small support, fixed on the inside of the beam. This support is called the cranial bar and its location is well shown in the following diagram.
Also in this plan, you can see the sequence of placement of each of the necessary layers when constructing a concrete slab and pouring floor from a wooden board. The only thing that is not indicated here is a waterproofing flooring, which is desirable to be placed on top of a concrete screed to protect it from constant contact with water.
The following diagram describes an effective solution for arranging insulated concrete floors without expanded clay spillage. Here, both mineral wool and extruded polystyrene foam boards can act as thermal protection.
In practice, often a concrete screed is not made, but a simple pouring floor system is made that does not require grouting. The beginning of work is the same as in the previous version.
Mineral wool is laid between the lags on the rough flooring. A drain valve is installed to ensure efficient water flow.
In the direction from the walls to the hole, wooden guides are arranged in such a way as to form a general slope at one point.
On top of the guides, sheets of galvanized steel with a slight overlap on the walls are attached to the screws.
Logs are installed above the metal surface for laying poured floor boards on top of them.
The final stage is the laying of finishing floors from boards located at a distance of at least 3-5 mm relative to each other.
It is important to provide for the possibility of removing the flooring to ventilate and clean the underground space from debris that has got there. The better the ventilation is performed, the longer the entire structure will last as a result. The best solution would be to organize a vent in the subfloor, as shown in the photo below.
This air duct will allow not only to ventilate the wood of the finished floor with high quality, but also guarantees the flow of fresh air into the washing room.
Do-it-yourself floor in a washing bath - concrete and wood
The floor in the washing bath is always made with a mandatory slope of the surface to the drain hole. This allows you to effectively remove water from the room and does not allow moisture to linger on the floor for a long time.
Do-it-yourself floor in a bathhouse sink
In the construction of small bathhouses for private use today, few strictly adhere to the canons of their traditional construction. Sometimes the boundaries between different types of baths are so blurred that it is already difficult to unambiguously determine its type. The top is taken not by blind adherence to standards, but by the creation of a comfortable, individualized and, often, multifunctional building. More than half of all baths are now equipped with universal steam rooms, in which procedures can be carried out both with “wet” steam, like Russian baths, and with “dry” steam, like Finnish saunas. But for whipping with a broom or washing in the neighborhood through the wall, soap (washing) ones are provided. They can be equipped with massage beds, ordinary and shock showers, washstands, fonts, and even small pools. Such a functional layout raises a number of questions about how to make a floor in a bath sink, one or another workable design.
Requirements for floors in soap rooms
Washing is the realm of water. After all, it is found here everywhere in the form of spills, streams and splashes. Therefore, regardless of whether there are local wastewater receivers near each of the plumbing fixtures or not, the floor of the room acts as an element of the sewer system. It can completely collect and divert spilled liquid or complement the drainage system, making it easier to keep clean. However, in any case, a properly installed floor in a washing bath must meet the following requirements:
- be equipped with an easy-to-maintain, but effective liquid removal system;
- ensure the comfort of walking on it with bare feet, cause pleasant tactile sensations;
- be non-slippery, safe;
- dry and ventilate quickly;
- withstand long-term direct exposure to fluid and thermal stress;
- comply with sanitary and aesthetic standards.
In addition, according to construction requirements, the washing compartment should have a floor level 20-30 mm lower than the coatings in non-wetted adjacent rooms.

Concrete floor in a washing bath
It is the most practical and durable construction, capable of serving as a stand-alone tiled floor, as well as the basis for leaking or non-leaking modern plank flooring. The device of floors in a bath in a washing department made of concrete with a surface subjected to direct use must fully comply with all the requirements described above. At the same time, for each list item, there is some variability in the choice of how to implement them.
Drainage
To collect wastewater, the floor surface in the soap compartment is equipped with a slope towards the receiving unit of the sewer system. Building codes set this value at 0.01-0.015%. That is, after the completion of the finishing of the concrete floor slab, the levels of the facing forming surfaces should have a deviation from the horizontal of 10-15 mm per 1 m. Latches of trap-type siphons act as receiving units for tile coverings. They should be positioned so that neither they nor the streams of water to them cross the main and side passages.
Important! The floor in the washing bath is equipped with a ladder, based, first of all, not on the form factor or design of its lattice (rounded, square, elongated rectangular), but on the throughput of the device. The performance of a plumbing fixture largely depends on the diameter of its outlet, which are manufactured according to size standards of 52, 62 and 90 mm. This factor should be taken into account so as not to stand in the shower ankle-deep in dirty water.
From the waste receiving unit of the floor to the washing water, they are discharged through sewer pipes outside the bath building. For their disposal, especially during intensive use of the bath, it is advisable to make a separate storage tank, a drain pit or a septic tank, and not load public sanitary facilities.

Installation of a warm floor slab
When assembling a concrete floor in a washing bath with your own hands from the zero stage of construction, you should not neglect measures to reduce heat transfer through the ceiling. Concrete and tiles have a fairly high thermal conductivity, so if you do not take appropriate measures to insulate them, then in winter you will feel cold on your feet. Neither the use of wooden gratings nor powerful heating in the room can resist such discomfort.
The creation of a warm floor slab can be implemented in the following areas:
- installation of elements of the underfloor heating system in it (with mandatory insulation of the base);
- its thorough thermal protection and waterproofing.
Floor heating in the washroom
In terms of the device for heating floor coverings, the washing room in the bath is not too different from any other household premises. You can read more about installing a water-heated floor system here, and about electric heating here. However, when choosing a heating method, two important points should be considered:
- Bath mode. So, for permanent use, both water and electrical circuits are suitable. If the room will warm up only for the duration of the procedures, then it is better to choose the electric option. He is not afraid of freezing, has less inertia when entering the operating mode (if the heater is mounted in a thin layer of mortar under the tile).
- Operational safety. Of course, water circuits do not pose a threat to human life, even in a damaged state. When installing an electric underfloor heating in a washing bath, you will have to take all possible protective measures. Firstly, a steel mesh with a cell of 30 * 30 mm should be placed above the electric heater in the solution and grounded securely to it. Secondly, an RCD must be installed, designed for a leakage current of 10 mA. Thirdly, we will have to deal with the issues of potential equalization. Taken together, it is desirable to carry out these measures for the arrangement of electric heating in the soap department under the guidance of a professional electrician.

"Pie" of the insulated floor in the washing room
Regardless of whether heated underfloor heating is assembled in the bath in the washing room or not, concrete bases are insulated and waterproofed. The method of practical implementation of thermal and hydroprotection is selected depending on the position of the overlap relative to the ground. The slab can be placed directly on the ground preparation or on the logs. The isolation of the concrete floor on the ground was discussed in detail in the article: "Features of making floors in steam rooms with your own hands." At the same time, it is no different from creating a similar design in the soap department.
In the case when the bath box is placed on poles, beam schemes (beams, logs) are often used for flooring in all rooms, equipping them with leaking or non-leaking flooring from boards. But sometimes, with such a supporting structure, it is necessary to assemble the floor in the washroom of a monolithic type, for example, to lay ceramic tiles or install an efficient floor heating system. Its schematic structure is shown in the figure below.

Wooden base assembly
Logs and all other lumber are used only from well-dried wood, treated at least 2-3 times with antiseptic and hydrophobic impregnations.
- When installing a beam frame, you can basically be guided by the same principles as when preparing it for finishing boardwalk, described here. There will be only some adjustment of the design parameters for the thickness of the insulation and increased loads. So, the height of the first layer of thermal insulation between the lags will be 100 mm, if an additional insulating layer (at least 50 mm) is still laid for the underfloor heating system. You can consider, for example, the option of a “skeleton” for floor insulation in the washing department of the bath on wooden beams 100 * 50 with a step of 450 mm (see tab. 1 on the link), reducing the length of the free span between the lag supports to 1 m.
- The board of the underlying roll and the cranial bar under it are used with the smallest possible thickness from low-grade wood (without signs of biological damage).
- Lay film rolled waterproofing with a high vapor permeability and the first layer of inter-beam thermal insulation, as described here.
- A ventilated space is arranged above the insulation - a ventilation gap. It is formed by punching from above the log bars of the counter-lattice. The thickness of the beams is selected based on the final clearance height of 20-30 mm. It is preferable to install a floor in the washing compartment, in which the formed horizontal ventilation gap communicates with the ventilation gaps behind the interior wall cladding of the room.
- The counter-lattice is covered with dice of the subfloor. Boards with the parameters indicated in table 2 are suitable for it (see link). They can also be replaced with sheet materials (OSB, DSP, etc.) with identical bearing parameters.

Installation of insulated concrete slab on wooden flooring
- Above the boards of rough rolling, a continuous carpet of dense waterproofing material is arranged. For these purposes, rolled sheets of bituminous euroroofing material are excellent. They are welded into a monolithic coating with a continuation under the cladding on walls with a height of at least 400 mm. Thus, a sealed waterproof bowl is formed.
- Lay the second layer of 50 mm thermal insulation boards made of extruded polystyrene foam (EPS). A similar thermal protection scheme is necessarily used if the washing room in the bath is equipped with a floor heating system. Otherwise, you can not mount an additional heat shield, but then you should increase the height of the inter-beam insulation to at least 150 mm.
- If EPPS was used, then a film is spread over it and a concrete slab is formed with slopes to the sewer receiving unit. If expanded polystyrene sheets were not used, then concreting can be carried out directly into the bowl from the waterproofing on the subfloor. The height of the reinforced casting should be 80-100 mm. Plasticizers and water repellents are introduced into the solution at the stage of its mixing.
Important! Only with such an integrated approach, heat and waterproofing of the floors in the washing bath will be able to provide you with the comfort of using the facility, as well as the long-term preservation of structural and finishing materials.
Concrete flooring in washroom
Construction requirements prescribe that floor coverings in rooms with a wet operating mode should be made of hydrophobic materials with a corrugated surface. However, in practice, the number of important parameters taken into account for floors in washing rooms is much wider. It also includes convenience, safety and comfort of use, resistance to water and temperature gradients, and aesthetic perception. For the most part, ceramic cladding with a profile set of properties has all these characteristics. And if the washing room in the tile bath is also complemented by light removable gratings made of wooden laths, then the most practical floor covering is obtained. After all, the main finish will be made of ceramics, which has a practically unlimited service life. Lattices will ensure the safety of movement, will not interfere with cleaning, as they can always be lifted and taken out to dry.

Features of the choice and installation of tiles
Finishing the bathroom floor tiles in the bath will only be done correctly when they are selected and installed in accordance with the specific operating conditions. Please note that tiles must be:
- matte, with a rough surface against slipping, have a coefficient of friction R 11-R 13;
- with a homogeneous dense structure, slightly absorbing water. Suitable properties for porcelain stoneware with a water absorption coefficient of ≈3% or tiles - 3-10%. Ceramics with a hydrophilicity of more than 10% is suitable only for finishing walls that are not constantly exposed to water;
- with high frost resistance, if the floor in the washing bath can be exposed to negative temperatures in irregularly heated rooms. Otherwise, the tile will quickly become covered with cracks.
It is recommended to treat the concrete slab with penetrating cement compositions before gluing the ceramic material. They include components that can penetrate deep into the porous mineral structure and completely seal its capillary channels. As a result, the concrete surface becomes a reliable barrier to the migration of dropping liquid.
Tiles on the floor of the washing compartment should be laid on moisture-resistant adhesive mixtures. When using glue, one should also take into account the temperature loads on the reinforced concrete base and its decorative coating. For irregularly heated rooms, as well as ceilings with underfloor heating systems, an appropriate adhesive mixture of increased elasticity is selected that can withstand thermal deformations.

Wooden floor in the washing bath
Traditionally, a washing room in a wooden bath, namely, such buildings are still massively erected in Russia, was equipped with plank floors. And, despite the fact that they are now seriously competing with concrete structures lined with ceramic tiles, as more durable, wooden coatings are still relevant. The device of floors in a bath in a washing department on the basis of lumber can be leaking and non-leaking.
Floor of the flowing (flowing) type
A floor structure of this type can actually be considered the same age as the appearance of the entire technology of building baths in general. Today it has undergone some improvements, but its basic functional principles have remained unchanged. With its working surface, the pouring floor in the bath still has a surface of boards that are installed with drainage gaps. In the classical version, seeping into these cracks, water is absorbed directly into the soil or concentrated in an absorbing pit, where it subsequently also goes into the ground. Now, under the boardwalks, concrete drain surfaces are predominantly created with slopes, along which the liquid flows down to the receiving node of the sewer system.
It should be noted that there are also intermediate solutions, between the most primitive way of waste disposal and the modern one. So, instead of concrete surfaces, carefully compacted greasy clay is used, or drainage is carried out not just into the soil, but into a crushed stone pillow. The use of clay and gravel bedding, of course, significantly reduces the cost and speeds up the installation of a washing machine in a bath, however, it has nothing to do with the concept of modern approaches to this issue. It is rather difficult to provide thermal comfort with such a scheme for arranging floors in a sink, as well as a feeling of freshness - in such a room there will almost always be a smell of dampness.

Mounting features of leaky coatings
In a simple version, pouring floorings are assembled quickly enough. Their load-bearing structures are made on logs, guided by the choice of lumber similar to the installation of floors on poles. Finished plank sheathing is not insulated, and its stuffing is carried out with slots between adjacent lamellas of ≈10 mm. Leaving drainage gaps too wide is not worth it, otherwise they will create problems when moving. If the boards are fastened too tightly, then swollen under the influence of moisture, they can completely close.
When mounting the pouring floor in the bath with your own hands, use nails to fix the flooring. Gradually, even with the most effective hydrophobic treatment, the wood of the coating will become unusable, its lamellas will have to be replaced with new ones. Unscrewing a self-tapping screw after several years of being in raw material is an unrealistic task. If the floorboard was fastened with a nail, then it can always be easily hooked and torn off from the support beam.
Important! When hammering nails, their caps must be sunk into the material, and the resulting recesses must be puttied with moisture-resistant target compositions.
Equipping a concrete base under the pouring floor, they adopt the principles of organization of drainage described above. That is, observing the slopes, installing the sewerage receiving unit and, further, the entire waste disposal system. Instead of a plumbing ladder, a rubber ball is sometimes used. When it floats up, it lets liquid into the sewer, and when there is no inflow, it lies on the hole of the drain funnel and blocks the return draft of cold air from the sewer pipe.

To ensure the thermal comfort of those washing in the bath, the durability of the wooden floor structure, they also resort to the following measures:
- the basement of the foundation is made insulated, with hermetically sealed products;
- a concrete base under the flooring is made with interlayers of heat and waterproofing according to the technology of floors on the ground;
- mount the ventilation system so that warm air passes under the pouring cover before being removed from the washing room.
Non-leakage type floor
Making a high-quality non-leaking wooden flooring in a washing bath is a rather difficult task, since it requires an almost perfect fit of the elements of the finishing board, as well as a 100% guarantee of the reliability of the waterproofing layer under it. However, the general principles of floor slab construction are identical to joisted timber structures, with the exception of the following structural differences:
- waterproofing above the insulation is mounted with a significant overlap of the strips (at least 300-400 mm), taking into account the direction of the water flow. It is welcome to lay several layers of film, which can be duplicated with sheets of dense material, such as plastic or aluminum. The surface of the hydro-barrier should already have a runoff slope, provided in any convenient way: appropriate installation of beams, stuffing additional beveled bars of the counter-lattice on the logs, etc.;
- the floor in the non-spill type washing bath is assembled from high-quality softwood grooved boards. It is preferable to place the lamellas so that water flows along them along the wood fibers;
- the slope of the surface of the front cover ends with a receiving sewer unit (ladder).
Regardless of the floor design you choose, the installation of a high-performance ventilation system is mandatory in the room. But in addition, the washing room in the bath should be additionally dried after each cycle of hygiene procedures - it is recommended to ventilate it by briefly opening doors and windows. All this will extend the service life of not only the floors, but also other building elements of the building.
How to make a floor in a bathhouse sink with your own hands: device, installation
We analyze how to make a floor in a bathhouse sink with your own hands. Features and differences in the choice of materials and installation methods in comparison with other bath rooms
How to make a floor in a bath in a washing room - planning and installation rules
Since the washing room belongs to one of the main rooms in the bath building, work on its device must be carried out in full accordance with the technology, taking into account the slightest nuances. Even a minor mistake can degrade the performance of the washing department. The solution to the question of how to make the floor in the washing bath correctly deserves special attention.

The conditions in which the flooring in the washing room is used are characterized by the constant presence of an increased level of humidity and frequent temperature changes. In the process of designing a bath and during its construction, this should be taken into account.
Requirements for flooring in a car wash
In order for the floor in the bath in the washing room to be made with high quality and last long enough, it must meet a number of requirements:
- quickly and completely drain water, for which the floor covering is made with a slight slope towards the drain hole or equipped according to the so-called leaking technology;
- well ventilated and dry quickly;
- be resistant to high humidity and temperature changes;
- it should be laid so as to exclude the possibility of drafts.
Varieties of floor coverings in the washroom
In private households, in the washing departments of baths, wooden (they are leaking / non-leaking) and concrete floor structures are usually laid.
As practice shows, the simplest option in terms of implementation is the leaking floor shown in the photo. On a pre-prepared base, which can be a concrete screed, lower crown, support pillars, etc., logs are fixed - they will become the basis for mounting the flooring from the boards.
Floor elements are laid at intervals of 3-5 millimeters. It is through these gaps that water will be drained. Usually leaking flooring is made collapsible. This design allows, if necessary, to remove the flooring and qualitatively dry the boards outdoors.

The leaky version, which is easy to perform and inexpensive in price, has a significant drawback - it cannot be insulated. When a bath is being built, the floors in the washing room, made in this way, can be mounted without creating a slope. Water will flow out through the gaps between the boards, and then go into the soil under the building.
When creating a non-leaking floor of wood materials, its elements are laid without gaps. This design does not provide for parsing boards. It is equipped with a slope in the direction of the drain hole. Further, the water enters the water collector and is discharged through the pipeline outside the building.
A non-leaking floor in the bath in the washing department requires the presence of a rough base and the laying of a layer of thermal insulation. Particular attention should be paid to solving the problem of ventilation of the underground space. One or more holes are made in the floor for ventilation - their number depends on the area of \u200b\u200bthe room. Plastic pipes with a cross section of 50 or 100 millimeters are inserted into them.
By the way, when a bathhouse is being built, warm floors in the washing room are created precisely without leaking.

Concrete floors in the washroom are made quite often, as they have many advantages:
- simple device;
- durability, strength and reliability;
- unpretentiousness in care.
Pouring a concrete surface is often much cheaper than installing a wooden floor structure. But such a floor has an important drawback - it is cold to the touch (read: “Cold floor in the bath - options for solving the problem, warming”).
There are several ways to solve this problem:
- move around in special shoes;
- insulate the floor;
- install a floor heating system, which will require considerable cash costs.
Technology for arranging a wooden floor
When deciding how to cover the floor in the bath in the washroom, many of their owners opt for wooden flooring. The work is carried out in stages.
First, prepare the base. To do this, lags are mounted using a beam made of pine or larch. It is desirable to make flooring from boards, in which the material of manufacture must match the log wood. The floor covering (not leaking) is made with a slope, due to which water flows into the drain.
Lags are mounted along the width of the washing compartment, thereby choosing the smallest distance between the opposite walls. In the case when the room is square, they can be installed in any direction.

Log installation procedure:
- In order for them to become stable, in the center of each of them a supporting chair is made of bricks, wood or using concrete pouring. When using brick or wood, you need to fill in a special platform with a height of 20 centimeters or more with reinforcement. It should be of such dimensions that it protrudes 5 centimeters from each side of the created support.
- Pits under the base are dug 40 centimeters deep for each site. The bottom and walls are rammed. Sand is poured into the recess with a 10-centimeter layer and 15 centimeters of gravel. Formwork is made from edged boards, its height should exceed the ground level by 5 centimeters. A roofing material is laid along the edges of the pit, a concrete solution is prepared and the formwork is poured with a layer of 10-15 centimeters. A reinforcing mesh is laid on top. From above, it is again poured with concrete to the very top edge of the formwork. Within a few days, the sites should dry.
- Heated bitumen is applied to the surface of the concrete base and a layer of roofing material is placed.
- When laying out a brick support, 4 rows are enough. Laying is carried out using a standard solution. Support is required for each lag.
- At the next stage, the underground is prepared, or rather the ground in this place of the structure. During the construction of a leaking floor structure, when the composition of the soil allows moisture to pass through, crushed stone is poured into the underground with a 25-cm layer and rammed. As a result, water will seep between the flooring elements into the existing gaps, penetrate into the soil through the backfill and be absorbed. Crushed stone in this case will act as a filter.
- If the soil does not absorb moisture well, it is necessary to equip a tray in it to divert water into the catchment area.
- When implementing a non-leaking structure, you need to decide how to insulate the floor in the bathhouse in the washroom underground. It is best to use expanded clay, observing a 15 cm gap between the lags and the backfill.
- A pit 30 centimeters high and 40-50 centimeters wide is dug near the wall. Its walls are rammed and strengthened with clay. A pipe is led out of the pit under a slope, for example, into the sewer. It is necessary to use products with a diameter of at least 11 centimeters for the fastest removal of liquid.
- The installation of the lag begins, they are fixed with anchors. In this case, it is necessary to observe a 30-40 mm distance between the walls and the logs. Before starting installation work, the embedded crown should be covered with roofing material. The beam for lags is additionally treated with an antiseptic composition.
- In the process of fixing the lag, you need to monitor their horizontal location. If necessary, they are hemmed at the point of contact with the support. It is also necessary to control the ratio of the lag to each other using the level.
Then proceed to the flooring of the wooden coating. The device of the floor in the bath in the washing room according to the flowing option is performed using unedged boards. Flooring elements should be pre-trimmed. It is necessary to make the most even surface from the end of the boards. Better yet, buy trimmed products.

The floors are laid in a washing room in a wooden bath in a flowing way in the following sequence:
- The boards are cut taking into account the parameters of the room, observing the ventilation gap between adjacent flooring elements and walls with a minimum size of 20 millimeters.
- The floor surface is laid from any wall, placing the floorboards parallel to it. 20 millimeters recede from the selected wall and put the first board on the logs, nailing it. The length of fasteners is selected in accordance with the thickness of the flooring. For example, 4 cm elements require 8 cm nails.
- Fasteners are driven in correctly, stepping back from the edge of the board about 15 millimeters. In this case, the nails must be set at an angle of 40 degrees. At least two fasteners should be used to fix one board.
- When the first bar is fixed, proceed to the installation of the second. The recommended gap between adjacent boards should be at least 3 mm. All flooring elements are fixed according to the described technology.
- Proceed to the final processing of the floor. Even two layers of drying oil will be enough. It is better to refuse staining.
When arranging a non-leaking floor, a tongue and groove board is used. The flooring elements are laid with a groove inside the room. In the process of fitting, you should tap with a mallet on the end with a groove. If you do not follow this rule, the tongue may break, because it is 2 times thinner than the fabric of the product.

A non-leaking floor in a sink in a wooden bath or other type of bath building is equipped as follows:
- First of all, make a rough base. Along the edges of the bottom of the mounted logs, wooden bars 5x5 centimeters in size are nailed. Boards of a rough base are laid on them, for which wood of 2-3 grades can be used. They are fixed with nails.
- Further waterproofing of the floor in the bath in the washing room is provided. To do this, for example, roofing material or a dense film is laid over the rough base.
- Install thermal insulation. Expanded clay, which is poured out between the lags, can be called the optimal choice of heat-insulating material. A second layer of waterproofing is placed on top of the insulation.
- At the final stage, they begin to create a finishing flooring from grooved boards. Laying is carried out according to the same technology as in the case of a leaky floor covering, but the floor elements are fixed without gaps.
- Refusal to fasten boards with nails is allowed. Then they can be removed in order to be taken out of the garbage room for the purpose of drying. In this case, a special method is used: the floorboards are fixed along the edges with the help of bars, which, in turn, are attached to the logs with capercaillie screws. When the need arises, they are unscrewed, the bars and boards are removed and dried outside the garbage.
Ventilation design device
The simplest method of solving the problem of ventilating the space between the rough base and the fine finish of the floor is to create holes to which pipes are attached that bring water out of the washing room.
There is another way to create ventilation - this is the installation of multi-level floors. Therefore, in each room they make a floor structure of different heights. For example, in the washing room, the floor surface will be lower than in the dressing room by 3 millimeters.

Option one is the most popular among developers, while the order of work is as follows:
- In the corners of the washing room at the base of the floor, holes are left for laying ventilation pipes with a diameter of 5-10 centimeters. The material used to make them may vary.
- Install ventilation pipes after finishing the walls in the room. Products with a diameter of not more than 5 centimeters can be disguised under the skin. Larger pipes should be installed in bath buildings that are visited more than twice a week. They are mounted in the corners of the room, attached to the surface of the walls with the help of special clamps.
Arrangement of a concrete floor
A floor covering created using a concrete mixture will last more than 25 years, while a wooden floor and logs will last only 6-10 years. But the installation of the screed is a laborious process, since it will be necessary to purchase or prepare a solution and pour it in, making reinforcement. You will also need to lay thermal insulation and perform other measures.

The procedure for pouring concrete floors:
- First, a pit is prepared, where water from the washing room will flow. To make it, they make a hole. In the pit, a pipe with a diameter of 15-20 centimeters is laid and taken out into the gutter, sewerage system or other similar place. The dimensions of the pit depend on the area of the room.
- The soil is leveled and broken bricks are poured onto it with a 15-centimeter layer. Gravel is placed on top of it with a layer of 10 centimeters, after which it is tamped. In other backfill options, crushed stone is used first, and then sand or broken brick and sand. All methods are considered correct.
- For waterproofing, roofing material or other similar rolled material is laid on top of the backfill in one layer, not forgetting the need to make a 10-centimeter overlap on the walls. To ensure complete sealing, the joints and seams are treated with bitumen.
- On top of the waterproofing material, a heater is poured - expanded clay. The thickness of this layer depends on the climate in a particular region. Most often, the backfill is made 5-10 centimeters high. A reinforcing mesh is placed on top of the expanded clay, preferably with cells of 15x15 centimeters, assembled from bars with a cross section of 10 - 12 millimeters. At the intersection, they are fastened with a flexible knitting wire. The grid is fixed with cement mortar for reliability. Before pouring, guides are fixed on the base.
At the end of the work, the filling of the sand-cement screed is leveled, distributing the mixture evenly over the surface. For smoothing, use, for example, a piece of edged board. To prepare the solution, it is desirable to use expanded sand (perlite). When using it, it is important to observe the correct proportions.
The solution is made as follows:
- 2 buckets of perlite are poured into a container (concrete mixer or trough) and 10 liters of water are poured. Everything is well mixed.
- Then add ½ part of a 10-liter bucket of expanded sand, mix the mass for 10-15 minutes, pour in 5 liters of water. Kneading is continued until a homogeneous mixture is obtained.
- Then a bucket of perlite is poured and 2 liters of water are poured. The result should be an almost loose composition. Water should not be added. After the mass is infused for 10 minutes, it will become plastic.
The finished mass is laid and leveled. The layer should be no more than 15 millimeters. It completely freezes in 4-5 days. On top, if desired, lay ceramic tiles.
The floor in the bath in the washing room: floor installation in the washing department, how to insulate, how to cover, how to make waterproofing in the sink in a wooden bath, heated floors, photos and videos
The floor in the bath in the washing room: floor installation in the washing department, how to insulate, how to cover, how to make waterproofing in the sink in a wooden bath, heated floors, photos and videos
Washing room is one of the main premises of any bath. In the process of arranging this room, the key requirements of building and finishing technologies and a number of additional nuances should be taken into account: any, even the smallest omission, in the future can lead to a significant deterioration in the performance of the room.
Floors deserve special attention in the process of arranging a washroom. The operating conditions of the washing room are such that the floor here is constantly exposed to moisture and frequent temperature changes, which must be taken into account in the process of designing the structure and its subsequent construction.

In order for the floor in the washroom to serve as long and efficiently as possible, it must meet the following requirements:
- contribute to the rapid and effective removal of moisture. To do this, the floors, as a rule, are made with a slight slope in the direction of the drain hole, or they are equipped according to the flowing technology;
- fully ventilated and dry quickly;
- withstand operation in conditions of high humidity and temperature extremes;
- be laid so that the possibility of drafts in the room is not allowed.
The main types of floors for the washing room
The most widely used in private construction are wooden (additionally classified into leaking and non-leaking) and concrete structures.

The simplest option. On a pre-prepared base (lower crown, concrete base, support pillars, etc.), logs are fixed, which act as the basis for the subsequent placement of the boardwalk.

Laying of boards is carried out with gaps of 3-5 mm - through them, water will be freely drained from the washing room.

As a rule, such floors are made collapsible, which allows, if necessary, to remove the boards and take them out of the room for better drying.
The method is budgetary and easy to perform, but has a significant drawback - it is impossible to insulate this kind of floor.
In the case of leaking wooden floors, the structure can be equipped without observance of the slope: the water will go into the gaps between the flooring elements, and then into the ground under the bath.
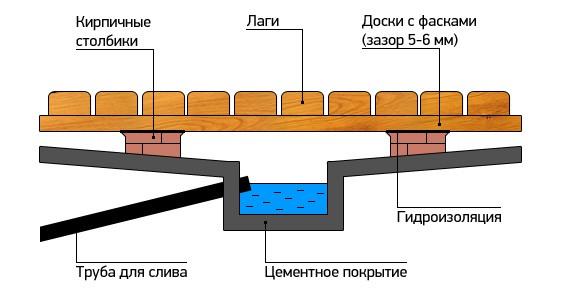

Boards are laid without gaps. The possibility of parsing such a floor is not provided.
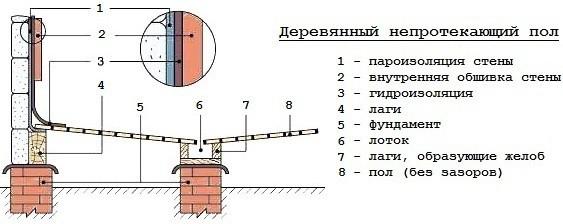
The system is equipped with a slope towards the drain hole - through it the water will drain into the water collector, and then through the pipe it will be discharged outside the building.
The design includes a "black floor" and a heat-insulating layer.
When arranging a non-leaking floor structure, special attention should be paid to solving the issue of ventilation of the underground space. As a rule, to ensure sufficient ventilation, a hole is made in the floor (or several, depending on the area of \u200b\u200bthe room) and a plastic pipe is inserted into it. Pipes with a diameter of 50 or 100 mm are optimally suited.

concrete floors

Relatively simple in arrangement, durable, reliable and unpretentious in maintenance design. In practice, pouring a concrete floor often requires a much more modest financial investment compared to building a wooden structure.
The concrete floor has the only drawback - it is cold. There are several options for solving the problem:
- walk in shales;
- insulate the floor well. The most popular option;
- install a floor heating system. It requires tangible financial investments and the involvement of third-party specialists if the private developer does not have the appropriate skills.
The procedure for arranging a wooden floor in a washroom
The procedure for arranging a wooden floor consists of several main stages. First, the base is prepared, then the flooring is equipped (the technology is somewhat different for leaking and non-leaking floors), and then ventilation issues are resolved
Laying a wooden floor begins with the installation of a log. Usually larch or pine timber is used. Flooring, if possible, should be made of boards, the material of manufacture of which coincides with the log wood. As noted, the floors are equipped with a slope towards the drain hole (in the case of a leaking structure, this rule can be ignored).
Installation of the log is carried out along the width of the room, i.e. the smallest distance between opposite walls. If the room is square (for example, 4x4, 6x6, etc.), the lag can be installed in any direction.

Important note! Logs are mounted transversely with respect to the drain.
For greater convenience of perception, the information is divided into several steps, supported by illustrations and diagrams and presented in a table format.
Table. Lag installation
| Stage of work, illustration | Description |
|---|---|
Let's start with the arrangement of support chairs. Preparation, planning | To ensure sufficient rigidity and stability of the log, a support chair is arranged in the center of each of them. For the manufacture of such supports, you can use wood, brick or concrete pouring. In the case of using wood or bricks, a support platform with a thickness of 200 mm or more is pre-poured with reinforcement at least with a chain-link mesh. Make the dimensions of the platform such that it protrudes approximately 50 mm from all sides of the future support. |
| Dig a hole for the base of each of the equipped sites. The recommended depth is 400 mm. Tamp and level the bottom of the pit and its walls. Fill the bottom of each recess with 10 cm of sand and compact it well, spilling it with water for better quality. Pour 15 cm of gravel on top and also thoroughly tamp. Install the formwork, pre-assembled from edged boards, into the prepared pit. You can use screws to fasten individual boards. In height, the formwork must rise at least 50 mm above the ground. Lay waterproofing material, such as roofing material, along the edges of the pit. Prepare concrete from 1 share of cement, 3 shares of clean sand and 4-5 shares of crushed stone. Water - approximately 50% by weight of cement. The consistency of the mixture should be quite thick. Fill the formwork with a 10-15 cm layer of concrete and compact it. Place a piece of reinforcing mesh on top of the fill, pre-cut in accordance with the dimensions of the formwork. On top of the mesh, pour the next layer of concrete up to the upper edges of the formwork and tamp thoroughly. Give the pads at least 1-2 days to dry. |
| Apply preheated bitumen to the surface of the equipped concrete platform, and put a layer of roofing material on top. If the bath is erected on a tape base, the height of the concrete pads must correspond to the height of the tape, i.e. their "tops" should be at the same level. |
| In the case of a columnar foundation, the supports must be erected to the level of the top of the embedded beam, on which the logs will rest in the future. |
| In the photo you can see the finished concrete pad. For a better understanding, the structure is shown with a brick support already erected and a log laid on top. In the same photo you can estimate the dimensions of the brick support. Traditionally, it is laid out with the dimensions of 2x2 bricks, and the height is selected individually in accordance with the conditions of a particular building. Usually 4 rows are sufficient. Masonry is carried out on a standard solution of 1 part cement, 3 parts sand and water. Lay out supports for each log. The number of supports is determined by the cross section of the beam. So, if you make logs from a bar / board with dimensions, for example, 15x10 cm or 15x8 cm, one such support in the middle will be enough. Installing supports every meter will reduce the cross section of the timber / board used to 10x5 cm or even 8x5 cm. |
| After the erection of the planned number of supports, you can proceed to the stage of preparing the underground, or rather, the earth in this part of the structure. If it is planned to arrange a leaking wooden floor, and the composition of the soil on the site allows it to pass moisture well, fill the underground with 20-25 cm of gravel and tamp thoroughly. As a result, water will drain into the gaps between the flooring elements, pass through the backfill layer and soak into the ground. Crushed stone in this situation will take on the functions of a kind of filter that ensures normal removal of moisture, prevents silting of the underground and helps maintain a normal level of humidity. |
| If the soil does not absorb water in the best way, the work will become somewhat more complicated: you will have to equip a tray in the ground, through which in the future water will be discharged into the water collector (pit), and from there - outside the building. To implement the mentioned idea, you make a clay castle with a slope towards the water pit. Some developers resort to arranging a castle from concrete mortar, but this solution leads to an unreasonable increase in financial costs. The clay castle is made in the following order: you pour about 10 cm of gravel on the ground of the underground space, pour a 15 cm layer of clay on top, and then level it so that a gradually increasing slope is provided from everywhere in the direction of the tray to remove moisture. The recommended settings are shown in the diagram. |
| If the arrangement of a non-leaking structure is planned, at the same stage you can insulate the underground with expanded clay, maintaining a minimum distance of 15 cm between the installed lags and the backfill to ensure effective ventilation of the underground space. |
| Dig a pit near the wall in the washroom. A height of 300 mm and a width of 40-50 cm is usually sufficient. Tamp the walls of the pit and additionally strengthen them with clay. From the equipped pit, lead the pipe to remove moisture from the water collector to the planned place (sewer, gutter, etc.). Use a pipe with a diameter of at least 11 cm - the liquid will be discharged through it as quickly as possible. The pipe is laid with a slope, as can be seen in the diagram. |
Let's start installing the lag | Fixing the lag is traditionally performed with anchors. When installing a non-leaking system, the first lag is laid near the wall opposite to the pit for collecting water. In accordance with the technology, the installation of the extreme logs should be carried out in such a way that they are at the highest elevation in relation to the rest of the elements - this will ensure the correct slope to the water collector. |
| Those logs, the installation of which is carried out along the edges, are not equipped with notches. In other lags, cuts are created. Observe the mowing of the order of 0.2-0.3 cm. Similar cuts can be prepared in the areas of contact between the log and the supports erected for them (the width of the cut is provided along the width of such a support). The total slope of the finished surface should be about 10 degrees. When determining the depth of the cut to be created, be guided by the number of lags to be installed. For example, if your washroom has a small area and 4 lags are enough to build a floor, make deeper cuts than in rooms with six lags and a large number of such elements. |
| When erecting leaking wooden floors, you can start installing the log from any convenient wall. The slope in this case is optional, so the elements can be installed at the same height. Saw a beam for a log according to the dimensions of the washroom. Keep in mind that between the installed lags and the walls of the room, an approximately 30-40 mm ventilation gap should be maintained. |
| Before installing the log, the embedded crown / support must be covered with a waterproofing material. Usually ruberoid is used. You are already familiar with the technology for arranging such insulation. Additionally, the timber for the manufacture of logs is impregnated with an antiseptic. |
| Be sure to control the horizontal fastening of the lag. If the control bubble in the level deviates from the center, hem the areas where the logs are in contact with the beam / support. Hem until the logs are level with the horizon. |
| To control the correct fastening of the lag in relation to each other, also use the level. For greater convenience, put a flat board on the installed logs and place a control device on it - a level. Control is carried out near the walls, as well as in the center of the lag. If necessary, hem the installed logs or trim them with wooden linings. |


The flooring of the mentioned structures will be carried out in a slightly different sequence, as a result of which there is a need for an individual consideration of two technological operations.
Prices for wooden beams
wooden beam
Leaking wood floor decking
To perform this work, an unedged board is used. Pre-cut the flooring elements. The most even surface must be provided from the end of the boards. If you wish, you can immediately purchase an edged board.
Proceed to the arrangement of the flooring of the leaking floor, following the technology presented in the table.
Table. Floor decking with leaky structure
| Stage | Explanations | Illustration |
|---|---|---|
| Cut the boards to the dimensions of your washroom, keeping in mind that there must be at least a 20mm ventilation gap between the decking and walls. |
|
|
| You can start from any wall convenient for you, erected parallel to the chosen direction of the flooring. Step back from the selected wall about 20 mm, lay the first deck board on the logs and nail the deck element. Select the length of the fasteners according to the thickness of the board to be laid. So, for fastening 4-centimeter boards, 8-centimeter nails are optimally suited. |
|
|
| Nails are driven in approximately 1.5 cm from each edge of the board. Important note! When driving in nails, set them at about a 40-degree angle. To fasten the board to the joist, use at least 2 nails. Fasteners try to sink a little (about 1 mm) into the material. |
|
|
| Having nailed the first board, proceed to fastening the second. The minimum recommended distance between decking elements is 3 mm. For greater convenience and ensuring the same gap width, you can use templates with the necessary parameters, made, for example, from fiberboard. Fasten all boards in accordance with the considered technology. |
|
|
| As a rule, they refrain from painting the floor in the washroom - without paint, the material will dry faster. It is enough to limit yourself to a coating in the form of 2 layers of drying oil. |
|


The procedure for arranging the flooring of a non-leaking floor in a washroom

For this flooring, a grooved board is used. Equip the flooring elements with a groove inside the room - the fitting process involves tapping with a mallet on the end with a groove. Otherwise, the sheet pile may simply break during the implementation of this event, because. it is 2 times thinner than the main canvas of the board.
The arrangement of the flooring is discussed in the following table.
Table. Non-leaking flooring
| Stage of work, illustration | Explanations |
|---|---|
| The flooring technology involves the preliminary arrangement of the "black" floor. Nail the bottom of the installed logs, along the edges, with wooden blocks measuring 5x5 cm. Lay the boards of the “black” floor on the fixed bars. You can lay board cuttings, material of 2-3 grades, unedged boards, etc. Fix boards with nails. |
| Lay a waterproofing material over the boards of the "black" floor, for example, a special film or roofing felt. |
| The technology involves the arrangement of a heat-insulating layer. Expanded clay is suitable for insulation. It is enough to fall asleep in the intervals between the lags. A second layer of waterproofing material is laid on top of the insulation. |
| After arranging the "black" floor, proceed with the installation of the tongue-and-groove boards of the finishing flooring. The basic recommendations are the same as in the case of a leaky floor, but the boards are laid without gaps. If you wish, you can refuse to fasten the flooring elements with nails - this way you can remove the boards and take them out of the washing room to dry. In this case, the following method of fixing the flooring is used: the boards are fixed from the edges with 2x3 cm bars. The bars themselves are attached to the logs with capercaillie screws. If necessary, the screws are unscrewed, the bars and boards are removed and taken out to dry. |


vapor barrier membrane prices
vapor barrier membrane
Solving ventilation issues
The simplest option for organizing ventilation of the space between the "black" floor and the finishing flooring was mentioned earlier - holes are prepared in the floor and pipes leading out of the room are fixed in them. A diagram of such a system is shown in the following image.

Another option for providing ventilation is the arrangement of multi-level floors. In this case, the height of the floors in different rooms will be different. So, in the washing room, the floor is made on average 3 cm lower than in the dressing room.

The first option has received the greatest popularity among developers. The procedure is extremely simple: in the process of arranging the floor in the corners of the washing room, special holes are left in the base for further installation of ventilation pipes. Pipes having a diameter of 5-10 cm are mainly used. The material of manufacture may vary.

Directly pipes for ventilation are mounted after finishing the walls of the room. Ventilation pipes with a diameter of 5 cm or less can be masked under the skin if desired. More impressive pipes are usually mounted in the corners and attached to the surface of the walls with special clamps. It is advisable to install pipes with a diameter of more than 5 cm in baths that are visited more than twice a week.
Prices for different types of ventilation pipes
ventilation pipes
The procedure for arranging concrete floors
A concrete floor will last more than 25-30 years, while the service life of wooden flooring and logs is limited to an average of 6-10 years, however, independent installation of a capital structure will require more significant labor costs - you will have to prepare / buy a concrete mix, pour it with reinforcement, lay thermal insulation and other related activities.
Instructions for self-arrangement of the concrete floor in the washing room are given in the table.
Table. The procedure for arranging a concrete floor
| Stage, illustration | Description |
|---|---|
| Moisture from the washroom will drain into the pit. Dig a hole for it. A pipe with a diameter of 15-20 cm is laid in the pit and discharged into the sewer system, gutter or other suitable place. The diagram shows the optimal dimensions of the pit for a small 4x4 bath. Change the recommended values in proportion to the dimensions of your room. |
| We level the soil and fill it with about a 15-centimeter layer of broken brick. On top we fall asleep a 10-centimeter layer of gravel and carefully tamp. You can use a more traditional backfill option, replacing the broken brick with sand. Some developers first fall asleep rubble, and then sand. In general, each option is correct. |
| On top of the backfill, we lay a layer of roofing material or other suitable roll material with approximately a 10-centimeter overlap on the walls. Seams and joints are coated with bitumen for complete sealing. |
| On top of the waterproofing material, we pour a layer of expanded clay for insulation. We select the thickness of the layer in accordance with the climatic features of your region. In the case of a washing room specifically, they are often limited to 5-10 cm backfill - and the costs are minimal, and walking on the finished floor is not so cold. Lay a reinforcing mesh over the expanded clay. Some developers limit themselves to using a chain-link mesh - for a compact room it is usually quite enough. A more reliable option is a mesh with cells of the order of 15x15 cm, assembled from 10-12 mm reinforcing bars. Standard flexible tie wire is used to fasten the rods at the intersections. The grid can be fixed with cement mortar. Often strips are made that simultaneously serve as guides. |


The main work is done. It remains only to level the fill with a cement-sand mixture. The composition is evenly distributed over the surface and smoothed out with a suitable device, for example, a piece of edged board with even ends. To prepare the solution, it is best to use perlite, i.e. expanded sand - the screed will help to increase the reliability of the structure and its thermal insulation properties.

When using perlite, it is very important to maintain the correct proportions. Pour 2 buckets of expanded sand into a concrete mixer or trough for manual preparation of a solution. Pour about 10 liters of water into a container and mix everything thoroughly. After that, you will notice that the volume of the mixture has decreased by about 30% - these are the properties of perlite.

Next, add half a 10-liter bucket of perlite and mix the mixture for 5-10 minutes, then add 5 liters of water and continue mixing until a homogeneous mass is obtained. Then pour a bucket of perlite and about 2 liters of water into the mixture. Continue to mix until a practically free-flowing composition is obtained. Don't add water. Let the solution stand for about 10 minutes and resume mixing - the composition will gradually gain plasticity.
perlite prices
perlite 10l
For greater convenience, before the screed, you can fix guides on the base, for example, from a drywall profile - it will be easier to navigate along them. In large areas, you can’t do without guides at all, but in a compact washing room you can manage without them, controlling the evenness of the surface with a level.
Lay the plastic mixture on the floor and level it. Do not make a layer too thick - 10-15 mm is enough. Remember to observe the slope in the direction of the water intake. The mixture hardens for 4-5 days. You can lay floor tiles on top. Use non-slip lining - this way you minimize the risk of injury to your washroom.


In the photo - the location of the lighthouses when forming a slope in the shower


Now you have a complete understanding of the procedure for arranging floors in a washing bath on your own. Follow the recommendations received, and you will be able to cope with the implementation of the considered activities as well as a professional master, significantly saving on the services of third-party workers and doing everything in the best possible way, because each technological operation will be controlled by you personally.

Successful work!
Video - Floors in the bath in the washing room
Despite the fact that the main room of any bath is, undoubtedly, the washing room is also an indispensable element. Between short visits to the steam room, vacationers head to the washing room, where they can cool off in cool water, relax in the font and undergo various beauty treatments (scrub, massage, etc.).
A washing room is a room whose distinctive feature is a high level of humidity, so this factor must be taken into account when finishing it. The floor deserves special attention, as it will be exposed to water regularly.
What are the floors in the washing bath?
In order for the floor in the washing room to serve for more than one year, it is important that it meets the requirements below:
- withstand exposure to moisture and strong temperature changes;
- well ventilated and dry quickly;
- ensure moisture removal.
First you need to decide on the place where the water will flow. If there is sandy soil under the building, then you need to dig a hole and strengthen its walls, another option is to build a water intake to drain water.
You can also install a metal container or make a concrete screed with a slope about 50 cm deep.
On the base, you need to strengthen the logs at a distance of 60 cm. Most often, a bar made of larch or pine is used. It is necessary to lay boards up to 2 cm wide on the logs, but you need to leave gaps of about 5-8 mm, this will be enough for the water to flow down unhindered, while walking on such a coating will be comfortable.

How to make wooden floors in a non-leaking type washing bath?
First you need to lay the logs on the foundation. Next, you need to lay a layer of waterproofing, seal the seams with sealant. Insulation should be tightly laid between the lags. The next stage is re-waterproofing, it is covered with a layer of vapor barrier film.
After it is necessary to make a draft floor with a slope towards the flow of water, cover it with a layer of polyethylene.
The last stage is the installation of the finish coating. For laying the floor, a tongue and groove board is suitable. The segments must be laid out in the direction of the drain at an angle so that the water flows to the hole.

How to make a concrete floor screed in a washing room?
First you need to prepare the base: compact the soil tightly, pour a 15 cm layer of gravel, crushed stone or broken brick. It is necessary to lay a layer of roofing material on the backfill layer, grease the seams with bitumen.
Remember that already when pouring the first layer, it is necessary to tilt towards the drain! Filling should be carried out in one step, otherwise a solid foundation will not work. If the washing area is too large, then you can lay wooden guides and pour concrete gradually into each of the sectors.
For additional structural strength, a reinforcing mesh must be installed. Then lay the next layer of concrete screed.

As already mentioned, the concrete base is cold and unpleasant to the touch. To get rid of this drawback, you can make warm floors in the bath in the washing room. Under the finishing layer of the floor, you can lay electric, water or infrared floors.

The most optimal and common option is water heated floors, because they have an affordable cost and do not emit harmful fumes. It is undesirable to make an electric floor, because a washing room is a room where there is always a high level of humidity.
In the washing room, the concrete floor covering is usually finished, because the screed not only looks unattractive, but it is also not very pleasant to walk on it barefoot. A popular option is lining - an environmentally friendly, aesthetic material with high performance properties.

Another common finishing material is tile. It does not deteriorate under the influence of water, has a natural composition, is durable and attractive in appearance. With the help of tiles it is easy to make an original design in the room. But tiles can be slippery, which is dangerous for washing, so you need to choose matte and anti-slip models. If the tile is still slipping, place wooden pallets or rubber mats on top.

Washing is a mandatory room in any bath. Its main feature is a high level of humidity, water constantly gets on the floor, so this must be taken into account when installing it. Be sure to think carefully about the issue of waterproofing, otherwise the floors in the washing room will quickly become unusable, and they will have to be changed, which is fraught with additional cash costs.
We also recommend
 Switching power supply: repair and refinement
 Remote control of light
 Swimming lessons for preschool children
 Notes for the master - home household alarms
 Clock propeller on Atmega8
 Device and relay application examples, how to choose and connect a relay correctly Microcontroller and relay simple switching circuits