Crafts from shells. Ideas and master classes
Let's make unique things that will decorate your home and fill it with summer mood! Crafts made from shells are a topic that gives boundless scope to the imagination of both adults and children.
How to make crafts from shells?
There are a lot of options for creative ideas for crafts made from shells. You can combine shells into three-dimensional shapes, you can combine shells with other natural materials, for example, stones, sand, clay. By laying out a pattern of shells on a sheet of paper, you can create appliqués or entire paintings. Shells are a unique natural material for children's creativity.
Crafts from shells for children (appliques)
Summer is the time for long-awaited family travel, little adventures and relaxation on the seashores. Every kid tries to bring home a small piece of happy memories - for example, a seashell. And it will be very interesting for him, together with adults, to make some kind of craft from this piece of sea life, because even the process of creating it will help to remember fun days spent on vacation.
If you glue the shells onto a sheet of paper, you can create a real “Fish” shell applique.
 Application from shells “Fish”
 You can make a funny bear using shells using the appliqué technique.
 Shell applique “Bear”
 Or you can make a funny mermaid.
 Application from seashells “Mermaid”
 Seashells glued onto colored cardboard make a funny and cute bear.
 Shell applique “Bear on a tree”
 Applications made from shells can be framed and then we will get a very delicate wall panel.

On a board you can lay out a very beautiful seabed with white fish. Various shells, pebbles, corals and even glass balls are suitable for this craft.
 Panel on a board made of shells “sea bottom”
 Look at the video on how to make a “Fish” applique from plasticine and shells:
If you use not only shells, but also twigs, you can make an interesting mermaid.
 Applique of branches and shells “Mermaid”
 Shell figures
The easiest way to make a figurine from shells is to supplement it with plasticine. Sea creatures made from shells are accessible to the youngest children and remind us that shells are gifts from the magical and fabulous sea.

The shells make cute koalas under the tree. Here you will need very good glue or a glue gun to attach the parts.

You can use shells to make cute owls on a stand. The factory eyes really bring this figure to life.

You can make an adorable cockerel out of shells.

And here is another example of how you can make a head for a bird out of a shell.

Look at the video on how to make a funny frog from shells:
A funny hedgehog is made from many small sharp shells.

You can make delicate, adorable cats from shells. The author of the craft made the tail of the cats from a thin long shell, the body from a large round shell, and the paws, head and ears from slightly flattened oval shells.

You can glue together a fish from two halves of identical white shells.

Using the same technique, you can glue together an elegant white swan from two shells.

You can glue together a lovely air angel from shells.

The shell giraffe is a real work of art.

For a poodle, you will only need the most delicate white shells.

In order to make a photo frame from shells, we need a base - any ordinary frame. We took a wooden frame painted white. In the absence of one, you can simply cut out a frame from cardboard.

Glue the largest shells to the frame.

Decorate the frame with small shells and pieces of coral.

The shell photo frame is ready!

Shell crafts for beginners
You should start making crafts from shells by collecting material for work. What we can do with you depends on what shells are available. For example, a candlestick made of shells can be a very interesting decoration for your home.
The first version of the candlestick is made on a round base. Seashells are glued to this base layer by layer.


The second version of the candlestick is made from a glass. Shells are glued onto the glass. The candle is placed inside.

Jars decorated with shells look very beautiful; they turn from simple glass containers into an original piece of furniture.

You can make an elegant vase from shells:
Large flat sinks can be used to decorate a kitchen stand.

If you can thread strings through the shells, then you can think about creating an unusual bookmark for a book.

A pendant made of shells will be a very stylish decoration for your home. To create it, you need to secure the shells with strings. The decoration will look more interesting if you use shells of different shapes, beads and faceted glass.

Large shells can be used to make a unique soap dish.

A large shell can be used to make an elegant stand for earrings.

Shell jewelry stand (video):
Flower pots or towel stands decorated with shells look interesting.

Tree of happiness made from shells
You can make an amazing gift with meaning from shells - a tree of happiness.

Watch how to make topiary from shells in the video (option No. 1):
Topiary made from shells on video (version No. 2)
With the help of sinks, you can breathe new life into an old mirror or box, making it a real designer masterpiece.

Shells make very beautiful wall panels. Look how beautiful the “Fish” panel, created from shells and a starfish, looks.

You can assemble a very romantic wall panel from a shell, stones and a twig.

You can breathe new life into a flower pot by decorating it with shells.

Shells, strings and sticks can be used to make very beautiful wall decorations.

Seashell dream catcher
A very neat idea is to make a dream catcher out of seashells. We will get a very stylish decoration filled with meaning. Dreamcatcher made of shells - 2  Dreamcatcher made of shells – 3
DIY flowers made from shells
The lovely shape and color of the shells itself suggests ideas for creativity. For example, people began to notice that some shells were surprisingly similar to the petals of various flowers. This is how a new direction of crafts made from shells was created - flowers and bouquets.
The soft pink shells make a charming rose.

You can supplement the shells with other material, for example, polymer clay. Then you can make a very effective composition.

A flower made from shells of different sizes and shapes will look interesting.
 Lilac shell flower
 The most talented and hardworking craftsmen began to create entire bouquets of shells.
You can decorate pots with fresh flowers with shells or make something like Japanese miniature gardens in some suitable container - for example, a bowl, small basin or tray.
Decoration made of shells "flowers" Hairpin made of shells DIY shell crafts reviews:
“When I was little, I made crafts out of shells. And now I would do it, but where can I get shells))” (alevita)
I would like to continue the topic, because the sea coast is rich in a variety of natural materials for handmade crafts. One of these materials is shells. In seaside resort towns, our attention, of course, is attracted by the large exotic shells and stars that line the counters of souvenir shops. Brought from distant seas, they will undoubtedly become a self-sufficient decoration for a marine-style interior. But you must admit, it’s much more fun to do something yourself, because when we create with our own hands, we put our soul and imagination into the product, and most importantly, even from ordinary shells found on Crimean beaches, you can make a truly unique gift, stylish decoration or item decor.
What can you find on the Black and Azov Seas? Most often you come across three types of shells - rapana, anadara and tritium:
As a rule, we find broken shells on the beach (finding a whole rapan is luck!), but this is not a problem, as we will see, fragments are also quite suitable for the job.
Now let's see what can be made from sea shells . Most of the craft ideas are found on www.etsy.com, where crafters from all over the world sell handmade items.
1. Decorating their seashells
Shells are an excellent material for marine-style jewelry: beads, pendants, earrings, bracelets. Depending on your idea, shells (both whole and broken) can be combined with pearls, beads and metal pendants.
To make jewelry, you may need to make a hole in the shell. Of course, if the volume of work is large enough, it is best to make a hole . But if buying a special tool is not practical for you, you can carefully poke a hole with a gypsy needle.
2. Photo frame
By covering an ordinary photo frame with shells and other seafood, you will get an interesting little thing that will become a decoration for your home or an original gift. A vacation photo just begs to be placed in a frame like this, which will remind you of the pleasant moments of the past summer all year round. As in the previous idea, shells are good to combine with other materials, for example, rope weave lace looks beautiful.
3. Wall decor
Or the initials of the newlyweds, lined with shells:
We hope our selection was useful to you and inspired your creativity!
There are so many things you can make from shells with your own hands! Candlesticks, paintings, flower pots, decorate the cake with a mastic shell, sew a toy of the same shape.
DIY shell crafts for a stylish home
See how to make beautiful candlesticks from old ones.
For such stylish things you need:If you collected the shells yourself, wash and dry them first. Lubricate one side with glue and attach to the surface of the candlestick. Glue the larger specimens first, then cover the space between them with small shells.
- old candlestick;
- glue "Moment";
- various shells.
This candlestick, made with your own hands, will become an exquisite table decoration, just like the next one.
It will be a pleasant addition to a romantic evening. This is what the exclusive accessory is made of:
- wide glass;
- sand;
- shells;
- candles.
If you don't have a suitable glass, you can replace it with a glass vase or another transparent fireproof vessel.
Place a candle in the center of the glass so that it holds well and for decoration, pour a layer of sand on the bottom of the vessel. Place a starfish shell next to the candles. Place small shells on the sand.Using almost the same principle, you can make crafts from shells with your own hands. For the next one you will need:
- gypsum or sand and cement;
- water;
- shells;
- glass vase;
- wooden box;
- candle.
You can use a children's cube as a box. By removing one of its sides.
Place the vase in a wooden cube. Make a cement mass consisting of 1 part cement and 3 parts sand and water or gypsum, mixing gypsum with water until creamy. Fill the gap between the cube and the vase with this mixture. Wait until the solution sets and holds its shape, but does not harden completely.Then remove the cube from the mold and frame a cement or plaster candlestick with shells. All you have to do is wait for the mass to dry completely and then you can put a candle inside and admire how the shell stone has turned simple things into an elegant creation.
Here's another candle you can make with your own hands. For it you will need:
- vase;
- shells;
- sand;
- candle.
Place a candle inside the vase. Place sand around the candle. Arrange the shells beautifully on it.
Looking at these shell crafts, you will think of the sea. To make pleasant dreams brighter, place a photo inside that will remind you of a wonderful vacation. But first, pour sand into a wide-necked jar and some shells on top of it.You can decorate this imitation of a seashore by cutting out seaweed from green paper.
How to make souvenirs from shells with your own hands
They will also help you make shells, photos will allow you to see interesting ideas. Such a network will be an excellent attribute and home decoration.
Take for her:If you have a network ready, use it. If not, then use a drill to make 8 holes at equal distances on one stick. From a skein of rope, cut 8 strands of equal length. Pass each one through the corresponding hole and tie a knot here. Fasten the other ends of these ropes in the same way, but in another stick. Make holes in the shells with a drill.
- wooden sticks - 2 pcs.;
- strong rope;
- shells;
- drill with a thin drill bit.
Before tying the end of the thread on the stick, thread it through the shell, and then secure it to the knot. Finish the ends of all ropes in the same way.
Cut several identical ropes. First thread the first one into the shell, then twist this horizontal thread with the vertical one. Also decorate the entire decorative network.
For him take:
- dish or plate;
- flat seashells - halves of valves;
- sponge;
- hammer;
- bowl;
- white acrylic paint;
- water.
To see how the shells will be arranged on the dish, place them on this container. Some larger shells can be broken with a hammer to fit between the shells to fill the gaps in the mosaic.
- If the putty is in powder, dilute it with water according to the instructions. If you have one ready to use, then place it on a plate and place the shells on top.
- Soak a sponge in water and wipe the surface of the shells to remove any solution that has gotten on them.
- Let the putty dry. To prevent cracks on it, sometimes lubricate these places with water.
- All that remains is to cover the putty with acrylic paint. When it dries, you can give an original gift to the recipient or place it in your apartment in the most visible place, like the following crafts made from shells.
To make this amazing ball of shells, take:Follow these instructions:
- shells of different sizes;
- ball blank;
- PVA glue or for ceramic tiles;
- putty knife;
- sand;
- soft cloth;
- sponge
For such a craft, you can use sea shells of the same shape and size. Then you will get a decorative ball like this.
- Mix some sand and tile adhesive. Take this solution with a spatula and generously lubricate the ball with it.
- Walk over the solution with a soft cloth, aligning the edges of the adhesive layer.
- Glue the large shells first and then the smaller shells. You can attach glass pebbles between them.
- Wait until the glue “sets”, then wipe off any excess from the shells with a slightly damp sponge.
To make your next creation, you will need:Cut out a triangular blank from cardboard, twist it into a cone, and glue it on the side. Starting from the bottom, glue the shells to it. You can make such an original Christmas tree for the New Year. Then decorate it with small colored balls and tinsel.
- thick cardboard;
- scissors;
- shells;
- glue or glue gun.
But here are some shell paintings and photo frames you can easily create.
If you glue the largest specimens to the wall and nail the hooks just below, you will get beautiful towel hangers. You can place this group in the hallway. It’s convenient to come home and hang a scarf or bag on such beautiful hooks.
DIY shell pincushion, decorative items
The marine motif is also reflected in the following textile works. They can be placed on the table or used as a pincushion.
Transfer the pattern pieces onto the fabric - there will be two of them for each product. Let's look at how to make a pincushion using the example of a starfish. Fold both fabrics for this pillow right sides together, stitch to the edge, but leave a gap to turn the pincushion through it, and then stuff it with padding polyester or cotton wool.If it is a pincushion, fold the braid into a loop. Place its ends into this hole on the pad and sew it up. Now you can hang the necessary handicraft item on the wall and always have it at hand.
And here’s how to create such a pincushion with your own hands in the form of Monomakh’s hat.
For her, take:Draw 2 circles with a compass - small and large. Place them facing each other, stitch to the edge, leaving a gap. Turn the product inside out, stuff it with filling, and sew up the remaining hole with a blind stitch.
- white thick fabric;
- threads;
- padding polyester;
- artificial pearls;
- beads;
- compass.
Now decorate the pincushion with pearls and beads, sewing them onto a large circle, which has become the top of an improvised cap.
You can sew a pillowcase onto a pillow by sewing a shell-shaped applique onto it. Place the soft item in the chair. A painting with elements in the shape of starfish will look great on the wall.
If you want to sew toys from tights so that they resemble large shells, then take note of the following master class.
For work we take:“Bite off” 2 pieces from the wire with pliers. Roll each one the same way - this is the basis of the future toy.
- thin tights;
- padding polyester;
- wire;
- insulating tape;
- pliers;
- pearl;
- eyes;
- needle and thread.
Connect them using electrical tape and wrap them with padding polyester.
Use a long piece of padding polyester to wrap both parts of the shell and put one part of the tights on them.
Thread the needle. Using this tool, tighten the edges of the hole in the tights.
Without breaking the thread, we make large tight stitches to mark the shell flaps. First you need to make the main stitches, and then the additional stitches.
After this, we sheathe the shell in a circle.
All that remains is to glue the eyes, the pearl and add color to the surface of the product using dry shadows.This is the shell you got, the price of which is incomparably less than the cost of a ready-made, store-bought one. This toy is made from old tights and leftover materials.
This shell-shaped bag will add to your collection of personal items with a nautical theme.
Handmade knitted items will also cost you very little.For a hat, sweater, jacket, you can use a shell pattern; a diagram and a photo of a sample will simplify the task.
- Rows 1 and 5, as well as rows 2 and 6 are knitted, row 3 is done like this: *from 5 loops we form five, then - 1 knit*, from 5 loops we form five.
- Rows 4 and 8 - purl. Row 5 - knit 3, *from 5 loops we form five, knit 1*, knit 2 loops.
- To form five loops from 5, pass the right knitting needle through five loops, grab the working thread, and pull it through the same loops. For now, leave the loops on the left knitting needle, yarn over on the right one, and knit the same loops again. Yarn over again on the right needle and knit these 5 stitches.
Baking decoration in the shape of a shell
If you baked a cake for a girl, decorate it with an excerpt from the cartoon “Ariel” using mastic. You can buy it or make it yourself from marshmallow candies or powdered sugar. To achieve the desired color, use food coloring.For it you will need:
- To make the sea, add blue food paint to a piece of mastic, knead it, and roll it into a circle. Using a rolling pin, transfer it to the cake. It will also help attach the mastic so that there are no air bubbles left.
- Form starfish and shells from red and yellow mastic. After wetting the areas of the “sea” with water, attach the shells here; the pictures will show how to make other elements of the sweet creation.
- Make Ariel's body and arms from flesh-colored fondant, and her tail from green. Attach each of its scales separately or cut them out with a knife on a strip of mastic and attach these ribbons directly to the tail.
- All that remains is to make a shell from white mastic. Familiarize yourself with the process.
The shape can be finely or coarsely toothed. Take the one you have.
- round shape with jagged edges;
- rolling pin;
- skewer;
- mastic.
After rolling out the dough into a layer, cut it out with a mold and shape it into an oval shape with a rolling pin.Using a skewer, apply a pattern in the form of straight lines to the workpiece.
Use a knife to cut a triangular notch at the bottom and roll the piece into a shell shape. Place to dry on a folded piece of foil. Also make the other half of the sink.
When the pieces are dry, fasten them with a backdrop cut out of mastic, moistening the joints with water.
Let dry for 12 hours, then it’s time to place the shell on the cake. You can place a pearl or several inside. Then such a cake would be very appropriate for a pearl wedding.
As always, in conclusion we suggest watching a selection of interesting videossailboat
We suggest assembling a sailboat with your own hands.
If you are on the sea coast, do not buy ready-made shell souvenirs.
It’s better to collect a collection of shells yourself and make an elegant, beautiful sailboat with your own hands!You will need:
Materials:
- one medium rapan for the body;
- three wooden sticks (thin skewers or branches) for the masts and one for the bowsprit;
- 6 matches for yards;
- a dozen to one and a half small shells for sails;
- threads for rigging;
- a large scallop shell for the stand.Tools:
- knife;
- glue (preferably superglue “Moment”, it really sets instantly. You won’t spend half an hour pressing a shell to the mast, waiting for the sail to stick!)Manufacturing:
We measure the length of the masts, divide the sticks into the required sections. We sharpen the tops with a knife for beauty.
We glue the sails to the masts: small shells at the top, larger shells at the bottom.
If you want to make the model more complex and beautiful, we will also glue to the masts transverse yards made of matches sharpened at both ends, on which the “rigging” will be attached.
For strength, tie the yards with thread at the junction with the mast. Let's wait until everything sticks tightly.
Now we will install the masts in a rapan casing.
For stability, we recommend inserting them into plasticine balls glued inside the rapana, and then securing them with drops of glue. We wait again: it is important that the masts hold tightly. For additional stability, the lower yards can be glued to the hull.
On the front of the sailboat we will glue a sharpened long stick - a bowsprit. We glue the front sails to it and the hull - a jib and staysail, and on the stern of the sailboat there is a rear sail - a mizzen. When everything is glued together, we stretch thin white threads between the upper and lower yards of each mast, as well as between the upper yard of the forward mast and the bowsprit.To prevent the threads from unraveling, add a little glue. For beauty, you can also glue flags made of multi-colored shell pieces to the tops of the masts. Finally, let's glue the sailboat to the stand. You're ready to sail!
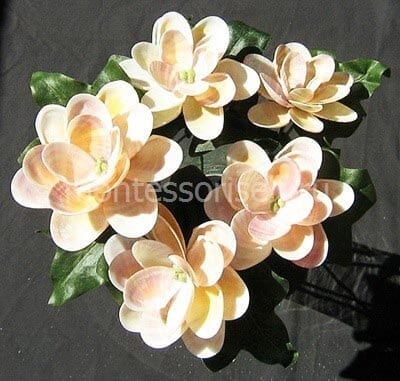
Lily
Mom is pleased to receive flowers as a gift, but is it a pity to throw away dried bouquets? Does she hate artificial flowers? Here's the solution: make a bouquet of amazing flowers that will never wither, but you can't call them artificial either - the composition looks so original. If in the summer you collected a variety of shells on the seashore, then the idea of a DIY flower is for you.
For each flower you will need:
- 5 small shells for petals;
- a lump of colored plasticine for the center of the flower;
- a long wooden skewer (straight stick, twig) for the stem.Making crafts:
We stick the petal-shells into the plasticine ball with their tips and press lightly so that they hold tightly.
Then we stick a skewer-stem into the same ball from below.
Here you have a flower!
The classic daisy flower is made from oblong white and lilac shells. But you can take shells of any shape and color - scallops, toothless ones; not only white, but also brown, orange, pink - and you will get a bouquet of amazing beauty!
Let us also add that plasticine balls do not have to be the same color. It’s much more beautiful if you mix several bright colors into a lump! Make three or five flowers together with your child - while the baby is interested. And give your mom an extraordinary homemade bouquet of shell flowers on a festive morning!Seashell painting
Who among us has not collected shells! Many even collect them. And, returning from a vacation on the seashore or river, they bring more and more exhibits. If you have a lot of them at home, this topic is for you. Try to use your imagination, be sure to involve your children in the work and create such a wonderful picture.
Progress:
The collected shells (about a hundred) should be thoroughly washed in running water. If some people experience a matte coating, don’t despair. The shine can be easily restored by treating the surface with a toothbrush moistened with a 10% solution of hydrochloric acid. Sort the cleaned shells by color and size.
Now you can start composing the composition. First, arrange the shells on a sheet of cardboard so as to obtain the desired pattern. There are many options here, it all depends on the choice of your imagination. Take regular organic glass (painted or tinted). Then transfer the shells sequentially to the glass and secure. Use “Moment” extra-strong glue. When the composition dries, cover the shells with 2 - 3 layers of varnish. Frame our work.Ideas from the Internet
Panel
These frames are all made from shells.
Flowers
Animals
Compositions
We also recommend
How to fix an electric kettle at home Why the electric kettle does not turn on - working stand
Restoration of wooden boxes How to decorate with carvings
How to make a plasterboard ceiling with lighting Installation of two-level ceiling lighting with LED strip
Ceiling lighting with LED strip: advantages, choice by degree of illumination, type of LED, color and density, installation and connection How to make an LED ceiling
Several options for using old CD blanks in everyday life
What is the service life of a washing machine