How to make a folding fan with your own hands. DIY fan - tips on making, selecting materials and sizes (85 photos)
The heat and flies forced a person to fan himself with branches, a bunch of feathers or a large leaf. This is how the idea of creating a fan came about. Fans were brought to Europe in the 17th century and became an integral accessory of the aristocracy. Today fan can be a beautiful piece of decor or a real salvation on a hot summer day. You don’t have to buy it in a store, but you can do it in a fairly simple way.
To make a fan craft you will need:
- pages from a glossy magazine or newspaper;
- a knitting needle or a thin bamboo stick;
- any glue, but one you trust and super glue;
- threads;
- decorative ribbons;
- beads;
- lace;
- decorative flowers;
- scissors;
- a simple pencil;
- a sheet of thick cardboard.
DIY fan craft
Fan making process

1) On a sheet of cardboard, draw a circle with a pencil with a diameter of at least 10 centimeters. Then we cut it out and carefully fold it in half - this is the base.

2) Then we start twisting the tubes. At least 31 pieces are required. To do this, we cut the pages of a magazine or newspaper into strips. Then we twist them into tubes, winding them on a stick or knitting needle. Be sure to glue the tip of the tube with glue.

3) Now we insert the resulting tubes evenly inside the base folded in half and fix them with glue. When all the tubes are glued, we glue our base too.


5) In addition to threads, you can use ribbons as decoration, then the fan will be more durable and beautiful. If you have lace, beads, dried or decorative flowers, then decorate the resulting fan with them, without being afraid to experiment.

Here's a simple way to make it DIY fans from old newspapers or magazines.

You can use a can of spray paint and blow out the fan with the color that best suits the interior.
Hairspray with glitter will add a unique shine to the product in the light of the sun's rays. the fan will delight the eyes of those around you and, of course, will not leave children indifferent. So get creative and let working with your hands bring you pleasure.
The fan came to us from the East. The first mention of it dates back to China in the 8th-2nd centuries BC. It appeared in Europe at the beginning of the 17th century thanks to the Jesuits and traders who collaborated with China. And it gained unprecedented popularity and significance at the courts of European emperors. It got to the point that during the Baroque and Rococo periods, the fan was part of ceremonial actions and communication between aristocrats. For example, ladies could open their fans only in the presence of the queen. As for communication between people, if a woman touched her lips and heart with an open fan, then she told her chosen one that he was her ideal. If you wanted to show the suitor that he was not suitable at all, then the fan was applied with your right hand to your left cheek. We invite you to plunge into this world and learn how to make a fan with your own hands.
Paper version
There are several options here. The first one that comes to mind is a method from childhood. Namely, we take any paper, fold it into an accordion, tie it at the base, open it, and now the fan is ready. However, if you want a more convenient and reliable design, then you can make this option from paper and ice cream sticks:
To do this, we simply glue the sticks along the fold line, and at the other end we make a hole and tie a thread. Making such a fan can be used as fun for children.
However, we offer you a slightly more interesting option. Namely, a fan made of paper tubes. For it we will need:
- cardboard;
- newspapers or office paper;
- PVA glue;
- stationery knife;
- pen or pencil;
- acrylic paints;
- ruler;
- ribbons, beads and decor at your discretion.
Cut out two bases from cardboard. To do this, draw semicircles, as shown in the images below. If you have a compass, it will speed up your work.


Now, using a stationery knife, we cut out our parts.

Let's put the basics aside for now. We cut strips of newspaper or paper about 6-7 cm wide. Take a knitting needle and, starting from the corner, twist the tube. At the end we fix it with glue. It is better to prepare more straws in advance.


We glue an odd number of tubes onto one base, as shown below.

Cover with the other half of the base. We cut off the ends of the tubes that stick out from the top.

We also cover all the sides with tubes using glue.


We take a new tube, fold it in half and go around the first post of the fan, thus weaving it to the base of the fan.


When everything is ready, paint the entire fan with acrylic paint.

We decorate according to the idea, as in the photo below.

You can paint the fan with stain and then, looking at it, people will get the feeling that it is made of twigs.

Knitted fan
For those craftswomen who have crocheting or knitting skills, we offer diagrams describing how you can create a fan using your skills.
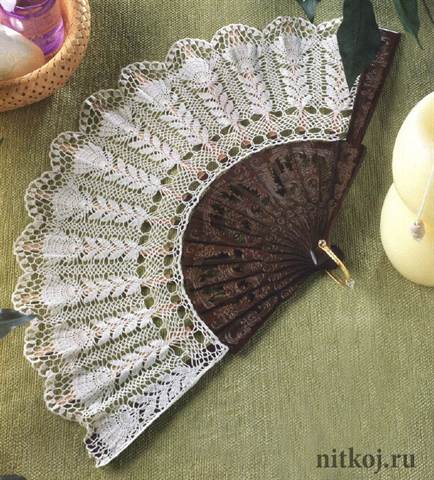

Such fans can suit you not only on a weekday, but also, for example, for a masquerade ball. You just need to choose a different thread color and use decor.

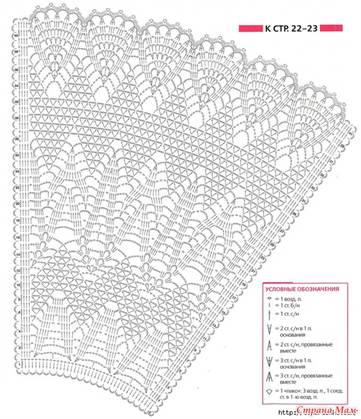
Moreover, according to these patterns, you can knit a fan not only with crochet, but also with knitting needles.
From wooden skewers
This accessory can serve not only as an addition to an outfit, but also, for example, as room decor. We offer you a master class on creating just such a fan. Prepare skewers, jute rope, glue and scissors.
Take 10 skewers and place them on the work surface. The outer ones should be single, but we put the sticks in the middle in pairs, and also fasten them.

Using jute thread, we twist circles of different diameters in a spiral and fasten them with glue. And place them between the skewers.

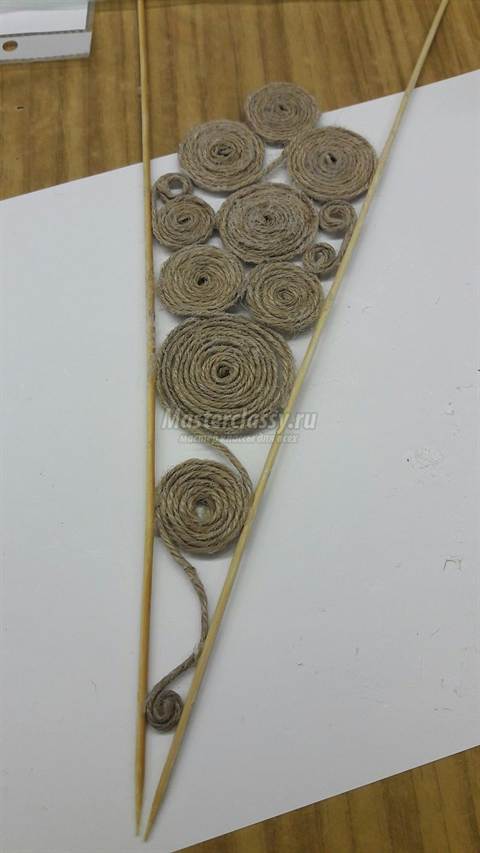
When all the segments are ready, we fasten them together using glue and the same jute thread.

We also put a thread on top. At the base we glue several jute spirals.

Such a fan will decorate an interior in eco-style, Provence, etc.
Other options and materials
It is also very popular to create fans from non-standard materials. For example, from disposable forks or spoons, as in the video below.
Recently I was cleaning out the costume room and came across some fans. Once upon a time, about ten years ago, I had a Chinese dance with fans. Accessories were very difficult back then. It’s not that we didn’t have the financial ability to buy them, although that too, but the main reason was that they simply weren’t available in stores.
Step 1 Take thick white paper or white cardboard. We will need 6 sheets of A4 paper or cardboard. For 1 fan with a diameter of 41 cm, you need whole sheets, for small fans with a diameter of 30 cm, 3 A4 sheets, cut in half (6 halves).

Step 2 We fold each sheet into an accordion (fan)

Step 3 Now for a little creativity. We take brushes, gouache and paint our sheets as your imagination tells you. I entrusted this procedure to my daughter. She was happy to help me. This is what happened.

Step 4 Now all our sheets need to be glued together, the edges strengthened by gluing additional paper. It should look like this.

Step 5 Now you need to cut out two wooden sticks. For a large fan, the length of the sticks is approximately 30 cm, for a small one 25 cm. The width of the sticks is approximately 1 cm. Drill holes in the sticks at a distance of 2 cm. For the width of the fan. Those. Where the handles will be, holes are not needed.

Step 6 Now we take our fan and a thick silk thread, fishing line or wire. I made a large fan using wire, a small one using thread. In general, we take what we have at hand. If it is a thread, then we thread it into a needle and, as it were, stitch the fan with stitches back and forth along the edge of the entire fan. If you have a fishing line, you will first have to make small holes and then insert the fishing line; you can also work with wire right away. Don't forget to leave the ends free on both sides. It should look like this.

Step 7 Now take a stick and thread the free end of the thread into the holes of the stick. As if sewing together the edge of the fan and the stick. Be sure to secure the end of the thread tightly and cut off any excess. Having done this on one side, adjust the tension of the fan. The fan should open freely, but not sag. After adjusting the tension, do the same on the other side.
The fan has been known in the east since ancient times. It was first mentioned in China, but it was also widespread in Japan and India. In Japan, a fan symbolized military power; in India, sultans were fanned with fans. Later, this accessory was brought to Europe, where it became an attribute of the aristocracy. Nowadays, this thing has become available to everyone, and you can easily make a fan with your own hands.
Paper fans
There are several ways to make a paper fan with your own hands: from very simple to very complex. You can use such accessories to decorate your interior or as a rescue on a hot day.
Children's fan
A child can make such an accessory on his own. In order to make it you will need the following materials:

First, take a piece of paper in the color you like. Then fold it like an accordion. We fasten one of the edges with a stapler. Now the resulting craft can be decorated by cutting out and gluing several multi-colored flowers.
Three-layer option
This manufacturing method is no more complicated than the previous one. To work you will need:
- 3 sheets of colored paper of different widths (for example, the first sheet is 29 cm wide, the second is 23 cm, the third is 19 cm);
- scissors;
- glue stick;
- hole puncher;
- ribbon.
You can choose absolutely any color for the fan. The main thing is that they combine harmoniously. Procedure:

Round skewers
Such a fan can complement the image of a snowflake at a matinee or decorate another children's costume. And making a beautiful round fan is very simple. For this you will need:
- 3 sheets of A4;
- scissors;
- glue or glue gun;
- 2 flat skewers.
It is best to use thick double-sided colored paper to make a fan, and instead of skewers you can use ice cream sticks. Stages of work:

From newspaper tubes
This fan can be hung on the wall and will become an original decoration for the interior. And it’s not at all difficult to do. For production you need:
- old newspapers or magazines;
- spoke;
- glue gun;
- threads;
- decorative elements (ribbons, beads, flowers, lace);
- thick cardboard;
- scissors or stationery knife;
- pencil;
- ruler.
Before starting work, prepare all the necessary materials. You can use a cardboard box to create the base. Operating procedure:

Japanese origami technique
The origami technique is quite simple, but requires accuracy and patience. To make a Japanese fan with your own hands using this technique, you will need the following materials:
- 12 white sheets of paper;
- scissors;
- red wool thread;
- office glue;
- a simple pencil;
- stapler
To prevent the fan from looking boring, you can find and print Japanese-style designs on sheets of paper. It is best if on each of 7 A4 sheets you place two identical patterns measuring 10x29 cm, and on another one print 4 of the same patterns measuring 7x20 cm. Operating procedure:

Fan made of fabric or feathers
Fans made from feathers look much more impressive than modest paper fans, and fabric accessories look more elegant. To create such fans with your own hands, master classes will be very useful.
From plastic forks
A variety of materials are used to make fans. For example, an original fan can be assembled from ordinary plastic forks. And to do this, you will need the following tools and materials:
- 19 disposable forks (you can take more, but be sure to have an odd number);
- lace 1 meter wide;
- feathers;
- satin ribbons;
- rhinestones;
- openwork ribbon;
- corrugated cardboard;
- old disk;
- heat gun;
- white cardboard;
- cup;
- a simple pencil;
- scissors.
The materials for the product must be selected so that the colors are harmoniously combined. Stages of work:
- On white cardboard, draw a disc with a pencil, draw a line in the center of the resulting circle and cut out two semicircles.
- We trace the neck of the glass on corrugated cardboard and cut out a circle, after which we cut it in half.
- Glue a small semicircle to a semicircle of white cardboard, carefully aligning them along the cut edges.
- We insert the forks into the corrugated paper and attach them to the large semicircle with glue. The forks should be positioned so that their tops touch each other.
- The second piece of white cardboard needs to be glued on top of a semicircle of corrugated paper.
- We take a satin ribbon and attach it to the top of the outer fork. Next, we intertwine the ribbon between the tines of all forks and glue it on the other edge.
- We glue a feather to each of the forks on top, and cover the attachment point with an openwork ribbon.
- We glue a corresponding piece of velvet onto the cardboard semicircle from below, and a flower made from ribbons on top.
Fabric fan
A fabric fan can be used as a prop for performances or as an unusual accessory. To make a fan with your own hands from fabric, You will need the following materials:

Wooden sticks for the craft can be taken from an old fan, and the fabric is not too thick.
If you don’t have old sticks, you can cut them out of plywood.
The size of the part is 40x1 cm. The parts need to be stacked and a hole for the thread should be made at a distance of 1 cm from the edge. Manufacturing procedure:
- We take wooden sticks, stack them and thread a pink thread through the hole. After this, we wrap the thread around them from below several times in a circle so that they hold better.
- We fan out the sticks so that they are at the same distance from each other and apply them to the paper. We outline them with a pencil.
- In the resulting semicircle, draw a small semicircle with a radius of 10 cm and cut it out.
- Using the template, cut out the piece from the fabric.
- We apply the fabric to the unfolded sticks and glue its edge to the lowest strip in the fan. After this, the fabric part needs to be glued to the rest of the sticks from below, and completely to the last strip.
- The top of the sticks should be sewn to the fabric with blue thread. You can sew blue tape onto the edges of the fabric to hide uneven cuts.
- After the glue has dried, the fan can be folded.
Chinese method
China can be called the birthplace of the fan. It appeared there in ancient times and was made from different materials: lotus, reed, feathers. A little later, thanks to the Japanese, folding fans appeared in China. You can try to make just such a fan yourself. D For this you will need:
- textile;
- ruler;
- thin plywood;
- bolt with nut;
- scissors;
- glue;
- sample.
Stages of work:

Vale for dancing
A whale is a type of cloth fan used in dance. To make a veil fan with your own hands, you will need the following materials:
- folding fan made of thick fabric;
- heat gun;
- scissors;
- silk fabric.
Before you start creating a veil, you need to measure the required length of fabric. It can range from 50 cm to 2 meters. And the width of the fabric should match the width of the existing fan.
Glue must be applied to the hard parts of the base. Next, you should fix the piece of fabric on the table and start gluing the edges of the base one by one. Do not stretch the fabric too much. It must fold freely, otherwise it will quickly tear.
The finished product must be left for a day for the glue to dry. After this, you need to get rid of that part of the base on which glue was not applied. To do this, carefully cut off unnecessary tissue from the back side of the veil between the ribs.
There are quite a few ways to make a fan at home: from the simplest, which even a child can easily handle, to more complex, which will require certain skills. All you need to do is choose the one that suits you and get to work.
Attention, TODAY only!
During the hot season, you really want to feel cool and get rid of the annoying heat. To ease your condition in the summer, you can take a paper fan with you on the road. You can buy it at the store, but it will be much more fun to make it yourself.
How to make a Japanese paper fan with your own hands: master class
Making a Japanese fan is fun, simple and quick. You can easily make a paper fan with your child.
To begin, you need to prepare the following materials:
- paper with a beautiful pattern (for example, a beautiful picture from a wall calendar or patterned paper);
- glue stick;
- scotch;
- scissors;
- Popsicle sticks.

How to make a fan out of forks with your own hands?
Plastic forks can be used not only for their intended purpose, but also for creative work. For example, you can create an original fan from forks. To do this you need to stock up on the following materials:
- twenty disposable plastic forks;
- glue "Moment";
- satin ribbons of two colors, one meter each;
- lace at least 50 cm long;
- scissors;
- CD;
- threads;
- needle;
- bow from gift wrapping.


To decorate a fan, you can use various materials: ribbons, beads, lace, artificial flowers, etc.
 |
 |
 |
 |
 |
 |
 |
 |
 |
In the warm season, people escape the heat in various ways: some people stay under or under a fan at home, while others prefer to fan themselves, especially in transport, where it is especially stuffy in the summer. The fan that you made yourself can be decorated at your discretion. Such a designer accessory will make you stand out from the crowd and attract the attention of others.
If you make a fan from ordinary plastic forks with an original design, then it can serve as decoration as a carnival costume made in the spirit of “Carmen”.
We also recommend
 How to fix an electric kettle at home Why the electric kettle does not turn on - working stand
 Restoration of wooden boxes How to decorate with carvings
 How to make a plasterboard ceiling with lighting Installation of two-level ceiling lighting with LED strip
 Ceiling lighting with LED strip: advantages, choice by degree of illumination, type of LED, color and density, installation and connection How to make an LED ceiling
 Several options for using old CD blanks in everyday life
 What is the service life of a washing machine