Finishing the chimney on the roof. Adjoining the roof to the chimney pipe Lining the chimney with a profile
With the correct laying of corrugated board on the roof of the house, it is guaranteed to avoid leaks during rains and spring snowmelt. By this criterion, one can judge the reliability of the roof. It should be remembered that any roof structure consists of many elements. The list includes valleys, front bars and a ridge. However, based on practice, the most risky element in terms of leakage is the chimney.
A few decades ago, stove-makers dealt with this problem by thickening a brick chimney. However, such work requires certain knowledge and skills, and modern structures are increasingly being built from metal. Typically, chimneys are made with a circular cross section. A simple instruction will help you figure out how to close a pipe on a corrugated roof.
Causes of leaks
The roof covered with profiled sheet must be equipped with several holes through which the chimney pipe and ventilation channels will be led out. As a result, the solidity of the waterproofing may be broken, which will increase the risk of leaks. It is rather difficult to solve this problem if the chimney had to be led out through an already constructed roof.
For high-quality sealing of the areas where the pipe adjoins the corrugated board, quite a lot of effort is required.

If the work is done poorly, many problems arise:
- Water starts to flow. This happens if the sealing of the junction of the chimney and corrugated board is poorly equipped.
- The rafter system began to rot. After water gets inside the roofing cake, the wood from which most of the roof elements are made gets wet. As a result, the structure is deformed.
- The roofing material itself begins to rust. The corrugated board is not very well protected from corrosion from below.
- Aging insulation. When the insulation gets wet, its effectiveness is significantly reduced.
To increase the reliability of the roof, you need to choose the right place for the outlet of the chimney and ventilation ducts. This will make sealing the pipes much easier.

Mounting Features
What needs to be done so that there are no leaks at the junction points of the pipe to the corrugated board? This requires proper sealing of the joints. Experienced installers note that when solving a problem, it is important to take into account the location of the chimney. The closer the chimney is located to the ridge, the less water gets to its junction with the chimney. In this case, the risk of leaks is reduced.
In addition, the pipe installed as high as possible along the slope has the smallest section located in the cold air zone. This minimizes the formation of condensate, which contributes to the buildup of soot inside the chimney. In addition, if condensation constantly forms in the pipe, the walls of the pipe are exposed to acid, which corrodes the metal.

It is necessary to separately consider different designs of chimneys in order to figure out how to arrange their joint with corrugated roofing.
Rectangular products
Today, more and more manufacturers are making sure that the joints of the roof and chimney pipes are reliably protected from water. For this purpose, special additional elements are being developed. They are installed near the valleys, ridge, pipes. Such elements are called aprons.

The main purpose of the apron is to collect water flowing down the chimney and roof slopes. With the help of such a device, moisture is diverted to the eaves into the drain system. However, during the installation process, it is important to consider one important point. You need to take care of proper waterproofing. As you know, it is imperative to lay a waterproofing film under the corrugated board. It doesn't matter if the roof is insulated or not. At the junction of the pipe to the roofing, a cut is made for the installed chimney. The edges of the cut are left with a width of 50 to 100 mm. In the future, they will be fixed directly on the chimney structure.
However, these are not all the points that need to be taken into account. At the joints, it is necessary to create a reinforced layer of waterproofing. Therefore, quite often a special tape is installed under the apron. It must be placed under the apron strips located on top. Partially the tape goes on the corrugated board. The scheme of work when creating a waterproofing layer should be as follows:
- first, the tape is applied to the lower edge of the chimney;
- after that, the joints must be sealed on the sides of the pipe structure;
- at the final stage, the upper edge of the chimney is pasted over.
Often there are situations when it is necessary to pass the stove pipe through an already created corrugated roof. This job can be done quite simply. However, one subtlety must be taken into account. It is necessary that the hole for the chimney in the roofing material be 1.5-2 cm smaller than the pipe itself. In this case, the chimney will not be able to crawl through. But for this, the edges of the corrugated board are simply cut and bent.
After installing the chimney, they will fit snugly against it. This allows you to create additional protection of the joint from leaks. In this case, under the corrugated board, it is imperative to mount the bottom bar of the apron, and on top - the waterproofing tape.

Pipe connection in the ridge
The easiest way to seal the joint of a pipe with a corrugated roof is if it is drawn through the ridge. This improves the reliability of the connection. In such structures, the formation of snow pockets is impossible. The risk of leaks arises precisely when they are present. Such options also have one significant drawback - to pass the pipe through the top of the roof, the ridge element should be divided. This means that two additional posts must be installed under the edges of the plots. You can seal the junction with an apron. However, it must have a specific configuration. Such an element is made of smooth metal sheets.
Attention! Often the space between the corrugated board and the apron is filled with a silicone-based sealant. Modern manufacturers offer the consumer to use self-adhesive tapes that are made of butyl rubber.

The upper junction zone between should be sealed by the standard method - using the upper elements of the apron, sealed from above with a sealant. The silicone composition is not afraid of high temperatures.
The joint of the pipe and corrugated board on the slope
Not in all cases, the layout of the building allows you to bring the chimney through the roof ridge. Therefore, another path is chosen - to make a hole on the slope. In this case, the work on sealing the junction becomes much more complicated.

The main goal is to properly install the top element of the apron. Therefore, the basic rule is the installation of this element under the corrugated board.
Attention! If the upper side of the chimney structure has a width of more than 80 cm, a shaped apron with a ramp is installed on it. This design is reminiscent of a breakwater that diverts water in different directions from the chimney.

The installation of such an apron is associated with certain difficulties. In addition, at the junction of its elements and corrugated board, two valleys are obtained. They need to be sealed in the same way as roof valleys. This requires the installation of additional slats and increased waterproofing.
round pipe
Many chimney structures for stoves are equipped with round channels made of metal sheet. Such products are multi-layered and additionally insulated. Such a pipe is sealed in many ways. It is worth sorting out the most popular:

When a residential attic is located under the roof of the house, the pipe passage must not only be sealed, but also carefully insulated. The gap formed between the apron and the pipe must be closed with a special heat-resistant gasket. It is attached to the plane of the product.
As you can see, you can equip the joint of the roof from corrugated board with a chimney yourself, knowing the installation features of various structures. In the process of work, it is important to follow the technology. This will ensure the sealing of the junction.

How to make a passage in corrugated board without disturbing the truss system
If the insulated roofing pie has already been completed, there will be many problems with passing a chimney through it. The main difficulty lies in compliance with fire safety requirements. At the same time, it is necessary to maintain the integrity of the vapor and waterproofing.
The chimney structure should be placed at some distance from the wooden rafters. Therefore, the passage of the pipe through the corrugated roof is created in a special box, which consists of rafters located next to the chimney. Two beams are fixed between them. They are placed above and below the chimney structure. From cross beams and rafter legs to the chimney structure, it is selected in accordance with fire safety standards. This indicator is in the range from 130 to 250 mm. It depends on the material from which the chimney structure is made.

The inside of the box must be filled with insulation with non-combustible properties. usually used high-density material made using basalt fiber. It has low hygroscopicity, in comparison with conventional heaters.
To ensure the tightness of the roof, it is necessary to cut through the corrugated board with an envelope on the hydro- and vapor barrier at the place of the pipe passage. Its edges should be fixed outside the wooden box.
To cut the corrugated board under the pipe in the place where it will be carried out, a continuous crate should be created. Thanks to this, it will be possible to firmly fix the lower abutment bar and the roofing material near the walls of the chimney structure.

conclusions
The choice of method for sealing the junction of the pipe and corrugated board depends on the shape of the chimney and the features of the roof structure. You can create a reliable connection using an apron (for rectangular structures) and additional elements (for round sections).
The choice of the location of the chimney outlet is also of great importance. The lower the pipe is located along the slope, the more water accumulates at the joints. This increases the risk of leaks. The best option for the location of the chimney opening is in the ridge of the roof or not far from it.
By following the technology of sealing the junction of the pipe and corrugated board for certain chimneys, it is possible to reliably protect the roof from leakage. It is especially important to do this if there is a warmed veranda.
11964 0 0
Do-it-yourself finishing of the chimney on the roof in 3 options
Many people think that finishing the chimney on the roof is needed only for beauty, this is partly true, but the aesthetic component is far from being in the first place here. Facing is needed, first of all, to protect the chimney, both from the inside and outside. Next, we will analyze the 3 most popular ways of arranging a chimney, plus you will find out why this is necessary and how to sheathe a pipe with your own hands.
Why trim the pipe
There are at least 3 reasons why it is necessary to finish the chimneys on the roof:
- High temperatures, on the one hand, and cold air, on the other, lead to the fact that condensate settles on the inner surface of the pipe. But this is not just water, the condensate is an aggressive acidic cocktail that gradually corrodes the pipe. External insulation shifts the dew point inside the insulation and eliminates the appearance of condensate;

- 222222 If a solid clinker brick or stainless steel pipe was used for the construction of the chimney, then these materials are not afraid of weather troubles. While ordinary brick without external protection will begin to crumble in a couple of years, steel will rust and concrete will crack;
- In addition to the strength of the chimney, there is also such an important point as the rain protection of the roof itself. If the sealing of the pipe connection sector with the roof was poorly done, then in a year the insulation will become unusable, and the wooden truss system will begin to deteriorate.

Standards and possible finishes
The chimney system, as, indeed, all furnace facilities, are important fire hazardous objects, respectively, all aspects of the arrangement are strictly regulated.
Norms and rules
All important points regarding the arrangement of heating, ventilation and air conditioning systems are described in detail in SNiP 41-01-2003. The work is quite voluminous, so I will retell only those rules that apply to chimneys:

- The ignition temperature of the thermal insulation and finishing materials of the pipe should be 20 ºС higher than the maximum temperature of the chimney from the outside, but ideally it is desirable to line the chimney with non-combustible materials;
- Sheathing the pipe with metal is allowed, but the metal must have an anti-corrosion coating;
- The brick pipe must have walls with a thickness of 120 mm or more;
- Concrete chimneys in private houses are rarely mounted, but if you decide to install such a pipe, then the concrete must be reinforced, heat-resistant and have a wall thickness of 60 mm or more;
- The minimum gap between the chimney and the wooden roof sheathing is from 130 mm;
- For ceramic chimneys not protected by thermal insulation, the gap between the pipe and the wooden roof structures is from 250 mm;
How to trim a chimney
| Illustrations | Recommendations |
 |
Clinker tiles. The above-mentioned clinker brick is a good thing, but expensive. Therefore, many lay out a pipe from ordinary bricks, and line it with clinker tiles on top. The material is able to withstand any vagaries of the weather, plus such tiles can be tiled not only in chimneys, but also in the stoves themselves inside the house. |
 |
Plaster.
The option is not as durable as clinker tiles, but if a reinforcing mesh made of fiberglass or galvanized metal is fixed on the surface of the pipe, then the plaster will hold well. But keep in mind, not everyone is able to plaster the surface with their own hands while standing on the slope of the roof. |
 |
Siding.
Both metal and cement siding work equally well for chimney liners. Moreover, this material is mounted on the crate, which means that it is possible to lay a heater under it. |
 |
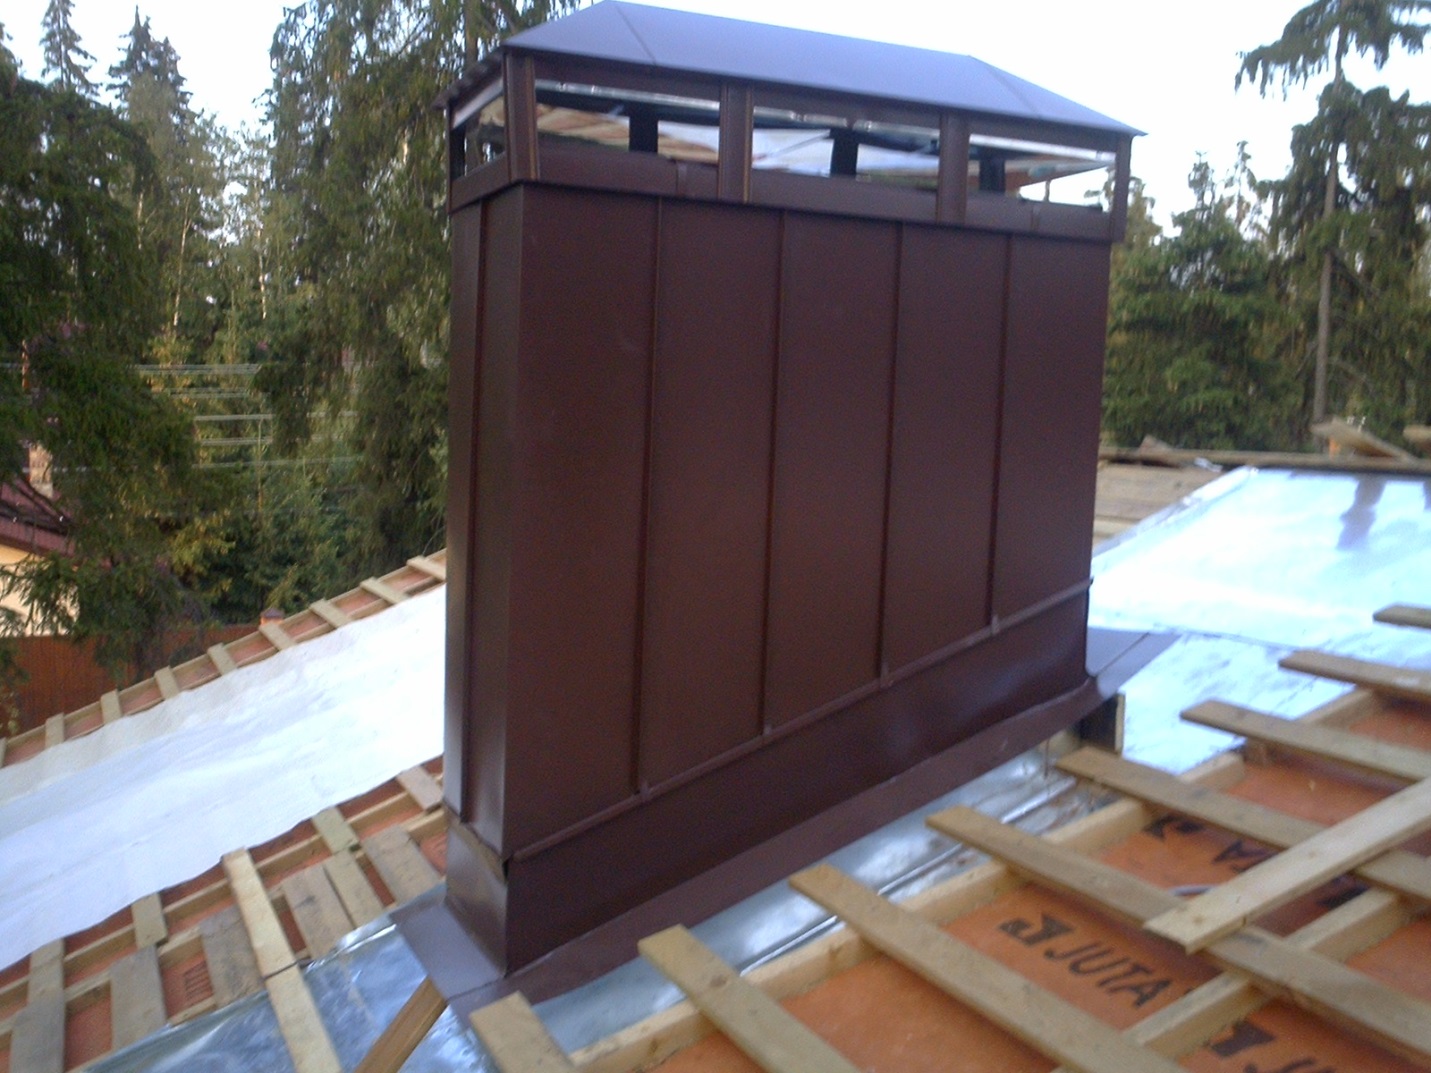
Decking.
Finishing chimneys with corrugated board is now one of the most common. This option harmonizes especially well with metal tiles. But if you choose a color, then steel chimneys on roofs made of slate, ondulin or ceramic tiles will also fit into the overall design. |
 |
bituminous tiles.
In this case, we can only talk about installing a decorative cocoon made of fire-resistant plywood around the pipe, on which bituminous tiles are stuffed. |
Three options for self-arrangement of the chimney outside
There are 3 options where a person without special training can do everything with his own hands. The first option concerns brick pipes, which do not need lining, but you need to seal the joint with the roof. After that, there is a frame version and a version with ready-made factory solutions.
Option number 1: we equip a brick pipe
The waterproofing of the pipe on the roof must be carried out before laying the roofing material. If the roof is already lying, then it will have to be partially disassembled. The entire perimeter is removed by 50-70 cm around, plus you need to remove the lower part of the roof from the pipe to the edge of the slope.

Of the materials, we need a wall-mounted metal profile. It can be bent from galvanized steel with your own hands or bought ready-made. The profile consists of 4 parts, which are superimposed on each other during installation.
It is definitely better to buy an outer apron for a pipe, and it is advisable to buy it together with roofing material, it is easier to choose a color.
The so-called tie is a sheet of roofing iron with sides bent on the sides. It is laid from the bottom of the pipe to the edge of the slope and is wound under the lower section of the wall profile.
In order to hermetically connect a brick pipe with a wall profile, we need to cut a strobe with a depth of about 20–30 mm on the pipe with a grinder. The bent edge of the profile is inserted into this strobe.

Next, we insert the bent edge of the profile into the strobe and fill the strobe with sealant. After that, we fix all 4 parts of the profile and a tie wound from below with self-tapping screws with press washers. Roofing material is laid on top of this entire structure.

The upper apron is attached to the pipe with self-tapping screws around the entire perimeter. On the pipe, it must go at least 100 mm. The lower part of the apron is often made of soft bituminous materials. It is pressed around the corrugated roof and glued to this roof with mastic or special glue.

The scheme works something like this: the top apron removes the main amount of moisture from the pipe, but if this barrier did not cope with its task and moisture got under the roof, then the wall profile will collect it and the water will drain down the tie from the roof.

Option number 2: mounting the frame
This method is well suited for insulating and lining the chimney with corrugated board, siding and other similar materials. To begin with, the base is sheathed with a metal profile, later we will mount the corrugated board on it. The frame is best made from a wall profile for drywall, it is wider than the ceiling.

It is not difficult to work with a metal profile, but if you are not confident in your abilities, then you can build a frame from wooden blocks. True, the wooden frame will need to be well impregnated with fire retardants, antiseptics and a water-repellent composition. Between the slats of the frame, to insulate the pipe, slabs of dense mineral wool are laid.

Decking or any other sheet material is screwed to the frame rails with self-tapping screws with press washers. The whole structure is crowned with an umbrella to protect against rain.

Option number 3: ready-made solutions
There are no problems with round pipes now. Special flexible aprons are produced for them. From experience, you can mount such an apron in a maximum of a couple of hours. Photo instructions for installing such an apron are given below.

- Choose the pipe diameter you need and cut a hole in the soft polymer cone;
- Pull the cone onto the pipe, the connection should be tight;
- Compress the lower soft metal ring in the shape of the roof;
- Thickly lubricate the perimeter under the ring with sealants;
- Screw the ring to the roofing material with self-tapping screws with press washers.
Conclusion
It is quite problematic to talk in detail about all the methods of finishing chimneys in one publication, so I tried to pick up for you the 3 most affordable options for a home master. If after reading the article and watching the video in this article you still have questions, write in the comments, I will try to help.
The functional necessity of a heating boiler or stove is a chimney. It should fulfill not only its intended purpose, but also fit as clearly as possible into the interior of the interior, as well as into the architectural appearance of the house. Finishing the chimney inside the house and on the roof must be done competently and fully comply with fire and building codes and regulations.
The work performed should ensure accessibility and convenience for the process carrying out work on prevention- accumulated during the heating season.
What materials to use for finishing the chimney inside the house?
The lining of the chimney inside the room must be beautiful and fit into the design of the house. It is necessary to add the existence of several ways to pass the chimney inside the house, namely:
- in the wall of the house when the fireplace or stove is located along one of them;
- in the center of the room - heating equipment, which has an island type of installation.
Carrying out work on is possible only if it is completed from wall blocks or bricks. In such a situation, you only need to decorate the wall in which it is located, exclusively non-combustible materials. What can modern construction stores offer? This is a special plaster - clinker, natural stone, terracotta, tiles and tiles.
By right, it can be called an old proven finishing option and, moreover, the most budgetary. One drawback - short service life, since the constant heating and cooling of the plastered surface over time leads to the appearance of a network of cracks. To strengthen the plaster, you will need a metal mesh, which is fixed to the surface. walls before plaster. Not only bricks can be used for a chimney inside a wall. Blocks are also used, especially for chimneys, made of slag concrete or expanded clay concrete.
Read also: We create a heat exchange device for the chimney
Their design assumes the presence of special sleeves - single wall polymer pipe, made of stainless steel or a polymer liner, which is filled with hot air during installation, and after cooling, the polymer bag solidifies, and it takes ordinary pipe shape.
If there are curvatures or irregular shapes, then the best choice would be a liner - the pipes are too energy-intensive. It should be borne in mind that the inner surface of the chimney should not have sharp protrusions, and the combustion temperature at the outlet of the chimney cannot exceed the mark of 180 C.
Chimney tiling
Several types of tiles can be used for cladding inside the house. and it doesn't matter where the location of the stove or fireplace - in the middle or against the wall of the room. You need to understand that the stove and chimney are one, and therefore finish will be identical.. The most beautiful, but at the same time the most expensive option for cladding is stove tiles, made individually for each stove, and the installation process must coincide with the construction of the heating unit. For cladding different tiles are used- terracotta is more expensive, but tiled can be called economical, the principle of working with which is practically the same.
If modular chimneys are used in the form of a sandwich pipe, then there is no need for finishing, in view of the fact that there is a place for polished metal in almost any interior. Finishing the chimney on the roof is also not required. To increase the heat output of the cladding furnace using natural stone- soapstone, jadeite, soapstone magnesite.
A large number of manufacturers offer options for ready-made stone portals for options with stone firebox. Undoubtedly, the question arises - how to properly arrange this system? According to experts, independent work should be excluded. It is better to purchase a ready-made set of pipes recommended by the manufacturer directly for this model, for sure, an option for internal and outdoor chimney installation.
For heating a dwelling with several floors, 2-3 furnaces are installed, whose chimneys should not be connected - this is strictly prohibited. For the normal functioning of the heating system, you do not need to stick pipes throughout the house, you need to lay with three wells for each furnace, which will allow you to compactly arrange all the pipes inside the house.
The lining of the chimney inside the room should be beautiful and fit into the design of the house. It is necessary to add the existence of several ways to pass the chimney inside the house, namely:
- in the wall of the house, when a fireplace or stove is located along one of them;
- in the center of the room - heating equipment having an island type of installation.
Work on the installation of the chimney inside the wall is possible only if it is made of wall blocks or bricks. In such a situation, you only need to decorate the wall in which it is located with exclusively non-combustible materials. What can modern construction stores offer? This is a special plaster, a huge selection of refractory tiles - clinker, natural stone, terracotta, tiles and tiles.
Plaster, by right, can be called an old proven finishing option and also the most budgetary. There is only one drawback - the service life is short, since the constant heating and cooling of the plastered surface over time leads to the appearance of a network of cracks. To strengthen the plaster, you will need a metal mesh, which is fixed to the surface of the wall before the plaster. Not only bricks can be used for a chimney inside a wall. Blocks are also used, especially for chimneys, made of slag concrete or expanded clay concrete.
Their design assumes the presence of special sleeves - a single-walled polymer pipe made of stainless steel or a polymer liner, which is filled with hot air during installation, and after cooling, the polymer bag solidifies and takes the form of an ordinary pipe.
If there are curvatures or irregular shapes, then the best choice would be a liner - the pipes are too energy-intensive. It should be borne in mind that the inner surface of the chimney should not have sharp protrusions, and the combustion temperature at the outlet of the chimney cannot exceed 180 C.
Chimney tiling
Several types of tiles can be used for cladding inside the house and it does not matter where the stove or fireplace is located - in the middle or against the wall of the room. You need to understand that the stove and chimney are one, and therefore the finish will be identical. The most beautiful, but at the same time the most expensive option for cladding is stove tiles, made individually for each stove, and the installation process must coincide with the construction of the heating unit. Different tiles are used for cladding - terracotta is more expensive, but tiled tiles can be called economical, the principle of working with which is practically the same.
If modular chimneys are used in the form of a sandwich pipe, then there is no need for finishing, in view of the fact that there is a place for polished metal in almost any interior. Finishing the chimney on the roof is also not required. To increase the heat transfer of the furnace for cladding, natural stone is used - soapstone, jadeite, talcomagnesite.
A large number of manufacturers offer options for ready-made stone portals for options with a stone firebox. Undoubtedly, the question arises - how to properly arrange this system? According to experts, independent work should be excluded. It is better to purchase a ready-made set of pipes recommended by the manufacturer directly for this model, for sure, an option for indoor and outdoor installation of the chimney will be selected.
To heat a dwelling from several floors, 2-3 stoves are installed, the chimneys of which should not be connected - this is strictly prohibited. For the normal functioning of the heating system, it is not necessary to stick pipes throughout the house;
Design features of the chimney
The purpose of the fireplace chimney, as well as the main function of the chimneys of furnaces or boilers, is to bring out, into the atmosphere, the products of combustion of fuel. Gases, together with soot, come from the furnace into the pipe under the action of draft. The correct formation of the chimney consists in the choice and construction of such a design, in which a minimum of soot remains on the pipe walls, and the draft prevents the flow of gases into the room.
Chimneys made of various materials have their own characteristics and may differ in design. For example, a traditional brick chimney consists of the following parts.
 Modern chimneys made of steel or ceramics do not have such fragments as otter or fluff, but they are simply necessary for the normal removal of smoke in brick pipes and protection of ceilings from heating
When choosing a material, it is necessary to take into account the temperature of the gases: it is higher in the furnace, lower at the outlet, but even at the highest point it can reach +100 ºС. The creation of traction is based on the temperature difference - hot air is replaced by cold air. Also important are indicators such as the height and internal diameter of the chimney - they are calculated when drafting the project.
 A variant of the fireplace scheme with a steel pipe chimney. Features: floor and wall cladding with non-combustible materials, floor finishing, the ability to create non-vertical sections using half-bends
With all the desire, it is impossible to build a chimney that would not need to be cleaned. Even in a ceramic chimney assembled according to all the rules, soot accumulates over time, making it difficult for gases to escape. Cleaning is usually carried out during the period when the fireplace is idle.
In addition, it is necessary to monitor the integrity of the joints and the inner surface: cracks, dents or protrusions that may appear over time prevent the normal circulation of hot air.
Fireplace rules and regulations
Consider excerpts from SNiP 2.01.01-82, which can be useful when installing a chimney for a fireplace on your own.
The chimney and the ventilation duct have different purposes, so you cannot combine them or use one instead of the other. Only one heater with an open combustion type can be connected to one chimney (the same applies to the stove).
If two fireplaces are located on the same floor, then they can be connected to one smoke exhaust channel, but it must be provided with a cut made in the form of a transverse wall at a height of 75 cm or more.
For concrete and brick chimneys, the minimum dimensions of the channel section are indicated. For example, if the power does not exceed 3.5 kW, the smallest section is 14 cm x 14 cm (for a circular section - a diameter of 16 cm), if the power is above 5.2 kW - from 14 cm x 27 cm (for a circular section - a diameter of 22 cm). The draft characteristics depend on the height of the chimney. The minimum allowable size is 5 m from the grate to the extreme point of the outer section of the pipe.
 The height above the roof depends on its type: flat - half a meter, pitched - more than half a meter from the ridge (if the distance to the ridge is one and a half meters), on the same level with the ridge (if the distance is 1.5-3 m) or on a conditional line towards the pipe from skate at a 10 degree angle (if the distance is 3 m or more)
The wall thickness of brick structures is not less than 12 cm, smoke exhaust ducts made of concrete - from 6 cm. Chimney bases must be equipped with windows with doors for cleaning. To facilitate cleaning work, when erecting a brick pipe, there should be no concessions or recesses on the inside that provoke the accumulation of soot.
If it is necessary to carry out the pipe (for example, bypassing the beam), inclined (up to 30 degrees) and horizontal (up to 1 m in length) sections of the same diameter as the main channel are possible.
 The upper part of the chimneys should be protected with an umbrella type device so that precipitation does not enter the chimney. If the roofing material does not have sufficient fire resistance, the installation of a spark arrester is also mandatory (the maximum dimensions of the grid cells are 5 mm x 5 mm)
The floor, walls and ceiling at the junction of the fireplace must be protected with fireproof materials - metal sheets, asbestos cardboard, plaster.
When a brick or concrete chimney passes through the ceiling, the gap should be at least 13 cm (the same applies to heat-insulated pipes), for ceramic structures the norm increases to 25 cm.
Professionals insist on installing a chimney not in the outer wall of the house, but in the inner bearing, explaining this by the harsh Russian winters. When mounting it in an outer wall (as a last resort), you should carefully protect the structure from freezing by thickening the masonry or by installing thermal insulation made of fireproof materials.
Types of chimneys for a fireplace
An analysis of various types of flue ducts allows you to find out which chimney is best for a home fireplace. Structures can differ both in design and in material of manufacture, with the second factor being decisive. Therefore, when choosing a scheme, you need to build on the material, but the choice of material for construction depends on regulatory requirements and the wishes of the owners of the house.
Option #1 - Ceramic
If funds permit, this is the first option to consider. Manufacturers, using popular schemes for erecting fireplaces, have thought through the manufacture of all kinds of parts, so you can purchase a ready-made kit for construction. Of course, the number of parts can be different - depending on the shape and size of the structure.
 Ceramics are ideal for wood-burning fireplaces that produce a large amount of "white smoke". The result of its impact on the pipe walls is condensate, which is completely harmless to ceramics. In addition, it is she who can withstand both increased heating and various chemical environments formed by combustion products.
What else positively distinguishes ceramic chimneys:
- perfectly smooth surface of the inner walls;
- fast heating and slow cooling;
- resistance to temperature up to + 900-1000ºС;
- compactness compared to other designs;
- service life up to 50 years.
The disadvantages include significant weight, due to which it is necessary to arrange an installation site or a special foundation.
Also, many are confused by the high cost of blocks and services for their installation. Indeed, when installing parts, care must be taken, use special glue and, at the last stage, use heat-resistant materials. When choosing, it is better to focus on proven brands: Hart, Tona, Ecoosmose, Schiedel, Effe2.
Option # 2 - brick
Brick is a traditional, one might say, even an ancient material. Over the centuries, many technologies have been invented for the construction of various types of stoves and fireplaces, and today it is possible to apply the best of them.
 Brick is preferred because of its availability, but only one type is suitable for high-quality masonry - solid clay. It is pre-fired and fully ready for use at high temperatures.
The masonry mortar is also important, the main purpose of which is to provide a tight, airtight connection between the bricks. Ordinary cement mortar is not suitable. It is necessary to mix a mortar of sand, cement and lime (5:2:1), which resists high temperatures, does not crack or crumble ahead of time.
When laying, make sure that the mortar from the joints does not protrude into the inside. The smoothness of the pipe is one of the main conditions for long-term and trouble-free operation. Read more about brick chimneys below.
Option #3 - steel
If the temperature of the gases in the flue duct does not exceed + 400 ºС, steel chimneys can be used. Modern pipes made of heat-resistant anti-corrosion steel are lighter than ceramic analogues and are suitable for almost all modifications of fireplaces and stoves. It is not necessary to erect additional platforms or foundations for metal pipes.
 The advantages are also the round section, which does not interfere with the removal of gases and is convenient for preventive cleaning. Installing and connecting steel parts is easier than building masonry or mounting fragile ceramics
They can be inserted inside old brick chimneys, producing a sleeve.
Conventionally, steel chimneys are divided into 2 categories:
- simple "hot" type, without thermal insulation;
- sandwich pipes consisting of three layers - thermal insulation is inserted between two layers of metal.
Special requirements are imposed on the heat-insulating material. It should not emit products dangerous to human life during heating, have a minimum thermal conductivity and not burn. In construction markets, you can purchase ready-made sets of sandwich parts, or you can place an order for a private project. The cost of the chimney cannot be called budgetary, but it justifies itself.
Option #4 - glass
A beautiful glass chimney is attractive not only externally. It is made of durable tempered glass, which is inert to chemical attack, which is typical for combustion products. In addition, perfectly smooth walls prevent the deposition of soot in large quantities, as a result, the chimney has to be cleaned much less frequently.
 A glass chimney can hardly be called a practical product. A small amount of soot reduces the aesthetics to zero, so you will have to wash the visible parts quite often
The disadvantages of glass are additional requirements for insulation and insulation, a special assembly technology (difficulty in creating hermetic joints), and the possibility of condensation. If we compare expensive glass and ceramic chimneys, then the latter will win both in terms of technical characteristics and performance in general.
Construction of a ceramic smoke channel
The most reliable and safe option for a chimney in a wooden house is a construction made of ceramic blocks. The outer side of it practically does not heat up, which means that there will be no problems with the passage through the floors. Consider the assembly sequence of the smoke channel from the components of the German brand Schiedel Rondo Plus:
Gallery of images Photo from Ceramic modules for the assembly of the channel Basalt wool for the insulation of the smoke channel Expanded clay blocks for the assembly of the shaft Shaped elements for the ceramic pipe
Let us make a reservation right away that the core is constructed from ceramic modules, i.e. a free-standing pipe, for which a separate foundation is arranged.
Image gallery Photo from Step 1: Laying the clay layer over the foundation for the chimney Step 2: Installing the first block on the waterproofing Step 3: Aligning the block according to the position of the rafters Step 4: Fixing the starting block to the cement mortar Step 5: Filling the starting block with mortar and boulders Step 7 : Leveling the top of the block with mortar Step 7: Assembling the chimney with heat-resistant mortar Step 8: Installing the second expanded clay concrete block
All technological holes are sawn in the course of construction on site. Cutting is done with an ordinary grinder with a diamond blade. To make geometrically precise holes in the configuration of the ceramic chimney there is a template. Further:
Image gallery Photo from Step 9: Installing the base of the ceramic channel Step 10: Location of the condensate drain Step 11: Laying the thermal insulation mat Step 12: Applying high temperature sealant to the end of the module Step 13: Installing the third expanded clay concrete block Step 14: Installing the module for the revision device Step 15: Fixing the inspection chamber door Step 16: Installing the fireplace connection module
The assembly of a ceramic chimney is carried out in a standard manner: the modules are built up one by one. However, it is worth paying attention to the specifics of passages through the attic floor and through the roof. In our example, the chimney and the ventilation stack are located side by side, which is why we had to slightly trim the rafters:
Gallery of images Photo from Arrangement of the passage through the floor beams Cutting between the ventilation and chimney Laying mineral wool mats Hemming the rafters under the ventilation riser Reinforcing the hewn rafters Arranging the roofing pie around the passage Building a chimney above the roof Installing a metal apron
Construction of a brick chimney
Regardless of the material used, when building a chimney, rules and regulations must be observed. If you incorrectly calculate the diameter or height of the pipe, choose a brick that does not meet the standards, forget about thermal insulation in the cold zone, the result may be disappointing.
Project preparation: sketches and calculations
There are two options for building a brick chimney:
- with a rectangular section - using only bricks;
- with a circular section - with an external laying of a chimney brick and an internal ceramic (asbestos-cement, steel) pipe.
The first option is common, but not desirable. The design with internal corners is inferior to the cylindrical form in terms of the quality of smoke extraction. Soot accumulates faster in a rectangular chimney, and it is more difficult to clean it, therefore, if possible, it is better to choose a combined design
Modern asbestos cement is no more harmful than slate or asphalt, so you should not be afraid to use pipes. However, there is one nuance that manifests itself with insufficient insulation - this is the rapid absorption of condensate. It is clear that a pipe with a broken structure will not last long, which is why ceramics are becoming more and more popular.
Brick pipes are constructed with a square or rectangular section. If a metal sleeve, round in cross section, is installed inside the brick channel, it is installed to its full height directly from the firebox. The narrowing of the smoke channel along the path of removal of combustion products is not allowed.
In order to accurately calculate the inner diameter of a brick or ceramic chimney for a fireplace, it is better to consult with experts: the height of the pipe, its direction, the number of turns, the material of manufacture, the volume and temperature of the exhaust gases, the type of fuel, the rate of combustion of fuel, etc. are taken into account.
However, there are a few general rules that should not be overlooked. Let's assume that for cylindrical chimneys, the standard proportion in relation to the firebox is 1:10.
Especially for fireplaces, the so-called "Swedish method" is used: determining the area of the chimney (f) from the area of \u200b\u200bthe furnace (F). The graph shows the values for fireplace systems with round, square and rectangular sections.
It is also believed that the cross section of the chimney should exceed the diameter of the blower. When calculating the height, it is necessary to focus on the height of the building (including the roof), the type of roof, the location of neighboring buildings.
If a horizontal section is planned in the structure, then its length should not exceed 1 m. This requirement is explained by the natural movement of heated gases vertically, which means that most of the soot will be deposited precisely on the walls of the horizontal section - the most difficult to clean.
Structural nuances of construction
One of the distinguishing aspects of brickwork is the drawing up of layered schemes. At the same time, the composition of the adhesive for the joints of the ceramic pipe and the mortar is selected to create a sealed structure of bricks. It is important that during the heating process the seams do not deform and do not change the shape of the pipe. The inner surface should be as smooth as possible, without protrusions and notches.
To connect pipe sections of different diameters, there are reducing steel or ceramic adapters. The attachment points on the pipe must be sealed so that there is no leakage of gases
In addition to reducing adapters, other shaped parts are also used - revision holes with doors, tees, corner elements.
To prepare old chimneys that have not been used for a long time, one cleaning is not enough. For efficient operation, a sleeve is required - an insert of a metal pipe of circular cross section. The brick walls of the chimney and steel should not touch, a gap should be left between them.
Mandatory stage - thermal insulation. It allows, on the one hand, to increase the rate of heating of the pipe, and on the other hand, to reduce or eliminate the formation of condensate. Also, chimney insulation material is a barrier against heating combustible materials in the vicinity of the chimney (although this should not be the rule).
Particularly noteworthy is the device for passing through the ceiling and roof, during the construction of which wood is involved.
Wall decoration materials around the fireplace chimney can be any, but not necessarily combustible. Often wooden (log, lumber) walls are left as they are - this is a violation. Suitable ceramic finishes (clinker, tiles) or metal sheets
It is also necessary to finish the outer part of the pipe that goes over the roof. To protect against debris and precipitation, “houses”, stylized weather vanes, and deflectors are installed.
Step-by-step instructions for laying a chimney
The prepared project is a guide to action: it contains a masonry scheme, an estimate, and a list of construction activities. Laying a brick chimney is the final part of building a fireplace.
Step 1 - preparation of materials and tools. To prepare the solution, sand, cement, lime (or special clay), a container are useful; for the construction of masonry - jointing, trowel, hammer, level.
Step 2 - preparing the solution. Masters usually know special secrets on how to make the solution more elastic and not cracking. For example, add a little lime to it. The consistency of the mass should resemble sour cream, be thick, but easily separated.
Step 3 - masonry. Ready-made ordering facilitates work - each row must be laid according to the diagrams. If a ceramic or steel pipe runs inside the brick case, this must also be taken into account when choosing a diagram and section size.
Step 4 - fluff. This element - the expansion of the pipe - is arranged when crossing the ceiling. At the same time, the brick is shifted ¼ towards the outer edge.
As a result of the shear, the thickness should reach 0.5 m. A sheet metal sleeve and pieces of basalt thermal insulation are inserted into the gap between the masonry and the ceiling.
Step 5 - laying a segment in the attic. Thermal insulation is required for an unheated room. The transition through the roof is equipped with the help of another extension - an otter. It protects the attic from rain.
Step 6 - design of the outer pipe and head. If necessary, install a spark arrestor, a deflector (to adjust the draft), above it - a ridge canopy or a cap (umbrella). In the construction market, you can buy ready-made heads.
A few tips from the masters of stove and fireplace business:
Image gallery Photo from Chimney box - the basis for the construction of the chimney Using a level to check the horizontal Brickwork tool Hole for the pipe in the ceiling Number of bricks for the chimney Mounting the damper in the groove Thermal insulation of the pipe in the attic room Exiting the pipe to the roof
Throughout the masonry, 2 points are important: that the tube is strictly vertical and that its inner surface is perfectly smooth. The sleeve guarantees smoothness.
What is roof lining for?
A beautiful chimney completes the architectural ensemble of the building. The roof of the house says a lot about the owner, the lined pipe testifies to the caring owner and even his prosperity. This part of the arguments "for" the aesthetic finish of the smoke channel is beyond doubt. However, there are several practical purposes.

What is the finish of the outer part of the chimney:
- Insulation and lining of the chimney extend its service life. The outdoor part of the chimney during the heating season is subject to a sharp and frequent change in temperature. Such a difference, coupled with the formation of aggressive condensate, leads to the rapid destruction of any chimney material. Insulation allows you to move the freezing point beyond the pipe body, reduces the temperature amplitude and prevents the formation of condensate inside the chimney.
- The insulated pipe provides good traction. Uniform and fast heating of the flue duct ensures high-quality draft during combustion. Soot, gaseous products of combustion (including carbon monoxide) are quickly and completely removed from the furnace without getting into the dwelling. This condition is decisive for the safety and efficiency of heating equipment.
- Finishing the connection between the pipe and the roof protects the roof from the ingress of atmospheric moisture into the roofing pie. The slightest marriage in the performance of these works will lead to damage to the insulation, to rotting of wooden structures.
Note! The correct finishing of the chimney pipe can only be carried out with approved materials. There are officially established standards and rules for carrying out work.
Functionality and safety: norms and rules
Since the heating system is a source of increased fire danger, its arrangement is strictly regulated by the norms and rules for the construction of SNiP 41-01 of 2003. This document combines the requirements for the construction work of ventilation, smoke ducts and air conditioning systems.
According to the official instructions:
- For insulation and lining of the chimney pipe, it is correct to use non-combustible materials. If you choose materials that, in principle, are capable of burning, then the temperature from ignition should be 20 degrees higher than the maximum heating of the pipe. The heating temperature depends on the type of fuel used in the system.
- Iron cladding is permitted provided that the steel is either stainless steel or with an anti-corrosion coating.
- The brickwork of the chimney must be thicker than 12 cm. The concrete pipe is not thinner than 6 cm. The installation of an iron or asbestos-cement pipe is not allowed in all heating systems (for example, in solid fuel stoves, the temperature of gases significantly exceeds their capabilities), their operating conditions are indicated in certificates and documents for finished products.
- The distance from the chimney wall to combustible materials and structures must be at least 25 cm, with insulation - 13 cm.
- The top of the pipe is equipped with a deflector or a protective umbrella. If the roof is covered with combustible material, then a spark arrester must be installed.
Clinker tiles are considered the best material for pipe lining. She has a great appearance (many natural shades), she is durable and non-flammable. The ideal option is a pipe completely made of clinker bricks. The refractory brick plus tile cladding option is more common.
Good appearance, performance properties shows classic plaster. This type of chimney pipe finishing can be called budget. Laid on a metal mesh, it comes out thick enough to provide thermal insulation to the pipe and serve as fire protection for the roof. The difficulty is that not everyone is able to independently perform high-quality plaster while on a roof slope.
Metal or cement siding will give your chimney a presentable look. Properly mounted on a frame with insulation, it also performs a high-quality protective function for the pipe.
Note! The use of plastic siding for lining the chimney is prohibited.
Framed corrugated board is a popular, inexpensive and easy-to-install material for finishing a chimney. This option is convenient for self-assembly, easy to match in color, durable and reliable in operation.

Finishing the chimney pipe: options and progress
The final finishing of the chimney duct is closely related to the work of insulating the roof and laying the pipe through it.
Pipe penetration through the roof
The output of the pipe to the roof depends on the modification of the pipe itself. The easiest way is to bring out a round metal sandwich pipe. No additional material is required for its insulation, since it has one layer of thermal protection inside the sandwich. Protective flanges can be purchased ready-made. They are flexible, making DIY installation easy.

To output a sandwich chimney through the roof, you should:
- Cut a hole for the diameter of the pipe. Why we apply markings from below and drill contour marks. It is more convenient to cut from the side of the roof.
- Put the inner protective flange on the pipe. Install structure. Lubricate the flange with refractory sealant, fix with self-tapping screws to the roof from the side of the attic.
- Put on a protective, flexible, conical flange on the outdoor part of the pipe. First, cut a hole in it, which is slightly smaller in diameter than the chimney. To make the tensioning process go better, coat the flange and pipe with soapy foam.
- Lubricate the flange with sealant and fasten it with self-tapping screws over the roof.
It is somewhat more difficult to bring a classic chimney through the roof. For its wiring, you will need to purchase or build a protective box with a heat-insulating layer.

Algorithm for the output of a square pipe through the roof:
- Cut a hole in the roof and roofing cake, 25 cm larger on all sides than the square of the pipe.
- According to the size of the resulting hole, build a protective box. As a rule, galvanized sheet is used for the box. It is easy to work with it on your own, galvanized iron meets the requirements of building codes, you can buy it inexpensively. The resulting box should look like a box, in the center of which a pipe is inserted, and the remaining volume is filled with basalt wool.
- Install the box in the opening. Pull out the pipe.
Cladding options
Sealing a brick or plastered pipe:

Cladding with corrugated board is used to protect both brick, plastered pipes, and to decorate a sandwich chimney, if required by the architectural solution of the house.
A common cladding option is a frame when pulling a double sandwich pipe from two autonomous stoves (for example, a stove and a fireplace). In this case, one rectangular pipe, sewn up with siding, looks more presentable than two iron ones.
Algorithm for mounting the frame finish of the chimney pipe:
- Mount a metal profile frame around the pipe. The size of the frame matches the hole that was made to bring the pipe through the roof.
How to make a window sill: materials and methods Before starting work on the manufacture of a window sill, you must carefully measure the dimensions ...
With a width of slopes on the window opening up to 20 centimeters, the work must be performed sequentially, first along the entire ...
Plastic or wood? Plastic window with wooden sill Definitely recommend this or that type of material for making…
The priority of independent heating of a private house is more and more obvious. In addition to significant savings, this is the ability to independently choose alternative heating methods. Among the sufficient number of available options, stove heating is still popular. Despite certain installation difficulties, this is the best way to create a favorable microclimate in the house.
Any independent heating, with the exception of electricity, requires the removal of combustion products through the chimney. Today there are enough materials with which it can be organized. In the event that it is a refractory brick, it is best to protect it from the negative effects of aggressive environmental factors through cladding.
When building a house, the question often arises: how to sheathe the chimney with corrugated board?
The chimney lining is a kind of shield that prevents the formation of condensate as a result of the interaction of the temperature difference between the environment and the chimney.
Finishing the chimney is the beginning of the roofing finishing work, because otherwise you can damage the finished roofing or stain it. Visually, both the chimney itself and the roof covering should form a harmonious tandem, therefore it is best to select identical materials for their sheathing.
Depending on what materials the finishing work is supposed to be carried out, several options for sheathing are provided. Each of them has a number of positive characteristics, however, each has some disadvantages.

Ready-made factory design for the chimney
Clinker bricks and tiles
A fairly common method is when clinker tiles or bricks are used in the decoration. A sufficient degree of strength, resistance to weather conditions and temperature differences are its main advantages. In addition, this facing coating is not afraid of dirt, which is important from an aesthetic point of view. There is only one minus: the need to use solid clinker bricks, planted on a special clinker mortar, causes a high cost of work. Therefore, this method in most cases is not available to a wide range of consumers.
Prefabricated prefabricated structures
You can sheathe chimneys with pre-prepared material. As a rule, this is a factory version of a pipe that has a steel channel. By means of bricks, reinforced mesh, plaster, the chimneys are finally brought to an ideal state.
Plaster
Speaking of a chimney, which involves a budget cladding option, it is worth remembering the old proven way of plastering a smoker. Despite the fact that this method is considered the most budgetary, it is no less durable and reliable.
As an alternative, methods using fiber cement boards, slate, etc. can be considered.
Profiled flooring sheet - the priority of the choice of facing material
The market for finishing and facing materials is quite diverse. The main criteria justifying the choice of one or another option are reliability, strength, durability. However, no less important is the price of the material and the ease of its installation.

Schematic representation of the casing of the chimney outlet
The corrugated board most of all meets all of the above requirements, due to its high technical characteristics:
- resistance to temperature fluctuations,
- length of service life,
- Ease and speed of installation,
- ease of maintenance,
- small specific weight,
- Low cost.
It is equally good to organize the facing covering of the roof and the lining of the chimney pipe with corrugated board. In addition, it looks quite impressive, adding respectability, solidity to the structure, emphasizing the style.
The professional flooring has rather wide color palette that allows to realize any design decision.
Varieties of corrugated board suitable for lining the chimney
A wide range of profiled sheets significantly expands the boundaries of available cladding solutions. Among the types produced are:

How to bypass the chimney with corrugated board
- Sheets of a combined type used in the organization of various structures of enclosing and finishing nature,
- Support type corrugated board, characterized by increased strength,
- Aluminum profiled sheets, characterized by a long service life and increased resistance to moisture,
- Painted profiled decking sheets,
- galvanized,
- roofing,
- Facing.
Each of the types can be used as a finishing material, and therefore the priority of choice is determined by the price of the issue.
The subtleties of the chimney lining
Facing the chimney pipe with corrugated board is the best option for finishing activities. However, before proceeding with its purchase, you need to know about some of the nuances of its storage and the intricacies of working with it.
When purchasing corrugated board, you need to take care of compliance with storage conditions. A dry, well-ventilated area is best suited for this purpose. The material is given a strictly horizontal position on a flat surface. Forced storage in the open air must necessarily provide for covering with a dense waterproof film.
First you need to make a metal frame. It is he who is the basis to which the skin will be directly attached. The attachment mechanism provides for the overlap of one corner of the sheet on the other. Mounting strength is achieved through the use of self-tapping screws. The aesthetic appeal of the joints is given by special corners used for finishing.
The external perfection of the design, its strength, durability will depend on how well the installation was carried out. It is fundamentally important to carry out the most even arrangement of the sheets of the bottom row. The resulting errors in the geometry of the sheet are easily corrected by additional components during installation.
Given the negative attitude of profiled sheets to a high temperature regime, thoughts about using a grinder in carrying out the sheathing stages must be immediately discarded. Ideal tools are an electric jigsaw and a circular saw with a special blade.
Thorough observance of the requirements guarantees the correctness of the work. As a result, the chimney will not only be satisfied, it will deserve a lot of encouraging reviews.
We also recommend
 Modular house of two change houses and a veranda Country houses based on change houses
 Automatic gates with a homemade drive: we build with our own hands
 How to build a doghouse and an aviary for a shepherd dog - a warm home for your pet A drawing of a doghouse for a German shepherd
 Adjoining the roof to the chimney pipe Lining the chimney with a profile
 We sheathe the chimney with corrugated board Facing a brick chimney
 How to make a trellis for cucumbers: we make supports from improvised means A trellis in a greenhouse for cucumbers with our own hands