Draw a vicious skyrim. A night to remember (Sanguine)
After a few hours of sleep, Lydia and I arrived in Morvunskar to get the master smith's gloves for the orc...
On the way, we met a lot of novice sorcerers, as well as ice mages, apprentices, fire mages, apprentices, and others ... Various staves were found with them: Pet Summon Staff and Zombie Staff; clothes with magical enchantments and even one recipe for "Atronach Smiths" that was new to me. In the beginning, we examined the courtyard and the balcony part of the fortress. In the found chest they found: 104 coins, a ruby and "Scroll: Curse of the Undead". They also collected iron ingots and even found silver ore lying on the table. Empty bottles were scattered throughout the fortress. This is the first place where I met a huge number of empty bottles. And this is quite an interesting and useful find ...
Having reached the main hall, we fought with apprentice necromancers and the Supreme Pyromancer. He turned out to be a very persistent and strong sorcerer. It’s good that I had potions with me, which I almost didn’t have time to drink. But, the main thing is that they managed to do it, and after that, I was treated myself and treated Lydia with the Healing Hands spell.
In this room, we found books, potions, a couple of troll skulls, and, of course, a chest near the throne, on which the Supreme Pyromancer previously sat. The chest contained: 297 gold pieces, a small soul gem, a replenishment robe, "Scroll: Mass Paralysis", a glass ax and, most importantly, what I came for is the Gloves of a master blacksmith! Then, wandering through the halls and rooms of the fortress, we also found a chest and even a safe. Very expensive things were found in the latter: 30 coins, a gold ring with a diamond (the second in my collection) and a sapphire. While exploring the fortress, we stumbled upon several more enemies: a sorcerer, an ice mage apprentice, and a certain Altmer (high elf) named Naris the Vicious. He began to attack and I had to destroy him. With him was found: a Dwemer dagger, the Staff of the Living Dead, a black mage's robe and black mage's boots. Behind the cage, I found burnt bodies, and next to it, a chest. From the found interesting ... One of the books called "The Secret of Princess Talara" - part III, the author of which is Mera Llikit, increased my knowledge in the magic skill of destruction. And among the found poisons and potions, I can note for the first time that I found the Virulent Poison of Paralysis, which is not in my collection. In the fortress of Morvunskar, I also found the sanctuary of Dibella. Having examined everything again, we hurried to the exit ... It was about 9 pm. That is, we spent about 12 hours in the fortress.
On the way, we met an assassin from the Dark Brotherhood, with whom it is high time to deal with. I found the adventurer's body. She also mined iron ore and collected flowers for alchemy. There was an idea to walk today to the Orc fortress, but since fatigue took its toll, we decided to take a break. We spent the night again at the River Hut.
Morvunskar.
Recipe for an Atronach Smith.
Courtyard of Morvunskar.
Inside the fortress.
Battle with the Supreme Pyromancer.
Troll skull.
Master Blacksmith's Gloves.
Found a rare gold ring with a diamond.
One of the rooms in the fortress of Morvunskar.
Sanctuary of Dibella.
The quest is taken in the tavern you visited first, and sometimes it travels from tavern to tavern, so in the middle of the game it is very problematic to find it. (For example, the Whiterun tavern was the first for me, but on my first playthrough, it appeared in Solitude, because according to the storyline, this is the first tavern that you have to visit on assignment).
The main quest begins with the mini-quest "Drink Sem Geven", which consists in a conversation with this same Sem.

We appear in Markarth.

Senna meets us and reprimands us. The easiest way to end it is to pay money. The price is really low, so even a poor player without preparation can pay ~600 Septims. But if the player has upgraded the skill of persuasion, then you should not spend money on such a trifle, but simply convince.
I do not consider another option, because 600 gold can be quickly filled even without wood.
After we deal with Senna, she sends us to Rorikstead.

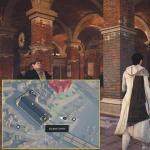
How to get to Rorikstead from Markarth (If you haven't opened Rorikstead yet) can be seen on this map (Roads are marked here, but beware of outcasts, who can be a real problem at a high difficulty level or at the beginning of the game).

There, in Rorikstead, we meet Ennis, who is also unhappy with us. He demands the return of the goat.

The goat can be paid for, at a price of 1000 Septims, but not everyone can afford it, so we agree to return the goat that we sold to the giant (We leave the conversation).

According to the marker, we find a goat, and with it, in fact, a giant.

If we approach the goat, we will see that it is possible to “Speak” with it, but be careful! When talking with a goat, she will follow you, and the giant, seeing the theft of his goat, will get furious and attack you. You can die from such a surprise.

If you are playing with stealth, it will be more profitable to kill him with a bow, hiding nearby.
It is also possible that you are lucky and you will catch a bug in which the giant simply does not notice you. After that, you can proudly run to Ennis.
Attention! In order to "Turn in a goat" to Ennis, it must be near the character. Otherwise, the dialogue simply will not start.
If you jumped off the cliff and rushed to Rorikstead, do not rush to load the save, wait a bit and the goat will come running to you.

Ennis sends us to Whiterun, to Iseult.
Finding it is absolutely easy, given the fact that it is highlighted with a marker.

Isolde demands a ring from you, or payment for a ring.
Again, paying for the ring at the beginning of the game will be problematic, but if you have leveled the persuasion skill, then you can try to convince.
But I will continue to describe the option for poor players.
Isolde sends us to the location "Grove of Witches Mist"

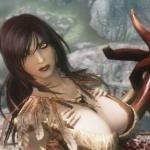
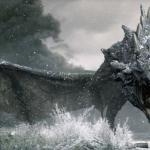
There we are met by such a monster, which we have to finish off.

After killing him, we will take a ring from the corpse, which we will later give to Isolde, as well as random ingredients. Such as the Feathers of the Witches or the Claws of the Witches.

After we gave the ring to Isolda, she sends us to the Morvunskar location, which is located near Windhelm.

There we will be met by magicians who, at a high level of difficulty, can cause trouble.
It is worth being wary of the High Necromancer, who is located inside the fortress.
(On the first playthrough, he had a staff of electric discharge, with which he killed me 5-6 times in a row, but on the second playthrough, this necromancer had absolutely no staff).
Fortress map for people who manage to get lost even here.

Here is the portal itself, into which we fearlessly jump.

The Secret of Talara, vol. 3 (original Mystery of Talara, v3)
Morvunskar01, MorvunskarExterior01, MorvunskarExterior02, MorvunskarExterior03, MorvunskarExterior04
Brief information

Morvunskar.Map.
This is a medium fort, which is currently home to mages of various levels. Its tactical location testifies to its importance, as it protects Windhelm from the northeast and Kynegrove from the southeast, as well as a large number of the main roads that can be seen from its towers. When exploring the fort, you can find an unusually large number of bottles of ALTO wine, empty wine bottles, as well as many ingredients for creating potions, all of these items are associated with the refuge of sorcerers and magicians.
outer fort

Morvunskar. Entrance to the upper fort. Fire trap.
Five cleavers guard the outer fort. The first can be seen in the wooden watchtower above the tunnel entrance, while the other two patrol the first courtyard. The fourth guards the stairs to the camp, and the fifth sits in an armchair by the fireplace. All magicians have a high level of detection, which makes it very difficult to approach the fort without being noticed, although it is easier to enter the fort from the west side, where, due to earth slides, where high walls are level with the ground.
The entrance to the upper fort is through a stone tunnel. At the very beginning of the tunnel there is a pressure disk, which, if accidentally pressed, activates a fire trap consisting of four fiery jets covering the entire passage through the tunnel in flames. Going into the courtyard, you can find three sleeping mattresses under wooden sheds and in the center of the courtyard there is a large fire and a table with food. The door to the inner part of the fort can be seen moving west from the fire, and not far from it is a chest with a variety of items and weapons in the level.
Inside the fort
When you enter the inside of the fort and go forward a little, you can hear the conversation of two sorcerers, who here apparently were a blacksmith and his assistant:
Blacksmith Sorcerer:- They drink day and night, and what am I doing?
Assistant sorcerer :- Do you work in the forge all day?
Blacksmith Sorcerer:"Why do they want me to work in the forge?" We use magic, not weapons.
Helper Sorcerer:- Yes, I do not know what to think about what is happening below.
Blacksmith Sorcerer:- I'm sure Narisu will enjoy it. He is a nasty person.
Helper Sorcerer:"Better shut up if you don't want to go there either." Then I'll have to work in the forge.
This room will contain a forge and a workbench, on the table there will be three iron ingots, two pieces of iron ore and one piece of silver ore, as well as a book Heart of Cherim (original Cherim's Heart) skill-enhancing blacksmith craft. The door next to this room will be closed and it will only open from the other side. In the room opposite the main entrance there is a kitchen, there will be a tanning machine, a lot of raw and dried food.
In the center of the room are two hearths with cauldrons, and after passing behind them, you go down through the unlocked door and find yourself in a straight corridor that will lead you to a large partially flooded room. Here, when you find a ladder on the left, you have to be careful before you go up to it, because in front of the pile of rubble is a pressure plate that activates a fire trap with fire jets from the left wall. Going down, you will see a makeshift throne at the top of the stairs, and a small dining room to the left of the stairs. The senior sorcerer will sit on his "throne" - a simple chair, and the other sorcerer will be at the top of the stairs and guard the large chest to the left of the throne.
The portal to the Misty Grove appears here, to the right of the throne, if you complete the quest A Night to Remember.
The dining room and part of the next corridor will be guarded by another sorcerer. After going to the middle of the corridor, another pressure plate will be installed here, which will activate the gate with spikes on the right side.

Morvunskar. Sanctuary of Dibella.
Not far from the trap there will be a post with a sorcerer who will definitely take an interest in the noise of the triggered trap and come running to this noise. However, if you start a fight with him, it is highly likely that two more sorcerers will come running to his aid from the bedroom. The bedroom will be on the right and contains two beds, while the room on the left will contain another bedroom that will contain a pentagram of souls, and several soul gems can be found on the shelves.
There is another sorcerer who will guard the door around the corner, behind it you will find the sanctuary of Dibella.
When you open the locked door to the east, you will find the necromancer Naris the Vicious and the results of his "experiments"
. You can even hear some of his comments about his experiments such as: "...the sweet smell of burning flesh.". On the left side, there is a lever that opens the gate to his torture chamber, where six burnt corpses will be found lying on a smoldering fire. A book can be found in the chamber The Secret of Talara, vol. 3 (original Mystery of Talara, v3), when reading which increases the skill destruction and a leveled poison, which will be on the shelves to the right of Naris where he was standing, and his chest.
The return to the top will lie through the door that did not open before, opening it will lead you directly to the exit from the fort.
The quest is taken in the tavern you visited first, and sometimes it travels from tavern to tavern, so in the middle of the game it is very problematic to find it. (For example, the Whiterun tavern was the first for me, but on my first playthrough, it appeared in Solitude, because according to the storyline, this is the first tavern that you have to visit on assignment).
The main quest begins with the mini-quest "Drink Sem Geven", which consists in a conversation with this same Sem.

We appear in Markarth.

Senna meets us and reprimands us. The easiest way to end it is to pay money. The price is really low, so even a poor player without preparation can pay ~600 Septims. But if the player has upgraded the skill of persuasion, then you should not spend money on such a trifle, but simply convince.
I do not consider another option, because 600 gold can be quickly filled even without wood.
After we deal with Senna, she sends us to Rorikstead.

How to get to Rorikstead from Markarth (If you haven't opened Rorikstead yet) can be seen on this map (Roads are marked here, but beware of outcasts, who can be a real problem at a high difficulty level or at the beginning of the game).

There, in Rorikstead, we meet Ennis, who is also unhappy with us. He demands the return of the goat.

The goat can be paid for, at a price of 1000 Septims, but not everyone can afford it, so we agree to return the goat that we sold to the giant (We leave the conversation).

According to the marker, we find a goat, and with it, in fact, a giant.

If we approach the goat, we will see that it is possible to “Speak” with it, but be careful! When talking with a goat, she will follow you, and the giant, seeing the theft of his goat, will get furious and attack you. You can die from such a surprise.

If you are playing with stealth, it will be more profitable to kill him with a bow, hiding nearby.
It is also possible that you are lucky and you will catch a bug in which the giant simply does not notice you. After that, you can proudly run to Ennis.
Attention! In order to "Turn in a goat" to Ennis, it must be near the character. Otherwise, the dialogue simply will not start.
If you jumped off the cliff and rushed to Rorikstead, do not rush to load the save, wait a bit and the goat will come running to you.

Ennis sends us to Whiterun, to Iseult.
Finding it is absolutely easy, given the fact that it is highlighted with a marker.

Isolde demands a ring from you, or payment for a ring.
Again, paying for the ring at the beginning of the game will be problematic, but if you have leveled the persuasion skill, then you can try to convince.
But I will continue to describe the option for poor players.
Isolde sends us to the location "Grove of Witches Mist"

There we are met by such a monster, which we have to finish off.

After killing him, we will take a ring from the corpse, which we will later give to Isolde, as well as random ingredients. Such as the Feathers of the Witches or the Claws of the Witches.

After we gave the ring to Isolda, she sends us to the Morvunskar location, which is located near Windhelm.

There we will be met by magicians who, at a high level of difficulty, can cause trouble.
It is worth being wary of the High Necromancer, who is located inside the fortress.
(On the first playthrough, he had a staff of electric discharge, with which he killed me 5-6 times in a row, but on the second playthrough, this necromancer had absolutely no staff).
Fortress map for people who manage to get lost even here.

Here is the portal itself, into which we fearlessly jump.

We go along the bridge, we find Sem Geven, we speak with him.
|
|
|


He turns out to be a Daedra Lord, gives us the Sanguine Rose and sends us to the tavern where we took this quest. That is, if we took the quest in Whiterun, then he teleports us there.

rose sanguine
|
|
|


P.S.
A significant part can be skipped if you go from Markarth directly to Whiterun to Isolde. Then she will talk to us about the ring. You can buy it off and immediately go to the fortress, quickly jump into the portal and get the coveted staff.
But passing quests in this way does not give any pleasure, so I recommend that you complete the entire quest without using either eloquence or money.
When the main character reaches level 14, an unusual character will appear in the tavern of the city where he is at that moment - a strange, cheerful magician named Sam Geven. Sam is already drunk and with a slurring tongue will offer our protégé a bet: who will outdrink whom. In case of victory, Dovakin will become the owner of a certain staff belonging to Sam.
The offer is tempting, and Sam himself is a funny, friendly type, so we agree. At first, everything goes as it should, but after the third circle, the world around suddenly darkens and our hero comes to his senses in a new place. Actually from this moment the task also starts.
Speak to Senna at the Temple of Dibella in Markarth
If you have already visited Markarth, then, waking up in a new place, you can recognize the interior of the upper floor of the Temple of Dibella. Seeing the awakening, one of the priestesses of the temple, Senna, will immediately attack the uncomprehending, hungover Dovakin. From her explanations, it will become clear that Dovakin, together with his friend, in an insane state, made a uniform brawl in the temple: he threw things, shouted something unintelligible, not to mention the desecration of the sanctuary with his appearance. After that, our drunk passed out, and his friend disappeared.
What happened so shocked Senna that even as a priestess of the goddess Dibella, who calls her followers to universal love, she cannot contain her indignation. She refuses to answer any questions until the temple is cleaned up and an apology is made.
If Dovakin is eloquent enough, then, using the gift of persuasion, you can persuade the priestess to forgive and tell the details without fulfilling her conditions. If this trick fails, then you can try to bribe Senna. Otherwise, you'll have to sort things out. To do this, you need to pick up strange objects scattered on the floor: a giant's finger, two bottles of Alto wine and a note from Sam, which, however, is more than strange and does not clarify anything.
Note:Once these items are in your inventory, they become quest items and can only be disposed of once the entire quest has been completed.
After cleaning, you need to apologize to Senna and she will finally tell you that in a drunken stupor the Dragonborn mentioned Rorikstead and advise you to continue investigating there. Well, there are still no other ideas, we go to the village.
Ask in Rorikstead about Sam and his staff
If our reveler, using fast travel, arrived in Rorikstead during the day, then on his right hand he will notice the farmers working in the garden - Ennis and Reldit, owners of the Cow Pie Farm.
Deciding to continue the investigation with their questioning, Dovakin will immediately realize that the nightly tricks did not end with the desecration of the temple. Ennis, noticing the approach, will come up and accuse the protagonist of kidnapping their goat, Gleda, which, according to the farmer, Dovakin sold to a giant living in the hills nearby.
Like Senna, the peasant refuses to tell anything, but like the priestess, he can be tried to convince, intimidate or bribe. Otherwise, you have to go look for his goat. Fortunately, the current owner, the giant Grok, grazes it really not far: in the hills, southeast of Rorikstead.
It is not clear how Dovakin managed to complete the sale and purchase transaction, because Grock is not at all friendly. It will not be possible to reach an agreement with him, he will have to be liquidated.
Note:You don't have to worry about Gleda's health. At this point in the quest, she is immortal. Moreover, Gleda is completely inoffensive and will dutifully follow Dovakin, even if he touched her during the battle.
Rejoicing at the return of his beloved, the peasant will tell you that he found a note filled with ale, in which it was possible to make out only that our hero owes money to Isolde from Whiterun. Well, you'll have to pay a visit to Isolde.
Talk about the staff with Isolde in Whiterun
A conversation with Isolde will not clear things up. On the contrary, things will become even more confusing. The girl will tell that the night before our hero told her a romantic and touching story about how, in the light of full moons, in the canopy of the trees of the Witch's Mist grove, he met a mysterious beauty. Young fell in love with each other at first sight. The story touched Isolde so much that she agreed to lend her wedding ring so that Dovakin could marry his beloved.
Upon learning that there was no wedding, Isolde demands the return of the ring. Here, again, you can show off your eloquence, or pay off, but if you want to get the most out of the task and figure everything out, then it’s better to fulfill Isolde’s request and go to the Witch’s Mist Grove in search of the ring.
Find and return Isolde's engagement ring
Witchmist Grove on the map of Skyrim. Witchmist Grove is located a little south of the Keen Grove settlement, which, in turn, is located a little south of Windhelm. The grove fully justifies its name: fog creeps between the trees, and in the center, surrounded by stakes, there is a hut, from which the bride is already running towards the betrothed. Moira is glad to have her fiance back.
Well, yes, they say the truth that there are no ugly women, there is little booze. The mysterious "beauty" turns out to be a nasty, ugly witch named Moira. Running up to Dovakin, she almost throws herself on his neck with a cry "My love! I have been waiting for your return for a long time to merge with you in ecstasy!”
Seeing the displeased expression on the face of our protégé, Moira will begin to suspect him of treason with her friend Esmeralda. Therefore, all attempts by Dovakin to convince the fortune-teller that everything that happened is a misunderstanding, and to persuade him to return the ring will be in vain - the failed bride will be furious. There is nothing to do, you have to cool the passion of the “girl” with iron or magic. Having finally obtained the wedding ring, we return to Whiterun.
Isolde will once again lament that such a romantic story turned out to be untrue, but in a conversation she will mention that the wedding ceremony was supposed to take place in Morvunskar. So we go there.
Travel to Morvunskar
Morvunskar on the map of Skyrim. This old military fort is located near the Witchmist Grove, on the other side of the river. Unlike most of these places, the population is not bandits, but aggressive mages. I must say that the local population leads a wild lifestyle. Spending their days in idleness, mages actively lean on booze, as evidenced by the considerable amount of empty containers in the courtyard and interior of Morvunskar.
It is better to enter the courtyard not through the main entrance, in which not only is there a trap, but also above it there is an observation tower with a sentinel mage. The courtyard of Morvunskar consists of several tiers, there are five magicians of different levels, including the mentioned sentinel: two patrol along the bridges and the surviving stairs between the tiers, two more on the upper tier are warming themselves by the fire.
In the interior, there is even more chaos. To the right of the entrance, in the hall, the vault of which is supported by wooden supports, there is a staircase leading to the lower floor and entrances to two rooms. The door to one of them is bolted on the other side. Another room is a forge, in which a couple of magicians work. You can overhear their funny dialogue, from which you can find out that the engagement of Dovakin and Moira was celebrated for almost three days.
After descending the stairs and passing through a short corridor to the lower level, the Dragonborn will find himself in a large spacious hall, the arch of which is supported by large stone pillars, dripping quite heavily from the upper floor. The hall consists of two sections: on the left are several overturned tables, on the right are steps leading to the dais where the throne is located. There are four magicians in the hall. Two are looking for surviving full bottles of wine at the tables, two more are on a dais.
Having risen to the throne, one can be surprised a lot by the unexpectedly opened spherical portal. You can immediately dash into it, or you can completely clear the premises of the fort before that - it's up to you.
If you decide to clear the fort, then immediately behind the hall is a winding corridor with the chambers of magicians. Behind one of the doors you can find a descent into the torture chamber, where the leader of the magicians, Naris the Vicious, tortures helpless victims. Creeping up to him imperceptibly, you can overhear the scoundrel's monologue. He admires the smell of burnt flesh and laments that he paralyzed the victims before his little auto-da-fé. According to him, it would be better if the victims rushed around the camera, which would allow them to practice accuracy.
In addition to Naris, three more magicians hang around in the rooms and the corridor. The corridor ends with the same barred door on the top floor of the fort. The door can be opened, and then return to the portal.
Note:All of Morvunskar can be traversed in stealth mode without killing anyone.
Go through the portal of Morvunskar
One way or another, jumping into the portal, Dovakin will find himself in a fabulous idyllic place - the Hearths of Pleasure. Eternal twilight reigns here, pleasant music plays, the river quietly rustles and fireflies flutter, and the autumn landscapes around remind the nature of the Rift.
There is only one way further: cross the river through the bridge, and then along the small canyon illuminated by lanterns, which ends in a clearing. Here, in the light of lanterns, there is a feast, at the head of which is our elusive friend Sam. Finally, we will get answers to all the accumulated questions!
Talk to Sam
Sanguine explains his behavior. Sam will be delighted to see that his friend has safely returned to the place of a recent drinking party, after which, in front of the astonished Dragonborn, he will turn into a strange four-horned Dremora. He will tell you that he is the Daedric Prince Sanguine, whose sphere is debauchery and drunkenness. The place they are in is the plane of Oblivion, owned by Sanguine.
Sanguine admires Dovahkiin's resourcefulness. He had a lot of fun watching our adventures. He will also explain that he has been looking for such an active character as the Dragonborn for a long time, after which he will finally give his staff - the Daedric artifact "Rose of Sanguine", with which you can summon the Dremora Lord. It doesn't even need the items that were on Sam's list left at Dibella's temple - it's just another one of Sanguine's jokes.
After the dialogue, the main character will be teleported to the tavern, where he first met Sam. At this point, the task is considered completed.
We also recommend
 Enchantment teachers in Skyrim: what do they give, where to find?
 Changing the appearance of characters with Face Ripper and Fo4edit
 Download sandbox games torrent Skyrim mods 18
 Location of rare resources in Assassin's Creed: Syndicate Assassin's Creed Syndicate all costumes
 Skyrim crashes when saving
 A night to remember (Sanguine)