Summer extension to the house with your own hands. Types of extensions to the house
Sometimes it happens that after the construction of a country house, it turns out that it has a small square, or there is a need for a separate kitchen, hozblok, workshop or barn. In this case, you have to make an extension to the house. To reduce material costs to a minimum, you should immediately think about what to build it from.
How to build an extension to the house with minimal costs, with photos and examples, how to prepare the foundation for it, what material to choose for the walls and roof - later in the article.

general information
In the event that water supply and sewerage are planned in the extension, as in the case of the construction of a kitchen or bathrooms, this issue should be puzzled before pouring the foundation.

If you plan to use the extension not only in the summer, then you should provide for floor insulation, for example, using expanded clay bedding. It is also useful to think over in the case of living in winter how to heat the room.

As an easy extension option, you can equip a veranda - it provides protection from wind and bad weather. In winter, it will not be possible to live on the veranda, since, as a rule, it is not heated.

The extension must be in harmony with the main structure. An economical, warm and prefabricated version of the building is a frame made of wood, after erection it is easy to finish it under the main building. It has many advantages:
- simplicity and speed of construction;
- relative cheapness;
- environmental cleanliness of the extension;
- there is no need to build a capital foundation.


Foundation construction
For a veranda or a frame-type residential extension, a columnar foundation is suitable, since the weight of the structure is small. If there is a need to bring communications, as is the case with a bathroom or kitchen, it is necessary to ensure thermal insulation of the water supply and sewerage sections located on the street. This will cost a pretty penny, but the costs are much less than if it were necessary to equip a strip foundation. The floors in such an extension are made of boards so as not to burden the structure.

The concrete pillars on which the structure will stand are poured 50x50 cm in size at a distance of 1.5 meters from each other. The bottom of the pits under the pillars is covered with a layer of sand, then with rubble, and all this is carefully rammed.

Pillars must be reinforced to give strength to the foundation. The formwork is removed about a week after pouring, when the concrete has gained strength. As a waterproofing, bitumen or roofing material is glued to the poles.

Bottom trim and floors
In order for the frame extension to serve for a long time, it is necessary to provide waterproofing and impregnate all wooden elements with an antiseptic and fungicidal composition. High-quality waterproofing gives bituminous mastic.

A 150x150 mm timber is used as the lower trim, preferably from larch. Under it, a roofing material is necessarily planted to isolate it from the foundation. The first row is laid strictly horizontally in level, without connecting the timber at the joints.

The second row is laid with overlapping joints on the first. Then, with the help of studs, the first and second rows are connected. You can use 50x150 mm boards instead of timber, and in order to achieve structural integrity, they are connected to self-tapping screws.

The lower harness is attached to the beds, on which the logs are laid. Insulation is placed between the lags, for example, polystyrene, and subfloors are laid. Finishing floors are laid from moisture-resistant plywood.


Walls
The walls are made in two ways - either they assemble the structure on the ground, and then erect it, or gradually build the frame in place. For the first option, several people are needed, since the structure cannot be lifted alone.

The erection process begins with corner posts, it is very important to maintain right angles in all planes. For racks, a bar with a section of at least 100x100 mm is used. The pillars are placed at a distance slightly narrower than the width of the insulation sheet.

Openings for windows and doors are equipped with additional pillars and crossbars. The top of the frame is fastened with an upper strapping of the same design as the lower one. Sheathing is carried out with OSB, siding, plywood, clapboard.


Roof and insulation of the extension
The roof is easiest to equip with an ordinary shed. It should be done as a continuation of the roof of the main building. This is possible if the extension to the house is side. The roof of the extension must go under the main roof.

All elements - rafters, beams, crate must pass with an antiseptic. The roof is overlapped and, depending on its type, is attached to the crate with self-tapping screws or slate nails.

Styrofoam or mineral wool is used as insulation. First, the frame is sheathed with a hydrobarrier, then an insulating material is placed between the racks of the frame, and a vapor barrier is attached between it and the lining. Then they attach OSB or drywall to the racks, and proceed to the fine finish.


Photos of extensions to the house


Most projects of individual houses provide only a residential part without additional outbuildings. Over time, residents, in the presence of free space near the house, often need to expand the structure with their own hands or with the involvement of qualified specialists. This can be due to a variety of reasons, such as an increase in the number of residents, the purchase of a car that will require a garage, and other circumstances. Annex - an auxiliary part of the building, which is adjacent to its main walls from one or more sides.
Varieties of attached buildings
The building can be:
- Open, in the form of a canopy adjacent to the main wall, a summer veranda, porch or terrace.
- closed:
- living room with panoramic windows;
- several additional living rooms;
- kitchen with barbecue and dining area;
- a separate recreation area, a children's play complex or a sports gym;
- insulated garage;
- workshop with pantries;
- sanitary unit with a swimming pool or bath;
- Russian bath or sauna, made mainly from wooden logs or timber as an extension to wooden houses;
- greenhouses for year-round cultivation of vegetables, a greenhouse or a winter garden;
- to accommodate boiler equipment for heating.
- Superstructure in the form of an attic, provided that the bearing capacity of the existing foundation allows such an increase in load.
Depending on the purpose, a heated warm annex is arranged or without heating.
Required approvals
An extension project to a private house can be ordered from specialized design organizations or developed independently. To change the design of the building, it is necessary to obtain a building permit from the local administrative authorities, which is necessary, as well as for the construction of the main house. The project should be coordinated with bodies a dignity. and fire supervision, communal department. If the distances from the border with neighboring plots, regulated by building codes, are not observed, a written agreement of the neighbors is necessary, preferably notarized. The illegality of the construction of an extension is also recognized in the absence of a written consent of all the co-owners of the building to carry out the work.
It should be borne in mind that a work permit is issued only with the existing registration of rights to own a land plot and a house in Rosreestr, taking into account in the state cadastre. In the absence of the necessary approvals, the structure may be declared illegal and subject to demolition. It is not necessary to obtain a permit for the construction of simple sheds or a porch.
Structures and materials for the construction of the superstructure of buildings

The added part should harmoniously fit into the overall interior of the house. A two-story extension to a one-story building will look ridiculous, which, moreover, will significantly complicate construction. It is recommended to use for the construction of walls the same materials from which the main structure is built. For an extension to a wooden house, use wood, and brick brick. You can use foam or aerated concrete blocks, and for a harmonious combination with the design of the house, veneer under a tree or brick. A high or turning porch, as well as open verandas and terraces, must be framed with a railing.
It is desirable to build the foundation of a capital extension to an old house of the same type as the one existing under the main building. Of course, for the construction of a simple canopy, porch or open veranda, there is no need for a powerful foundation. In most cases, a columnar foundation with a small laying depth or screw piles is sufficient.
For capital buildings and garages, reliable and durable foundation structures are needed. Mainly prefabricated and monolithic tapes or a monolithic slab. When using poles and screw piles, it is mandatory to tie with a grillage, and to protect the space under the floor, pick up from the cladding with basement siding with insulation from basalt mineral wool or other similar heaters. On the top of the foundation, horizontal waterproofing is required from rolled waterproofing materials (stekloizol, hydroisol, rubemast or roofing material).
A good option is a frame extension to the house. The frame is constructed from wooden blocks filled with insulation (for example, mineral wool boards) and lined with thick moisture-resistant plywood, OSB boards or other materials. The attached building can be made with window openings. The doorway is more convenient internal, which allows passage to the attached part without going outside. But it is also possible to enter the device directly from the street.
The roof is most often arranged single-pitched. It is important to ensure that snow does not accumulate at the junction, so the roof is made with a slope angle of ≥ 25 degrees. The canopy is most often covered with sheets of monolithic polycarbonate or ondulin.
The floor, depending on the purpose of the room, can be concrete (mainly in garages, workshops and storerooms), wood, lined with porcelain stoneware or tiles. Often arranged "warm floors".
The walls of the garage are recommended to be built from non-combustible products (brick, concrete or lightweight concrete blocks) with overlapping with reinforced concrete slabs or corrugated board. Be sure to provide a number of ventilation holes.
How to make an adjoining extension to the house

The connection of an existing building with an extension is one of the most crucial moments of construction. If construction technologies are not observed, cracks will inevitably form in the junctions with opening up to large cracks. This is caused by the difference in the existing loads and the complete absence or slowdown of the settlement of the foundation of the old house.
Attachment of the attached part is carried out in the following two options:
- With an expansion joint without direct contact between foundations, walls and roofs. It is recommended in the presence of problem soils (peat or clay). A gap is provided between the constructs, which is later filled with elastic heat and waterproofing materials. It is permissible to lay a board treated with several layers of bituminous mastic. The resulting seam is closed with decorative inserts. Be sure to eliminate the possibility of the formation of "snow bags" on the roof at the interface.
- Inclusion of all constructs in joint work. The new foundation is arranged with occurrence at the same depth as the existing one. It is applied at the bases from the soils which are not subject to heaving. The contacting surface of the old one is cleaned of soil, a layer of waterproofing, and a notch is made with a perforator. Reinforcing bars are tightly hammered into the drilled holes with sealing of the holes. The obtained mortgages are connected by welding with the reinforcing cage of the extension foundation, and concreting is carried out with a thorough compaction of the mixture using a deep vibrator. Brick walls are connected in the same way. The rods are placed every two rows in the seams of the new masonry. Wooden structures are tightened with steel bolts or studs with double-sided thread, complete with wide washers, nuts and locknuts. To pair the roof, it will be necessary to remove part of the roofing and jointly fasten the rafters and beams of the house and the extension with the addition of new additional nodes and racks. In some cases, it may be necessary to build a common truss system or replace elements of greater length.
The second option is more complex, laborious and costly, although it cannot be guaranteed that the joint of the joints will not disperse over time.
Depending on the design, materials of the existing house and the purpose of the attached premises, the foundation type, material and thickness of the walls, the truss system and roofing materials for the new building are selected.
Before deciding how to build an extension, it is necessary to foresee all the possible nuances of future construction and to ensure that you protect yourself from possible administrative sanctions.
Advantages of an extension compared to a freestanding building
- Reducing the scope of work on the supply of engineering communications (electricity, water supply, heating, sewerage, ventilation).
- Less material consumption and cost of construction, since at least one existing wall is used.
- Rational use of the territory without cluttering with additional buildings.
- Additional insulation that prevents the penetration of cold air directly into the house with a decrease in heat loss.
The advantage of private real estate lies primarily in the fact that you can easily make an extension to a wooden house without problems and significant costs. For example, you can quickly and easily make an extension of 10-15 m², which serves as a veranda, kitchen or a place for receiving guests. An addition to the main house must be done in such a way that everything looks harmonious, and at the same time is comfortable and functional.
What to make an extension to a wooden house
Separately, it is worth paying attention to the materials from which the extension is made. If the house is wooden, then it is quite possible to supplement it with square meters of wood or even timber. So the general concept of the building will not be violated, and everything will seem more beautiful and comfortable. The tree allows not only to simplify the work on the product, but also significantly save. A big plus of this material is that it is quite warm. However, to use the premises all year round, it is still worthwhile to carry out additional work on insulation.
In some cases, craftsmen choose bricks to work with. This is a more expensive material, but it has its advantages. First of all, bricks always keep heat well, so minimal insulation work will be required. In addition, the maintenance of the extension will be simple, which distinguishes this material from wood.
However, when an additional brick room is attached to a wooden house, this may not look very good. Therefore, you have to choose between practicality and appearance. Or, as an option, you can then use the same type of external finishing materials throughout the house at once, including the attached room.

The extensions, which are made with their own hands from a bar, look very nice. It is a durable material that will last a long time if properly cared for. The appearance of the building itself is immediately transformed, and the house becomes like a fairy-tale hut. But the price of quality material of this type can be high.
The most inexpensive option is a do-it-yourself frame extension to a private house. Such construction methods have recently become very popular. Manufacturers offer to build entire houses in 2-3 floors in a short time. As for the extension, its construction in this case will be inexpensive. Frame buildings always require high-quality insulation and waterproofing. But still, they significantly outperform all other options in terms of price, speed of work, and even appearance. The frame extension will look good next to the wooden one, and together with the brick house. This is a great option for budget owners.
Where to begin
Before you make an extension to a brick house or any other with your own hands, you must first coordinate this with government organizations. Initially, project documents are drawn up taking into account all the nuances, but work with government agencies does not end there, since at the end of construction the extension will need to be legally registered. All such issues are resolved in the administration of the settlement or in multifunctional centers.
Do not start work before all the nuances are agreed. Otherwise, if something goes wrong, you will have to clean up what has already been created, and this is troublesome and expensive.

Next, you need to purchase the material, according to the planned estimate. It can be wood, timber, brick or stone. It must be borne in mind that the type of materials must meet all the requirements of the building. If it is planned to be small, and it will not be loaded with a powerful roof, then you can take an ordinary tree. For capital buildings, it is still worth using stone or brick.
Experts strongly recommend at the initial stage to check all the nuances and consult with professional architects. This is especially true in cases where heavy materials are planned to be used. Of course, the extension is not the second floor. However, even it can significantly load the main building. Therefore, before starting work, it is necessary to carefully check the serviceability of all components, the quality of the foundation and consult with specialists.
If the construction of an extension seems like too much work, you can entrust it to professionals. In this case, you can save not only time, but money. If you opt for a modern frame version, it will be both beautiful and cheap. And most importantly, such structures are very light, so they do not load the main building at all.
Those who decide to make an extension to their house with their own hands should take into account that incorrect actions will lead to the fact that the load on the building will be too great. If the house is old, a professional preliminary diagnosis is necessary. An insufficiently strong foundation can cause the building to be completely destroyed, therefore, by creating an extension, the master runs the risk of being completely homeless.
Extension building technology
As for how to make an extension to the house, the main thing is not to damage the main house and get additional square meters. To do this, it is necessary to carry out high-quality preparatory work before starting construction. They must be multilateral, that is, you need to study every detail.

First of all, it is necessary to check the quality of the foundation, its depth and width. This will determine whether the base can withstand the additional load in the form of an extension.
In order to get a warm building, its walls must fit snugly against the main building. But this is permissible only if the structure is well preserved. In addition, you need to immediately think over the options for movement, namely doors and passages. It is quite possible that at the place where the extension to the country house will be connected to the main building, an additional arch will have to be made under the door. Here it is necessary to clarify whether the wall will withstand it. Sometimes it happens that the walls look quite normal. But one has only to start diagnosing, as numerous shortcomings are revealed.
Special requirements are always placed on the roof. It should be light enough and match the type of construction. There are 2 options for how to properly make a roof in an extension to the house. In the first case, it can be a continuation of the main roof, and the second - a separate roof. Both one and the second method have their pros and cons. If you make a solid roof, the whole structure will look beautiful and harmonious. But indoors there will be one minus, namely a sloping roof or the need to build a small attic and additional insulation. A straight roof from the outside does not look too beautiful, but inside it will be a more convenient option for further interior decoration.

Particular attention should be paid to extensions, which will be made of wood. This material is different in that it needs shrinkage. This process takes a certain amount of time, and sometimes reaches several years. Therefore, during the first years of use, the attached structure may settle and move away from the main wall. If it is initially fixed very tightly, then this can damage the main wall. Therefore, the wooden frame must be left at first. Only after it settles, you can proceed to the design and strengthening of the wooden extension.
As for the foundation for the extension, it does not matter much. If the main building is on a solid and high-quality foundation, then a pile foundation can also be used to build an extension.
It is believed that making an extension to a wooden, brick or stone house is a very simple task. In fact, it is much easier than building a second floor. However, if certain requirements are not observed during the construction of the extension, this can have a very bad effect not only on the quality and functionality of the new building, but also spoil the existing building. Therefore, you should be extremely careful and attentive.
Simple extension to a wooden house
The complexity of the work always depends on the type of project. Some try to make the extension create additional space, but also become a decoration of the building. But such options are quite complicated both in execution and in choosing the right materials. If there is no desire to face difficulties, you can make a simple extension with your own hands quickly and inexpensively.
The first step will be to choose the optimal location for future construction. At this stage, you need to assess your financial capabilities, choose the right materials, decide on the size of the building and resolve the issue with permits.

Next, you can proceed to the foundation. For a simple and light structure, there is no need to make a powerful foundation. Most often, masters refuse a monolithic foundation and opt for a tape type or a columnar basis. For a small frame extension or veranda, this will be enough.
Before you build walls, you need to take care of the arch for the door from the house. In order not to destroy part of the wall, it is recommended to make a passage in place of an existing door or window.
After pouring the foundation and its complete readiness, you can start working on the walls. The easiest way is to make extensions to wooden or brick houses from solid sheets. That is, the extension will be of the frame type. It is advisable to place poles for fastening panels and further installation of the roof at a distance of about 1.5 m from each other, but no more. After their high-quality fixing, you can start tying the walls. The final stage will be the installation of the roof and the complete hermetic finishing of the room.

Experts most often recommend a roof for extensions, which will be a continuation of the main roof. So the whole building as a whole will look more harmonious and attractive. The extension will no longer look like a build-up on the house, but will become its full-fledged part. If you use the same materials for decorating the facade as for the house, then everything will look very harmonious. But you shouldn't rush with the exterior decoration. In addition, you need to wait some time before installing windows and doors. The extension needs to be given time to stand and settle. Only then can further work be continued.
Building insulation
In order for the room to be used at any time of the year, you need to know how to insulate the building. This is a simple job, but it requires certain rules to be followed. First you need to choose a heater. The most popular materials are Izover, Izorok, URSA and Rockwood. All of them are inexpensive and consist of mineral wool. For 1 m² of wall it will take about 70 rubles.

Most often, mineral wool is used for insulation. It is laid under sheets of drywall, which are then sheathed with walls and ceilings. But the work on insulation does not end there. All seams that will be between the sheets must be carefully sealed with putty. Only after that you can proceed to the further design of the walls, that is, painting, wallpapering and other types of finishing work.
But in order for the room to be usable in winter, it is also necessary to insulate all windows and doors. For this, special materials are used to save a lot of heat in the house.
With the right approach and high-quality work performed in a do-it-yourself room, you can live at any time of the year. From an ordinary summer veranda, it will turn into a full-fledged building, where you can equip a living room with a fireplace or a room for another purpose. Insulation work for an extension with an area of 12 m² and a ceiling height of 3 m will cost about 10 thousand rubles.
If your house plan does not provide for an extra room, garage, or other space that you feel the need for, you need a frame extension. The easiest way to make an extension to a wooden house. You do not have to hire specialists, because, having at least some construction experience, you can do all the work yourself.
What is it for?
Extensions are necessary when, during the planning of your house, you overlooked the need for any room, or you did not have enough money to build additional rooms, a garage or a bath. When you need an extension:
- Do you want to expand the area of \u200b\u200byour house with your own hands. You can finish building a frame house as much as you like.
- You need a garage, but don't want to build it separately.
- You have been dreaming of a bright veranda or a summer dining place for a long time.
- A small sauna attached to a wooden house never hurts
- Do you want to have a utility room to store different things?
When you have decided what exactly you will build, you must determine the following points:
- Do I need an additional foundation for a new wooden room
- what kind of roof will be on your extension
- will it have windows or additional doors
- do you need a supply of water, light and other communications to a wooden outbuilding
- how and what will you carry out the insulation
- you will build with your own hands or invite specialists
Technology and step by step instructions
As the name implies, the basis of this structure is the frame. However, even before the frame is established, you may need a foundation. It can be a lightweight, columnar or strip foundation. Given the moment of some shrinkage, it is better not to mount with the foundation of the house already installed. Most often, a strip foundation is chosen. Its essence is simple: a trench is dug in which formwork is installed. A concrete mortar is poured, consisting of 1 part of cement, 3 parts of sand and 5 parts of crushed granite. After the foundation hardens, the formwork is removed.

If the construction takes place on unstable (eg clay or loose) soils, it is necessary to allow some time for the foundation to shrink.
The second stage in the construction of an extension to a frame house is the installation of a frame. Its basis is wooden beams treated with protection. The wood must be treated with bioprotection against insects, and fire protection to prevent burning of the wooden structure.

- exterior finish
- OSB sheathing (DSP, LSU)
- windproof membrane
- insulation
- vapor barrier
- OSB inner lining
- interior decoration
Most likely, you will use 15 cm thick material for insulation. These are average figures for our region. Based on this, you will need lumber from the 150 line. The step of the frame racks will be 59 cm, where sheets of 60 cm heat-insulating material will fit perfectly.

Insulation of a new building
Insulation of a frame extension to a wooden house can be done in various ways. The most commonly used heaters are:
- foam sheets
- mineral wool
- liquid heaters
- isover, ursa
- mineral basalt types of heaters
Insulation of the extension as a whole is similar to the insulation of any frame house, however, there are some peculiarities. Since in places where new frame walls are attached to existing walls, there are often hard-to-reach places for insulation. As a result, cold paths appear there, nullifying all the work on the general warming of the frame extension. To insulate such joints, you can use:
- liquid insulation in the form of hardening foam
Jute is an excellent insulation that needs to be caulked around the corners.
Be careful: if there is felt in jute, moths can start eating this material over time. Choose jute, which will contain only vegetable raw materials - hemp or flax fibers.
Before laying jute, study the technology and be sure to use personal protection, at least closed clothing and gloves.
Liquid heaters are good because they are extremely easy to apply with a can to the most inaccessible places. The synthetic composition does not attract insects, its service life is several decades. Liquid insulation is attached to almost any surface, and hardens very quickly.
Important: liquid heaters do not like ultraviolet light, under the influence of which they can change their structure and color. Do not work with this material in the sun.
If you are insulating with mineral wool, it is better to overlap it. This way we will avoid cracks that let the cold through. The insulation for the frame extension must be well fixed; for this, staples or glue are used.
If you settled on the insulation of the frame extension with the help of foam sheets, then they are located close to each other, fixed, and the joints are foamed. It is better not to use foam sheets for internal insulation, as the smell of construction chemicals may be present in the house for some time.
If you decide to attach a bath
With the addition of a bath, everything is much more complicated than with an ordinary extension. The reason for this is the need to supply all communications. And if, as a rule, there are no difficulties with light, then difficulties may arise with the withdrawal of sewage and water into the bath.

What you should pay attention to:
- All materials for the extension of the bath must be labeled "for rooms with high humidity." All wooden elements must be of high quality processed.
- Water can come from the house (often you have to raise the floor or otherwise get to the laid pipes) or come from a separate source of water - a well or well. Often the second way is easier and cheaper.
- Wood for a bath should not emit resins when heated, so we do not use conifers.
For the rest, the bathhouse-extension differs little from the usual bathhouse, about the construction of which you can read here.
Roof for a new building
There are two ways to install the roof of a frame extension with your own hands. The first method is the establishment of a new building under the common roof of the house, and the second is the construction of a separate small roof (usually shed).
You can use any roofing material, but by far the most common is regular 8-wave slate. Its length is 175 cm, and it overlaps. You can calculate the amount of roofing material, knowing the area of \u200b\u200bthe future roof and the size of the overlap (it should be at least 5 cm, and preferably 10).

To protect the place where the new roof adjoins the house, it is necessary to lay it with a galvanized iron apron. The sheet of iron is bent at an angle, which depends on the angle of the roof. A sheet of galvanized iron should not be less than 30 cm in width.
One part of such an apron must be attached under the roof overhang, and the second part must be fixed directly on the slate of the extension to the house.
Important: Use only slate nails 100-120 mm, the ends of which are not bent, otherwise the slate will crack from temperature changes. Leave them as is or cut them with a grinder.

In addition to slate, other roofing materials can be used.
New room - new floor
After the roof is done, it is time to think in the field. We can also make it ourselves. In short, the construction of the floor is done in several stages:
- draft floor
- finishing floor
The draft floor is arranged like this. A cranial bar (5x5 cm or slightly less) is attached to the sides of the genital lags. Edged boards are laid on the bar, the thickness of which should be 2-2.5 cm. The following layers: glassine, insulation, again glassine. The subfloor is a supporting frame for the finished floor, and also creates an air cushion for even more insulation. After that, we begin laying the finishing floor.

The finished floor can be of the following types:
- wood
- concrete
If you decide to stay on a wooden one, use a milled board. Very comfortable are those that are connected with spikes in the grooves. Dimensions can be as follows: 28-44x98-145mm. On the back side they have vents that provide ventilation and air circulation. The size of the blower is about 20 mm.
Also for a wooden floor you can use: tongue-and-groove seamed boards, which are sold with tongue-and-groove slats and spikes of various shapes (straight, segmental and trapezoidal).
Important: if you use a board to create a floor, laying is done taking into account the annual rings on the wood. They must look in different directions!
After finishing the floor, you can do the finishing.
The concrete floor is made easier. After a layer of insulation and insulation, a concrete screed is carried out. You can put a finish on top of the screed. You can make a screed with your own hands, knowing the technology. However, the concrete floor has one drawback - it is cold. Therefore, it is worth thinking about the "warm floors" system in the extension, if it is a living space.

Ready-made tubes fixed on the grid cells - a good move
Warm floor is done like this:
- First, a concrete base or screed is laid.
- A layer of thermal insulation is laid (20-100 mm).
- Reinforcing layer
- The pipes of the water heating system are laid. For fixing, they are fixed with clamps to the cells of the reinforcing mesh. The pipe laying step should not exceed 3 cm.
- The next layer is the floor underlay.
- At the last stage, we mount the floor covering. It can be parquet, laminate, tile, linoleum and others.
In addition to a water warm house, you can make an electric one, which is even easier.
When the floor is ready, we install doors and windows. They are fastened with self-tapping screws, spacers, nails and wedges. Installation is level.
You can read about wiring electricity to a new room. Wiring can be carried out both from outside the house, there and through a common wall with an extension.
Internal insulation
The walls of the extension must be insulated not only outside, but also inside. For this, a superdiffusion membrane, foil materials and insulation are used.
Superdiffusion membrane is a modern insulating "breathing" means. Sometimes, in order to save money, plastic wrap is used instead, but this material collects moisture, as a result of which mold spreads on the walls of the house.
Foil materials are applied to the wall with an overlapping aluminum surface and fixed with ordinary rails.
When choosing a heater, it is best to stop at mineral wool or ecowool. They are functional, inexpensive and durable.
The insulation layer covers the vapor barrier, which is sewn up with sheets of OSB, chipboard, plywood, lining, DSP, etc.
Next comes the interior decoration. For an extension, you can use not a wooden bar, but also a metal profile. Exterior finishes can be different - you can choose options and see pictures and videos.
Before proceeding with the construction of an extension of a living room to an individual residential building, it is necessary to obtain permission from the department of architecture and urban planning of your city.
Learn more about how it is done in order to avoid mistakes when building brick walls on your own.
Insulation of the roof from the inside is not very expensive and will save money on heating the house. Read about how to perform insulation and what materials to choose.
To do this, you will need to provide documents for the land (lease agreement or certificate of ownership, cadastral passport), documents for the house (certificate of ownership, technical passport), construction and architectural projects (in principle, there can be one project, but in it must necessarily contain sections affecting the construction and architectural part of the extension being built) and, of course, write an appropriate application for permission.
Foundation for an extension
After receiving the permit, we start construction. Construction, of course, must begin with the construction of the foundation. To do this, along the perimeter of the future outbuilding, we dig a ditch with a depth of at least half a meter, the width of the ditch should be about the same.
We cover the bottom of the ditch with sand and gravel. This is necessary in order to increase the density of the connection between the foundation and the ground, as well as in order to reduce the risk of subsidence of the foundation.
Then we start pouring the foundation. The solution of the future foundation is prepared based on the climatic conditions of your region, the characteristics of the soil of the earth, the size of the future room and the weight load exerted on it by the foundation (all this should be reflected in the project). In addition, the foundation must be below the freezing level of the soil.
If the foundation is above this level, then in this case the moisture accumulated in the soil will swell and expand during freezing, and thereby cause additional uneven loads on it. Such an impact on the foundation will lead to its deformation, as a result of which cracks of various sizes may appear on it and the walls of the future room.
 After the foundation is filled, it should be watered abundantly. You need to start watering eight to ten hours after the completion of work on its construction. This is necessary to avoid the appearance of cracks on it and its uneven drying. This procedure must be performed three to four days in a row.
In order not to constantly run with a hose, the foundation can be evenly covered with wet sawdust. The foundation will dry completely after three to four weeks. But this does not mean that you can immediately start building walls. Let it sit for a year. During this time, the foundation will completely sink and “find” its place.
When pouring the foundation, it is better to give preference to the type of its construction, which will be similar to the construction of the foundation under the main house. If the foundation under the main house protrudes from the outside beyond its borders, then the new foundation can be “connected” to it, to give strength and avoid additional subsidence.
Walling
The walls of the room can be built of brick, cinder block or rounded logs, or other suitable building material. A block extension to the house is also a viable option, although not the best. Everything here will depend on your preferences and financial capabilities.
But it is better, from the point of view of aesthetics, the material of the walls of the new extension should be similar to the material of the walls of the main house or be combined with it (unless, of course, you are going to carry out the exterior decoration of the walls of the whole house with modern finishing materials). An example is a frame extension to a wooden house, this is both simply done and looks aesthetically pleasing.
The height of the walls (ceiling) of the new extension should be slightly lower than the height of the main building. It should be exactly as low as necessary for the arrangement of the roof.
 When erecting the walls of a new room, it is necessary to resolve the issue of their "bundle" with the wall of the main house. In this case, experts do not recommend the use of a rigid connection. Since the weight and "age" of the main structure exceeds those of the new extension, which in turn affects their uneven subsidence. A rigid connection in this case will lead to the appearance of cracks. And not only at the junction. It is best to use an "elastic layer" in such cases.
"Elastic layer" settles as follows. The wall of the extension should not adjoin closely to the wall of the main building. Between them you need to leave a small distance of two to three centimeters. The remaining space is filled with a special sealant (Vilaterm or foamed polyurethane) for expansion joints and gaps.
Making a roof
It has already been said above that the height of the annex should be slightly lower than the main house. So, when constructing the roof of a new room, it is necessary to ensure that the roof goes under the eaves of the house, forming a smooth transition. The pairing of the two roofs should be such as to prevent as much as possible the ingress of precipitation in the form of snow, rain or other moisture into the extension.
Best of all, at the junction of the roofs, arrange the transition from a galvanized iron corner. We bring one part of such a corner thirty or forty centimeters under the roof of the main building and leave the same amount on the roof of the new extension. The resulting space between the roof and the edge of the metal corner is carefully sealed.
Beams for the roof of a new room can be made, for example, from wooden beams. The bars themselves are laid on pre-prepared grooves in the wall. As the covering of the roof of the extension, we choose a similar material for the roof of the main building. The ceiling must be insulated. As a heater, you can use expanded clay or mineral wool, or a similar material. The ceiling itself can be either wooden or reinforced concrete slab. The same goes for gender.
By the way, to level the floor, it is best to resort to a dry screed. In terms of its qualities, such a screed is no different from others. In addition, it requires less labor and financial costs.
The interior of the new room will depend on its purpose and your design skills. But before that, do not forget to first carry out all the necessary engineering networks in the new room, for example, electricity and heat supply.
And in the end, I would like to say that all construction work on the construction of an extension to a residential building must be carried out in strict accordance with the project submitted to the department of architecture and urban planning.
Any deviation from the project will entail certain legal consequences, up to the impossibility of legalizing the house as a whole. If at the construction stage of the extension you deviate from the project for any reason, then it is better to immediately inform the Department of Architecture and Urban Planning about this, get their approval and make appropriate changes to the project.
After the extension of the new living room is erected and accepted by the commission for the commissioning of buildings and structures, you can safely go to the registration chamber and make appropriate changes to the title documents for the house.
We also recommend
 Placement and display of goods on the trading floor: rules and principles for the placement of goods Drawing up a layout for the placement of an assortment of goods of homogeneous groups
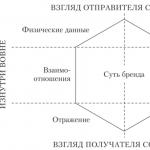 Communication strategy for brand promotion Communication brand idea
 Components of training - 稽古【Keiko】
 Role, style and way of consumption
 Customer and Contractor - relationships as the basis for the success of the project
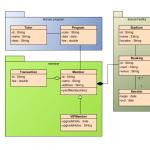
 Encyclopedia of Marketing The main stages of marketing research