Frame house from scratch. How to build a frame house with your own hands - step by step instructions
A frame house is a great opportunity to acquire your own comfortable housing for reasonable money and in a short time. But so that the first strong wind or heaving of the soil does not fold it like a house of cards, you need to know a clear sequence of work and some secrets of frame construction. We provide step by step instructions on how to do it right.
Design project and house drawing
Significantly reduce construction time, avoid many mistakes and reduce material consumption, design will help you. But this is not only the study of the interior of the rooms. The design project includes blueprints. For the foundation, truss system and wall frame, they are simply necessary.

To develop a design project and drawings, you can turn to professional designers or try to master specialized programs. For example: ArchiCAD, Arcon, WoodEngine, CadWork. However, please note that some programs require the purchase of a license key and time to master.
Laying the foundation for a frame house
The frame house can be independently erected by you on a slab, pile, columnar or strip foundation. Each has its own advantages and disadvantages, suitable for a certain type of soil. How to determine which one to choose?
Soil analysis on the construction site
The foundation, selected in accordance with the characteristics of the soil, is not just a reliable basis for the entire structure. It is also the rational use of your money. Not always a frame house needs an expensive slab or deep foundation.

Helping you make the right choice land analysis taken from the construction site. What it will help determine:
- The depth of groundwater. If they flow close to the soil surface, the cellar device will have to be abandoned.
- The qualitative composition of the earth (fine sand, gravel, clay, etc.). The best option for construction is gravel soil, the worst is fine sand.
- The depth of soil freezing. The larger it is, the more time-consuming and expensive the work on laying the foundation will be.
For research, you can dig a hole yourself at least one and a half meters deep, take samples of the earth and take them to the laboratory. A less time-consuming option is to invite geotechnical engineers directly to the construction site.
Features of the strip foundation
The strip foundation is a closed loop of reinforced concrete. It is laid under the load-bearing walls of the house along their entire length.

Despite the complexity and high cost of laying, the strip base is the best option for a frame house. It has a large bearing surface, allows you to equip the basement and perform construction work even on heaving soil.
The sequence of erection of the strip foundation:
- Digging a trench and laying a sand cushion on its bottom.
- Waterproofing of trench walls.
- Installation of wooden formwork.
- Assembly and installation of reinforcing mesh.
- Filling the formwork with concrete and its compaction.

Strip foundation height must be at least 2 times its width. Under such conditions, transverse deformation does not occur in it.
Pile-screw foundation - a simple and affordable foundation for a house
The pile-screw foundation allows you to build a residential building on weak and uneven terrain without construction experience. It becomes a reliable support for the walls, as the piles firmly cling to solid rocks below the freezing level of the soil.

Screw piles- metal rods, on the pointed ends of which blades are welded. This design allows you to simply screw them into the ground, like a drill. This can be done with the help of special equipment or manually. But in the latter case, you will need at least three people.
Laying a column foundation
The columnar base is erected only on stable soils with high bearing capacity.
Work is carried out step by step:
- Round wells are drilled along the selected perimeter in the ground.
- A metal frame connected from reinforcement is installed in them.
- The casing formwork is lowered into the wells.
- Cut off the above-ground elements at the same level.
- The wells are filled with concrete and compacted.

The height of the heads (the above-ground part of the pillars) should not be less than 400 mm. Otherwise, the wood flooring will rot from constant exposure to moisture.
Slab foundation - when a considerable investment justifies itself
The slab foundation is rightfully considered the most expensive. This is due to the large bearing area, which is the main advantage of a monolithic base.
A house built on such a slab is protected from distortions, because even when exposed to frost heaving forces, it moves along with the foundation.

The technology of laying the base involves
- Removal of the topsoil (fertile).
- Geofabric laying, backfilling of sand and gravel cushion and its compaction.
- Flooring waterproofing material.
- Installation of wooden formwork.
- Mounting and installation of a mesh connected from ribbed reinforcement.
- Pouring concrete and its subsequent compaction with a special vibration machine.
The height of the slab base is usually 100 mm.
Lower trim of the house
If you are going to build a frame house with your own hands, you can’t do without a lower trim. It unites all the elements of the foundation, if it is columnar or pile-screw, connects the base of the house with its walls, and serves as a support for laying the floor.

For device bottom strapping use a beam of 150x200 mm or a bunch of boards placed on the end. Lumber must be pre-treated with an antiseptic and flame retardant.
They are fixed on the foundation with the help of anchor bolts with a wide nut. The connection of the beams to each other is carried out using panels or “half-tree”, “in the paw”, additionally strengthening them with nails, steel corners.
Laying and warming the subfloor
The basement beams form the basis of the subfloor. Their function is performed by bars with a cross section of 140x180 mm or boards with a size of at least 160x50 mm. The ideal option is a material with the same cross section as the elements of the lower trim.
The fastening of the floor beams is carried out “in half a tree”, making the appropriate cuts. For additional fixation, two nails are used for each junction of the bars.

Then the flooring and its insulation are performed according to the following scheme:
- Fastening cranial bars to the bottom of the beams.
- Fixing subfloor boards on them.
- Waterproofing beams and flooring with dense polyethylene.
- Laying insulation in the cells formed by the bars.
- Installation of vapor barrier.
- Flooring plywood, floorboard or OSB board.
Such a “pie” is ready for fine finishing at the final stage of self-construction of a frame house.
Stages of erection of the frame of walls and roof
The draft floor with its rigid base is the reference point for erecting the frame of the walls and mounting the truss system under the roof. This is one of the most time-consuming stages of building a frame house.
Installation of vertical racks for external walls
According to the existing lower strapping, markup is made for fixing the vertical racks of the frame. Their length determines the height of the ceiling on the floor minus its fine finish.

Work begins with the installation of corner elements with a cross section of at least 100x100 mm. They are fixed in two main ways:
- With the help of a wooden dowel, which should rise 80-100 mm above the corner connection of the piping. In this case, the rack is literally strung on it.
- With reinforced galvanized metal corners.
For racks on straight sections, a beam with a smaller section is suitable - 50x100 mm. Its connection with the strapping is carried out by complete, incomplete cutting or using steel corners. Here you can use fasteners without reinforcement.
When determining the pitch of the racks, be guided by the width of the insulation or wall sheathing sheet material. To prevent the vertical elements of the frame from heeling, they can be fixed with temporary jibs.
Upper frame frame and interfloor overlap
Only after fixing the racks strictly vertically and in a fixed position, they begin to work on the upper harness. All grooves and fastenings in it should be similar to those that took place in a similar lower belt. This will give the structure good spatial rigidity.

Note! The width of the beams of the upper trim should be equal to the width of the uprights.
Mounted similarly to the basement. Logs from a board 50x200 mm with a step of 600-800 mm are fastened with nails to the bars of the upper trim.
If the ceiling is not an element of the roof truss system, but the floor of the second floor, it must be further reinforced with spacers. Their function is performed by edged boards, which are lined up between the lags in one line and fixed with nails. With a span width of the second floor of 2.5-3 m, one line of spacers is sufficient. For a larger span, you will need two parallel lines.

Assembling the truss system
The truss system determines the shape of the roof of a frame house built from scratch. Most often, it is double-sided.
Suitable for rafters boards with a section of 50x150 mm or 50x200 mm. They are installed on the bars of the upper trim in increments of 0.6-1.1 m.

The rafters are also interconnected, which gives the roof appropriate rigidity and determines its bearing capacity. To do this, use the following elements:
- longitudinal runs;
- crate;
- crossbars;
- racks;
- sill;
- puff.
If the span of the second floor or attic is less than 10 m and there are no load-bearing walls in the house, except for external ones, hanging rafters can be mounted. This system involves fastening each rafter with one end to the strapping, and the other - to the counter element. Tightening in the form of a horizontal beam allows you to strengthen the structure.
Rafters appropriate where there is an intermediate support for them in the form of a load-bearing wall or a columnar element. They are reinforced with internal middle racks.
Thermal insulation of walls and roofs
Work on the insulation of walls and roofs should be proceeded only after the installation of all windows and doors.
In the right frame house, the technology for their implementation is similar and comes down to creating a “pie” consisting of several layers.

- Outer cladding. It can be fiberboard, OSB, DSP or facade board.
- Waterproofing. It is necessary to protect the insulation from moisture from the street.
- Thermal insulation material. It can be polystyrene, extruded polystyrene foam, mineral wool, etc.
- Vapor barrier. Usually, a membrane film is used to remove moisture from the room.
- Internal lining. Suitable for these purposes: plywood, OSB, drywall.
The roof is not sheathed on the outside with sheet material. His place is taken by crate, which serves as the basis for the roofing material.

Insulation of the interfloor overlap is similar to the thermal insulation of the subfloor.
Engineering systems of a frame house
Without utilities, a frame house will be a dark and cold box. For this reason, it is necessary to know where and at what stage they are laid.

- Heating pipes and water supply systems are mounted inside the frame walls. Do this before warming them up. The cold water supply pipe is placed in a corrugated moisture-resistant "sleeve", which is associated with the constant formation of condensate on it.
- Sewer pipes are mounted in the walls and under the floor. Their supply to septic tanks is provided at the stage of laying the foundation.
- Electrical cables are located inside the walls, under the false ceiling or in the channels of the skirting boards.
- Laying hidden electrical cables can only be carried out in special pipes and ducts. These works are also performed before the thermal insulation of the walls.
Video: unacceptable mistakes in construction
A frame house is light and very simple, it can be built in a short time. Such structures are becoming more and more popular. Buildings are erected in suburban areas for both seasonal and permanent residence. When erecting buildings using this technology, it is necessary to take into account only one detail - the period of residence. In the article we will give step-by-step instructions for building a frame house with our own hands.
Foundation selection

Since frame houses are very light, a particularly powerful foundation is not required here, you can install the following types:
- screw piles;
- columns;
- shallow tape.
Much when laying the foundation depends on the type of soil and the number of storeys of the structure. So, when building a simple one-story house, you can completely get by with a columnar one, even on capricious soil.
Column Foundation

- In order to build a small house for one average family on a columnar foundation, about 120-150 columns must be purchased for the foundation.
- Using a conventional drill, it is necessary to make depressions in the ground with a diameter of 20 cm and a depth of about a meter. The distance between the holes is about 80 cm.
- Then asbestos-cement pipes (pillars) are inserted into the holes. The space remaining next to the pipes must be rammed, filled with rubble and sand.
- Through the funnel into the holes of the columns it is necessary to pour the cement solution.
Having established such a foundation, you don’t even have to wait until the solution hardens in order to continue working.
Screw pile foundation
On screw piles, you can build a house without involving a team of workers. To install piles, on the contrary, it is desirable to use manual labor. This is due to the fact that such work allows you to screw the piles strictly according to the level without deviations.
When screwing in piles, one basic rule must be remembered: it is strictly forbidden to unscrew piles again. Even if one of them was installed incorrectly, it is better to just leave it in the same position than to disturb the compacted ground.
Unscrewing piles is the main mistake of all beginners.
Construction stages

There are two technologies for building frame houses: Finnish and Canadian. However, the principles of the construction of such structures are the same.
Stages of construction:
- Frames are used to build a house. They can be wooden or steel, depending on the wishes of the owner. Today, the most widespread wooden from a bar. They are economical, environmentally friendly and easy to install. Steel frames are more expensive by about a third. However, they are somewhat lighter in weight, which saves on the foundation. Steel fasteners can be safely used in steel structures. But for wood it is better to choose wooden dowels.
- First of all, you need to make a floor. To do this, put a roofing material on the base of the floor. Next, you need to install a bar along the perimeter, which will serve as the basis for installing a subfloor. The rough floor is made from the most inexpensive material - unedged boards.
- Before installing the subfloor, it is necessary to make logs and put insulation between them, which will protect against cold and moisture. Before laying the boards, it is better to pre-treat them with impregnations from rotting and dampness.
- When the floor is ready, you need to assemble the walls. They are mounted first on some flat surface, and only then installed. It is advisable to choose an absolutely flat place in order to bring down the frame of each wall, otherwise distortions may occur. On each side of the walls it is necessary to make braces that will support the racks.
- When installing walls, you need to take into account the desired height of the ceiling. It is better if it is within 2.5 meters. This ensures that after decorative finishing it will not become lower than 2.3 meters. Usually low ceilings oppress and cause unpleasant feelings.
- The house is sheathed with boards.
- Window installation is important. According to technology, their size should not exceed 20% of the wall size. When glazing, you can choose any double-glazed windows. If you plan to live in the house all year round, then it is better to choose triple sealed double-glazed windows.

After the frame is assembled and sheathed, and the roof is ready, it is necessary to proceed with the decorative finishing of the structure. The house can be finished with clapboard, siding or sandwich panels. When finishing the roof, care should be taken that it does not leak. Between the lags it is better to lay a layer of heat insulator and waterproofing material. Such modern material as metal tile is well suited for external coating.
House insulation

Before warming the house, you need to choose materials. Warming is carried out from the inside and outside. Interior decoration is best done with mineral wool and drywall. If desired, you can use vinyl drywall inside, which not only retains all the heat-insulating properties of this material, but also has excellent aesthetic characteristics. Thus, the master will simultaneously solve the problem with insulation and make a decorative finish of the room.
External insulation is carried out before finishing. You still need to carry out thermal insulation.
- First, they make the crate of the house. A layer of mineral wool is laid between the laths of the crate.
- Styrofoam is applied on top of the mineral wool.
- The gaps between the foam plates and the uprights are foamed with ordinary mounting foam.
- Insulation of the outer part of the frame can be carried out without crates.
The interior is insulated in much the same way. It is necessary to lay the material between the racks of the house, and then additionally close it with foam.
Features of arranging the vapor barrier of a frame house

Vapor barrier is a must in any room. Especially if it is a residential building, in which there is a kitchen, bathroom and other places of high humidity. It is noted that in such premises the level of moisture can be even higher than in the open air.
Installing a vapor barrier is often done incorrectly.
- The main mistake is the use of home-made materials and polyethylene instead of factory vapor barriers. The vapor barrier film, despite its similarity to polyethylene, has a special structure. She is multi-layered.
- Incorrect and poor-quality installation of the vapor barrier. Sometimes builders in the process of installing the membrane can tear it or damage the seams. It also often happens that the membrane does not adhere well to the walls.
- Installation of a vapor barrier membrane on the outside of the house. Outside, windproof layers are usually made. And the vapor barrier must be mounted only from the inside. By the way, during installation, make sure that the membrane is installed on the right side.
The vapor barrier membrane is mounted on the heat-insulating layer. The fact is that it is the heat insulator that is most often harmed by condensate. Therefore, it must be protected. If steam gets inside, then after about a couple of seasons, the owner of the house will find that the heater has ceased to function. Moisture is to blame here, which caused the appearance of cracks in this layer. If the defect is not corrected, then it will only get worse. Soon the steam will reach the boards.
Typically, the thickness of the walls of a frame house is 70% insulation. If the insulation layer is destroyed, the structure will fall apart very quickly.
When installing a vapor barrier, it must be remembered that the building must "breathe". It must be present natural movement of air masses.
Installation of polyethylene instead of special membranes destroys ventilation processes. This causes the destruction of the house. Dampness, mold and fungus begin to appear in the premises. Forced ventilation is unlikely to save the situation.
No other material is as destructive as polyethylene. It completely seals the room. Considering that modern houses also have sealed double-glazed windows and double doors, one can imagine what kind of atmosphere would be in such a room.
Photos of interesting solutions


Video: self-construction of a house using frame technology
The construction of frame houses came to us from abroad. These lightweight structures are the basis for the construction of country houses and cottages in Scandinavia and a number of European countries. The basis of the construction technology is assembled frames made of wood or a metal profile; mineral wool and basalt insulation are used for insulation. The wall takes on a finished look after it is covered with various plates, for example, DSP. The final version of the coating is already applied to these plates.
Which frame to choose - metal or wood?
As a material for the frame, a new dried timber of various sections, made of coniferous species, is used.

Undoubtedly, wood has a number of properties that give it advantages over stone and metal - this is the ability to breathe, and much more. But at the same time, wood has drawbacks, without appropriate treatment it is prone to the appearance of fungus or mold, in addition, under a number of conditions, it becomes possible for strains of harmful microorganisms to appear.
All of these factors lead to the fact that some developers prefer frame structures made of metal. The metal profile has a zinc coating, which can guarantee long-term corrosion protection. In addition, the necessary perforation has already been prepared on the metal profile for frame housing construction.
The difference between frame housing construction and panel housing construction is environmental friendliness. Only natural wood and the possibility of using natural insulation.
In addition, a frame house is possible without the help of a large team.
Now it is believed that a frame-panel house can only be a country house. However, the experience of many European countries, for example, Swedish or German technology, tells us about the good opportunity to use a frame house in winter and summer for year-round use. Reviews also confirm this.
So, let's start building a house with step-by-step, step-by-step instructions. We hope they help you.
Preparatory work

Buying a frame house is not difficult, just contact a specialized company selling such products or, having developed a project yourself, build your own home. The order of construction work can be displayed in the following list:
- research;
- Design;
- Foundation construction;
- Construction of a box, roof;
- Warming, finishing works and arrangement of engineering systems.
In the first two stages, the possibility of building a house in this place is clarified. If possible, then the type of foundation, its design is determined. As a result of these works, a specification and estimate appear, which contains a list of materials and tools, their estimated cost. Before starting all these preparatory work, the developer must draw up a technical task for the future home.
Laying the columnar base of the foundation

Depending on the condition of the soil and the mass of the future house, the developer determines the type of foundation. Practice shows that any type can be used as a foundation - foundation on screw piles, tape, monolithic platform or columnar. When building a columnar foundation, it is necessary to have on hand at least an approximate drawing of the location of the walls.
The essence of this foundation is that the pillars will be placed in the corners of the building and in places of maximum load on the structure. For the foundation of this type, concrete, brick is used.
Before starting work, it is necessary to mark the location of the pillars.
After its implementation and quality control, you can begin to manufacture the pillars themselves. To do this, you can use a separate formwork, or you can arrange their production directly on the site.

The first step is to make a pillar support, it is called a shoe. Look at the photo, it shows a pile with a shoe schematically. Its dimensions are up to 30 cm in height and 25–30 cm in cross section. The structure of its design includes a reinforcing mesh, which is located parallel to the surface of the earth, several vertical reinforcing bars can be installed - they will be the basis for the pillar. After the shoe hardens, you can make the main part of the foundation pillar. To do this, you can use either a pipe cut or build a wooden formwork. The height of the entire structure is equal to the sum of two terms - the depth of the pit (freezing height) and the value of the column above the ground (from 100 mm).
Some experts use traditional M300 concrete as a material, while others use sand concrete. In fact, the type of concrete used must be determined at the stage of calculation. The main thing to remember is that the material for making the shoe and the base must be the same. For further work, it is necessary to allow the finished parts to dry. This process will take at least 7 days, but if you use bricks or cinder blocks, the drying process is accelerated by several days.
After the poles are ready, you can start installing them. To do this, you need a hole drill, which will allow you to dig a hole under the pole. The size of the pit should exceed the size of the shoe. Installation of pillars is carried out in strict accordance with the layout of the foundation. The poles are installed at a distance of 1-2 m from each other in places of greatest load, for example, under a heating boiler. After installing the pillars, the space between them and the walls of the pit can be covered with rubble and sand.
Construction of the wall frame
Rostverk - platform for home

The completion of the construction of the foundation allows you to begin work on the construction of the main supporting structures. The basis of the walls and everything else in the frame house is the grillage. This is a wooden or metal structure that is laid on foundation pillars protruding from the ground. According to its contour, the grillage repeats the outlines of the future house. When laying it, it is imperative to use measuring instruments that allow you to control its horizontalness. The dimensions of a beam or a metal profile are determined by the weight of the building structure being erected.
Building a wall frame

After installing the grillage, you can begin to install the wall frame. To do this, you can use a beam with a section size of 150x50 or more. The beam must be made from coniferous trees and dried to a state of 12-18% moisture. In addition, we must remember that all wooden structures must be treated with protective agents against mold, fungus and fire.
The wall frame can be assembled side by side on a flat piece of land; when assembling the frame, it is necessary to immediately prepare window and door openings. The finished frame of one wall can be installed on the grillage and secured with jibs. As with all assembly operations, builders must use a measuring tool to install wall frames in a strict plane orientation.
House roof installation

Creating a roof is one of the most important moments in building a house using frame technology. Errors that occur during its construction lead to deformation of the roof, violation of the thermal insulation regime. As a result, it may be destroyed. The ceiling ceiling is responsible for solving several problems, namely:
- Hanging a ceiling covering on it;
- Heat retention.
If the developer provides for a second floor or attic, then the ceiling must be reinforced. Depending on the load that the ceiling will take on, the size of the section of the ceiling beam is selected. For example, if the useful and non-residential load is 147 kg per square centimeter, then it is necessary to use beams with a section of 150 * 50 m with a step between them of 400 mm.
The process of installing logs and rafters for them does not differ from such a process carried out during the construction of a traditional house.
That is, after marking, the logs are nailed to the top bar of the wall frame in a vertical position.
In order to fix the log, it is enough to use three nails, two are driven in on one side, and one on the other, at both ends.
The rafters can be assembled on a flat area of the construction site and, after assembling them and checking its correctness, lift them up. The assembly of the roof begins with one of the facades, the use of a plumb line is mandatory. Having exposed the first rafter, it is necessary to fix it with jibs, and after installing the second, it is advisable to tie the installed structures. In addition to the fact that the rafters are interconnected, to increase the strength of the structure, it makes sense to connect the rafter and the log using a vertically lowered board. This is how the rafters are installed sequentially.
The installation of the lathing also does not differ from such an operation carried out during the construction of a roof on an ordinary house. Laying of hydro- and thermal insulation is carried out in accordance with the instructions attached to this product. Both artificial and natural materials are used as heat-insulating materials. To reduce the weight of the structure, it is advisable to use foam, which is produced in sheets of different thicknesses.
Another positive property of a frame house can be called the fact that all finishing work can be carried out without waiting for it to shrink. They can be carried out immediately after the insulation is laid in the openings, and the wall frame itself is sheathed with slabs. Then the developer can start finishing the walls from the inside and outside.
Internal work in the house

The material that is used for wall cladding from the inside, and this can be DSP or its analogues, allows you to apply almost any finishing material on its surface - wallpaper, tiles and others. It all depends on the choice of the developer and the interior design of future premises.
outdoor work
With work on finishing the house outside, the situation is somewhat more complicated. Depending on the climate zone in which the frame house is built, additional insulation may be required. For these works, you will need a heater, a waterproofing film, as well as a wooden beam or a galvanized metal profile to create a crate. To insulate the walls, a crate is installed on them, made of a wooden beam or a metal profile.
The dimensions of the crate must correspond to the dimensions of the insulation that will be laid in it. Some experts recommend laying a layer of waterproofing film on top of the insulation. If the task is to create a ventilated facade, then it is necessary to fix smaller bars on the vertical bars of the installed lathing, and the siding will be attached to them. The resulting space will serve for natural ventilation and prevent excessive moisture from accumulating.
How much does it cost to build a house
The experience of building a frame house by those who rely only on their own strength shows that the entire cycle of work from the construction of the foundation to the start of finishing, with the correct organization of work, the absence of interruptions in materials and the presence of one or two assistants, can be three to four months.
Building a house with your own hands is also beneficial from an economic point of view. When buying a finished structure, the developer pays for the project, building materials, in addition, the labor of builders and installers is paid, by the way, who will build the house in about the same time frame. The price of the project is from 5-50 000 rubles. If you buy a finished house project, it will cost about 15,000 rubles, and if you order an individual house project from an architect, it will cost 30,000 - 50,000 rubles. Now many architectural workshops work remotely, so even being in Biysk they will be able to design a dream home project for you. In other words, with the cost of a finished house and work on its construction at about 1.5 million rubles, it must be understood that this figure depends on the region and configuration, building on your own will cost half as much. For example, some companies offer their customers country houses at a price of 1,115,000 rubles to 1,824,000, and cottages - within 300,000 rubles.
If you are not ready to build a house or you do not have the opportunity, then order a turnkey house using Canadian, Scandinavian or Finnish technologies.
Video
Watch a video about building a frame house with your own hands.
Necessary tools and materials
Paper rolling machine Foam blocks Cement Ruberoid The wire Expanded polystyrene (styrofoam) OSB-plate Gypsum board sheet bar Level Circular saw Plumb Electric drill Nail puller Show allFrame structures are becoming more and more in demand - this is an inexpensive and at the same time durable housing. You can build both a luxurious villa and a neat house in the countryside - there are a large number of projects. It does not matter whether you build it yourself or entrust it to specialists - the necessary knowledge will allow you to control the process at all stages.
We decide on the main thing - a warm house or a recreation area?
Frame houses are called because the whole structure of the house is vertical wooden racks and horizontal plank strapping. A light wooden frame is erected in a matter of days, even if you do the work yourself with several assistants, and specialists will cope even with a complex project even faster.
Before you build, you should clearly decide whether you will live in such a house all year round or its use will be limited to summer outings. It depends on your decision how well the frame house will be insulated. If the building will be used only in the warm seasons, then the issue of serious insulation, high-quality heating and energy savings is removed by itself - the building needs standard thermal insulation measures so that in winter the temperature in the room does not fall below zero.
But if you decide to build a house for year-round use, the issue of thermal insulation should be approached very seriously, following all the rules. It is insulation that is the cornerstone of the entire frame technology, on which both the saving of resources in the future and the structure of heating depend. The conditions of the climatic zone where the house will be built are taken into account - for example, for the central climatic zone, only the thickness of the boards for sheathing the house should be at least 100 mm.
Another point that should be decided at the project stage is the number of storeys of the structure. Experts categorically recommend not to build buildings above 2 floors using frame technology, and even then, it is desirable that the second floor be attic. But you will be sure of the strength of the whole structure and its durability.
The foundation of the house is the key to longevity
Having calculated the load that will fall on the foundation, you will be pleasantly surprised - in the case of frame houses, there is absolutely no need for a deep foundation of great width. Almost any option is suitable: slabs, piles, tape base. If the choice fell on the screw or pile version, then keep in mind that then you will have to seriously insulate and finish the basement of the building. By choosing a concrete slab, you will get a foundation that is too low, which will even look unusual.
As practice shows, it is best to build a one-story frame house on a shallow strip base on a sand and gravel cushion. On inactive soils, it is enough to pour 15 cm of sand into the trench, 10 cm of gravel of the middle fraction. The width of the trench in this case is half a meter. It is important to lay reinforcement with a diameter of 12 mm along the entire perimeter of the tape, which will eliminate deformation during soil heaving. Watch the video on how to make such a base.
This is just an example - in each case, the foundation should be calculated separately. The most important thing is to take into account the characteristics of the soil. If funds allow, it is always better to play it safe and make a certain margin of safety. The columnar foundation is carried out quickly enough, and most importantly, there is no need to wait until the mortar has completely hardened. For a house for an average family on a columnar foundation, you will need about 150 columns, or rather, asbestos-cement pipes, which you will turn into columns in the process.
To begin with, at a distance of up to 80 cm along the perimeter of the future building, use a drill to make indentations with a diameter of about 20 cm and a depth of at least a meter. Pipes are inserted into these holes - the space around them is covered with fine gravel and sand and compacted, as in the video. A standard cement solution is poured into the pipes - that's all the work. It is absolutely not necessary to wait until the cement hardens - the pipes will take on the first load, and in a few days your columnar foundation will be able to withstand the whole house with appliances and residents, inclusive.
A screw pile foundation differs from a column foundation in that steel pipes with a screw at one end act as piles. The pipes are screwed into the ground at the same level - the main thing is not to unscrew them back if the pile went at an angle. This is the main mistake of beginners - by unscrewing the pile, you will loosen the soil, and under the weight of the house, the foundation may sag in the future.
Universal technology - we build for centuries
In fact, frame houses, subject to all technologies and regular repairs, can stand for more than two hundred years. There is real evidence of this - the world-famous Fachwerk houses, which, in fact, are also frame structures. In any case, at least two generations will receive a warm and comfortable home.
The main stages of construction are the same for all frame structures. It all starts with the construction of a frame - metal or wood. Wood is used for the frame more often, since the material is environmentally friendly and easy to use, in addition, the cost of a metal frame will be 30-40% higher. True, the metal frame is lighter, which means you can reduce the cost of the foundation.
In addition, it will be possible to use metal fasteners, which is prohibited in the case of a wooden frame. Sooner or later, the metal will start the process of decay in the wood, the joints will become less strong, the house will begin to loosen, and the structure will become dangerous for residents. There is a special fastener - wooden dowels, which exclude putrefactive processes.
The best type of wood for a frame house is oak. True, this option is not always possible, and therefore often a high-quality timber with a cross section of at least 150 mm 2 is used. The connection between the elements is carried out using the tongue and groove technology - make sure that there are no gaps between them.
Stage one - floor and walls
In frame housing construction, it is the floor that first appears. First, roofing felt is laid around the entire perimeter of the future walls and a wooden beam with a section of 150 mm 2 is laid on top - watch the video how the craftsmen do it. It is important to cover the tree with antiseptic preparations that will protect the material from decay.
The beam is fixed with anchor bolts, maintaining a step of 2 m. There should not be a skew of more than 10 mm in the corners - this is easy to check with a level.
It is very important in building a frame house to use the same materials for load-bearing structures, floors and walls - the expansion coefficient in this case will also be the same, and you will avoid possible distortions. When the beam of the lower harness is laid and fastened together, you can lay the logs for the floor. Boards with a thickness of 5 cm and a width of 15 cm are suitable for the log. The elements are fastened by cutting grooves in the beam of the lower trim. Between the lags, the distance can withstand no more than 60 cm.
Then bars of a smaller width are attached to the lags than the lags themselves. This will allow you to lay the so-called draft floor between the bars - the floor boards will be laid directly on the logs. Do not forget to treat all elements with antiseptics. For the subfloor, in order to save money, even uncut boards are used - this does not matter much.
Glassine is attached to the subfloor for high-quality vapor barrier with a stapler, after which a heater is placed between the timber - mineral wool or polystyrene. A thickness of about 10 cm is enough. It is important to lay the thermal insulation in such a way that there is no free space around the edges, as in the video. To do this, the mineral wool slabs are cut in such a way that they are several centimeters wider than the space between the lags - then it is possible to tightly close the entire space. In the case of foam, the slots will be correctly blown out with mounting foam. The ceiling is also insulated using the same technology.
Then a finishing floor is laid - boards 40 * 150 mm are suitable for this. The boards are properly sealed with wedges and staples and nailed to the joists. Check with a level how even the floor turned out - the quality of the entire further construction depends on it.
The step-by-step assembly of the wall frame is as follows:
How to make a floor and walls in a frame house - a step by step diagram
Step 1: Bottom harness
For the lower strapping, we use the same beam with a section of 150 mm 2 with pre-prepared grooves. It is important that there is a distance of no more than 50 cm between the grooves.
Step 2: Preparing the Boards
On a flat and dry area, prepare boards for the walls. The length of the boards should be equal to the desired ceiling height - experts recognize 2.7 m as the best option. This is enough so that the room does not feel cramped, and it is not stuffy in summer, and at the same time it will not be difficult to heat the house in winter.
Step 3: Installing the Corner Posts
In those places where the corner posts will be located, steel dowels are first placed, and holes for them are drilled in the end part of the bars. The bars are installed and fixed with temporary jibs. In the same way, intermediate bars are installed.
Step 4: Top harness
The upper harness is made from the same beam with grooves as for the lower one. The most important thing is to adjust the location of the grooves so that they are completely identical with the bottom ones. Otherwise, there will be distortions. When the upper trim is laid on the racks, it should be fixed to each rack with at least a couple of nails, hammering them to a depth of at least 10 cm. After that, the frame is strengthened with permanent cuts, and the temporary ones are dismantled.
Step 5: Ceiling
In places where there will be interior partitions, support bars are installed. Ceiling beams are made of timber 50 * 15, place them at a distance of no more than half a meter, at the junction with vertical racks. The beams are fastened both with steel brackets and with the help of pre-cut grooves.
Step 6: Window openings
Installation of window frames occurs at the stage of erection of the wall frame. In accordance with the norms, the area of the window opening should be at least 18% of the total area of the wall. The frame is fixed with vertical posts adjusted in height. If you are building a house exclusively for summer use, then double-glazed windows with one glass are also suitable, but for living all year round you will need high-quality windows with at least two glasses - it all depends on the climate.
Of course, all this work can be reduced significantly by using ready-made sandwich panels. Now many factories offer their services in this direction - you just have to choose a house project and prepare the foundation. Assembling a house from sandwich panels is like playing Lego, you just need to connect the elements into a single structure. From the point of view of economy, this option is the most profitable, since the sandwich panels are very light and insulated, which means you will save on foundation and insulation, not to mention the time that you would spend on these works.
Under the roof of my house - how to build a roof?
The more difficult you have chosen the project of a frame house, the less likely it is that you can handle the construction of the roof yourself. If the second floor is attic, it is better to contact specialists who will correctly calculate the entire rafter system. But with a simple gable roof you can handle it.
For rafters, a beam of 5 * 15 cm is chosen. The edges of the beams are joined at the end at an angle of 50 ° and knocked down with nails. This simple design is fastened with a board across, the letter "A". It is easier to assemble the rafters on the ground, and only then raise them to the roof and fasten them with 200 mm nails. Sheathing boards are attached to the rafters in increments of 10 cm. It is necessary that they go beyond the extreme rafters by 25 cm. Roofing material is laid on the crate, after which you can proceed with the installation of the roofing material.
This is the simplest version of the roof, which can be supplemented with high-quality thermal insulation. As you know, a house loses up to 20% of heat through the attic! Insulate correctly from the outside - this way you save space inside, and it’s easier to carry out work. A vapor barrier is laid on top of the crate, for example, glassine, which is familiar to everyone, which is fixed with a stapler. Another light crate is stuffed over the vapor barrier - in increments of 50-60 cm.
Heat-insulating material, for example, mineral wool, is laid in the space between the crate. Then the vapor barrier is laid again, a layer of roofing material is added and the roofing material is mounted. It is important that a gap of several centimeters is maintained between the roofing material and roofing materials - in this case, the space under the roof will be ventilated, and condensate can easily leave the heat-insulating cake.
Home decoration and insulation - the finish line is near
It is most convenient to insulate a house built using frame technology from the inside. Therefore, first of all, the structure is sheathed from the outside with OSB boards, and then with siding or clapboard. After that you can go to .
Styrofoam and mineral wool are eternal competitors among thermal insulation materials. But still, foam plastic has a lower thermal conductivity - 40 mm of foam plastic is equal to 45 mm of mineral wool in terms of thermal insulation. A 10 cm layer can replace a brick wall two meters thick! The most important advantage of this material is its waterproofness, which mineral wool cannot boast of. If it gets wet, it will lose its properties.
The insulation is laid between the vertical posts - as mentioned above, the materials should fit snugly against each other. Do not spare the mounting foam to blow out the cracks. At this stage, do not forget to lay the wiring. You can read more about the choice and the technology itself in a separate article on our website.
The most proven option for lining inside is wooden lining. However, if you want to act in a more original way, you can purchase a block house - a lining that imitates a rounded log. If the wood paneling does not suit you, you can seal the walls inside with OSB boards, then with drywall, which remains only to be puttied. After that, you can paint the walls or glue the wallpaper - whatever your heart desires.
Or without it, with your own hands, from a summer residence intended for seasonal living, to a capital cottage, everyone can. Especially when it comes to. They are a complex constructor for adults, and high-quality assembly can only be done if there is an accurate and detailed instruction. Such documents in individual low-rise construction are drawings of frame houses.
Drawing of a frame house showing all dimensions
This is not just an official document, without which it is difficult to obtain a building permit from the regulatory administrative and land authorities, but a real guarantee that the selected type of house is fully adapted to specific climatic conditions, land, meets the expectations and requirements of the client.
This is a voluminous package of papers, which contain comprehensive information on the progress of work, the installation procedure for structures, detailed instructions for performing certain actions. Even the cost of the house will not come as a surprise to you, as the project documentation contains a detailed estimate that takes into account all the materials needed to assemble the frame.
Frame house drawings are a voluminous document containing more than 100 pages with detailed plans, diagrams and detailed instructions.

An example of one page of a complete set of a frame drawing
Conventionally, all documentation can be divided into several parts, which make navigation through the document easier and more convenient.
Detailed instructions for installing a frame house with your own hands
It can be read by both professionals and private builders who do not have special education and extensive experience. But still, to achieve a high-quality result, it’s worth at least a little to understand the topic. The entire specification is presented here, the sequence of work is indicated, the approximate time required for the implementation of each stage of construction.
How to perform steam, moisture and wind protection, which GOSTs and SNiP apply in a given situation, on what basis window and door structures are selected - all this is present in the attached instructions. There are also general recommendations regarding the construction of the whole, with or without an attic.

The project of a one-story frame house with an attic
Detailed instructions for the construction of each individual element should be looked for in thematic blocks.
Foundation Construction Guide
Here you can find working drawings and nodes necessary for the arrangement of the foundation. Dative instructions for arranging the foundation will contain not only the required dimensions and depth of occurrence, but also information on how to correctly set the foundation formwork with minimal time and money costs.
Read also
Projects and layout of a one-story house 6x6
Calculation of the amount of reinforcement, its type, methods of knitting, with the included assembly scheme containing vents and anchors. Data on how the lower trim is attached to the foundation should also be present in this section and answer the question in detail.
Frame house assembly guide
The most voluminous part of the documentation, as it contains information on the implementation of the main part of the work.

Scheme of the device frame house
The drawings represent the schemes for attaching and assembling the rafters, mounting the support board and fitting the top trim of the house. If it is, then a detailed design for the arrangement of the latter is attached. And also - for the correct setting of the walls, the collection of corner structures both inside and outside the house, the installation of internal partitions, load-bearing and decorative.
Detailed wall layout plans are also present in the document, they offer either a typical design of the space, or a design layout plan agreed with the customer.
The arrangement of the porch is also included in this part of the project documentation. A general design is provided, fences, lifting are being developed. During construction with a building spot of 6 x 6 or more, the working documentation is completed with all the necessary elements, including window structures.

Layout of a frame house with an attic 6 x 9
For a seasonal structure, most often, in order to reduce the cost of construction, single-chamber double-glazed windows are used, and for a permanent structure, two-chamber plastic windows are used.
According to the same scheme, it is possible to build a panel house. The classic skeleton is assembled on the spot, its base is a separately exposed frame made of timber, which is sewn up after the completion of the skeleton exposure. Assembly technology is slightly different. The main beacons are placed on the finished foundation and fasteners are mounted.

The process of building a frame cottage on the foundation
And the shields - wall elements - are assembled on a horizontal surface, and then they are already raised and installed on the foundation, fixing themselves in the required position.
Depending on the project, the thickness of the walls is also selected, from 170 mm to 270 mm. This provides the necessary level of thermal insulation and prevents senseless overspending of building material. Mineral wool is used as a heater, drywall is used for interior decoration, and osb boards are used for exterior. The roof is made of metal tiles. But any can be changed according to the wishes of the client.
Guidelines for laying and installation of utilities
Electricity, gas pipeline, sewerage, water supply - all these are integral attributes of a modern comfortable private house. Not only the comfortable operating conditions of the facility, but also the reliability and safety of the entire structure will depend on the timeliness and correctness of the work performed on their installation.
Read also
Photo layout of houses
How many sockets and switches will need to be placed in the future house, where is it better to place them, what kind of automation is needed for the smooth and safe functioning of the house, as well as how to properly make an electrician in the kitchen and bathrooms - answers to all these questions can be obtained in this section . In addition to general recommendations, there are mandatory detailed work plans and diagrams for laying electricians and connecting them.
The same principles apply to the arrangement of plumbing, water supply, sewerage, and ventilation.

Laying utilities in the frame
Competent projects try to place all communication routes and interchanges as close to each other as possible so that they can be hidden in a special box and not spoil the interior of the room, and also “not eat up” the necessary space. The procedure for laying networks, as well as methods for connecting and wiring them, are present in the installation manual for engineering networks.
Estimate of a frame house
The biggest danger when starting to build your own one-story house, whether it is a 6 x 6 country house or a more serious structure, is to calculate the construction budget incorrectly, not to take into account all the necessary materials. At best, the process will drag on for an indefinite period, at worst, in general, it will freeze and it will become impossible to continue work.
To avoid such a situation when building a house with your own hands, you need to order project documentation from professionals. 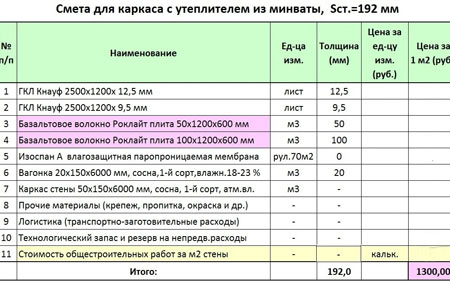 In addition to detailed diagrams and drawings, each project is completed with a detailed estimate. Such a document indicates how much and what material will be needed at each stage of construction in meters, pieces, packages, kilograms, as well as a price range.
With phased construction, you can not spend money on the purchase of material for the whole house at once. It will be possible to acquire gradually the volume that is required right now.
This is convenient in terms of delivery, unloading and storage. This procedure is especially relevant for those who are engaged in construction on garden plots. In a limited space, it is possible to build a house of 6 x 8 or 6 x 9, but it is almost impossible to place all the building materials at once, and even protect it from precipitation.


