What to make the walls of the basement under the house. How to build a basement under the house with your own hands? Reinforcement of future walls
A do-it-yourself basement in a private house is often a necessary room. But when building such a structure, you can encounter many problems. It is important to take into account all the nuances so that in the future there will be no serious troubles and surprises.
First of all, you need to decide on the purpose of the room. The underground floor can be of several types:
- basement- a floor that is half or less buried in the ground. The basement floor is the best option for arranging residential premises. It is possible to make full-fledged windows in the walls.
- Heated basement- a floor buried in the soil by more than half. At the same time, heating is carried out in the premises. The device of a warm basement (as well as a basement) is accompanied by many requirements that must be taken into account even at the stage of designing a house.
- Unheated basement- the floor is more than half buried in the ground, without heating. This option is the simplest. Do-it-yourself construction technology is distinguished by a reduced composition of additional work. Such a basement can be used as a storage room, various utility rooms can be located here (electrical room, water metering unit, heating unit, etc.).
Requirements
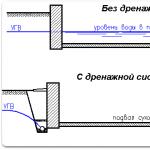
To make a foundation with a basement with your own hands, you must fulfill several requirements. The main ones are waterproofing and thermal protection. Before starting construction, it is necessary to study the geological conditions on the site. If the groundwater is located too high, the construction of the basement will cost a round sum.
It is important that the groundwater level is at least 50 cm from the base of the foundation. If this requirement is not met, it is necessary to equip dewatering systems or reliable waterproofing. Both of these options require an impressive financial investment.

With a high level of groundwater, it is recommended to completely refuse to provide a basement under a residential building. This is due to the fact that the increase in area cannot compensate for all the costs of the foundation with a basement. In this case, it would be reasonable to apply such types of foundation as a shallow slab or piles.
Waterproofing
Even with a low location of moisture, the arrangement of a reliable moisture protection system will be required. When doing work with your own hands, the following types should be provided (all are used at the same time):
- vertical waterproofing of basement walls (coated or from rolled materials);
- horizontal waterproofing along the edge of the foundation;
- drainage;
- blind area around the perimeter of the building, which will protect the structure from the effects of melt and rain moisture.
 The scheme of waterproofing and insulation of the basement at a high groundwater level (walls made of FBS or monolithic)
 Drainage is arranged around the entire perimeter of the building. It is assembled from pipes with a diameter of 100-200 mm. You can properly make drainage with your own hands, taking into account several requirements:
- pipes must be laid at a distance of 300 mm from the base of the foundation vertically;
- the horizontal distance should be between 300 and 1000 mm;
- around the drainage, it is necessary to arrange a filter layer of crushed stone;
- to prevent the spread of rubble, it will be properly wrapped with geotextile;
- the slope of the drainage pipes must be made at least 0.003 (this means that for each meter of length there must be a vertical change of 3 mm).

Drainage is discharged into the sewer or into an open area. It is important that after the discharge, the water does not return again to the perimeter of the building.
The construction of the basement implies the presence of a blind area around the perimeter of the building. Usually it is taken 1-1.5 m wide. Such dimensions will not only effectively remove rain moisture to a safe distance, but also provide a convenient passage around the house.
To protect an existing basement from groundwater, internal waterproofing and drainage can also be used. The need for it arises with a high location of moisture. Such events are expensive, so they are not widely used.
 In an existing basement, you can perform internal drainage
 Warming
Do-it-yourself arrangement of a floor with heating implies the presence of a heater in the basement floor structure and on the walls. The floor on the ground can be insulated with extruded polystyrene foam or expanded clay gravel. The thickness of the insulation is taken depending on the climatic conditions. We can give the following recommendations for the general case:
- foam plex thickness 100-150 mm;
- the thickness of the expanded clay bedding is 300-500 mm.
Penoplex is laid on a layer of sand, a vapor barrier material is provided on top of it. This technology provides for a minimum thickness of the floor screed equal to 30 mm. Concreting of the basement floor is carried out on top of the heat-insulating material. You can also use a variant of the floor cake, in which concrete preparation is arranged under the thermal insulation layer. When using extruded polystyrene foam, a waterproofing layer can be dispensed with.

During the construction of a new building, the walls of the basement are insulated from the outside with their own hands. During repairs, it is possible to make insulation from the inside, but this option will not be correct from the point of view of heat engineering: the interior is protected, but the foundation is exposed to the destructive effects of cold. Extruded polystyrene foam is again used as a heat insulator. When placed outside, it will also play the role of additional waterproofing.

The thickness of the insulation is correctly selected by calculation. If it is not possible to contact a specialist, you can assign a value of approximately. In most regions, it will be enough to use Penoplex 100 mm thick. The fixing of the material is carried out on a special glue and dish-shaped dowels. Sheets should be staggered to ensure ligation of vertical sutures.
How to build a basement
Do-it-yourself basement device implies a strip foundation. It can be monolithic or from FBS blocks. When building a private house, it is reasonable to choose the first option. Monolithic technology has the following advantages:
- no need for heavy equipment;
- low need for labor resources;
- reducing the cost of transporting materials.

Concrete for work can be made independently, or it can be ordered at the factory. The strip foundation is recommended to be poured from prefabricated concrete. This is due to the fact that it is easier to make a mixture that fully meets all requirements at the factory. The ratio of cement, sand and gravel in the composition is especially important.
The brand of concrete mixture is determined depending on the number of storeys of the building and the material of the walls. For the tape, in most cases, classes B15 - B20 (or grades M200-M250) will suffice.
To make a monolithic strip foundation with your own hands, you will need to complete and install the formwork. Laying the solution is carried out in one go (preferably). You can get the job done faster with a concrete pump. Typically, such services are offered by manufacturers of concrete mixes.
The order of work in general is as follows:
- Clearing the territory, removing debris, marking the location of the building;
- excerpt of the pit;
- foundation soil compaction;
- arrangement of a sand cushion 300-500 mm thick under the foundation;
- installation of formwork from wooden panels (a fixed formwork made of polystyrene foam is also possible);
- reinforcing work (the strip foundation is reinforced with frames, the minimum diameter of the working longitudinal rods is 12 mm, for connecting vertical and
- horizontal diameter is assigned a minimum of 8 mm);
- pouring concrete;
- then it is necessary to give the foundation time to gain strength, the exact interval depends on climatic conditions, on average 1-2 weeks are enough (full strength is achieved after 4 weeks);
- the next step is to make insulation and waterproofing;
- backfilling of the sinuses along the perimeter of the walls with medium or coarse sand.
The strip foundation for a house with a basement is taken deep. The scope of work in this case is quite large, but all of them must be completed to reliably protect the interior of the building.
There are always plenty of questions related to the arrangement of the basements of private houses, even when the construction of the basement is carried out simultaneously with the construction of the house. It is all the more difficult to lay down a basement under the house when the building is rented out for people to live in.
Why is a basement under a residential building necessary?
The idea of building a basement under the house arises, as a rule, in cases where the reasons that prevented the arrangement of the basement during the construction of the house disappear or are eliminated, or it is simply impossible to do without a basement.
Most often, the owners agree to build a basement under the house:
- Water has gone from local aquifers close to the ground surface. The groundwater level allows you to make a basement or cellar without regard to the possibility of flooding the premises;
- There is simply nowhere to store the crop, the existing cellar is small, and there is no way to upset or increase it, so you need to make a basement under part of the house;
- The heaving forces and the level of soil freezing are quite high, the basement made will allow to partially insulate the foundation and reduce the threat of destruction of the structure of the base of the house.
Important! In any case, the construction of the basement will be hampered by the need to do a huge amount of earthwork with your own hands.
The best option would be to make a basement under a part of the house, for example, from the side of the household or auxiliary premises of the house. Digging a pit from a living room will require transferring a large amount of excavated soil and dirt, and it is quite difficult to do this without consequences for the situation inside the house.
The second, no less interesting way to build a basement is to make it with a separate entrance from the street. In this case, the residents of the house will be completely relieved of the problems associated with digging a pit.
Where and how to make a basement
For conventional strip foundation structures, building a basement is not a particular problem, except that most construction and finishing operations will have to be done in extremely uncomfortable cramped conditions. In this case, the main thing is to make a foundation pit for the basement with the dimensions of the walls, which do not reach the strip base of the foundation by at least a meter and a half.
The situation with shallow or slab foundation structures is much more complicated. In the first case, it makes no sense to make the basement small, and it is dangerous to go deep into the ground below the level of the supporting surface of the foundation tape, this can lead to the dumping of the concrete base of the house into the basement pit.

For slab foundation structures, there are practically no problems with how to make a foundation pit correctly if, after arranging the basement, the specific pressure on the soil does not exceed its bearing capacity. The construction of any building is carried out with a certain margin of pressure on the ground, but a twofold decrease in the supporting surface of the slab after the construction of the basement can lead to a fracture of the slab array.
Therefore, before deciding where and how to make a basement under the house with your own hands, you should consult with experienced specialists in the field of foundation construction.

We build a basement, how to make a basement at minimal cost
In addition to the safety of building a basement, every owner wants to make a basement under the house with minimal effort, labor and materials. But in this case, saving on concrete or metal is inappropriate when it comes to the safety of the entire house.
The easiest and cheapest way to make a basement is if the house structure already has a basement, for example, a brick caisson with pumping equipment for a well. In this case, it remains only to expand it and make the walls of normal height.
The arrangement of any basement is carried out in four stages:
- Initially, the position of the future basement under the building is determined, all elements are drawn on a scale sketch in order to understand where the entrance will be, and how difficult it is to make such an entrance;
- A pit is being dug - a foundation pit according to the size of the future basement;
- The walls are laid out of brick or cast from concrete, the floor slab is concreted;
- The ceiling is being installed, which must be done in the basement without fail. Otherwise, water vapor will break through the ceiling.
In addition to the correct choice of the layout of the basement under the building, you will need to think about how to make a convenient staircase design, along which you can go down to the basement. In the easiest way, you can make a step ladder from two steel spans. Such a staircase can be easily made from a tubular profile and sheet metal with your own hands and installed in the basement.

How to make a basement pit
Today, there are two ways to dig a foundation pit under the house. Both options are widely used for arranging underground rooms and galleries.
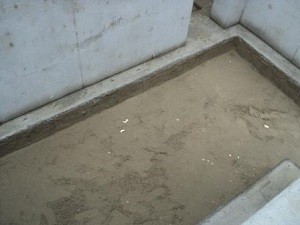
The first method involves horizontal excavation. Before starting work, it is necessary to make a pit with a section of 80x80 cm to the depth of the future basement. If there is no groundwater under the building, then you can do without a pit, otherwise you will need to make a small niche in the dirt floor, where to insert a drainage pump to pump out groundwater. If the hole remains dry for three days, the pump can be removed.

To make the process of digging a pit relatively safe, you need to put a ventilation pipe and lighting into the pit. To remove the soil, you can make a winch or invite an assistant, the second option is more expensive, but more reliable. Digging a pit with your own hands alone will take at least a week.
The second method involves a radical acceleration of the digging process. To do this, the floors and insulation are removed on the first or basement floor, and the future basement is marked. The soil is drilled out with an electric drill to the required depth, after which the hole is cleared with shovels. In this way, a foundation pit under the basement can be made in 12-15 hours of work.
Important! The open method of digging a pit is safer and simpler, in addition, concrete work, wall finishing and laying the basement ceiling are greatly simplified.
Arrangement of a stone box basement
Regardless of whether there is water in the pit of the future basement or not, it is necessary to make bottom drainage. You can save on an inexpensive drainage scheme, especially if the strip foundation has its own drainage system, but it is better to play it safe and lay a drainage pipe around the perimeter of the finished pit, pour rubble, sand, lay waterproofing and reinforcing mesh. Only then pour the concrete slab. If this is not done immediately, then when water appears, the pressure on the bottom of the concrete box will be so great that moisture will seep through microcracks along with liquid clay.

Experts recommend equipping the basement under the house in the form of a monolithic concrete box. Often, before casting a box of concrete, the soil walls of the pit are lined with ceramic bricks, on which rolled waterproofing is welded. This is followed by the installation of a reinforcing frame made of a bar with a diameter of 10-12 mm. First you need to install the vertical bars and connect them to the release of the reinforcement from the floor slab. After that, the horizontal threads of the reinforcement are laid out, which are tied up at the corners with the help of L-shaped bent rods 70-80 cm long.
It is better to make formwork for casting walls immediately with shield struts. This reinforcement allows you to simultaneously take the required amount of concrete from the automixer. For the manufacture of a formwork frame, a beam with a section of 100x50 mm and an ordinary inch board are suitable.
Pouring concrete mortar in parts is very long and inconvenient. At the same time, the concrete mass unloaded into the formwork must be punched with an electric vibrator, achieving the maximum quality of compaction.
Two words about radon
Experts recommend making a basement not only because of the high strength and good waterproofing of the walls. Concrete effectively restrains the penetration of radon into the basement. In rocky soils with a low level of groundwater, the owners prefer to lay out the basement with ordinary red brick, which practically does not offer any resistance to radon.
Given the deadly danger of radon and the extremely ineffective removal from basements using conventional supply and exhaust ventilation, it is still better to make the basement box in the form of a monolithic concrete casting.
Ceiling assembly
The manufacture of a ceiling slab is considered one of the most difficult stages of construction. Initially, supply and exhaust ventilation pipes are installed on the walls of the concrete box of the basement and wiring for lighting is brought in special hoses.

On the walls, fasteners are driven in for mounting a metal staircase. After that, the location of the entrance is determined and a steel or wooden frame of the door or hatch is installed.
Next, you need to make a steel reinforcing frame of the floor slab, for this a standard reinforcing bar with a diameter of 12 mm is used. One of the ways to make a slab involves rolling a continuous row of asbestos-cement pipes onto concrete walls, after laying reinforcement and formwork, the entire structure is poured with a layer of concrete, 120-150 mm thick.
An easier way to make a slab is to cast it on the walls in parts, in separate slabs up to 50 cm wide. For this, a reusable metal formwork and four rack jacks are used. After completion of the work, the joints between the slabs must be filled with concrete mortar.
Conclusion
The technique of building a basement under the building of a finished house does not differ much from the technology of building a conventional basement. The only obstacle in the work, due to which the construction time is at least doubled, is the impossibility of the full use of special equipment. In addition, a large amount of manual labor significantly increases the cost of the work. Today, a team of builders for the construction of a concrete basement under a residential building will ask for at least 5 thousand dollars, while the usual version is built for 2-2.5 thousand dollars.
To build or not to build when building your own house? When answering this question, you need to think carefully, weigh all the pros and cons, and only then make a decision. As much as I can, I will try to help you with this.
Building a basement can often be very rewarding. A workshop, a sauna, a laundry room, a boiler room, a game room (for example, a billiard room), a gym, etc. will fit in there quite harmoniously. In the basement, it is easy to create comfortable conditions for storing supplies for the winter (vegetables, various pickles, etc.). If the relief of the site allows, it is sometimes used as a garage.
In general, of course there are advantages, but there are also disadvantages. Almost everyone says that building a basement is quite expensive, especially when you have to deal with the problem of high. This process is very time-consuming and requires qualified performers. If serious mistakes are made during construction, then the basement will only give you a headache.
The choice of constructive solutions during construction is mainly determined by two factors:
- depth of groundwater;
- basement will be warm or cold.
First, consider the case where the groundwater level does not rise above the level of the basement floor. In this case, we need to protect it only from the capillary moisture present in the soil.
 So, first of all, we dig a pit. It is better not to deepen the basement into the ground to its full height. If the basement ceiling is located at a height of about 1 meter from ground level, it becomes possible to make window openings, that is, there will be natural light in the basement rooms. In addition, the presence of windows is very good in terms of ventilation of the basement, which is also important. When you raise the basement higher, the likelihood of it coming into contact with groundwater decreases.
Thus, taking into account the height of the ceilings in the basement, the height of the basement ceilings, the thickness of the preparatory layer and the concrete floor, as well as the finishing floor, we dig a pit to a depth of about 2-2.2 meters. After the excavator, we clean the pit by hand.
Building a basement takes more than one day. There is always a chance that it will rain. After that, the soil at the bottom of the pit may liquefy and lose its bearing properties. Therefore, it is necessary to take some measures to prevent this.
Firstly, when cleaning the pit, you need to give its bottom a slight slope from the center (for example, on two sides). Along the perimeter of the pit, it is necessary to dig shallow ditches, also giving them a slope in a certain direction. At the lowest point, we dig a pit to collect rainwater. You can dig a small barrel (metal or plastic) into it. Water is pumped out of it by any pump.
After cleaning the pit, we prepare the foundation. We fill the bottom with a layer of crushed stone 10-15 cm thick, and then the same layer of sand, with obligatory tamping. The ideal option is to use special vibrating plates for compaction. If there is none, we ram it by hand, moistening the sand a little.
Rolled waterproofing is rolled onto the prepared base. Minimum 2 layers with obligatory welding of joints with a gas or gasoline burner. You can use an ordinary roofing material, carefully smearing bitumen between layers.
Then we put the formwork for pouring the concrete floor. Its height is about 30 cm. It is convenient to use 2 edged inch boards 15 cm wide. Some builders fill the slab 20-30 cm protruding beyond the future walls of the basement. Why this is justified I can not say for sure.
If we are building a warm heated basement for waterproofing, we lay out a layer of insulation (5-10 cm). Extruded polystyrene foam is best suited for this. If the basement is supposed to be made cold (for example, to store supplies for the winter, it is not necessary to insulate the floor. It will create the necessary coolness. At the same time, the floor of the first floor will need to be insulated.
Then we lay out the reinforcing mesh on the insulation in increments of 20 cm. We use reinforcement with a diameter of 12 mm. You need to lay it in 2 layers. If later the walls of the basement are supposed to be made of monolithic reinforced concrete, we bend the ends of the reinforcement along the perimeter upwards, so that later the reinforcing cage of the walls is tied to them (see photo). We fasten the rods together with a knitting wire. In order to save money, it is better to use fiberglass reinforcement, which has recently become increasingly popular. It is cheaper, stronger, easier to work with and moreover, it does not corrode.
After completion of the reinforcement, pour the concrete slab. Its thickness is not less than 20 cm. After pouring, the slab must dry, it is recommended to load it with walls no earlier than after 3 weeks. If the basement walls are supposed to be made of monolithic reinforced concrete, you can start setting up the formwork and knitting the reinforcing cage literally the next day.
Basement walls, as mentioned above, can be built from monolithic reinforced concrete. Also, when groundwater occurs below the basement floor, the walls are built from FBS blocks, or laid out from ceramic (red) bricks. Silicate brick is not suitable for these purposes.
After the walls of the basement are erected, it is necessary to make waterproofing from the outside. It is usually done in two ways:
- coating with bitumen in 2 layers;
- (e.g. technonicol, etc.)
5-7 days after waterproofing, you can proceed to. Again, extruded polystyrene foam is best suited for this. Regular polystyrene absorbs moisture over time and loses its properties. Insulation plates, in order not to damage the waterproofing layer, it is better to glue. Bituminous mastics are used as glue.
Above ground level, it is better to fix the insulation boards to the plinth with special dowels for foam plastic (the so-called "umbrellas"). So more reliable.
Wall insulation is recommended in any case: both when the basement is heated and when it is not. The insulation protects the basement walls from freezing and its consequences - the formation of condensation on the walls, the appearance of dampness and mold. In addition, the insulation boards protect the waterproofing from mechanical damage.
After the walls are insulated, we backfill the soil with compaction. For additional protection of the basement from rainwater, we must make a blind area, and we also lay insulation under it. More about this is described at the very end of the article about. There is also a short video.
 When building a basement, it is imperative to provide for its ventilation. It is carried out in accordance with the scheme shown in the figure. Supply and exhaust air ducts are located in opposite corners of the room.
For the winter, the supply air duct is closed.
In the case when groundwater rises above the level of the basement floor, its construction is more complex and expensive. About this we .

- Date: 22-05-2014
- Views: 986
- Comments:
- Rating: 33
How to build a basement in a private house
Building a basement is a task that almost every land owner has to face. It is almost impossible to imagine a private house without a cellar. If you think that the basement is intended solely for storing all sorts of unnecessary things (as usual, a balcony in an apartment), you are deeply mistaken. can quickly and very easily solve the problem of lack of usable space and save its owner from many problems.
Classification of cellars and cellars
Before proceeding with the device, it is necessary to study the features of the available options. There are several types of building structures. Each of them has its own goals.

So, for example, a basement-cellar is great for storing vegetables and fruits, preparations for the winter, etc. However, in the case of the construction of such a cellar, heating is prohibited, which is not entirely good for the foundation.
The technical basement will accommodate various engineering structures, such as boilers, water heaters, filters, etc. This makes it possible to get rid of bulky structures in the kitchen or bathroom and use the usable space with maximum efficiency.
The basement can be equipped with a billiard room or an office. It all depends on your needs and wishes. If you want, such a basement can even be turned into a gym.
A spacious basement equipped as a workshop is a real salvation for everyone who loves to make something with their own hands. The room can be divided into 2 functional areas: a warehouse for storing various kinds of tools and a workshop.
One of the most popular options is the construction of a basement-garage. It is important to bear in mind that the main condition in this case is the availability of a convenient entry.
The basement of the house should be very spacious, because you will need to take care not only of organizing the proper conditions for storing the car, but also for carrying out repair work.
The cost can vary widely. To a greater extent, it all depends on your requests. You can always choose an option with an acceptable construction cost.
Back to index
Basement construction: step by step instructions
Before starting the construction of the basement, one must take into account such an important point as the height of the walls. If the basement will be used as a technical room, the wall height should be 190-220 cm. If it is a living room, the optimal wall height is 260 cm.
If groundwater passes close to the surface, it is better to make a basement from reinforced concrete. Professionals recommend using concrete M 500.
Prepare the following tools for building a basement:
- shovel;
- bayonet shovel;
- axe;
- bucket;
- hacksaw;
- hammer;
- hacksaw for metal;
- plane;
- portable welding machine;
- trowel;
- concrete mixer.
The procedure for building a basement also depends on the level of groundwater. If they are located too close to the surface, the floor is formed first. Otherwise, work can begin with the construction of walls.
First, a hole is dug with some margin in width (for formwork). A pillow is formed from sand and gravel. After that, formwork is installed, waterproofing material is laid, reinforcement is laid and concrete is poured.
During the construction of a concrete basement, the walls are erected using strip foundation technology. First, trenches are dug, their bottom is covered with sand, after which the formwork is installed. Waterproofing is arranged, reinforcing mesh is laid and concrete is poured.
If the floor is poured first, the wall formwork should only be installed after the concrete has fully cured. Otherwise, the formwork braces can easily be pressed into the floor and form recesses that you do not need.
Concrete is, of course, a very good material. But if you are not looking for simple solutions and want to be 100% sure of the reliability of your building, think about building brick basement walls.
The work requires certain skills and extreme accuracy, since you have to monitor the verticality and horizontality of the walls, but the result is definitely worth it. Masonry starts from the corner and is carried out up to the 7th row. If plaster will be applied to the walls, care must be taken to ensure that the solution does not fall on their inner surface.
Professionals recommend laying a reinforcing mesh every 50 cm. This is done in order to give the structure additional strength. In order for the frame to be completely covered with a solution, the thickness of the applied layer is increased by 2 cm.
Remember about the places of window and door openings. Lintels are made of both wood and reinforced concrete. Wooden jumpers are made of bars with a section of 150 mm. They are pre-treated with bitumen and laid at a distance of 250 mm on each side. Reinforced concrete lintels are installed in a reinforced formwork, the width of which should be similar to the width of the walls. Reinforcement with a diameter of 7-8 mm is used.
Blocks can be used to build basement walls. This method attracts with the opportunity to save time, since the basement of the blocks is built quickly enough. The only inconvenience is that each block will need to be aligned vertically, horizontally and wall level. So that this process does not seem tedious to you, laying should start from the corners. Bearing columns are filled with mortar according to the column base technology.
Back to index
Even if your basement is being built on the driest area, you still need to take care of high-quality waterproofing. After all, no one is safe from breaks in water pipes and heavy rains.
If you are building a basement with blocks or bricks, you need to protect the gaps between the joints. For this, waterproofing mastic is used. Layer thickness - from 20 mm. After the seams are smeared, you can additionally process the building blocks with the same mastic. Now you can finish the surface with plaster. To do this, a reinforcing cage is pre-fixed on the walls and a layer of plaster of 30 mm is applied.
The joints between the floor and walls must be coated with bitumen. Ideally, penetrating waterproofing should be used. But keep in mind that filling concrete pores is possible only if the floor has not yet completely dried out. Waterproofing mastic is applied only on a dry surface.
Waterproofing is arranged not only inside the basement, but also outside. External waterproofing allows you to provide reliable protection against moisture under the floor and outside the walls. The best way to protect the floor is to carefully compacted clay at the bottom of the pit. It is covered with a double layer of roofing material and coated with bitumen.
The walls are insulated using a similar technology. A roofing material is laid along the entire height of the walls, which should extend beyond the surface by 200 mm. If there is a gap of 100 mm outside the walls, then clay must be laid around the entire perimeter, if the gap is larger, halves of bricks are laid.


Our distant ancestors had no idea that the basement could be used as a dwelling.
However, with the development of technological progress, building materials have appeared that can make the basement habitable.
It is for this reason that the owners of country houses, interested in increasing the usable area of their own home, use the basement for a variety of purposes.
Basements built in compliance with all technological features can perform a variety of functions - it all depends on the needs of the homeowner. In any case, this corner will not become a useless room, and it certainly will not be empty.
Types of basements by purpose
By way of use basements are divided into several types:
- cellar for storing vegetables, fruits and various homemade preparations. Today, many residents of country houses are happy to grow vegetables and fruits. Now they will have the opportunity to take a separate corner for the harvest.
- Basement workshop. In this room, you can make a full-fledged workplace, put comfortable tables and place all the necessary tools on the basement shelves.
- Basement as an additional room. Most often, original living rooms or cozy mini-bars with a wine cellar are arranged here. However, in the basement there may be a bedroom, a lounge, and a billiard room.
- underground garage This is a great idea for small lot owners who can't build a free standing garage for car storage and maintenance.
- Basement with bath, sauna and swimming pool. With proper design and construction of this room, it will be a great place for the whole family to relax.
- Basement as a technical room. Here you can place a boiler room or various communications, for example, a gas boiler for heating a house.
Materials and tools
To the choice materials necessary for the construction of the basement should be approached with special attention, since not only the quality of the structure, but also the process of waterproofing (protecting building structures from moisture penetration) will depend on them.
The best solution for building a basement would be silicate brick. When building walls and ceilings, it is better to use waterproof concrete, which will protect the basement from the pressure of groundwater.
As for the tools, you will need:
- mixer for the preparation of concrete composition;
- several clean buckets;
- welding machine;
- shovel, as well as bayonet-shovel;
- trowel (in other words, "trowel", a tool that is a polished spatula on a curved handle);
- hammers of various sizes;
- saw;
- plane;
- hacksaw;
- axe.
Basement building step by step
Before starting the construction of the basement, it is necessary to carry out all the necessary calculations and compose blueprints future building. In this case, the depth of soil freezing should be taken into account, as well as the negative destructive effect of groundwater.

Groundwater can make the basement unsuitable for full use. Prolonged exposure to groundwater leads to foundation destruction and then the entire building.
Laying the foundation for a country house with a basement
 It is clear that the basement will be below the ground surface, so it is necessary to dig a foundation pit of the required depth. (1.5 - 2 m) and then arrange it properly.
The trench walls should compact to keep the soil from sinking. Several layers of crushed stone and sand are laid at the bottom of the pit, which are carefully compacted.
Basement floor construction
 It should be noted: if you make the floor after the walls, then the concrete mixture is poured air bag, and the construction of formwork is not required.
Basement floor construction technology:
- First of all, it is checked pit depth, if necessary, remove excess soil.
- Next stage - basement waterproofing. This procedure can be carried out in different ways, but the simplest way is to use a special thick film for waterproofing, it is sold in specialized stores. This material is durable and does not lose its properties for many years.
- After waterproofing on the base of the floor is mounted thermal insulation layer consisting of extruded polystyrene, expanded polystyrene, etc. Sheets of thermal insulation material are laid directly on the surface of the film.
- Another one is mounted waterproofing layer and then set reinforcement mesh. The thickness of the wire of such a grid should be at least 3 mm.
- The last step in the formation of the base for the floor will be pouring concrete mortar. The optimum thickness of the concrete layer is 8 - 10 cm.
Advice! In order to keep the heat in the basement better, it is necessary that the thermal insulation layer be at least 5 cm thick.
After the concrete base has completely hardened, you can proceed to floor finishing in the basement. For this you can use ceramic tiles, flooring etc.
Construction of monolithic walls in the basement
 If technology is chosen for a house with a basement strip foundation, then the walls will turn out to be reliable and durable.
The procedure is as follows:
- initially mounted stationary wooden form, which corresponds to the height of the walls;
- Further reinforced monolithic walls. For this, a reinforcing cage is knitted, the distance between the cells is 25x25 cm, reinforcing mesh diameter not less than 12 mm;
- poured concrete. It is important to fill immediately, and not in several stages. To do this, you must first take care of the availability of the required amount of concrete mortar.
Advice! The thickness of the concrete walls in the basement should be 20 - 40 cm. It may vary depending on the characteristics of the soil and the number of floors in the residential building.
Basement waterproofing
 In order for water not to accumulate in the basement, you need to think about it. waterproofing.
If the basement was built from foam blocks or bricks, all seams should be covered with a special waterproofing mastic and then gently plaster the walls.
Also on the floor all available joints treated with mastic. This procedure should only be carried out on a dry surface.
Another mandatory step will be the production drainage(a method of collecting and subsequent removal of groundwater from a building structure), which will protect the basement from flooding, as well as from the accumulation of moisture.
To do this, even at the stage of building walls, specially dug trenches at the base of the foundation (the lower part that is in contact with the ground) are installed drainage pipes. Products are mounted at an angle of approximately 3 degrees. Water from them will leave naturally.
How to make ventilation in the basement
 Most often, to create comfortable conditions in the basement, they use supply and exhaust ventilation system providing a natural supply of fresh air.
It consists of:
- supply pipe supplying fresh air from the street;
- hood that brings air outside from the room.
exhaust pipe mounted along the ceiling, and then displayed on the roof. If there is a fireplace channel in the basement, then the hood is installed next to it. This allows you to significantly improve the efficiency of basement ventilation. The exhaust pipe should be located higher than all buildings that are located near the house.
supply pipe is installed on the opposite side of the exhaust, and is located approximately at a height of 50 cm from the floor. This pipe is also displayed on the roof.
How to insulate a basement
 The basement is the coldest and most uncomfortable place in the whole house, so you should take care of it, which will not create condensation in the heat and keep warm in the cold.
After the waterproofing mastic dries, you can begin the process of floor insulation.
For this, it is used polystyrene foam, which can be glued to the floor surface using bitumen (tarry or solid product - a mixture of hydrocarbons with sulphurous, nitrogenous, metal-containing derivatives).
Styrofoam sheets are covered from above asbestos-cement slabs.
Suitable for the ceiling surface:
- polystyrene foam is glued to the ceiling using liquid nails or universal synthetic adhesives;
- mineral wool is mounted in a crate, which is pre-made from boards or metal profiles;
- foam is glued to the surface of the ceiling using a special adhesive.
Basement design
 Basement design completely depends on the needs and desires of the owner of the house.
So, lovers of entertainment and fun parties can arrange there stylish bar, and lovers of family holidays will like living room with soft sofas, a fireplace and a large TV.
Finishing the basement depends only on the preferences of the owner of the house, elements are often used brickwork, arches, and aged furniture and accessories. Be sure to take care of grounding outlets, without which safety is out of the question.
As a rule, the basement is connected to the house with a small hatch. For convenience, you can build a staircase or buy a finished structure.
Estimated cost of building a basement
 If the basement is built with your own hands, then the cash costs will go only to materials and the necessary tools. Everything will depend on room dimensions and, of course, from the professionalism of the performers.
If you involve professionals with special construction equipment in the work, then the prices vary from 500 thousand to 2 million rubles.
You can learn the features of building a basement with your own hands from laying the foundation to building walls and ceilings from this video.
We also recommend
 Which air purifier for an apartment to choose
 Which air purifier for an apartment to choose
 Motor soft starter
 How to remove a metal front door from its hinges
 How to build a basement under the house with your own hands?
 Ways to install electric instantaneous water heaters Electric instantaneous water heater on a faucet how to install