Do-it-yourself universal arc for toys. Do-it-yourself developing rug: elements, principles, ideas
The development of the crumbs at an early age is very important. To do this, it is not necessary to master complex techniques and devote a lot of time to classes: this will only tire the baby. It is much easier to purchase a mat for newborns. In a playful way, the child will develop vision, motor skills, sensory skills, coordination of movements. And if there are no funds to purchase this useful gadget in the store, then you can make it yourself.
Benefits of a development mat
Modern developing mats for babies have become known not so long ago. This is a complete game complex that develops the intelligence of the child. If earlier mothers used a blanket as a regular bedding, so that the baby would be warmer to play and crawl on the floor, today a simple bedding is no longer relevant.
It is better to choose a rug with arcs on which various toys are hung, this further develops coordination and stimulates the baby to focus his vision.
Musical elements and various tweeters are very good, they develop hearing. And to press a button, you need to build a logical chain in your head: button-press-music. Such actions will develop the thinking of the crumbs.
- For the development of sensory, children's rugs should be equipped with various rustling elements, as well as fragments of fabrics with different textures.
- Often in such gadgets you can see a special "safe" mirror. This element is very useful. With its help, the child knows himself, examines the face. Such a mirror will not break, even if the baby drops it or starts to gnaw.
- Well, one more indisputable advantage of such a toy is that it can keep the child busy for quite a long time, which makes it possible for the mother to do something else.
All the necessary elements are already provided in the purchased models. But these rugs are not cheap. For the simplest option with a minimum of developing elements, you will have to pay at least 2000-3000 rubles. At the same time, it is not a fact that the baby will be interested in such an acquisition for a long time with a small number of interesting “tricks”.
It will be much more interesting to experiment and make a similar toy for a newborn on your own. If there are older children in the family, they can also be involved in the creation of such a game center. So the youngest member of the family will get an educational toy, and the older children will have an interesting and creative time.
How to sew a developing rug with your own hands
In fact, everything is not so difficult as it seems. To make such a gift to a baby, you only need a little patience, imagination and available materials.
Where to begin
First you need to soberly assess your sewing capabilities and perseverance. If this is tight, then you do not need to take on complex models. To get started, a simple option made from an old blanket, fabric appliqués and buttons is quite suitable. Although such a gadget looks rustic, it will be very interesting for the crumbs.
Applications of various shapes and colors from dense fabric are sewn onto the basis of an old blanket (you can take felt). It is good to decorate everything with buttons, and make several elements detachable - this will develop motor skills. The more decor and color, the better!
To make such a rug for a baby, you will need a minimum of time and materials.
If there is a desire to do something more complicated, then more thorough preparation is needed. You need to stock up on materials in advance, find suitable ideas on the Internet or come up with them yourself. It is better to draw a future rug on paper in advance in order to clearly imagine what should happen. This step will help you choose fabrics and accessories.
Selection of materials
The choice of starting materials depends on the idea. But there is a general set that will definitely come in handy:
- Threads of different colors for sewing and embroidery.
- Needle.
- Scissors.
- Sewing machine. Of course, you can limit yourself to hands, but with sewing equipment, the rug will turn out neater, and the work will go faster.
- Velcro tape.
- The zip fasteners are short and brightly coloured.
- Regular lingerie.
- Various types of braid.
- Buttons of different shapes, colors and sizes.
- Scraps of fabric of different textures and patterns.
- Candy wrappers for "rustling" elements.
- Squeakers from old toys to make a musical rug. You can use musical elements with buttons on batteries from books or toys.
- Plastic rings from old pacifiers and nipple holders.
- An old blanket for the base. Instead, a synthetic winterizer or any other insulation that does not clump and dries quickly is suitable.
- Bright fabric for lining the rug. It is necessary to use hypoallergenic materials (cotton, fleece, flannel, etc.).
This set is quite enough to sew an amazing educational toy. Based on the idea, you can add to the list.
The main stages in the manufacture of a developmental rug
1. It is necessary to think over the design and make patterns

Here is a pattern suitable for the base of the rug. It already provides for the division into sectors. Each of the sectors will carry its own semantic load. Leave seam allowances when cutting.
Patterns for decorative elements are also best done in advance on paper in full size. You can get templates online or draw your own.
2. Then you need to cut the fabric for the base and sew. An old blanket or synthetic winterizer is placed inside to make the base warm and the child can play on the floor.
3. When the base is ready, you can proceed to the main work - decor. Game elements can be very different.

House with opening door. Behind the door is a bright application

Ladybug with a zipper that trains motor skills

Volumetric sun, which can be supplemented with a "tweeter"

Tent made of smooth texture material (cloak fabric can be used) with Velcro and zipper

Berry on a string that you can pull back and forth

Velcro bridge across the river

A cloud with a pocket from which you can pull out the "rain" from the braid

Voluminous clouds with synthetic winterizer inside and tulle folds outside. They can be sewn to the base, or they can be made with Velcro.

A flower made of textured fabric with a voluminous center where you can put a rustling element, a button with music or a squeaker
There can be a lot of ideas for game elements. To begin with, the entire decor is sewn separately. Then it is carefully sewn to the base. Here are just a few options for ready-made homemade rugs:

Idea with sectors decorated according to the seasons

And this is how you can decorate the edges. With the help of braid, they can be turned into bumpers. Buttons can be used instead of ribbons

Bright rug "Parsley"
4. If you want to complicate the task and make a rug with arcs, then you can make them using flexible plastic pipes of small diameter or a cheap plastic hoop.

Plastic pipes suitable for arcs. If there is a plastic hoop, then it must be cut in half

Arcs need to be wrapped with synthetic winterizer. Foil insulation will also work. The whole structure is well wrapped with threads for fixation. Manipulation is carried out with both arcs

From above, the arcs are sheathed with a material suitable for the base of the rug

To fix the toys, you need to sew these loops of braid into the covers of the arcs

Another option for attaching toys is Velcro cuffs. This design can be easily moved along the arc
To fix the arcs on the base, you can use different methods. It is better to choose those in which the arcs are removable. This will make the mat easier to fold and store.
The first way - plastic carabiners
You will need four carabiners, you can take those left over from old highchairs, strollers, sleds, etc. And also it will not be difficult to buy them in a sewing accessories store.

One part of the carabiner is fixed on the inside of the mat at all four corners

The second part is fixed at the ends of the arcs. For fixing, a cover of arcs is used, which for this needs to be made a little longer
To secure the arcs, you just need to fasten all four fasteners, and fix the crosspiece on top with tape or braid, tying it crosswise. The second part of Velcro is sewn to the ends of the arcs.

The arcs are inserted into the holes crosswise and fixed from the inside with Velcro. You need to tie a ribbon on top for additional fixation. Instead of braid, you can use the same Velcro tape, which is sewn from below the upper arc and from above the lower
You can choose any method of fastening the arcs. Someone uses buttons or simply sews arcs to the base.
5. It remains to hang the toys to the arcs. They can be purchased at the store in advance or sewn with your own hands. Hanging toys also need to be equipped with interesting details, for example, insert a rattle bell inside.

Here such a bunny can be an excellent hanging toy. Sewing does not require patterns. A couple of patches for the head and dress, a ribbon for the ears, a cord for the arms and legs are enough
With the help of this instruction, you can sew an excellent developmental mat for a newborn, which will turn out to be even better than the purchased one.
Buying a play mat is easy. But not all models that are sold in stores meet the necessary safety conditions. Why take the risk while spending your money? It is much better to make this useful gadget with your own hands. And you can be absolutely sure that all the materials are of high quality, and the thing is made soundly and with love.
In addition, the little thing will be original and presented in a single copy - a great option for a gift. As the baby grows, you can watch him and supplement the thing with game elements in accordance with the interests of the baby. Better yet, make several rugs with elements of varying complexity. So the baby will definitely not get bored, and mommy will have some time for herself or household chores.
Loving parents, trying to develop their child from birth, use modern techniques and all kinds of expensive toys. Recently, specifically for these purposes, developing rugs have been invented. You can buy such a rug in the store, but many women prefer to make it with their own hands, because it is not at all difficult to do. In this article, we will tell you how to make do-it-yourself developing mat for children from 0 to 3 years old, and show photo the most original ideas.
Developing mat for a small child
A developing mat is a textile or knitted cloth, decorated with bright applications, with movable elements placed on it for the game. It is sometimes supplemented with a frame for hanging toys. This rug gives children the opportunity to develop from the first days of life, and is designed for use up to 3 years of age.

Developing mat for a newborn
Playing with a developing mat will help:

Did you know that a baby's brain is not fully developed at the time of birth. In the first months and years of life, the most active growth and development of neural connections in the brain takes place. This process, and the number of connections created, is influenced by the environment in which the child grows up and how they are treated.
Developing mat for babies

For a child, a developing mat will become the largest and most useful toy that never gets bored, and for a mother, it will be the main visual aid for practicing with a baby. When the child grows up and begins to sit independently, he will be able to play with him and develop without outside help. Bright applications and a large number of various elements will occupy the attention of the child for a long time, and you will get the opportunity to relax a bit, or do household chores. During joint classes, it is necessary to show the child what actions can be performed with objects placed on the rug, and to get him to complete the assigned tasks.

Developing mat for the little ones
Benefits of a DIY rug

Tip: make a rug with a margin in size so that as the child grows up, add new developmental elements to it that are suitable for age. It will "grow" with the child and will always be new and interesting.
Making a developmental rug

We make a developing mat with our own hands
First you need to decide what exactly you want to see on your rug, and draw an approximate sketch on a piece of paper. Then choose a material that is suitable in size and texture for the base of the rug and for its lining. To make the rug soft and warm, you will need a synthetic winterizer or warm coat fabric. The latter will help the rug keep its shape better and not wrinkle during the game.

Ideas for a developmental rug made of squares
Tip: choose natural or semi-synthetic fabrics for the front panel. They must have a stable color and not accumulate static electricity. Well suited chintz, linen, gabardine, suit fabrics with natural wool fibers. For lining, take a material that does not slip. Do not use satin and satin. It is better to take chintz, cotton jersey, linen or velveteen, wool suit fabrics.

Bright and colorful educational mat for children
Hardware preparation
Collect all the shreds and unnecessary things that you do not mind cutting. Try to choose different in texture, bright fabrics, with interesting patterns. Wash and iron everything. Look around your house for threads, buttons, and clasps. Find laces, buttons and beads of different colors. Gather small toys and boxes together. All this will be useful to you in your work and this is enough for a start.

Photo of a model developmental rug for children
Then, as needed, you can look for and select the necessary materials. You may need ribbons, elastic bands, Velcro. Useful metal and plastic rings, boxes of kinder surprises and broken rattles. You can use multi-colored woolen threads of different thicknesses.
Important! Do not use toys with small parts that cannot be fixed on the mat, small children put everything in their mouths and can swallow them! Do not use materials that crumble, break or come off!
Foundation preparation

Do-it-yourself developing mat for a baby
Cut out from the main fabric, from the lining and from the synthetic winterizer of the same size of the panel. Lay them out in three layers so that the synthetic winterizer is inside, and connect them together. Finish the edges with an overlock, edging, or a simple hem. The base for the rug is ready.

Photo of a developing rug with overhead details
Creating a playing field
On the prepared basis, we create a playing field according to the sketch. It can be a forest, a lake, or a flower bed, a road for cars and a river for ships. You can make a green meadow and a blue sky with clouds. We cut the details of the desired size and color, fold the edges and sew them onto the rug, first by hand and then on a sewing machine.

Developing mat with small details for a small child
Tip: put the parts on a soft adhesive base (non-woven fabric), it will become easier to work with them and they will look better.
Production of game elements
This is the main and most time-consuming part of the work. You can make flowers, butterflies or mushrooms, come up with fabulous houses and castles. Make cars, airplanes or boats, sew any kind of small animals or birds. Show your imagination. They can be sewn on or fixed movably, on cords or ribbons, fastened to the mat with Velcro or buttons.

Educational mat in bright colors
Tip: to make the game elements voluminous, use a synthetic winterizer to fill them.
Interesting ideas

Tip: To make a lake, use a piece of clear plastic or organza and place the fish underneath. For weed, a fleecy fabric of a suitable color is suitable.

Educational mat with houses, butterflies and toys
Attaching items to the mat
According to the invented sketch, place the finished elements on the rug. Sew on buttons, laces and Velcro, fasten toys, place game characters in their places. Close the zippers and lace up the pockets. Finish each developmental composition according to the sketch you created.
Important! Check the reliability of attachment of small parts, the strength of cords and threads with beads, the integrity of loops and boxes!
The original idea of a developing mat for a baby

Developing activities with a rug

Did you know: children who are regularly taught are ahead of their peers in development by the age of two, and their vocabulary is 300 words higher.
The idea of a beautiful developmental rug

Having spent a little time on making a developmental mat, you will use it for the development of your child for several years. You will always find something to occupy the baby and what to play with him. Bright and colorful rug will decorate the children's room and become a favorite place to play. Made by your hands with love, it will bring a lot of joy to your son or daughter and leave warm memories for a lifetime.
Developing mat for kids
Do-it-yourself developing mat for children from 0 to 3 years old 39 photo ideas:


The developmental rug appeared in everyday life relatively recently and has already gained wide popularity: in caring for a child and raising him at an early age, he is able to replace a whole set of things and at the same time practically does not take up useful living space. Accordingly, the prices for these items are clearly overpriced, so there are more than enough people who want to make a developing mat from scratch with their own hands, especially since at home this is quite possible and does not require any significant costs.
However, if you look at the well-known manuals for the manufacture of developmental rugs, then they come down mainly to instructions on what material to take, how to cut, sew, stuff, etc. And the rest - something like "parents can show their imagination and express their individuality." My? But the rug should help the child to form a personality, while in adults it is the way it is. Then, mom, most likely, already knows how to sew, since she looks at sites for needlewomen, and not trade catalogs. In this publication, we will try, first of all, to give readers an idea which developmental rug for children in which case will be better and how to make it based on the characteristics of child psychology. Although cutting and sewing will also not be left out.
Technologically, most developmental rugs are equivalent to a quilt, although other versions are possible, see below. Actually developing elements in it are various kinds of applications, pockets, valves, voluminous soft linings. How to bring all this into a single product, see for example. Master Class:
Video master class: do-it-yourself developing rug
And we will try to figure out how to come up with a composition that is useful for the baby and entertaining for him. More precisely, what framework should be followed when fantasizing about a future home-made developmental rug.
Note: when reading further about the composition of the rug in the master class, questions may arise, which we will talk about later.
0 to 7
Let us briefly recall the main stages of development of young children. Please note that the indicated age limits are conditional; individually, they can vary significantly. So:
- 0-6 months- reckless. Feelings are almost completely organic (“internal”, dictated by the state of the organism). The foundations of vision are being formed: a clear vision (the look becomes meaningful), adaptation to illumination. Feedback from the outside world is instinctive: a cry, a smile, non-purposeful movements.
- 0.5-1 year- the slider, learns to recognize information from the senses and dispose of it, making as yet uncertain movements. From about a year old, he will already benefit from developing toys and objects, incl. rug, giving tactile and visual sensations. Color vision is still imperfect, the blue gamut is perceived as dark and with subtle subtle shades, and red and yellow tones are excessively bright, “blazing”.
- 1-3 years- a walker, the child learns to control the limbs and make purposeful movements. In vision, blue tones gradually gain “juice” and warm ones fade. The “rangefinder” of binocular vision is gaining accuracy, but its geometry is still distorted: objects seem huge, plump. At the age of 2-3 years, the child needs an already developing mat with game elements. The first exact feedback with the world appears - speech.
- 3-5 years- the most important "evolutionary leap": a person begins to think, compare causes with effects, draw elementary conclusions about the causes of what is happening and forecasts for the future based on an analysis of the current situation. Motor skills, sensory organs and speech are improving, but there is no abstract thinking yet: the baby’s world is his things and the immediate surroundings, and his mother is his center. Cause-and-effect relationships are recognized as simple direct ones.
- 5-7 years- Imaginative thinking develops. A normally developed child is already able to track 2-4 steps of cause-and-effect relationships and, accordingly, make purposeful movements from the same number of phases. Color vision is almost adult, and in all other respects the child is no longer a baby. Following the rule of ontogeny, this is a transition from primitive savagery to civilization: the child already understands that the world is not only what he directly feels, but something huge, but completely knowable, transformable and usable. The rug, perhaps, will still fit, but for some other purposes: in development, he has done his job, it's time to go to school.
Note: the rule, or principle, of ontogenesis in biology states that any living organism in its individual development (ontogenesis) to some extent repeats the biological history of its evolutionary ancestors (phylogenesis). This rule is also true for humans. For example, in the initial stages of pregnancy, a human fetus has ... gills for a while. Then, while still in the womb, they disappear and are replaced by lungs.
Is he needed at all?
Teachers, pediatricians and child psychologists have not yet come to a consensus on whether a developing mat is definitely useful for a child. There is only one agreement: a developing mat for babies is beneficial only if the mother regularly and as much of the time as possible of the child’s play activity engages with him or at least carefully looks after him. Otherwise, the whole little world of the child can close on the rug, and he can grow up as an introvert, or, even worse, an autistic person who cannot organically fit into human society and adequately respond to the circumstances of life. Simply put: a rug will not replace a mother, although it can greatly ease her worries. If the mother leaves her on the rug to develop as best she can, and she winds herself somewhere, then it will only get worse.
What rug do you need
“They tore off the bear’s paw / Dropped the bear on the floor / I won’t leave him anyway / Because he is good!” Everyone knows how strongly children become attached to their favorite toys. The basis of this effect is impenetrable: the instinct of self-preservation. The loss or damage of a familiar thing, the safety, reliability and benefits of which, from the point of view of the small, have been verified, is a signal of some kind of danger. All the more terrible because it is unknown. That is why, and not because it will have to be altered, it is highly desirable to make a children's developmental rug so that it becomes a favorite from the moment the need arises for it to its retirement time - turning into a bedside or just a play mat. Reincarnation is also possible, for future new family members. Then it should be interesting to play with the youngest and the child is no longer small on the developing rug.

Successful examples of this kind of amateur creativity are shown in the photo. We will talk about the materials for them below, but for now let's pay attention to:
- The detailing is varied, but not too small and not very large: the little things cannot be seen properly by a slider, and very large uniform fields will not arouse sympathy for a walker if they do not seem clearly threatening;
- The color scheme is not flashy, the bright details are small, so that they don’t seem big in comparison with themselves. Elements of blue colors in the composition do not dominate;
- For the slide stage, there are many details with a variety of textures - there is every opportunity to hone your sense of touch;
- They also give walkers the opportunity to practice counting. Not yet consciously, but then it will be easier to understand that 1 is not 2 and not 3 and that “a lot” can be counted as much as you like;
- Pockets, valves, ties, fasteners - we learn to move our fingers accurately;
- For thought stages, zoning, implicit on the left and explicit on the right. Organizing order in our little world, we get accustomed to it ourselves.
Note: even before the stage of objective thinking, it is possible (perhaps with the help of a child psychologist) to determine what the child's temperament will be. In some cases, this is also possible for newborns, for example. using the rules of inheritance of temperament. For choleric and melancholic people, implicit zoning is preferable, and for sanguine and phlegmatic people, explicit zoning is preferable.
About materials
It is best to make a developing mat from natural fabrics, whose hypoallergenicity (inability to cause allergies) has been tested: satin (for a smooth but not slippery base), felt, calico, flannelette, denim. Wool is not good, it is an allergen. Weak, safe for adults, but the skin of children is much more sensitive. For the same reason (delicate skin) silk is not suitable, it is very easily electrified and shines with highly polarized light, see below.

Modern synthetic fabrics for children's things are not inferior to natural ones, but - only and only with acc. certificate from trusted manufacturers. If synthetics of obscure origin seem to be no worse than cotton, this does not mean anything: it can be made from cheap plastic obtained using toxic catalysts. Catalyst residues from fabric fibers can be released in amounts that are not detectable by normal laboratory analysis, but are harmful to children with prolonged exposure.
It is better to take a synthetic winterizer as a filler, it is hypoallergenic and practically does not accumulate static electricity. Furniture foam brand from 35 is not so good, it is noticeably electrified in a dry room. The most ordinary batting would be perfect - but, alas, before the first wash. As for the threads, the best option is propylene. They are durable, resistant, non-allergenic. By themselves, they are slightly electrified, but if the entire mat is antistatic, charge accumulation is not detected.
What not to
The above rules for constructing the composition of a children's rug give a wide scope for the imagination of parents, therefore, it is necessary to outline the boundaries that cannot be crossed. It is completely unacceptable to have a mirror on a developmental rug, pos. 1 in Fig., which, by the way, is a sin of many expensive products promoted in trade. It's not that the child can be afraid of his own reflection, not at all. The fact is that the direct light reflected from the mirror (and how to avoid it for sure?) Is polarized up to 100%. For a fragile visual apparatus, this is very harmful; putting a mirror is strongly discouraged in the nursery for large children.

Note: volumetric details in this sample are just an accident. There will be no harm from them.
The next gross mistake is monotonous objects for palpation, pos. 2. The tactile sense must be developed comprehensively, like the others. And at pos. 3 - too large a brilliant field of saturated blue. Why it is bad - see above.

Further on fig. there are examples of mistakes that are more or less forgivable. At pos. 4 the blue field is muted, on pos. 5 its area is relatively small. At pos. 6 the location of the cold color is generally unsuccessful, the so-called. the effect of the dominance of the top, but the pale blue tint significantly levels it. Here the main mistake is too detailed and complex composition, designed already for a fairly developed figurative thinking.
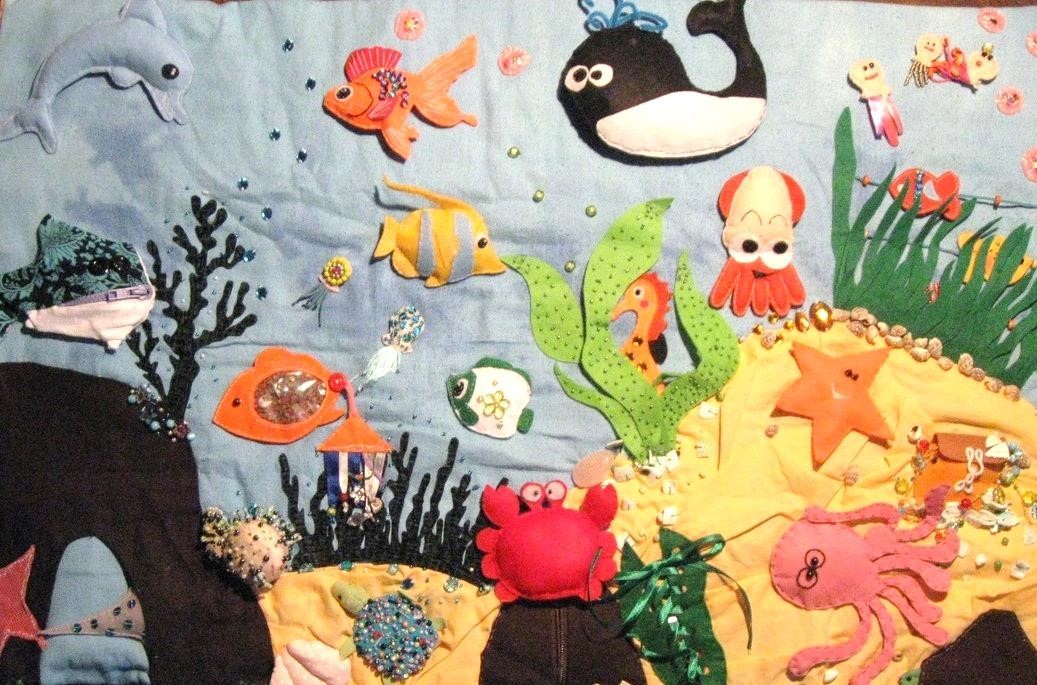
Note: to completely abandon the blue in the color of the developmental rug, of course, is also bad. The child must learn to distinguish it. Here it makes sense, in addition to choosing soft shades, to drive the blue to the center of the rug, where it will be psychologically neutral, see for example. video below.
Video: developing rug “Underwater World”

The error of the rug on pos. 7, presumably, is clear in the light of the foregoing: this is too small and devoid of a clear meaning of the detailing of the zones. How to understand these patterns to a person who thinks in terms of "baka - it hurts", "wet - bang"? Also in pos. 8: the rug is clearly for a girl, but what's the point in each sector? If children, due to still undeveloped figurative thinking, are pragmatists, then girls are doubly pragmatic. And for the most part, they stay that way for the rest of their lives. The same flaw, of unclear meaning, in position 8: zones of a suitable size are clearly expressed, but a purely childish question: why is that here? Can you explain to yours?
Correct mats
Rugs for girls
The detailing of a developing rug for a girl can be quite detailed, as, for example. in the master class at the beginning. But on condition that the whole composition is semantically transparent and oriented in a certain direction. If the range of interests of the daughter is still unclear, then the zones should be made larger, clearly defined, and the details in them should also not be smaller, on the left in Fig. Girls generally prefer round rugs; the range of interests for the future hostess is not an abstract concept. Interests for successful housekeeping require many different ones, and in this case, you need to zone the round rug with sectors, in the center. If the rug is rectangular, then in the middle there must be a free place for the mistress of this little world, on the right; in women, the desire for autarky remains for life.

Other special mats
For a fidgety child, who is always drawn to where it shouldn’t be, a rug with a soft barrier is well suited, on the left in fig. A large children's carpet can be supplemented with a separate barrier in the center. It does not have to be filled, a very low pom-pom barrier will do. How to sew a children's rug from pompons, see the video at the bottom of the section, but in the same way you can make a border on any developmental rug.

Children's educational mats with special features
The soft barrier is also psychologically soft, in contrast to the playpen fencing, and keeps the child in his legal operating zone unobtrusively. Suddenly, a beloved child intends to do Skoda on the side, something like this flashes in his firebrand: “Uh-uh ... Mmmm ... Based on the analysis of the totality of acting factors, by trivial conclusions we come to the conclusion that, in principle, unauthorized activity objectively possible, but only very likely - my mother will scold.
For girls who are very, very economic, in a good sense of the word, a rug with large deep pockets and flaps is suitable, on the right in fig. Being a kopush for the same future mistress and housekeeper is not such a sin; in life can be useful in the same way as courage for a boy.
Video: do-it-yourself pom-pom rug for a child
About car mats
Developing car mats are mostly boyish, although in modern life, knowledge of traffic rules and the ability to drive vehicles are necessary for everyone. Therefore, the narrow specialization of the mat for road traffic cannot be considered its disadvantage. After all, where does it say that there should be only one favorite toy? Or that it is impossible to sew another, general developmental one to the car mat?

If a child plays with cars on the rug alone from childhood, it is desirable to make it somewhat stylized, detailed and textured, as described above, on the left in Fig. If his driving discipline is controlled by the traffic police inspector in the form of an older brother, the detailing is more detailed and close to reality, in the center. But in any case, it is not necessary to put a traffic light at each zebra crossing, or leave all zebras without traffic lights. It is best to depict traffic lights at 1-2 crossings, on the right in the same place, so that you can understand: it is a zebra in Africa, a zebra, with or without a traffic light.
Rugs with arches
Developing rugs with arcs more than replace the playpen, without at the same time presenting explicit prohibitions in the form of its fence:
- Virtually, but unambiguously, define the child's own space, without creating at the same time physically insurmountable obstacles; this contributes to the development of self-discipline from an early age.
- For arcs and toys suspended from them, it is much more capable to grab, learning to walk, than for the arena barrier.
- On a rug with arches for a child, the probability of flopping backwards with a swing (which, by the way, the playpen does not prevent) is minimal.
- Being already a fully qualified walker, with the help of the same toys it is convenient to make sips, pos. 1 in fig.

Arcs for a homemade children's developmental rug can be made in different ways. The most durable and inexpensive are obtained from a plastic gymnastic hoop covered with padding polyester and sheathed with fabric. It is only necessary to decide how to make them collapsible, so that when the need has passed, they can be cleaned and hidden.
In industrial products of this kind, arcs are often crossed and provided with a hidden hinge, pos. 2. It is difficult to make it with your own hands, given the soft lining of the arcs, and tying the crosshair with a cord (pos. 3) or a bow is unreliable.
The easiest way is to make the arcs tangent and tighten the joint tightly with a braid or elastic band, pos. 4 and 5. If the legs of the arcs are connected with a strip of plywood 3-4 mm thick, then the tent from them will turn out to be no less durable and convenient for assembly and disassembly than a hinged tent. Connecting the legs of the arcs with plywood is also not difficult: wooden corks are driven into their ends, and a screed strip is attached to them from the underside with self-tapping screws. Next, the visible wooden parts are sanded and painted.
In cramped living conditions or, say, when the whole family goes to the country for a long time, a developing mat-bed and one arc can come in handy. In this case, her legs are placed in pockets sewn on the outside on the sidewalls. For a child to sleep, so that the relief of the rug does not press, they put a mattress.
About the rug figurines
Figures for a developing rug, as already mentioned, are sewn. Patterns of several types are given in fig. The tree, top left, is a simple application. These details are sewn onto a green flap in the form of a crown. But the hippo, so beloved by little ones, is already something like a textile cameo: it is 3-layered from patches of different colors of the same shape. In subsequent, bottom-up, flaps, windows are cut through which the previous or lower layer peeps through. The figures from the set on the right are made in one technique or another.

Despite the great variety of educational mats for children in stores, very often we cannot choose a specific model. And this is not surprising, all babies are special. But it is difficult to determine exactly what is their peculiarity in the first weeks of life. Therefore, usually the choice either falls on all rugs at once, or none of them fit our needs.
If you still can’t decide on the choice of rug, then know what you can create with your own hands! Enough desire and knowledge of the basic principles of their design. What will we talk about next.
Basic requirements for do-it-yourself rugs
Even if you already know exactly what type of rug you need, take your time to grab a needle and fabric. It is very important not to forget that developing rugs become the main toy of your baby for a long time, a faithful companion and assistants in mastering the world. Therefore, for starters, it is worth studying the basic requirements for such rugs, and only after proceeding to their tailoring.
Attention to detail
The best child psychologists are working on the development of modern rugs and high-tech equipment is used, but handmade rugs have their own number of advantages:
- you choose the materials for the rug yourself and are sure of their safety,
- you decide how many games and game elements will be on the mat,
- you yourself form the size of the playing field of the future rug, and it can be very different from the standard ones offered by world manufacturers,
- your rug will be created exclusively for your baby, it will take into account his features and preferences, his love for certain games, as well as colors.
That is why, until now, most mothers prefer to sew developing mats for children with their own hands.
But before you start sewing such a rug, you need to remember a few important requirements for work, so as not to be disappointed with the result.
1) If you are going to develop the fine motor skills of the baby, then choose different objects that will perform this function.
The monotony will quickly get tired of the child, and he will lose interest in the game.
2) If you want the mat to serve you for a long time, leave free space for adding new games.
In the first days of life, the baby will be more and more interested in playing with large details, images and beads, but the older he gets, the smaller and more detailed the subsequent sectors will be.
3) For the base of the rug, choose bright colors, but not flashy or glossy, so that the baby's eyes do not get tired and the passion for the game does not disappear.
4) Think over the arrangement of sectors and game elements on the canvas so that they not only include the maximum benefit as an educational game, but also harmoniously fit into the overall idea.
The field must be logically built, otherwise the child will not see the final goal and soon his interest in the game will disappear.

Do not forget that the main purpose of the rug is the development of your baby in a playful way. And therefore it is very important that it be interesting, fun and informative.
To create a do-it-yourself developmental rug for children, you will need a lot of different materials. But this does not mean that it should be full of beads, laces and randomly stuck Velcro, which will only interfere and confuse the baby.
First you need to think over the main theme of the rug, decide on its main tasks and functions, and then start stocking up on materials.

The first thing you need to sew a developmental rug is fabric.
It is needed both for creating the base and for most of the applications that will decorate the playing field. Therefore, when choosing it, pay attention to the following:
- non-slip fabric is suitable for the wrong side so that the rug does not crawl on the floor,
- for the base, a solid, dense fabric is more suitable so that it can withstand frequent use of the rug,
- thin fabrics are suitable for decor and applications - chintz, calico, cotton,
- for rustling elements, choose raincoat fabric, artificial silk,
- for games aimed at developing tactile sensations, velvet, suede, velvet, and are more suitable.
As you can see, it takes a lot of fabric to create a developmental rug.
Do not forget about the fittings, which play an important role here:
- , zippers and teach children to fasten parts;
- elastic bands will help to hide and get individual game elements, as well as depict natural phenomena. For example, rain or the sun peeking out from behind the clouds;
- beads, sequins and multi-colored pebbles will attract attention and develop the perception of the color of the crumbs.

Take a look around, not only sewing accessories can help you create a developmental rug. Everything will go:
- peas, beans, millet and buckwheat - as a filler and the creation of rustling toys;
- woolen threads - as an imitation of grass or animal hair;
- bright candy wrappers - as inserts and sound effect.
And this is not the whole list of materials that may be useful to you. Each rug is unique, just like its owner. Therefore, you decide what suits you to create it.
Do not forget only that all materials must be natural and not hazardous to the health of the baby.
Sew small details firmly, and choose the fabric wisely so that it does not shed and does not paint children's palms.
We create a developing mat for children with our own hands
As we have already said, developing mats for children are different. They differ not only in size and content, but also in purpose, because they are created for the specific age of the baby. Therefore, first decide how long you want the rug to serve you, and only what suits you best. And we will try to figure out how to create the basis and how to complement the playing field of the most common types of children's rugs.
Do-it-yourself rug with arcs
Since rugs with arcs and sides are best suited for infants, it is worth creating them in bright colors.
In addition to the previously mentioned materials in the form of fabric and accessories, we also need arcs. A gymnastic hoop or metal-plastic pipes will help us with this.

Therefore, to create a developing mat with arcs, we need:
- plain fabrics of bright colors - coarse calico, chintz, cotton;
- non-slip fabric for the back of the mat;
- synthetic winterizer;
- gymnastic hoop with an approximate diameter of 65 cm or 3-4 meters of a metal-plastic pipe.
First, decide on the size of the rug itself.
The most common size of a developing mat with arcs is considered to be 90x90 cm, but you can decide for yourself what area your baby's playing field will be.
Rug base
Cut out a square of the desired size from the main fabric for the front side of the rug and the same size from the non-slip fabric, which will become the reverse side. Sew them together and turn right side out, but leave enough opening for stuffing.
To make it soft to lie and turn over on the rug, insert several layers of synthetic winterizer into the resulting blank and then sew everything up.
So that the synthetic winterizer inside the rug does not move or crumple, quilt the future rug (all layers of synthetic winterizer and fabric), manually or on a sewing machine.
So we have created the basis for the developmental rug, which can be decorated immediately or over time with toys and applications for your fidget.
arcs
Now let's move on to arcs.
If you have chosen a gymnastic hoop, then you first need to cut it in half to get a frame. Then the arcs must be made safer and softer. Therefore, we again take out the synthetic winterizer and wrap the blanks with it.
When the arc is not visible under the synthetic winterizer layer, and you consider it as soft and safe as possible for the baby, take a fabric, sew a long pipe out of it, turn it inside out and insert the resulting arc into it.
Connecting the arcs and the base of the rug
Don't forget that arcs up must be connected together, for this you can:
- sew two laces into one of the fabric tubes, with which you will then intercept both arcs;
- cut a ribbon from the main fabric with which you will tie the arcs;
- take any braid or finished tape.
After the base and arcs are ready, the main question remains, how to connect the two main elements together?

If you do not plan to assemble and disassemble the rug, you can sew the fabric that wraps the arcs to the corners of the rug. Your developmental mat on this will be ready and you can use it.
If you plan to make it more transportable, then at the stage of sewing the base, you should think about options for attaching arcs.
You can cut small pockets in the form of pipes with a diameter of a couple of centimeters larger than the arc, and sew them to the corners of the base of the rug.
Visually, the process of such a connection is shown by Olga Volkova in her master class:
You can cut through the base of the rug at the cutting stage, overcast the resulting loops and sew on the back of the Velcro. Attach the second part of it to the finished arc and insert it into the loop. This is exactly what Lyubov Lozinskaya suggests doing, sharing the tricks of creating a mobile and bright educational rug in her master class on creating a children's rug.
If you plan to use a developmental mat even after the baby learns to walk, then the arcs can be assembled separately from the playing field.
To do this, you just need to cut them to the desired length, wrap them with padding polyester and sheathe them with a cloth, and then form an arc by pulling the ends of one pipe between each other with a tape. You get a solid frame of two arcs, on which you can lay any rug that fits in size.
Calculation of pipe length for arcs
To do this, simply multiply the diagonal of the rug by the number π, equal to 3.14, and then divide the resulting result in half.
For example, you want to assemble arcs from a pipe for a rug measuring 90x90 cm. They will be installed in the corners of the field, therefore, the base of our semicircle will be the starting point.
So, the diagonal of our rug will be 126 cm (90 cm x 1.4). Now we need to multiply the resulting number by 3.14 - 126cmx3.14 - to get the circumference of the proposed circle, which will be equal to 395.65 cm. But since this is the length of a full circle, we need to divide it in half - 395.65 cm / 2 = 197.82 cm. In total, we need two cuts of metal-plastic pipe with an approximate length of 198 cm. If the arc is too high, just shorten the length of the pipe until you get a satisfying result.
Please note that one pipe should be several centimeters longer than the other for greater structural stability.
Do-it-yourself rug with arcs and sides
Another distinguishing feature of developing mats for younger children is the presence of not only arcs, but also bumpers so that fidgets stay in place.

As we have already said, there are several types of such rugs:
- with attached sides;
- with sides that are part of a large rug.
Attached sides can be pillows, rollers or other soft limiters.
If you want the rug to become your assistant for a long time, then your choice is a rug with lifting sides. After all, it has two sizes - assembled and disassembled.
To sew such a rug, you first need to build the correct pattern. To do this, decide on the size of the original, small rug. Draw this square or rectangle on paper, and now add a rectangle on each side, the height of which will be the height of the wall. This is what your foundation will be.
In places where the sides will fold, you can sew on laces or ribbons. Then, to assemble the rug, it will be enough for you to tightly tie them together. If you prefer Velcro or buttons, then sew them along the entire height of the side.
More clearly, the process of creating such a rug can be seen in a small master class by a young mother.
Do-it-yourself themed or play rug
And yet, the most popular among developing mats for children are play mats. After all, they have so much interesting and fun!
The basis of such a rug can be sewn in different ways:
- a solid canvas, to which applications and educational toys will be sewn afterwards;
- separate sections that will be connected, eventually increasing the rug in size.

But in any case, you will need:
- several large pieces of fabric;
- synthetic winterizer or foam rubber as a sealant;
- patches of bright fabric of different textures;
- buttons, beads and other accessories;
- locks, Velcro and elastic, etc.
First, decide on a sketch of your future rug:
- consider the size of the finished product and whether you will sew it from flaps or from a single piece;
- think over the location of the games and the logical transition between them;
- come up with the plot of the rug.
It is very important that in everything that happens on the rug there is a meaning and a pattern. Do not try to place games with bees and hedgehogs in the middle of the sea - this will only confuse the child.
An excellent hint can be the choice of the type of rug. You can stitch:
In any case, you will need a base, sewn from two pieces of fabric and layered with filler, so that the rug is as safe as possible for playing.
After that, you can sew game elements to it in the order you need.
If you chose a terrain map as a plot - a forest, a freeway, or a park - then you can divide the field into heaven and earth. At the bottom, place trees, a road, small animals or houses, at the top you will have room for clouds, the sun, birds and planes.
Do not limit your imagination, you can always add a new object to the rug by simply sewing it on or swapping it with other places.
Use Velcro, buttons and zippers to connect toys. So an airplane can fly in the sky attached to a lightning slider, windows in a house can open and close with a button, and a hedgehog hiding under a bush can pick apples or berries that are attached to it with Velcro.

cute soft hedgehog
When creating educational mats for children with your own hands, be sure to pay attention to the variety of types of toys:
- sew or tie noisy objects - pour buckwheat or beads into a chocolate egg capsule, tie or cover with a cloth, giving the toy the image of a bee, butterfly or rabbit;
- use felt for flat applications that will move around the playing field and fasten with Velcro, buttons or buttons;
- provide for the presence of pockets on zippers, in which there will be;
- sew applications with a candy wrapper inside into separate sections of the rug, such rustling will not go unnoticed by the little fidget.

Mat toys collection
If you have not yet decided on the plot or are not confident in your abilities, then take a look at the video master class by Handmade Tailor. Here you will be inspired to create a simple play mat with different elements and principles for attaching toys.
If you doubt your sewing skills, then you can use the great idea of Svetlana Rost, who suggests creating an educational rug based on stool cushions. So you can increase or decrease the size of the playing field, swap games and tasks, or even temporarily remove those that your baby is already tired of.
Double-sided development mat
Practical parents prefer double-sided mats that contain two playing fields. So they will provide their baby with an occupation for a long time and save the family budget.
But when creating such developing mats with your own hands, keep in mind that the baby will move along it and nothing should interfere with it. Therefore, you should avoid voluminous and hard objects that can cause unnecessary abrasions and bruises.
As with gaming mats, you first need to:
- come up with a story;
- draw a sketch and a map;
- prepare materials.
After that, you sew all the game objects and Velcro on the prepared playing fields and sew them together according to the principle of a stitch sandwich - fold the playing field, apply a synthetic winterizer to the wrong side and put the second playing field, inside out to the filler. Sew the resulting sandwich together, sew along the edge of the inlay.
For games on such a developmental rug, felt toys are most suitable, which can be rearranged, shifted or used for both sides.

Puzzle mat or puzzle mat
If your baby is already old enough and independent, then he will like the idea of \u200b\u200bassembling his own rug. The very process of folding will be an excellent game for him and a test of logic, spatial thinking, as well as the relationship of forms with each other. It is for this that puzzle mats or puzzle mats were invented.


Big puzzle for a little man
Most often, such rugs are made of PVC, i.e. at home, it will be difficult to repeat their production. But mother needlewomen found a way out and began to sew puzzle mats in the form of many soft pillows that can be easily connected to each other.

To create these do-it-yourself developing rugs, you will need:
- fabric - felt, fleece or cotton is best;
- filler;
- pattern.
First, consider how many pillows you want to sew and what shape they will be. Draw the assembled puzzle and cut out each piece separately - this will be your pattern. Then just transfer it to the fabric - each detail should be cut out in two copies, which will then be sewn into pillows.
Stuff the pillows tightly with synthetic winterizer or any other filler, sew up the hole and you can give the finished rug to your child for playing. He himself will decide how to collect it and what to do with it next.
To add another element of the game and test the logic of the child, you can sew on the pillows an appliqué in the form of a labyrinth or a road, which will need to be connected in the correct order.
Eclerka and her detailed master class will help you understand the process of creating a puzzle rug in more detail, in which she shares the intricacies of cutting and sewing pillows.
As you can see, in order to give your child a full-fledged development and help him to know the world, it is not necessary to run to the store and buy everything from its shelves. Sometimes it is enough to show imagination and ingenuity, as well as to give him your love through the creation of a convenient, useful and interesting developmental rug. And what it will be and what it will teach your baby - it's up to you.
The birth of a child for all parents is a very joyful event, for which they prepare in advance, stocking up on various accessories for a new family member. All kinds of toys, pacifiers, bottles, diapers and clothes - all this is an integral part of the preparations. And quite often during pregnancy, a woman shows interest in needlework. Someone knits socks and booties, someone decides on hats and blouses, and some dare to take on more serious things, such as, for example, a children's play rug. Of course, the baby will need it not immediately, but in two months, when the baby learns to concentrate his attention on individual objects, but it is better to do it in advance, because then there simply may not be time. It is about how to sew developing mats with your own hands that will be discussed in this article.
First stage - sketch
The first stage of work is that you should draw a plan diagram, having thought through what exactly the game rug will be. With your own hands, you can create a real developmental center for a baby, or just a warm blanket with interesting elements. Therefore, when making such a thing, you need to take into account the age of the child. For children of two months of age and a little older, developing mats for newborns with special arcs are suitable, on which all kinds of rattles and soft toys with various fillers are attached. Such a thing will be interesting to the child until such time as he learns to sit. But an older baby who already knows how to crawl will not be indifferent to soft or rustling details on the rug. They may be removable. When developing a sketch, you need to decide not only on the developmental elements, but also on the color design. It is best to give preference to rich, but natural colors. Red, blue, green, yellow, orange, blue and other natural shades will create a harmonious composition, while rich light green, neon and hot pink will irritate the child's eyes. Therefore, it is better to make a developing mat with your own hands using fabrics of natural colors. After all the details are thought out and a sketch is made, you can proceed to the selection of materials.
The second stage - the selection of materials
In order to sew a children's developmental rug with your own hands, you will need to stock up on dense material or leather for the bottom of the product and colored fabric cuts for decorating the main elements. In addition, you will need various fillers, such as plastic balls of unequal size, well rustling cellophane, insulation of different densities, such as holofiber, synthetic winterizer, and plain cotton wool. As for the quality of fabrics, for the place where the baby will lie, it is better to take natural warm and soft fabrics such as flannel, fleece or polar. And the rest of the parts can be made from raincoat fabric. Also, quite often craftswomen in such works use calico for children's bed linen, because it is this fabric that has a cheerful children's coloring and will look very appropriate in such a product.

It is good if the main game elements are removable so that they can be easily washed. Therefore, Velcro or zippers are useful in the work. You will also need to buy several meters of corset bones, with which it will be easy to construct stable arcs for the rug.
Third stage - template
As with sewing any thing, you first need to build a pattern for the product. To do this, you will need paper, a pencil, a ruler and scissors. If there is no drawing paper or other large sheet at hand, then it is quite possible to use wallpaper or construction film.
First of all, draw an oval, circle or square, depending on what shape the base of the rug will be. If some special drawing is planned on it, like a 3D application, then you should immediately select or draw a suitable picture on your own on a duplicate of the base and cut it into parts. If these are small elements, then it is enough to simply draw the base into sections, so that it is easier to determine the size of additional parts. It is also necessary to estimate the size of the arcs if the mat is intended for a baby. Here it is necessary to measure the height of the future rack, on which the toys will be hung. As well as the width of the strip, in which the corset bone will fit in several layers, wrapped with padding polyester. You should also consider what kind of fasteners for rattles will be. It can be just ribbons, ropes or fabric ribbons that are attached to the arc with Velcro. Quite often they make loops sewn into the upholstery of the arc, on which rattles are then hung. Now it is quite easy to find toys with special hooks for hanging in stores.
The fourth stage - cutting the fabric

Using templates, it is necessary to cut out all the elements of the product. Namely: the base, the inner filler (for softness), the fabric on which the baby will lie, stripes for decorating arcs and appliqué elements. In order for the rug to be sufficiently soft, light and at the same time stable, a combination of batting and synthetic winterizer should be used as an internal padding, or thick foam rubber should be taken. In fact, it is not difficult to sew a developing rug with your own hands. The main thing here is to correctly develop a template and, when cutting, do not forget to give seam allowances. It is worth noting that for dense materials in which the threads do not crumble, allowances can be 5 mm. But for fabrics such as raincoat fabric, the indent from the edge to the seam must be at least a centimeter, otherwise the product will begin to spread during operation.
Fifth stage - sewing elements and assembly
Of course, this stage of work is not so difficult in comparison with the calculations, but here, too, it will be necessary to make a lot of efforts to connect all the elements into a single whole. Do-it-yourself developing rugs should be made as accurately and competently as possible. The sequence of work for the implementation of each specific idea must be considered separately.
How to sew a rug with arcs
So, we sew a developing rug with our own hands for an infant. Usually it is made round or square, two arcs are attached to its base, connecting in the center. To make such a developing rug with your own hands, the patterns of which are quite simple to develop on your own, you only need to correctly calculate the height of the arcs so that the baby is comfortable in such a structure, and, of course, the base area, given that children grow very quickly.

How to make arcs
To decorate the racks, you need to take plastic corset bones, which are sold by the meter, and fasten three or four pieces with tape. After the workpiece is wrapped with synthetic winterizer. Next, start sewing the cover. To do this, it is necessary to measure the diameter of the prepared arc, add a seam allowance to this value and cut a strip of fabric 30 cm longer than the workpiece. After the strip is sewn, turned inside out and a workpiece is put into it, and Velcro is sewn along the edges. In order to make it convenient to hang rattles from the racks, loops made of the same fabric are inserted into the seam. In the center of one of the arcs, a tape or braid is attached in order to secure the two racks together.
How to make a base
Next, start working on the base. According to the prepared template, all layers of the rug are cut out. So that the stuffing does not crumple, it should be sewn to the bottom of the base sheathing, and then sew the second front part. It is worth noting that the filling must be dense enough so that the bent racks do not deform it. If the shape of the rug is square, then the mounts for the arcs must be placed in the corners, but if it is round, then the diameter should be measured and the value divided by 4. And it is at this distance that the arcs should be placed. At this stage, it is necessary to decide on the option of mounting the racks. If these are Velcro, then one of the parts of the tape should be sewn to the bottom of the base at the joints. If there are ties, then ribbons or braid must be inserted into the seam.
It is difficult to say which shape is better for developing mats for newborns. The advantage of a square one is that such a product will take up much less space, and while the baby is very small, it can easily be arranged right on the changing table. At the same time, such round-shaped play centers are more spacious, and the hung toys will not be in front of the child's face, but at chest level.

How to connect the base and arcs
How to connect all the prepared parts to get a ready-made children's developmental rug? You can fix the racks and the base of the game center with your own hands in several ways:
- Velcro tape. One part of the tape is sewn to the elongated edges of the covers of the arcs, and the other to the bottom of the base of the rug. This connection is very convenient and reliable. Even if the baby pulls the toys strongly, the arc will stand still. The main thing is that the tape should not be shorter than 15 cm.
- The ties made of fabric braid are also quite reliable. The main thing is not to use thin satin ribbons for this purpose, because they are easily torn and may not withstand constant stress. To arrange such a connection along the edges of the arcs and in the places of their attachment, either wide ribbons or processed strips of fabric are sewn at the base. It is worth noting that they cannot be tied with a bow, as the baby can easily untie them by inadvertently pulling on one of the free edges.
- Sew-on arches. This option is also very common, but folding a rug with non-removable arcs is very inconvenient. For a beautiful design of such an attachment, a small pocket is made from a piece of fabric at the junction, which, going a little into the arc, will hide the alignment seam.
Having connected all the details and attached rattles to the loops, you will finish making a developing mat with your own hands.
Ideas for rugs with 3D patterns
For a baby who has learned to sit or even crawl, it is better to sew a rug with a large number of removable parts, because he will no longer lie in one place, looking at several rattles. And here - just a huge number of ideas. It can be a tree-shaped rug with removable fruits, or an entire city with towering houses, from which windows and doors are removed, where there are roads and soft cars, as well as various flowers. It can be a clearing with removable plants and insects. For inspiration, you can consider already made do-it-yourself developing mats, photos of which, in particular, are in this article.

How to make a 3D application
Removable elements for the rug are not so difficult to make, as it might seem at first glance. Such a developing rug, reviews of young mothers about which they say that kids can spend hours playing, will form the baby's logical thinking and train fine motor skills of fingers. After all, one can only imagine how much effort the crumbs need to make in order to figure out how the elements are attached to the base. To create such interesting details, any fabric will be used. Moreover, it is not at all necessary to excel and make, for example, a typewriter with all the little things. It can be a flat version of the toy, with two wheels, windows and headlights. Also, fruits should be as simple as possible with a few leaves and lines, if only it would be clear at first glance that it is a pear or an apple. In order for such elements to interest the child, rustling oilcloth or plastic balls can be added to the filler. It is better to make such elements double-sided, stuff them not tightly and sew on small pieces of the tenacious part of the Velcro tape on both sides. In order for the child to understand exactly where this or that element should be, stripes should be made on the rug with the outlines of the objects that need to be attached there.
Fantasy has no limits
Knowing how to sew educational rugs with your own hands, you can make a whole series of similar toys for your child. With their help, the kid can easily learn geometric shapes, numbers, letters, names of fruits, berries and animals. In order to simplify the task, you can pick up a printed children's fabric and make details of a simple geometric shape with a drawn image. You can also use photographs embedded in the element and covered with a film part for long-term operation. In general, only your own imagination can be a limitation for creativity.

Basic rule
Do-it-yourself educational rugs can be of different themes, but you should try not to overdo it, trying to fit a lot of different elements in a small area. Let it be better to be a small but neat play center for the baby. In addition, as already mentioned, you can not stop at one product and make several of them. At the same time, you can also arrange the connecting elements and start an exciting game with the baby, clinging more and more new sections to the rug.
We also recommend
 How to get a house key
 Do-it-yourself developing rug: elements, principles, ideas
 Wedding decorations on the car - flowers made of paper and napkins
 How to make a laundry basket with your own hands, interesting ideas
 How to make a beautiful DIY laundry basket
 How to make a stool with your own hands: we make a stool from wood, drawing and step by step instructions