The Witcher 2 passage of the mission blood curse. Complete walkthrough of the main and side quests of the second chapter
For me, there was never such a question - unconditionally, Roche. I don't even want to play as Iorveth. However, on the Internet, as it turned out, opinions were divided. Main points of contention and personal reasoning:
1. Bloody Gebnya against terrorists. I never cease to be touched by the talk of noble elves fighting for justice. Let's kill the civilian population, provoking pogroms in the quarters of non-humans - but for freedom, equality and fraternity. On the other hand, a special detachment of the Temerian military with their racism towards elves of any age and gender. In fact, both camps deserve each other. Only some stand guard over the law, while others are trying to flood the streets with blood in order to change the world for the better. Quite vital, by the way.
2. Roche got Geralt out of jail. Let me remind you that the main character was caught at the scene of the murder of Foltest without any evidence in favor of the theory of the witcher in the robes of a monk. Even if we admit the idea that the commander of the Blue Stripes did this out of selfish motives, Geralt decided to cooperate. Fleeing from one side to the other will not add credibility or popularity in both camps.
3. Roche was the first to attack Iorveth when they met in the forests of Flotsam (as an option, Geralt and Triss attacked). Firstly, the conflict between Iorveth and Roche has been going on since the beginning of the latter's command, when his group defeated the elven detachment. Surely the commander is familiar with Iorveth's tactics better than the rest of the heroes, so he chose the appropriate scenario. Secondly, later, when Zoltan meets the elves, we learn that Geralt can smell an ambush - in that episode, he counted all the archers in the trees. Nuff said.
4. Shall I give Iorveth his sword? Hmm... to choose always ready to help special forces or elves, at that time already several times trying to kill the protagonist? I don't know, such a difficult decision. It is amazing: quite often there is an opinion that helping the Blue Stripes is a betrayal of an elf who trusted Geralt. And that the sword must certainly be given away so that the struggle is waged on an equal footing. And then you can go over to Roche.
“You are thinking like a person who doesn’t care at all who cuts whom, who is not concerned, and Geralt at that moment had to choose a side. They actually fight to the death. To be honest, when I read this post, a child introduced himself dogs and watching with interest as they tear each other.
I remembered a good quote about "on an equal footing."
“With a short nod, the redhead reached for his left shoulder, to his right, then to his sides. Unfastening his shell, he took it off, dropped it to the ground and took up the greaves.
- I wanted to meet you for a long time, - he delighted me, continuing to undress. - I'm Borel. I don't want to be told later that I killed you in a dishonest fight.
Borel ... Something familiar in the name ... Well, yes, of course. This is what Dara told me, she loves and respects him very much. Her swordsman, master of the blade. The master is the master, but what a fool. Having parted with the armor, Borel parted with my respect for him. The battle is not a game, and I had no desire to surrender to the power of a self-satisfied fool with a different opinion. "" © DotanagelA
Among other things, the moment is filled with inconsistencies so much that even I do not have enough arguments to explain each. Why were Loredo's men involved in the roundup? How did two groups fit in the bushes, humans and elves? Did Geralt (and Leto!) feel their presence? And so on.
5. Iorveth makes an appointment with Geralt and Zoltan in the head-eye's lair. He just doesn't trust anyone!
6. Roche constantly forces you to make a choice between a sense of duty and Triss. I have an opinion that the game is full of situations when one character is ready to throw himself into the pool with his head, and the other seeks to cool his ardor and act according to plan. Moreover, Geralt and Roche often change places. For example, in the "Assault on Vergen" quest, the commander was ready to take revenge on Henselt with his bare hands.
The task regarding the conspiracy in the camp begins after talking with Detmold: the sorcerer will come to us when we finish talking with Henselt.
[Choice] We can track down the conspirators in two ways: help the son of Manfred [A] or find a certain Odrin and gather his drinking buddies [B].
Butcher of Cidaris
[A] Wandering around the camp, we will sooner or later end up in the dining room. There, among others, we meet Manfred, who is drinking vodka alone. If we talk to him, he will tell us about his son Sven, who is waiting for a duel with a certain Letande Avet, also known as the Butcher of Cidaris. If we offer our help, Manfred promises to do his best to thank us. We're leaving to talk to Sven. At first, he tries to get rid of us, but in the end we convince him to fight the Butcher together. We go to Avet to pitch our idea for a 2v2 fight to him. He agrees and we return to Sven. When we say that we are ready, we will be transported to the arena, where Avet and his partner are already waiting for us. [Combat] In combat, the main thing is to repel the attacks of the Butcher and deliver strong blows with a steel sword.
You can immobilize the enemy with the Sign of Yrden and stab him in the back. At the exit from the arena, we will meet Manfred, who will thank us for trying to save Sven or for saving him - depending on the outcome of the battle. We can ask him about people with square coins. Manfred is true to his word: she gives us a square coin. In addition, he advises us to go to Madame Karol's brothel and ask for Zosia the Whistle. We must ask that "her smile will open the gates of paradise for us."
This is the password of the conspirators. After the fight with Avet, Proxim will also approach us, who will say that King Henselt was watching our fight. He liked it so much that he ordered a jousting tournament. Proxim invites us to take part in the tournament, and this will be the beginning of a new task (Ave Henselt!).
Truth in beer
[B] We can also find out about Whistle Zos if we help the drunkards who roam the camp in search of their friend Audrin. To do this, we need to talk to one of the three drunken soldiers. We can go around the whole camp, but we won't find any traces. Audrin sits on the banks of the Pontar. We're leading the drunk soldier back to the camp. At the gate, sentries stop us. We can tell them that we got Audrin drunk as he is a key witness in the investigation we're running, or we can just bribe them. In any case, they will let us into the camp. We will have to wake Audrin twice: to find his comrades and to take him to the dining room. If we found all three of Audrin's friends, then we can go to the dining room to drink beer. If we get the conversation right, these gentlemen will relax and loosen their tongues. They will tell you about the brothel, Zosia's Whistle and square coins. To do this, we must say that everyone is afraid of Henselt, and then that we need information. Otherwise, we won't get anything from them.
[Choice] When we have a square coin and information about Whistle Zosa, we can go to Dethmold and tell him everything we learned. The matter will end with the fact that his soldiers will help us in the battle with the conspirators. However, we can continue to investigate the conspiracy on our own.
So, we go to Madame Carol's brothel. We say that we want to have fun with the girls, show her the money and choose the Whistle Zosya. We say to Wendy: “I want your smile to open the gates of paradise for me,” and she will open a secret passage to the lair of the conspirators.
Below we will meet Vinson Trout, whom Detmold and the foreman Zyvik told us about. Vinson has one of the magical items needed to finish the ghost fight - the Seltkirk Armor. The conspirators leave us no choice: we will have to fight. [Combat] The easiest way to kill opponents is to knock them down with the Aard Sign and then finish them off. It is important not to forget to search Trout's body after the battle and pick up the armor. There is an interesting note on the table in the middle of the room. It's worth reading. Suspiciously reminiscent of Master Buttercup's style... Looks like we'll have to talk to the poet in the camp. The first part of this quest ends with a conversation with Buttercup. Meetings with the leaders of the conspiracy will have to wait. After defeating Trout and other conspirators, we can visit Detmold and tell him about everything. The sorcerer will pay us a reward for each killed conspirator, so that we can earn good money.
If we helped Roche kill commandant Loredo, then we leave Flotsam on the ship of a special detachment of Temeria. We are going to the border of Aedirn and Kaedwen. As far as we know, Leto fled there with Triss. In the same place, near the city of Vergen, the Kaedweni army is preparing an invasion of Aedirn ...
We start Chapter 2 playing as the Kaedweni King Henselt. Accompanied by Sheala de Tanserville, the sorcerer Dethmold and the Kaedweni knights, we set out to negotiate with the Aedirn nobility. The nobles seek the patronage of King Henselt after the assassination of King Demavend. Henselt intends to use this opportunity and seize the lands of the deceased neighbor.
The famed Maiden Saskia, the dragon slayer mentioned by Iorveth in the first chapter, intervenes in negotiations with the barons. After a mutual exchange of "courtesies", the girl challenges the king to a duel. It is up to us whether we accept this challenge or follow the advice of Detmold and try to capture Saskia, which will lead to a big battle. [Combat] We shouldn't have any problems, just block enemy attacks and deal heavy blows with a steel sword. At a certain moment, the priest of Kreva will try to stop the battle, but Henselt kills him in a fit of rage... The sky darkens, fog thickens, and spirits appear from it.
Geralt and Roche approach the gates of the Kaedweni camp. The witcher's medallion begins to tremble, warning of impending danger. Suddenly, a ghostly haze covers the area. In it we meet Henselt and his companions. We must take the king out of the phantom battlefield and get to the camp. Detmold shows us the way and surrounds everyone with a protective magical barrier. [Combat] The ghosts that attack us quickly die after entering the protective dome of Detmold. We shouldn't go outside the safe territory - we won't last long outside.
In the fog, Detmold is stopped several times by ghosts. We will have to defeat them all in order to free the mage from their spells. So, we get to the Kaedweni camp. At the gate we meet foreman Zyvik. The king instructs him to show us the camp, and then bring us to the royal tent.
Zyvik leads us through the camp, showing us the blacksmith, the canteen, the hospital, and the fighting arena. If we have no desire to tour the camp with a guide, we can try to convince the old campaigner to take us right away to the upper part of the camp.
At the royal tent, we meet the Nilfgaardian ambassador - you can talk to him. Then we go to meet with Henselt. The king asks us about the murders of Foltest and Demavend and asks us to remove the curse from the battlefield. He also tells us about the events of three years ago. When we leave the royal tent, Detmold approaches us and asks us to give him some time.
Conspiracy Theory (Part One)
The task regarding the conspiracy in the camp begins after talking with Detmold: the sorcerer will come to us when we finish talking with Henselt.
[Choice] We can track down the conspirators in two ways: help the son of Manfred [A] or find a certain Odrin and gather his drinking buddies [B].
Butcher of Cidaris
[A] Wandering around the camp, we will sooner or later end up in the dining room. There, among others, we meet Manfred, who is drinking vodka alone. If we talk to him, he will tell us about his son Sven, who is waiting for a duel with a certain Letande Avet, also known as the Butcher of Cidaris. If we offer our help, Manfred promises to do his best to thank us. We're leaving to talk to Sven. At first, he tries to get rid of us, but in the end we convince him to fight the Butcher together. We go to Avet to pitch our idea for a 2v2 fight to him. He agrees and we return to Sven. When we say that we are ready, we will be transported to the arena, where Avet and his partner are already waiting for us. [Combat] In combat, the main thing is to repel the attacks of the Butcher and deliver strong blows with a steel sword. You can immobilize the enemy with the Sign of Yrden and stab him in the back. At the exit from the arena, we will meet Manfred, who will thank us for trying to save Sven or for saving him - depending on the outcome of the battle. We can ask him about people with square coins. Manfred is true to his word: she gives us a square coin. In addition, he advises us to go to Madame Karol's brothel and ask for Zosya the Whistle. We must ask that "her smile will open the gates of paradise for us." This is the password of the conspirators. After the fight with Avet, Proxim will also approach us, who will say that King Henselt was watching our fight. He liked it so much that he ordered a jousting tournament. Proxim invites us to take part in the tournament, and this will be the beginning of a new task (Ave Henselt!).
Truth in beer
[B] We can also find out about Whistle Zos if we help the drunkards who roam the camp in search of their friend Audrin. To do this, we need to talk to one of the three drunken soldiers. We can go around the whole camp, but we won't find any traces. Audrin sits on the banks of the Pontar. We're leading the drunk soldier back to the camp. Guards stop us at the gate. We can tell them we got Audrin drunk as he is a key witness in the investigation we're running, or just bribe them. In any case, they will let us into the camp. We will have to wake Audrin twice: to find his comrades and to take him to the dining room. If we found all three of Audrin's friends, then we can go to the dining room to drink beer. If we build a conversation correctly, these gentlemen will relax and loosen their tongues. They will tell about the brothel, Zosya's Whistle and square coins. To do this, we must say that everyone is afraid of Henselt, and then that we need information. Otherwise, we won't get anything from them.
[Choice] When we have a square coin and information about Whistle Zosa, we can go to Detmold and tell him everything we learned. The matter will end with the fact that his soldiers will help us in the battle with the conspirators. However, we can continue to investigate the conspiracy on our own.
So, we go to Madame Carol's brothel. We say that we want to have fun with the girls, show her the money and choose the Whistle Zosya. We say to Wendy: “I want your smile to open the gates of paradise for me,” and she will open the secret passage to the lair of the conspirators.
Downstairs we will meet Vinson Trout, whom Detmold and foreman Zyvik told us about. Vinson has one of the magical items needed to finish the battle of the ghosts - the Seltkirk armor. The conspirators leave us no choice: we will have to fight. [Combat] The easiest way to kill opponents is to knock them down with the Aard Sign and then finish them off. It is important not to forget to search Trout's body after the battle and pick up the armor. There is an interesting note on the table in the middle of the room. It's worth reading. Suspiciously reminiscent of Master Buttercup's style... Looks like we'll have to talk to the poet in the camp. The first part of this quest ends with a conversation with Buttercup. Meetings with the leaders of the conspiracy will have to wait. After defeating Trout and other conspirators, we can go to Detmold and tell him about everything. The sorcerer will pay us a reward for each killed conspirator, so that we can make good money.
Blood Curse

The king will tell you that three years ago his former adviser, Sabrina Glevissig, cursed him when he sent her to the stake on charges of betrayal. We decide to help the monarch and remove the curse from him. To do this, we need to look at Detmold and ask him a couple of questions. The sorcerer gives us a lot of valuable information about the curse, Sabrina and the spirits that attacked us in the fog. Among other things, we learn: in order to remove the spell from the king, you need to perform a special ceremony. To do this, we must find out as much as possible about the events of three years ago. In addition, Detmold advises us to inspect the place of execution of the sorceress.
lost sheep
We are going to the place indicated by Detmold. At the exit from the camp, foreman Zyvik asks us to look for two missing soldiers at the same time. We must order them to return to the camp as soon as possible.
We cross the stream at Roche's camp and walk west along the shore. On the way to the place of death of Sabrina, drowners will attack us. [Combat] The silver sword and the Aard Sign will help us against them.
We approach the circle and meet the soldiers Zyvik is looking for. They ask to be taken to the camp. But before we help them or leave them to their fate, we must inspect the place of execution. If done carefully, we will find a letter from a soldier, square coins and a nail, and we will also notice curious marks in the ashes.
After inspecting the circle, you need to talk to the soldiers. They will tell us about the cult of Sabrina, led by a man nicknamed Inspirational, and about the execution that took place at this place three years ago. They will try to take the nail we found, and if we do not agree, then our dialogues with other admirers of Sabrina will change a little.
We lead the soldiers to safety, and along the way we fight drowners emerging from the river. When we reach the ford across the stream, the soldiers thank us and leave for the camp. We've completed Zyvik's mission. When we return to the camp, we will receive a reward for our help: we will be allowed to speak with the captive Scoia'tael. He will tell us about the plans of Serrit and Egan, Leto's henchmen.
In the circle we found some interesting clues. They must be used to remove the curse from Henselt. The soldiers mentioned the Inspirational One who lives in the gorges behind the camp, and the Relic Vendor that can be found at the canteen. So, we return to the camp. On the way to the dining room, we meet soldiers who are arguing over a relic. If we have the nail we found in Sabrina's circle, we can compare it to what they have. It will immediately become clear that their relic is an ordinary fake.
We'll find a merchant in the canteen. If, when examining the place of execution of the sorceress, we noticed noticeable traces, then we will learn much more from him. The wandering merchant will tell you that Yagon pierced the dying Sabrina with a spear to end her torment. In addition, he will advise us to meet with the Inspirational.
We leave the camp and head east towards the gorges. On the way, we are waiting for the corpse-eaters, scouring the battlefield. [Combat] Monsters will attack in groups, and when they die, they will grab their heads and explode. It is best to use the Aard Sign against them and finish off stunned and knocked down creatures with a silver sword. If the corpse eater grabs its head, you need to quickly jump away from it to a safe distance - it will soon explode.
Inspiration
In the ravines we meet two soldiers fighting off the rotten ones, but we do not have time to save them. After defeating the monsters, we turn north and reach a clearing where the Inspirational hut stands. There we are attacked by harpies. [Combat] There are quite a few of them, so you should shoot them down with the Aard Sign and run to the hut. Candles burning around will scare away the creatures.
The inspired one will immediately guess that we did not come to him without a reason. We learn little from him until we win his trust. To do this, we can try to bribe him or start worshiping the cult of Sabrina Glevissig. If our purse is empty and we are ready to deceive the head of the cult, we will have to pass the test - drink the potion that the Inspirational will give us and spend the night in a crypt in a hollow nearby.
We're going to perform the ritual. In the hollow we are attacked by rotten ones, and we deal with them in the same way as with the previous ones. We find a crypt between two lakes. When it gets dark (at 21:00), you can start the ritual. We drink the potion we received from the Inspirational. We will remember what we saw for a long time ...
When it's all over, we'll return to the Inspirational's hut. As new believers, we will ask him about the events of three years ago. He will tell us about the curse that Sabrina placed on Henselt. If we ask about the artifacts needed to end the ghostly battle, the Inspirational will tell us about the Zeltkirk of the Gulet and say that his armor may be the symbol of courage we are looking for. We should also ask him about Yagon's spear, which is needed to remove the curse from King Henselt. We learn that the relic dealer must have it...
It looks like the trader didn't tell us everything... We head to the camp to have another talk with him. He confesses that he once had the spear with which Iagon ended Sabrina's agony. If we bribe, convince or intimidate him (in the latter version, we need a nail found at the place of execution), he will tell that he lost a spear in the bone to some soldier. Later, this soldier fought with the Scoia'tael in the Pontar Valley, and the spear fell to the commander of the elf detachment, Iorveth ... The merchant will say that, according to rumors, the elf joined Saskia and that he is now in Vergen, on the other side of the fog. We need to discuss this with Detmold. Maybe even now the sorcerer will be of some use to us.
Get out, evil spirit!
We inform Dethmold who now has the spear needed to break Sabrina's curse. The sorcerer recommends that we go to Vergen, a fortress on the other side of the ghostly haze. He will give us a medallion that will show us the way in the fog, and an embassy flag, which (in theory) will open the way for us to the city of dwarves.
At the exit from the upper camp, we will encounter Zoltan, grumbling about the racism that flourishes in the camp. Our friend will be happy to know that there is an opportunity to get to Vergen, although he will be wary of this venture. Thus, we find a companion for a dangerous journey. Together we step into the ghostly mist.
Before our eyes appears the battlefield of three years ago. Our witcher's medallion, combined with the amulet received from Detmold, will show us the way to Vergen. In the fog, we are constantly attacked by the spirits of fallen soldiers and draugirs - demons made from the armor and shields of the fallen. [Combat] We will have to fight for our lives. Trying to kill all opponents in the dark does not make sense. Our goal is simply to get to the other side. Against the spirits, a silver sword and the Signs of Aard and Quen should be used.
Coming out of the fog, we will follow Zoltan to the city of dwarves. In the burnt village beyond the ravine, we will encounter a squad of Scoia'tael. Thanks to Zoltan's presence, the elves won't kill us. They will advise us to meet with their commander on the outskirts of the city.
In the mentioned suburbs we meet our old friend, Yarpen Zigrin. This dwarf now serves as the commander of the guard. In a conversation with him, we learn that the banner of the Brown Banner - the symbol of death that we are looking for - can be found in the catacombs in the forest beyond Vergen. Yarpen cannot let us into the city as parliamentarians, but Zoltan decides to stay in Vergen and not return to the Kaedwens. He promises us to get the sword of General Vandergrift from Saskia - another memorable item needed to remove the curse. We agree with Zoltan that we will meet in the abandoned mines under the city. You can get there from the gorge.
Symbol of death
So, we decide to search for the banner of the Brown Banner. To do this, you need to explore the catacombs in the depths of the forest. At the entrance to the catacombs, ghosts can attack us. [Combat] The silver sword and the Signs of Yrden and Aard will help us deal with them.
We have to get to the lower level. There, in one of the halls, we meet the spirit of the standard-bearer Brown Banner. [Choice] [A] We can trick him into claiming that we once entered Buruya, or [B] we can fight him.
[A] If we claim to have served in the Brown Banner, the spirit will not believe us. But if we insist, he will ask us some questions to check. The answer to his first question is wrong. The next answer is Manno Coehoorn, and the third answer is Manno Coehoorn was killed near Brenna. The answer to the question about the generals in the battle for Vergen is Zeltkirk and Vandergrift. The last answer is that Bigerhorn took us prisoner. So we will convince the incredulous ghost, and he will allow us to take the banner from the sarcophagus. If we make a mistake, but we have a beaver hat or a cloak of the Brown Banner, the spirit will give us another chance. Otherwise, we will have to fight him. We can get these items during the Baltimore Nightmare quest or win them in dice from Scalen Bourdon.
[B] If we're not in the mood to chat with the spirit, or we give the wrong answer to one of its questions, we'll have to fight. [Combat] This is a very difficult fight to prepare for. The sign of Yrden will help us a lot: it will allow us to immobilize the enemy and finish him off with a silver sword. Now we can take the banner of the Brown Banner.
But that's not all. If we deceived the ghost, he will periodically pursue us in other battles.
Symbol of hate
We've done our part. Let's hope that Zoltan did his job and got a sword... We're going to meet the dwarf. We pass through the outskirts of Vergen and the burnt village and find ourselves in the same place where we left the fog. At the crossroads we turn left, towards the gorges, and after passing through the old gate, we turn left again. So we reach the secret entrance to the mine.

The Dwarven Mines are a real labyrinth. We will probably get lost more than once before we begin to navigate them and find the way. Not only that: the dungeon is dark, and the oil lamps are of little use. I advise you to stock up on potions in advance that will allow us to see in the dark. In the mines we will encounter corpse-eaters. [Combat] We use tried and tested methods: knock them down with the Aard Sign and finish them off with a silver sword, remembering to jump to a safe distance when they die. After a long wandering in the mines, we reach a room where we will be attacked by a two-meter duckbill. This corpse eater is big and strong like a troll. [Combat] The easiest way to deal with him is with the Sign of Yrden and a finishing blow to the back. In the corridor behind the door we will meet Zoltan and Saskia, the Dragon Slayer.
To our surprise, the girl herself will give us the sword in the hope that we will remove the curse from the battlefield. In addition, Zoltan will tell you that Iorvet lost the spear we needed in the bone. Its new owner, Scalen Bourdon, is the young dwarf we met in the suburbs.
Looks like luck is on our side. We need to take advantage of this and play dice. We return to the city and challenge the dwarf. He immediately agrees, warning that we will lose anyway. We need a spear, so we play until we win. Then we return to Henselt's camp through the mist.
Like the first time, we use our medallion in the fog and follow its instructions. This time it will be much easier to get through the fog as we can see the camp in the distance. Spirits and ghosts will meet us again. [Combat] We deal with them with quick blows of the silver sword, and if necessary, use the Signs of Aard, Quen and Yrden.
Coming out of the fog, we meet Rocher with a detachment. Vernon says that a woman came out of the mist shortly before we arrived, and that the Blue Stripes were attacked by the Nilfgaardians who met her. It looks like it was Philippa Eilhart's servant, whom the sorceress sent here in search of Triss ... Or maybe she is spying for the Empire? We hurry to the camp: perhaps Ambassador Shilard will explain everything to us. In the camp it turns out that the Nilfgaardians have already sailed ... We must talk with Henselt. Perhaps he will let us follow the Blacks.
We go to the king and tell him about the artifacts that we got on the other side of the fog. The king wants us to begin the ceremony immediately. He and his guards head to the site of Sabrina's execution. We need to meet with Detmold to get magic powder from him. With them we will draw the runes that we read about in the book taken earlier from the sorcerer.
Having received everything we need, we go to Sabrina's circle. After a brief conversation, the king leads us to a hill that overlooks the area. There we have another conversation with him. We need to accurately recreate all the events of three years ago. Under our guidance, Henselt must draw the runes that are needed for the ceremony.
It's kind of like a mini-game. If we read the book that Detmold gave us earlier, then we can easily draw the signs in the correct order. We need to create a kind of goat skull inscribed in a circle. To do this, we advise Henselt to start at the witch circle and move towards the petrified bread. Then we ask the king to go to the charred tree, and then to the carcass of the raven, curdled milk, and finally again to the witch's circle.
Now we need to set fire to the runes - this will allow the rite to begin. The signs on the ground will light up with blue flames and ghosts will appear outside the circle. In time, the barrier protecting the king and us will disappear, and evil spirits will enter. We must protect Henselt until Sabrina's spirit speaks the last words of the curse. [Combat] We fight off the attacks of ghosts with a silver sword and use Signs as necessary. Soon the king pierces the spirit of the sorceress with a spear, completing the ritual and removing the curse from himself. Henselt will be so grateful to us that he will promise to hand over the medallion - a symbol of faith needed to remove the curse from the entire battlefield. In addition, the king will invite us to the tent to celebrate the liberation…
Kingslayers

When we remove the curse of Sabrina Glevissig from the king, Henselt invites us to a feast. Arriving at the upper camp, we see that the monarch is receiving the Redanian ambassador. The guards won't let us into the king's tent, and we'll have to wait until evening. After 22:00 we make another attempt. The ambassador informs Henselt that after the death of Foltest and as a result of the tragic death of Prince Bussi, his sister Anais may become the heir to the throne. The king asks us about some details of the siege of the castle of La Valette. However, the conversation is interrupted by the murderer, from whose hand the ambassador will fall. We save the king with the Sign of Aard. We are waiting for a fight with two killers. [Combat] Our opponents are strong enough. In a fight with them, it is worth using blocks and the Yrden Sign.
At a certain point, Sheala intervenes in the fight, and one of the assassins manages to escape. Henselt wants to talk to us again, and this time he invites his court sorcerers - Sheala and Detmold. The latter wants to resort to necromancy, magic forbidden by the Chapter. This is the only way to get at least some information from the dead killer.
Now we are free. We can finish other tasks or wander around the camp. But if we want to know more about the killers, it's time to visit Detmold. We'll find him at the field hospital in the lower camp. He proposes to conduct a necromantic ritual together. To participate in it, we need Rook potion. If we do not have its recipe, we can buy it from one of the merchants in the camp. The ingredients can be easily found on the field next to the camp. When we prepare the potion and drink it, we need to talk to the sorcerer again. Detmold begins the ritual...
Thanks to necromancy, we now see the world through the eyes of the killer - Egan. We are in a gorge, far from the camp. We have another kingslayer with us, Zerrit. We need to get to the hideout. Along the way, we encounter harpies that live in the gorges. [Combat] Strong blows of the silver sword will clear the way for us. Soon, Serrit leads us to the hideout. We go strictly behind him, trying not to touch the traps with which it is surrounded. So we will reach the place where the main killer is located - Summer. We talk to the Kingslayer and learn that Sheala de Tanserville is also involved in the plot and that the assassins no longer need her. Also, Leto says he's going to Loc Muinne.
Then, still under the influence of Detmold's spell, we are transported to Henselt's camp. Zerrit is walking along the wall, and we need to sneak on the ground. If we fail, we will return to the field hospital and the vision will end. If we want to know more, we will have to try. We must hide behind a stone on the left and wait for the sentries to finish talking and leave. Now you need to get to the end of the passage between the tents and the palisade. If we succeed, we will find ourselves in a cave under the camp, where Zerrit will voice his ideas regarding the creation of a new Council and Chapter of Sorcerers at a meeting in Loc Muinne. Then the spell will take us to the upper camp, where we will have to fight to get into Henselt's tent. [Combat] We need to deal with the two-handed guards and shieldmen armed with two-handed swords. We must parry their blows and deliver power blows with a steel sword.
The action of necromancy ends, and we come to our senses in the hospital. We briefly retell everything we saw, and go to the hideout of the killers. The wounded Zerrit is probably there. First we can wander around the camp and finish the rest of the tasks. After that, we go to the cave of the killers along the path that we walked during the vision. We find a dying Zerrit in the same place where we met Leto in the vision. We briefly talk with him about Sheal. Now we must return to Detmold and tell him about everything. The sorcerer tells us that it's time to remove the curse from the battlefield, and gives us Henselt's medallion - a symbol of faith that we need to dispel the darkness. After that, it remains for us to uncover the conspiracy. If the plot is already revealed, you can remove the curse from the battlefield.
Eternal fight
We promised Henselt that we would at least try to lift the curse from the battlefield. Only by getting rid of the ghostly haze will we be able to leave the king's camp and go in pursuit of the Nilfgaardians who kidnapped Triss.
Throughout the second chapter, we will collect information and look for a way to get rid of ghosts. Thanks to our own experience and the help of the sorcerer Detmold, we find out that we will need four artifacts related to the battle three years ago: symbols of faith, courage, hatred and death. When we complete the earlier quests that make up the main storyline, we will come to the conclusion that the artifacts we need are the following: Henselt's medallion, Seltkirk's armor, Vandergrift's sword, and the banner of the Brown Banner. We will receive the medallion from Henselt when we complete the Assassins of Kings quest, the armor after the battle with Vinson Trout and the conspirators (Conspiracy Theory), and in Vergen (Blood Curse) we will get the sword and banner.
Having obtained all four artifacts, we go to Detmold's tent and ask him for the last advice. Then we go into the darkness.
In the mist, the spirit of an Aedirnian soldier takes possession of us. Our commander gives orders to the archers and sends us to capture the enemy banner. We run through the defenses to the spirits of the Kaedweni warriors defending the banner. [Combat] We must block and strike quickly. We are deprived of witcher abilities, so we will have to do without Signs, potions and bombs.
After that, the spirit of the Kaedweni soldier is instilled in us. We must inform our commander that the banner has fallen into the hands of the enemy. Arrows rain down from the sky. Hiding behind wooden shields, we cross the battlefield. The archers fire at regular intervals, so we're safe between shots. This is how we get to our general. Vandergrift. Draugh. The General enters into battle with Sabrina Glewessig, court sorceress of King Henselt.
Sabrina sends a rain of fire onto the battlefield. We have been possessed by the spirit of the Aedirn commander Zeltkirk. Once again we engage in battle with the spirits and ghosts of the Kaedweni soldiers. [Combat] We only have a sword at our disposal. We try to block enemy attacks and strike back quickly. In the end, we find ourselves face to face with Vandergrift. The spirit of Zeltkirk leaves our body, and in the battle with the draug we can finally use all the abilities of the witcher.
[Combat] The fight with the draug is one of the most difficult in the game. The Kaedweni general has become a demon that can turn into a tornado, call out a volley of archers, and finally send Sabrina's fireballs at us. When the draug uses his special abilities, we'd better take cover behind something. When he is not using them, we should attack him with a silver sword. Most Signs are useless in this fight, but Quen can be useful. You also need to use dodges and rolls to get close to the demon from the side and deliver a powerful blow.
After the death of the demon, the spirit of the Kaedweni priest will take possession of us, who will try to lead the soldiers out from under the fiery shower. Hiding behind cover, we head towards the edge of the fog...
Conspiracy Theory (Part Two)

After we have removed the curse from the battlefield, Dandelion will wake us up. He tells what happened in our absence. The soldiers are dissatisfied with Henselt's agreements with Nilfgaard, and Detmold has arrested several conspirators, and if we do not do something immediately, he will send another half of the camp to the rack. Henselt went with the army to Vergen. In addition, Buttercup informs us that the conspirators are hiding in the house at the top of the hill.
We hasten to the place the poet spoke of. To our surprise, we meet Vernon Rocher there. We have no choice: we must help Roche. Together we rush to the Temerians' tent in search of Bianca. At the Blue Stripes camp we are attacked by Kaedweni soldiers. [Combat] We will win if we skillfully parry blows and use the Signs of Aard and Yrden. We see that the tent is empty. The camp whore reveals that Detmold has invited Roche's men to a banquet in the camp dining room. We go there, but on the way we run into Kaedweni soldiers left in the camp. [Combat] Our enemies are numerous, some of them have halberds, so we will have to be careful. You need to put blocks and dodge. The signs of Yrden, Quen and Aard will also come in handy. Arriving at the place, we will find all the people of Roche ... hanged. Only Bianca survived. She tells who did it. Burning with a thirst for revenge, Rocher rushes to Vergen to find and punish Henselt. Geralt is more interested in Sheala de Tanserville, who also fled to Vergen. It's payback time...
Assault on Vergen

So, we are heading to the besieged Vergen. Our path leads through the gorges, which we are familiar with on the assignment of the Assassins of Kings, so we are again looking forward to meeting with the harpies. In the depths, where there used to be fog, we find ancient debris, and next to them is a troll.
[Choice] We can talk to her politely and find out that her husband recently met someone going to Loc Muinne. Or we can kill her to save time. On the way to Vergen, near the old quarry, we should be ready to meet harpies. Then, in the hollow, we will have the opportunity to save the troll's husband, who was attacked by three Kaedweni mercenaries. If we killed the troll before, her husband will attack us. Around the bend we meet Kaedweni shieldmen. [Combat] Don't forget about blocks and strike hard with the steel sword. After the fight, we will notice one of Detmold's men nearby. It turns out that the sorcerer also knows about the secret passage to Vergen.
Wasting no time, we hurry to the cave. We don't have to look long for a runaway soldier. We face him... and his comrades. This is revealed to be one of Adam Pangratt's men. We have already seen him in the camp. He will order his people to kill us, and he himself will go deeper into the caves. We'll have to draw our sword again. [Combat] This is a rather difficult fight. It is best to block enemy attacks and use a combination of powerful and speedy strikes with a steel sword. The signs Aard and Igni will also come in handy. Deeper in the caves we will find another group of mercenaries. Making our way deeper and deeper, we will meet Detmold himself. [Combat] The most important thing is to deal with Pangratt. To do this, you need to alternately use strong and high-speed strikes and put blocks. You should also beware of Dethmold's spells and use rolls to dodge them. When the mercenaries are defeated, the sorcerer will open a portal and disappear. We rush forward: Vergen should be close by. At the exit from the caves, we meet Zoltan, who tells us that Sheala is in the house of another sorceress - Philippa Eilhart. [Choice] In addition, Zoltan will say that the Kaedweni have laid siege to Iorveth . It's up to us to decide [A] whether we want to help the elf, or [B] immediately go after Sheala.
[A] We climb the stairs to the suspension bridge that Chivay was talking about. Roche runs ahead, but the bridge falls and we are left alone. If we want to help Iorvet, then first we run to the right, to the fortification that Zoltan told us about. There we will face a large force of Kaedweni. [Combat] In this fight, you should not forget about blocks and strong blows. After the victory, Iorveth will have a short talk with us.
[B] Now we just have to find Sheala de Tanserville. On the way to Philippa's house, we will come across a few more soldiers. Then, after a couple of steps, we will have to face the monster that the sorceress summoned. [Combat] It is important not to forget about blocks: this monster can easily knock Geralt down. The Sign of Igni and the strong blows of the silver sword will help us.
We get to Philippa's house only to see the sorceress open the portal. Sheala de Tanserville will advise us not to look for her again. She will disappear along with Saskia, and Henselt will appear instead. The king will order us to be killed. [Combat] In this battle, we will need a combination of blocks, the Sign of Igni, and strong strikes of the steel sword. After defeating the enemies, we will have to deal with Henselt. Meanwhile, Roche will break into Philippa's house. [Choice] It's time to decide what to do with the king of Kaedwen. We have a choice. [A] We can spare him and tell Roche it's better to keep our hands clean, or [B] let Roche kill the king. This decision will have serious consequences in the third chapter.
Looks like all roads lead to Loc Muinne...
Prologue | Chapter I
ROCHE'S PATH
Prelude to War: Kaedwen
If we helped Roche kill commandant Loredo, then we leave Flotsam on the ship of a special detachment of Temeria. We are going to the border of Aedirn and Kaedwen. As far as we know, Leto fled there with Triss. In the same place, near the city of Vergen, the Kaedweni army is preparing an invasion of Aedirn...
We start Chapter 2 playing as the Kaedweni King Henselt. Accompanied by Sheala de Tanserville, the sorcerer Dethmold and the Kaedweni knights, we set out to negotiate with the Aedirn nobility. The nobles seek the patronage of King Henselt after the assassination of King Demavend. Henselt intends to use this opportunity and seize the lands of the deceased neighbor.
The famed Maiden Saskia, the dragon slayer mentioned by Iorveth in the first chapter, intervenes in negotiations with the barons. After a mutual exchange of "courtesies", the girl challenges the king to a duel. It is up to us whether we accept this challenge or follow the advice of Detmold and try to capture Saskia, which will lead to a big battle. [Combat] We shouldn't have any problems, just block enemy attacks and deal heavy blows with a steel sword. At a certain moment, the priest of Kreva will try to stop the battle, but Henselt kills him in a fit of rage... The sky darkens, fog thickens, and spirits appear from it.
Geralt and Roche approach the gates of the Kaedweni camp. The witcher's medallion begins to tremble, warning of impending danger. Suddenly, a ghostly haze covers the area. In it we meet Henselt and his companions. We must take the king out of the phantom battlefield and get to the camp. Detmold shows us the way and surrounds everyone with a protective magical barrier. [Combat] The ghosts that attack us quickly die after entering the protective dome of Detmold. We shouldn't go outside the safe territory - we won't last long outside.
In the fog, Detmold is stopped several times by ghosts. We will have to defeat them all in order to free the mage from their spells. So, we get to the Kaedweni camp. At the gate we meet foreman Zyvik. The king instructs him to show us the camp, and then bring us to the royal tent.
Zyvik leads us through the camp, showing us the blacksmith, the canteen, the hospital, and the fighting arena. If we have no desire to tour the camp with a guide, we can try to convince the old campaigner to take us right away to the upper part of the camp.
At the royal tent, we meet the Nilfgaardian ambassador - you can talk to him. Then we go to meet with Henselt. The king asks us about the murders of Foltest and Demavend and asks us to remove the curse from the battlefield. He also tells us about the events of three years ago. When we leave the royal tent, Detmold approaches us and asks us to give him some time.
Conspiracy Theory (Part One)The task regarding the conspiracy in the camp begins after talking with Detmold: the sorcerer will come to us when we finish talking with Henselt.
[Choice] We can track down the conspirators in two ways: help the son of Manfred [A] or find a certain Audrin and gather his drinking companions [B].
Butcher of Cidaris[A] Wandering around the camp, sooner or later we will end up in the dining room. There, among others, we meet Manfred, who is drinking vodka alone. If we talk to him, he will tell us about his son Sven, who is waiting for a duel with a certain Letande Avet, also known as the Butcher of Cidaris. If we offer our help, Manfred promises to do his best to thank us. We're leaving to talk to Sven. At first, he tries to get rid of us, but in the end we convince him to fight the Butcher together. We go to Avet to pitch our idea for a 2v2 fight to him. He agrees and we return to Sven. When we say that we are ready, we will be transported to the arena, where Avet and his partner are already waiting for us. [Combat] In combat, the main thing is to repel the attacks of the Butcher and deliver strong blows with a steel sword. You can immobilize the enemy with the Sign of Yrden and stab him in the back. At the exit from the arena, we will meet Manfred, who will thank us for trying to save Sven or for saving him - depending on the outcome of the battle. We can ask him about people with square coins. Manfred is true to his word: she gives us a square coin. In addition, he advises us to go to Madame Karol's brothel and ask for Zosya the Whistle. We must ask that "her smile will open the gates of paradise for us." This is the password of the conspirators. After the fight with Avet, Proxim will also approach us, who will say that King Henselt was watching our fight. He liked it so much that he ordered a jousting tournament. Proxim invites us to take part in the tournament, and this will be the beginning of a new task (Ave Henselt!).
Truth in beer[B] We can also find out about Whistle Zos if we help the drunkards who roam the camp in search of their friend Audrin. To do this, we need to talk to one of the three drunken soldiers. We can go around the whole camp, but we won't find any traces. Audrin sits on the banks of the Pontar. We're leading the drunk soldier back to the camp. Guards stop us at the gate. We can tell them we got Audrin drunk as he is a key witness in the investigation we're running, or just bribe them. In any case, they will let us into the camp. We will have to wake Audrin twice: to find his comrades and to take him to the dining room. If we found all three of Audrin's friends, then we can go to the dining room to drink beer. If we build a conversation correctly, these gentlemen will relax and loosen their tongues. They will tell about the brothel, Zosya's Whistle and square coins. To do this, we must say that everyone is afraid of Henselt, and then that we need information. Otherwise, we won't get anything from them.
[Choice] When we have a square coin and information about Whistle Zosa, we can go to Detmold and tell him everything we learned. The matter will end with the fact that his soldiers will help us in the battle with the conspirators. However, we can continue to investigate the conspiracy on our own.
So, we go to Madame Carol's brothel. We say that we want to have fun with the girls, show her the money and choose the Whistle Zosya. We say to Wendy: “I want your smile to open the gates of paradise for me,” and she will open the secret passage to the lair of the conspirators.
Downstairs we will meet Vinson Trout, whom Detmold and foreman Zyvik told us about. Vinson has one of the magical items needed to finish the ghost battle - the Seltkirk Armor. The conspirators leave us no choice: we will have to fight. [Combat] The easiest way to kill opponents is to knock them down with the Aard Sign and then finish them off. It is important not to forget to search Trout's body after the battle and pick up the armor. There is an interesting note on the table in the middle of the room. It's worth reading. Suspiciously reminiscent of Master Buttercup's style... Looks like we'll have to talk to the poet in the camp. The first part of this quest ends with a conversation with Buttercup. Meetings with the leaders of the conspiracy will have to wait. After defeating Trout and other conspirators, we can go to Detmold and tell him about everything. The sorcerer will pay us a reward for each killed conspirator, so that we can make good money.
Blood CurseComplete walkthrough of the main and side quests of the second chapter
 Complete walkthrough of the main and side quests of the second chapter
The king will tell you that three years ago his former adviser, Sabrina Glevissig, cursed him when he sent her to the stake on charges of betrayal. We decide to help the monarch and remove the curse from him. To do this, we need to look at Detmold and ask him a couple of questions. The sorcerer gives us a lot of valuable information about the curse, Sabrina and the spirits that attacked us in the fog. Among other things, we learn: in order to remove the spell from the king, you need to perform a special ceremony. To do this, we must find out as much as possible about the events of three years ago. In addition, Detmold advises us to inspect the place of execution of the sorceress.
lost sheepWe are going to the place indicated by Detmold. At the exit from the camp, foreman Zyvik asks us to look for two missing soldiers at the same time. We must order them to return to the camp as soon as possible.
We cross the stream at Roche's camp and walk west along the shore. On the way to the place of death of Sabrina, drowners will attack us. [Combat] The silver sword and the Aard Sign will help us against them.
We approach the circle and meet the soldiers Zyvik is looking for. They ask to be taken to the camp. But before we help them or leave them to their fate, we must inspect the place of execution. If done carefully, we will find a letter from a soldier, square coins and a nail, and we will also notice curious marks in the ashes.
After inspecting the circle, you need to talk to the soldiers. They will tell us about the cult of Sabrina, led by a man nicknamed Inspirational, and about the execution that took place at this place three years ago. They will try to take the nail we found, and if we do not agree, then our dialogues with other admirers of Sabrina will change a little.
We lead the soldiers to safety, and along the way we fight drowners emerging from the river. When we reach the ford across the stream, the soldiers thank us and leave for the camp. We've completed Zyvik's mission. When we return to the camp, we will receive a reward for our help: we will be allowed to speak with the captive Scoia'tael. He will tell us about the plans of Serrit and Egan, Leto's henchmen.
In the circle we found some interesting clues. They must be used to remove the curse from Henselt. The soldiers mentioned the Inspirational One who lives in the gorges behind the camp, and the Relic Vendor that can be found at the canteen. So, we return to the camp. On the way to the dining room, we meet soldiers who are arguing over a relic. If we have the nail we found in Sabrina's circle, we can compare it to what they have. It will immediately become clear that their relic is an ordinary fake.
We'll find a merchant in the canteen. If, when examining the place of execution of the sorceress, we noticed noticeable traces, then we will learn much more from him. The wandering merchant will tell you that Yagon pierced the dying Sabrina with a spear to end her torment. In addition, he will advise us to meet with the Inspirational.
We leave the camp and head east towards the gorges. On the way, we are waiting for the corpse-eaters, scouring the battlefield. [Combat] Monsters will attack in groups, and when they die, they will grab their heads and explode. It is best to use the Aard Sign against them and finish off stunned and knocked down creatures with a silver sword. If the corpse eater grabs its head, you need to quickly jump away from it to a safe distance - it will soon explode.
InspirationIn the ravines we meet two soldiers fighting off the rotten ones, but we do not have time to save them. After defeating the monsters, we turn north and reach a clearing where the Inspirational hut stands. There we are attacked by harpies. [Combat] There are quite a few of them, so you should shoot them down with the Aard Sign and run to the hut. Candles burning around will scare away the creatures.
The inspired one will immediately guess that we did not come to him without a reason. We learn little from him until we win his trust. To do this, we can try to bribe him or start worshiping the cult of Sabrina Glevissig. If our purse is empty and we are ready to deceive the head of the cult, we will have to pass the test - drink the potion that the Inspirational will give us and spend the night in a crypt in a hollow nearby.
We're going to perform the ritual. In the hollow we are attacked by rotten ones, and we deal with them in the same way as with the previous ones. We find a crypt between two lakes. When it gets dark (at 21:00), you can start the ritual. We drink the potion we received from the Inspirational. We will remember what we saw for a long time ...
When it's all over, we'll return to the Inspirational's hut. As new believers, we will ask him about the events of three years ago. He will tell us about the curse that Sabrina placed on Henselt. If we ask about the artifacts needed to end the ghostly battle, the Inspirational will tell us about the Zeltkirk of the Gulet and say that his armor may be the symbol of courage we are looking for. We should also ask him about Yagon's spear, which is needed to remove the curse from King Henselt. We learn that the relic dealer must have it...
It looks like the trader didn't tell us everything... We head to the camp to have another talk with him. He confesses that he once had the spear with which Iagon ended Sabrina's agony. If we bribe, convince or intimidate him (in the latter version, we need a nail found at the place of execution), he will tell that he lost a spear in the bone to some soldier. Later, this soldier fought with the Scoia'tael in the Pontar Valley, and the spear fell to the commander of the elf detachment, Iorvet ... The merchant will say that, according to rumors, the elf joined Saskia and that he is now in Vergen, on the other side of the fog. We need to discuss this with Detmold. Maybe even now the sorcerer will be of some use to us.
Get out, evil spirit!We inform Dethmold who now has the spear needed to break Sabrina's curse. The sorcerer recommends that we go to Vergen, a fortress on the other side of the ghostly haze. He will give us a medallion that will show us the way in the fog, and an embassy flag, which (in theory) will open the way for us to the city of dwarves.
At the exit from the upper camp, we will encounter Zoltan, grumbling about the racism that flourishes in the camp. Our friend will be happy to know that there is an opportunity to get to Vergen, although he will be wary of this venture. Thus, we find a companion for a dangerous journey. Together we step into the ghostly mist.
Before our eyes appears the battlefield of three years ago. Our witcher's medallion, combined with the amulet received from Detmold, will show us the way to Vergen. In the fog, we are constantly attacked by the spirits of the fallen soldiers and draugirs - demons made from the armor and shields of the fallen. [Combat] We will have to fight for our lives. Trying to kill all opponents in the dark does not make sense. Our goal is simply to get to the other side. Against the spirits, a silver sword and the Signs of Aard and Quen should be used.
Coming out of the fog, we will follow Zoltan to the city of dwarves. In the burnt village beyond the ravine, we will encounter a squad of Scoia'tael. Thanks to Zoltan's presence, the elves won't kill us. They will advise us to meet with their commander on the outskirts of the city.
In the mentioned suburbs we meet our old friend, Yarpen Zigrin. This dwarf now serves as the commander of the guard. In a conversation with him, we learn that the banner of the Brown Banner - the symbol of death that we are looking for - can be found in the catacombs in the forest beyond Vergen. Yarpen cannot let us into the city as parliamentarians, but Zoltan decides to stay in Vergen and not return to the Kaedwens. He promises us to get the sword of General Vandergrift from Saskia - another memorable item needed to remove the curse. We agree with Zoltan that we will meet in the abandoned mines under the city. You can get there from the gorge.
Symbol of deathSo, we decide to search for the banner of the Brown Banner. To do this, you need to explore the catacombs in the depths of the forest. At the entrance to the catacombs, ghosts can attack us. [Combat] The silver sword and the Signs of Yrden and Aard will help us deal with them.
We have to get to the lower level. There, in one of the halls, we meet the spirit of the standard-bearer Brown Banner. [Choice] [A] We can trick him into claiming that we once entered Buruya, or [B] we can fight him.
[A] If we claim to have served in the Brown Banner, the spirit will not believe us. But if we insist, he will ask us some questions to check. The answer to his first question is wrong. The next answer is Manno Coehoorn, and the third answer is Manno Coehoorn was killed near Brenna. The answer to the question about the generals in the battle for Vergen is Zeltkirk and Vandergrift. The last answer is that Bigerhorn took us prisoner. So we will convince the incredulous ghost, and he will allow us to take the banner from the sarcophagus. If we make a mistake, but we have a beaver hat or a cloak of the Brown Banner, the spirit will give us another chance. Otherwise, we will have to fight him. We can get these items during the Baltimore Nightmare quest or win them in dice from Scalen Bourdon.
[B] If we're not in the mood to chat with the spirit, or we give the wrong answer to one of its questions, we'll have to fight. [Combat] This is a very difficult fight to prepare for. The sign of Yrden will help us a lot: it will allow us to immobilize the enemy and finish him off with a silver sword. Now we can take the banner of the Brown Banner.
But that's not all. If we deceived the ghost, he will periodically pursue us in other battles.
Symbol of hateWe've done our part. Let's hope that Zoltan did his job and got a sword... We're going to meet the dwarf. We pass through the outskirts of Vergen and the burnt village and find ourselves in the same place where we left the fog. At the crossroads we turn left, towards the gorges, and after passing through the old gate, we turn left again. So we reach the secret entrance to the mine.
Complete walkthrough of the main and side quests of the second chapter
 Complete walkthrough of the main and side quests of the second chapter
Dwarven mines are a real labyrinth. We will probably get lost more than once before we begin to navigate them and find the way. Not only that: the dungeon is dark, and the oil lamps are of little use. I advise you to stock up on potions in advance that will allow us to see in the dark. In the mines we will encounter corpse-eaters. [Combat] We use tried and tested methods: knock them down with the Aard Sign and finish them off with a silver sword, remembering to jump to a safe distance when they die. After a long wandering in the mines, we reach a room where we will be attacked by a two-meter duckbill. This corpse eater is big and strong like a troll. [Combat] The easiest way to deal with him is with the Sign of Yrden and a finishing blow to the back. In the corridor behind the door we will meet Zoltan and Saskia, the Dragon Slayer.
To our surprise, the girl herself will give us the sword in the hope that we will remove the curse from the battlefield. In addition, Zoltan will tell you that Iorvet lost the spear we needed in the bone. Its new owner, Scalen Bourdon, is the young dwarf we met in the suburbs.
Looks like luck is on our side. We need to take advantage of this and play dice. We return to the city and challenge the dwarf. He immediately agrees, warning that we will lose anyway. We need a spear, so we play until we win. Then we return to Henselt's camp through the mist.
Like the first time, we use our medallion in the fog and follow its instructions. This time it will be much easier to get through the fog as we can see the camp in the distance. Spirits and ghosts will meet us again. [Combat] We deal with them with quick blows of the silver sword, and if necessary, use the Signs of Aard, Quen and Yrden. Coming out of the fog, we meet Rocher with a detachment.
Vernon says that a woman came out of the mist shortly before we arrived, and that the Blue Stripes were attacked by the Nilfgaardians who met her. It looks like it was Philippa Eilhart's servant, whom the sorceress sent here in search of Triss ... Or maybe she is spying for the Empire? We hurry to the camp: perhaps Ambassador Shilard will explain everything to us. In the camp it turns out that the Nilfgaardians have already sailed ... We must talk with Henselt. Perhaps he will let us follow the Blacks.
We go to the king and tell him about the artifacts that we got on the other side of the fog. The king wants us to begin the ceremony immediately. He and his guards head to the site of Sabrina's execution. We need to meet with Detmold to get magic powder from him. With them we will draw the runes that we read about in the book taken earlier from the sorcerer. Having received everything we need, we go to Sabrina's circle.
After a brief conversation, the king leads us to a hill that overlooks the area. There we have another conversation with him. We need to accurately recreate all the events of three years ago. Under our guidance, Henselt must draw the runes that are needed for the ceremony.
It's kind of like a mini-game. If we read the book that Detmold gave us earlier, then we can easily draw the signs in the correct order. We need to create a kind of goat skull inscribed in a circle. To do this, we advise Henselt to start at the witch circle and move towards the petrified bread. Then we ask the king to go to the charred wood, and then to the carcass of the raven, curdled milk, and finally again to the witch's circle.
Now we need to set fire to the runes - this will allow the rite to begin. The signs on the ground will light up with blue flames and ghosts will appear outside the circle. In time, the barrier protecting the king and us will disappear, and evil spirits will enter. We must protect Henselt until Sabrina's spirit speaks the last words of the curse. [Combat] We fight off the attacks of ghosts with a silver sword and use Signs as necessary. Soon the king pierces the spirit of the sorceress with a spear, completing the ritual and removing the curse from himself. Henselt will be so grateful to us that he will promise to hand over the medallion - the symbol of faith needed to remove the curse from the entire battlefield. In addition, the king will invite us to the tent to celebrate the liberation...
KingslayersComplete walkthrough of the main and side quests of the second chapter
 Complete walkthrough of the main and side quests of the second chapter
When we remove the curse of Sabrina Glevissig from the king, Henselt invites us to a feast. Arriving at the upper camp, we see that the monarch is receiving the Redanian ambassador. The guards won't let us into the king's tent, and we'll have to wait until evening. After 22:00 we make another attempt. The ambassador informs Henselt that after the death of Foltest and as a result of the tragic death of Prince Bussi, his sister Anais may become the heir to the throne. The king asks us about some details of the siege of the castle of La Valette. However, the conversation is interrupted by the murderer, from whose hand the ambassador will fall. We save the king with the Sign of Aard. We are waiting for a fight with two killers. [Combat] Our opponents are strong enough. In a fight with them, it is worth using blocks and the Yrden Sign.
At a certain point, Sheala intervenes in the fight, and one of the assassins manages to escape. Henselt wants to talk to us again, and this time he invites his court sorcerers - Sheala and Detmold. The latter wants to resort to necromancy, magic forbidden by the Chapter. This is the only way to get at least some information from the dead killer.
Now we are free. We can finish other tasks or wander around the camp. But if we want to know more about the killers, it's time to visit Detmold. We'll find him at the field hospital in the lower camp. He proposes to conduct a necromantic ritual together. To participate in it, we need Rook potion. If we do not have its recipe, we can buy it from one of the merchants in the camp. The ingredients can be easily found on the field next to the camp. When we prepare the potion and drink it, we need to talk to the sorcerer again. Detmold begins the ritual...
Thanks to necromancy, we now see the world through the eyes of a killer - Egan. We are in a gorge, far from the camp. We have another kingslayer with us, Zerrit. We need to get to the hideout. Along the way, we encounter harpies that live in the gorges. [Combat] Strong blows of the silver sword will clear the way for us. Soon, Serrit leads us to the hideout. We go strictly behind him, trying not to touch the traps with which it is surrounded. So we will reach the place where the main killer is located - Summer. We talk to the Kingslayer and learn that Sheala de Tanserville is also involved in the plot and that the assassins no longer need her. Also, Leto says he's going to Loc Muinne.
Then, still under the influence of Detmold's spell, we are transported to Henselt's camp. Zerrit is walking along the wall, and we need to sneak on the ground. If we fail, we will return to the field hospital and the vision will end. If we want to know more, we will have to try. We must hide behind a stone on the left and wait for the sentries to finish talking and leave. Now you need to get to the end of the passage between the tents and the palisade. If we succeed, we will find ourselves in a cave under the camp, where Zerrit will voice his ideas regarding the creation of a new Council and Chapter of Sorcerers at a meeting in Loc Muinne. Then the spell will take us to the upper camp, where we will have to fight to get into Henselt's tent. [Combat] We need to deal with the two-handed guards and shieldmen armed with two-handed swords. We must parry their blows and deliver power blows with a steel sword.
The action of necromancy ends, and we come to our senses in the hospital. We briefly retell everything we saw, and go to the hideout of the killers. The wounded Zerrit is probably there. First we can wander around the camp and finish the rest of the tasks. After that, we go to the cave of the killers along the path that we walked during the vision. We find a dying Zerrit in the same place where we met Leto in the vision. We briefly talk with him about Sheal. Now we must return to Detmold and tell him about everything. The sorcerer tells us that it's time to remove the curse from the battlefield, and gives us Henselt's medallion - a symbol of faith that we need to dispel the darkness. After that, it remains for us to uncover the conspiracy. If the plot is already revealed, you can remove the curse from the battlefield.
Eternal fightWe promised Henselt that we would at least try to lift the curse from the battlefield. Only by getting rid of the ghostly haze will we be able to leave the king's camp and go in pursuit of the Nilfgaardians who kidnapped Triss.
Throughout the second chapter, we will collect information and look for a way to get rid of ghosts. Thanks to our own experience and the help of the sorcerer Detmold, we find out that we will need four artifacts related to the battle three years ago: symbols of faith, courage, hatred and death. When we complete the earlier quests that make up the 74th main storyline, we will come to the conclusion that the following artifacts are needed for nm: Henselt's medallion, Seltkirk's armor, Vandergrift's sword and the banner of the Brown Banner. We will receive the medallion from Henselt when we complete the Assassins of Kings quest, the armor after the battle with Vinson Trout and the conspirators (Conspiracy Theory), and in Vergen (Blood Curse) we will get the sword and banner.
Having obtained all four artifacts, we go to Detmold's tent and ask him for the last advice. Then we go into the darkness.
In the mist, the spirit of an Aedirnian soldier takes possession of us. Our commander gives orders to the archers and sends us to capture the enemy banner. We run through the defenses to the spirits of the Kaedweni warriors defending the banner. [Combat] We must block and strike quickly. We are deprived of witcher abilities, so we will have to do without Signs, potions and bombs. After that, the spirit of the Kaedweni soldier is instilled in us.
We must inform our commander that the banner has fallen into the hands of the enemy. Arrows rain down from the sky. Hiding behind wooden shields, we cross the battlefield. The archers fire at regular intervals, so we're safe between shots. This is how we get to our general. Vandergrift. Draugh. The General enters into battle with Sabrina Glewessig, court sorceress of King Henselt.
Sabrina sends a rain of fire onto the battlefield. We have been possessed by the spirit of the Aedirn commander Zeltkirk. Once again we engage in battle with the spirits and ghosts of the Kaedweni soldiers. [Combat] We only have a sword at our disposal. We try to block enemy attacks and strike back quickly. In the end, we find ourselves face to face with Vandergrift. The spirit of Zeltkirk leaves our body, and in the battle with the draug we can finally use all the abilities of the witcher.
[Combat] The fight with the draug is one of the most difficult in the game. The Kaedweni general has become a demon that can turn into a tornado, call out a volley of archers, and finally send Sabrina's fireballs at us. When the draug uses his special abilities, we'd better take cover behind something. When he is not using them, we should attack him with a silver sword. Most Signs are useless in this fight, but Quen can be useful. You also need to use dodges and rolls to get close to the demon from the side and deliver a powerful blow.
After the death of the demon, the spirit of the Kaedweni priest will take possession of us, who will try to lead the soldiers out from under the fiery shower. Hiding behind cover, we head towards the edge of the fog...
Conspiracy Theory (Part Two)Complete walkthrough of the main and side quests of the second chapter
 Complete walkthrough of the main and side quests of the second chapter
After we have removed the curse from the battlefield, Dandelion will wake us up. He tells what happened in our absence. The soldiers are dissatisfied with Henselt's agreements with Nilfgaard, and Detmold has arrested several conspirators, and if we do not do something immediately, he will send another half of the camp to the rack. Henselt went with the army to Vergen. In addition, Buttercup informs us that the conspirators are hiding in the house at the top of the hill.
We hasten to the place the poet spoke of. To our surprise, we meet Vernon Rocher there. We have no choice: we must help Roche. Together we rush to the Temerians' tent in search of Bianca. At the Blue Stripes camp we are attacked by Kaedweni soldiers. [Combat] We will win if we skillfully parry blows and use the Signs of Aard and Yrden. We see that the tent is empty. The camp whore reveals that Detmold has invited Roche's men to a banquet in the camp dining room. We go there, but on the way we run into Kaedweni soldiers left in the camp. [Combat] Our enemies are numerous, some of them have halberds, so we will have to be careful. You need to put blocks and dodge. The signs of Yrden, Quen and Aard will also come in handy. When we arrive, we'll find all of Roche's people... hanged. Only Bianca survived. She tells who did it. Burning with a thirst for revenge, Rocher rushes to Vergen to find and punish Henselt. Geralt is more interested in Sheala de Tanserville, who also fled to Vergen. It's payback time...
Assault on VergenComplete walkthrough of the main and side quests of the second chapter
 Complete walkthrough of the main and side quests of the second chapter
So, we are heading to the besieged Vergen. Our path leads through the gorges, which we are familiar with on the assignment of the Assassins of Kings, so we are again looking forward to meeting with the harpies. In the depths, where there used to be fog, we find ancient debris, and next to them is a troll.
[Choice] We can talk to her politely and find out that her husband recently met someone going to Loc Muinne. Or we can kill her to save time. On the way to Vergen, near the old quarry, we should be ready to meet harpies. Then, in the hollow, we will have the opportunity to save the troll's husband, who was attacked by three Kaedweni mercenaries. If we killed the troll before, her husband will attack us. Around the bend we meet Kaedweni shieldmen. [Combat] Don't forget about blocks and strike hard with the steel sword. After the fight, we will notice one of Detmold's men nearby. It turns out that the sorcerer also knows about the secret passage to Vergen.
Wasting no time, we hurry to the cave. We don't have to look long for a runaway soldier. We face him... and his comrades. This is revealed to be one of Adam Pangratt's men. We have already seen him in the camp. He will order his people to kill us, and he himself will go deeper into the caves. We'll have to draw our sword again. [Combat] This is a rather difficult fight. It is best to block enemy attacks and use a combination of powerful and speedy strikes with a steel sword. The signs Aard and Igni will also come in handy. Deeper in the caves we will find another group of mercenaries. Making our way deeper and deeper, we will meet Detmold himself. [Combat] The most important thing is to deal with Pangratt. To do this, you need to alternately use strong and high-speed strikes and put blocks. You should also beware of Dethmold's spells and use rolls to dodge them. When the mercenaries are defeated, the sorcerer will open a portal and disappear. We rush forward: Vergen should be close by. At the exit from the caves, we meet Zoltan, who tells us that Sheala is in the house of another sorceress - Philippa Eilhart. [Choice] In addition, Zoltan will say that the Kaedweni have laid siege to Iorveth . It's up to us to decide [A] whether we want to help the elf, or [B] immediately go after Sheala.
[A] We climb the stairs to the suspension bridge that Chivay was talking about. Roche runs ahead, but the bridge falls and we are left alone. If we want to help Iorvet, then first we run to the right, to the fortification that Zoltan told us about. There we will face a large force of Kaedweni. [Combat] In this fight, you should not forget about blocks and strong blows. After the victory, Iorveth will have a short talk with us.
[B] Now we just have to find Sheala de Tanserville. On the way to Philippa's house, we will come across a few more soldiers. Then, after a couple of steps, we will have to face the monster that the sorceress summoned. [Combat] It is important not to forget about blocks: this monster can easily knock Geralt down. The Sign of Igni and the strong blows of the silver sword will help us. We get to Philippa's house only to see the sorceress open the portal. Sheala de Tanserville will advise us not to look for her again. She will disappear along with Saskia, and Henselt will appear instead. The king will order us to be killed. [Combat] In this battle, we will need a combination of blocks, the Sign of Igni, and strong strikes of the steel sword. After defeating the enemies, we will have to deal with Henselt. Meanwhile, Roche will break into Philippa's house. [Choice] It's time to decide what to do with the king of Kaedwen. We have a choice. [A] We can spare him and tell Roche it's better to keep our hands clean, or [B] let Roche kill the king. This decision will have serious consequences in the third chapter.
Looks like all roads lead to Loc Muinne...
We also recommend
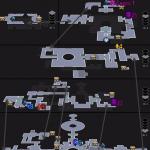 Passage of the game Darksiders II Key to Redemption
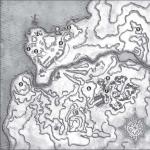 Complete walkthrough of the main and side quests of the second chapter
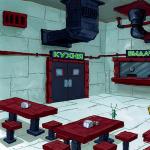 SpongeBob SquarePants (Walkthrough)
 spongebob games squarepants
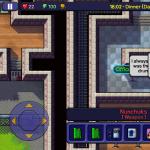 Escape Impossible: Revenge Walkthrough Walkthrough Can you escape video
 And the dragon came. Difficulty of choice. Key points of the game The Witcher 2 kill the dragon or escape the consequences