Darksiders 2 Complete Walkthrough Achievement Guide
Achievement difficulty: 5/10
Offline: 47 (930 )
Online: 4 (70 ). You need to go through all the waves of the Crucible (The Crucible) and send a gift to a friend. Requires an online pass, the code for which is printed on the back of the manual. An Xbox Live connection is required.
Approximate amount of time needed to get 1000: 35-40 hours
Minimum number of playthroughs: 1+ (you can say 2. Of course, you can immediately start the game on maximum difficulty, but then you will need to continue playing in order to reach level 30. In addition, in order to pass The Crucible tests, it is advisable to collect the most effective loot and upgrade your skills.I advise you to play the game on easy or medium difficulty, and only in New Game+ mode start Apocalyptic difficulty.When you get the achievement for the maximum difficulty, you can reduce the difficulty to finish the remaining achievements).
Number of achievements to skip: 0
Do cheat codes affect achievements?: Not
Does difficulty affect achievements? Yes. However, completing the higher difficulty levels will count the achievements for the lower difficulty levels.
Glitched Achievements: Yes (there are reports of some achievements not unlocking)
Unobtainable achievements?: Not
Additional conditions?: The Crucible Pass code is required for two achievements.
Introduction:
Before us is a third-person hack "n" slash game, complemented by RPG elements and various puzzles. Darksiders 2 is a sequel to another game, which is not required to pass - you can enjoy the second part without it. Unless you can miss some plot points. There are many different collectibles in the game, as well as side quests that complement the single player campaign. Backtracking will be present at a few points, so it's best to leave the collection of collectibles to a later stage of the passage. Since you will have to start a New Game+ anyway, I advise you to start with the average difficulty and choose the maximum one on the second playthrough. Fortunately, there are no achievements related to the combat system of the game in the project. To beat absolutely everything, you will need an online pass, which is included in all new copies of the game (if you bought a used disc, you will most likely have to buy a pass in the digital store). As in any other RPG, you will collect a whole bunch of all kinds of loot. Try not to waste money and sell extra items. It is better to save items highlighted with purple edging. The save system in the game involves the use of only one slot, but if you wish, you can arrange manipulation with USB storage or a cloud service. Some people have reported various glitches that forced them to start the game from scratch. The author of these lines, for example, had a glitch due to which it was impossible to complete one story quest, but moreover, I was able to go further by some miracle.
First pass. Any difficulty, collectibles and side quests:
I suppose that the most successful option would be the passage on medium difficulty. Then you will have to collect collectibles and complete side quests. The game itself is not very difficult, but you will probably die quite often due to accidental falls into the abyss. One thing to keep in mind - the progress of collectibles and side quests will not be saved across New Game+. That is, if you do not have time to collect everything during the first playthrough, then on the New Game + you will have to collect everything from scratch. The point of no return can be considered the Well of Souls when you go to fight the final boss. But even if you missed the moment, before starting a new game, you can load the last save.
Walkthrough New Game+:
Now you can choose the maximum difficulty. Complete only story missions. Now you will need to complete the game and get the hero level 30.
Online achievements:
With the online pass, you can send a gift to a friend and perform in the arena, where you will have to go through 100 waves of opponents and then defeat the boss, however, we advise you to do this in one sitting after you reach level 30 and collect all the necessary loot. To enable the minimum difficulty after the maximum, do the following: after obtaining the achievement for the Apocalyptic difficulty, do not start a new game, but load a save and change the difficulty setting.
Conclusion:
The game is actually not very difficult, but it may take you a while to collect all the achievements, complete side quests, collect loot, change outfits and puzzles. And not many people like to go through the game again. Therefore, to the question of whether it is worth trying to knock out 1000 over the weekend when you rented the game, I will answer unequivocally - no. It is worth knocking it out only if you bought it, and it will lie with you for quite some time.
| Permissiveness / BFA | 10 | ||
|
Get access to everything. |
|||
|
This achievement is awarded for completing all other achievements. You will receive it after unlocking the 49th achievement. |
|||
| Full Potential | 30 | ||
|
Unlock all tricks and upgrades. |
|||
|
You can buy tricks from various trainers. There are two of them in the game - Thane, whom you will meet almost at the beginning, and the ghostly skeleton Draven, who lives near the Eternal Throne. In total, you will need to buy 21 receptions, which will cost 150,000 souls.
|
|||
| Selflessness / Pay It Forward | 10 | ||
|
Gift an item to a friend. |
|||
|
It is only available online and requires an online pass. You can get the achievement during your first visit to the Forge Lands, in the Trestone Fortress. Approach the snake emblem, activate the statue. Then click, right-click with the left stick and press. Select a player who also has Darksiders 2. If you wish, you can complete the gift with your message - to do this, clickand enter text. After completing the package, click. It is better to send something unnecessary, because you can return the item on the condition that it is sent back to you. You can even send a gift to your second account, even if it has a silver status. |
|||
| Feeding Time | 20 | ||
|
Level up the 1st possessed weapon. |
|||
|
You need to find the possessed weapon. It rarely drops from enemies and chests. It is highlighted in orange. In the inventory above it will be written "Possessed". Take the first such weapon, and the hint system will tell you about its features. Then enter the inventory menu, click on the weaponand in the small menu, select the "improve" item by feeding him some loot. As soon as the pumping scale is full, you will receive an achievement. |
|||
| Class! / epic! | 10 | ||
|
Death reaches level 30. |
|||
|
Level 30 is the maximum level for your character. You have to start the game again in New Game+ mode to get to the maximum level. After the first playthrough, in which you complete all side quests, you will level up to about level 22. |
|||
| Abracadabra / Abracadabra | 30 | ||
|
Open all tombs. |
|||
|
In total, you have to open 4 tombs. They are large treasures in which you can find a bunch of useful items. The entrance to the treasuries is complemented by a large dragon statue above the door, and colored stones are placed on the door itself. To open each door, you need to buy keys from Vulgrim, exchanging 10 pages of the Book of the Dead for one key. In total, you need 4 keys, and, accordingly, find 40 pages of the Book of the Dead.
To find all pages use video guide. |
|||
| Is there anybody here? / Is There Anyone Else? | 30 | ||
|
Complete the Crucible. |
|||
|
Requires code "Crucible". You need to activate the online pass, and then reach the game until you defeat the Colossus Guardian. After that, you can go through the map to the desired location and start the quest. You have to fight waves of opponents. To open access to additional waves, you need to go through the game further. But as we have already advised, it is better to go to the Crucible arena after you reach level 30 and collect all the useful loot. You will definitely not complete all the waves at least until you reach level 25.
|
|||
| Requalification / Respec Yourself | 20 | ||
|
Your first retraining. |
|||
|
You can redistribute skills with Vulgrim. You can meet him for the first time in the Weeping Cliff location while you are playing through the main story campaign. He will demand 1000 souls from you, in return for which he will reset his skill points. If you don't have a lot of money, you can go to the dashboard and download the game again. |
|||
| Bravo, old / Bravo Old Chap | 20 | ||
|
Defeat Wicked K. |
|||
|
Requires code "Crucible". After defeating all the waves of enemies in the arena, you have to face the Wicked K boss. Defeat him and get the achievement. |
|||
| Soul Reaping | 30 | ||
|
Get access to the Reaper skin. |
|||
|
This achievement is story related and cannot be missed. This technique will open at level 6. |
|||
| The Secondary Adventure | 50 | ||
|
Complete all side missions. |
|||
|
Side quests are marked with purple dots on the map. You can activate them, then they will turn into the color of the main task. Various characters give out side quests, but some of them can be started randomly. You need to complete all the quests in one playthrough. Video guide for the side quest “Light of the Fallen”: |
|||
| 90 | |||
|
Complete the game on APOCALYPTIC difficulty. |
|||
|
This complexity is the maximum. Starting the passage with this level of difficulty, you will receive other achievements for the difficulty. If you feel strong enough in yourself to cope with this challenge, you can immediately start the game on apocalyptic difficulty. But still, we advise you to play it at the intermediate level, and leave it for replay in the New Game+. That is, after getting level 22 and after getting all the other achievements. In this case, you will have to quickly run through the story part of the game. |
|||
| Brother for Brother / Four My Brother | 90 | ||
|
Complete the game on NORMAL difficulty. |
|||
|
Cm. " A True Horseman”. |
|||
| Safari in the land of demons / A Stroll In The Demonic Park | 30 | ||
|
Complete the game on any difficulty. |
|||
|
Cm. " A True Horseman”. |
|||
| Down to the Last Crumb / All You Can Eat Buffet | 30 | ||
|
Complete "Sticks and Stones". |
|||
|
After meeting with one of the stone constructs in the Fjord location, you will be given the opportunity to shoot down the stones that hang in various locations. Shoot them with a pistol, and they will be counted in your piggy bank. To complete the quest, you need to find 34 mystic stones, 25 power stones and 10 resistance stones. |
|||
| Surprise for you / I "ve Brought You A Gift | 30 | ||
|
Defeat Judge of Souls. |
|||
|
This boss can be found in the Labyrinth - this location was created for a side quest issued by an advisor. You can find it in the Eternal Throne in the Kingdom of the Dead. In this location you will find individual pages of the maze map. You will also find additional pages that will indicate the path to rare loot, but you can do without it, however. Below are the directions for each section of the maze. FROM ( N) - North, Yu (S) - South, B (E) - East, W (W) - West. First floor:
Second floor:
Third floor:
Fourth floor:
Fifth floor:
Sixth floor:
Seventh floor:
Eighth floor:
Ninth floor:
Tenth floor:
|
|||
| Antiquary / Antiquing | 30 | ||
|
Complete Lost Relics. |
|||
|
There are a total of 30 relics in the game that you can sell to the Ostegoth. There are three types in total. There are 15 relics of Etu-Goth in the game, 10 relics of Renagoth, 5 relics of Kagoth. |
|||
| I'm Cool / Like a Noss | 30 | ||
|
Defeat four creatures named Thane. |
|||
|
After a short duel with Thane, you can take on a side quest in which you need to kill four creatures:
|
|||
| Lord of the Black Stone | 10 | ||
|
Complete the quest "Lord of the Black Stone". |
|||
|
Meet in the story, you will not miss it. This is one of the last quests in the game. |
|||
| Mad Queen / The Mad Queen | 10 | ||
|
Complete the mission "The Mad Queen". |
|||
|
Meet in the story. This is a very short quest. You just need to talk to Lilith and get Time Traveler from her. Once you get to the Black Stone location, go to the east door and go up the stairs. |
|||
| Stains of Heresy | 10 | ||
|
Complete the "Stains of Heresy" quest. |
|||
|
Meet in the story at the end of the game. |
|||
| On Parade / Mass Ruckus | 10 | ||
|
Equip only great items. |
|||
|
There are 7 slots for equippable items in the inventory. Elite items have a purple frame. You need to find Scythe, secondary weapon, shoulder pad, armor, gloves, boots and talisman. All this can be found in chests or in the corpses of opponents. If desired, you can buy items from Vulgrim. Buy a Decorated Strongbox from him for 10,000 souls and 8 coins. If you wish, you can go to the dashboard, returning your money. |
|||
| True Master / Diamond Geezertron | 10 | ||
|
Get access to the last skill on any branch of the skill tree. |
|||
|
In total, the game has two branches of character development, and, accordingly, there are only two last skills. These are Reaper's Storm and Frenzy. You must be at least level 20 and still have upgrade points. |
|||
| The Rod of Arafel | 10 | ||
|
Complete the "Wand of Arafel" quest. |
|||
| The Root Of Corruption | 10 | ||
|
Open the Well of Souls. |
|||
|
This achievement is story related and cannot be missed. |
|||
| City of the Dead | 10 | ||
|
Complete "City of the Dead". |
|||
|
This achievement is story related and cannot be missed. |
|||
| Book of the Dead / The Book of the Dead | 10 | ||
|
Complete the "Book of the Dead" quest. |
|||
|
The Book of the Dead can be collected by finding all the pages scattered around the game world. This side quest will be given to you by Vulgrim. You can find it in the Weeping Cliff location. Look for the merchant icon on the minimap. After talking to him, you will take the quest. After collecting all 40 pages, return to it. |
|||
| The Court of Bones | 10 | ||
|
Defeat Vasilevs. |
|||
|
This achievement is story related and cannot be missed. This boss is the third in a row among those whom you must find and bring to the Bone Lord. The quest associated with it is called the Court of Bones. Killing him won't be hard at all, just keep hitting him. A couple of times he will jump on a giant spider, but in this case it will be even easier to hit him. |
|||
| Royal fee / The Toll of Kings | 10 | ||
|
Complete the "Royal Pay" quest. |
|||
|
This achievement is story related and cannot be missed. |
|||
| The Lord of Bones / The Lord of Bones | 10 | ||
|
Complete the quest "The Lord of Bone". |
|||
|
This achievement is story related and cannot be missed. |
|||
| Tree of Life / Tree of Life | 10 | ||
|
Complete the "Tree of Life" quest. |
|||
|
This achievement is story related and cannot be missed. |
|||
| Heart of the Mountain | 10 | ||
|
Complete the "Heart of the Mountain" quest. |
|||
|
This achievement is story related and cannot be missed. |
|||
| To Move a Mountain | 10 | ||
|
Complete the "Move the Mountain" mission. |
|||
|
This achievement is story related and cannot be missed. |
|||
| Gnomad / Gnomad | 40 | ||
|
Complete the mission "Gnomad". |
|||
|
This side quest involves collecting collectibles. In the game you need to find 4 figures of gnomes. Video guide: |
|||
| Tears of the Mountain | 10 | ||
|
Complete the mission "Tears of the Mountains". |
|||
|
This achievement is story related and cannot be missed. |
|||
| Fire of the Mountain | 10 | ||
|
Complete the "Flame of the Mountains" quest. |
|||
|
This achievement is story related and cannot be missed. |
|||
| Steep Dive / The Triple Lindy | 15 | ||
|
Perform 3 different jumps in the Smelter. |
|||
|
In the location "Smelter" during the quest where you need to awaken the guard, you will reach the area where you need to activate the second Heart Stone. In this location there will be many different ditches with water. You will need to jump into the water, then swim and climb the giant to activate the lever. On the way back you will come across three balconies. Instead of carefully getting off, jump down. You will also need to climb up twice more to jump from the other two balconies. Map:
|
|||
| By Your Command / By Your Command | 10 | ||
|
Obtain a stone of excommunication. |
|||
|
This achievement is story related and cannot be missed. |
|||
| Death Will Tear Us Apart | 10 | ||
|
Get the Spirit Divider. |
|||
|
This achievement is story related and cannot be missed. |
|||
| I recognize this thing / Looks Familiar | 10 | ||
|
Get "Atonement". |
|||
|
This achievement is story related and cannot be missed. |
|||
| Through time / Tearing Time A New One | 10 | ||
|
Get the Time Traveler. |
|||
|
This achievement is story related and cannot be missed. |
|||
| Can I have a piece? / I Can Has Cake? | 10 | ||
|
Acquire "Traveler in the Void". |
|||
|
This achievement is story related and cannot be missed. |
|||
| Ghost Touch / The Spectral Touc | 10 | ||
|
Get Death Grip. |
|||
|
This achievement is story related and cannot be missed. |
|||
| Pathfinder / Pathfinder | 10 | ||
|
Use fast travel for the first time. |
|||
|
Once you reach the Cauldron quest, you can move around the map by pressing, and then switching the menu to the map tab. There you need to select the desired location and click. |
|||
| The Godfather / The Big Boss | 20 | ||
|
Defeat Absalom. |
|||
|
This achievement is story related and cannot be missed. This is the last boss in the game. He does not have a second form of metamorphosis, which would somehow change the course of the battle. Beat him and you will complete the game and also get the achievement. Surprisingly, fighting him is pretty easy. |
|||
| Soul Crusher | 20 | ||
|
Defeat the Howling Bolshak. |
|||
|
This achievement is story related and cannot be missed. This boss will meet you in the City of the Dead. Keep hitting him until he spawns skeletons. Then deal with them and start killing him again. Then take off his mask. Repeat a few times and you will kill him. |
|||
| We're not done yet! / It's Not Over | 20 | ||
|
Defeat Samael. |
|||
|
This achievement is story related and cannot be missed. This boss will meet near the end of the game, when you need to get the Demon Key. Periodically, he will sit on the throne, and then you should carefully dodge the fire that appears under your feet. |
|||
| Clipped Wings | 20 | ||
|
Defeat the Archon. |
|||
|
This achievement is story related and cannot be missed. This boss can be killed during the Spots of Heresy quest. Attack him all the time, wait for him to drop his shield and use the harpoon to continue hitting him. It may seem a bit more difficult than the rest of the bosses. It is possible that you will need several attempts. |
|||
| Ashes to Ashes / Dust to Dust | 20 | ||
|
Defeat the Guardian. |
|||
|
This achievement is story related and cannot be missed. During the story, you will awaken a huge stone giant. He will only attack with two types of strikes. Dodge him (the easiest way to do this is on a horse). When he puts his hand on the ground, shoot the bomb attached to his hand. Then pull with the harpoon and climb it. When he throws fireballs at you, shoot them while they are flying in the air. Then try to get a giant between you and the ball. All you have to do is climb onto his arm and pull the stone out of him. |
|||
| Voronyatina / Crow Carrion | 20 | ||
|
Defeat the Elder Raven. |
|||
|
This achievement is story related and cannot be missed. You will get this achievement after defeating the very first boss. Just hit him and dodge. After the victory, approach him and talk. |
|||


Translation - Roberta. Editing - Madnfs
Difficulty: Normal.
Find a way to save War.
Let's watch the introductory video. The balance of the world was disturbed, the brother of the protagonist is to blame for this. Death is sent to correct the mistakes of the War. On the horse we get to the Dark Fortress. Climb up and deal with enemies. We pick up the items that fell from them. We go inside, run along the walls, holding the jump button. We jump from one beam to another, turning 180 degrees. We destroy the enemies, climb the wall with vines and smoothly move to the ceiling. Difficulties should not arise with the first mini-boss - the Ice Giant. We strike - we deflect. Then we pass into the corridor, make a double run along the wall and push the mechanism to start the elevator.
We go up, climb the ledges. We jump from wall to wall and climb up. We continue to move vertically along the vines. We move to the right to the beams, follow the instructions displayed on the screen. We deal with enemies, go down the vines. In order not to fall into the abyss, we get to them by running along the wall. We move to the right, we jump onto the ledges, then onto the beams, we climb higher and higher. Meet the Keeper of Secrets. We carry out target acquisition in order to focus our eyes on War. We attack and dodge the triple blows of the enemy. Having used up a little less than half of the health, we quickly press the button to gain the upper hand. We finish off the brother and, using the portal, we move to another place. Before that, the Keeper of Secrets strikes us, but then we manage to kill him.
The Elder heals our wound and then sends out a Construct of Warriors. We deal with them and communicate with a new acquaintance.
The flame of the mountains
We move along the paths and get to the Trestone, where we meet the beautiful Elia and her brother Valus, the keepers of the forge. It is necessary to help the creators, to free the Flame of the mountains and the Tears of the mountains from corruption. Our benefit is that then we can get to the tree. Once upon a time, blacksmiths created a great assistant who coped with damage, but while the forge is captured, accordingly, it will not be possible to summon an assistant. We communicate with Thane and ask him to open the gate. Before leaving, you can acquire various skills from him.
We run forward, in front of the abyss we go around to the right, climbing the wall. Having got out into a vast territory, we see in the distance a one-eyed monster blocking the path. We call the horse and go to the Cauldron. Arriving at the place, we help Karn to destroy the constructs. We enter the building, use the mechanism on the right to open the next door. To successfully move through dangerous corridors, you need to remember a few rules:
We grab and throw shadow bombs at mechanisms that cannot be reached
We search the chests and find a lot of useful items
We hold the corresponding button so that the raven shows us the right path
We push the balls into the sockets, and to extract them from them, we use bombs
We extract from the chests special keys that unlock the green doors
Thus, we get to the first boss Garn. The danger is his chainsaw hand, we jump off at the moment of attack to the right or left. When the enemy is weakened, we inflict as many blows as possible and move away, as Garn has a habit of exploding and gathering again. We destroy the boxes, in some of them you can find healing potions. As a reward, we get the Dark Avenger weapon, which once belonged to the ferocious warrior Draven and therefore absorbed the rage and vindictiveness of its owner.
We pass through the doors and turn the lever in the center 720 degrees counterclockwise. The cauldron is replenished with unquenchable flames. Now you can return to Elia and report on the work done. To quickly move to it, open the global map and select the target (Armor and weapons). After talking with Elia, we get the Atonement pistol belonging to Discord.
Mountain tears.
We get to the open area and rush on a horse to the gate. After talking with Karn, we shoot at the reddish pimple on the gate and pass on. On the way we encounter enemies, flying Pityers will pester us endlessly until we destroy the hotbed where these creatures come from. The gates ahead are closed, on the left the damage has blocked the ledges. We shoot at the pimple and climb up. We deal with enemies, go further and jump down. We get to the Storm Fort.
We run along the corridor, in front of the door we turn right and climb up. We grab the shadow bomb, throw it at the ball on the opposite side. We shoot at the bomb, jump down, push the ball into the appropriate slot. We pass through the door and move to the next one on the left. We continue to go forward until we get to the statue in the center of the room. We climb up on the right, we are taught to jump from wall to wall while running along it. Push the ball down and install it in the socket. Now we go to the left, rise and jump. A little further there is another ledge, we climb along them and pick up the shadow bomb. We release the ball in the corner, again we go after the bomb and attach it to the ball. We push the ball to the locked gate. We climb onto the platform in the center along one of the sides, where there is a ledge. We step on the button and shoot at the bomb on the ball. We install the ball in the place intended for it. We pass through the opened door, in the corridor we destroy the pityers and the hotbed. Behind the next door, we undermine the damage that enveloped the lever and start the flow of water. We jump into the water and go down to the end of the current. Then we climb the ledges on the left, open the door, jump into the water again. We continue to swim, this time under water. We climb up, while running we jump from wall to wall. We fall into a trap, chop small enemies, and then deal with a larger one.
We go further, we need a key to open the door on the left. We jump into the drained drain and go along it to the end. We get to the chest, take the key and return to the door. We move along the corridors and get into a room with a puzzle. First you need to get the ball, you can do this, as we already know, with a bomb that is at the top. It's not possible to push the ball just like that, so we use a proprietary technique, thanks to which the ball instantly appears on top. We place it in the slot, grab the bomb and stand on the lowered platform. We throw a bomb into the ball and blow it up. We pass through the corridor, where we deal with enemies and a hotbed. Behind the next door we pull the lever - it does not lend itself. We shoot at the bomb on the damage, activate the lever again. We jump into the water and swim to the end. Climb up, pull the lever. We get into a huge territory, we are interested in the door on the right. We pass there and meet with the boss Karkinos. Our actions will be as follows:
1) We grab the ball and forcefully push it into Kirkonas
2) Quickly destroy the hatched crab and attack the soft belly of the boss
3) Run and dodge underground creatures
4) Dodge the battering ram
As a reward, we get the "Crusher from Kirkonas" - a powerful hammer that unleashes colossal damage on the heads of enemies. We go to the lever, activate it and, having opened the global map, we quickly move to Elia. We enter the forge working at full power and take the key of the creator from the ancient one, which will help activate the Guard in the smelter. To do this, we first need to get to the forest and find a construct there.
Move the mountain.
After entering the building, we activate the construct and bring it to the connector in the floor, as we did earlier with the balls. We shoot at the target under the door and move along the chain to the other side. We deal with the enemies, take away the shadow bomb from the small room and destroy the damage. We climb ledges, beams and again ledges. We jump off, rounding the lowest ledge, and go down the stairs. We deal with the flyers and the hotbed, from where they appear. We pass through the door, go up the stairs to the left. On the right we will see a ledge, we climb along them to the next door.
We find ourselves outside and run to the door with multi-colored elements. But so far it will not be possible to open it, so we enter the next building. We destroy the enemies, climb the stairs and go into the next room. We activate the construct on the left and use it to clear the path to the door. We get up on the connector and jump off the construct. We face enemies, in order to destroy the sentinel construct, it is necessary that he launch an attack. We quickly jump back and, returning in a jump, strike. On the ledges we go around the crystals of damage. We get to the next hall and go around the abyss along the ledges on the left. Using the construct, we split the corruption crystals on the opposite side. We return there and activate the lever. We quickly return along the bridge to the construct and make our way along the corridor to the hall. We go straight, stand in the connector and release the chain. We move to the other side, shoot at the bomb on the left. We install the ball in the slot, deal with the enemies and stand right in front of the grate next to the bomb. We grab it and throw it into the ball - we shoot. We get the key from the chest, along the vines we return to the construct. We saddle it, remove the chain and unlock the green door. On the vines on the wall and ceiling we get to the lever. With the help of the construct, we cut our way to the connector, leave it and move on. In the arena we fight with many enemies and five sentries who will attack one at a time. The most important thing is to destroy them in time to prevent the appearance of new enemies. With each new sentry there will be more enemies, and they become larger.
We get along the corridors to a small room, where there is a designer in the corner, and a lowered lift is in front. We get up on the lift as a constructor. We climb to the left side through the ledge and along the walls we move to the opposite side. We pass further, on the left is the designer. Using it, we raise the lift (the path to the connector from the lift is indicated by circles on the floor). Where the second constructor stood there is a connector, we lower the grate. With another constructor we pass through the place where the grate fell. We also get up in the slot and shoot the chain. On the beams we return to the designer, we drive them to the connector near the beam. The door is open, we can go through it. Having got out, we get to the next door on the right. We deal with the manifesting snoops and later with two mini-bosses. Don't forget to use Reaper Form to effectively defeat large enemies. We pass inside, roll the ball into the slot, in the next room there are again two large enemies. We are not fond of combinations, we make several blows and dodge.
We get to the boss Lump-construct. Despite its huge size, the enemy has a weak point - the heart, hidden under the thickness of the armor. Actions are as follows:
1) We run in a circle, being as far as possible from Uvalnya
2) Watch out for the shockwaves and jump when they get close to us
3) Quickly pick up one of the fallen shadow bombs, throw it at the enemy and shoot
4) We strike at the dropped heart, without being distracted by other small enemies
5) We continue to run in a circle, finishing off the embroidered enemies
We go upstairs, interact with a huge statue, that is, with the Guardian. After talking, we sit on his shoulder, and he takes us to the Valley of the Father of Stones. On the advice of the ancient, we return to Eidard and communicate with him.
Mountain heart.
We pass through the forge and communicate with the Guardian. The bridge has been restored, and meanwhile we have a satellite - Karn. We get to the smelter, we go along the circular path. We interact with a partner - he will throw us over the abyss. We climb up the ledges, wait for the boiler and jump onto it. We move to the right, getting ready to jump. Jumping down, we cross the abyss by running along the wall. We destroy the constructs, pull the lever on the left, go through the door. We jump on the lever, open the door for Karn. He runs to the next door and prepares to hold it when we jump off the lever.
We get to the Guardian and in order to revive him, you need to get three Hearts of Stone. Turn left and go to the first passage. We get to a structure. The bird points the way up, Karn will help you get there. We jump into the water, swim under it to the other side. Thus, we get to the ball, now you need to open the door. We pass further, again we dive into the water. There will be a passage through which we will get to the button. The door has opened, Karn will hold it while we get the orb out of here. We push the ball by force into the slot on the wall. A constructor appears from under the water, activate it and move back from where we came from. At the crossroads, turn right, destroy the crystals. We go straight to the next passage. We stand on the connector, start the circuit. Having reached its half, we jump into the vines on the left. We climb up, then we jump along the beams. In the next room we run from wall to wall, we cling to the ledge. We wait until the magma flow disappears, and quickly run along the wall. After passing through the door, we deal with enemies. We get to the chest, we extract the key from it. Right from here we jump onto the chain and head to the original room, where we unlock the green door.
We rise along the twisted stairs, we pass further. Karn will transfer us to the opposite side, and we must immediately eliminate small opponents. We go further, free a certain object from the shackles and get the ability "Death Grip", which allows you to cling to objects / targets located at a distance. We return back, using a death grip to cross over the abyss, jump onto the lever and wait for Karn to hold the door. Or we go around through the passage on the left. Further, we pass into the room on the right. We destroy a couple of enemies. Bombs hang at the top right, we grab them with a death grip and throw them into the mechanism on the left. We go further, along the beams on the left we get to the lever. Activate it and climb the wall to the ledges and jump onto the beam. In the jump, we use the grip, move along the vines on the ceiling, jump again and find ourselves at the lever. We activate it - the bridge is completely restored. Now we climb the wall and move along the ledges to the right. We get to the lift, pull the lever and go down. Everything is as usual, we move along the beams, ledges, when running along the wall we use a death grip. We press the button, we are attracted to Karn and we are thrown to the other side. We keep our way down, where we can activate the construct and get to the Heart of the Stone. We attach ourselves to him and drop him down so that his partner can deliver him to the Guardian. We will be attacked in the elevator, destroy everyone and stand in front of the Guardian.
A new path has opened, we cross the magma using a death grip. We pass through the first pipe, kill the flyers, move along the second pipe. We stand on the button and wait until Karn holds the next door. Then he will throw us over the abyss, we fly over the second abyss on our own with the help of a grip. We revive the construct and stand in the place allotted for it - between the two columns. We shoot with a chain and climb up to the central hill. Rotate the lever counterclockwise 360 degrees. We quickly jump down and prepare to jump onto the ledge of the slowly lowering platform on the left. We climb onto the chain, from the chain to the center. On the vines we climb to the right and get to the lever. Activate it, bridges appear. We go back, saddle the construct and with the help of it we pass through two bridges and destroy the interfering crystals.
We find ourselves in the territory where we see the second Heart of the stone. We destroy the enemies and jump into the water on the left. We climb along the wall to the vines, then along the ledges, we help ourselves with the help of a death grip. Next, jump back into the water on the other side. We keep the way up to the lever along the ledges and beams. Activating the lever will cause the water level to rise. We return to Karn and, driving the construct, we drive up to the stonebreaker. We pull the nearby lever, the construct is destroyed, and its ball falls into the hole. This ball then ends up in a cauldron that collapses under the weight. Periodically, a bomb appears at the bottom of passing boilers. We attract it with a death grip and throw it at the crystals above. We climb up, take the key from the chest. We unlock the door nearby, roll the ball back into the socket in the floor. We climb the walls, jumping from one to another, and get to the Heart of Stone. We return to the Guardian, in the room with bridges the water level has risen. We jump down and climb the indicated ledges. We get through the pipes to the button that opens the door.
The last heart is left, if we don’t know where to go, then we ask Dust to show the way. We are interested in a lattice door through which Karn will help to get over. There will be a lever on the right, activate it. We restore the construct, with the help of it we cut through the path, destroying the crystals. We clean the room with the Heart and stand in the corresponding slot in the center. We climb the wall, we pass further. Using a death grip, we reach the beam in a jump. We move along them, then a long run along the wall, using the grip. We are getting to the Heart quite quickly, but the most interesting is ahead. As soon as we free the Corrupted Heart, Karn will take it away, and we will find ourselves in traps, alone with the Corrupted Guard boss. Rather, he is only a warm-up opponent, since an epic battle awaits us later. The scheme of action is as follows:
1) Avoiding Claps and Dangerous Spins
2) Quickly carry out a series of attacks with scythes, and when the enemy is weakened - with additional weapons
We approach the guard and freeze in doubt. After all, the Heart is tainted with corruption, and activating a guardian with this item can lead to the most terrible consequences. And so it happens, the defender, who should be the main weapon in the fight against corruption, himself became this very corruption. We follow it, that is, we get out of this place and get to the Trestone. Then we go to the forest, where we will meet the raging Guardian. The battle will take place in several stages:
Stage 1:
1) Run clockwise (on a horse) and dodge hammer blows
2) Distance from the Guardian - as far as possible
3) Hold on the sight, and as soon as the enemy's hammer is on the ground, shoot at the shadow bombs on his hand
4) We quickly run up to the Heart and are attracted to it with a death grip, inflicting three blows
5) Repeat these steps until the arm falls off completely
Stage 2:
1) We run in any direction, the main thing is not to collide with a huge shadow bomb
2) We shoot the bomb until it flies up
3) We stand right behind the Guardian, but we don’t come close to him
4) The bomb will fly towards us, but will collide with an obstacle between us, that is, with the Guardian
5) We quickly run up to the fallen cannon, climb up it and cling to the Heart in a jump; throw three standard hits
6) Repeat these steps until the arm falls off completely
We watch the video of the destruction of the last Heart. The ancient of the last strength again restores the purified Guardian so that he can remove corruption from the path.
Tree of life.
We get to the ill-fated place where we communicate with brother Absalon, who became Corruption. Then we will talk with the merchant, we can buy more powerful weapons, armor and potions from him.
Bone Lord
We get to the Cleft of Leviathan and go inside the building. We run along the walls, use the death grip. We move along the vines, we go down lower and lower. We get up on the button and wait until all the grates open. Then quickly run from wall to wall. Enter the door on the left and fight the skeletons. We pass further, before the bridge we turn to the left. We grab the bomb and hook it next to the mechanism. We pass along the bridge, on the other hand we aim and shoot at the bomb. The bridge has been restored, we pass along it and take the key from the chest. We deal with the emerging bugs. Near the first bridge, you can jump onto the beam and get to the exit. We unlock the green door, go down the beam. We destroy a couple of skeletons, go down the stairs. We get out, on a horse we get to the Serpent Peak. Let's watch the video. We get to the Throne Room, it is not so difficult to do this. We climb higher and higher, jump on the beacons. Arriving at the place, we try to enter the Bone Lord. The guards do not let us in, because this requires the permission of the Councilor. In turn, the Advisor also does not want to let us in, but agrees to one condition - to defeat the Champion of the arena.
Royal fee.
We get to the Golden Arena, along the way we avoid the abyss along the vines on the wall and ceiling. We go down the twisted stairs. We twist the lantern, grabbing one of the sides, 180 degrees, thereby opening the other door. To attract the attention of the Champion, you need to find three soul stones. Turn right and climb up the ledge. We pass through the door, go down the steep stairs, bypassing the abyss by running along the wall. We deal with a large number of skeletons and go to the next room. We get up on the button in the central hill. The cage has opened, we pick up the bomb with a stranglehold. We throw it at the lantern, we attract to ourselves the very foundation that remains after the explosion. We put it on the button and go further along the opened grate. We run from wall to wall so as not to fall into the pit. Without turning into the room, we pass on, push the mechanism and pull the lantern towards us. Now we can look into the room and hang the lantern on the outstretched hand of the statue in the center. We twist and aim a bright light at the door. We get to the first stone of the soul, tear it out of the forehead of the statue. We go back, the grate is blocking the path - we must deal with the bugs. This pistol is perfect for this. We return back, a new door will open, from where skeletons will appear. We run along the corridor and climb up the ledges. We jump along the beams to the opposite side. We pull the lever and get out into the arena. Insert the soul stone into the head of the statue.
We deal with the skeletons and go upstairs to the next door. Once inside, turn left and go up the steep stairs. From the fallen half of the bridge we attract a shadow bomb. We get to the lantern and break the nearby crystals. Behind them will be another bomb, we grab it and throw it across the abyss. We move along the walls to the opposite side. Explode the crystals near the lantern with a bomb. We direct the lantern into the grate, go forward to the end and to the right. We take the lantern from the button, destroy the enemies and put it on the button near the statue with the lantern. We get along the walls to the previous statue with a lantern and direct it to the grate. We attract the lantern from the button with a death grip and hang it on the statues above (we climb the twisted stairs). The bridge has been restored, we cross it, go through the door and go down. We destroy numerous boxes if health potions are needed. We go further, deal with bugs and skeleton archers. We take the second stone of the soul, we return to the arena along the opened path. Insert the soul stone into the head of the statue.
We go to the central door. In the corridors we encounter a huge number of warrior skeletons and destroyer skeletons. The latter are especially dangerous, they act as mini-bosses. Having bypassed the bridge, we stand on the button and quickly run up, we attract the bomb. We get up on the platform and throw the bomb into the mechanism. We find ourselves on the other side, where we find the third stone of the soul. But before you get it, you need to defeat the Skorobeya-bump. After his attack, quickly pull up to him and deliver powerful combo blows from behind. If you attack from the front, the enemy quickly applies a shield, which complicates the process of destruction. We take the soul stone and return to the arena. Insert the soul stone into the head of the statue. Gnashor appears in the form of an underground worm. When he leans out, his head emits blue light, we quickly do a death match. We beat the defenseless enemy until he goes underground again. When the enemy finally crawls out from under the ground, a real fight will begin. Our actions will be as follows:
1) Keep a distance from the enemy when he takes out the worm and starts to strike them on the ground
2) We attack Gnashor, and when his blue talisman appears, we quickly attract him
3) We inflict as many blows as possible until he disappeared underground
4) We run around the territory and as soon as the ground rattles under us, we dodge
Having defeated the Champion, we get the Golden Skull. We open the global map and quickly move to the Eternal Throne. We communicate with the Advisor, and then with the King. We ask him to provide the Source of Souls. You need to complete the task of finding and delivering the three immortal lords.
Farisir.
We get to the tomb of Farisir. Once inside, hit the crystal in the center of the elevator and go down. We move along the corridors, dealing with mummies. In the room with the button, turn right and climb up. We clear the area from crystals with the help of bombs. We jump down and pull down a large statue. We stand on the button, continue to pull the statue towards us so that it is directly in front of us. Bombs hang on the left, we throw them at the statue, thereby moving them away from us. When it is under the bars, we leave the button and go further. On the lift, hit the crystal with the Roman numeral one (I). We go into the only room with a test. On the ledges on the left we get to the mechanism. We push it and move to the opposite side, using a death grip. From here we can see shadow bombs stuck to the ring in the center. We grab it and throw it into the mechanism on the opposite side. We return to the original position and shoot at the bomb. When both rings are at the same level, quickly fly to the other side. We take the key from the chest and go back. We jump into the pit and climb up, having previously destroyed the zombies. We face the ghosts, deal with them and get to the lift. We go to the third floor, open the green door. We move along the corridors, destroying ghosts and one general. We find ourselves somewhere between the third and fourth floors. On the ledges we move to the other side. We shoot at the bomb on the crystal on the left. We go down to the lever, activate it and a bridge appears. As we noticed, there is a column a little higher next to the bridge, we pull it to the button in the center. We return upward between the third and fourth floors. We jump onto the lift, go to the second floor and get to Farisir through the central door. The enemy will not be a problem, and he does not have any special moves. Therefore, we simply attack Farisir and dodge his blows. Sometimes he will summon skeletons, but they are also very easy targets.
We get the opportunity to call the immortal lord. We stand in the center and press the appropriate button. We order him to stand on the button behind bars.
Arbiter.
We get out (it is possible from the global map) and go to the tomb of the Arbiter. On the way we will have an obstacle, we stand in a circle and call on the lord. We direct it to the lever behind the bars on the left. Having reached the tomb, we go inside and get to the lever, fenced with bars on all sides. In the next room, we call the lord, standing in a circle, and direct him to the lever. We pass further, turn into the room on the right. We quickly call the lord to help deal with the enemies. We pull the lever and go to the immortal to the button behind the bars. We go back to the center, jump down. Pull the column between the two platforms. We jump on them and go to a meeting with the Arbiter. At his request, we set off for three restless souls, and then he will return to the Bone Lord.
We pass through the indicated door, move along the bridge and in the corridor we fight with the Lich, who summons endless skeletons. Of course, we direct all forces against the main enemy, trying to deal with him as soon as possible. We continue to go along the corridor, call on the lord on the right and enter the door on the left. We send it to the button, we pass along the bridge. Similarly with the next bridge, but it does not open up to the end. Therefore, in the jump, we use a death grip. We attract a lantern and put it next to it. Inside the wall on the left, we will notice the bombs and with the help of them we will destroy the crystals on the sides of the non-revealing half of the bridge. With a lantern we pass to the center and hang it on the statue. Rotate it 90 degrees, send it to the ally's button. We go into the next room, before reaching the stairs, we climb the ledges on the right. We jump in a turn and cling with a grip. We go upstairs and free the first soul. Then we deal with the enemies and return to the lord.
We go to the next door and, having passed along the bridge, we immediately encounter enemies and the boss Torturer. He is so slow and weak that if we just ran around in circles and fired a pistol, we would have overcome him very soon. However, we attack with everything we have. Still, the enemy has one strong point - the Tormentor attacks very sharply, so we carefully monitor him and often dodge. Requires a key to move on. We turn into another passage, call the immortal. We point him to the button around the corner. There were useful obstacles on the walls, on them we get to the back side of the lattice. Let's not forget to use the death grip on the last jump to hook on the lord. We go through the gap, again we are attracted to the wall. We move forward, on the right we notice a lever that opens the next door. We search the chest in the room and take the key. We jump down through the hole opposite the lever. We unlock the green door and find ourselves at the destroyed stairs. Using a death grip, we climb to the center. Once again we use the grip, we cling to the ledge. We jump in a turn, quickly apply the grip twice, climb higher on the wall, jump again in a turn - hold the grip. We get to the very top, take the second soul and, having finished with the enemies, we return to the Arbiter.
We leave through the central door for the last soul. We pass through the abyss, call on the lord and enter the lift. We deal with enemies and hit the crystal, which will take us to the second floor. However, we are prevented from doing this by a crystal of corruption. We send the immortal to the button that opens the grate, behind which are shadow bombs. We climb up and throw the bomb straight from there into the crystal. We jump down to the platform and go further. Climbing up, taking the soul. We see a suspended Keeper of Bones. We are attracted to him with a death grip and strike. Then the Bone Giant appears. With him, too, everything is quite standard - we attack, we dodge. We return to the Arbiter.
Before us appears the last servant of the King, who sends us to new trials.
Vasilevs.
Before heading to the Golden Arena, let's stock up on health potions. Arriving at the place, we jump into the portal and find ourselves in the Psycameron. We fight with Walkers - very strong opponents. As often as possible we dodge and strike, only after their attack. We go further, we call already two lords. We send the first one to the button on the right, stand right under the door and point the second lord to the button on the left. We pass forward, we call on the lords. We stand on the button on the left and when the bridge is restored we send the lord to the button behind bars. We go up the stairs, we see the red door. Under it there is a passage, we jump there. We direct the immortal to the button behind bars. We pass further, we go down down the long beam. Ahead on a hill are three wall-mounted mechanisms. The order of activation is as follows: center - right - left. We take the key from the chest and go back up the beam.
We unlock the green door, we observe a certain arachnid creature. We call on the lords, stand on the button in front of the bridge. We look obliquely to the left and send to the assistant button. The door on the opposite side opened. We go there, we are not in a hurry to run along the walls to the ledges. We look down and to the right, we send to the button of the lord. Now we run along the wall and find ourselves right under the grate, which will open soon. We jump down directly from the ledge and with a death grip we are attracted to an ally. We climb the stairs, without turning right, we continue to move forward. We go down to the left, we see a button behind the bars and send an assistant to it. We move along the corridor, raise the bridge, activating the wall mechanism on the left. We pass through it and get to the door.
We call the lords in a small room and enemies immediately appear. It will not be difficult to deal with even two Lumpy Scarabs, since two immortals are a terrible force. We go further, we get along the wall to the mechanism and activate it. We enter the opened door and go to fight with the boss, more precisely with two bosses - Vasilevs and Echidna. Both share one health for two. At first, the fight will seem easy, but from the second half of your health, you will have to carefully look around and not lose sight of the insidious Vasilevs. We do not stand in the way of the spider, so as not to be up to our ears in electricity. Thus, we defeat the last lord and return to the Bone Lord in the Eternal Throne.
City of the dead.
The King sent us to the City of the Dead. Use the Spirit Separator ability. We move each of the side statues in the opposite direction, without releasing them. We apply the previous appearance, again choosing the same ability. We pass inside, deal with the skeletons and the general. We stand on the button in the corner, use the soul separator. We send one copy to the opposite side, and with the other we climb up the ledges and slide the mechanism. Idea in the next room, we head to the passage on the left. We go around the abyss by running along the wall, turn right and get to the lever. We use the spirit separator, with one copy we turn the lever 180 degrees counterclockwise, and with the second we pass into the next room, we pick up the bomb from the wall on the left. We return to the room with the lever, on the right we see the mechanism, we throw a bomb at it. A platform is released on the left, we climb it with the main character and use the spirit separator. With one turn the lever, with the other we drag the platform to the other side. Here we are in the next room. Climb the stairs, go straight ahead and jump down through the gap in the floor. We take the key from the chest, activate the mechanism on the left. We get to the green door, unlock it and move on.
As soon as we enter the bridge, we immediately use the spirit separator. With a copy we climb the ledges on the right. We rise to the very top from wall to wall. We turn the lever, thereby turning the bridge in the other direction. With the second copy, we go further and look for a wall mechanism that opens the way to the lantern. We accept the previous state and return back. We attract a lantern to ourselves, we get to the statue through the passage, where there is an abyss. We put it right on the edge, go over the wall and pull it towards us. We install the lantern on the statue, turn it 180 degrees, and then move along the open path. We climb up the vines, we are not afraid to jump in a turn, so we can grab a death grip. We move along the ledges and soon we encounter two ghosts. Here you can see two levers - a large wall one and a regular one located on the other side. We use the spirit separator and activate the wall lever, run to another lever that turns the bridge. We will not be able to go back, so we take on our former appearance and are again divided into souls. We activate the wall lever, with the second copy we attract the bomb opposite. We pass along the bridge and, turning to the left, we throw a bomb into the mechanism. Now we can go further, there is another mechanism ahead, we go through the door on the left. We keep going until we get to another mechanism that will open the door below. We jump to the bridge and go to the arena. We fight against three ghosts, a general and three tormentors! Nearby there are two chests where we will find health potions. We pass further, we cling to the lever and the fire begins to rise. We quickly move along the ledges and get out to the top.
Having got out, we break through to the next door, simultaneously destroying the enemies that appear. We will save the Reaper's appearance against the Liches, who will be after the abominations - also very dangerous creatures, when attacking which we take damage.
We get to the hall, where we see a beam of light at the top. You need to get there, for this we go straight through the next door. We rise upward, bypass the lattice through the wall. We stand on the button and use the spirit separator. With a copy we run along the wall to the mechanism and activate it. We return to the original state and go through the opened door. From here it will not be difficult to jump to the statue with the help of a death grip. We twist the statue emitting light 180 degrees. We pass to the other side and fight with a few speed bumps. Then we grab the bomb and destroy the crystals. We climb up, get out onto the balcony. A snake is circling through the air, so as soon as it flies away, we quickly pick up the key from the chest. We go back and see that you can climb to the green door from below along the ledges. So let's do it and get to the place with two buttons. The point is to move the platform from one room to another, as we did before. To begin with, we stand on one button and apply a spirit separator. We stand with a copy on the next button. With the second copy we climb up and move the platform as close as possible to us. We take the previous form and stand on the platform, again use the soul separator. One copy will press the button that is responsible for the nearest grate, and the second will hold the platform further. We move the first copy to the adjacent button, the second copy will move the platform to the button next to the door. We accept the former form and move on. We activate the mechanism on the left, fly to the center. We turn the statue back to the place where the bomb is located. We return there and throw a bomb at the crystal. We push the mechanism on the statue and go down. We go to the door where the pillar of light is directed and meet with the boss Howling Bolshak. We act as follows:
1) We dodge aside from simple blows; when the enemy uses a sweeping blow, he moves his hand first in a small, then in a large circle. Considering this, we quickly move from a large to a small circle.
2) We attack Bolshak on the hands (after a simple blow) and the head (after a sweeping blow)
3) We finish off the weakened enemy
4) He will hide in the pit, and we must chop up a lot of skeletons that appear from the center.
We go further and meet with the Elder Raven, who says that we need to visit the Tree and pick up the key from there before we get to the Source of Souls. Open the global map and quickly move there. We pass through the gate to the Lost Light.
Key to redemption.
We jump to the Crystal Tower, where we encounter the Corrupted Angels. We deal with several, then a real warrior of light Nathaniel will come to the rescue. After talking with him, we can buy everything you need. We enter the tower, pull the lever and find ourselves at the top. We go to the left, deal with enemies. On the ledges on the wall we avoid the pit and destroy the remaining angels. We jump into the hole and from there we rise along the ledge. We move away and use the spirit separator. With one copy we get to the bomb, grab it and go to the edge of the pit. With the second copy, we attract it from the other side with a death grip and, having reached the crystal, we throw it at it. We put on the usual appearance and run to the place where the crystal was. On the ledges and vines we climb to the very top. We meet with the Archon and ask him for the key. He promises to help if we get Arafel's rod on Earth.
Wand of Arafel.
We jump into the portal and immediately find ourselves in the thick of things: we observe the fight between angels and evil spirits. We help Uriel deal with the flocks. We grab a weapon in the corner and the game turns into a shooter. There are several shooting modes, something like a machine gun and a shotgun. Having cleared the area, we communicate with the angel. We learn that the Rod was broken, and its parts are scattered throughout the city. We move forward without releasing the weapon from our hands. At the sight of enemies, we tactfully retreat. Potions will become incredibly valuable, they often fall out of enemies, so we try not to miss them. We get to the subway, we go down. Here we will find the staff of Arafel, get out and meet Uriel again.
We pass through the sewers and again get out into the streets. At the exit, we can pick up more powerful weapons. Raven will tell you where to go if there are problems. We meet the tall boss Noss. We shoot at it until it is completely destroyed; we shoot flying creatures only when there are too many of them. The damage from them is small, and they appear constantly. We go down into the tunnel and it seems that the flow of enemies will not stop until the very second part of the Wand. The main thing is not to leave the creatures behind us and confidently move forward. We pick up the Eye of Arafel and, having got out, we meet with Uriel.
We pass through the building and exit to the street on the other side. We destroy everything that gets in our way. We move under the bridge, then we climb it and go back already on its surface. At the end of the path, we pick up the last part of the Wand and return to Uriel. We enter the portal and go to the Archon in the Crystal Tower. We give him the Wand, we get a transport on which we can get to the castle.
Spots of heresy.
Unfortunately, we cannot control the bird, so we just look at the local landscapes. Having reached the citadel, we go inside and run to the left. Climb up the wall, turn the lever. The water below is cleared of damage, we jump off and go through the doors. In the room with damage, turn right, get out. Climb the stairs, go inside and climb up the ledges. We go further, we watch a small cut-scene. Clinging with a death grip, we fly further and destroy a couple of angels. Next to the crystals, we run along the wall and find ourselves on the other side. We stand on a large circle on the left and apply a spirit separator. With the first copy we stand on the button on the right, the second - we pass through the opened passage. Climb up the ledge to the left, turn left and stand on the button. We take the old form. We get out of the pit on the other side, climb over the wall. We grab the bomb and throw it at the crystals in the center. We fly over the abyss and enter the building. We jump down, hit the blue ball in chains. We get a new ability Traveler in the void. We create a portal in the blue area on the wall and the same one at the top. We pass along the lower portal to the upper one. We return back by jumping over the abyss. We install two new portals and go to the neighboring island. Pull the lever, jump down. Now we create charged portals (holding the button) on the wall and floor. We fly into the one on the wall, and fly upstairs. We move forward, destroying new angels that are able to call on weaker angels. We avoid the abyss with the help of portals, we get to the bright ball. We create a portal near it, look around and see another such ball in the distance. We create a portal, and the bridge is freed from crystals. Walking forward a little, we see a passage on the left. It creates two infected portals - on the wall and in the floor. Here it is advisable to choose a gun and shoot numerous souls. Climb up the stairs and enter the building. We deal with enemies, we stand in the center. Use the spirit divider and use the copies to climb the two levers on the sides.
We climb the wall, once at the top, open the portal in front of the ball. We look down, create another portal near another ball. The water is clear, we follow the stream. Having reached the end, we grab the bomb on the right and destroy the crystals on the left. We climb up the vines, keep going until we get out on the other side. Ahead we see a locked door, on the right - crystals, so we go to the left. We jump down, destroy the enemies. We pass further, we jump down through the hole in the floor. We see a ball and a place to create a portal. We go outside, deal with the enemies. We fly with the help of a death grip, climb the ledges and run along the walls. Once at the top, we see two levers and through the glass we can observe two areas for portals directed at each other. Each of them is responsible for its own lever. We will need to make sure that the one on the right is higher than the left and then we can fly over the abyss. Outside, not far from the levers, there is another place where you can create a portal. We do it as follows:
1) Use the spirit separator and use one copy to turn the first lever
2) With the second copy we create two portals and turn the second lever with it
3) With the first copy we look into the portal on the wall and create another infected portal through it, turn the lever
4) We release the lever of the second copy and fly to the other side through the portal on the wall, activate the lever that opens the door.
We apply the previous form and go down the short path to where the ball was. We create a portal, we return upward. We pass further through the opened lattice. Run along the wall, destroy the angels. We take the key from the chest, climb the ledges up. Bomb, destroy the crystals and go up to the locked door. We go inside and create a portal.
We move along the drain, cross the abyss with a death grip. We get to the building and go inside. Dealing with oncoming enemies. We are in a place where there are numerous abysses. Create a portal on the wall ahead and another one on the bottom right. We cross the abyss, using a death grip, and jump right into the portal. Create a charged portal above your head. We enter the lower portal, fly out of the upper one and run along the wall. Again we create two charged portals. We climb up the ledges.
We destroy the enemies and get to the mechanism. We use the separator of the spirit, we twist the mechanism with one, we extend the platform with the second. In the usual way, we climb onto the platform, and again applying the spirit divider, this time already pushing the platform inside. We pass further, near the mechanism we use the separator of the spirit. With one copy we twist the mechanism, with the second we create charged portals below and near the mechanism. We release the lever with the first copy, go down and, looking through the portal, create another charged portal. Now we take the previous appearance and go back along the island to the very first mechanism. We go further to the ball and create a charged portal on the wall. We perform the operation of pushing the platform from the outside to the inside. We get to the second mechanism and twist it. The inner ball has absorbed energy, we release the lever and thereby destroy the damage. We create a portal in the place opened for it. We go to the next room, at the top of the ball we create a portal. The water is cleared, and we move along the drain. Having passed to the end, we will descend to the right and run to the breach in the wall. We create portals and find ourselves inside, where we jump down.
We get to the door and pull the lever on the left. The water is completely clear, we can enter the central door. We create a charged portal on the wall - below and above. Having flown over, we create another portal higher. We jump down, enter the portal. We run along the wall to the right, then we go up the stairs and find ourselves in the library, where Jameira the Scribe is waiting for us. He's an easy target if done right. We create below two portals on the walls. We stand in front of one of them and wait until the enemy fires a clot of energy. We quickly dodge and he, it turns out, hits himself. We attack the stunned enemy, retreat. We repeat this action one more time until the Scribe finally flies up, from where he will direct the laser at us. We create a charged portal directly below it and another one on the wall of the upper level. As soon as we see the laser, we quickly take a position so that there is a central portal between us and the beam. We watch the video, from which we learn that in fact the Archon misled us and the key was with him all this time.
We leave for the Crystal Tower and, having climbed the stairs, we watch a series of videos. We run in a circle and dodge wave attacks. Then we quickly carry out a series of blows and again move away. When the Archon takes off, we again dodge wave strikes. Soon he will be above our head, we cling to him with a death grip and attack. This action must be carried out until the enemy collapses to the ground. Then we can finish him off, that is, cut his wings so that he cannot take off. We continue to attack the enemy and dodge the waves. As a reward we get the Angelic Key. We return to the Tree of Life to the Elder Crow. We leave for the Edge of Shadows through the portal, where we have to get the Demon key.
Mad Queen.
We jump forward, go through the building and meet a friend from whom you can buy useful items. We skip further, we get to the Black Stone. We go into the door on the right and go up the circular stairs. We watch a video in which Death communicates with Lilith. She hands us a new "toy" that allows you to create portals and travel to the past.
Lord of the Black Stone.
We go back, we go down the stairs. Enter the next door and immediately turn left. Use the Time Traveler on the wall. The territory has been restored, we are entering the center. We fight with enemies, we are afraid of what is with chains. If he pulled, we sharply dodge to the side. After finishing with everyone, we go into the first door on the right. We run along the walls and climb up the ledges. We pass along the corridor, having finished with a couple of demons. Using a death grip, we climb even higher. Having got out, we pull the lever and destroy the enemy. Open the portal to the past, go through it and jump down. We climb up to the opposite side. We go to the left door and move straight to the center. We see that the chest is bricked up with damage. On the wall we create a portal to the past, we destroy enemies. We stand on the button on the left and use the spirit separator. A passage has opened, along which we get to the room of one of the copies. We deal with the enemies and pick up the bomb from the recess in the wall. We stand on the edge of the abyss with fire, run up with the second copy and attract the bomb. Again we stand on the edge of the abyss, with the first copy we attract the bomb. Thus, we deliver it to the crystals and free the chest. We return to the present through the portal. We take the key from the chest and run back to the locked door, having previously dived into the past. Next, pull the lever, jump down the indicated path. There we can create a portal to the present and then climb to the central door along the ledges. We go further, create a portal to the past and meet with Samael.
Stage 1:
1) If health potions are in short supply, then you will have to dodge a lot to survive. An effective way is to dodge and immediately strike
2) When Samael returns to his throne, follow the fireballs and run from side to side
Having spent half of his health, we run up to the throne and strike. Getting ready to quickly press the appropriate button. We dodge back so as not to be on fire.
Stage 2:
1) Keep a distance from the enemy, close contact is very dangerous, as we will be constantly struck by electricity
2) Small circles will appear on the ground, followed by one large one. Only the big one is dangerous, we catch the pace and then we can easily avoid damage
3) Don't forget to use the gun! We simply run away from randomly arising large circles, and do not evade, because this will only slow us down and there is a risk of running into fire!
For our labors, we get the Demonic Key and return to the Elder Raven. We insert the keys and enter the Source of Souls.
Source of souls.
The embodiment of Chaos, that is, our brother Absalom, is the last game boss. Revelations do not have to wait - dodge, attack. The main thing is to save all your strength for the very last stage of the fight (after two finishing moves). We enjoy the sweet victory and watch the final video.
, Black stone , .
We return to the main road, go further, we slip past the castle on the coast. We move further straight along the course and climb up the mountain serpentine. We enter a small room, take the contents of two chests, take a seal in the crevice on the right, shoot Stone of Power (3/25), hanging from above above the front door. We leave the room, go down.
We climb up the other way a little south. We rise to the cliff to the left of the road, and jump down to collect the seal. We return back to the right road.
On a narrow winding road we get to the entrance to the building. Almost at the very end of the road, Stone of Mystic (10/34) will hang at the top right. We shoot insects inside. At the end of the corridors along the right wall we climb up, take and throw the yellow projectile into the blue ball on the opposite side. We shoot at the attached projectile, the ball will fall down, after that we jump to it, and roll it into the recess. We enter the next location.
|
We return to The Fjord (Fjord) after receiving the item Creator's Key (Maker's Key). We swim into the bay in the southwest of the location, there we will find a dilapidated stone golem named Oran. He gives the task to find parts of his stone body (they look like huge green boulders). Oran golem body parts location: The right leg is located in The Fjord on the mountain in front of the entrance to The Drenchfort. The right hand is right in the middle of the Shadow Gorge location. The left leg is in The Charred Pass behind the second round gate. The left hand is in front of the entrance to The Scar. Having found all the parts of the golem, we return to it. Additional task completed. The golem now mentions a blacksmith shaman. We go to Tristone to the girl Muria. She gives us the task to find 6 seeds of the shade leaf (Gather the Seed). Seeds drop from Prowler monsters that live in the hills of the Fjord. We bring the seeds to the shaman girl, we get the item Magnetite (Lodestone). The Maker's Chronicle item can now be found. This book lies in the location of the Cursed Forest (Baneswood) in a small cave in the northwest. We carry the found book to Orana in the south of the location of the Fjord (The Fjord). (Quest completed. Get 384 XP, 1500 Gilt). |
|
We return to The Fjord (Fjord) after receiving a demonic hand. We approach the coastal fortress. We climb to the second floor of the fortress with the help of a demonic hand. We take two chests. We jump down from the western edge of the fortress to take the seal hanging in the air. We fall into the water, swim to the pier, filled with growths of crystals. We swim under it, move towards the coast, find the bars on the wall, and climb up along them. On the pier, with the help of a demonic hand, we attract a yellow projectile to ourselves and throw it into the crystals. We pass further, we take the chest. |
|
We return to The Fjord (Fjord) after obtaining the split ability. Building to the east, accessed by a winding uphill road. We go inside, stand on the central plate, split in two. With two copies, we stand on the pressure plates on the left and right. Our statue will rise, at this time you need to turn off the split and quickly jump to the hill. At the top we leave the statue on one plate, with the first hero along the wall we get to the second plate behind the bars, with the second hero we take the thing page of the Book of the Dead (6/10) volume 3. If you destroy all the jugs in this room, then a secret chest will appear. |
|
We return to The Fjord (Fjord) after receiving the ability to teleport. We sail south to the merchant Vulgrim. Behind him, we activate two portals, destroy the crystal, pick up the chest, then from afar we aim at the crystal in the right corner, pick up the thing page of the Book of the Dead (5/10) volume 4. In the room where the explosive projectile is located, Stone of Resistance (9/10) hangs high on the wall. |
Storm Fort (The Drenchfort)

We leave into the room with a huge statue in the middle. From the front door we go to the left almost to the very corner, we approach the cliff and carefully jump down onto a small ledge to go into the cave where lies Book of the Dead page (6/10).
We jump down to the base of the statue, and take the chest. There will be a door directly opposite, we shoot at Stone of Mystic (11/34), hanging above it. From the chest we go to the right side, there will be a seal. We go down to the very bottom, along the left or right wall we climb up. One path leads to a locked door, there is nothing there. The other one is towards the openable door, where another chest lies nearby. We go to the open door.
1 stream. At the entrance we collect a couple of chests.
We go into a small room on the south side. We deal with several opponents, and then with the boss.
Boss: Earth Crag
This boss looks like a wooden stump with arms and legs. It does not pose a particular danger, it is easily destroyed.
(Only in DLC). We go forward, pick up on the table Karn Helm (Journeyman Helm).
Take the chest, get out of here.
We move further out into a large room with a statue of a blacksmith holding a hammer. Here we dive into the water, in the crevice on the right we take the chest. We go up. On the right side, we run along three walls and find ourselves near the ball, roll it down, and then into the recess.
We pass to the left side of the room. We pass along the arch of the gate and collect the seal. We take the chest near the doors (we will get the full map of The Drenchfort location) and the chest on the left side. We see a ball shrouded in growths of yellow crystals. To the right of this place we climb the wall, take a yellow projectile there, throw it into the crystals and blow it up. With the next projectile we destroy the crystals on the balcony on the right. We roll the ball to the closed gate, put a yellow projectile on it. We climb onto the platform located at the back to open the gate. Without getting off it, we shoot at the projectile on the ball so that it rolls into the central room. We get off the platform, we ourselves get into the central room along the wall, and then we roll the ball into the recess. We pass through the opened door.
We go along the corridors, at the end of the path we press the lever. The first damper opened, the water ran down the chute. We move along the gutter with water, climb the wall to the left to take the chest.
We return to the central room with the statue of scales.
2 stream. The scales tilted to one side under the weight of the water. Now you need to open the water on the other side for a counterweight.
We jump into the water, find a long tunnel in the center and swim through it. There will be a seal at the other end of the tunnel. We climb up the wall, go to the left side and collect the chest. We go to the right side and rise even higher.
Dealing with monsters. After that, the boss will jump out.
Boss: Savage Stalker
It behaves in the same way as a regular Stalker monster, but for defeating it they give a new ability - Reaper Form (Transformation into a reaper spirit).
Move on. In the next room, from the central part of the water trough, we jump to the branch on the right. There we climb up the wall, from the right edge of the ledge we run along the wall to the right side to get into a small corner where it will lie Book of the Dead page (7/10). We go down, we go further. In the chest we find the key (Skeleton key). We return to the door with bright blue chains.
Having opened the door with the key, we go further along the corridor. Entering the room, climb up the left wall. We take a yellow projectile, throw it into the growths of crystals, and blow them up. We go down there, take the chest, with an effort roll the ball up the hill (middle mouse button), and then put it in the recess.
On the right side of the room, we run along all the walls, at the end we get a chest. Below, under the balcony, there is a small nook on the right, where another chest lies.
We go to the central part of the room. We take the yellow projectile and install it on the ball from the side of the elevator. We get up on the elevator, shoot at the projectile on the ball so that it jumps out of the recess. From this, the elevator lifts us up. We go in the door.
We pass along the corridors, in the room on the left side we shoot bombs on the growths of crystals, after that we turn on the lever. The second flap is up. We move back along the water chute. We turn left, there we climb up to press the second lever. We move further along the water flow, we return to the central room with the scales.
Central stream. Now the water flows from both sides and runs away in the central direction. We go to the door, under which the water flows. We pass through the next door and get to the boss.

Boss: Karkinos
Take the egg (E) and forcefully roll it (middle mouse button) towards the huge stone. The stone turns out to be the boss Karkinos. Normally, he is invulnerable. To inflict damage on him, you must first wait until the next egg falls from the ceiling, then take it and throw it at the boss with force. The boss will fall on his side, now you can beat him. This will need to be repeated several times. For defeating him, we will receive the "Masher of Karkinos" item.
We go forward, we press the last lever. The level is passed, you can return to Tristone.
Tristone (Tri-Stone)
We go into the opened room Forge Creators (Maker's Forge). We go around the blacksmith's furnace, on the back of the statue above the furnace hangs Stone of Mystic (12/34). We approach Aliya, we get a new main task "Move the mountain" and an item Maker's Key. With it, you can revive stone golems, and this will allow us to go to the location The Nook (Callout). You can also return to the location to revive the golem Oran.
Cove (The Nook)

We enter the room, break all the boxes, in one of them there will be a seal. We open the chest. We approach a pile of stones with a bright blue glow, use the Maker's Key, from this the stones add up to a golem. Having saddled the golem (key E), we call on it into the recess on the floor, after that we shoot the chain (middle mouse button). On the chain we reach the door.
In the next room, we deal with the enemies, take the yellow projectile and break the growths of yellow crystals. We take the chest and move on.
We make our way along the logs, pillars and ledges to the next large room. In the room we break all the boxes, in one of them there will be a seal. Press the lever to open the previously closed door. At the same time, a corridor down will open nearby. We go along it, exit to the lake of lava, go into the door on the left to climb up again, but along a different path.
We go into a room with two elevators. First, we jump along the poles above the lava (you need to step on the top, and then on the bottom luminous pole). After pressing down, the ball will roll down, we go to it. We press the lower lever nearby - the elevator goes down, we roll the ball onto the elevator. We climb up the opposite wall, press the upper lever to lower the second elevator to the middle. We jump down, press the lower lever again, take the first elevator up. We look a little up and break Stone of Mystic (13/34) there. Berm the ball and forcefully throw it on the second elevator (middle mouse button). We jump down, climb the opposite wall, press the upper lever to raise the second elevator. The ball is raised up, now we roll it into the recess. We collect chest standing nearby, we go into the following doors. There we take another chest. As a result, we go back to a huge room. In it we go into the northern door, where we have not been yet.
We get into a large room filled with water. We jump into the water, swim down the spiral staircase, on one of the floors we swim into the room, we find the seal. We climb up the spiral staircase, jump to another building, and, in the end, get out into the street.
The Tomb of Death (a stone door with multi-colored symbols) can only be entered after we collect all 10 pages of the Book of the Dead and sell them to the merchant Vulgrim. (Inside the tomb there are six chests and racks with rare weapons. In the far corner we move the movable column and take out the thing “ Blade Master Talisman».
We approach Karn, we give him a helmet (Journeyman Helm). We take the chest behind the column. We enter the temple.
|
We return to The Nook (Bay) after receiving a demonic hand. We go into the location, turn right (east), and go to the lava lake. We jump on the rings, collect the seal. On the rest of the destroyed bridge, the boss is waiting for us. Boss: Vehir(Level 15) The Fire Dragon. To hide from the fiery breath, very often you will need to go down to the ledges. We pass into the largest central room, we see growths of crystals on the second floor. We jump there along the wall with the ring, break the crystal, behind it lies page of the Book of the Dead (2/10) volume 2. |
|
We return to The Nook (Bay) after obtaining the split ability. We pass into the largest central room, climb to the second floor, split in two and pick up the chest behind the bars. |
|
We return to The Nook (Bay) after receiving the ability to teleport. We reach the lake of lava, in the northern corridor we activate the first portal. We enter the door leading to the room with two elevators, at the very top we stand on the corner, aim and activate the portal on the high balcony corner. We go into the first portal, get to the balcony, take two chests. |
The Lost Temple
We kill the monsters, take the chest hidden behind the left stairs, go to the next room.
We activate the golem, sitting on it, we break the crystals, and then we roll the golem's ball into the recess.
In the next room we break the boxes, we find a seal there. We kill the attacking enemy in the form of a flying stone head (Construct Sentinel) with a pistol, we get for it carved stone for an extra task. On the opened bar on the northern wall we rise upward, we go further.
Having reached the water, we jump into it to take the seal in the far left corner from the lowered bridge. In the same place we find an underwater grotto, in it we pick up a chest. We go up. We get to the golem, activate it. We drive up on the golem to the cliff on the left, shoot the chain (middle mouse button) at the yellow crystals on the other side. We get off the golem, go to the other side, press the lever there. On the raised bridge we again go to the golem, and then without stopping we ride on it forward. There will be a chest along the way.
Having reached the central room astride the golem, we go to the southern dead end. We roll the golem's ball into the recess, shoot the chain. Down in the pit hangs Stone of Mystic (14/34). Even lower in the pit lies a chest. Then we run along the chain to the other side of the abyss. There we shoot at a hanging bomb, roll up the ball, put a yellow projectile on it, approach the closed grate and from there shoot at the projectile. The ball pops up, the grate drops, and we take the key from the chest. We leave from here, we return to the central room to the door chained. We pass through the door, climb to the other side, turn on the lever. You can go further.
We jump down, sit down on the golem and ride it to the next room. There we break all the outgrowths of the yellow crystal, roll the golem into the recess on the right, shoot the chain, move along it to the other side. There we take the chest. We return back. In the left part of the room we examine the chest (inside the map of The Lost Temple location). We sit down on the golem, we go further, we roll it into the recess in front of the grate. We pass through the opened door.
In the arena, you will have to fight with numerous opponents for a very long time. At the end, a chest will appear as a reward for this.
We go further south. Move on. We run along the narrow corridor without a floor along the walls, jumping from one to another. Then, in a narrow place along the walls, we climb up, also jumping from wall to wall. At the top, we run along the right wall to take the chest. Move on.
Behind the left wall we take another chest. We take the seal behind the roots of a huge tree.
(Only in DLC). Pick up under the arch Compass Karn (Journeyman Compass).
At the next door on the left is another chest. We enter the door.
We activate the golem, we start it on the elevator. On foot we climb along the walls to the second floor. There we activate another golem, on it we go into the recess in front of the elevator to raise the first golem. We change to a raised golem, on it we go to a recess that opens the grate. We leave it here, and on the second golem we reach the cliff in front of the far door, shoot the chain into the growths of the yellow crystal. Then we drive on the golem to where the grate opened. At the end of the corridor, we stand in the recess and shoot the chain. We run along the chain to another wall. We jump down to the right side, pick up the chest standing there, go upstairs. We sit down on the first golem, we reach on it to the deepening in front of the abyss in order to open the doors on the other side of this abyss. We return along the pole to the chain, and along it to the second golem, we go further, behind the golem, a grate has opened, where Book of the Dead page (8/10). We return to the chain, and then we jump over to the door to the next room.
We go out to the balcony with a gorgeous view of the mountains. We run along the right wall to another balcony, there we meet a couple of dozen opponents. We enter the room.
We climb up the wall, shoot the bomb. As a result, the ball falls down. We see four poles and a room on the other side of the cliff. Stone of Power (4/25) hangs on the wall of the room. We jump over the poles to the other side with a small room where lies Book of the Dead page (9/10). We jump down. We roll the ball into the recess, go into the opened door.
We kill all the monsters, destroy all the boxes and pots, one of them will have a seal. Let's move on to the boss.

Boss: Construct Hulk
At first we do not attack him, we will wait until he hits the floor (at this time we bounce so as not to take damage). From such a blow, yellow shells will fall from above, they will be located along the edges of the arena. We take the nearest projectile and throw it at the boss. There will be an explosion, and a ball of infection will fall out of the boss. Now we attack and inflict damage on the boss. So we repeat several times.
We pick up four chests, we approach the large gates and open them. We talk with the Guardian (Guardian), after which we return together to Tristone.
Tristone (Tri-Stone)
In the settlement, we start a conversation with a blacksmith. He tells us that the Tree of Life is the exit from this world and the entrance to other parallel worlds. We get a new main task "The Heart of the Mountains".
We approach Karn, we give him the found Compass of the Wanderer (Journeyman Compass).
The Foundry

We pass along the bridge between the water and the lava, on the left we take away the chest, Stone of Resistance (1/10) hangs on one bucket.
In the next room, we go in a circle to the cliff, here Karn will transfer the hero to the other side. One bucket at a time, we move to another island, and from there we move to a room with a blue door on the minimap.
Here we jump onto the glowing pole to open the gate for Karn. He walks forward. The two of us move on with him.
In a large round room we go into the nearest passage on the left. In the next room we approach the grate in the wall, Karn will throw us to the other side. There we take the chest and jump into the water. We find a seal in the water, and then we look for another way out of the water. We get out upward, we pass by the ball, again we dive into the water from the other side. Under water, we are looking for a way to the chest, we swim up to the room with the ball. We step on the pressure plate, roll out the ball into the central room, and then roll it with force in the direction where the path of symbols leads. The golem went upstairs. We activate it, sit on horseback and go to destroy the growths of crystals.
First, we shoot the chain at the crystals on the second floor, then we pick up the chest there. Further in the narrow corridor, a chest behind the crystals will also be hidden. We move on.
In a room where there is a door wrapped in bright blue chains, in one of the passages we drive up to the edge of the cliff, roll the golem into a recess, shoot with a chain, and run forward along it. We jump to the left on the wall along which you can crawl. We crawl up, along the logs we get to the second floor. Then we go through a couple of rooms, and at the end we examine the chest, where we find the key. We return to the golem.
We approach the door with chains, open it with the key. Climb up the spiral staircase. There Karn throws us to the other side of the cliff. We collect the chest (there is a map of The Foundry location in it), we go into the round room.
We break the chains and pick up a new device Death grip (Deathgrip)(demonic hand). The grip turns on instead of the pistol. It allows you to attract useful objects to yourself and use rings driven into the ceiling. We go back.
SECRET: On the right there is a high ledge, which you can’t climb just like that. To get there, we approach the cliff with the ring, go down to the ledge, jump down into the abyss, during the fall we quickly use the demonic hand to cling to the ring and get to the lower ledge. From here we go up through the secret tunnel and find ourselves at the top, where lies Book of the Dead page (10/10)(All pages of the first volume of the Book of the Dead have been found, now they can be sold to the merchant Vulgrim, get the “Bone Key” item and open the Tomb of Death near The Lost Temple with this key).
We approach the cliff, grab the ring on the ceiling (middle mouse button) and find ourselves on the other side. We go into the corridor. With the help of a demonic hand, we take out a yellow projectile through the growths of crystals and throw it into the crystals. We take the chest. We go down the stairs.
Astride the golem, we return to the cliff to shoot the chain again. We run along the chain to the middle, then we jump to the right side, we cling to the ring on the ceiling, we take the chest, along the wall, and then we return back along the chain.
Now follow Karn into the largest round room on the level.
1st Heart Stone. We reach the lowered bridge, Karn will lead us exactly here. Here, on the wall on the right, we grab a yellow projectile with a demonic hand and throw it into the lever. The bridge rises, we go on it further.
In the next room, along the poles, we get to the left lever, press it. We rise higher and jump along the ring to the ceiling. We move along it to the right lever. We return to the center along the wall.
We sit on the elevator, press the lever and go down. Below, Karn once again throws us over the abyss. Now you need to run along the walls using a demonic hand. For a good overclock, it is best to activate the demonic hand well before approaching the rings. Having stepped on solid ground, we turn towards the ring, fall down, and then we put our hand to the ring in order to run to the upper ledge and pick up the nearby chest. We return to the upper ledge and jump from it back to the ground. We get up on the pressure plate, with the help of a demonic hand we fly far ahead.
We jump along the walls, in one place we climb up to take the chest. We move on. At the end, we activate the golem and ride it through the lava. We collect the chest on the left. We drive into the recess on the golem, shoot the chain a little higher than usual. We climb up the chain and take the Heart Stone. On the elevator we return to the central round room. We put the stone in place.
2nd Heart Stone. On the ring that appears, we jump to another island, go forward. We pass a small pipe, we leave into the room. In the far pipe, which leads nowhere, lies a seal. We go into the pipe that leads into the room between the two blue doors. Having reached there, we press the lever, we pass further.
The satellite throws us over the abyss. Here we collect the seal in the far left corner, then activate the golem, roll it into the recess, shoot the chain. We get off the golem, climb a small hill. There we twist the lever to the very end, and then we approach the raised column on the left. She will slowly go down. You need to have time to climb up it, then run to the middle of the chain and from there jump onto the wall and cling to the ledge. We move on, we press the lever. He will raise all the bridges in this room. We return and sit down on the golem. On it we go to the yellow crystals and destroy them. We move on.
We leave for the square in front of the dam. We deal with all enemies. We find and destroy the crystals on the second floor. After that, we get off the golem, Karn will throw us on this second floor. There will be a chest with a key. Next to this place, we jump into the water, take the seal there. We climb up the grassy wall in the eastern part of this location. Having risen to the top of the dam, we take the chest.
We jump into the water on the other side of the dam. In the water we find another seal. Climb up the wall with the ring. At the top we press the lever, from which the dam starts working, and starts the mechanisms on the other side. We go further, we collect the chest. If you destroy all the boxes and jugs here on the site with the chest, then another secret chest will appear. We cross the dam back.
We sit down on the golem, roll it into the crushing chamber, get down, press the lever nearby. The golem is destroyed. The remaining ball is rolled to the door with chains, and then into the recess in front of the grate. In the opened corner we climb up, starting from one wall, then from the other. We take another giant stone and return with it to the central room of the level.
3rd Heart Stone. We jump behind the bars, press the lever to open the door. We sit on the golem, break all the growths of crystals, roll it into a recess. We climb up, make our way along the logs and run along the walls using the rings. We take the stone.
Boss: Corrupted Custodian
The golem becomes infected with black goo, and now you have to fight him. We come close to the boss, when he swings - we bounce to the side, and then we start to beat him. Continue like this until he runs out of health. It swings very slowly, so there will always be time to dodge it. It will only be necessary to move away from him from time to time when he begins to spin like a hurricane.
We take the stone to the central room. A huge Guardian (The Guardian) comes to life and walks towards the World Tree. We return to the exit through the punched tunnel on the right, we pass through the Trestone, at the location of Stonefather's Vale we catch up with the Guardian.
Stonefather's Vale

Boss: Guardian (The Guardian)
We jump to the boss, wait for him to start swinging, at this time we bounce to the side with acceleration. When the Guardian strikes the ground, shoot the bombs on his lowered right hand with a pistol. The hand will explode and fall off for a while. We run up to the fallen shoulder, switch the pistol to the demonic hand, aim and grab the green crystal. Having climbed up, we beat the crystal with ordinary weapons. After ten seconds, the boss will recover. Now you need to repeat the same thing one or two more times, after which the boss's right arm will fall off.

The guard will start attacking with his left hand - he will release a large yellow explosive projectile. The projectile will roll on the ground behind us, we dodge and shoot at it. When the projectile is low on health, it will stop in place. At this moment, we hide behind the Guard (but do not get close to him, otherwise he will start kicking), the projectile will fly into the Guard. From this, the boss will fall on his left hand. We climb along his hand, as if along a wall, jump up, cling to the crystal with a demonic hand and beat him. So we repeat a couple of times, after which the boss will lose his left hand. And the head of the protagonist will finish himself.
The head blacksmith restores the Guardian to its normal, uninfected form. A fight ensues between the giant Guardian and the no less gigantic eye of infection. As a result, the path to the World Tree opens, where there will be an entrance to the next world. But it is worth staying a little in this world to collect all the remaining treasures.
In the Stonefather's Vale location, we jump into the northeast gorge. There lies page of the Book of the Dead (1/10) volume 2. Nearby on the rock above hangs Stone of Mystic (15/34).
To collect all the treasures, after receiving the demonic hand (death grip), we return to the already completed locations (text under the lines):
, , , .
Scar (It is not necessary to enter this location for the main passage. The additional task Spark of Life is performed here) There are level 17 enemies in this location. We go to the location The Scar (Scar). We get to the entrance to the building. With the help of a demonic hand, we jump onto the log, and from it we jump down and take the seal. We stand in front of the door to the building, turn around and look at a fragment of a large pipe on the left. In the place of its break is Stone of Power (5/25). We go inside the building. We pick up the chest under the entrance stairs. Inside we fight with strong enemies of level 17. And then you have to very quickly climb up the walls, escaping from the rising lava. fire lift. We sit down on the golem and calmly ride on the lava. We drive into a recess in the floor, shoot with a chain and move along it to the other side of the lava. We pick up the chest there (there is a key inside). We take the seal over the abyss with the help of a demonic hand, and do not jump down. Then we turn back, run along the wall from above, grabbing the ledges. At the end of the path will lie page of the Book of the Dead (3/10) volume 2. We go to the door with bright blue chains, open it with the key. In the next room, we very quickly jump over the stone pillars to the other side, as the pillars will gradually sink into the lava. Next we expect very strong enemies. You don't have to deal with them manually. It is better to find a place on the wall where you can climb up, run along the walls, press the lever and sit astride the golem. We take the chest (it will contain a map of The Scar location). Another chest at the exit from the room on the second floor. We go further on the golem. We press the levers on the left and right, take the chest, we go further in the center. We get off the golem, climb over the bars. We deal with the fire golems, and the bars open. Let's go further. We break the growths of crystals with the chain of the golem, the bridge is lowered, you can drive through. At the end, we shoot the chain to the other side, and move there. In the middle of the chain, we turn left, jump into a dark crevice in the wall and hook on a demonic hand. We go upstairs, take the chest. We get to the end of the chain. In the next room, take two chests and go to the boss. Boss: Ghorn We just beat him, and when he starts to glow red, we run away. Several times you will have to run away from the lava bubbles that the boss will summon. After losing half his health, the boss will start to summon small fire golems. |
Tree of Life
Now you can go to the Tree of Life. We approach, watch the video, after which we find ourselves in a completely different world.
It does not matter if there are unfinished business in the first world, near the Tree you can always return to the previous worlds. To do this, you just need to enter the appropriate portal under the tree.
Watch the launch video. The balance of the world is broken. The culprit is the brother of the protagonist. Death is sent to correct War's bug. Ride your horse to the Dark Fortress. At the top, deal with enemies, pick up items, go inside, run along the walls. Hold the jump button. Climb up the vines, go to the ceiling. The first mini-boss is the Frost Giant. When you defeat him, you need to push the elevator start mechanism.
Climb up by following the instructions that appear on the screen. Kill enemies, go down the vines. Move to the right, jump onto the ledges, run onto the beams, climb higher.
Keeper of secrets. When you use up a little less than half of your health, quickly press the button. Kill him, use the portal.
The elder will heal the wound, after which he will find the Construct of Warriors. Deal with them and talk to a new acquaintance.
Passage of game Darksiders 2 - Flames of mountains
Follow the path to the Trekstone. There you will meet the beautiful Elia, her brother Valus. Help them by freeing the Flame of the Mountains, as well as the Tears of the Mountains from corruption. Then you can get to the tree. Talk to Thane, ask him to open the gate. You can acquire different skills from him.
Run forward, go around the abyss on the right side along the wall. On a vast territory you will see a monster with one eye. On a horse, go to the Cauldron. Help Karn kill the constructors there. In the building, use the mechanism on the right side. Go through dangerous corridors.
Get to the first boss named Garn with the chainsaw hand. When he weakens, inflict more blows and retreat further. It can explode and reassemble. There are healing potions in the crates. Reward - weapon "Dark Avenger".
Go through the doors, turn the lever 270 degrees against the clock. The cauldron will be filled with a flame that does not go out. Return to Elia, tell about what has been done. You can use the global map of the world. After talking with her, you will receive the Atonement pistol.
Walkthrough Darksiders 2 - Tears of the Mountains
Get to the open area and ride your horse to the gate. After talking with Karn, shoot at the red pimple on the gate, go further. Then meet the flying Pityers. We need to destroy the nursery. Then shoot at the pimple, climb up. Kill the enemies, move on, jump down. You need a Rainfort.
Run along the corridor, turn right in front of the door, climb up. Take a shadow bomb, interfere with the ball, which is in the opposite direction. Shoot the bomb, jump down, push the ball into the slot.
Go through the door to the next one on the left. Then there will be a statue. Climb up to the right. You will be taught how to wall jump while running. Push the ball down, install into the socket. Go left, climb up and jump down. Climb up the ledge, take the shadow bomb. Release the ball in the corner, go for the bomb, attach it to the ball.
Passage of the game Darksiders 2 continues. Push the ball to the locked gate. Climb up to the platform where there is a ledge. Step on the button, shoot the bomb on the ball. Place the ball in the right place. Go through the door, destroy the hotbed of pityers.
Behind the door, undermine the damage that enveloped the lever, start the flow of water. Jump into the water, go downstream. Then climb up the left ledge, open the door, jump into the water. Continue swimming, but already under water. Climb up. Get on the enemies. Hit the small ones first, then the big ones.
Blow on. You need to take the key to open the left door. Jump into the drain, go along it. Box. Take the key, go to the door. Through the corridor you will enter a room with a puzzle. First, get the ball with the bomb. Move it to the slot, grab the bomb, get on the platform. Throw a bomb at the ball, blow it up. For further passage of the game Darksiders 2, go through the corridor, deal with enemies. After the next door is a lever. He doesn't give in. Shoot the bomb that's on the corruption. Activate the lever, jump into the water, swim to the end. Climb up, pull the lever. Get into a large area. You need the right door. Go there and kill the Karkinos boss:
- take the ball, push hard on it;
- kill the crab quickly, attack the soft belly of the boss;
- run and dodge creatures;
- dodge the ram.
You will receive a reward - "Crusher from Kirkonas". Go to the lever, activate it. Open the global map, move to Elia. Go to the working forge, take the key. He will help in activating the Guardian in the smelter. But first, go into the forest to find a construct.
Walkthrough Darksiders 2 - Move the Mountain
Enter the building, activate the construct, bring it to the connector in the floor. Shoot at the target under the door. Move along the chain to the opposite side. Kill the enemies, take the shadow bomb, destroy the corruption. Climb on ledges, beams, ledges. Jump and go down the stairs. Kill the flyers, destroy the nursery. Go through the door, go up the stairs. There will be a ledge on the right side - climb to the door.
Once outside, run to the door. Go to the next building - kill the enemies, go up the stairs, go to another room. Activate the construct on the left. He will help clear the way to the door. Stand on the connector, jump from the construct. Then kill the sentinel construct. Go around the ledges crystals of corruption. Get to the hall, go around the abyss. Using the construct, split the crystals of corruption, which is on the other side.
Passage of the game Darksiders II - go back, activate the lever. Quickly return along the bridge to the construct, make your way to the hall. Stand on the connector, release the chain. Get over to the other side, shoot the bomb. Place the ball in the slot, kill the enemies, stand in front of the grate, next to the bomb. Take it and throw it at the ball - shoot. Get the key from the chest, follow the vines back to the construct. Saddle it, remove the chain and open the green door. On the vines get to the lever. Use the construct to cut a path to the connector, leave it and move on. On the arena, fight with a large number of enemies, five guards. They attack one by one. Destroy them promptly.
Get through the corridors to a small room. In the corner you will see a construct, in front - a lowered lift. Stand as a constructor on the lift, climb to the left side along the ledge. Move on. The construct will be on the left. Use it to raise the lift. In the place where the second construct was, there is a connector. Lower the grate. With the help of another construct, go through the place where the grate went down. In the further passage of the game Darksiders 2, stand in the slot and shoot the chain. Return to the construct along the beams, then you need to drive them into the slot at the beam. The door will open. When you get out, you will reach another door on the right. Kill the snoops and two mini-bosses. Use the Shape of the Reaper. Go inside, roll a ball into the socket, in another room there are again two not small enemies. Don't get carried away with combinations. Better dodge.
Reach the Boss Bulb Construct. He is big, but with a weak heart. Take this into service.
When you soak it, go up, interact with a large statue - the Guardian. After talking, sit on your shoulder so that he delivers to the Valley of the Stone Father. The ancient will give advice to return to Eidard, talk to him.
The Keeper of Secrets
We ride a horse. We just gallop forward and nothing more until we reach the ruins. Next, we jump onto the stone wall and continue on our way. Here the skeletons will join us in battle. Use your trusty scythe to grind their bones to smithereens.
Don't let them surround you. To do this, roll over and constantly move. After killing them, continue forward. Dust is our faithful companion. This crow will help us. In particular, it is she who shows the way to the goal. If you are lost, then follow it.
We run forward until we fall into a hole. Don't worry, we can easily go upstairs. Now we run along the left wall. As did the Persian prince. Further to the left there will be an ice wall. It can be broken, and inside you will find a treasure chest with useful items.
Next, we run through the pit using the wall on the right. Then grab onto the ledge and climb up. There will be more ice skeletons. Kill them. Experience never hurts. We go further and come across three hanging pillars. We jump on the first, we swing, then we jump further. And we pass, thus, to the end of the opposite ledge. Kill the skeleton and continue on your way.
Then we fall into a trap: we are surrounded by skeletons. There is nothing difficult. We kill them and move on. Then we reach the wall with a vine and climb it up. We move a little and jump to the ground. Then again we climb the wall with the vine. We go out into the open.
Now we approach the door and challenge the ice giant to battle. He may scare you outwardly, but he is a very easy opponent. Just dodge his attacks and counterattack, but don't overdo it with the attack. Be patient. After defeating the giant, a passage will open, into which we will go. Then we jump up the walls. Then onto the elevator and jump up the walls again.
We rise upward to the wooden poles. We continue to storm the vines until we see the poles. We get to the last pillar and to the ground. We kill ice skeletons and into the cave. Inside, run along the walls and reach the wooden beams. Jump on them until you reach the right place. Then we go up until we reach the boss.
Boss: Shadow of War
It's easy to defeat him. You will notice that the boss makes three strong swings with his weapon. It is after the third blow that he must be counterattacked. At a certain point, he will block your attacks and start shooting spikes on the ground in a certain area. You have to either move away or jump in time. Then we repeat the counterattack again, after the third swing. At the moment when it starts blocking, press the indicated button on the screen. All.
The Fire of the Mountain
After the video, we fight with enemies. We'll have to defeat them all so that we can continue our journey. After the battle, use your points to upgrade yourself, acquire new abilities. Before you continue on the road, go behind the statue, where you will find the treasure. Then follow the passage until you reach the stone. You will meet Tan, who is standing in the middle of the square. Talk to him. You can also get a new ability from him for free. Tang will also be able to give a side quest. We recommend returning to him with a more pumped hero.
Then go south along the road, and then turn west. Here you should meet Murai. You can buy potions from her, as well as get side quests. It will also allow you to get new items and answers during the dialogue. Unfortunately, there is not enough money for some things.
Now go to the forge and talk to Alya. After the conversation, talk to Thane and he will open the gate for us. Follow the trail until you reach the pool and then dive inside. We'll find the boatman. Then we climb up the wall and continue on our way. Walk forward until you reach a large clearing. Now you can summon your trusty steed to quickly explore the area.
You can either head east straight away to complete the main quest, or you can scavenge for treasure. In the western part of the valley you will find a chest with coins. In the northern part of the valley you will find page from the book of the dead . There will be three guards next to her, who will have to be killed. Another chest with coins can be found underwater.
In general, you can explore these lands later, but now we are going to the main goal. We reach the eastern goal and turn north. Destroy the ruins and go inside the ruins. Inside we find the desired chest, after which we go outside and continue on our way.
We leave to the northeast (to the corner of the map). Here, destroy the ruins to the left of the stairs and get inside. We also scour the chest and exit. Now we go to the left (east) and reach the next ruins. Nearby there will be a statue in the center. Just behind it there is another one page from the book of the dead . Now we're heading southeast. Walk along the path. The chest will be on the map - we rob it. The next target is on the rock on the left. Destroy the ruins again and go up to the second floor, where there will be a chest.
Now we ride a horse until we get to the next location. We reach the pass and finds a hollow tree trunk on the left. There will also be a chest inside. Then we go west. We clean the area from enemies and dive. The next chest will be behind the pipeline. Then we sail west. There will be a large-scale wall, on the side of which there are pegs. We climb up to them. Then we go up the slope and reach the goal. We are moving southwest. We will also find a chest along the way.
After you enter, you will be able to meet Karm, who will give us instructions. Join him and help him clear the area. Then talk to him about the craft of Muria. This is related to the side quest. Then he will lower the bridge, you will be able to climb up.
To the right, press the switch to open the door. We go to the main hall and jump to the right. Here you need to find a shadow bomb. Take it and throw it towards the northern door, to the bolt. Before moving on, grab a shadow bomb and throw it to the west, towards the spiked crystals. There will be a cache with two chests.
We move north to the land of fire. Now it's time for acrobatics. We climb up, jump on the walls and reach our goal. Then we find a vine and go down it. Use the shadow bomb to activate the switch.
We go to the next area. We are ambushed. There will be a new type of enemy here. Take the enemies out into the open to avoid a closed fight, otherwise they will overpower us. We meet the stalker - the enemy. We concentrate on it. Use your features to defeat him. Dodge his attacks in time. Defeating him will allow you to progress through Muria's side quest. Once you clear the area, there will be a chest to the west. Find the key in the chest.
After that fight with the stalker, we run south. We will return to the purple locked door. Use the key we found to open it. Once inside, swing and jump onto the blue ball and roll it to the hole. This will activate the pegs on the adjacent wall. Climb up to reach the next floor.
There will be a chest on the right - open it. Then reach the end of the path and jump onto the ledge at the back. We will also find a chest there. Then we go to the left. Then we jump to the ground - down. Let's see the switch. Click on it. In the next room you will find shadow bombs. Throw them into the yellow crystals. You will release a blue ball, which you need to take and put in the hole located in the southern part of the room. The iron gate will open. Then the second blue ball will fall out, and next to it you will find another one. book of the dead page .
Clue! If you accidentally put a blue ball in the wrong hole, then just throw or place a shadow bomb nearby. She will knock the ball out of the hole.
Place the second blue ball in the hole next to the stairs. Thus, you will gain access to the chest, which contains the second key we need. Now exit the room and head south. To open the door of the room, use the lockpick.
Now hit the switch and quickly run to the railing on the right. Quickly run across to the other edge, then pull yourself up and reach another ledge. Continue upstairs. Again you will find shadow bombs. Throw one to the crystals. After destroying them, you will find a chest below. Then go back and destroy the barrier with the bomb. Then we press the switch again and jump to the upper ledge. Take the shadow bomb and throw it on the switch. Now let's go to the boss.
Boss: Garn
The boss is simple. There shouldn't be any problems. Use focus on it. Just avoid his attacks and counter him. Once you deal enough damage to him, he will fall to his knees. During this time, hit him as much as you can. He will be the most vulnerable. Then our boss will quickly restore his health. At this point, run back from him, as he will deal damage in a certain area. Then repeat the process and you will kill him.
After defeating the boss, go to the next door. Check the chest along the way and kill the enemies. You can destroy items. Reach the balcony, where there will be a lever. In the northwest corner of the room there will be structures, destroying which you will find another page of the book of the dead. There will be a chest in the next room. Then use the lever and leave the area. Once outside, talk to Karm. Ask him about Miril. Use the map to return to the village. Talk to Alya to continue the game's storyline. Now you can trade with her. Mission completed.
The Tears of the Mountain
At this point, you can challenge Thane and defeat him, or you can postpone it until later. By itself, he is not a difficult enemy. Go west yourself and find Karma there. Talk to him and find out more about your current goal. There will be crystals at the gate. Blow them up to unlock your path.
Drive forward until you reach a large area with marauders. Clear the area from enemies. Then return to Karm and ask him about the stone. This will allow you to continue on the side quest. We're heading west. We clear our way with shadow bombs. Get up. There will be a chest on the left. Get inside. There will be many looters inside. Watch out, during the battle, do not accidentally fall into the abyss. Exit the tower and turn right. Find another chest with coins. Climb down and pull the lever to open the gate.
Go west. Meet a dude named Black Rot (Blackroot). It is here that the side quest for collecting 69 stones will begin, which will have to be collected in the game world. To collect a stone, you need to shoot at it when you find it. The "Collections" section of the game will help in the description of the stones. At this point, you can start collecting stones.
After talking to the dude, go left and look up. You will see mystic stone . Shoot him to get him collected. Then we ride horses to the east, to the shore. Go to the mountain on the right. Blow up barriers with the help of shadow bombs. Swim southwest until you encounter a sleeping giant. Talk to him about finding the stone. Inside the room on the second floor there will be a chest. On the first one is a character familiar to us, to whom it is mono to sell something.
Continue heading east until you reach a mountain path. Above the cave entrance power stone , and in a secluded corner on the right there will be a chest. We are moving southeast. As you pass the ruins of the pier, go up the hill, then to the left and you will find black trees. There will be another one on the way up mystic stone . Then we move on to another location.
Keep going until you reach a locked door with two marauders nearby. Kill them and go right. Climb up the wall. Then use the shadow bomb to get the blue orb and knock it out of the statue. Take the ball and jump down. Insert it into the hole. The bolt on the door will be pushed back and you will be able to go further.
Let's go to the pool. We need to go through the doors on the left, but you can search the area for items to collect. Look at the ceiling to the south and you will see mystic stone . If you dive into the pool and swim through the tunnel to the south, you can find a chest with coins.
So, now you can go to the door on the left. We rise to the top floor. On the left there will be two pegs, on which you can climb up. After the first turn, jump down and find a chest. We return to the main path. Move along the wall until you reach a ledge. Here you will find another page from the book of the dead . Then we climb up the walls and enter the door on the right.
In the northeastern part you can find a chest. Go to the door located on the south side. There will be marauders here. Get rid of them. There will also be new enemies here. They have strong damage, so be careful when dealing with them. Now go to the east door in the previous room. Go down the corridor until you reach a small square.
Now we need to place the two blue orbs in their respective slots to open the east door. Dive into the water and then you will find a chest in the southern part. Then we emerge and push the ball into the hole. Go down the other side of the gate and find a chest there. Use the railings to climb up and find a shadow bomb. Explode the crystal to release the blue ball and push it towards the gate. Place the bomb on the ball itself again to push it out of the room, then pick it up and place it in the second hole.
The gate will open. I'm going down the aisle. Destroy the hive along the way. We pass to the next area and kill the marauders. Use the shadow bomb to explode the crystals and use the lever. Water will flow. Then we go to the main square.
Now dive and swim into the southern tunnel. On the other side we rise to the wall and run to the left. Find a chest.
Move to the next passage and you will see empty aqueducts. On the left along the wall, get to the beginning of the aqueduct. Here will be page from the book of the dead . Jump down and kill the marauders. YOU will receive the key. This key must be used on a locked door.
We destroy the enemies that we meet along the way. Then we will be in another area. Explode the crystals to clear your path. We jump down and take the chest. Take the soft and push it up the slope. Put the ball in the hole. We'll lower the platform. Take the shadow bomb, put it on the ball, and stand on the platform. Now detonate the bomb. The ball will fly out, and we will go upstairs. Move on.
Destroy the hive along the way and keep moving in the indicated direction. Destroy the crystal and pull the lever. Then jump downstream until you reach another gate. Then go upstairs. Use the lever again to open the gate.
Boss: Karkinos
Prepare for the boss fight. Send to the end of the chamber until he shows up. To awaken it, stand on the round platform and press the desired key (RT). He will appear. At the moment when he crashes into the wall, take the egg and throw it at him. Sometimes the egg can fly past the target, then a cute friend will hatch from it, which must be killed immediately, otherwise it will cause problems.
When the boss takes enough damage from you. He will start diving into the ground and attack by jumping out of the ground. Perhaps it will let out vines. It will also generate an explosive wave. Continue the process until you beat him.
Then take all the loot and pull the lever to go outside. Then return to the village and talk to Alya.
To Move a Mountain
After we get the creator's key, the side quest The Stolen Stone will be updated. Talk to Alya to continue completing the story quests. We go to the goal on the map. We enter the cave and activate the glowing stone nearby. We move it to the blue hole. Then we climb the wall. Here you need to install the chain, and then run to the next ledge.
Next, we kill the enemies, use the shadow bomb to blow up the crystals. Then we pass through the room. We go up the stairs to an open area. We kill enemies, and then we destroy objects near the well in the northeastern part of the map. Let's find a chest. Climb up the western wall to find two chests. Then jump down and activate the lever.
The stairs on the right will lead us to the entrance. We run along the wall so as not to fall into the lava. Jump on the wooden beam and climb up the pegs. Then release the ball. Then go back to the entrance and pull the lever. You call the elevator. Then pull the lever again. Jump into the bodice and wait for it to rise. We take the ball with us.
Then we drag the ball into the next elevator. Pull the lever again and call the elevator. Now push the ball into the hole and go to the next room. Pull the lever again to open the gate. We ourselves go through the doors on the north side. Then we dive into the water and swim along the stairs to reach the underwater chamber. We'll find coins there. Keep swimming until you get out.
Keep going until you meet Karma. You can talk to him to update the side quest. Then enter the temple. Once inside, defeat all enemies. Proceed to the next door. Break the structures that block the path. Break the crystals ahead. Move the ball into the hole to move the bolt on the door.
In the next room, you can find new enemies with a shield that deflects all our attacks. Killing enemies will become a little more difficult. These devils drop a crafting stone needed by Muria. Needed for his side quest. Then we break the crystals, and run to the square. Then we dive and swim in the southern tunnel. Let's find a chest. Then we return to the place where we dived and move in the other direction. There will be crystals on the left, we pass them to the bridge. You should see a lever. Pull it.
We are waiting for the bridge to rise. As soon as this happens, then two enemy waves will go at us at once. Kill the enemies and return to the square. Destroy the crystals on the south side. At the bottom of the pit you will find mystic stone . Then we move on. Use the shadow bomb just above the statue to blow it up and push the orb further into its slot. Then defeat the enemies around. Now go to the gate, grab a couple of shadow bombs and throw them on the beam. Move away and blow it up. You will gain access to a chest with a key.
Then use the wall to get to the other side of the gate. Remove the chain and open the locked door. Then on the wall reach the lever and jump down. Kill the enemies and activate the lever. Now we need to open the gate. To do this, use a simple mechanism located in the room. You will see a free slot and a plate that needs to be activated. Then enter the opened gate. There will be several enemies here. We kill them.
Then we go further through the door. You need to cross the corridor, for this you need to run along the walls and jump from one to another. Reach the other end of the corridor. Then we pass into the next room. Then back to another room. Here you need to activate the platform and move it to the elevator. Get to the top floor. Use the lift activation hole to provide power and raise the lift.
Then insert it into the hole by the stairs and the gate on the left will open. Notice a group of crystals on the wall. Use the chain to reach them. On the other edge of the ledge there will be a slot that will open the bolt of the door that is closed. At the other end of the ledge there will be page from the book of the dead . We leave through the main door. Destroy the barrier ahead and move towards the door. We will be attacked. Avoid being surrounded by enemies. Use your skills, as well as potions as needed, to defeat your enemies. We kill them and continue to move on. Then you have to use the bomb to knock the ball out of the statue.
In the upper left corner on the beams will be power stone . In the small doorway on the left you will find a page from the book of the dead . Climb down and push the ball into the slot reserved for it. The west door will open. Go there and be ready to fight. Dangerous enemies will be waiting for us here. Don't let them surround you.
Boss: Fire the constructor
Easy boss. Wait for it to hit the ground. Then grab a shadow bomb (they will be nearby) and throw it at him. Then, after the bomb explodes, you will have a couple of seconds to hit him. Repeat the process until you defeat him. After the battle, you will find as many as 4 chests at the top.
We watch the video and return to the village. Talk to Eidad to complete the quest.
The Heart of the Mountain
We leave the village outside and meet Varden outside. Talk to him. Karm will also join us and help explore the dungeons, as well as help in combat. Don't worry, you don't need to protect Karma. He is immortal. We go inside.
Once inside, take a look around. Boilers will be hung around. In one of them you will find stone of resistance . So we keep going until we reach a dead end. This is where Karm will help us. We will have to jump onto the wooden beam and wait for the cauldron to get through. Grab one and wait until you start walking past the stone pillar on the left. Jump on it and onto the ground. We run to another ledge. We destroy the barrier, and use the lever to move the bolt on the door.
In the next room, jump onto the iron bolt on the wall to open the gate. Karm will come in. Then jump down. The door will fall on Karm, but he will hold it so you can get through. We pass quickly.
We continue the path and kill the enemies. We go until we reach a round room with an elevator in the center. Karm will give us a lift again. Then we dive under the water and swim north and find a coin, and then northeast to swim out to the right place.
You will reach a crossroads. Again spit to the northeast and click on the plate to lower the gate. Then we quickly return until the gate has risen and swim to the other side, where the ball is. Press the button again to open the gate. Karm will hold them for us. We take the ball with us.
Now you need to throw the ball in the direction of the symbol to activate the glyph. It is necessary that the ball hit the hole.
Once you do that, enemies will appear. Clear the area of enemies. Let's go further. Move along the crystals. Move west until you reach the plate you need to activate. We move until we find a vine. Climb up it and enter the door.
There will be lava flows. Wait for them to disappear and run along the wall. Then we go into the next room and kill the enemies. When leaving the room, take the key with you. We jump down. Open the locked door and move to another room. Karm will give us a lift again. Defeat the enemies that will appear here. Open the north door and attack the purple stone in the center. You will receive an ability that will allow you to move more quickly with the help of rings on the ceilings. All such rings are highlighted in purple.
Then go back to Karm and return to the stairs. We go down. With the help of the new ability, you can easily and quickly explore the dungeon. I'm going west. Enemies will often appear here. Then use the bomb on the switch (throw it on the bomb). The bridge will rise.
Turn left in the room and jump onto the wooden beams. There will be a lever here. Pull on it and raise half of the bridge. Then we rise to the wooden beam. Then you can jump to the vine. Then again with the help of the rings we get to the second ring. Pull on it and raise the other half of the bridge. We meet with Karm, go ahead and pull the lever to activate the lifting platform.
In the next corridor you will see a collection stone. Karm will give us a lift to another ledge. Then we go up and click on the disk. Then in the next room we jump down. Then start the platform and ride on the lava. We are moving southwest. Destroy the crystals along the way. Move until you find a hole to activate a special plate. We return to the elevator and pull the lever to activate the elevator. While the elevator is going, enemies will attack us. Protect yourself until we get there.
Enter the tunnel until you reach a large hall. Move on to find an activated platform. Karm will hold the door for us, Let's go quickly. Let's ask Karma to give us a lift. Use the rings to move across the abyss. Nearby there will be a hole that must be activated, and then pull the lever.
Once you release the lever, run fast as the platform slowly lowers. Climb up the vine. Climb down and pull the lever to raise the bridge in the big room. I'm going south. Kill the enemies that appear. Next is the lever. You can dive into the water and find a coin there, and then we emerge and activate the lever. We are moving to the northeast. Then we climb up the wall. Then we move along the rings and crawl up the next wall.
Run north, then go right. We run to the right and jump to the ground. Climb up and clear the area of enemies. Climb up to the platform and then pull the lever. The water will rise. Swim west. Meet Karma. Karm will throw us up on the ledge again. Then turn off the crusher and pull the lever. Now use the machine to stand on the lever and drag the ball. Take the ball with you and carry it into the room.
Now we push the ball into the hole to open the iron gate. Moving on with Karma. Click on the disk and jump down. We swim and exit through the tunnel. We cross the channel and click on the disk on the ground. Now we go south and ask Karma to throw us behind the iron gate. Nearby there will be a lever that must be activated, which will clear the path. Move forward and find a chamber with a stone. Then we get to the top ledge. The last "heart stone" will be visible at the top. Get to it and the boss fight will begin.
Boss: Corrupted Guard
This boss is slow, but very "fat" and tenacious. Dodge two of his attacks. Keep your distance, then. With the help of the rings, quickly jump to it and attack. And then we act according to this principle. Not difficult. After the victory, you can return to the ancient one. Fast Travel does not work here, alas. Either you do the whole way back, or you go further. And then we have, yes, the boss again.
Boss: Guardian
Here you have to keep running. As soon as you notice that the guardian raised his hand with a hammer, immediately jump to the side as far as possible to avoid damage. Then use shadow bombs and shoot him in the arm. The explosion will weaken him and make him vulnerable to attack. One of his stones will become vulnerable. Jump to the stone with a glove and hit as much as you can. Do this a couple of times and you will break his arm.
Next, the keeper will release explosive charges that are also chasing us! You will need to first shoot her with a pistol as many times as she starts to charge. While it is charging - run for the guard. The explosion will again weaken it. Again his stone will become vulnerable. But to the stone you will first have to jump on his hand. There will be beams to climb up, and then in a jump with a glove we grab onto a stone. Let's attack him. Repeat the process until you have destroyed all the stones. The third stone can not be destroyed. It is enough to watch the scene of his death.
The Three of Life
So, having received the quest, we call the faithful horse and jump to the point on the map. We reach the desired location and go further. We go up the stairs to the door on the left. Let's watch the video. Before us is a huge door with a lot of symbols. In general, we watch the video. Let's go without spoilers. After the video, we wake up in the same place and chat with the old man. Immediately we buy everything we need, we sell everything that is superfluous. In conversation, we know more about the tree.
Then we continue to follow the marker on the target. We call the horse and follow forward. The bridge will shake a couple of times, but don't worry. We keep running forward. Along the way, we can deal with the skeletons. Experience is never redundant. We reach the gate and go inside.
Road to the Gilded Arena
So, we go inside and run along the left wall, then we jump to another and crawl forward along the vine. Then to the beam, one level below, again to the wooden beam and up. We continue to climb up, and find a chest with pleasant contents. We jump to the very bottom. We get up on the button and a lot of spikes will open. Then we quickly run along the wall and cling to the edge. We run further and open the door. This is a round room. Enemies will attack us. We wet everyone in the meat! The music subsides. Then we go to the door and open it. On the left there will be a part that needs to be pushed to the wall, then pushed again. We will raise the bridge and run further. On a wooden stick we rise upward, we jump to the right and all above. Here we find two chests.
We go down again. We have to move on somehow. To do this, go back along the first bridge to the place where the shadow bombs were. Take a couple of them and attach them to this crane. Now go through the first bridge to the other side and shoot their cannons at the bomb, it will explode and you will activate the very platform, respectively, the second bridge will rise, and the first will fall. We run further. There will be a chest with the key we need. On the way back we will be attacked by scarabs. With the key we go upstairs, where we opened two chests, only to the other side, we return to the round room and back again. We reach the door and open it.
We keep running forward. Then we open the door and go down. We open the door again. We kill skeletons. Behind one of the statues will be page from the book of the dead . Open the door and go outside. We run to the marker on the map. Kill zombies along the way. Then we cross the bridge. You can summon the right horse. In the middle of the bridge, turn right and run further. We run until the cutscene starts. Before us appear air creatures that entail a ship of unprecedented beauty.
We are on the ship. We climb up the wooden beams. Then we jump from wall to wall and we are at the top. We go along the wooden bridge, but do not rush. A little behind him at the beginning there will be a chest. And now let's move forward. We go up. Now we crawl forward along the vine, upward. See the swinging hammer? We jump on it, then on the second one, and then use the glove and jump further. There will be a chest on the right. Now we go to the left. Use your glove again, and then climb up the vine and jump onto the chain from behind, from it to the beam to the left, then up and onto the opposite beam. Now jump onto the peg and use the chain again twice. Now up again, then onto the beam on the left and again on the beam on the left. We jump from it to the peg and use the purple glove a couple of times. Then onto the beam and jump into the passage. Hooray. Acrobatics is almost over. We go down.
We run further. Here we go up. We jump down again. We open the door. The movie starts. We run forward. We're talking to Draven. We sell the excess, buy and run further. We go down. You can gouge the boxes to find something useful. We go outside, rise and talk with the dude regarding the arena. We have just arrived there.
The Gilded Arena
After the conversation, a dot appears on the map. We follow her. We just can’t call the champion to fight, we need to somehow attract his attention, and for this we need to collect three souls altogether. We go down. And we run further. We open the door. We move along the wall to the other end of the cliff and open the door again. Here we run forward. We will see how the cuties gently caress each other, or rather the very creatures that drag the ship. We go forward and open the door again. Then we open the door again. The article on the right will have a blue crystal in its hands.
We go down the spiral staircase. We open the door. Here we see the source of the green beam. We turn the platform two times counterclockwise and we will be able to open another door in the direction where the beam shines. There will be two chests down in the abyss. Then climb back along the vine. Run along the wall on the left, then use the glove and run along the wall again. We open the door. We go out to the balcony. Let's watch the video.
Well, now we need to collect those same three souls. We go to the right. If you get lost, then the faithful raven Dust will tell you the way. Open the door and go down the stairs. We run down the corridor. Again we reach the door and open it. The video will play. There are a lot of skeletons here. We kill them. After the first wave will trample the second. Then you can go to the door and open it. We run further. We open the door again. We see a familiar ray of light. Go to the platform in the center, press the button and grab the bomb. Use it to destroy the crystals and open the chest. Then we throw a bomb on the beam itself. You will receive a lamp emitting this beam. Install it on the platform where the button is. This is temporary. Then you can move along the corridor to another part of the building. You will have to run along the wall, as there will be spikes on the floor. Here you will see a gate with a green circle at the top. The beam should shine here and only then the gate will open.
Rotate the platform two times to the left (counterclockwise). Then a little higher next you will find a lever that needs to be pushed in. Then we take the same lamp with a beam that we left on the buttons. Take it simply with a chain. Then we go to the pedestal and install it. All gates are open. We run further. Then we go ahead. There will be an Animus stone here. Actually this is what we need. On the way back we will be attacked by bugs. We kill them, after which the passage we need will open.
We go back to the exit. We open the door. There will be stone on the ceiling. Then use the peg to climb up. Then we go up again. Use the lever and open the gate. We entered the arena, which we have already seen. The resulting horn is inserted into the hole of the statue. Excellent. Another passage opened, and only a couple of horns remained.
We enter the passage. Don't forget to use Dust if you get lost. This is easy to do here. So let's open the door. Inside is a platform with a beam of light. We can run into the first room, climb the stairs up. Here you can blow up the yellow crystals and find a chest behind them. Then we reach that platform and move it to open another door. Let's go to the bridge, but there is an opening. Below you will see a shadow bomb. Take it and blow up the yellow crystals. Then go down. There will be a chest. Then we climb back to that bridge. We take a shadow bomb and put it on the crystals. They block the same beam of light. Now rotate the platform to open the door. The crystals are gone. We go further. On the right in the opening there will be a chest.
Next we will find a lamp with a light on the button. As soon as we take it, the gates will close and we will be attacked. We kill enemies. After killing them, the gate will open and go back. We put the lamp on the button, which will open the gate before the abyss. We ourselves go to the second platform and turn right. The gate will open. We will go out to the abyss where our lamp will be. We pick it up with a chain. Then rotate the platform again three times counterclockwise. We take our lamp and go up the stairs. We install the lamp on an empty platform.
The bridge will now be raised. We run forward and open the door. We go down the stairs. It will be destroyed, so we jump down. We open the door. Skeletons will attack us. We go to the cave. Here is the second horn or soul, as you please. Scarabs are attacking us again. We wet the creatures and take the horn, then open the door and insert it into a free slot. Phew. There is one more left. The camera will show how the entrance to the third hall opened, where we will find the last horn.
If you get lost, then call Dust. He will show the way. We open the door, and we are immediately met by a good pack of skeletons. We keep running. There is a passage, but in front of us there is an abyss on the right door. We run along the corridor and reach the next door. Here again, a lot of skeletons. We kill them. Then we go further and press the platform. The camera will show how we closed a certain altar. We stand on the button in the center and attract ourselves a shadow bomb. We squeeze out this platform again to open the altar, now we ourselves get inside it with a bomb and throw it on the button and activate it. We will turn over together with the platform and the altar to another location.
Here we will be attacked by a scarab - an overgrowth. He is a mini boss, so it's not difficult. In fact, there is absolutely nothing complicated. Just dodge his attacks and keep moving as he is very fast. We calmly take the third horn (soul) for ourselves and return it to the remaining free slot. With the help of the altar we return back. To do this, simply pull the platform in the wall behind you and quickly stand up to the altar. We return to the arena and insert the last horn.
Boss: Gnashor
So, there is a fight with a worm. He constantly roams underground. You will see the earth rising from it. The easiest way is to jump in a circle. In this case, he will not have time to reach you. Sometimes it will spin into a wheel on the surface and ride around the bush. Again, we dodge in a circle. At the moment when he jumps out, give him a glove in the face. You will stun him for a couple of seconds. He will just lay down. Quickly jump up to him and deal all the main damage. And so a couple of times, after which the worm will change its shape.
He will now perform a series of three punches, and will occasionally lash his mace from a distance and his tail. At this point, it is also better to run in a circle from him. The rest is nothing complicated. After a series of blows from him, quickly jump towards him and in the air with the help of a glove and strike a series of blows and so repeat the process until he turns slightly bluish. He will start growling loudly. Again with a glove in the face to him and he will literally fall apart. Beat the worm before it gathers. Repeat the process a couple of times.
After killing him, we get a golden skull and a pretty chest. Then we return to the ship to the ghost with which we asked for a conversation with the champion. Before talking to him, we sell everything that is superfluous to Ostegoth, we buy everything we need. Then we go up the floor of the stairs and talk to this dude. We tell him that we have done everything necessary and want to see his king. Let's watch the video next.
Phariseer's Tomb
We run to a very large gate. Here will be the first lord of death. Activate the elevator and go down. We kill the zombies and open the door again. Kill the enemies again and run to the door. We open it. We have a button. She opens the gate ahead. At the top you will get a shadow bomb. It can be used to destroy yellow crystals. Also, if you destroy the crystals at the button. Then you will get access to another source of shadow bombs, which is next to the button. At the top there will be a chest for crystals.
To the left of the grate there will be a platform that we freed from the crystals. We move the platform to the grate at the time! We ourselves stand on the button, take the bomb and throw it into the platform. She will move under the bars and hold her back. We can easily get through. We open the door and enter the open room. Again we open the door in another edge. Behind the statue we will find a page from the book of the dead. We go back. Here we activate the crystal under the Roman numeral 1 and go down the elevator. We get down and open the door, then we jump to the center of the abyss with the help of a glove and jump down.
There are a lot of zombies here - we kill them. Then we rise to the original position. On the left there will be beams on which you can reach the platform and activate it into the wall. The camera will show how you lowered another ring from the ceiling, but the first one, alas, rose. On the side of the pubescent platform with the ring you will find shadow bombs. Take it and throw it on the platform that has been pushed into the wall. Then we return to the starting position to the edge of the abyss. We blow up the bomb and quickly jump along the rings to the other edge. There will be a chest with interesting contents. As soon as we return back to the door, a cutscene will start playing. Before us is a mini-boss. We kill him.
Take the elevator again and go to the second floor. It's not possible here yet. We're going to the third. There's a door. Fortunately, the key was already found in the chest earlier. We open it. There will be zombies. Then we fight with similar mini-bosses that were before. Then we meet with a knight, in whose hands a hard shield and a sword. In general, nothing complicated - we easily kill him. Then we run down the corridors. We open the door and leave the room where the elevator once went. On the beams on the left we move to the other end of the corridor and open the door. On the left will be a wooden strip. We easily go down along it, then go to the next beam on the left and go down again. We'll still find the chest. Then we climb onto the next block and go down. There will be a column that you need to take and pull along with a glove. Next, we go to the platform to the elevator. There will be a button, and we put the column on it. Then we return back to the elevator. Now you can go to the second floor. We open the door and pass on. We stand on the button and quickly jump to the arena in front.
Boss: Farisir
In general, nothing complicated. But have time to dodge a series of his attacks in time. The fight will be complicated by the fact that skeletons will come to the aid of the boss. At the moment when you beat him, and at least henna to him - immediately jump back. At this point, he starts to attack with an AoE defeat. We jumped back, killed the interfering skeletons and beat him again. Then we watch the video.
Judicator's Tomb
Use the map to move to the next grave. We are coming. Inside you will see a statue with circles on the floor. Standing on it, you will be able to summon the previous boss. Now he is on our side. He will pull the lever on the other side of the grate. We go further. You can summon the death lord again. New monsters will also attack here. We kill them. They kind of remind me of strangers. We activate the lever. We return to the previous room We ourselves ask the lord to stand on the button, which will raise one of the columns. The one that can be moved we put in the center, and then we put the lord on the button on that side. Then we easily move to the other side. There is a chest here. We go further and stumble upon skeletons. We fight them. We also kill the reaper who summons skeletons. After the fight, open the door and move on. Point the lord to the button. Half of the bridge cannot rise. You will notice that something like a bump or growth is obstructing it. With the help of a glove and a lord, we cross the bridge. Just reach out to him. Then you will find a shadow bomb with which you can blow up this obstacle. Here you will find a lantern that needs to be placed on a platform in a round room with different paths. We rotate the statue counterclockwise a couple of times and go further into the room with water. There used to be a ladder here, but it has fallen. We rise to the top of the tower with the help of rings and beams around. A battle awaits at the top of the tower.
Then we go out to the square, where we talk with the lord and get the soul. We need to collect two more. We open the door and pass on. Here again we fight with strangers. They also look like the creatures from Dead Space. Then there will be a mini-boss. Fatty like that. There is nothing complicated, at the moment when his claw gets stuck, just beat him on the growth or whatever it is will tear him apart. Then we go further. We need to get the key. Call the lord and ask him to stand on the button. The camera will show how the ledges appeared. On them we move to the lord. We calmly move forward, a little acrobatics, a fight with skeletons and our key. We go back and use it on the door. We take the second soul and return it to the lord.
Then we go up to the second floor. Again ask the lord to press the button. The protrusions will appear. On them we run to him. Again we ask him to stand on the button and take the bomb. Throw the bomb on the bump that prevents you from passing. We use the elevator and find the last soul. Now we fight the boss.
Boss: Keeper of Bones
You will see a hanging skeleton on top. Use the glove to jump on him and kill him. I repeat the process 3-4 times until he dies. Of course, this is not all, and his second form is waiting for you, otherwise it would be too easy. Next, he will turn into a d giant made of bones. You can activate the reaper form and easily crucify him, or you can simply dodge attacks and just beat him up. Nothing complicated.
So, nothing complicated. There will be a mark on the map - we go to it. First you will come to the arena where you fought with Gnashor. The video will play. After the cutscene, we fight the enemies and move forward. So, now we can call the lords. Call on them and ask them to stand on the button, and stand on the lift yourself. Next will be a locked door. Again we place the lords on the buttons and open it. There will be a button at the chest. Also aim one at the lever. Then raise the bridge, to do this, put the lord on the button, then on the far button and quickly jump over the bridge with the glove until it closes. Next, go to the grate and you will see a fire of the same color as the lords. Send one of them to him. The gate will be open. Again, we ask the lord to stand on the button below and open another gate. We quickly jump over the gorge with the help of a glove.
Next, we will enter a room where three levers are located. First ask the lord to use the middle lever, then the right one and then the left one. Finally, we will get the key at our disposal. Then put the lords on the near and far buttons to open the gate. Next, we move into the room where the button will be. We put the unfortunate lord on it, climb onto a small ledge nearby, then jump and cling to the lord with a glove. Let's go to the caves. We need to find a lever. We go along the corridors. We are attacked by skeletons, and then two beetles and large such skeletons. Next, use the lever and pass quietly through the abyss further.
Boss: Echidna
First of all, we fight with a skeleton with two swords in our hands. It doesn't seem to be dangerous. And, in fact, here is our boss - his pet Echidna. He is on top of it. Just dodge his attacks and counterattack. Then he will get off his pet and we will have the opportunity to give him a good kick. During the fight, he will saddle his pet a couple of times. His attack is foreshadowed by electrical discharges around. Jump away at this point. We continue to fight and then watch the video.
City of the Dead
Before us, the gates, alas, are closed. We use our new abundance - the separation of souls. You call your doppelgänger. Send the first death to the button on the left, the second death to the button on the right, and now pull the columns to open the gate. We find ourselves inside the city of the dead. Next, we go into the room and kill the enemies. We use the division of souls again. One we stand on the button, and the second we activate the lever. Further in front of us will be a locked door. Accordingly, we need to find the key. Next, we will find the room where the platform is located. Of course, you need to put a lantern on it. So now we are looking for it. We go further and stumble upon the lever. Use the division of souls. One clone activates the lever, and the second goes further and finds the bomb. Then throw a bomb on the second lever and blow it up with the pistol. You will release a column that needs to be dragged to a large gate. Now we stone on the column. With one pull the lever to open the gate, and with the help of the second clone we push the column inside.
Then we run forward and go down through the hole in the floor. Here we will find a chest with a key. We return to the door and open it. There will be a bridge. In the middle of it, use the division of souls. With one copy, make your way up to the lever. Pull it up and keep holding it. The camera will show how the bridge has moved. On the left you will find a lever that will open the gate. Then we return to the room and find the lantern. We take a flashlight and go to the platform on which it must be installed. Now we rotate the column 2 times counterclockwise to form a bridge with the help of a beam and go further. Then some acrobatics. We are on the bridge again. Use the division of souls. One clone has to pull the lever. Rock again and clone to the golden beam, which will open access to the next lever. Take the bomb with the second clone and throw it on the lever. PRAISE BE TO ALLAH! The path has opened. Phew.
Next, press the platform into the wall. We go to the right place. Use the lever again, go down and go to the door. We open it and enter. Fighting skeletons and zombies. After the fight, the elevator with spears will begin to descend. You need to quickly climb up the bars. Then we run up the stairs. Enemies will constantly attack us in waves. Nothing complicated. We continue to climb up, then run across the wall and jump from beam to beam. Then you will reach the button. Stand on it, use soul division and run with a copy to the lever.
Now we run to the gate. Click on the lever in the wall and jump onto the beam. The platform itself needs to be turned 180 degrees, that is, twice. Then the lattice will open, and we pass further. Here you will fight with the beetles, and then take the bomb. A little higher in the chest will be the key. Then return to the initial large room. Climb up and open the door with the key. Then go to the room where you could use the button to open the jagged gate. Stand on the button that will open the gate near the column that we carried with us. Stone on it. Clone stand on another button. We stone again and send a clone to move the column behind bars.
Now we stand on the column and stone on it. Send the clone down to open the gate. The second roll up the cart. The first clone from the button on which he stood, stands on the next one. The second clone moves the cart towards the first button again. Then again we roll the cart on the button, which will open the door for us. Enter the room and pull the lever by the elevator. We jump into the elevator and push the platform into the wall. Turn the platform with the beam once (by 90 degrees) and go into the room where we meet with the boss.
Boss: Howling Highway
To be honest, there are no difficult bosses as such. So, our Cthulhu will appear. No other way to call it. Dodge his attacks. At the same time, he will sometimes hit with his hand backhand. Have to jump. Themselves beat him on the paws, after his blows. Also hit the tentacles. Hit him until he hits his head on the platform. You can pretty much kick him.
Then he crawls into the hole. Fighting skeletons. Again it appears and again repeat the process above. We just kick it and nothing more. We beat him until we get rid of his mask in the video. God, what a handsome guy. Again creeps away. We fight with skeletons and already finish it. After the victory, we go to the next room and watch the video.
The Key to Redemption
We jump into the portal from the kingdom of the dead. Next, we have a dialogue with the elder. Let's ask him. Next, we call on the horse and gallop forward to the goal. Along the way, you can break various boxes, search chests. We reach the arena Here we have new enemies - archangels in armor. Well, let's fight them.
After a fight with them there will be a video, then another fight and we will be allowed to talk with one of the archangels. The fight is simple but long. Next, we go inside the room and activate the lever. We go up. Here again we fight with the archangels. Then we jump over the pit, using the ledge and fight again. After the fight, go back by jumping over the gap. Stone it. With the help of one clone, take a nearby bomb and throw it to the second clone. And already the second throw bombs on growths. Then we go upstairs and another video is waiting for us, after which we jump into the portal.
The Road to Arafel
Let's watch the video. We must help Ariel. Strangely, the archangel from Diablo 3 was also named. Well, okay, after all, they have the same source for names. We fight together with him from enemies. We will be handed a submachine gun. We can call the right horse and follow further to the mark on the map. We resort and destroy the growths, after which we pass into the formed passage. As you have noticed, the action is already taking place in the city familiar to us.
We go to a point on the map, after which a video awaits us. You can search the boxes along the way. Here you can find a large number pages from the book of the dead . We continue to follow forward until we stumble upon the boss.
Boss: Noss
Some skinny huge creature that launches homing bugs at us - bombs. Here you can pick up a machine gun for a real grenade launcher or something like that. We just run at a certain distance and shoot at the villain. After he dies, look at the map and keep blasting forward to the mark on the map. We collect all the relics needed by the archangel and return them to him. After the conversation, jump into the portal. Video Noss
The Ivory Citadel
First we have a video. Then we run inside the building. We rise along the ledges, after which we pull the lever. Roller again. The lever opened a passage for us - we go there. Then we pass along the corridor and get into the open corridor. Sky overhead. Nicely. Climb a little higher with the help of the bars on the walls.
Here we watch the video again. Next, we will have to fight the archangels. They are still unhappy that we are hanging around. Further along the walls we go down and find a map of the area. Then, with the help of the vine, we cross the abyss. We pass under the arch and reach the button. We stone to the left of the arches. From the first clone we go to the button on the right, and the second we go under the arch, where we stand on the right on the second button.
The circle will open and the statue will fall down. Then we climb up the ledges. Then, using the glove, take the bomb and destroy the barrier. Then we jump over the abyss. Then in the room we go down and beat on the luminous face. Now we can teleport. You will see a blue circle on the wall. We teleport to it, and then a little higher. Jump into the portal from below and find yourself at the top. Go back a little and you will see two blue circles. Create a portal and jump into it. Now you need to find the lever. We jump into the hole and look for a blue circle below to create a portal.
Then find a circle on the wall and jump into it. We jump out and fight with the archangels. Now we can go to other circles with which we can make portals. Fighting angels again, damn them! We run forward and meet yellow balls with portals. Create portals between the balls and we will get a beam that will destroy the barrier. Move on. Look up. You will see a blue circle, just like below. Climb up the beams and go through the gate, where you will again have to fight with enemies.
After the battle, petrify in the center. With one clone, stand on the golden lever, with the other on the other. Next up is a video. Now go up again using the glove and the bars. We make a portal from above and below, next to the yellow ball. Now we are moving along the water channel. Let's run to the crystals, which must be destroyed with a bomb. She will be there. Then we climb up the vine and enter the room. Roller and go further down the corridor. Climb down and fight the archangels again. After the battle, the gates will open, through which we need to go and go down. We find a blue ball and make a portal. Again we go outside and fight with the angels. Then we can cross with the help of the ring.
Go up. You will see two levers and a blue ball. Press one lever and go to the platform. Create a portal and go to the lever. Petrify and pull this same lever with a clone. With the second clone we jump into the gate. We find ourselves in a room with a lever. We pull it and raise the gate - we pass there. I'm going upstairs. The chest will contain the key to the door. Take a bomb nearby and destroy the barrier on the way. A little higher, open the door with the key. Create a portal and go down to the very bottom to the yellow ball and the blue circle. Create a portal and watch a cutscene. Then we jump into it again and roll along the channel. Use the rings and gloves to cross the chasm. Walk along the dry channel and enter the gate. There will be waterfalls. We fight again. Go outside and jump into the water, down. Now we go outside. There will be portals and a ring.
Create a portal and jump into it. Now create another portal on top, and jump into the bottom one yourself. We will be on the ledges on the wall. We run to the place where the blue circles are. Create a portal and jump into it. We rise even higher and join the battle. Then go to the blue circle and the yellow ball. There will also be a lever nearby. Petrify nearby, pull the column to the lever with a clone. Then we climb onto the column and stone on it. Use the clone to turn the lever, and use the second to pull the cart towards the yellow ball. Again we go to the lever. Stone next to him. Rotate it with one clone, and with the second make a portal from the circle that appears. Below will be the same blue circle. Release the lever you were holding with the clone and the portal will turn. In the lower portal, you will see an image of a blue circle! It turns out that we will have to make a portal inside the portal, keep this in mind! Now clone run to the first lever, where you will find another blue circle. From it already create a portal. Turn the lever second. Now all yellow balls will be connected by rays. The beam will destroy the barrier behind which there is a blue circle. On the left you will find a blue ball, from which you will have to make a portal. Let's watch the video next.
We approach the channel with water. There will be two circles here. We make a portal. We jump through the crevice to the portal. Then go down and go along the narrow path to the lever. Turn it around. Enter the room. Watch video. Walk a little further. Here we create portals from two circles and jump to the bottom one. We'll be at the top. Let's create the portal again. We jump down again and make a portal so that you fly out of the topmost one. Then we go up the stairs.
Boss: Scribe Jameirah
This is where the battle will be more fun. In any case, the boss is more difficult than before. He throws yellow balls at us. Create two portals opposite each other and stand opposite one yourself, respectively, he throws the ball, we jump back. The ball flies into the portal and, flying out of the other side, hits the boss. After which he will lose consciousness. We can hit him a couple of times.
Then our friend will go upstairs. The principle is the same. Create one portal at the bottom, and the second on the second tier. We recommend using the beam in the very center on the floor. When he fires a beam, then run to the portal and jump out on the top tier. The beam will hit him, and we will fall down. Actually, everything. After the battle, we watch a video where we chat with a fat man. Climb up and fight the boss again!
Boss: Archon
He will throw stones at us. You will have to constantly jump and jump in order to dodge attacks in time. After he stops throwing stones, quickly run to him and attack him. As soon as he rises into the sky above the arena, then immediately pull up to him with the help of a glove and attack him, otherwise we will get on cabbage soup, plus, we will waste time. Repeat the process until you defeat him. Then we watch the video.
The Black Stone
The point is marked on the map. Let's go to her. We go inside the building. We go up. Place the statue on the button. The gate will open. Then we go outside and watch the video. We call our faithful horse and gallop forward. Let's watch the video again. Next we fight the enemies. Then we run along the corridor and reach the lever. Activate it. Then we pass into the next room. The door is locked. Turn left from the door and find a green circle. Create a portal and jump into it. You will see a button on the left. Put on the clone button, and the second you can make a portal by going down the stairs. With the second clone, look for the second portal, and next you will find a bomb. Throw it into the portal to the first clone. Then, with the help of a bomb, we destroy the structures.
Boss: Samael
Not difficult, but our boss is very fat. No matter how we beat him, ridiculous damage will be inflicted on him. At certain moments, he will completely set fire to the floor on the ground, which will also inflict damage on us. At the moment when he flies away, fireballs will begin to fly at us. Dodge them. In general, repeat the process and you will kill this Diablo brother. After defeating him, we will receive a demonic key or a demon key.
Well, the final battle is ahead. You are ready? We advise you to fully stock up, sell everything superfluous, upgrade yourself, if you still can, buy jars of potions, upgrade your clothes and go. So, the final boss!
Boss: Chaos Incarnate
Well, who cares, but somehow he didn’t impress us visually. To be completely honest, Diablo's previous brother seemed stronger. Fight him. At first, dodge his continuous blows with an ax and draw in the moment when, after his blow, she gets stuck in the ground. At this point, you will be able to strike at him.
How to remove a quarter of the damage to him, she will become more aggressive and cooler, but to no avail. Again, his hammer will be stuck in the ground for a couple of seconds. At this point, we attack him. We ourselves stay away from him and shoot him with a pistol or whatever you have there. We kill him and watch the video. ALL!
Side quests
The Hammer's Forge
After you complete the level in the Tears of the Mountains, you need to talk to Alya to get this quest. You will have to head north to the ruined village. If you have already discovered this place, then use fast travel.
Once inside, go to the main square. Dive into the water, here you will find a coin. Then we return and enter the door. We dive again and go to another area. Then we climb the wall and go to the western side. We go along a narrow corridor, jump from wall to wall and run along them until we reach the next ledge. Then we get to the top ledge.
We reach the room with shadow bombs. Eliminate the enemies, then take the bomb and throw it at the crystals nearby. Blow them up and clear your way. Then take a bomb and break a lone crystal - you will find a unique weapon. Walk forward until you reach a room where many crystals are blocking the path. Nearby there will be a lever for which you need to pull. Then we jump up and grab the bomb. We throw it into the crystals below. We jump down and kill the enemies. I'm going north.
To go further, you must defeat all enemies. Then we jump from wall to wall. We reach a large hall. We dive into the water and leave in the room where we take the bomb. Throw it on the crystals and get a reward. Then we continue on the east side. We enter the room and move on. We kill enemies. We reach the box, where there will be a key to all doors. Next, pull the lever to remove the barrier and jump down. We open the locked door and reach the treasured chest, where the item we need will be. Return it to Alya to complete the quest.
Stick and Stones
In the village, turn west and find a man named Blackroot. He will give this quest, and also give Lure Stone (bait) in addition. Now, with its help, we need to collect 69 stones scattered around the world of the game. To collect them, it is enough to shoot them with our bait. For each collection of stones, you will receive a separate reward.
Shaman's Craft
This quest can be obtained after talking with Muria. Ask him about crafting, after which he will say that he needs the ingredients for a powerful amulet.
Ingredients:
- Stalker Bone (drops after killing a hunter)
- Mordant Dew (obtained after killing a stinger)
- Carven Stone (obtained after killing a guard with a shield)
Important! Creatures must be killed in that order. They are in this and go during the game. If you break the order initially, then the items will not fall out! You can also talk to Karn. He will tell you everything about every being.
Spark of Life
After you complete the Shaman's Craft quest, talk to Muria. She will tell you that with the help of her experiments, a creature called Ghorn was obtained. You just need to kill him and that's it. The boss is easy. Looks like you don't know what. Shoots rockets, a swarm of bees, which should be avoided. In general, weaker in strength than the bosses from the main plot. We kill him and return to Muria.
Lost Souls
After talking with Nathaniel, you will be prompted to quickly reach the Eternal Throne. There, talk to the chancellor and get the quest. Completing this quest will allow you to unlock another quest - Sparks of Life.
Silent stone
Once you reach the fort for the first time, swim along the river southwest of the harbor. Somewhere in that area you will find a sleeping giant. Just take a good look at it and you will get the quest. You need to somehow wake him up, and for this you need a key.
To find the key, you need to search the Drenchfort. There you will find a key that, according to the description, awakens the sleepers. Then use it on the giant. Get an interesting stone as a gift.
The Wandering Stone
You will receive this quest after completing the Silent Stone quest. We need to find the missing body parts.
So, you will find the left hand in the southeastern part of the map. It will be in front of the entrance to the cave. The left leg will also be in the southeast, only lower, to the south. You will find the right hand at the ruined village. Go to the middle of the gorge. The limb will block the path. The right foot is located on the path that leads to Drenchfort.
Then return to the giant and complete the quest.
Lost Relics
You will find Ostegoth in the Kingdom of the Dead, and in the story you will meet more than once. He will ask you to find relics that are scattered around the world. Find all thirty and get your reward.
The Maker Warrior
There is a Thane in the Tri-Stone location that you can challenge. Defeat him in battle and complete this quest. After defeating him, he will give you 4 more side quests where you will be a bounty hunter:
- Find and Kill Achidna
- Find and Kill Bheithir
- Find and Kill Gorewood
- Find and Kill The Deposed King
Achidna, Bheezir, Gorwood, and the Deposed King will have to be found and killed. Nothing complicated, however, the bosses are stronger on the rise. We do not recommend completing the task at the initial stages of the game. And remember, all these murders are four different quests that you have to complete in order.
The Chancellor's Quarry
After you find Nathaniel, you will be given the chancellor side quest. We must go through the labyrinth, at the end of which we will face a powerful boss. Defeat him and demand from him his crown, which must be returned to the chancellor.
Light of the Fallen
On Earth, meet the Angel Ariel, who will ask you to find and kill ten of his brothers. It is very easy to pass it by completing the main quests, since almost all angels will come across on the way.
The Book of The Dead
The quest is given by Vulgrim. Asks to collect all the pages from the book of the dead. All 40 pages are scattered throughout the game world. Every 10 pages can be exchanged for a key to one of the four tombs of death, where there are a lot of cool weapons and things inside.
The Crucible
Not so much a side quest, but a combat arena where you can fight opponents who attack in batches. Know one nuance. In total, there are 4 stages of 25 waves in the arena. After every 5 waves, a chest appears. If you open it, you will reset the counter. Accordingly, save yourself for better rewards in later waves.
We also recommend
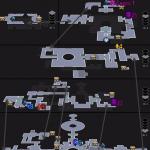 Passage of the game Darksiders II Key to Redemption
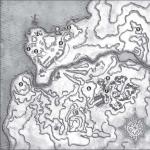 Complete walkthrough of the main and side quests of the second chapter
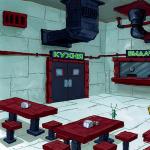 SpongeBob SquarePants (Walkthrough)
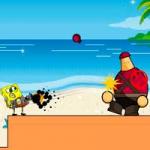 spongebob games squarepants
 Escape Impossible: Revenge Walkthrough Walkthrough Can you escape video
 And the dragon came. Difficulty of choice. Key points of the game The Witcher 2 kill the dragon or escape the consequences