Homemade caracat drawings. How to make karakat and other homemade products from a walk-behind tractor
Lightweight all-terrain vehicles with huge cameras are able to overcome severe off-road conditions that other types of off-road vehicles cannot traverse. Self-made vehicles of this type are simple, since they do not have a complex technical base, which is why they have won the recognition of most home craftsmen. Such equipment is especially in demand by residents of rural areas, where precipitation greatly reduces the quality of roads, as well as by lovers of hunting, fishing and extreme recreation.
Types of homemade all-terrain vehicles
Depending on the type of design and chassis, the following types of homemade all-terrain vehicles differ:
- Swamp boats. They have a simple design and are relatively cheap to manufacture. They are equipped with an outboard motor and allow you to move around shallow bodies of water.
- Crawler swamp vehicle allows you to drive through overgrown reservoirs, but is quite complex and expensive to manufacture, as it requires the attachment of a special type of tracks.
- All-terrain vehicle on low-pressure tires- the simplest and most promising type of swamp vehicle, the performance of which depends on the design and reliability of the tires.
Some homemade products later become serial models. This happened with, which is now known throughout the world.
Types of homemade all-terrain vehicles with low pressure tires
Homemade all-terrain vehicles on low-pressure tires, having the same principle of off-road movement, may differ in type of design. There are the following main types of vehicles of this type:
1. Four-wheel drive karakat. In its design, it uses transmission and chassis elements from outdated types of passenger cars. It has all-wheel drive, a transfer case, and the adapted boat hull in its lower part and the tightness add buoyancy to the all-terrain vehicle. Designed to overcome swamps and swamps, capable of delivering cargo and people to inaccessible areas.
2. Tricycle on low pressure tires. It has a very simple design and can be made by almost any car enthusiast in a garage. The IZH Planet 3 motorcycle is often taken as the basis for such an all-terrain vehicle, due to its endurance and unpretentiousness. 
3. Homemade karakat with SZD motorized stroller engine. Its peculiarity is that the engine is located not under the frame or gas tank, but under the seat or in the rear of the all-terrain vehicle’s frame. Chassis parts are traditionally taken from cars, and elements of motorcycles are used in the front part. Pipes, channels and angles are used to make the frame. 
4. All-terrain vehicles with low-pressure tires based on passenger cars or ATVs. They are manufactured using ready-made main units by reworking the transmission and chassis, as well as equipping them with low-pressure tires. 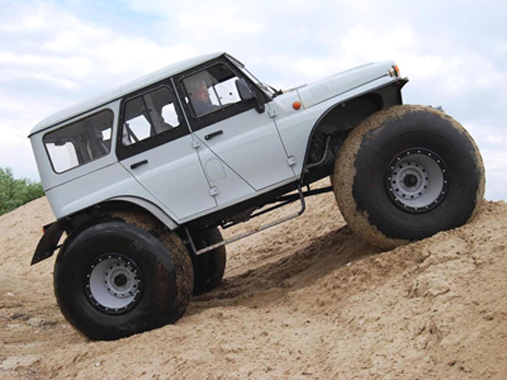
How to make an all-terrain vehicle on low-pressure tires?
Work on manufacturing an all-terrain vehicle begins with drawing up an action plan, the full implementation of which means achieving the desired result. The following tips will help you save time and money:
- Availability of free time, allowing you to regularly carry out work on assembling the all-terrain vehicle. If it is absent, it is better not to start at all.
- Budget planning. Creating an all-terrain vehicle yourself allows you to save on purchasing a production model, but in order to eliminate unnecessary expenses, you need to make all the calculations and buy the necessary components and parts, and also leave a certain amount for unforeseen expenses or breakdowns.
- Developing a plan. If you have experience in developing vehicles or the inclinations of a design engineer, it is possible to independently create a drawing of an all-terrain vehicle. In the absence of such, they use other people’s experience and ready-made drawings, of which there are a sufficient number on the Internet.
DIY low pressure tires
Tires of this type visually resemble huge pillows that support the entire structure. The degree of grip in such wheels allows the vehicle to be passable on any off-road terrain. Depending on the design features, such tires are divided into the following types:
- Arched. They are 5 times larger in size compared to a standard wheel, and have a thickness of up to 700 mm. The pressure in them is like in a regular ball - 0.05 MPa. Installed exclusively on the drive drive.
- Wide-profile. They are distinguished by an oval design and pressure up to 2 times lower than standard. Most often used in lifting vehicles.
- Toroidal. They are manufactured in tube and tubeless versions and are highly popular among car enthusiasts.
- Pneumatic rollers, having lugs to improve cross-country ability, and ribs to increase rigidity, giving the entire structure stability and strength.
The cost of factory-made low-pressure tires may be unaffordable for many car enthusiasts. But for your own all-terrain vehicle, it is quite possible to make such a wheel yourself. The work is performed in the following order:
1. Selection of source material, for example, agricultural or aircraft tires, as well as other types of industrial transport. 
2. The tread is cleaned, washed and dried, after which the desired patterns are drawn to create your own design, as well as to remove excess wire and rubber.
3. To remove excess wire, the inner part of the wheel is trimmed and the cord is removed using.
4. Excess rubber is also removed with a winch, making cuts around the circumference, and securing them to the cable with pliers, carefully pulling and cutting with a knife.


5. After removing the tread layer, the surface is cleaned with sandpaper.
6. Disk assembly. To do this, use a standard disk cut in half, or welded from plates and pipes, and then carefully polished to prevent damage to the camera. 
7. The tire is pulled onto the rim and secured with belts or a fire hose, and then inflated. The wheel is ready. 
What type of tread should I choose for an all-terrain vehicle?
To select the right type of tread for an all-terrain vehicle with low-pressure tires, you need to consider the following factors:
- The protector must have the ability to self-clean. This property is especially important for using an all-terrain vehicle in harsh and wetlands.
- When using an all-terrain vehicle on peat bogs, choose tires with low and shallow terrain, otherwise if their top layer breaks, the grip will be insufficient for full movement.
- When used in snowy areas and on sandstones, tires with a rare pattern are chosen.
Choosing an engine for an all-terrain vehicle
Most often, the following type is used as a power unit for self-manufacturing an all-terrain vehicle:
- Motorcycle.
- ZAZ car.
- Motoblock.
- Domestic cars.
The presence of a specific engine in an all-terrain vehicle does not make a fundamental difference. It is more important to take into account such a feature as ensuring it is sufficiently cooled, since the vehicle is operated all year round in different temperature conditions and at low speeds. The ZAZ engine is excellent for this, as it can withstand temperature changes well. All-terrain vehicles running on motoblock power units have also proven themselves to be the best.
Another main criterion for choosing an engine for a future homemade product is its power.
The power reserve must be sufficient so that an all-terrain vehicle on low-pressure tires can get out of mud, water, or deep snow.
By choosing a unit with a power reserve, you get better performance, prevent overheating and create conditions for the longest service life.
Features of the all-terrain vehicle chassis
The chassis of all-terrain vehicles on low-pressure tires is manufactured in a form to give the all-terrain vehicle better cross-country ability, increase the comfort of driving the vehicle and make riding easier for the driver and passengers. This type of design has a main drawback - the complexity of manufacturing.
To create it, pipes, angles and channels made of durable alloy steel are used, creating a strong base that can last for several years without breaking. The frame is made both solid and articulated. The latter has a high working potential, but the complexity of its manufacture makes it quite rare in home-made designs.
Sequence of self-assembly of an all-terrain vehicle
Assembling an all-terrain vehicle on low-pressure tires includes the following steps:
1. Selecting the type of all-terrain vehicle and the base on which the units and parts will be mounted. For this, frames of cars or motorcycles are used, as well as home-made structures developed on their own or borrowed from someone else’s drawings.
2. Manufacturing and assembly of suspension with rear axle. For this, the optimal solution is independent design, and, although much more time will be spent on its creation, the end result will be an all-terrain vehicle with higher cross-country ability and ride comfort.


3. Installation of wheels. Performed after completion of work on the rear axle and suspension. Metal hubs are used to mount the cameras. Properly manufactured or selected low-pressure wheels will provide the all-terrain vehicle with increased driving safety and good handling. 
4. Engine installation. Particular attention is paid to the correct design of the cooling system. 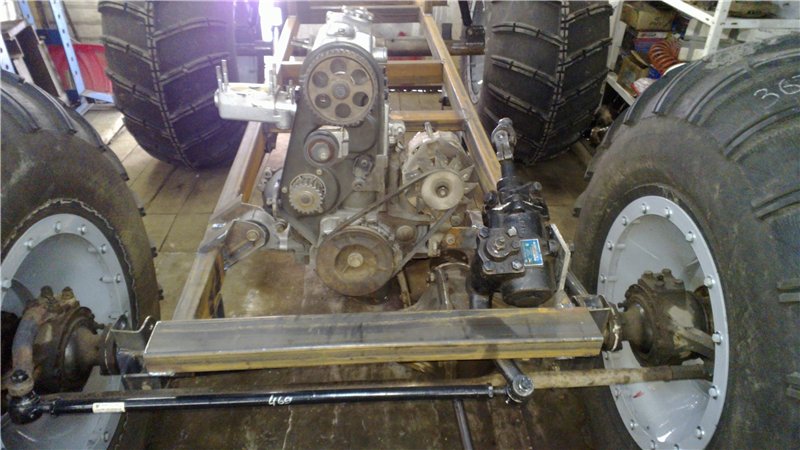
5. Installation of additional systems. Includes connecting the brake system, exhaust gas communications, clutch, etc. At this stage, the body of the all-terrain vehicle and lighting fixtures are installed.
6. Completion of work and implementation of a trial test, which shows the performance of components and systems. If there are problems or points that need to be improved, the shortcomings are eliminated, after which the all-terrain vehicle is ready for use. 
Video testing a homemade all-terrain vehicle
So I decided to build a three-wheeled karakat, below in the photo is the result of the work done. Now the karakat even has a cabin as protection from the rain. Below are some stages of the construction of this device.
The search for the necessary components for the karakat began, as the main thing was that I already figured out what and how to do. I laid out the main components, these are the Ural engine, the VAZ gearbox and the bridge from the Volga.
 This is how I make disks
 I peel off the OI-25 tires
 Frame
Frame
 Connecting boxes
 I cooled the engine, secured the fan and made the drive from the crankshaft.

 I installed a car generator, but removed the original Ural generator altogether since it is weak and, in addition, six-volt, and with this it is possible to create a powerful light and power with a reserve.
 I connected the bridge to the box using Zaporozhye drives, one is screwed to the flange of the box, which required re-drilling two holes in the flange on the second one, one fork was replaced with a UAZ one (by the way, on the lock of the UAZ cross), the splines were cut in half and they were fitted with a splined bushing cut from Cossack hubs.
 Test ride, although without a muffler and gas tank yet, a bottle instead, but I liked it
 Next is a photo of the already run-in caracat, so to speak.

 As it turned out, the generator drive from the fan turned out to be weak, so the generator moved to a new location. The belt is now on the crankshaft flywheel.
 This is what a karakat looks like now.
 This is how the device turned out. If the first gears are in both gearboxes, then it pulls very well, the maximum speed is about 5 km/s. If the VAZ gearbox is first, and the Ural gearbox is fourth, then the maximum speed is about 40 km/h, and if the VAZ gearbox is second, then you can accelerate as fast as you can. There are no brakes at all yet, but they are planned, as well as braking using the engine and with your feet. The caracat swims and seems to be quite stable, but the front is a little heavy, the front wheel sinks a little more than half, more precisely 10 cm above the axle.
Today the Internet is filled with many projects of genuine interest: how to make a homemade all-terrain vehicle, or how to make a caravan from a walk-behind tractor or motorcycle. When you see such a car for the first time, you involuntarily doubt whether its driving characteristics are good, since from the outside it will seem that the Carakat is a bulky and clumsy car. In reality, everything looks different.
In swamps, mud and river beds, such all-terrain vehicles are simply irreplaceable, since they have sufficient buoyancy and can easily overcome small water obstacles.
How to make a karakat from a walk-behind tractor
Typically, a karakat from a walk-behind tractor is operated at a speed of less than 70 km/h, which is quite acceptable for bad roads, not to mention their complete absence.
Due to the strong suspension, welded from steel pipes connected by hinges, the caracat can withstand significant loads. Steering the steering wheel of such an all-terrain vehicle is not complicated, since it is based on a simple design based on a conventional worm gear.
Even a powerful carat based on the Urals is characterized by good performance, not counting the ease of maintenance and availability of spare parts, unlike factory all-terrain vehicles.
Light Caracat
A lightweight caracat, equipped with huge wheels, easily passes difficult off-road conditions, finding its way where other vehicles simply cannot pass. From the point of view of their design, such homemade caracats do not have a complex technical basis and are easy to manufacture, which has led to their wide popularity among most home craftsmen.

The secret of the simplicity of this approach to manufacturing lies in the original idea - using ready-made units as much as possible, to assemble an all-terrain vehicle from parts and assemblies of trucks and cars, motorcycles, mopeds, which opens up a wide field for the application of creative energy and skills of home-made designers. There are also known projects made from walk-behind tractors belonging to the middle or heavy class.
Making a karakat from a walk-behind tractor with your own hands
So, how can you make a karakat from a walk-behind tractor with your own hands and thereby create for yourself a reliable and indispensable assistant not only for your own household, but also for fishing and hunting trips?

In creating such a carat from a walk-behind tractor, the main stages described below can be distinguished:
Choosing a Frame for Caracat
A carat from a walk-behind tractor, naturally, requires the skilled designer to have a walk-behind tractor, preferably belonging to the heavy or middle class. In fact, a carakat is nothing more than a home-made all-terrain vehicle mounted on four or three wheels (depending on the design), with wheels “shod” in low-pressure tires, driven by an internal combustion engine.
To ensure that the karakat made from a walk-behind tractor does not disappoint your expectations and becomes an indispensable vehicle for long hunting or fishing trips on difficult off-road terrain, you need to clearly imagine all the stages of its production.
First you need to decide on the frame. In principle, many designers of home-made caracats took frames from IZH motorcycles, or even from URAL, which is determined by the financial capabilities of the participant(s) in the caracat manufacturing process, as well as what is available at hand.

Karakat from IZh has good maneuverability, which predetermines its main use when moving through the forest, as well as when overcoming rough terrain with large differences in elevation, slopes and ravines.
Making your own pendants
At the next stage of making a karakat from a walk-behind tractor, it is necessary to make the suspension and rear axle. The pendant will need to be made with your own hands, since the karakat pendant involves a welded structure of two parts connected by means of hinged fasteners. In the Karakat suspension design, the spars are mated to each other by means of a steering bushing, a strut and a special strut, resulting in the formation of an independent rear and front suspension.
When installing both the side members and the steering wheel bushings and special struts, it is necessary to achieve the independence of the suspension, since it is the independent suspension that is of particular importance for all types of homemade caracats, since it provides the caracats with the maneuverability of a tracked all-terrain vehicle along with maneuverability and a soft ride, especially when overcoming rough terrain.
Installation on homemade karakat wheels
The wheels of the future caracat are its most important and most expensive part. You can either purchase them or make them yourself. It is important to note that all the known home-made designs of these all-terrain vehicles, including even the karakat from the Ant scooter, are equipped not with wheels themselves, but only with tubes and tires for the wheels of trucks (KAMAZ, Ural, as well as their trailers, including the large K-700) .
It is these wheels that ensure ease of steering and overcoming uneven terrain, which ultimately ensures the safety of driving such an all-terrain vehicle. The significant volume of the chambers gives the caracat with such wheels good buoyancy, which is a useful addition to its good maneuverability. Sometimes caracats are equipped with simple inner tubes attached to the suspension via wheel rims and metal bands that wrap around the outside of the wheel inner tube and are attached to the rims.

Installation of the engine and its complementary torque transmission systems to the drive wheels. After installing the suspension with wheels on the karakat frame, you can begin installing the engine, as well as all other systems that complement it - the clutch, the braking system and the system for removing burnt fuel products.
Upon completion of this, it is necessary to comprehensively test the karakat, and only after successful completion of the tests can it be fully exploited. Depending on what kind of walk-behind tractor (high or medium power) the home designer of the karakat has at his disposal, so will its power.
Karakat from walk-behind tractor drawings and video


Today on the Internet you can find a large number of projects of entertaining homemade machines, popularly called caracats, or pneumatics. These unique all-terrain vehicles, equipped with bulky cameras, are capable of driving through severe off-road conditions. From an objective point of view, such homemade products do not have a complex technical base and are quite easy to manufacture. This fact has allowed them to gain popularity among numerous home craftsmen who make caracats with their own hands.
What kind of car is this?
Looking at this mechanism for the first time, you involuntarily think about whether this homemade product has decent driving characteristics. To an ignorant person, it may at first seem that the karakat is a very cumbersome and clumsy device. In truth, the opposite is true. A reliable suspension made of metal pipes allows you to withstand extremely heavy loads. It should be noted that it is absolutely uncomplicated, because its basis is the standard
Unlimited scope for experimentation
The secret of the success of this invention lies in the following. Initially, the idea was to produce an affordable pneumatic all-terrain vehicle, the basis of which would be ready-made units. You can make caracats with your own hands from parts from cars and trucks. All this gives unlimited scope for experimenting with model design.
Karakat is also popular among craftsmen. In the process of making it, craftsmen never encounter difficulties. It should be noted that to produce such a machine you will need a medium or heavy class monoblock.

Pneumatic device
Karakat is equipped with three and sometimes four wheels with low-pressure tires. It moves thanks to an internal combustion engine. The type of power plant depends on the power of the manufactured caracat. A wide variety of engines can be used (Izh, Ural and others).
In the vast majority of cases, caracat pendants are made independently. This part consists of two independent systems secured by an extended hinge joint.
The most impressive part of the car is the wheels. It should be noted here that it is the most expensive part of the structure. For this reason, many craftsmen make karakat wheels with their own hands, resorting to the production of low-pressure tires.
Manufacturing stages
How to make a karakat with your own hands and admire an unpretentious, reliable household assistant and an indispensable tool, without which not a single real, full-fledged man's vacation - hunting and fishing - can do? To do this, we highlight four main stages in constructing a wonderful all-terrain vehicle:


Possibility of use

Caracats are popularly called pneumatics, which is explained by the presence of low-pressure wheels, which provide the self-propelled vehicle with excellent maneuverability. In swampy areas, among mud and in river beds, hand-made caracats are simply irreplaceable, because they have excellent buoyancy and the ability to cross water obstacles. Such cars are often used for hunting or fishing trips, and over very impressive distances. In most cases, a homemade caracat (assembled inside and out with your own hands) is designed for speeds of up to 70 km/h. This is quite enough, especially taking into account bad roads or their partial absence.
Many people ask how to make their own karakat from a walk-behind tractor. Now craftsmen are trying to modernize any equipment they can get their hands on and make something unusual. Every year there are more and more such people. Especially often, craftsmen try to build all-terrain vehicles; one of the types is the carakat, which is built from an ordinary walk-behind tractor.
How to make a karakat from a walk-behind tractor with your own hands
Even the simplest version of the karakat is capable of reaching speeds of up to 70 km/h and can easily pass any off-road terrain and withstand all the loads placed on it. It can perform all these functions thanks to a strong suspension, which can easily be made from steel pipes connected by hinges and welding.

No expensive materials are needed to make such a unit. All that remains is to slightly adapt to the way you drive this vehicle.
Let's look at how to make a karakat from a walk-behind tractor with your own hands. In the process of creating a karakat, the following stages can be distinguished:
- Making the frame - it is advisable to use a walk-behind tractor of medium or heavy weight (using a Neva walk-behind tractor is the best option for making such equipment), using this you will get a good quality all-terrain vehicle with three or four wheels. Some designers use spare parts from a Ural or IZH motorcycle as a frame.
- Creation of the suspension and rear axle - the suspension design consists of two parts connected to each other by hinges. At the request of the developer, it is possible to design the front and rear suspension, ensuring their high independence.
- The production and installation of wheels is the most expensive and time-consuming part of the caracat.
- Most craftsmen do not buy ready-made wheels, but use homemade ones, which are tires and low-pressure chambers (it is preferable to use these products from trucks: Ural, KamAZ or their trailers).
- Installation of the engine and systems (brake, clutch, exhaust of burnt fuel products).
See » Review of the Luch MB-1 walk-behind tractor

Before using it fully off-road, you should test the manufactured device.
Homemade ATV from a walk-behind tractor
In addition to the caracat, you can also build a homemade ATV from a walk-behind tractor, which is a four-wheeled, safe and maneuverable motorcycle.
The main thing is that it must be equipped with a high-quality motor.
But it is worth remembering that a homemade ATV will be quite maneuverable and durable, like its original, but in terms of speed it will be much inferior to it.

The process of transforming a walk-behind tractor into an ATV is carried out in 3 successive stages:
- Increasing the wheelbase, the need for which arises due to the location of the wheels on the walk-behind tractor under the engine. This process can be carried out by turning inserts on a machine or by purchasing ready-made options in the store.
- Creating a frame that can be used as a basis for a bicycle or motorcycle. If they are not available, you can use ordinary steel pipes, which must be welded together. The frame is attached to the walk-behind tractor using the rotary joint using 2 pins.
- Selection and installation of wheels - low-profile tires should be used. You can't do without disks here. You can use inner tubes from trucks, which will avoid installing additional shock absorbers. In order for the rubber to last longer on the ATV, you need to take a regular canvas watering hose and wrap the wheels of the unit in several layers. To prevent it from unwinding, its ends are fixed with glue.
Tricycle from a walk-behind tractor
Let's look at how to make a tricycle from a walk-behind tractor. The creation of such a vehicle will differ quite a bit from the construction of an ATV. The only thing is that you can use a scooter or motorcycle as a frame, and the walk-behind tractor itself will be located under the driver’s seat or immediately behind it. The construction of a trike is similar.
A tricycle is any three-wheeled vehicle from a bicycle to a car, and a trike is a three-wheeled motorcycle. At the same time, some experts argue that “trike” is translated from American English as “tricycle.”
See » Which walk-behind tractor is better to choose for cultivating land plots and other work?
There is also a buggy with a walk-behind tractor engine. Do-it-yourself buggies are not created as often as the units discussed above.
We also recommend
 A frozen miracle with your own hands: learning to make jewelry from epoxy resin DIY jewelry from epoxy resin
 How to make soda at home without much expense?
 Pedicab drawings dimensions
 We grow hops in the country How hops are harvested on an industrial scale
 How we build How we built the house ourselves
 Juicer. Types and device. Operation and application. How to choose. Centrifugal or auger juicer - what to choose How an old juicer works