Arrival at 1 am. Accounting info
Today we will look at how to correctly post a bank statement in 1C.
Now we will consider in more detail the issue of working with such a document as a 1C bank statement. As an example, let’s take a situation where you need to make a non-cash payment in accordance with a supply agreement.
For example, there is a certain company Pilot TD, which must pay the UkrPostachSbut company a certain amount. To reflect this action, you need to open the item in the “Bank” menu. There, select the “Outgoing payment order” section. The same procedure can be performed if you go to the control panel. There will be a bookmark of the same name, click on it.
You need to add a new entry in the payment order journal. The payment order must be completed in accordance with the requirements (depending on the specifics of the transfer), and then saved.


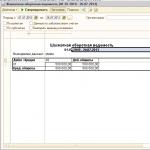
After this, you need to open a special category called “Bank Statement”. There, set the day on which the bank statement is directly saved.


Once you have dated it, you need to add another statement.

In the newly created statement, you must fill out the bank account, and also do not forget to put the date. A future bank statement in 1C will be generated for it.

If you have filled in all the required fields correctly, the functional panel will now be available to you. Find the “Select unpaid” tab on it.

A window will open in front of you, where you will need to check the required document (or several documents at once). When the checkboxes are checked, click on the “Check checked” button.

When completed, you need to close the form. Now you can see a statement in 1C, which is generated according to the required date.

There is another simple way to generate outgoing and incoming bank documents. They are formed directly from the extract form itself. This is easy to do, just click on the “+Add” button. And then in the same window you will be able to use 1C documents and:
- change the payment status of documents and much more.
navigate through all statements;
view the results of the conduct;

Any enterprise in the course of its business activities acquires and pays for goods. Payment terms may vary - from prepayment to payment upon receipt. In 1C Accounting 8.3 you can configure any scheme for receiving goods and making payments.
The procedure for reflecting payment to the supplier
In order to reflect the fact of payment to a counterparty for goods in the 1C Accounting information base, you should use a payment order. Based on the generated document, it is then necessary to carry out an operation to write off funds from the current account by creating a document of the same name. After closing both documents, the necessary transactions will be generated in the information system, and data on the debiting of funds will be reflected in the accounting registers.
If the user has a solution for digital exchange of documents with the bank, it is not necessary to generate payment orders in 1C Accounting. It is enough to reflect the write-off of funds in the program. In this case, the document for debiting is created on the basis of downloaded payment orders from the Bank-Client system.
If you need to create a payment order in the program, then this document is available in the 1C Accounting 8.3 menu section dedicated to working with bank accounts and cash.
This document must be completed taking into account the following recommendations:
- The transaction type should indicate that this is a payment to the supplier.
- A mandatory detail of a payment order is the date of its formation.
- If there is budgeting, you should indicate the BDDS item under which payment will be reflected.
- Next, you need to indicate the payment amount.
- It is also necessary to reflect the purpose of the payment in accordance with the requirements of the Bank of Russia.
- After filling in all the fields, you should select as the status of the payment order that it has been paid. As a result, 1C Accounting will automatically generate a document for debiting funds from the account. All fields in it will already be filled in. It is necessary to remove the value that the document is confirmed by a bank statement, since the actual payment has not yet been made. In this case, the necessary transactions will not be generated.
- When finished, you can print the document, as well as close and post it to the database.
Once the bank statement is received, it will be necessary to confirm the already created document for debiting funds from the account. To do this, you will need to open the document in the appropriate journal, check the box that the operation is confirmed by a bank statement, and then save it, post it and close it.
You can check the correctness and view the transactions generated by the document using the Dt/Kt button.
The procedure for reflecting the receipt of goods after payment
Before performing all operations that reflect the fact of receipt of goods at the enterprise's warehouses, it is necessary to set up the accounting policy in the organization. If it does not exist, then it is necessary to create it, since this is provided for by law. The main document by which changes are made to the 1C Accounting registers when goods arrive is “Receipt (act, invoice)”. It is available in the menu section of the information system, where all documents for reflecting purchase actions are located.
It is necessary to fill out a document reflecting the receipt of goods at the warehouse, taking into account the following recommendations:
- First of all, you should indicate the document number and its date.
- As a supplier, you must select an organization that is listed in the directory of counterparties.
- Next, you should indicate the agreement with the supplier. The 1C Accounting information system provides the user with the opportunity to select to fill out this field only those contracts that have the status “With a supplier”, therefore it is necessary to control the correctness of the reflection of information about contracts in the program.
- After this, you need to select a warehouse to which the goods will be posted.
- If necessary, you can change the accounts on which settlements with counterparties are reflected or adjust the rules for accounting for advance payments.
- The shipper and consignee must be indicated.
- Using the selection or adding function, you should create a list of goods that are received. They are selected from the directory of item items. If there is a need, you can add information about the product article or other information to the form.
- Once you have completed filling out the document, you must save and post it.
The correctness of how goods receipts are recorded in 1C Accounting can be checked using the function of demonstrating document transactions and movements.
After posting the document reflecting the receipt of goods, the acceptance of VAT for deduction should be reflected in the 1C Accounting information system. To do this, use the invoice received from the supplier. It is created on the basis of a document confirming the receipt of goods.
When filling out the described document, you must take into account the following nuances. Firstly, the invoice must be registered. To do this, information about the date and number is entered into it, and the corresponding processing is started. Since the document is generated based on the receipt of goods, all fields will be filled in automatically. Adjustment may only be required in the following cases:
- it is necessary to indicate the date when the document was actually received;
- The invoice allows you to accept VAT for deduction; for this, the corresponding box must be checked.
Once you have completed filling out the document, you must post it, save it, and close it.
You can check the correctness of the posting of goods and their value using the balance sheet for account 41.
It is produced by a document of the same name (in the latest versions of the program it is called “Receipts (acts, invoices)”. In this step-by-step instructions, I will give consistent instructions for recording the purchase of services and goods, and will also consider the postings that the document makes.
In the interface of the 1C 8.3 program, this document is located on the “Purchases” tab, item “Receipts (acts, invoices)”:
After this we get to the list of documents that have ever been entered. To create a new receipt, you must click on the “Receipt” button, where a menu for selecting the desired type of operation will appear:

- Goods (invoice) - a document is created only for goods with an accounting account - 41.01;
- Services (act) - reflects only services;
- Goods, services, commission - a universal type of operation that allows the receipt of returnable packaging;
- - a special type of operation for accounting for the tolling scheme; in the postings, such receipts will be reflected in off-balance sheet accounts;
- — to reflect the receipt of fixed assets on accounts 08.03 and 08.04;
- Leasing services - generates postings to account 76.
Let us consider in detail the receipt of goods and services.
Receipt of goods in 1C Accounting 8.3
To complete the purchase of a product in the 1C program, you need to enter a document with the “Products” type. In the header of the document, you must indicate the recipient organization of the item, the warehouse for acceptance, the counterparty-seller and his agreement:

Below, in the tabular section, information about positions is entered:
Get 267 video lessons on 1C for free:

What goods were purchased, in what quantity, at what price and at what VAT rate (if your company is a VAT payer). Accounting accounts may or may not be present in the tabular section. It depends on the program settings. In postings, the goods are usually credited to account 41.01.
This completes filling out the document.
If the supplier has provided you with an invoice, it must be reflected in the program. This is done by filling out the “number” and “date” fields at the bottom of the document:

After clicking on the “Register” button, 1C itself will create a new document “Invoice received”. This document makes entries for VAT (for example, 68.02 - 19.03) and creates an entry in the purchase book.
Let's look at the postings of the created 1C using the document “Receipt of goods and services”. This can be done by clicking the Debit-Credit button:

As you can see, the document generated two postings:
- Debit 41.01 Credit 60.01 - receipt of goods and accrual of debt to the supplier;
- Debit 19.03 Credit 60.01 - reflection of the incoming document.
In this case, the goods are sold on credit, that is, on a post-payment basis. If we had paid for the goods first, the program would have generated an advance offset entry (Dt 60.01 - Kt 60.02) for the amount of the prepayment.
Watch our video on how to purchase a product:
Receipt of services in 1C 8.3
Purchasing services in the program is not much different from purchasing goods. Filling out the header is absolutely the same, except for indicating the warehouse. The primary document for reflecting such a transaction is usually the “Service Rendering Certificate”.
The only difference is the indications in the tabular part of the nomenclature with the “service” type. For example, I will arrange to receive delivery services:
Usually, working with bank statements is configured automatically through the client-bank system, but the ability to integrate client-bank and 1C is not always possible. In this case, work with the bank will have to be done manually. Let's look at how the necessary documents are generated.
Creating a payment order
In order to transfer money from an organization’s current account to pay suppliers, pay taxes and other fees, you need to create a payment order. On the “Bank and cash desk” tab, select the “Payment orders” item:
A list of payment orders opens. In the upper left part of the document, click the “Create” button, a form for a new payment order opens. The following fields are filled in:
- Transaction type – selected from the proposed drop-down list according to the type of payment being made;
- Recipient – the required counterparty is selected from the counterparty directory, the recipient’s account and the agreement are filled in automatically from the counterparty’s details;
- Amount of payment;
- VAT – by default it is set from the counterparty’s data;
- VAT amount is calculated automatically;
- Purpose of payment.
It is important to correctly indicate the type of operation, since depending on the selected operation, the document details will change.
For example, when choosing the type of transaction “Payment of tax”, you will need to fill out the “Type of obligation” field, you can change the BCC and OKTMO code (by default they are filled in with current data). The order for payment to the supplier looks like this:
After completing a completed order to pay the supplier, no transactions are generated in 1C; it is just an information document that records the need to generate a similar payment order in the client-bank system (remember, we are talking about manual work).
Another way to create a payment order manually is through the “Pay” button, which, like the “Create” button, is located above the list of payment orders. When you click, a list opens from which you can select the desired type of payment: “Accrued taxes and contributions” or “Goods and services”:
When you select one of the items, it will analyze the organization’s debt and generate a list of documents that require payment:
To create payment orders to several creditors at once, you can mark the required documents in the list and click the “Create payment orders” button.
New payments will appear in the list. They are in bold and not posted because they need to be verified. After checking the correctness of filling and the correctness of the amounts, the order is carried out. In this case, you also need to duplicate the order in the client-bank system.
As soon as the bank has confirmed that this payment has been transferred to the recipient, the movement of funds in the accounts must be reflected in 1C and debited from the organization’s current account.
You can debit your current account from the same payment order. In it you need to set the status to “Paid” and click on the hyperlink “Enter a debit document from the current account.”
The document “Write-off from the current account”, unlike a payment order, generates transactions in 1C.
You can see the transactions by clicking the “Show transactions” button:
Everything was filled out correctly: funds were transferred from the organization’s current account to the supplier’s current account, which is reflected by posting Dt60.01 - Kt51. In the list of payment orders, a check mark appears in the first column opposite paid documents:
Receiving payments from buyers
To reflect the receipt of funds to the organization’s current account, use the “Bank statements” item in the “Bank and cash desk” section:
When you select this item, a journal opens that reflects all receipts and debits from the current account:
To enter information about receipt, use the “Receipts” button. The document “Receipts to the current account” opens, in which the following fields are filled in:
-
The VAT rate, agreement and movement item of the DS are filled in from the previously established values.
Type of transaction – in our case, “Payment from the buyer” is set;
Payer – the counterparty from whom the money came is selected from the directory;
After filling out all the data, the document is posted:
Once done, you can check the wiring:
Posting Dt51 - Kt62.02 shows that money has been received from the buyer to our account.
The list of bank statements shows current information on the current account status for the current day:
Information is provided on the amount at the beginning of the day, on receipts and write-offs for the day, and the balance at the end of the day.
If you need to clarify information for any other day, you can use the calendar to select the desired date:
A list will be generated for the selected day, which will also show all information about the account status.
Register of documents
To obtain summary information on transactions on a bank account, use the “Register of Documents” report; the button of the same name for creating it is located in the journal of bank statements. After clicking the button, a document is generated for printing:
An already completed document is created; all that remains is to post it after verification:
The counterparty's debt for this sale is extinguished, and the receipt automatically falls into the sales subordination structure:
Payment orders are issued in a similar manner based on purchases and receipts of services.
Checking the status of your current account
You can check the status of your current account both in the journal of bank statements and through the “Start Page” on the main page of 1C:
Also, to check the account, you can use the balance sheet for the account (51 accounts for ruble transactions, 52 for foreign currency transactions).
How to post a bank statement 1C 8.2 1C 8.3?
The procedure for making a bank statement in 1C version 8.2 is indeed slightly changed compared to 1C 7.7. But, if you think about it, the apparent inconvenience of the new algorithm is replaced by an understanding of its logic. We have already briefly covered working with a bank statement in one of our previous articles. This is the article “How to sell currency? Selling currency in 1s 82" |
Today we will look at the process of working with a bank statement in more depth. So, …
For example, we will reflect the process of payment by non-cash means under a supply agreement.
Let’s say the organization Dobro LLC pays a certain amount to the organization UkrPostachSbut. To reflect this action, open the “Bank” menu item and select the “outgoing” item. The same can be done in the control panel on the tab of the same name.

We add a new entry to the payment order journal. We prepare the outgoing payment order in an appropriate manner. Let's save it.


Then we add a new statement.

In the created statement, fill in the required bank account and the date for which the statement is generated.

After filling in all the details, a functional panel will automatically become available, on which you need to click “Select unpaid”.

In the selection window, mark the required document or several required documents with checkboxes and click “Send checked”.

After completion, close the form and the statement generated by the required number becomes visible.

To be fair, we need to add that we can also generate outgoing and incoming bank documents directly from the statement form. This is done simply by clicking the “+Add” button.
In the same statement window, you can navigate through statements, view the results of the transaction, change the payment status of documents, etc.

We hope that our article has sufficiently covered the answers to the questions: “ How to issue an outgoing payment order? How to make a payment? How to enter bank statements in 1C version 8.2? How to make a 1C bank statement? How to post a bank statement in 1C? How to post a bank statement in 1s 8? Bank statement 1C 82″
If you have any difficulties, we will definitely help.
You can discuss the operation and ask questions about it at.
If you have questions about the article or there are still unresolved problems, you can discuss them at
Rate this article:
We also recommend
 List of children's rights in Russia and normative legal acts in which they are enshrined. The child has the right to development
 What rights does a child have under the Russian Constitution? How to ensure a child’s right to a name
 Is there a law determining the place of education (school) at the place of residence?
 Accounting info. Accounting info How to change the responsible person in 1s 8.2
 Payroll preparation
 Accounting info Making selection for cocoa powder