Technology for growing champignons at home. How to grow champignons at home - a step-by-step guide
Champignons today have become the type of mushroom that is available for growing at home. The period between planting the mycelium in the substrate and receiving the first fruits is minimal. Growing champignons does not require special conditions. It is enough just to provide a cool room with high air humidity. A basement or cellar is quite suitable.
Champignons can be grown both for personal use and for sale. But it is important to know that the substrate for their growth, when wet, emits a rather strong odor. It is not advisable to keep it in a residential area.

The very first and most important step in successfully growing mushrooms is proper preparation of the substrate. It must be prepared with high quality in compliance with all stages.
The substrate for champignons consists of:
- 25% compost (wheat and rye straw)
- 75% horse manure
There is experience in growing champignons based on chicken manure or cow manure, but you should not expect high yields in this case.
The substrate is prepared in an open space on the street or in a well-ventilated room, since during its fermentation ammonia, carbon dioxide and moisture will be released. Additional additives per 100 kg of substrate are:
- 2 kg urea
- 2 kg superphosphate
- 5 kg chalk
- 8 kg gypsum
As a result, we get almost 300 kg of finished substrate. This mass can fill a mycelium with an area of 3 square meters. m.
If you decide to prepare compost based on chicken manure, then the proportions will be as follows:
- 100 kg straw
- 100 kg litter
- 300 l water
- Alabaster
The procedure for preparing the substrate is as follows.
- The straw is soaked in a large spacious container.
- Straw is laid alternating layers with manure. There should be 3 layers of straw and 3 layers of manure.
- The straw is wetted with water during the laying process. Three layers of straw (100 kg) will take about 300 liters.
- While laying the layers, urea (2 kg) and superphosphate (0.5 kg) are gradually added in small portions.
- Mix thoroughly.
- Add chalk and the remainder of superphosphate, gypsum.
The resulting substrate is left to undergo the smoldering process. In this case, the temperature in the mixture will rise to 70 degrees. After 21 days, the compost will be completely ready for further use.
Planting material

There is no need to save when purchasing planting material. Therefore, they purchase mycelium (mycelium) only of the highest quality. It must be grown under special laboratory conditions. Manufacturers of myceliums today present two types of planting material:
- Compost mycelium
- Grain mycelium
Grain mycelium is produced in plastic bags. It is stored for about 6 months at a temperature of 0 to 4 degrees. Grain mycelium is used at the rate of 0.4 kg per 100 kg of substrate (mycelium area 1 sq.m).
Compost mycelium is sold in glass containers. Its shelf life depends on temperature. At zero degrees it can last for about a year, but if the temperature is at 20 degrees, then the mycelium must be used within 3 weeks. Compost mycelium is used at the rate of 0.5 kg per 1 sq.m of substrate. Its yield is much lower than that of grain.
A properly prepared substrate will certainly spring back when pressed. Before placing mycelium in it, it must undergo a pasteurization (heat treatment) process. After heating, the substrate cools down to 25 degrees. About 100 kg of substrate is placed in 1 sq.m of mycelium in a layer of approximately 30 cm.

Take a piece of mycelium the size of a chicken egg and bury it about 5 cm into the substrate. Each portion of the mycelium is placed at a distance of 20 cm from each other. A staggered arrangement is used for planting.
Another method involves uniform distribution (sprinkling) of mycelium over the entire surface of the substrate. It also needs to be buried no more than 5 cm.
Further actions are to provide the necessary conditions for the establishment and germination of the mycelium. Air humidity should be maintained at around 90%. The substrate must also be kept constantly moist. To prevent it from drying out, the mycelium can be covered with sheets of paper. Watering the substrate is carried out through paper. An important condition for the establishment of mycelium is a constantly maintained substrate temperature of 22 to 27 degrees. Any temperature deviations from the norm must be adjusted immediately.
The mycelium germination time is approximately 7 to 14 days. After this period, the substrate needs to be covered with a covering layer of soil of about 3 cm. It is prepared independently from one part sand and nine parts peat. Approximately 50 kg of cover soil will be needed per square meter of mycelium.
The covering layer is kept on the substrate for three days, then the air temperature in the basement or cellar is reduced to 15-17 degrees. The cover soil is moistened with a spray bottle, and the room is constantly ventilated. Drafts are not allowed.
Harvesting
The process of growing champignons yourself in a cellar or basement is not too complicated or time-consuming. The period from planting to harvesting the first harvest is 120 days. Only those mushrooms in which the plates under the cap are not yet visible are suitable for consumption. Those mushrooms that are large in size, overripe, and the plastic ones are dark brown in color are prohibited from being used as food. They can cause poisoning.
The mushroom should not be cut, but carefully plucked with a twisting motion. The resulting depression is sprinkled with a covering substrate and moistened.
The mycelium will bear fruit for about 2 weeks. The number of harvests collected during this period is 7. Up to 14 kg of crop is harvested from one square of area.

To grow champignons in large quantities for sale through retail chains, I use polymer bags. This method has gained recognition in many countries. With its help, a large harvest is obtained.
- A polymer film is used to make the bag. The capacity of each bag ranges from 25 to 35 kg.
- The bags should be of just the right volume to make them convenient to work with. In addition, the correct location of the bags affects the number of grown champignons. They are usually arranged in a staggered or parallel pattern.
- So, when installing bags with a diameter of about 0.4 m in a staggered arrangement, only 10% of the usable area will be lost, while their random installation results in losses of up to 20%.
- The height and width of the bags may vary. You need to take into account their conditions and ease of work, as well as the physical capabilities of the basement (cellar).
The method of growing mushrooms in bags is less expensive, as specially mounted shelves or containers are not required for their placement. If there is a need to use the space of the room as efficiently as possible, then a multi-tiered system can be created to arrange the bags. The advantage of this method also lies in the speed of combating emerging diseases or pests. An infected bag can be easily removed from healthy neighbors and destroyed, whereas if the mycelium becomes infected, its entire area will have to be removed.
It is important to remember that growing mushrooms is a rather labor-intensive process. If champignons are grown for sale, then it is impossible to do without the use of agricultural machinery to make the work easier for workers.
Experienced mushroom pickers can list a large number of methods they have tested for independently growing champignons in a basement (cellar). Each method has its own advantages and disadvantages. The main thing is compliance with growing technology, strict adherence to all instructions and requirements. The result is achieving the desired result and obtaining a rich harvest of mushrooms.
How to grow champignons at home (at home)
On their acres of land, summer residents cultivate almost everything. But if you ask whether mushrooms are grown at home, few will answer in the affirmative. And, nevertheless, their breeding is not only possible, but also advisable. They are an excellent addition in the form of various dishes to the everyday table, and a very profitable business. This primarily applies to champignons, given their market value. Although their excellent taste is somewhat offset by the “biting” price, they are in demand, and quite a lot. The basis for success is knowledge of the intricacies of the technology for growing these mushrooms and a competent approach to business.
There are several methods for growing champignons at home. The difference is only in certain details. For example, in the method of implementation, volume of production. Everyone is free to determine for themselves what exactly they need - growing champignons for their own consumption or for sale. Knowing the final goal and focusing on your capabilities, choosing the best methodology and making the necessary adjustments to certain types of work will not be difficult. The main thing is to understand all the nuances of the technological process.
It is more correct to start from this point so that the reader immediately understands, firstly, that there is nothing particularly complicated in this, and secondly, whether he can implement any of the listed technologies, taking into account his own capabilities and needs.

Favorable conditions for champignons
They don't need much:
- Humidity (%) – above average (about 70 – 80).
- Temperature (ºС) – moderate, within 18±4.
- Good air exchange. How to organize ventilation - natural or forced - is decided on the spot.
And practically no care, unlike most gardening or ornamental crops.
In the garden
In this case, we mean not only a plot on the site, but also a certain area in a greenhouse, a large basement, an empty barn, a vegetable storehouse, and so on. All that is needed is some segment of the territory (horizontal base) onto which the prepared soil mixture can be poured.

Step-by-step instruction:
- Waterproofing the base. Since champignons need high humidity, it is necessary to prevent water from escaping into the soil. The simplest way is to trim it and cover the entire area of the future bed with polyethylene film (preferably thick; it is stronger).
- Laying the substrate. The recommended thickness of its layer is 35±5 cm.
- Sowing mycelium. You can choose one of two common methods. The first is that grooves are made in the soil into which planting material is loaded, which is the thinnest bodies - “mushroom” threads of champignons (vultures).

That is, similar to how the seeds of carrots, beets and a number of other crops are sown. The second technology is no more complicated. Planting material is simply scattered over the surface. To ensure that the mycelium is well established in the substrate, there is again a small (about 5 cm) layer of prepared soil on top.
All that remains is to organize systematic irrigation of the beds. For the mycelium to grow, the soil must be kept moist at all times. Plus - regulate the temperature (if we are talking about a room) at the required level. The appearance of the first mushrooms can be expected in about a couple of months.
Advantages:
- The simplicity of this technology.
- Virtually no preparatory activities other than choosing a location.
- Minimum investment. Only for the purchase of mycelium. The cost of 1 sachet is around 150 rubles.
Minuses:
- There is a high risk of infectious diseases in champignons. It is clear that it is impossible to clean ready-made beds with planted mycelium. Therefore, when visiting a room with champignon mycelium, you will have to follow the rules of hygiene. Change of shoes and so on. If the bed is on a plot of land, in a shaded place, it is much more difficult to comply with all sanitation requirements.
- Inability to change the position of the mycelium. How significant this drawback is is up to the owner of the territory to decide. But it’s still worth noting.
- Difficulty in harvesting champignons.

On the racks
This method is known as Dutch technology.
The difference from the horizontal method is that the substrate is loaded into containers (preferably plastic containers). They can be placed on shelves (or turned into separate compartments), knocked together on pallets, and so on - there are plenty of options.

You can do this too - make some kind of shelves with drawer shelves. It's much more convenient.

Advantages:
- Rational placement regardless of the chosen location. Moreover, if necessary, it is easy to change.
- Significant space savings. Shelves can be arranged in floors or tiers.
- High quality care. First of all, the fight against infections is greatly facilitated.
- A sharp reduction in labor costs, taking into account the mechanization of the process.
Minuses:
- Some difficulty in caring for champignons is explained by the fact that in the process you will have to look after each container (compartment) separately. Conduct a soil inspection, identify lesions, etc.
- Experts note the high cost of this technology. Even very rough calculations show that growing mushrooms on an area of 100 m² requires financial investments in the amount of at least 500,000 rubles. For example, for organizing drip irrigation and much more. But this is for volume production of champignons.
If you obtain them in relatively small quantities (for yourself), you will not need to spend a lot of money (substrate + containers). Possibly artificial heating. Therefore, this “minus” is somewhat leveled out.
In bags
Naturally, in polyethylene.

Step-by-step description of the process:
- The substrate is loaded into the bags, to the top, and compacted a little.
- Water is pouring in. So that the soil becomes moist throughout its entire depth.
- Small holes (8–10 cm in diameter) are made in the walls of the bags. Typically, a checkerboard pattern is chosen. This allows you to grow champignons more compactly.
- The mycelium is placed in the resulting “nests” of the improvised mesh.
Advantages:
- For the home - the most rational way. The bags can be placed wherever and however you like, and moved to another place if necessary.
- All costs come down to the purchase of containers and mycelium.
- In fact, the entire mycelium is divided into parts, completely isolated from each other. If it is damaged in one of the bags, it is disinfected or thrown away. But the “infection” with this method will never spread throughout the entire room.
The only drawback is increased labor costs. This is primarily due to loading the substrate into bags and sowing the mycelium into the holes.
In containers
This is the most homely method, since this technology is easy to organize in an apartment. Containers with the substrate can be placed anywhere - on a balcony, window sill, under a cabinet (closer to the heating radiator), not to mention extensions to private houses, basements, and so on.

Step-by-step description of the process:
- Preparing containers. Not only the “dishes” themselves are needed, but also a lid with a tray.
- Disinfection of containers.
- Sowing mycelium. Approximate depth – 4.5 cm.
- Moistening the soil with mycelium.
The practice of cultivating champignons in this way shows that the main attention should be paid to watering. Temperature is a secondary factor. But if it is higher than the recommended value (for example, about 26 - 27 ºС), then the development of fungi occurs more intensively.
This technology has many advantages, but there are practically no disadvantages. For your own consumption (given that no one will eat champignons every day), it is enough to “charge” 3–4 small containers. This will take little time, maintenance is minimal (only watering), and it’s not difficult to guess where to place them.
There are a number of other ways, but it makes no sense to consider them. They are hardly suitable for home use. For example, block cultivation of champignons. Such containers are made in production, mainly from organic matter (manure, seed husks, peat, sawdust), by pressing the prepared mixture. There are advantages, but, according to reviews from those who grow mushrooms at home, everything “crosses out” a significant disadvantage - such containers are short-lived (enough for a maximum of 3 harvests), they collapse quite quickly (you will have to look for a durable “shell”), and with their transportation big problems. All this together leads to significant costs.
Substrate preparation
For those who have realized that growing champignons at home is worth it, the question of preparing the soil mixture is no less interesting. The substrate (in some sources it is called) is a nutrient medium for planting mycelium, from which the mycelium develops. Instructions for its preparation are placed on the back of the package with planting material or attached on a separate piece of paper. Therefore there are no problems with this.

Main components of the substrate:
- Rotted manure (horse).
- Hay or straw (fresh).
- Various additives - chalk, bone meal, superphosphate and a number of others.
In principle, following the manufacturer’s instructions, preparing a nutrient medium for champignons, knowing the proportional ratio of the components, is not difficult. Especially if we are talking about a relatively small amount of substrate.

The article provides complete information on growing champignons. Well, it’s not difficult to decide which method to choose, taking into account your capabilities and the required volumes of mushroom production.
Champignons are grown in garden beds in spring and summer, and in autumn and winter - at home, in greenhouses, indoors, cellars, and hotbeds.
The cellar is an ideal place for growing mushrooms. To get an excellent harvest, you need to prepare a nutrient substrate, prepare the room, control humidity and temperature.
Substrate preparation
You can use horse manure with bedding, place it in a cone shape and pour water on top. Humidity should be around 60%.
Next, you need to add 3 kg of ammonium sulfate per 1 ton of manure to the substrate. Cover the pile with straw or mats so that the manure begins to heat up and the water does not evaporate. Then wait 5-7 days and use a pitchfork to mix the manure with gypsum per 1 ton of manure - 4 kg of gypsum.
The substrate can also be prepared from wheat straw with chicken droppings. For 1 ton of straw you need to add approximately 300-400 kg of chicken manure, 60 kg of gypsum and 30 kg of urea.
To begin with, the straw is mixed with 120-150 kg of chicken manure and 25 kg of urea (in solution). Then it is sprayed with water for 7-10 days. Next, the straw is folded into a pile and layered with dung, about 250-280 kg per 1 ton of dry straw.

Soil laying
Typically, champignons are grown in a cellar on an earthen floor or in wooden boxes. The ridges are made 70x70 cm in size. The manure is laid in a thick layer of about 40 cm, then compacted with a tamper to 25-30 cm. The side ridges are compacted with a shovel.
Boxes are most often used 100 cm long and 50 cm wide. They are filled with manure and compacted to 20-25 cm.

Planting mycelium
A temperature of 26-28 °C at a depth of 4-5 cm is considered acceptable for planting champignons.
To grow mushrooms, use 500 g of compost mycelium or 400 g of champignon grain spores per 1 square meter.
The “seeds” need to be placed in the substrate. We make a depression no more than 5 cm, the distance from each other is 15-20 cm, add a little compost mycelium to each depression. If you have champignon spores, then they need to be scattered over the surface. Little by little, the mycelium threads will be able to grow across the substrate.
During the growth period of the mycelium, you need to maintain the air humidity in the cellar at 65-85% so that your substrate does not dry out. The temperature must be maintained at 22-28 °C. Mushroom threads will be able to actively spread in 9-14 days. After this, the surface of the substrate should be covered with a small amount of earth (2-4 cm, a mixture of limestone 1 part, soil 3-4 parts and peat 4-5 parts) and wait another 4-6 days. Spray with water periodically.

Forcing fruiting bodies
When the incubation period is over, the temperature in the cellar should be lowered to 14-16 degrees. The first harvest can be harvested after 3-4 months. Pick them only if the lower part of the cap is covered with a white film and the brown plates are not yet visible. The mushrooms are not cut, but carefully twisted from the planting site.
The place where the mushroom grew needs to be sprinkled with a little soil. The champignons will grow vigorously within 12-16 days. If the conditions created and the compost for them were good enough, then during this time you can harvest 4-8 mushroom harvests.

How to grow champignons at home - video
Growing champignons at home for beginners, as well as for experienced mushroom pickers, is a modern, fashionable, and exciting activity. This is both a kind of hobby and a source of additional income, if you approach the matter rationally and competently. Champignons are a fairly popular, always in demand, tasty and healthy food product. They do not linger on store shelves, despite the fact that they do not have the lowest cost. By growing them yourself, you will always be sure of their “pure” origin.
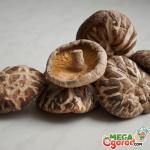
Champignons, photo:
They are healthy: they contain glucose, carbohydrates, vitamins, 18 amino acids, and easily digestible fats. They also go harmoniously with any food; they can be boiled, fried, baked, pickled, canned.
This mushroom is incredibly tasty, low in calories, and is an excellent alternative to meat (which undoubtedly attracts the attention of vegetarians).
Knowing how to grow champignons at home, you can provide yourself, as well as your friends and relatives, with a quality product.
Before you start mushroom growing, you should sensibly assess your desires and capabilities. In addition to time and financial investments (purchase of materials), you must have appropriate premises. Some skills, detailed study of information on relevant Internet forums, the presence of a competent adviser will never hurt you. If we compare the process of growing champignons and oyster mushrooms, then our case, of course, is more labor-intensive. But if you compare it with the worries and nuances of growing porcini mushrooms, then it will be much easier and shorter in time.
Where do champignons grow in nature?
If we consider natural conditions, they are found almost everywhere. Forests, steppes, meadows, forest edges, lowlands, open spaces with moist soil and even semi-deserts, mountain forests are common places of growth.
As for “home” conditions, they can grow in a garden or vegetable garden, cellar, basement, specially equipped garage, or greenhouse.
How to grow champignons? Many years of experience of mushroom pickers have proven that they grow best where the basement is equipped with good ventilation.
In this case, the air temperature should be relatively cool (not higher than +20 °C), and if this process is put into operation, then the mercury column on the thermometer should vary between +12..+18 °C year-round. The humidity percentage should be approximately 70..85%, lighting does not play a special role.
Growing champignons at home - technology
Necessary factors for a successful process are:
- The right choice of location.
- Disinfection of the premises.
- Organization of microclimate.
- Proper preparation of the substrate.
- Laying compost.
- Selection of mycelium.
- Planting mycelium.
- Appropriate care.
As mentioned above, under properly organized conditions, mushrooms can be grown all year round. The technology itself is not highly complex, as it might initially seem. From the very beginning, you need to arrange everything correctly, and then the process will follow the well-worn path. This work can even be called creative, something like a hobby. To date, breeders have developed approximately 50 varieties of this mushroom, which have slight differences in appearance. The color of the cap, its structure, and storage duration may vary, but all cultivated varieties are “children” of the ordinary white champignon.
An example of a light brown variety in the photo:

Let's take a look at basement growing as a basic example, since this method is considered the most common. For so-called “cellar” breeding, it is best to choose high-yielding varieties such as Sylvan 130, Hauser A15 or Somycel 512. They are quite unpretentious, not difficult to care for, and are also very prolific.
Remember - the most important factor for the successful outcome of your efforts is the presence of well-established ventilation in the room where the mushrooms will grow!
A constant supply of fresh air is very important, since during growth they emit carbon dioxide, and its excessive concentration in the room leads to stretching and elongation of the mushroom stem.
How to grow champignons at home - disinfection of the premises:
- The most common and frequently used is whitewashing the ceiling, walls, and all surfaces with lime with copper sulfate (copper sulfate) added to it. The so-called “recipe”: 2 or 3 kg of slaked lime + 100 g of copper sulfate per bucket of water (10 liters). When working with disinfectants, be sure to wear a protective mask on your face!
- The second method is more dangerous for the human respiratory tract and also requires protection. Take 350 g of bleach, dilute it with 10 liters of water, and apply it by irrigating the walls of the room.
- Irrigation of walls and other surfaces with 4% formaldehyde using a construction spray is most convenient.
- You can fumigate a room with a sulfur bomb - it also gives a very effective preventive effect.
- Chlorophos is a radical, destructive method, but it is too poisonous in its composition. It affects not only mold, but also harmful insects.
After any treatment, the room must be properly ventilated - this is also a prerequisite.
Let's return to ventilation, or rather, let's clarify one nuance: the air should be fresh, but drafts should be excluded. It is better to cover the ventilation pipes (“smotherers”) with fine mesh nets - this will create an obstacle to the penetration of insects, as well as a small barrier to air masses. If you have a large, serious room, and cultivation is on stream, then the ventilation system should be more global, with additional fans located above each large box. If opportunities permit, then installing air purifiers with replaceable filters will not be superfluous for this matter.
It is clear that a thermometer and hygrometer are simply necessary for the room where mushrooms are grown. This way you can always control the level of air humidity: if there is a lack, spray with water from a spray bottle, if there is excess, ventilate. With the onset of summer heat, fans solve this problem, but if this type of mushroom is grown throughout the year, then in addition to all the above-mentioned benefits of civilization, you will also need additional heating of the basement or cellar.
Large cellar room, photo:

It is best if your cellar, in addition to all the growing requirements, has an earthen floor (not concrete). By and large, the more purposefully the room is adapted specifically for mushroom growing, the better it will be. Any unnecessary additional factors in the basement, cellar, garage or barn that are not related to the topic of growing mushrooms will only interfere and disturb the “microclimate” of the room.
To the “advantages” of mushroom science we can add the fact that they are able to bear fruit perfectly even in complete darkness. This distinguishes them from all other green inhabitants. The weakest light bulb is enough - they will feel comfortable, but the light will most likely be more useful to you in order to comfortably navigate the place.
If growing champignons at home initially has far-reaching plans, and the owner has a large room, then dividing it into 2 zones will be a reasonable, convenient solution. Simply put, mushrooms must originate somewhere, and a specially prepared substrate is designed for this process (more on that a little later). So, in one zone there will be a substrate along which the mycelium will spread (this is called incubation). In the second compartment the boxes with mushrooms will be placed directly, where they will be forced out.
The temperature regime of these two compartments should also be different: the mycelium usually grows at a temperature of +23..+24 C°, and the growth of fungi occurs at a temperature column of +16..+18 C°. If you get used to it and develop your own “schedule” for moving boxes from one zone to another, you will be able to grow these delicious, beloved mushrooms all year round.
Compost for growing champignons
Preparation of compost (substrate) is one of the most critical aspects of mushroom growing. The quality of the mushrooms will directly depend on the properly prepared substrate. Usually, when you buy champignon mycelium, the packaging with the contents indicates the substrate corresponding to the given variety, as well as the nuances of its preparation. The varieties are different, and the composition of the compost and its collection technology may vary. However, most often these parameters do not differ significantly.

The substrate should be prepared either in a room specially designated for these purposes, or in the open air (on the street), under a well-equipped canopy. It is important that the compost is not exposed to precipitation (rain) or sunlight. It is also highly recommended not to pour compost onto “bare” soil - lay a sheet of thick plastic film. Thus, unwanted insects or any other pests will not penetrate into the substrate. It should not come into contact with the ground, but blowing air on it from all sides is a must!
Compost for champignons should be moderately moist, as excess moisture can disrupt proper fermentation processes.
Be that as it may, the street is the best place for the maturation of the substrate; the active release of ammonia and carbon dioxide will not be beneficial to anyone. The average time for the substrate to be “ready” and fermented is approximately 25-30 days. During this period, it is recommended to stir it at least three times (to ensure uniform fermentation). You will know that the process has come to an end by the absence of the specific smell of ammonia. By this time its color acquires a brownish tint. While the substrate is fermenting, the temperature inside it can be approximately +50..+65 C°, and ready-to-use compost has a temperature of no more than +24..+25 C°.
By the way, to enrich the contents of the compost when first mixing it, you can add crushed lime to the general composition. During the second mixing - superphosphate fertilizer, during the third - ground gypsum or its construction analogue (alabaster). The already “ready” substrate, in addition to the characteristics described above, does not stick to your hands, is springy upon tactile contact, the straw is extremely softened, and is easily divided into fragments.
As an alternative to the process of making your own substrate, you can recommend purchasing ready-made compost, which is sold in the gardening departments of supermarkets or flower shops. Of course, such a substrate will be of lower quality than one prepared by hand, even though it will be written on the packaging that it has all the required characteristics.
Here it’s up to you to decide what is more convenient for you, whether you have time to carry out all the preparations for growing these mushrooms. Looking at the general characteristics of “good” compost, let's highlight the main ingredients.
Composition of compost for growing champignons:
- For these purposes, it is generally accepted that horse waste products are the best. In addition, it is important to consider that the horses ate hay, and not green grass. The moisture content of horse manure for making up the substrate should be approximately 45%. Horse waste can be replaced with cow or poultry waste, but, according to the experience of experienced mushroom pickers, the harvest on such a “basis” will be much worse. So, you will need about 100 kg of horse manure.
- Straw - it is better to choose a dry, rye or wheat variety. You will also need about 100 kg of this.
- Alabaster (gypsum) – approximately 6 kg.
- In other cases, alabaster is replaced with urea (2.5-3 kg) or the same amount of saltpeter (per 100 kg of straw and 1000 kg of manure). As we remember, these fertilizer additives are added when mixing the compost.
- Again, using 100 kg of horse waste, 100 kg of well-dried rye straw, 3 kg of urea, 5 kg of chalk, 2 kg of superphosphate, 8.5 kg of gypsum when mixed will create the optimal ratio of ingredients.
How to grow champignons at home? Use fresh animal products while they still contain the most nutrients. Make sure that the added components do not contain pine shavings or sawdust - they release resin, and these mushrooms sense it and react painfully to its presence. Phosphorus fertilizers, as well as urea, are actually very recommended and useful - they are sources of phosphorus and nitrogen, which are so necessary for champignons. But chalk normalizes the acidity of the substrate and maintains an optimal pH level.
Champignons: growing at home is the easiest way to create layers:
- We take a convenient wide container, fill it with hot water, and soak the straw for about 24 hours.
- After this, we lay it in layers along with manure. You will get approximately 5-6 layers. Do not forget to moisten each layer with not very hot water, lightly, but do not wet it abundantly.
- After 3 days have passed, we take a pitchfork and thoroughly mix the compost-straw “pie”, but at the same time add fertilizers - superphosphate with urea (urea). At this stage, the substrate begins to smell strongly of ammonia. After 4 days, we shovel the substrate again, additionally adding those feedings that are required according to the standard for this variety.
- In general, mixing the compost should be done approximately 4 or 5 times throughout the entire process. Spare no effort on this - the useful elements will be evenly distributed throughout the entire composition, and the mass will acquire a relatively uniform consistency.
The so-called “care” of compost has already been described above, but I would like to add and repeat the warning regarding excessive moisture. Too much moisture in the substrate will slow down its maturation, but what’s even worse is that it will wash out from the mixture all the useful ingredients required for development and growth.
Compost components (dry hay, horse manure, fertilizers), photo:


Champignon mycelium - planting
The substrate, of course, should be purchased from a reliable representative (special laboratories are best). When the compost is already ripe, we transfer it to an appointed place, put it in boxes or special forms, where further actions will take place:
- To get a good harvest of champignons, 1 m² of compost will require approximately 500 g of mycelium or 400 g of these varietal spores.
- If mycelium is used, then small holes, 4 or 5 cm deep, should be made across the entire surface of the container with compost, at a distance of 20 cm from each other. An appropriate amount of mycelium is placed in these holes; if fungal spores are used for sowing, they are simply scattered evenly over the surface of the substrate.
- After some time, you will notice spider threads covering the surface of the compost containers. By this time, the humidity temperature in the room should be at the level of 75-95%. To prevent the substrate from drying out, it can be irrigated from time to time with clean, settled water from a spray bottle, and additionally covered with a clean, damp cloth or paper.
- The mycelium of champignons begins to grow at a temperature of +20..+28 C°, the active phase of the spread of the mushroom “web” begins after about 10 or 12 days, then the top layer of compost will need to be sprinkled with the appropriate soil mixture (about 4-5 cm), wait another 3 days, after which transfer the containers with future mushrooms to a colder room with a temperature of +12..+16 C°. Or forcibly lower the temperature in the room to a given mercury column.
- Please note that ordinary garden soil for “sprinkling” will not suit you. Prepare in advance a mixture of 1 share of limestone, 5 parts of peat, 4 parts of clean soil. After 3 – 3.5 months, expect the first well-deserved results of your labors.
A harvest from one mycelium can produce from 5 to 8 periods of ripening of new mushrooms. This is called a “wave”; the most generous collection of champignons occurs in the first three “waves”. Here it is important to catch the moment of ripening - when the cap underneath is still covered with thin white skin (film), and the brown plates are not yet visible. The mushrooms need to be unscrewed from their place of growth, but not cut off (so that harmful bacteria do not penetrate into the mycelium through the cut site).
After the crop is harvested, carefully sprinkle the substrate again with the soil mixture described above. During the next two weeks they will grow especially actively.
A mushroom correctly extracted from the soil, photo:

Cap in optimal state of maturation, photo:

How to grow champignons at the dacha in open ground?
In addition to the above-described, most commonly used “basement” method of growing mushrooms, there are other alternative options. For example, how to grow champignons at home, namely in a summer cottage. Sometimes, for some reason (lack of a basement, garage or other suitable premises), the desire to grow these mushrooms seems impossible. But if you are the happy owner of a summer cottage, everything is possible!

The most successful period for this is summer and autumn; here it is also important to choose a comfortable place. Champignons - where do they grow? In shaded places, on specially prepared soil, the place for the mycelium should be moderately moist, the soil should not dry out, and the sun's rays should not illuminate the chosen place too much. To protect against drought on hot days, beds are often covered with plastic film or special covering material to create a certain microclimate. It is important to bring mushrooms as close as possible to conditions similar to their natural growth environment. Since we cannot influence weather conditions, we need to try to give the mushrooms moisture when they need it, as well as the presence of fresh air.
In the garden bed under the trees, photo:


After sowing the mycelium on the beds, in the open ground, growing champignons - their technology is practically no different from the rules for growing in the cellar. After a couple of weeks, the “webs” of mycelium grow over the soil surface; at this point, the temperature is lowered by sprinkling the soil surface with a thin (up to 5 cm) layer of damp soil. The temperature, similarly, should vary within +12..+15 C°, but in no case reach above +20 C°. As with the method described above, it will be much more productive if this land contains peat and limestone. Regular watering (or rather, gentle irrigation) is best done after sunset - this will optimally moisten the soil and prevent the formation of a dense earthen crust. With the right approach to business, in about 3-4 weeks you can expect a harvest of your own mushrooms.
The mycelium puts out “cobwebs”, photo:

Let's summarize how to grow champignons in the country:
- It is better to plant mycelium or spores on soil specially prepared for this purpose. This may be soil brought from a forest area.
- The soil should be optimally saturated with fertilizers, well moistened, and free of stones, fragments of bricks or remnants of old roots.
- It is best to plant mushrooms in open ground at a neutral air temperature - +21..+22 C°.
- If a greenhouse is chosen for planting, you should carefully monitor the level of humidity and air temperature in it. The conditions are not much different from basement or garage mushroom cultivation. It should be remembered that heat and drought are destructive for them.
- As already mentioned, the planting method does not differ from the “basement” analogue (20 cm from each other, shallow holes, sprinkling with earth mixture after the “cobwebs” appear).
- Once the first mushrooms are obtained, the amount of watering can be reduced (so that the roots do not rot), irrigation is everything in this matter.
After all the waves of the mushroom harvest have died down, the spent substrate can simply be disposed of, or can be quite successfully used as organic fertilizer or mulch for some trees or even flower beds. Of course, it will no longer be suitable for re-growing mushrooms, but it will serve well as an excellent supplement for your green inhabitants. As for all kinds of containers, boxes after harvesting and composting, they will require mandatory disinfection, as well as the room where the mushrooms were grown.