Do-it-yourself sewerage in the bath - arrangement scheme and basic recommendations. Sewerage for a bath: we mount the system with our own hands Sewerage in a bath with a toilet possible schemes
It is better to do the internal sewerage for a bath immediately after pouring the foundation. Do you have a floor plan. Mark where the plumbing elements will stand: washbasin, shower, toilet, plums.

A trench is made 50 cm deep. It is not worth digging below, because the drain will be directed to the cleaning system with a certain slope. It is envisaged to apply a heater for pipes. Pipes are laid in the trench, risers are brought out to each of the nodes, insulation is laid on top of the pipes, then geotextiles and filled up.

At the exit from the bath, a tee is inserted into the pipe, from which the exhaust pipe will go up and exit to the septic tank.

The hood will run along the wall of the bath and will remove gases from the activity of bacteria in the septic tank sump. Then the external sewerage is done.
There are two sewerage systems: centralized, local (autonomous).
The advantage of the first is that there is no need to dispose of waste products. It is enough to connect to the system and regularly pay for the use. Installation of communications can be no cheaper than arranging a simple septic tank. But such a system is reliable in operation, cheaper to maintain and does not harm the environment.
Sewer pipes are laid in a trench with a slope.
Important! Height difference from 10 to 15 mm per 1 p/m for pipes with an inner diameter of 110 mm.
Suitable pipes are PP (polypropylene) or PVC (polyvinyl chloride). They are easy to mount. One side of the pipe has a socket with a rubber seal. The smooth end of the next pipe is lubricated with silicone and inserted into the socket. It turns out a tight connection.
The slope must be maintained up to the connection well to the central system. The recommended laying depth is 0.5 meters below the freezing zone for the area. In this case, it is not necessary to insulate the pipes. If this condition is not feasible, they must be thermally insulated.

Thermal insulation materials for sewer pipes.
For insulation use:
- basalt fiber;
- expanded polystyrene;
- mineral wool;
- foamed polyethylene;
- penoizol;
- expanded clay.
It is easy and effective to insulate with semi-cylindrical panels (shell) - polystyrene foam and other polymers. They are put on a pipe and fastened with tape.

Local sewerage is mounted directly on the site in the form of treatment facilities:
- cesspool;
- filter well;
- septic tank.
Choosing the type of treatment plant for the bath
For a country bath of seasonal use, the simplest filtering sewer well (FC) is suitable. First you need to determine the composition of the soil and the groundwater level (GWL). The preferred option for a filter well is a low groundwater level. Filtration - the ability of a rock to absorb a certain amount of water over a certain period of time.
The dependence of soil filtration on its composition (through 1 m2 of soil)
- Sand From 100 l/day;
- Sandy loam From 50 to 600 l/day;
- Loam From 5 to 300 l/day;
- Clay Up to 5 l/day;
Important! The filtered water must pass through a filter layer at least one meter thick before entering the groundwater. To filter only washing and washing drains, it is enough that the total area of the filtering surface of the well is at least 4 m2 for a family of four to six people.
Filter well device
Material for construction can be:
- an ordinary metal or plastic barrel without a bottom;
- brick (for laying the walls of the well);
- concrete rings;
- corrugated PVC pipe "Korsis" (diameter from 600 mm).
It is necessary to dig a mine for FC no closer than 20 meters from the water intake (well, well). The depth of the mine is not strictly regulated. The main thing is to find a filter layer of soil. With a low occurrence of groundwater, it is necessary that the area of \u200b\u200bthe filter layer be as large as possible. We fill the bottom of the mine with a 10-centimeter layer of rubble.

We level the bottom of the mine, we ram. We install a container without a bottom on the bottom - a large metal or durable plastic barrel with perforated holes opposite the filtering wall of the shaft. Any strong container will do.


We fill the space between the walls of the barrel and the shaft with fine gravel or crushed stone to the level of the upper holes. Then we pour a layer of clay and ram. Next - a fertile layer of soil. With a large filtration area in sandy soils, more than 4 m2, daily filtration will be from 600 to 1000 l / day. This is quite enough not only for bath drains, but also for filtering waste from the septic tank of household waste of a country house all year round.
Important! Sewer pipes, FC and septic tank must be insulated. The containers installed in the ground must be anchored - fixed to the ballast at the bottom of the pit. It can be a concrete screed, concrete pipes, concrete slabs. They are fastened with clamps, cables, technical slings. This will prevent the container from floating up in swellable soils.
The situation is more complicated when the GWL is high. The underground filtration method will not work. A sealed storage device is the way out with a high GWL. Such a drive can be a cesspool, made according to sanitary norms and rules (SNiP). According to these standards, it should be no closer than 20 meters from wells and wells. The pit must be sealed.
Cesspool device
The principle of operation is simple: waste is accumulated in a sealed container and, as it accumulates, is pumped out by a sewer. The frequency of calling the car depends on the volume of drains and the pit. A prerequisite is a free access for maintenance.
The modern version of the cesspool is the simplest septic tank, consisting of two compartments. The first compartment is a sump, the second compartment receives the treated waste from the sump and filters them into the soil, provided that the thickness of the filter layer up to GWL is at least 1 meter. If this condition is not feasible, then an additional pumping system is built into the second compartment, consisting of a fecal pump and automation connected to a level float. Waste is pumped through the discharge line to the filtration field.
Septic tank made of concrete rings
Before ordering the rings, it is necessary to calculate the required volume of the septic tank. For a bath of frequent use, including several plumbing fixtures: shower, bath, washbasin, toilet - it is necessary to build a multi-chamber septic tank of the appropriate usable volume (mark to the pumping level). Consumption per family will be about 1000 liters per day. A 3-chamber septic tank is suitable (three rows of rings, 2 pcs / row).
Important! It is better to increase the volume of the septic tank due to the number of chambers, and not the depth of the rings. There is a limit due to GWL.
For self-assembly, you can order concrete rings:
- sump - two rings, bottom, cover;
- chamber for cleaning and disinfection - as for the sump;
- filter well - two rings with a lid;
- rings (for height selection);
- PVC tees 110 mm;
- PVC pipes;
- hatches.
Rings with an inner diameter of 1000 mm and a height of 800 mm are suitable for arranging a two-chamber septic tank with a well. The working volume of the septic tank will be more than 3.5 cubic meters, which is quite enough.

Choose a place to unload the rings directly near the septic tank shaft. Usually the rings are brought in by trucks with a crane-manipulator. Prepare the shaft and unload directly with the installation of rings in the shaft. This will save money on an additional crane call. The mine digs to the depth of the rings. Add another 20 cm for a sand and gravel cushion and 50 centimeters for arranging the necks of the hatches. As a result, it will be 2 meters. If the GWL is higher, then pick up rings of a smaller height.

From the bath, the drain pipe enters the first settling chamber. Under the influence of gravity, solid waste settles to the bottom. The transition of fluid from the first to the second occurs through the tee. Such a system cuts off the bubbling gas cap in the first container.
Turbid water and small suspended particles enter the second, which are processed by bacteria. Waste water purified by 60-70% enters the filtering chamber. Further, if possible, the effluent from the third tank is filtered directly into the soil or pumped out to the filtration field through drainage pipes.
The lower rings 1 and 2 of the chambers have a bottom. Usually the filter well does not have a bottom (for a larger filtration area). If the GWL is close to the base of the well 3, the bottom is insulated from a pillow of sand, gravel, clay. The space between the walls of the tanks is covered with fine sand, watered, rammed. The height of the sand filling is 1 meter. Then they fall asleep with ordinary excavated earth, ram clay from above and pour a fertile layer of soil.
In the third container in the filtration zone, the walls of the well are perforated. If natural filtration cannot cope with the removal of wastewater, then a pump is connected. The efficiency of such a system depends on the activity of bacteria, which increases if the liquid in the tanks is aerated with a low-power compressor unit.
Here the drain pipe from the bath enters the sump.

The entrance is carefully sealed, the pipe and trench are insulated. A tee is put on the end of the drain pipe. It plays the role of a compensator and a ventilation pipe can be brought out through it.

The tee is fastened with a clamp to the wall. The transition from the chambers is made with a 110 mm PVC pipe. The exhaust pipe can be installed in the cleaning chamber.

From the second tank, the transition is made to the FK. The whole system is closed with covers. Necks with hatches are sold separately. They are made of polymer-sand material, cost less than cast iron and withstand loads from 3 to 120 tons, are easily attached to the concrete cover with 10 mm anchor bolts.

You can order a metal or plastic container of a certain volume with two compartments. For a country bathhouse, a septic tank made of large plastic barrels is quite suitable.

Such a structure can be built without having high building skills. The outlet from the second tank can be directed to an absorbent trench.
Construction of an absorbent trench
This is an additional artificial system for cleaning waste from a septic tank. If the FC does not have time to filter out the effluents from the bath, then they enter the trench and go into the soil. For a bath with a small consumption of water, one trench is enough. The bottom of the trench should be no closer than 1 from the groundwater level.

Here is the trench layout.
- Waterproofing.
- Rubble.
- Backfill soil.
To drain the drains from the bath, a trench 6 meters long is enough. At the end of the spray pipe, a 90 degree nozzle and a ventilation pipe are inserted. Waterproofing (geotextile fabric) is laid on top of the rubble and with an overlap on the walls of the trench.
The spray pipe is made of 110 mm PVC sewer pipe. Holes of 5 mm are made along the entire length of the pipe along the entire length. If the pipe is in the freezing zone, then it is necessary to lay stone wool insulation on the top layer of crushed stone, then geotextiles.
No matter how perfect the local cleaning system is, it requires periodic maintenance. When planning a place for a septic tank, it is necessary to take into account the possibility of unhindered access of special equipment. Work on the arrangement of sewerage can be done independently. Modern pipe materials and fittings simplify their fitting and joining. Take it easy, and you'll be fine.
Probably, the vast majority of owners of summer cottages and suburban private houses cannot imagine their life without their own, since such a structure is an integral part of ancient Russian traditions. A bath is not only a place for washing, but also a kind of home “dispensary”, working to restore the strength and health of the owners, for the necessary periodic relaxation. But in order for it to bring only pleasant sensations, its arrangement, and in particular - all the necessary communications, must be done in accordance with all the rules.
One of the traditionally problematic components of the bath system is the disposal of used water, so it is very important to properly organize its removal and collection point. Discharging contaminated, untreated wastewater onto the ground or into natural water bodies is strictly prohibited, and such an approach will inevitably lead to penalties from environmental supervisory authorities. Therefore, in the absence of a centralized sewage system (as it most often happens), a special pit of storage or drainage action is usually created for these purposes. And in order for the drain pit for the bath to function effectively, it is necessary to study its design before starting construction, and during the period of work on the arrangement, follow the recommendations of experienced craftsmen.
The main types of drain pits
The arrangement of any drain pit is a rather laborious process, since the pit will most likely have to be dug manually. At the same time, such a hydraulic structure does not differ in the complexity of the design, so any owner of the site can build and equip it on their own, without even involving assistants, of course, if there is enough strength for earthmoving.
Drainage pits can be divided into three main types - a sealed container, a pit with drainage capacity, and consisting of several chambers.
To begin with, let's figure out what each of the varieties is in principle.
- A sealed drain pit is most often equipped at construction sites with shallow ground aquifers. It is often called a cesspool, that is, requiring periodic emptying of the collected volumes of dirty water.
For its construction, a pit is dug into which a container with a sufficiently large volume is installed. It will collect sewage. As the tank fills up to a certain critical level, the waste is pumped out by a sewage machine.
This option is environmentally friendly, since no contaminants and chemical cleaning solutions enter the soil and groundwater, which can adversely affect the condition of the fertile soil on the site, as well as have a negative impact on high ground aquifers. However, this option is not convenient and cost-effective, since you will have to constantly monitor the filling level of the tank and often call specialized vehicles, and such services are not cheap.
Prices for septic tanks
- A hermetically closed bottom is not created in the drainage drain pit. As it is used a bulk layer of filter building material - most often crushed stone or gravel is chosen for this purpose.

In addition, often holes are also made in the walls of the drainage pit at a certain height through which water will be absorbed into the soil. This option is great for a bath and is perhaps the easiest to build, however, if the characteristics of the soil on the site allow it.
- A septic tank is a whole system consisting of two or more chambers with different purposes.
In any of the options, the first chamber most often has a sealed design and serves to collect, primary filter and treat waste - solid components settle to the bottom, and liquid ones are clarified, undergo a biological treatment cycle due to the action of aerobic microorganisms. This container is connected to the second chamber with a special overflow pipe - the clarified liquid waste flows into the next compartment, which is already organized according to the principle of a drainage well. Water passes through the drainage, is cleaned and absorbed into the soil.

If a septic tank of three tanks is planned, then the third chamber is made drainage. The second one serves for the final settling of suspensions, deeper purification of water through the action of anaerobic microorganisms. And from here comes the overflow of the purified liquid into the drainage well.
A septic tank is most often equipped in the case when it is supposed to collect the entire considerable amount of liquid waste from both a residential building and a bathhouse.
What is important to know about the design and rules of septic tank equipment?
A septic tank is already a rather complex engineering structure, the creation of which must obey certain rules. Often, homeowners prefer to install a prefabricated prefabricated system. What are the rules for arranging such a treatment plant, and what to pay special attention to when - read in a special publication of our portal.
Materials for arranging a drain pit for a bath
Various materials can be used to build drainage type bath drain pits. Their choice directly depends on the estimated volume of effluents, the financial capabilities of the owners of the site and the convenience of construction.
Drainage pit from barrels
To create this water drainage system, metal or plastic barrels of various sizes are used. However, such a drain can be equipped in different ways:
- First option. At the bottom of the excavated pit, covered with drainage material 300 ÷ 400 mm thick - crushed stone or coarse gravel, after tamping, a barrel with perforated walls and a cut bottom is installed. This takes into account the fact that between the walls of the barrel and the pit there should be a space of at least 100 mm, which is also filled with drainage backfill.

A pipe is brought into the barrel at the required slope angle, through which the used water from the bath will flow into the container. These runoffs will gradually, through the holes in the walls and through the bottom part, seep into the drainage layer, be cleaned, and then soak into the surrounding soil. In some cases, not only the free space of the pit is filled with drainage material, but even the barrel itself, that is, water will flow immediately into the drainage layers, and then into the ground. This way the barrel will never fill up.
It must be correctly understood that such a scheme is not suitable for collecting other types of wastewater from a residential building. For a bath, which is used for its intended purpose once or twice a week, such a pit becomes one of the best options.
- Second option. In this method of arranging the pit, two barrels are used, installed at different levels - one is about 200 mm higher than the other. They are interconnected at the top with an overflow pipe. Water from the bath enters the first upper container, soapy sediment and solid suspensions settle in it, and when it is filled, the water overflows into the second barrel, to which one or two long drainage pipes with perforated walls are attached.

The outlet pipes from the second tank are laid in drainage trenches with gravel or crushed stone filling, through which the water purified from chemical precipitation will be distributed, moistening the soil. The trenches are covered from above with a layer of fertile soil, approximately 500 mm thick, and can be planted with ornamental shrubs, which will constantly receive watering. Thus, two problems are solved at once - the removal of water from the bath and the irrigation of plants on the site.
This option for arranging a drain pit will be discussed in detail below.
Brick drain hole
The arrangement of the walls of the drain pit can be done with the help of bricks, which are laid out with gaps - through them, water is drained into the drainage backfill and further into the ground. The difference between this pit and the first version, made from a barrel, differs only in material, but the principle of operation remains the same. A drainage layer is poured into the gap between the soil and brick walls, which will purify the water and distribute it throughout the pit, diverting it into the ground.

A pit made of brick is more durable and designed for a larger volume of water. Moreover, if you dig a pit deep enough, and make the bottom and lower part of the walls airtight, then this design may well be used to drain other waste, but in this case the pit will have to be periodically cleaned.
To equip such a variant of the drain pit, it is not at all necessary to use a new brick - the used material is also quite suitable.
Prices for metal barrels
metal barrels
Drainage pit made of concrete rings
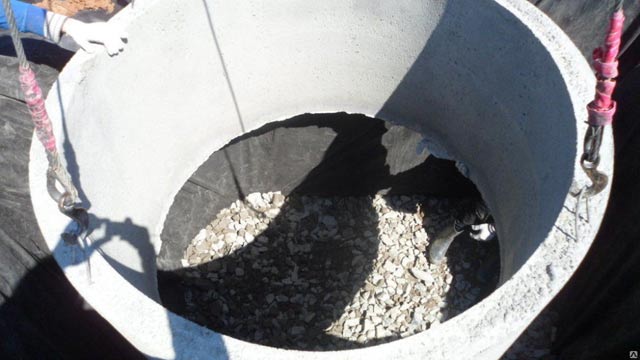
If there are financial and technical possibilities, then the drainage pit can be built from concrete perforated rings, which are installed in the prepared pit. After installing the rings at the bottom of such a well, a drainage backfill is arranged.

In this option, the entire space between the walls, as in the previous cases, is also covered with drainage material, so the pit, provided that it is used only for bathing needs, will never be filled with water. In the same case, when the pit is deep enough and the bottom of the well is cemented, then such a pit is suitable not only for a bath, but also for a common one. True, this will require additional calculations, an assessment of the absorbent properties of adjacent soils and the location of aquifers.
Pit from old car tires
A drainage pit made from waste car tires can only be used for liquid waste, so it is the best fit for collecting periodically incoming water from the bath.

Tires are installed in different ways: in some cases, holes are cut in their side walls, in others a small gap is provided between the slopes, in others, the outer walls are almost completely cut off, but the principle of operation of the drainage pit remains the same.
This option for draining water from the bath can be called the most popular, as it is easy to arrange, affordable (tires are easy to find for free) and practical to use.

On the diagram, the numbers indicate:
1 - Crushed stone or gravel of a large fraction - drainage backfill, with a layer of 250 ÷ 300 mm thick.
2 - Old car tires.
3 - Drain pipe from the bath (there may be two of them)
4 - Crossbars for laying the cover.
5 - Cover or hatch.
Around the laid out stack of wheels, and sometimes inside the resulting well, a drainage cushion is backfilled, which makes it possible to retain and purify the water coming from the bath. With good drainage capacity of the soil and periodic use of the bath, the pit never overflows.
It should be noted that other materials that can withstand exposure to high humidity are also suitable for building a drain bath pit.
How to independently equip a drain pit for a bath
Soil survey at the site of the planned drain pit
In order for the drainage system from the bath to be effective, it is necessary to determine the type of soil in the area at the approximate depth of the planned pit. To do this, a trench or test hole is dug. In order for the bath to be used in winter, the depth must be below the freezing level of the soil. Information about soil freezing in a particular area is easy to find on the Internet, or you can consult with the owners of neighboring plots who have been using systems of such drain sewers for a long time.
Prices for concrete rings
concrete rings

Sandy soils, sandy loams, including those with stony inclusions, have good drainage capabilities.
But dense clay layers can cause problems. At high humidity, they are well saturated with water, swell, and become practically waterproof, when dried, they shrink. In addition, they are highly susceptible to frost swelling. These qualities of such soils are unfavorable both for laying and when laying pipes in trenches, as they can lead to deformations and damage to themselves and other elements of the system.
To build a drainage pit in such soil, if it extends to a great depth, is an almost meaningless exercise. Well, if it is necessary to lay a pipe through such layers to a drainage pit that reaches the depth of the soil with high absorbency, then the bottom of the trench must be lined with a sand cushion 100 ÷ 120 mm thick, which will prevent the hard impact of ground vibrations on the elements of the drain system.
The level of occurrence of groundwater (GWL) is also important, since the degree of absorption of water entering the drain pit will also directly depend on this. So, between the bottom of the pit and the location of a stable aquifer, there should be a distance of about 1000 mm. If the groundwater is located close to the surface, then the polluted water will not go well into the drainage, and such a well will soon turn into a fetid pit, as it will be constantly filled. In this case, as with clay soils, the drainage pit option will not work. You will either have to install a sealed container that requires periodic emptying, or organize water drainage to special surface filtration fields.
Having chosen the material for the construction of the pit, it is necessary to decide on several more important points of its arrangement, on which the efficiency of the system depends, the environmental safety of both the site itself and its inhabitants.
First of all, you need to decide on the place where the pit will be located.

- Quite often, owners have a drainage pit directly under the building, but this becomes possible only if:
- the pit is equipped before the construction itself;
- the building rises above the ground on a columnar or pile foundation, which will need to be well waterproofed;
- good ventilation should be provided under the bath building;
- the sewer pipe connecting the drain of the bath and the pit will require effective thermal insulation.
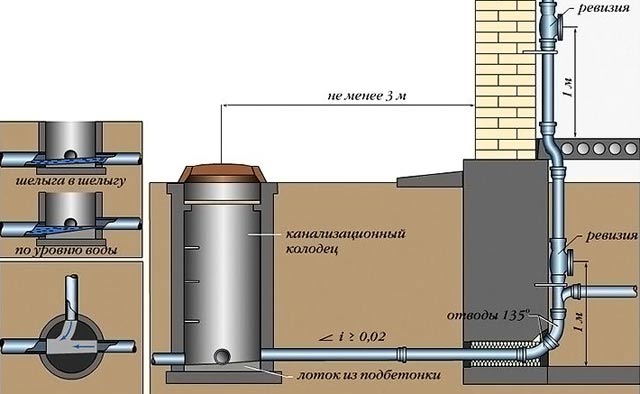
- If the pit is located separately, away from the bathhouse, then it must be provided that it is at the required distance from sources of drinking water, natural reservoirs, residential and outbuildings, trees, the border of the site and the road passing near it. The required standards are shown in the diagram below:

- The pit should be located below the level of the drain hole in the floor of the bath, at least 150 ÷ 200 mm, and the recommended distance from the bath building is 3 ÷ 5 meters.

- If the drain pit has to be located close enough to the structure of the bath, then:
- the bottom of the pit should have a slope of 20 ÷ 25 degrees, diverting water from the walls of the building;
- perforation in the walls of the barrel, concrete rings or tires, must be done from the side that will be farther from the walls of the bath;
- It is very important to observe the correct slope of the sewer pipe so that dirty water does not stagnate inside the channel, but immediately goes into the drainage pit, there is no risk of freezing when using the bathhouse in winter. It is especially necessary to remember this in cases where it is decided to place the pit far enough from the bath. The amount of slope required depends on the selected pipe diameter - this is quite clearly indicated by the diagram below:

It should be noted that to organize the drainage of water from a small bath without a toilet, a pipe with a diameter of 50 mm is usually sufficient. In order to maintain the desired slope, when digging a connecting trench, as well as when adding a sandy "cushion" into it, control the difference in its depth using the building level.
Arrangement of a drain drainage pit - step by step
In this section of the publication, two options for drain pits will be considered, which can be equipped independently.
conventional drainage pit
This version of the drainage pit has a design that can be made from various materials, which were discussed above.
| Illustration | |
|---|---|
 | After determining the location for the location of the drain pit, you can proceed to digging the pit. For a bath drainage well, a pit depth of 2500 ÷ 3000 mm will be sufficient. It can have a round or square shape in cross section - it will depend on the chosen material for arranging the walls. For example, if the pit is made out of brick, then it is more convenient to lay a square or rectangular shape out of it, but in some cases a round well is also completely formed from it. The diameter of the pit should be 150÷200 mm larger than the prepared container. |
 | When the pit is prepared, a trench is dug from it to the building of the bath at the right angle for laying the drainage pipe. The width of the trench can be 300 ÷ 500 mm, and the depth will depend on the level of soil freezing in the area where the bath is built, but not less than 500 mm at the entrance to the well. |
 | The bottom of the finished pit is covered with stone of the middle fraction - it is gravel, crushed stone, chipped brick or even broken slate. The drainage layer must be at least 300 mm, since it is designed to retain dirty water and clean it, that is, moisture must flow to the soil by capillary action, which will allow it to be quickly absorbed. |
 | Further, they act differently. You can immediately lay a sewer pipe, and then work on the brick walls of the water intake well, or first install or build a container, and in the course of its construction, a drainage pipe is inserted into one of the specially made holes. Most often, the pipe is laid at a time when the walls are brought out to the level of the depth of the trench, otherwise it will simply interfere with work. |
 | So, the walls of the drain well can be built of brick. Masonry is carried out in compliance with the clearance between adjacent bricks in a row of 40 ÷ 50 mm. The wall can have a thickness of half a brick or one brick - this parameter is chosen by the builder, and to a greater extent depends on the amount of prepared material. Having raised the walls of the well by another 200 ÷ 300 mm, the space between the soil walls and the brick walls is filled with drainage backfill. |
 | If concrete perforated rings are used to form the walls, then specialized equipment will have to be involved in their installation, since each of them has an impressive mass, and distortions should not be allowed during installation. After their installation, the distance between the soil and concrete must also be filled with drainage backfill. It should also be noted here that if concrete rings are used for the pit, then one should not rush to install the walls of the sewer pipe into the hole, since under their weight they can sink somewhat into the ground - it happens that by 100 ÷ 150 mm. Therefore, it is recommended that the finished concrete well be left alone for some time to shrink, otherwise the plastic pipe may crack or break from the pressure and stress that has arisen. |
 | When using metal barrels for the pit, the bottom and lid are cut off from them, and the side walls can simply be cut with the help of a grinder. The cuts are made at a distance from each other of 200÷250 mm horizontally and in increments of 100÷120 mm in height. If two barrels are used, they are placed one on top of the other. After installing the lower one, the free space around its walls is filled with drainage. After that, in the second of them, in the upper one, a hole is marked and cut out through which a drainage pipe will be installed in the barrel. A marking hole can be cut with a grinder, but an opening made with an electric jigsaw will still be more accurate. To do this, a hole is drilled at one of the points of the marked circle, into which the nail file of the tool should freely enter. |
 | If plastic barrels are prepared for the drain pit, then they are mounted in approximately the same way as metal ones, but quite often the drain pipe is connected through the top cover of the container. In a plastic barrel, the bottom can also be cut off, or several round holes with a diameter of 100 ÷ 120 mm are cut into it. |
 | Holes with a diameter of 10 mm are drilled in the side walls along the entire perimeter of the polymer container with a frequency of 100 ÷ 150 mm horizontally and vertically. Around the barrel and under it, crushed stone or gravel is backfilled, into which, as in previous cases, water will flow from the holes of the barrel, be cleaned and go into the ground. |
 | The most commonly used and material for arranging the drainage well of the bath are car tires, which are stacked one on top of the other. On the inside, at the edges of the tires, in three or four places, holes with a diameter of 10 mm are drilled, through which they are fastened together by means of, for example, plastic clamps-puffs. The sewer pipe can be brought between two tires. In this case, for emphasis, along the edges of the plastic pipe and in three or four more places between the tires at the place of its passage, bricks are installed that will remove the load from the plastic from the upper slopes. |
 | Another option for driving a pipe is to install it in a hole cut in the side wall of the tire. When choosing this method, it is necessary to foresee the possible shrinkage of the structure by cutting a hole larger than the pipe diameter by 70 ÷ 80 mm. |
 | Quite often, the drain bath pit is not filled with drainage material around the barrels or tires, but is filled with it by two-thirds - this allows water to slowly flow to the soil walls and slowly soak into them. |
 | It is recommended to strengthen the top of the pit with brick walls by equipping a concrete platform with a hole for the hatch. To do this, a formwork is built around the well, into which a reinforcing grid is laid, and then it is poured with concrete mortar, a layer 70 ÷ 80 mm thick. |
 | After the concrete has hardened, a homemade cover made of a steel sheet and a corner is installed on the hole. Factory-made hatches, metal or plastic, are also quite applicable. |
 | Special plastic sewer manholes can have various shapes and linear parameters. So, when planning to install this particular option, the hatch is purchased in advance, and the top cover of the drain pit is already equipped according to its size. |
 | A well made of concrete rings is usually covered with a special cover made of the same material with a ready-made hole for a plastic or cast-iron hatch. |
 | The walls of the well, built from tires or from barrels, have less rigidity than brick or concrete, so it is best to strengthen them with cement mortar mixed with crushed stone. If the drainage was filled up between the walls of the well and the soil, then its upper layer, standing 120 ÷ 150 mm, is recommended to be made from the solution mentioned above. Further, the top of the pit can be left in this state by simply installing a hatch on the hole, or you can equip a concrete platform above the structure with its subsequent backfilling. |
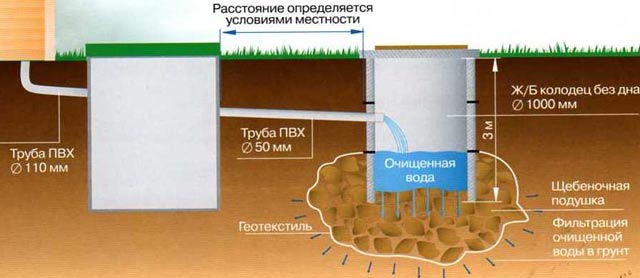
Pit on the principle of a two-chamber septic tank with an output to the filtration field
The second option is more complex in design, but its functionality is much higher. This system is perfect for arranging in areas with groundwater close to the surface, since it does not require a deep pit. In addition, such a design can also be a solution for organizing drainage water from the foundation, from a storm well filled from linear storm water inlets on the site or their gutters on the eaves of the roof of the house.
To figure out how to cope with the arrangement of such a hydraulic structure, you should consider this process in detail.
| Illustration | Brief description of the operations performed |
|---|---|
 | For this system, two plastic barrels are used, which are easy to prepare for installation work and connect to sewer pipes of the same material. Usually, for a drain pit of a small bath, two or three containers with a volume of 200 ÷ 250 liters are enough. |
 | The pit for the installation of barrels is also dug 100 ÷ 150 mm larger than their diameter, and due to the fact that containers of equal size will be installed at different levels, the pit for them should have a stepped configuration. The depth of the pit in this system should be 450 ÷ 500 mm more than the height of the barrel. This distance will be needed to equip a drainage cushion under the barrel and a recess for the pipe entering it. The difference in the installation level of the tanks should be 150÷200 mm, and the distance between them varies between 200 and 300 mm. Barrels are installed in one line. The bottom of the pit is compacted and covered with rubble of medium fraction, with a layer 80 ÷ 100 mm thick, which also needs to be compacted. |
 | Next, you can proceed to work on the preparation of containers. The barrel installed above will serve as the primary chamber, that is, a sump for dirty water. A neat hole is cut in its top cover into which a drain pipe will be installed. In the side wall, on the opposite side from the hole in the lid, holes are cut for the pipe, which will connect the first barrel to the second one, installed somewhat lower. To insert plastic pipes into the lid or into the walls of the barrel, you can find special flanges in the plumbing store, such as the one shown in the illustration. |
 | If not, then you will have to cut a hole with maximum accuracy, and then for sealing - do not spare high-quality silicone sealant. |
 | Additionally, it is recommended to cut a hole for installing a ventilation pipe with a diameter of 40 ÷ 50 mm, or install a tee, as shown in the illustration, where one outlet will be designed to connect the sewer drain pipe from the bath, and the other, vertical, for the ventilation pipe. |
 | The second barrel is equipped with three holes, one of which is drilled in the top cover, and two - in the side wall, below the top edge by 100÷120 mm. The axes of these side windows must be turned radially from the axis of the central hole by 45 degrees. |
 | Branch pipes with 45-degree bends installed on them are cut into the side holes and sealed. As a result, the pipes for connecting the drainage pipes will become parallel to each other - as shown in the illustration. |
 | Additionally, in the lower part of the walls of the second barrel to be installed, on the opposite side of the entrance, small holes are drilled, 5 mm in diameter, at a distance of 150 ÷ 170 mm from each other. This is an additional outlet of water to the drainage backfill around the barrel. However, if powerful filter fields will certainly cope with their task, and even more so if such a septic tank has to be installed in the immediate vicinity of the bath, then this operation is not mandatory. |
 | The result should be such a design, as shown in the illustration. Having mounted a system of barrels and nozzles, you can proceed to the creation of a filtration drainage field. |
 | For the drainage platform, which is located at a slope from the installed barrels, a trench is dug, having a width of 1200 ÷ 1500 mm and the same depth to which the first barrel above is buried. If desired, the drainage filter field can be stretched over the entire area, as it will not become an obstacle to arranging beds for annual crops or planting shrubs above it. A geotextile sheet is laid on the bottom of the resulting channel, on top of which drainage will be laid. Backfilling the trench with crushed stone is done in layers, each of which should be carefully tamped and distributed under a slope along pre-set pegs. The slope of the trench should be approximately 25 mm per linear meter. The pegs pre-installed with the necessary difference in height will become a kind of beacons for the correct backfilling of the drainage layer. |
 | As the drainage material falls asleep around the lower barrel, water is poured into it, otherwise the external pressure of the soil can deform it. It is recommended to fill the space between the walls of the barrels with gravel or coarse sand, which should be compacted by spilling water. Further, pipes with perforated walls are connected to the nozzles, through which water will be distributed over the drainage site. Holes are drilled in increments of 150÷180 mm along the bottom and sides of the pipes. Pipes after drilling are dressed in a filter "casing" made of geotextile - so that the inside of the pipes is not subjected to silting. |
 | The next step of the pipe and the entire space of the trench is covered with crushed stone of the middle fraction mixed with sand. Such a layer should reach the lid of the barrel installed below, that is, completely cover the pipes from above with a layer of at least 100 ÷ 120 mm. On top of the rubble, it is best to backfill several different layers of soil. So, crushed stone is first covered with geotextile, on which a layer of moistened sand 70 ÷ 80 mm thick is laid, and the rest of the space can be filled with fertile soil. On this site, it is quite possible to equip a flower bed, plant annual vegetable crops or even small shrubs with a shallow fibrous root system. |
At the end of the publication, it should be noted that there are other materials that can sometimes be found in the yard among old stocks or even seemingly unnecessary trash, which in fact may well be suitable for building a drain pit for a bath. For example, you can find a use for old sheets of wave or smooth slate, or even trimmings of corrugated board left after roofing work.
Some resourceful owners of country houses lay out the walls of the drainage well with glass or plastic bottles that are filled with sand, find other very interesting solutions. Therefore, if there is a desire to save money, and at the same time free up part of the yard or sheds from old materials, then you need to turn on the fantasy “to the fullest” - and act! We will be glad if some creative master will share his innovations on the pages of our portal.
Another example of a simple drain for a bath is shown in the video below.
Video: How to make a drain for a bath yourself, at minimal cost
July 7, 2016
Specialization: master in the construction of plasterboard structures, finishing work and laying flooring. Installation of door and window blocks, facade finishing, installation of electrics, plumbing and heating - I can give detailed advice on all types of work.
High-quality sewage in the bath is just as important as a good steam room and a comfortable rest room. But it often happens that the developer makes mistakes due to ignorance, and as a result, problems arise during operation in the form of blockages and freezing in the winter. To avoid this, carefully read this article, it contains the most useful recommendations, following which you can build a reliable system.
Description of the workflow
I want to immediately note that the work must be carried out even at the stage of construction, so that subsequently it would not be necessary to break the screed or adapt to existing conditions. I will analyze the process in the form in which it should take place, and I advise you to stick to this option. If everything is done correctly, then the work will not take much time and effort, and the result will be excellent.
Preparatory stage
This stage is carried out after you have poured the foundation, because it takes 4 weeks for the concrete to gain strength, and during this time you can do a lot of useful things so that the work does not stand still.
To begin with, I will present a process diagram, and below I will analyze it in more detail:

- You must draw a diagram and mark exactly where the drains, washbasin, toilet and other sewer elements, if any, will be located. It is important to clearly understand the position of all the components, this will help to calculate the length of the pipelines and their location, it is better to spend 15 minutes on the plan and see the full picture than to think about everything already in the process of work, in this case you can make mistakes;
- Next, everything necessary is calculated; special trapiki with are used for drain holes in the floor. A riser is assembled at the location of the toilet, and a thin pipe is connected from the washbasin to the main line. In fact, everything is very simple, and if you have a detailed plan on hand, then you just have to make a list of the necessary elements and calculate the length of the pipes;
You can contact a consultant in a plumbing store with a drawing, he will help you calculate everything you need or double-check your list, so the likelihood of miscalculations and errors is reduced to a minimum.

- When buying, purchase pipes with a small margin, if necessary, an extra piece can be cut off, but if you do not have enough 5-10 cm, then you will not be able to solve the problem in any way. For the outer part of the system, which will be laid under the road, it is better to use orange pipes, their price is higher, but they are more resistant to stress.
Laying communications inside the building
While the foundation is gaining strength, you can lay the internal system. In general, different sewage systems are used in baths - you can implement several options with your own hands. I will talk about the most modern and most reliable of them. In addition, in addition to excellent performance, it is also easy to assemble, which is important for those who do not have experience in this area.
The work is done in the following sequence:
- Inside the building, we dig trenches for laying pipes, their depth should be 70-80 cm. Try to plan the position of the pipes so that the system has a minimum number of turns and bends, since blockages most often occur in these places. It is important to dig trenches in such a way that when laying pipes, a slope is observed, which should be 2-3 cm per linear meter;
- Then a sand cushion 10-15 cm thick is poured onto the bottom and carefully compacted and leveled. It is necessary to make the foundation reliable, then the minimum load will be placed on the pipe connections;
- If there is a significant recess inside the foundation, then vertical pipes are brought to the level of the future location of the floor. Do not worry that in fact the floor may turn out to be slightly higher or lower than the planned line - set them with a small margin and you can simply cut off the excess;

- As for the connection of the elements, this part of the work needs a separate description: carefully inspect the sealing gum for integrity and proper location in the seat. In order not to damage the seal, lubricate the joints with liquid soap or at least moisten them with water;
- All the elements that will be covered with sand and concrete are exposed, the outer part is assembled after, at this stage it is important to assemble the hidden part of the communications.

When pouring the foundation, you can leave a hole for the sewer by inserting a piece of pipe of a larger diameter.
If you don't, you will have to drill a hole, which is labor intensive, so it's best to think about this aspect in advance.
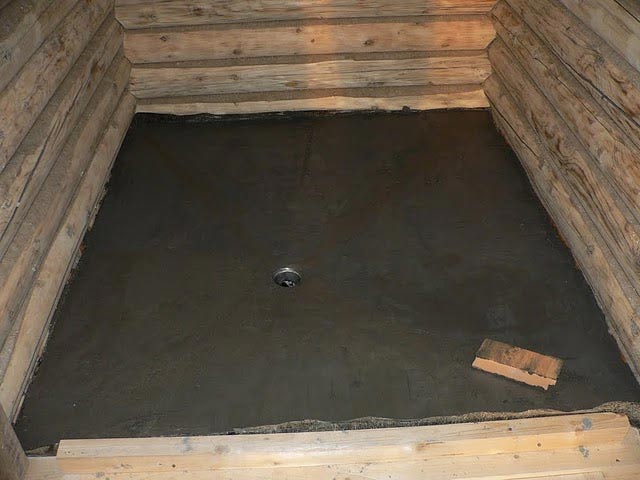
Further, the space is covered with sand and a concrete screed is poured, I will not describe this process, the review is about something else. What you need to do at this stage is to accurately set the position of the ladders so that they are at the right level and the slope of the floor leads to them. If everything is done correctly, then the work can be considered successfully completed, it remains only to install and connect the plumbing afterwards.

Outer part of the system
We will figure out how to make a sewer in baths that are not connected to a centralized communications system. That is, you need to build an accumulation system with your own hands, there may be several options, and each of them has its own characteristics.
But I will start by laying pipes to the well, as this is a very important part of the process:
- The depth of the pipeline must be below the freezing level of the soil, in each region this indicator is different and can vary from 60 cm to two meters. An average of 120 cm is suitable for most regions, and many use it as a guideline when carrying out work;
- At the bottom of the trench, again, it is necessary to pour a sand cushion so that the base is reliable and even, the standard slope is 2 cm per linear meter, this is enough for the unhindered removal of drains. Further, a pipe is laid on this basis, all elements are carefully connected from beginning to end;

- If it is not possible to lay a pipe to the desired depth due to problematic soil or other factors, then insulation can be used. The insulation is made with the help of special polyurethane foam elements, which are simply put on the pipe and perfectly protect it from freezing even at the lowest temperatures.

Pay special attention to the place where the sewer pipe exits the foundation, it is this area that most often freezes, so it can be additionally insulated by wrapping it with mineral wool.
Now let's deal with the system of accumulation of effluents from the bath. There are two main options: a storage well and a drainage system. Both options have their own characteristics, and I will talk about each of them. Let's start with the storage capacity, its main advantages:

This option also has disadvantages:
- The need to periodically call a sewage machine for pumping;
- It is necessary to equip the entrance of special equipment to the well;
- The tank can be filled with groundwater.
As for the workflow, it is simple:
- A hole is dug under the well rings, their number can be from two to five, depending on the volume of drains;
- Next, the elements are laid, if necessary, the joints are additionally sealed with cement mortar;
- A sand and gravel cushion is poured to the bottom and a concrete solution is poured, as a result, you get a sealed container from which drains will not get out. A hatch is placed on top - and the system can be used.
The drainage well has its own differences, as for the advantages, the following can be noted:
- Low cost of arrangement, you can use various available materials;
- Simplicity of work - below I will describe the process, and you will see that there is nothing complicated in it;
- There is no need to pump out drains, which reduces the cost of system maintenance.
Among the shortcomings, it should be noted the need to replace the filter layer every 1-2 years.
Works on the device of a drainage well are as follows:
- First of all, you need to build a container, for this you can use either special well rings, or wheels from a truck or tractor. Or you can even lay out a brick structure at all, the photo below shows just such an option;

- Next, you need to pour a drainage layer of crushed stone with a layer of 30 to 40 cm, this is very important for filtering wastewater, this work can be considered completed. Don't forget to close the top with a trapdoor or other solid structure.

As you can see, the instructions for carrying out the work are quite simple, it is important to do everything carefully and reliably, do not save on the quality of the pipes, and the system will last you a very, very long time.
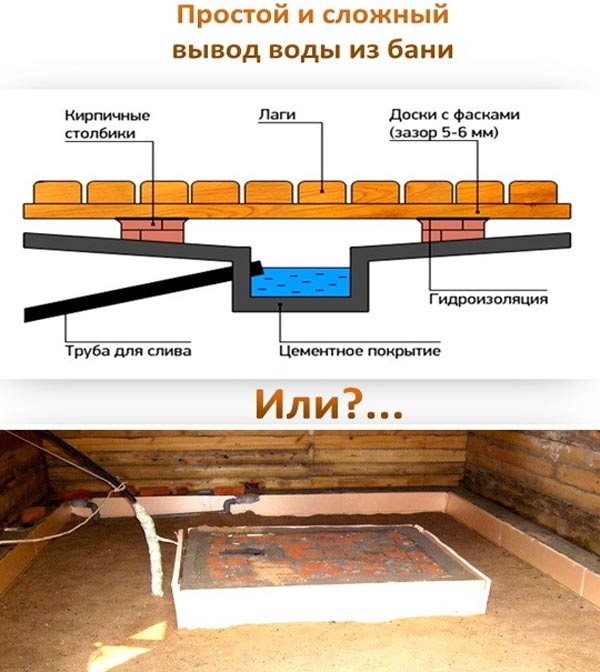
Simplified version of the sewer
If you use the building only in the summer, then do-it-yourself sewerage for a bath can be implemented in this way:
- A pit is being built under the floor, this is the name of a recess 50-70 cm wide and 50-60 cm deep;
- The floor is made with a slope, and a grate or trapik is placed in the middle above the trench, through which water will drain;
- Next, the pit is half filled with rubble, it will filter the water and release it into the ground. The filtrate needs to be replaced once every 2-3 years.
Naturally, this option is only suitable for small volumes of water, and the system works well only on well-absorbing soils.

The organization of sewerage for a bath (with or without a toilet) is a rather responsible task, the solution of which depends on how convenient and comfortable it will be to use this room. Despite the fact that such work is relatively simple, there are many nuances, without which it will not be possible to achieve an acceptable result.
We will give a step-by-step guide in which we will describe in detail how to make a reliable system with your own hands so that the autonomous sewage system in the bath functions smoothly. But before proceeding to the process, it is necessary to clarify the following fundamental points.:
- decide how to bring water and sewerage to the bath;
- find out the depth of soil freezing and what type of soil (the latter is necessary for organizing a drainage system);
- decide whether the bath will be with a toilet or not;
- choose a place for a drainage pit, taking into account sanitary requirements;
- How many people will the bath be designed for?
The choice of the type of sewer system directly depends on the last point, as a rule, a bathhouse for a private house or cottage assumes that few visitors will use it.
In this case, the ideal solution would be to stop at the drainage type of sewerage.

This process includes several steps:
- it is necessary to dig a drainage type well, 1x1 meter in size, as a rule, this is enough. If the bath is planned with the expectation of many visitors, then a larger well will be needed.
The depth of the pit depends on the level of soil freezing characteristic of this type of terrain. For example, if the soil freezes by 50-60 centimeters, then the pit must be made at least one and a half meters deep;
- a solution of clay is applied to the bottom and machines of the trench, as well as the pit, to form a coating of about 10 cm in thickness. In this case, it is necessary to make a slope towards the well;
- in the well itself, a filter pad is made of sand, crushed stone, gravel or other material with drainage properties. The thickness of such a "cushion" should be at least half a meter, while its upper part should rise above the level of soil freezing;
- a ceiling is installed on top (with a hatch for preventive cleaning), which is covered with soil.
It is necessary to pay attention to such an important point: the pipes through which the drains flow, like the water supply system, require insulation. Otherwise, during the cold season, the risk of pipes freezing increases. If the water freezes in the pipe, the drainage system will cease to function. If the site is located in a warm region, then thermal insulation can be omitted.
Related video:
Those who have a site on sandy soil can confine themselves to arranging a horizontal drainage type cushion. It is set up as follows:
- a trench is dug in dimensions: depth -1 m, width - 0.3 m, length -1 m;
- a drainage cushion 20 cm thick is created in the trench;
- a sewer pipe is brought (directly to the pillow), after which the soil is poured from above.
Pit arrangement
In the event that the soil on the site has poor drainage properties, it will be necessary to make a pit in which the drains will accumulate until they reach a predetermined level, after which they will be discharged. An example of a pit design is shown in the figure.

Note that the outlet pipe must be laid at a slope in the direction of the flow of wastewater.
For the manufacture of a pit, it is allowed to use any material that has waterproofing properties, for example, you can make a tank from tires of the appropriate size.
In order to prevent the penetration of unpleasant odors from the water drainage system into the bath, it is necessary to install a water seal on it, the principle of its operation is clearly shown in the lower figure.

Floor organization options
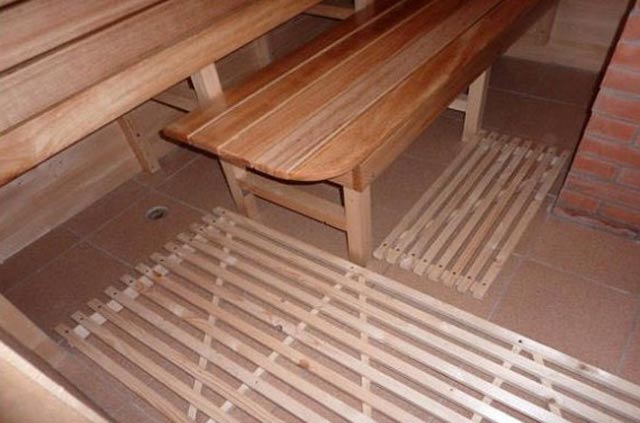
The flooring in the bath can be arranged in two versions:
first: make the floor leaky, in this case the boards are laid with a gap of about 5-10mm and attached to the joists. Such flooring can be lifted and dried at any time;

second: the floor is made capital, it has a slight slope towards the drain, from which the drains will be directed to the pit or directly to the well for drainage.

Removal and cleaning
If the bath is planned based on a large number of visitors, then the drainage type of the sewer system is not suitable for it. Ideally, it is better to divert wastewater to the central sewer, when this is not possible, you will have to take care of installing a wastewater treatment system.
A septic tank can be used as a treatment plant, the rules and method of its installation are almost identical to a drainage well. Let us briefly recall the sanitary norms:
- drainage, storage and treatment facilities cannot be installed at a distance closer than 30 m to places where drinking water is taken;
- an autonomous treatment plant should be located no closer than 5m from the border of the site and 3m from the house;
- the distance to an open reservoir or river should not be less than 50m.
Outlet pipes
The system allows the use of plastic, cast iron, concrete, asbestos-cement, as well as ceramic pipes. It is not recommended to use steel products due to their rapid failure due to corrosion.
As for the diameter, it depends on the load on the system, as a rule, pipes with an internal diameter of 100-120mm are installed. The laying is carried out below the level of freezing of the soil, while a slope is made towards the well or septic tank.
In places where the pipe turns or branches, special inspection-type wells should be installed, we will talk about them in more detail.
Installation of manholes
The task of such wells is to provide access to the pipe in places of its possible clogging (turn, branch).

For a sewer system for a bath, it makes no sense to make manholes of large diameter. As practice shows, one meter is enough. There are no restrictions on materials, the only requirement for them is to provide waterproofing.
You can buy ready-made plastic structures, their price is relatively low, and a wide range of similar products allows you to choose a design for almost any configuration of the sewer system.
The well must be provided with reliable thermal insulation so that the pipe does not freeze in winter. The installation of manholes is carried out according to the same principle as drainage wells and septic tanks.
In the article, we examined the main points that you should pay attention to when installing a sewer in a bathhouse, as you can see, the device of this system is not difficult. For those who have little building skills and have free time, it will not be difficult to both bring the sewerage system and provide water supply to the bathhouse.
If you doubt your abilities, then it is better to entrust such work to specialists, but the cost of the project in this case will increase significantly.
The construction of a bath on your own site can be made from different materials and using various technologies, however, a sewerage device in a bath is necessary for any method of construction. Understanding how to make a sewer in a bath with your own hands will greatly contribute to both financial savings and comfortable further use of it.
Existing options for the construction of sewerage in the bath

 Designing a water drain in a bath
 Proper technical construction and drainage, performed in compliance with the basic rules, will ensure long-term use of the bath without the need for frequent maintenance of internal communication systems.
Starting on your own site, and considering suitable projects, you must immediately work out how to properly make a sewer in a bath. This is due primarily to the fact that the laying of the wastewater disposal system, with any method of its organization, is carried out at the stage. 
Sewerage in the bath can be organized in two ways:
- Pressure type with the installation of pumping equipment for special purposes, providing the selection of sewage. This method is good to use when arranging bath rooms below the soil level, for example, in the basement.
- Non-pressure flow, in which wastewater is discharged due to the slope of the laid pipelines and is the most generally applicable.
 Scheme of the design of a free-flow drain in the bath
 When designing a bath sewer communication, it is necessary to take into account the arrangement of the following components:
- or a place of accumulation and processing of wastewater;
- pipeline both external and internal;
- drain devices in the washing rooms (ladders, gutters);
- odor removal system (ventilation outlet, siphons).
Criteria for choosing a sewer system
When designing a sewer system in a bath, it is necessary to take into account several main points on which the choice of its most optimal device depends.
 Bath outlet options
Construction of a sewage storage tank
The collection and processing of wastewater is one of the main activities of the entire range of works on the construction of a bath sewer in the absence of nearby centralized sewer systems. In this case, it is necessary to equip a container in which effluents will be collected on their own. This can be done in several ways, depending on the technical features of the construction and the availability of financial opportunities.
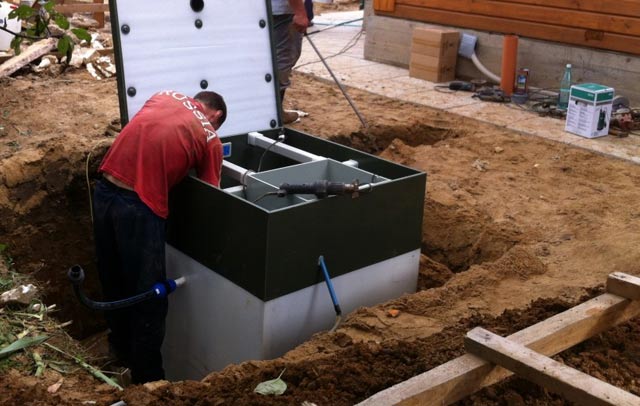 The process of installing a septic tank for a bath
 Schematic diagrams of the device of wells can be the following:
Depending on the choice of the concept, it is necessary to select the material for manufacturing. The following options are possible:
- plastic containers, for example, eurocubes or other containers of the appropriate volume and composition;
- prefabricated concrete rings;
- pouring a concrete box directly on the ground;
- , laid in a checkerboard pattern with drainage gaps.
 An example of finishing a drainage well with brick

After the material and the scheme of the device have been selected, it is necessary to choose the optimal place for construction and ensure the correct preparation of the pit for deepening or the device of the tank.
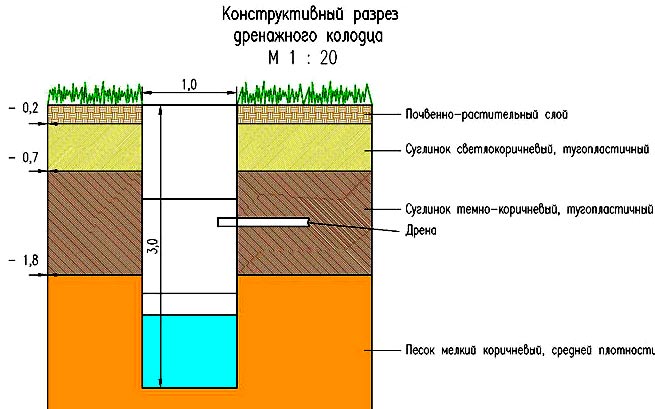
 Design and design of a drainage well

In this case, the following rules must be observed.
After earthworks have been completed to prepare the pit, its bottom and edges must be smeared with a clay composition to avoid shedding of the edges, and the sand cushion and drainage layer should be backfilled if necessary.
 Drawing and names of the elements of the drainage well
In this case, it is necessary to take into account:
When arranging drainage tanks, it is also necessary to provide for the presence, which will contribute to the efficient processing of waste and exclude an unpleasant odor.
Features of laying sewer pipes
The most relevant material for organizing wastewater disposal today is plastic pipes, which, due to their properties, have replaced pipes made of cast iron, metal and asbestos concrete. They have a long service life, wear-resistant, easy to work with during installation, and also have a low cost.
To connect pipes, appropriate docking modules or fittings are provided, which have a variety of configurations to perform complex joints and piping.
 An example of laying sewer pipes in a bath

Laying of external sewage pipes is carried out in prepared trenches, prepared taking into account the following features:

 An example of a manhole device

Docking of the pipeline to the sewer well is carried out by tie-in methods with sealing of the joint.
The pipeline is connected to the bath itself through by installing the pipe in the technological holes and sealing the connection point with cement mortar. The video shows the process of laying sewer pipes.
Arrangement of internal sewer outlets
The laying of pipes for equipping the sewerage of internal premises depends on the planned method of arranging the floor, the functional purpose of the premises and the number of drain points.
In small baths, water is supposed to be drained directly from the washing room.. Other options involve the removal of waste from several points, including a toilet and additional water supply points, for example, a shower, a washbasin.
 An example of a sewer outlet in a bath
All this must be taken into account when planning a bath, to ensure the necessary technological conclusions.
The material for covering the floor is also of no small importance for how the drain in the bath will be organized.

 Examples of design and installation of ladders in the bath

Work on laying internal pipelines is carried out in the following sequence.

After completing all the steps for laying out the pipes, they are poured with concrete mortar, taking into account the following points:
- the height of concrete above the pipes must be at least 10 cm;
- it is necessary to ensure the slope of the concrete base in accordance with the planned type of floor covering.
The final stage of the sewage device inside the bath is laying the floor covering.
 The process of laying the floor in the bath
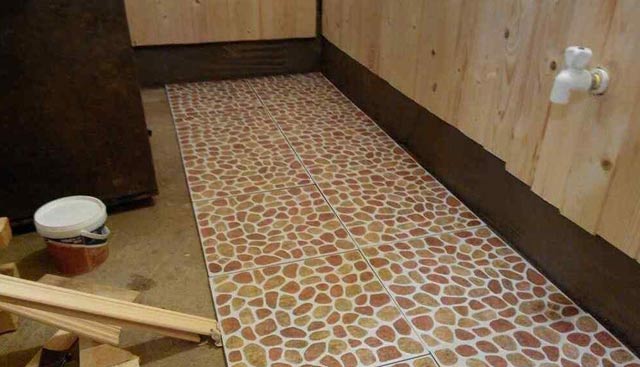

We also recommend
 What is the name of the amount of money at stake in the game Modern monetary system is a financial pyramid
 How to name a horse: we select a suitable nickname
 How to name a horse: we select a suitable nickname
 Point of the celestial sphere above the observer's head
 Common peacock (Indian)
 What is the name of the male and female