How to build a brick grill and stove. Outdoor fireplace: oven, grill, barbecue, cauldron, tandoor, smokehouse
To make delicious dishes in the country, a good option would be to use a brick barbecue. Making a design with your own hands is quite simple.
Our article will introduce you to the principles of operation of a mini oven, you will find out what it can consist of.

Barbecue is the most popular method of cooking outdoors. This design is similar to a barbecue and has a standard device.
The difference between a grill and a barbecue
Barbecue specialists who have rebuilt a lot of outdoor stoves with their own hands know that a barbecue cooks food from below using smoldering coals.

The food is not fried on top. Therefore, you have to constantly turn the skewer.

With barbecue things are different. The meat is placed on the grill; the grill itself becomes slightly lower than the side walls. This is the whole essence of the work of this design. In a barbecue oven, the tray looks like a solid sheet, without grates.

While the coal is smoldering, the food is gradually fried due to reflection from the walls of the oven itself.

The walls of the barbecue are high, due to this a smoke cap is formed above the products, they are slightly smoked in it, this gives them a special aroma. If you put a piece of tough pork in such an oven, during the process of roasting in the oven it will become soft and juicy.

You might think that the height above the walls of 25 cm does not matter, but this is not the case. The culinary process is a delicate matter; food is susceptible to the slightest change in temperature.

If you pay attention, you will notice that most picnics in nature or at the dacha are not complete without a barbecue oven; the grill is not so popular. There are quite a few designs of brick barbecue ovens, so you can easily choose a convenient option for yourself.


How to build a barbecue yourself?
At first glance, it seems that cooking in a barbecue oven is not simple, which means that the design is complex. However, this is not true; building a stove with your own hands is quite simple.
It is those who love countryside gatherings who build stoves with their own hands. Every owner always has the materials for its construction at hand. Every man held bricks in his hands, which means that building a stove would not be difficult for him.
First, they put up brick walls, then measure out the place where the firewood tray will stand, the last step is installing a grate for food.

When building a barbecue oven, it is important to think about its appearance. A beautifully crafted structure will be the best decoration for a summer cottage.

Design Features
In simple terms, a barbecue oven is the most primitive brickwork. They make it in the shape of the letter “P”. Such a simple structure will be an excellent option for outdoor cooking.


Skilled builders install mounts for skewers on the stoves; this greatly simplifies the work when frying meat; you don’t need to hold anything with your hands, just turn it over.

BBQ Oven Materials
The barbecue oven is assembled from standard red brick, which is always available on the site. It is impossible to coat layers of brick with ordinary clay; here you need high-quality cement mortar.

At the completion of the construction of such a furnace, a pipe is always removed; it serves as an exhaust hood, a canopy from bad weather and strong winds.

If there is an exhaust hood, such a stove can easily be placed in a gazebo or on an open terrace; it will not emit acrid smoke directly in your face.

Grills and barbecues have become very popular with absolutely everyone lately. Who doesn't love eating delicious food outdoors?


Without exception, everyone loves the taste of juicy, roasted meat. It is for such pleasure that it is worth using all your strength and experience to build such a stove. You will be proud of your invention, and also delight your loved ones with new kebab recipes.

Photo of brick barbecue


Ordinary and facing stone made of baked clay is a universal construction material. Therefore, a simple brick grill can be quickly built even without mortar. A stationary hearth made of this material is considered simple if its design does not have a chimney.
Clay and ceramic bricks can withstand extreme temperatures, but have a significantly shorter lifespan in furnaces and hearths than fireclay fireclay. Therefore, the simplest temporary barbecues are made of ordinary brick, and in stationary fireplaces of simple design, the inside of the firebox can be lined with fireclay lining.
Even if you add legs made of the same material to a rectangular brick box, the structure will still remain a barbecue. As soon as the master covers the firebox with a roof, it will automatically turn into a barbecue oven, although without a chimney, but with a hole for removing combustion products.
"March"
From a few bricks, accidentally found or specially taken for a country picnic, you get the simplest fireplace for frying meat on skewers over coals. In this case, it is necessary to take into account the nuances:
- the brick has standard dimensions of 25 x 12.5 x 6 cm; to save building materials and space in the trunk of a car, it should be installed on its edge;
- for normal roasting of meat without burning, the skewers should be 20 - 25 cm away from the coals, so at least 2 rows of bricks will be required;
- the width of the brick “box” is taken for standard skewers to be 37 cm, that is, 1 brick;
- The length of the barbecue for a small company is 75 cm, that is, 3 bricks.

They just took a few bricks and made this super quick structure on site, according to this drawing!
Thus, in total you will need at least 16 standard format bricks. Each one weighs 3.5kg for a total of 56kg minimum. The hearth manufacturing technology is as follows:

After the coals have cooled, the structure is disassembled and the turf is laid in place.
Classic grill
For a stationary fire on the site, you will need a base made of non-metallic material (sand or crushed stone), compacted with a vibrating plate or manual rammer. If the weight of the structure exceeds 450 kg, a monolithic reinforced concrete foundation will be required. For a home craftsman with minimal mason skills, a do-it-yourself brick grill, the simplest and most inexpensive one in the bottom photo in the shape of a rectangular box, is more suitable.
The manufacturing technology is as follows:


You can make such an inexpensive stationary barbecue
The main nuances for this modification of the hearth are:
- there is no need for an ordering scheme, since it is impossible to make a mistake in this case;
- the bottom row (called a bottom in kilns) is necessary to prevent the destruction of concrete from extreme temperatures; it is recommended to lay it out with refractory bricks;
- waterproofing is needed to prevent the destruction of the concrete foundation and masonry from soil moisture (not to be confused with groundwater!), It is made from rolled bitumen materials, pieces of which are placed under the foundation before it is poured, or the first row on a base made of non-metallic material.

Don't forget to waterproof the bottom row.
All other designs of brick barbecues are more complex, so order is required. But they are more convenient to use. Here are a few more photos where you can see other interesting options: 

Option with woodshed

Well, and a video on how to do masonry correctly:
BBQ oven
Unlike a classic barbecue, a barbecue simplifies the preparation of meat by placing it on a grill rather than on skewers. A simple budget barbecue grill is built from brick using the following technology:


Scheme of a ready-made budget brick barbecue
Attention: A grill with a drawer for ash and a grate above it for placing coals is considered more convenient to maintain.
This design is slightly different from the described version:
- after making the legs under the back and side walls of the barbecue on the spoon row, the brick of the next level is laid with a poke (side walls only);
- then another spoon and tie rows are laid out.

With retractable hearth
A metal drawer for ash is placed on the resulting lower ledge. A grate for coals is placed on the upper ledge. If you make another ledge in the same way, you will get a convenient drying rack for berries and mushrooms.
Well, and a detailed video, for clarity:
Without solution
If there are bricks left over from the construction site on the site, you can use it to build an inexpensive temporary barbecue as soon as you see the guests suddenly arriving. The main manufacturing nuances are:
- without mortar, the half-brick legs are too unstable, so it is better to replace them with 4 pedestals (columns) 1 x 1 brick with a row of bandages;
- instead of a sheet of iron, you can use a piece of any sheet material (OSB, plywood), but 2 continuous rows of brick must be laid above it;
- The height of the barbecue box is 2 - 3 rows, the dimensions are at the discretion of the home craftsman.

Quickly fold without solution
Attention: The construction is considered temporary, “in a hurry”; bricks stained with coals and ash are difficult to wash, so it is better to use ordinary rather than facing stone.
For detailed instructions, watch the video:
A rather attractive barbecue grill with an original design is a version made from several rows of bricks without mortar in the shape of a round cabinet.

Barbecue in the form of a pipe without mortar

This can be quickly built simply from what you have on hand.
Additional elements for simple barbecues
When adding additional functions of a stationary fireplace to the design, you will need to make drawings or sketches for it by hand. Since the hearth will be more complex, errors may occur during the construction of the masonry. The main additional elements for a simple barbecue are: a cutting table, a brazier stove and a sink.
Cutting table
An inexpensive option that significantly increases the comfort of use is the simplest do-it-yourself brick grill with a cutting table using the following technology:
- the rear wall lengthens, ligation with the central wall-stand becomes more difficult;
- in addition to the above structures, another wall-rack is built on the side, close to the masonry of the hearth;
- A tabletop made of natural/artificial stone is laid on it and on the side wall of the grill.

The cutting table can be located on any user-friendly side relative to the hearth.
Dutch oven
In addition to meat on skewers or a barbecue, there is often a need to prepare other dishes in pots, pans, or by heating or boiling a kettle. Therefore, instead of a cutting table, space is allocated for a brazier stove.
To do this you need to perform the following operations:
- lengthen the structure starting from the bottom row;
- make a front wall with a door for the combustion chamber;
- equip the hob with concentric cast iron rings to adjust the power of the stove.

The top photo shows a diagram of a barbecue with a hob of the simplest type.
Washing
To equip a barbecue with a sink, it is enough to mount a stove with a slot for a sink instead of a regular countertop, install a water supply or increase the height of the rear stack and hang a washbasin on it, as in the bottom photo.

Distributing cold water supply (cold water supply) throughout the area is much more difficult than collecting water into a washbasin. Even with seasonal operation, you will need to drain the liquid for the winter and preserve the system.
Thus, the construction material brick is suitable for making barbecues in a hurry in the field and on a suburban area. When laying on a solution, you can increase the functionality of the simplest barbecues by using a sink, countertop, hob or anything else that you find necessary and convenient when working. Here it is important to give free rein to your imagination and not to be afraid, you will definitely succeed!
Do you like to cook kebabs and other food outdoors, but still don’t have your own barbecue? We invite you to correct the current situation right now! After studying the following instructions, you will learn in what sequence a full-fledged garden stove is laid out, and the presented diagrams will help you thoroughly understand all the nuances of the technology.
Materials for building an outdoor stove
Start by preparing your materials. You will need:
- . You don’t need much of it, so you can prepare it yourself;
- boards for constructing formwork. An unedged board is perfect;
- fittings Needed to strengthen the foundation. You can use unnecessary metal products - cuttings of channels, thick wire, strips of steel, etc.;
- edged boards. From these boards you will build formwork for a concrete screed under the tabletop;
- bricks. You will need simple ceramic and refractory products;
- iron pipe with a diameter of about 150 mm;
- foundation waterproofing material. Ruberoid is usually used;
- mixer;
- sink. A metal sink is best for a garden stove;
- rubber hose.
Select the required amount of starting materials in accordance with the selected dimensions of the future furnace.

Prepare a stove design. This guide walks you through the process of building a complete food preparation unit complete with a cutting countertop and sink. If you don't need a sink and table, simply exclude the steps associated with arranging them from the instructions.
Choose a suitable location for. First of all, you should be comfortable using the oven.

Important! If tall trees grow near the selected site, make sure that their branches will not be in close proximity to the future chimney. Otherwise, prune the branches or they will burn.
The stove should not be adjacent to any buildings with its back wall. During operation of the barbecue, the brick will become very hot, which will not have the best effect on the condition of the adjacent buildings - they may simply burn out.


Arrangement of the foundation for a barbecue oven

The oven will have a relatively small mass. It will be perfectly supported by a reinforced foundation with a thickness of about 20 cm. M100 concrete is optimal for pouring.
First step. Mark the area for the foundation. Do this using pegs (metal rods, pipe scraps) and twine (cord, rope, etc.).
Second step. Dig a pit around the perimeter of the base. The recommended depth is about 30-35 cm. Be sure to leave a 5-cm margin for the width of the hole.
Third step. Fill the bottom of the recess and compact it thoroughly.
Fourth step. Make formwork. To make it more convenient, first assemble boards 30-35 cm wide from boards. Select the length according to the size of the sides of the base. Install the formwork elements around the perimeter of the pit.
Fifth step. Place the reinforcement in the formwork. It is best to use steel rods with a diameter of 1 cm.
Sixth step. Pour the concrete.
You can begin further work 3-4 days after pouring the foundation.
Lay a double layer of roofing felt on the foundation. It will take over the functions of waterproofing and provide reliable protection of the walls of the garden stove from moisture from the soil.


Choose the shape of the barbecue openings. If you want to make rectangular openings, select the material for arranging the lintels. An iron corner will do. If the opening is designed in the form of an arch, make a template in advance for laying out the arch. Use boards to make a template.


Having dealt with the nuances described above, proceed to masonry work. The type of bricks, patterns, various inserts and other decorative solutions are at your discretion. In the manual in question, the stove is laid out in a style similar to the design of the house.

Lay out the bottom tier. Lay the walls in half a brick, not forgetting to leave openings. Use cement mortar to hold the bricks together. Lay out the walls to a height of 60 cm if you plan to arrange an arched opening, or to a height of 80 cm if you decide to make a rectangular opening.
With a similar height of the opening and a couple of rows of bricks on top, the worktop will be located at a meter distance from the base, which is the most convenient option for work. If your height differs noticeably from the average, adjust the height of the table to suit your needs.
If you decide to make a rectangular opening, place a metal corner on the last row of masonry in accordance with the diagram, and then lay out the walls of the stove around the perimeter. If you want to arrange an arched opening, first install a template for laying the vault.

If a sink will be installed, at the same stage lay a pipe in the wall of the stove. You will run the water supply hoses through it.
Lay out the walls to the desired height. In the example under consideration, the height of the walls is 0.9 m. Make the top row of masonry with a slight protrusion outward. Thanks to this, a step is formed inside, allowing the installation of formwork for pouring the screed.
For the laying to be successful, carry out it in compliance with the following rules:
- the seams must be of equal width;
- the height of the openings must be such that at least 2 rows of masonry fit between their upper edges and the table;
- The arched opening must be designed with one central brick.
Having completed the arrangement of the lower tier, start preparing the base for the firebox and table. Make a screed. Place the concrete formwork on the previously installed step inside the oven. Cut the boards according to the dimensions of the span. If a sink is to be installed, leave space in the concrete screed to accommodate it. This is done very simply. You just need to avoid blocking the area for installing the sink. Cover it with another kind of formwork, fixed with spacers.
Fill the screed and leave it for three days. After the specified time, dismantle the formwork of the sink opening.
Cover the countertop with a material of your choice. For example, solid slabs of marble are perfect - they are both beautiful and convenient.


The second tier of the barbecue oven consists of a combustion chamber and walls that cover the area from prying eyes from the street. With partitions, everything is extremely simple - these are ordinary solid walls, laid out in half brick. If you want, you can completely refuse to arrange them. The procedure for constructing the firebox deserves special attention.


Prices for refractory bricks
Fire brick
Furnace arrangement
The furnace firebox has a two-row design: the outer row is made of ordinary ceramic bricks, the inner row is made of refractory material.

Lay the firebox in the standard way. The recommended parameters are as follows:
the height of the firebox opening is 7 rows plus an arch, or 9 rows in the case of a rectangular opening;
- firebox depth – about 600 mm;
- width – about 700 mm.
Having laid out the opening of the combustion chamber, add a couple of additional rows of masonry on top and proceed to arrangement.
To achieve the required chimney width, successively reduce the length of the combustion chamber walls. The back and front edges need to be shortened by half a brick in each next row. The side walls should be reduced by 25% of the width of the brick. According to this pattern, you need to lay out about 7 rows. Then you can begin to arrange the chimney pipe. It should have a rectangular shape. The recommended height of the structure is 12-14 rows.


At this point the fireplace is ready. To avoid any problems during this step, follow these recommendations:
- do not make the firebox opening too high. 7-9 rows are enough. Otherwise, the draft in the chimney will become too weak, as a result of which all the smoke will go into the area and not into the sky;
- The inside of the firebox must be lined with fire-resistant bricks. Otherwise, the masonry will simply crack under the influence of temperature changes;
- The chimney should also not be too high, because because of this, cravings will worsen;
- Make sure that the bottom of the combustion chamber is as flat as possible - this will make it much easier for you to clean out ash in the future.
Finishing touches
The barbecue is almost ready. Finally, do the following:
- install the faucet and sink;
- connect the water supply and intake hoses;
- cover the countertop with finishing material (optional). The best finishing option is natural;
- Lay out the area in front of the stove with paving slabs.
If you want, set up a table and a couple of benches next to the barbecue. Additionally, in such a situation, it is recommended to think about arranging a canopy.

Now you know how to build a barbecue oven. The presented unit will allow you not only to cook delicious dishes, but also to burn leaves and other small debris - the barbecue copes with all tasks perfectly.
The countertop and sink will make the stove as convenient to use as possible. You don't have to run into the house to prepare groceries - everything can be done in one place.
The free space under the table is suitable for storing firewood. Here they will always remain dry and well ventilated, which will prevent the wood from becoming damp and rotting.


Good luck!
BBQ prices
Video - Do-it-yourself barbecue oven
You have a dacha. You want to make it not only beautiful, but also convenient and comfortable for your family and friends to relax. And so that everything doesn’t cost too much. Don't know where to start? Do-it-yourself brick barbecues and barbecues for a summer cottage made from a photo are an ideal start for arranging a summer cottage. We assure you that after reading this article and looking at the drawings, you will build an ideal barbecue on your site, on which you will then cook delicious and healthy food.
A step-by-step guide to preparing and building a DIY brick barbecue
Preliminary work (layout and drawings)
Before you build a brick grill, you need to carefully consider what it will be like. We recommend paying attention to the following points:


When you decide what kind of barbecue you want to make, make detailed drawings with exact dimensions. Thanks to them, you will not only be able to correctly build the structure itself, but also calculate the amount of materials needed.
Choosing a place for the barbecue
Brick barbecues can be located anywhere in the summer cottage - in the garden, in the gazebo, on the terrace - as long as it is convenient. But we advise you to consider the following recommendations:
- The first and most important point is fire safety! Do not build garden barbecues near wooden buildings, dead trees or bushes.
- There should not be a playground nearby.
- It is convenient if the stove and the brick wall of the summer kitchen are located nearby, so that you don’t have to run far for groceries and everything else.
If the project includes a sink, build a water supply nearby.
To ensure that the future roaster stands well and firmly for many years, make its base as reliable and stable as possible. The dimensions and strength of the foundation depend on the dimensions of the planned structure. In any case, the foundation should be larger in area than the barbecue by approximately 50 cm on each side.

After two weeks (if it’s hot, maybe less), when everything has hardened well, you can start building a barbecue with your own hands.
Choosing a brick for a barbecue
Here again we should remember about fire safety. If the barbecue is indoors, you should take a special refractory fireclay brick; it contains a lot of clay, due to which it can withstand high temperatures well and quickly warms up the room.

Types of bricks used to build barbecues
If the future construction is planned to be outdoors, then professionals do not recommend making everything from fireclay bricks, since they do not like moisture. It is better to take solid ceramic brick M200 or facing. The interior of the firebox itself will be made of fireclay bricks.
If desired, at the final stage of construction of the barbecue, its decorative finishing is done.
Preparing the solution
For cladding you need a cement-sand mixture, and for laying the stove itself, clay-sand with the addition of a small amount of cement for strength. You can take a ready-made mixture for stoves and prepare it according to the instructions.
To prepare your own clay solution, you will need:
- red clay;
- sand;
- cement;
- water.
The clay is filled with water and left for 5-6 days. Then it is thoroughly mixed, sand and cement are added little by little (a glass of cement 400 per bucket) and mixed again. The mixture is ready to use.
After the foundation hardens before construction, two layers of roofing felt must be placed on it for waterproofing. This is done so that the brick draws less moisture from the base, this will extend its service life.
Then we determine the position of the wall, apply the solution and begin to build a brick grill with our own hands.
Be sure to check everything with a level so that the masonry is even, as this will affect the quality of the stove in the future.
Laying a simple brick grill (arrangement)
To build such a barbecue, carefully consider the diagram according to which step-by-step masonry is carried out, the so-called order. 

The so-called half-brick masonry is performed: each odd row (1,3, etc.) begins with a whole, and each even row (2, 4, etc.) with a half. This is done for a bunch of bricks. 

We lay a ceiling on top of the 4th row, on which dishes can then be placed. 

On the 8th row you need to put 4 thick-walled corners, as shown in the figure. We lay the 9th row on the corners.
In the 10th row, all the beauty of this barbecue is “piano keys”. They can be cut with a grinder from white fireclay and red facing bricks.
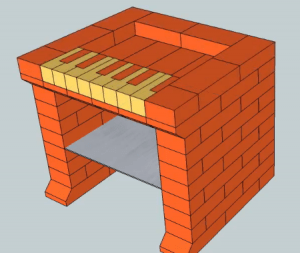
The last 2 rows - and the grill is ready. Please note that in the 11th and 12th rows longitudinal halves of bricks are used.


The skewers and grill will then be placed on them.

View from all sides
This is what our brick piano grill looks like from different sides.

Option 1 - drawing with dimensions (click to enlarge)
Final result with dimensions.

Option 2, improved - drawing with dimensions (click to enlarge)
Another option for a barbecue piano. It is wider and the back wall is built from the very bottom. Watch the video for the laying process of this option.
This was the one that was easy to build on your own, even without experience in this field.
Do-it-yourself brick barbecue - step-by-step construction with real photos
Let's consider another option, more complex - how to make a brick barbecue with your own hands, which includes two lower compartments for firewood, dishes and other small items, a combustion chamber, a table top and a chimney at the top.
For the construction of the structure itself, in this case, they used facing bricks and refractory bricks for the inside of the furnace.
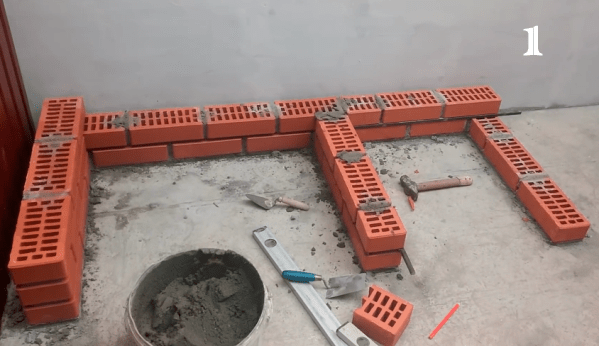
Initial stage of construction
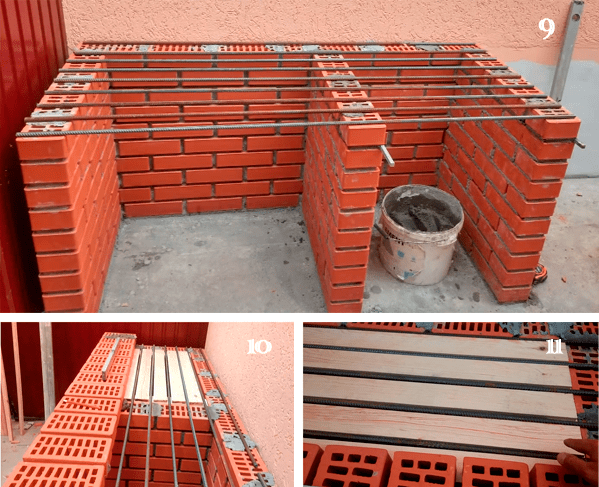
We begin laying in the same way as described above. The lower part will be in the shape of the letter “W”, only the compartments will be different in width. The wider one for firewood will have a firebox and chimney above it. The second is for dishes and other accessories; there will be a table top at the top.
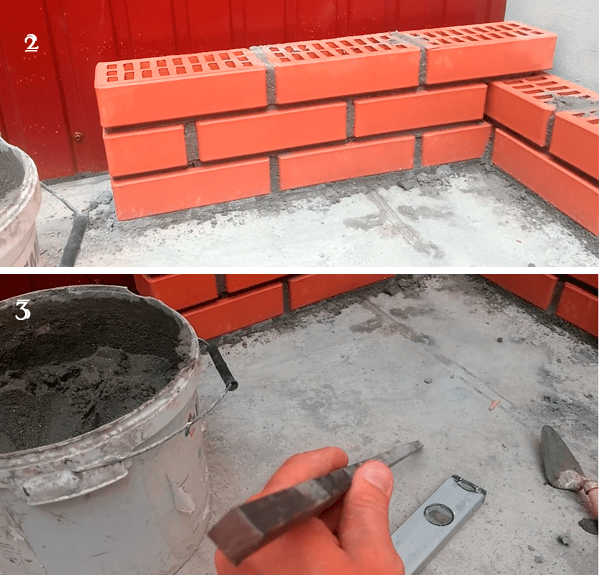
We make even seams between rows
To ensure that there is an identical and even seam between the bricks everywhere, a metal strip is used here when laying, the cross-section of which is square with a side of 12 mm. But we recommend taking something thinner - 5-10 mm will be enough. You also need to constantly control the level of verticality and horizontality of the masonry.

Brick laying process
The plank is placed on the edge, as shown in photo 4, and then carefully covered with mortar. On the side where the bar was placed, we place the mixture equally with it, on the other side, a little more, in a slide. We lay the brick, hold it with one hand on the side of the plank, and lightly tap it with a hammer on the other side to level it. When the solution dries a little, remove the bar.
To make the laying process move faster, there must be several planks, since they are needed for each row.
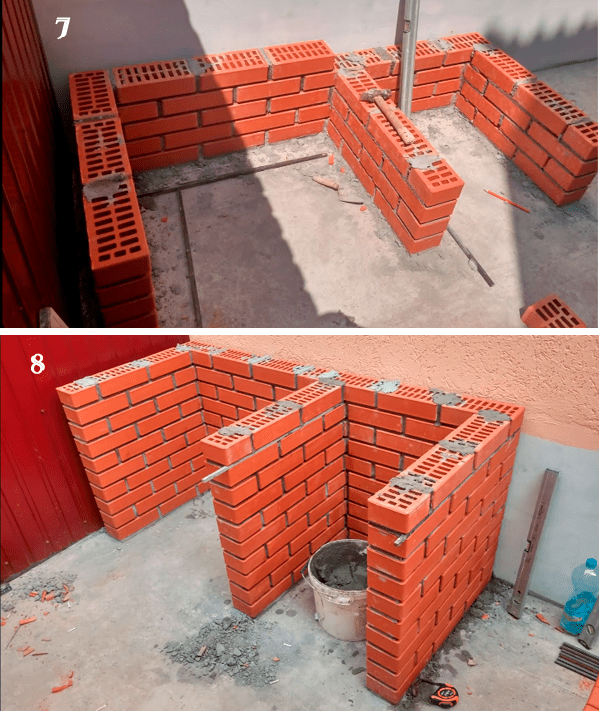
Lay out the bottom part - the first 10 rows
According to this principle, 10 rows are laid out.
Preparing the base for the firebox and countertop
Next will be the firebox and countertop. On the 10th row we place reinforcement with a diameter of 12 mm. The distance between the rods is 70 mm. Formwork is placed between the reinforcement so that the mixture does not fall down when the seams between the bricks are filled.
Professional advice: it is better to take metal corners, as there is a possibility that the reinforcement will bend under the weight.

Lay out the brick and fill with mortar
Bricks are laid out at equal distances from each other over the entire area. Those that fall on previously erected walls are placed on the mortar, the rest are simply placed on the formwork. Then the gaps between the bricks and the surface are filled with mortar.

We form the combustion chamber and vault
After drying, the firebox is erected - 8 rows are laid out vertically. Next, the back part, which is located near the wall, is also erected, and the remaining three sides are narrowed upward by half a brick. So another 9 rows are laid out.

We are building a chimney
The next stage is the chimney. In this case, 20 rows are made of brick, and at the top there is a stainless exhaust pipe. A high chimney is needed so that the smoke does not disturb you or your neighbors, and the draft is better.
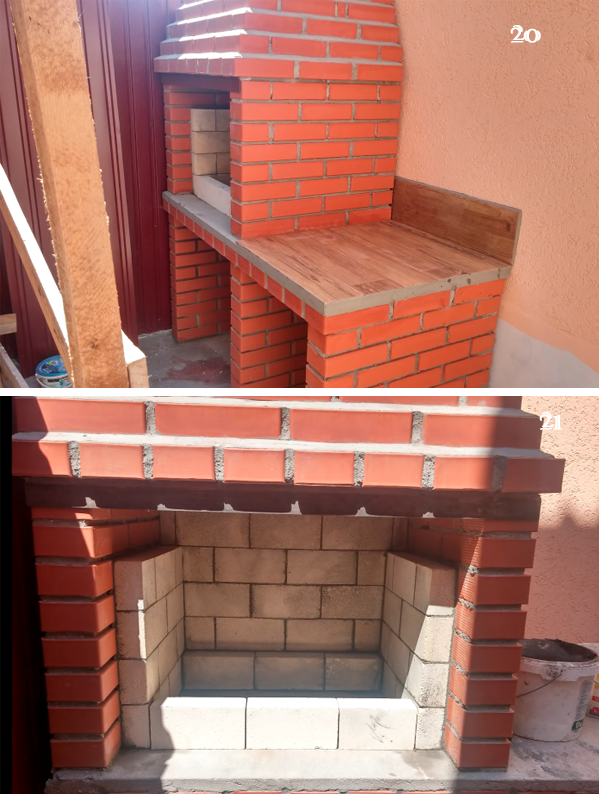
The last stage of construction - finishing the countertop and firebox
And the finishing touches - the countertop is laid out with tiles, and the inside of the firebox is covered with refractory bricks.

Final result
After a few days for complete drying, the barbecue is ready for use.
We recommend watching a video that shows the entire process of laying a garden brick oven.
Below in the gallery you can see more photos of barbecues and barbecues for your dacha made from brick with your own hands, and choose the one that is suitable in style, functionality and location specifically for your site.

 In the gazebo
  On the terrace
  With hob
  On the street
  With built-in smokehouse
There is no fundamental difference between barbecues and barbecues, except that in the first, food is cooked on skewers, and in the second, on a grill. Both can be done on one structure, the construction of which will be discussed.
Often, a country barbecue is a simple outdoor building in the open air. A brick barbecue is a more complex device, which can be located in a summer kitchen, gazebo or outdoors, but it already has a chimney and, in most cases, a cover to protect from rain and snow.
A temporary brick cooking device is a great summer option.
If you do not plan to be at the dacha in winter, then a barbecue or grill made of brick without mortar is perfect for this purpose. In the spring it can be easily and quickly folded and disassembled for the winter.

Laying scheme without mortar
Here is a diagram and step-by-step instructions that show how to make similar grills and barbecues from brick.
If the barbecue is planned to be small (9-10 rows of bricks), you can simply level and compact the ground well. For a larger structure, it is better to pour a foundation.
We begin to lay out the bricks according to the same principle as in the previous versions, but in a circle and with gaps of approximately 50 mm.
We lay a steel sheet on top of the 5th row, which will serve as a tray for coal.
Add 2 more rows and install a cooking grate. Then 2 more rows for protection from the wind.
To build such a round barbecue, you will need a little more than 100 bricks.
This is one example of a temporary barbecue, you can change it at your own discretion. Or choose and build one of the options shown in the photo below.


Portable lightweight barbecues are good outdoors, but near the house or at the dacha you want more convenience and aesthetics. Brick barbecues can provide all this. Due to the plasticity of the material, they can be small - occupying about one square space, or there can be decent corner complexes with a hearth, hob and even a sink and water/sewage supply. Even a completely inexperienced mason can build the simplest brick barbecues with his own hands. One such project will be described in detail below. It can be used as a training task before building something more serious.
Simple brick grill
Any brick structure requires a foundation. And even such a small barbecue, as presented below, is very undesirable to place directly on the ground. The foundation will have to be poured. It can be made strip or slab. The slab is more reliable: it will not move in winter and the masonry will not fall apart.
The dimensions of the foundation for a brick grill are 10-15 cm larger than its dimensions. First, the plant layer is removed; if necessary, the pit is deepened by 10-15 cm. Its bottom is leveled and compacted. A 10 cm layer of crushed stone is poured and compacted again. It is advisable to use a vibrating plate: you will not compact the soil enough with a manual tamper. The height of the tape is 20-30 cm, the thickness of the slab foundation is 10 cm.
Depending on the type of foundation chosen, the appropriate formwork is constructed. For greater strength, reinforcement is made with a rod of 10-12 mm in diameter. For the tape, two threads are laid around the perimeter; for the slab, a “cage” is made: rods are laid lengthwise and crosswise in increments of 20 cm. Everything is filled with concrete of a grade no lower than M200.
If the temperature during construction stays around +20°C, after about a week you can continue work: the concrete has gained more than half its strength. Two rows of waterproofing are laid on it (roofing felt, roofing felt, modern roll waterproofing), coated with bitumen mastic or other liquid waterproofing solution. After this, you can begin laying.
Dimensions and materials
You can build this small brick grill with your own hands even without any experience. It is a structure in the shape of the letter “P”. There are two parts: the brazier itself and the table next to it. The design is simple and easy to modify. You can add another section nearby, make it wider or narrower, deeper or shallower. You can make two protrusions for the grates - this is if you will be preparing a large number of kebabs.
In the basic version, the dimensions are as follows:
- width 180 cm;
- depth 90 cm;
- barbecue height 100 cm.
To lay this garden barbecue, you can take solid ceramic bricks, you can also use fireclay SHA-8. For the order given below, 202 bricks were used.
For the lower part - up to the 5th row - a cement-sand mortar 1:3 is used or with the addition of one part of lime. Further, where heating will already occur, a clay-sand solution is used. Its proportions are selected based on the qualities of the clay (oily, normal, skinny). In terms of thickness - it should not be too liquid, but not too thick. About the same as good thick sour cream.
Order and order of work
This country grill is made of bricks laid “on a bed”. Two protruding rows (bricks laid crosswise) serve as support for the brazier sheet and the grill grid. Here you can also place it on a spoon (place it on the narrow part), then the sheet will rise a little higher. In the lower part you can store firewood or use it for other household needs.
The rows are placed in a bandage - offset, for this you need halves of bricks. They can be cut with a grinder. The first six rows form the brazier and table on the right. Starting from the 7th row, the masonry goes only in the part where the grill itself will be located.
Seam thickness 5-8 mm. It should be the same.

In order not to disturb the geometry during construction, you can pull the cords and align all the rows along them. But you check each brick and each row with a level for horizontalness. You must constantly check the verticality of the walls and corners. To do this, use a plumb line (a cord with a weight at the end). You can check the verticality with a level, but it has an error, especially if it is not a professional, but an amateur instrument. So, with such a check, there is a good chance of getting a roasting pan with slanted, clogged walls.
The procedure for this brick barbecue is simple and does not require additional explanation. Questions may arise regarding drying. If the weather is dry, leave the grill to dry for three to four days. Then you can build the fire little by little. Heat in a gentle mode for a couple of days, using thin wood and little by little. Then you can fry the first batch of kebabs.

One of the options for a simple brick grill. It differs from the basic version in that there are two rows of protruding bricks. Another difference is that the table is smaller.
If rain is expected and there is no canopy over the grill, cover it with oilcloth. After about a week, you can begin slow drying: turn the fire low and not for long. Drying will also take 2-3 days. Then you can test a brick grill built with your own hands.
Video arrangement of a brick grill with a stove
For those who perceive visuals better than words, it will be more convenient to watch than to read the description. For you detailed explanations of how to build a brick grill with your own hands in video format.
This structure is more monumental - the arch of the firebox is round and the slab is nearby. Without any experience at all, it will not be easy to cope.
Brick grill in the gazebo
If you are going to install a brick barbecue in a gazebo, the options proposed above will not work - the smoke will be all under the roof, which will not add joy to you. For gazebos you need a barbecue with an exhaust pipe. This structure is more complex, but you can easily do this option yourself. The arrangement below for a brick grill for a gazebo is also not very difficult to put together with your own hands. It, like the first one, has an even arch, which is much easier to do if you have no experience.
Dimensions and materials
This brick grill/barbecue has medium dimensions:
- width 150 cm;
- depth 75 cm;
- the total height to the beginning of the chimney is 217.5 cm.

For masonry, you can use ceramic solid bricks. For the area where the fire will burn, you can (but not necessarily) use fireclay bricks. In the figure it is indicated in light yellow.
The laying of the “cold” belt - up to the 11th row inclusive - can be done with cement-sand mortar (1:3). Next you need to use clay-sand. The thickness of the seam is in any case 5-7 mm. To withstand it exactly.
Structurally, this grill consists of three “cold” compartments in which you can store firewood and use it for household items. The “hot” zone starts from the 12th row. Here they light a fire and install a barbecue grill or barbecue racks.
Order and explanations
The arrangement of this brick grill is a little more complicated, so explanations are needed. The first row is laid out flush with the gazebo floor. If your foundation is low, you can also raise it with bricks laid on cement mortar.

The next four rows are placed with a dressing. This will be the woodshed - an area where it is convenient to stack firewood. On the fifth row, three strips of metal 3 mm thick and 50 mm wide are laid on top. They will serve as support for the bricks of the next row. Lay the sixth and seventh rows according to the pattern.
In the 8th row, the formation of two chambers for household items begins. Look carefully at the location of the seams. This is important: none of them should coincide with the seam of the bottom row. This is the only way the brick wall will be strong enough. Where required by the scheme, the bricks are cut: halves and even quarters are used.
In the 11th row, the middle wall is no longer placed, but metal strips are placed on top again: the next row, covering the utility compartment, will rest on them. The 12th row is slightly larger in size than all those located below: everything goes smoothly along the back wall, and in front the bricks protrude about 3 cm.
The 13th row is also laid out solid. A brazier will be installed on it. It is slightly larger in size than the previous one.

The next rows form a “hot” zone - the fire will burn here. This zone is smaller in size than all the underlying rows. To make it more resistant to fire, it is lined with fireclay bricks placed on the narrow side. It is not the same size as ceramic and the height of the rows and seams will be different. Ignore this and lay it out independently of the ceramic one. Just follow the rotation as indicated in the diagrams.
In the 21st row a steel corner is laid. You can use black or stainless steel with a thickness of 3-4 mm. The dimensions of the corner are 40*40 mm or 50*50 mm. The length is from the middle of the brick on the right to the middle of the one on the left. The front wall of the chimney will rest on this corner.

In the 22nd row there is also fireclay brick, and the front wall of the chimney also appears, resting on a corner. This row is larger in size than the previous ones: in front the bricks hang over the corner by 3 cm. The next row becomes even wider, and then there is a gradual decrease. Row after row, the smoke channel becomes narrower. By the 30th row a pipe is formed. It rises above the roof of the gazebo by at least 50 cm. When constructing it, alternate rows 30 and 31. This brick grill can be considered built with your own hands. Now you need to dry it without fire for 5-7 days, and then gradually heat it for several days, evaporating the water from the masonry.
Laying a brick grill: another project
Another version of a brick barbecue grill in a gazebo is presented in the video. There are no explanations, but everything is quite clear and there are no difficulties in this project. Perhaps it is worth saying that starting from 52 seconds, 4 sawn bricks are laid. Their front upper part is cut at an angle of 45°. In the video, the sawed parts have a lighter shade.
Also in the second minute (1:35) the arch is being formed. This is easier to do if you cut and secure a template from plasterboard, and lay bricks on it.
Brazier with brick cauldron
Another option for a barbecue, but more complex: under a cauldron with a stove. The video instructions are detailed, there are explanations in the video from the author.
Brick corner grill
Sometimes you need to fit a brick manga into a corner. There is a specially shaped firebox for this, although no one is stopping you from making one of the previously proposed options and attaching a utility surface at an angle. One of the corner barbecues made of brick is laid out one order below. This is already quite a serious job, with doors, valves and other attributes of the stove business.

We also recommend
 Strawberries growing and care in Siberia in spring
 Oleander flower: poisonous or not?
 Feeding tomatoes with boric acid: how to increase productivity for pennies
 How and with what to treat viburnum against aphids
 How to treat viburnum from pests and aphids?
 Black aphid on viburnum: effective control methods