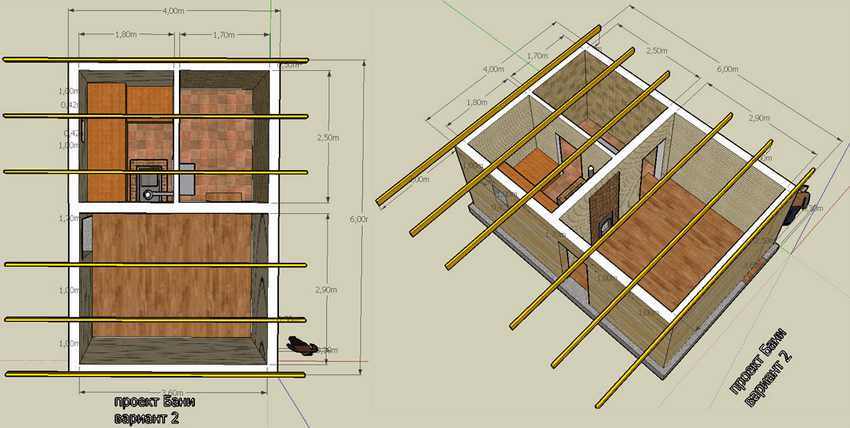
Making a bath with your own hands. Do-it-yourself bath construction: choice of type, features, equipment
A bath is a mandatory attribute of most summer cottages and personal plots. However, often its construction is associated with considerable costs. However, when a small building is being built, which is used only in the warm season, financial losses can be minimized.
Overview of alternative building materials - choose from three
The main expenses that await us during the construction of a bath are the purchase of building and consumables. Therefore, when drawing up a construction estimate, we will think about how these costs can be reduced. The traditional building material for baths is wood in the form of a beam or a rounded log. A little less common are buildings made of brick or sibit, which have proven themselves well. But, unfortunately, the price of such consumables is quite high.
Consider alternative materials that are not so well known, but quite suitable for the quick construction of an inexpensive bathhouse:
- Cinder block. It is easy to work with, and its cost is low.
- Arbolite (wood concrete). It was widely used in construction in the middle of the last century. Differs in light weight, simplicity in processing, plasticity.
- differs in the speed of construction. The price depends on the heat insulator used.
Of these options, the last two are the most acceptable. The fact is that the classic cinder block can hardly be called an environmentally friendly material. Of course, modern manufacturers reduce its danger to a minimum, but this applies only to large companies. But health is not something you want to risk. A lot has already been said about frame baths. Therefore, further we will talk about how to build an arbolite bath.
A strong foundation is the key to the durability of the building
The owners of dachas and country houses are popular with tape, monolithic, screw foundations and options on supporting posts. Each of these options has strengths and weaknesses. For example, it is quite possible to make a strip base with your own hands at no extra cost, but it is almost impossible to equip it in areas with difficult terrain. In addition, concrete (the main component) gains strength for at least 14 days, and ideally a month. There is no need to talk about efficiency.
A monolithic foundation can withstand significant loads, but at the same time it is subject to the same disadvantages as a strip foundation - it is difficult to equip it in swampy and uneven areas. Not to mention the price. The cost of such a foundation does not differ in availability. But you also need to take into account the cost of logistics. One of the most affordable are the foundations on the supporting posts. Yes, the device of such a foundation will require a minimum of labor and cash costs. However, like the previous options, it is undesirable to use it in areas with watery soil.
Screw piles are considered equal in cost to strip foundations. You can agree with this opinion, if you forget about the associated expenses. To install metal piles, you do not need to order and pay for the delivery of concrete, spend money on a reinforcing belt, sand and gravel for a pillow. But, perhaps, the main advantage is that you can install a screw foundation in one day without outside help.

Such piles are blamed for their inability to withstand significant loads. But our task is to build a bathhouse as quickly as possible and at minimal cost. For us, screw piles are the best option.
We install a screw foundation - a step-by-step description
Let's start with a description of the pile itself. This is a steel pipe equipped with a tip and blades at the bottom. The dimensions of the pile depend on the required depth of screwing into the ground, but cannot be less than 2.5 meters. The body of the pile is coated with an anti-corrosion solution. After twisting into the ground, the pile is crowned with a square head (50 × 50 cm). It is fixed with a welding machine, after which the seam is protected from corrosion. It is on this head that the support beam (channel) will lie, from which the construction of the bath will begin.

Work on the device of the screw foundation begins with the markup. The proverb "measure seven times - cut one" is more relevant than ever. The number of piles depends on the dimensions of the future building, but the distance between them cannot be more than 3 m, and preferably 2–2.5 m. After marking and cleaning the construction site from debris and foreign objects, we invite assistants and proceed to screwing the pile:
- In the marked place we make a pit with a depth of no more than 30 cm and install a pile in it.
- We align the pile vertically, pass scrap through the mounting eyes and begin to screw the pile.
Of course, the length of the crowbar will not allow you to create an effective lever. Therefore, we lengthen it with pre-prepared pipes, preferably with a square section - they have higher rigidity. The average penetration rate is 20 cm per pile revolution. We stop screwing when the metal lever is deformed. But at the same time, it is important that the pile goes below the freezing point. The minimum distance from the ground surface to the pile tip is 1.5 m.
After deepening the piles, we check their elevated edges - they should be on the same level. If necessary, we make corrections with the help of a grinder. We complete the work by pouring cement mortar into the cavity of the pile. This will give it additional rigidity and prevent corrosion. The final stage, when working with piles, is the installation of the strapping. For a bath from wood concrete, we make it from a metal channel, welding it to the heads. For a frame bath - a beam drawn with bolts is enough. A mandatory requirement in both cases is the use of a building level, the horizon must be even, because the quality of the walls and roof depends on it.
Arbolite blocks - features of material and construction
Theoretically, you can make wood concrete blocks yourself. To do this, you will need a vibrating table, molds for blocks, cement and leftover lumber (sawdust, shavings). However, given that the cost of such material is low, it can be purchased at a hardware store. This material combines such important characteristics for a bath as good vapor permeability and low thermal conductivity. In addition, we do not forget about the safety of this material for human health.
Today, you can hardly find baths with a combined steam room and sink. As a rule, the layout provides for a separate steam room, sink and room. Drawings drawn up before construction will allow you to choose the optimal size and number of consumables. There are two technologies for building walls from wood concrete - monolithic and from blocks. The first involves the preparation or purchase of an arbolite solution. Let's say right away that pleasure is not cheap, but with self-production it is also a long time. Therefore, we turn to the second option - block construction.

By and large, this method does not differ from working with brick, sibit or cinder block. The layout begins with the installation of corner blocks, after which a thread is pulled between them - a guideline for masonry. Adhering to the line given by the cord, lay out the first row. Next, we check its horizon with a building level. If necessary, we correct the flaws and proceed to laying out the second row.
Please note that, unlike the same sibit, no special glue is required for laying arbolite blocks - it is quite possible to get by with the usual solution of sand and cement. However, there are also similarities. For example, when laying out door and window openings, you need to lay a corner or channel on top. So, we raised the body of the future bath, it remains to build a roof, install a stove and finish the interior.
Gable roof - roof and ceiling in a single complex
Among the variety of roofs of various types (Gothic, hip, oriental), we will focus on the gable. The explanation is simple - this design is simple, reliable and relatively low price. From building materials for the construction of such a roof, we need:
- Beam 100 × 100 mm - from it we will make a Mauerlat, vertical racks and stops for them.
- A board 50 mm thick and 100 mm wide - blanks for the truss system.
- Unedged boards and laths for lathing.
In addition to lumber, we will prepare a vapor barrier film, mineral wool, roofing material. As the latter, we use a metal profile - it is easy to work with, and it is relatively inexpensive. We start with the treatment of wood with an antiseptic and fire-fighting solution, in the bath - this is a mandatory requirement. Then we lay a waterproofing layer along the upper perimeter of the walls. And only after that we proceed to the installation of the truss system.
It begins with the laying of a bar - Mauerlat along the perimeter of the walls. Naturally, all corners are checked with a building corner, and the horizon - with a level. After the mauerlat is leveled, we attract it to the walls with anchor bolts. The next step is the installation of tie beams. They are attached to the long sides of the Mauerlat "in the paw". That is, we need to cut out the corresponding grooves in the beams and the beam (base). After laying the wooden parts, we additionally fix them with nails or staples. It is desirable to maintain a distance between the beams of 1.5 meters.
Having finished with the preparation of the base, we expose vertical racks at the ends of the building. We immediately attach temporary slopes to them (they will give rigidity to the structure) and rafter legs. We connect the racks with a beam - a run, the rest of the rafter legs rest on it. By the way, release them 20 cm from the wall - this will reduce the impact of precipitation on wood concrete. After installing the rafters, we stuff an unedged board on them as a crate, lay a vapor barrier film on it. It is attached with a construction stapler.

The final stage in the construction of the roof is the laying of roofing material. The metal profile is pressed against the crate with roofing screws. Having closed the constructed circuit, we have already completed 70% of the construction. It remains for us to hem the ceiling and finish the walls inside the bath.
Interior decoration - PVC panels or lining?
Among the budget finishing materials, we highlight PVC panels. They have proven themselves well in the decoration of the rest room and washing facilities. It is quite a worthy alternative to ceramic tiles. You can choose such material for every taste and budget. But only for washing. In the steam room, it is better to turn to the traditional lining made of linden - it will not melt when exposed to high temperatures.
It is noteworthy that wall cladding with clapboard and panels is performed almost the same way. In both cases, we need to mount a wooden crate. A metal frame that causes corrosion is unacceptable in this case. We mount wooden (in the steam room) and plastic (in the sink) panels on a stuffed and leveled wooden base.

Keep in mind that the distance from the stove to wooden surfaces should be at least 0.5 meters, but it can be reduced to 25 cm by protecting flammable surfaces with non-combustible material.
The final step before installing the oven is the installation of the ceiling. To do this, you can use lining or planed boards. We nail them to the tie beams and go up to the attic, we need to insulate the ceiling. Boards hemmed from below and tie beams formed the floor of the attic. We cover it with a vapor barrier film and fill it with mineral wool. In order to save money, we will use not ready-made mats, but crumb mats, it can be bought, as residual raw materials, at enterprises producing sandwich panels and similar products.
The only caveat when arranging the ceiling is to install a 40 × 40 cm metal box at the exit of the chimney. It will be required in any case, regardless of which stove you prefer - metal or brick.
Having your own plot of land gives you an excellent opportunity to acquire your own bath or sauna.
In order for the installation of such a building not to cause problems, we will consider in this article the stages of building a bath with our own hands.
Installation progress
The first step is to choose a place for the future building. If your plot is small, then it’s quite simple: the foundation should be laid where a residential building will not be built.
For a larger area, make your choice based on personal preference. However, compliance with the rules must also be adhered to.

Foundation
The construction of a bath in stages with your own hands begins with the installation of the foundation. The bath is not a large multi-storey building and does not imply the presence of heavy stationary furniture inside. Therefore, it does not make sense to pour a monolithic reinforced concrete slab and you can get by with a pile or strip foundation.

Although the pile model comes out somewhat cheaper, it is recommended to resort to it only in cases where the terrain for construction is sloping or lowland.
The best choice would be the implementation of a strip foundation, because it:
- Has higher strength. It will come in handy in case you want to attach an attic in the future.
- Creates additional thermal insulation. For a couple, this is an important advantage.
- Provides the possibility of organizing a subfloor or cellar.
- We remove the vegetation layer from the site selected for construction.
- With the help of pegs and a cord, we mark the future foundation.

- We dig a trench around the entire perimeter and in places where they will pass. Depth - 50 cm, width - 10 cm more than the expected walls.
Tip: in order to save money, it is allowed to lay a foundation under the inner walls flush with them.
Since they still do not have a bearing load.

- We fall asleep a pillow of gravel 15 cm thick and carefully ram it.
- Lay a layer of waterproofing in the form of a polyethylene film.
- We mount on the sides of the moat a formwork from knocked down plank boards, which should rise 20 cm above the level of soil freezing.

- We mix the solution: gravel, sand and cement in proportions of 5: 2.5: 1. Water is added according to the situation for ease of kneading and bringing the mass of fluidity.
- We are waiting for 28 days, after which you can proceed to further work.
log cabin

Although the price of wood is higher than many modern building materials for a bath, there is no better option. Traditional wood with its warmth, smell and aesthetic appearance cannot be fully replaced with cheap cinder block or foam block.
For the construction of the sauna body, a wooden beam with a section of 15 cm by 15 cm is best suited.
There are two assembly methods:
- In the paw.

- Into the bowl.

During installation, the following nuances are observed:
- The optimal height for walls is 250 cm.
- Thermal insulation materials must be placed between the crowns.
- Wood is treated with antiseptics to protect against decay processes and pest attacks.
Tip: for the lower crowns, it makes sense to specifically purchase more durable and reliable tree species, such as oak or larch.
They will be able to more successfully resist the dampness coming from the earth.
Floor
- To comply with the waterproofing, we lay a layer of roofing material on the foundation concrete.
- From above we install wooden beams.

- We lay an unedged board 15-20 mm thick on the beams, fixing it with nails or self-tapping screws. This is how the rough layer of the floor is obtained.
- On the draft base we mount the logs.
- Between lags.
Which is great for:
- Styrofoam;
- extruded polyurethane foam;
- basalt wool;

- expanded clay.
- The insulating material on top must be covered with a waterproofing layer in the form of a polyethylene film three millimeters thick.
- We make the finishing layer from a grooved three-centimeter board.

Tip: when installing the floor structure, provide a distance of a couple of centimeters between the insulation and the finishing coating for better air ventilation.
Ceiling
Now the phased construction of a do-it-yourself bath is approaching the arrangement of the ceiling, which has its own characteristics due to the presence of the most aggressive environment. After all, especially during operation in winter, the ceiling is affected by the strongest heat from the entire steam room, and severe frost from above.
The hemmed construction is most consistent with bathing conditions, which is performed as follows:
- Are installed. As in the case of the frame, you can use the methods in the paw and in the cup.

- From above we lay and fix the unedged board.
- From the inside, standing on a stepladder, lay a plastic film for waterproofing with a release on the side walls, closing the beam openings.
- We install insulation sheets between the beams:
- mineral wool;

- felt;
- penoizol;
- Styrofoam;
- polyurethane foam.
- Next, we close everything. It serves as a vapor barrier and reflects heat radiation. We fasten it with a film to ensure sealing.
- We nail wooden planks through the foil to the beams.
- We fasten tongue-and-groove boards to the installed rails.
Wherein:
- We leave two centimeter gaps between the ceiling lining and the wall to provide air conditioning.
- For fixing we use clamps.

Roof
The roof structure can be used as a double-pitched or single-pitched roof. Shed is of course economical, but also less practical. If you want your bath to serve you for a long time and reliably, it is recommended to install a gable system. Moreover, it will also allow you to equip an attic utility room.

The roof consists of a truss system, lathing and insulating coating material. If you do not have experience in relevant work, then it is advisable to invite a specialist to carry out this stage.
Metal tile is perfect for covering. And if the slopes on one side of the building are taken out half a meter, then you can equip a wonderful woodpile.
Internal work
At this point, the ceiling and floor are already ready, therefore, the stages of finishing the bath now consist in wall cladding:
- We stuff parallel strips on the inner surface.
- Between them we install insulating materials. Basalt wool, felt, foam plastic and extruded polyurethane still remain in demand.

- We cover the insulation with foil to reflect thermal radiation.
- We sheathe with a tongue-and-groove board using kleimers. This will get rid of the protruding caps of the screws, which can later cause burns.

Everything, the bath is ready. It remains only to install furniture and a stove, after which you can begin to operate the bath.
Conclusion
Building a bath with your own hands is, of course, troublesome. But the result is worth it. It is not possible to single out the more important ones among all the stages of construction, all of them, one way or another, affect the quality of the future bath.
- The wood that is used for the construction and finishing of the bath is vulnerable to dampness and therefore it must be protected as much as possible by creating good ventilation and treating with antiseptics.
- The steam room will only be of high quality and economical in terms of fuel consumption, when maximum thermal insulation is provided. Therefore, pay special attention to the insulation of the building.

The video in this article will introduce you to additional materials on this topic. Happy building work!
Not always the process of building a bath goes without complications. This is especially true for those who decided to build it for the first time on their site. Owners have to discover a lot of new things, given the number of issues that they have to solve. One of the important is the choice of suitable material for construction. Experience shows that timber is a more than worthy option for this project.
Built from this material bath will be able to satisfy the owner according to the most important parameters for it - safety, reliability and service life. An additional reason why you should pay attention to this material is the simple technology. Therefore, anyone can build a bath from a bar with their own hands.
What kind of timber can be used to build a bath?
The choice of building materials for the bath directly affects what characteristics the finished structure will have. Therefore, you need to pay attention to its quality.

Do-it-yourself guide to building a bath from a bar
For those who don't know how to build a 3x4 bath from a bar, it should be understood that it is necessary to start the construction of this structure with your own hands from drawing up a project. You can make it yourself, order it from a design bureau, or find a ready-made version in open sources. In the project, you need to specify the exact amount of building materials, after which you can proceed to the implementation of your project. The first stage, from which construction should always begin, is the construction of the foundation.
The first stage is the foundation
The steam room, like all other rooms of the bath, turns out to be light, which means that there is no need to build monolithic foundation structures. An ordinary strip or column foundation will be quite enough.
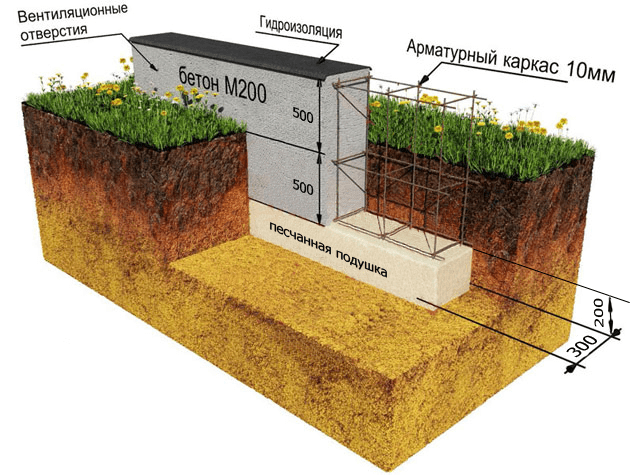
If you decide build with your own hands the base of the tape type, then first you need to dig a trench around the perimeter and under the walls of the future building. It is necessary to lay a sand-gravel mixture on its bottom, and a reinforcing mesh on top. Now start making formwork, after which it must be poured with concrete. Experts recommend making a foundation 70–100 cm deep. To choose the optimal depth, we advise you to take into account the level of soil freezing in your place of residence.
 The finished structure must rise above the ground by at least 50 cm. Compliance with this condition guarantees sufficient protection lower rims from high humidity. Inside the perimeter of the strip foundation, you need to make strips of sand and gravel. Next, you have two options: immediately pour concrete or start building a wooden floor. It is difficult to give specific recommendations here, so be guided by personal preferences.
Column foundation construction technology for a bath from a bar provides for the manufacture of brick supports and tinted asbestos pipes around the entire perimeter of the base, as well as in the corners and under the internal walls of the future building. But before installing the supports at their location, it is necessary to make a concrete "cushion". When installing poles, it is necessary to maintain a step of 150 cm.
When making any base the following rule must be observed - additional reinforcement must be performed. In order for the concrete to cure sufficiently well, it must be allowed to stand for approximately 3-5 weeks. After that, you can proceed to the next step.
The second stage - foundation waterproofing
 Here you will need on a hardened foundation apply a layer of molten bitumen, and on top of it - a layer of roofing material. When the bitumen hardens, it is necessary to repeat the operation. The result should be a strong two-layer moisture protection.
Before moving on to the next step, you need to treat the wooden structures with antiseptic compounds. This should be done immediately after preparing the cuts for connecting the beams, provided that these cuts were not made initially.
The third stage - the first crown
Now you can start laying the first crown walls of a bath from a bar. First of all, you need to fix the slats up to 1.5 cm thick on a waterproofed base, but first they need to be treated with an antiseptic. In the process of laying the rails, be sure to maintain a step of 30 cm.
Reiki will serve as a support for the first crown of bars. Reiki are used as an intermediate layer, which will help to avoid contact between the beam and the foundation of the bath. Due to it, the tree will be better protected from decay, which will help increase its service life.

Start installing the first crown, but do not fix it tightly yet. Before you need check that it stands correctly and evenly, and for this you need a square and a level. If necessary, adjust the location of the bars of the lower crown, after which you can attach it to the foundation. To do this, you can use several methods. The most commonly used method is to use anchor bolts.
At the same time, developers most often do without fastening lower beam to the foundation. This is not due to unwillingness or lack of time. The fact is that such a design perfectly fulfills its function even without fixing the lower crown, since stability is provided by its own weight. There is another important positive point in this decision - if you later need to replace the beam of the lower crown, then this will not be so difficult to do.
Do not ignore the space between the base and the first crown, which must be sealed with mounting foam.
Fourth stage - the rest of the crowns
Most often the walls baths are built from a wooden beam section 15 x 15 cm. First you need to lay a heat-insulating material on the first crown of the beam, which is most often used as moss or jute. In their absence, tow is also suitable. When insulating the structure with moss or tow, keep in mind that you will have to make an overlap along the edges of 10 cm. Subsequently, when you finish the job, these edges will serve you for caulking.
 Now you can proceed to laying the second crown of the beam, and wooden dowels are used for their fastening. But First you need to make mounting holes suitable diameter. With the help of one dowel, you can fasten two or three rows of timber. In the process of laying the walls of the bath from a bar, be sure to control the height. This must be done every three to four rows, using a building level and square. Before moving on to laying the next crown, lay on the previous layer of sealant.
Two top crowns need to install without fixing. This is due to the shrinkage of the wood. You can proceed to the installation of ceiling beams only when the shrinkage of the wood is completed. But before you start installing cans, you will first have to dismantle the top crowns.
Fifth stage - door and window openings
For the manufacture of openings intended for the installation of doors and windows, several methods are used:

Given all these complexities, it is best to use the first method, which is easier and more common.
The sixth stage - caulking

Having completed the construction of the timber "box", you you need to let her "overwinter" for about 6-7 months. This is the time it takes for the tree to shrink. Be sure to protect the building for the "wintering" period with slate and boards. But this is not necessary if, in the process of manufacturing the structure, you compacted the crowns with moss. A log bath will serve you well without additional caulking.
But still don't rush with the adoption of the final decision, first carefully examine the bath. If you can find large gaps, then you can’t do without caulking. Take tow or moss, make a tourniquet out of them, and then insert it into the crevice and tamp it well.
Another excellent material for sealing gaps is jute sealant. Given its performance, it is a better option than tow and moss. Although it has a serious drawback - it costs much more than the above-mentioned seals.
Seventh stage - the roof
At this stage of work, you need perform more carefully than on the previous ones. The thing is, the roof is the last barrier to precipitation. But you can start building a roof structure only after shrinkage is over. If you hurry, then after a couple of years the roof is severely deformed.

Conclusion
Construction of any object is a responsible event, especially if they are a bath from a bar. The process of its construction has its own characteristics, which everyone who is going to build it with their own hands needs to know. And in the process of resolving other issues, you will definitely need to find out about the procedure in accordance with which it is necessary to carry out work on the construction of a bath.
phased building your own bath hands is a guarantee that you will be able to exactly meet all the requirements of the technology and ensure a long service life of the bath.
Almost every land owner, sooner or later, thinks about building a bath. After all, a bath is not just a room for washing, but also an important element of summer vacation. The construction of a turnkey bath can be ordered from professionals for a tidy sum, or you can try to build a bath with your own hands.
After reading this article, you will be able to choose a project, find out the sequence of the construction process, get acquainted with the models of boilers and find the best bath option for your dacha.
Before starting construction, it is necessary to develop a bath project. To do this, it is not necessary to contact an architect, you can develop a simple project yourself, especially since now there are many computer programs for designing.
Think about what size bath will be optimal for your family. What rooms will be located inside the bath. From what materials to make the foundation, walls and roof, do not forget also about the decoration of the bath. An important point in the design is the location of the boiler and the method of its combustion.
Below you can see the popular projects of baths:

- Bath project size - 4x4 meters.
- Bath project - 4x6 meters.

- Bath project - 5x6 meters.

- Bath project - 6x3 meters.

- Bath project - 3x3 meters.
After you have decided on the size and materials for the bath, you need to draw up a cost estimate.
Foundation
For the construction of a bath, several types of foundation are used. Depending on the weight of the walls and the characteristics of the soil, the following types of foundations are made:

- Slab foundation.
- Column foundation for light walls.
- Pile foundation.
- Concrete strip foundation.
As practice has shown, the most reliable foundation for almost all types of soil is a concrete strip foundation reinforced with reinforcement.
To make a strip reinforced foundation for a bath, you will need:
- Cement.
- Sand.
- Gravel.
- Fittings.
- Formwork.
- Ruberoid.
- Wire.
- Shovels.
- Concrete mixer.
- Harness.
- Stakes.
- Tools (pliers, hammer, tape measure and others).
In the place chosen for the construction of the bath, mark the trench for the future foundation. For marking, use a tourniquet stretched between the pegs. The width of the trenches is made based on the weight of the material for the walls. For a one-story bath made of wood or brick, it is enough to make a trench 30-40 centimeters wide. After installing the markup, do the following:
- Based on the markings, dig a trench 50-80 centimeters deep.
- Tamp the bottom of the trench and fill it with water to shrink the soil.
- Cover the bottom of the trenches with roofing paper for waterproofing.
- Fill the trench with gravel to a third of its depth.
- Install the formwork along the edges of the trench.
- Make a frame reinforcing the foundation, from reinforcement rods interconnected by wire.
- Install the reinforcement cage into the formwork.
- Using a concrete mixer, make a cement mortar in the proportion of one part cement to one part sand and two parts gravel.
- Pour the cement into the formwork, being careful not to allow air pockets.
- After the concrete has dried, remove the formwork.

The foundation for the bath is ready!
Walls
For the construction of walls use the following materials:
- Wooden bar.
- Logs.
- Boards.
- Brick.
- Blocks from various building mixtures (cinder block, aerated concrete, wood concrete, and so on).
Since the construction of a bath from logs or bricks has already been quite widely described on the Internet, let's consider the option of building a frame bath from a bar of 15x15 and 5x10 centimeters and boards with a section of 2x15 centimeters:

- Make the lower trim, for this, take bars with a section of 15x15 cm and install them on the foundation, connecting them with special metal plates and corners. There is another way to connect the bars, by cutting spikes, grooves at their ends and then fastening them with screws or nails. When tying, do not forget to put waterproofing under the bars.
- Install vertical racks from a 5x10 cm beam. The distance between the racks is usually 50-60 centimeters. First of all, determine the position of window and door openings and install the racks framing them.
- In the process of work, fix the already installed racks with temporary strips so that they do not warp.
- Make the top harness by attaching it to the ends of the uprights.
- When making the final fastening of the upper trim, carefully monitor the position of the vertical racks, checking their evenness with a level.
- Be sure to reinforce all corner joints with diagonal posts, this will help to avoid warping the frame.
- Make a ceiling sheathing.
- After making the frame, make the outer cladding of the walls of the bath with a board with a section of 2x15 centimeters. If you do not want gaps between the boards, then make the sheathing - "overlap", laying the bottom edge of the board on the nailed board. In appearance, this method resembles wall siding.

- Having sheathed the bath from the outside, proceed to the installation of insulation. Sheets of foam or mineral wool are installed along the vertical racks of the frame.
- On top of the insulation, it is necessary to install a layer of vapor barrier, which is attached to vertical racks using thin rails.
- After installing the vapor barrier, make the inner lining of the bath with clapboard or slats.
- Insulate the ceiling by laying vapor barrier sheets on the inner lining, then insulation. Sheathe the ceiling from the outside with plywood sheets.
Please note that the manufacture and insulation of the ceiling can also be done after the installation of the roof.
Roof
The roof for the bath is of three types:
- Shed.
- Gable.
- Complex - consisting of four or more slopes.
Usually, the first two options are used for a bath. Let's look at the option of a gable roof covered with metal tiles: 
The manufacture of the roof begins with the installation - Mauerlat. In the case of frame walls, the role of the Mauerlat is performed by the upper stroke.
- Install the uprights on the bench.
- Connect the racks with girders and puffs.
- Install the rafter legs by attaching them to the Mauerlat, run and connecting the upper ends to each other. The distance between the rafters should be 50-60 centimeters.
- Install sheets of metal.
- Sheathe the gables with wooden slats or sheet iron.
For a more visual acquaintance with the roof fastening, the following figure is shown: 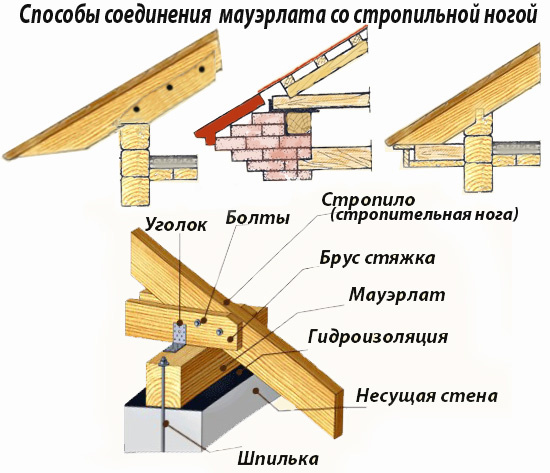
All sizes of roof elements are listed: 
Keep in mind that the smaller you make the slope of the roof, the more snow load will fall on it in winter. Also, a small slope of the roof can lead to poor drainage and leaks.
floors
The design of the floor depends on the type of room. In the rest room, ordinary wooden floors are made. In the washing and steam rooms, the floors are made of two levels:
- The first level is made of concrete, has a slope towards the drain hole.
- The second level is a finished floor made of boards with gaps for draining water.
If you want to make a floor of porcelain stoneware or tiles, then they simply fit on the first level, sloping towards the drain hole. 
In order to make a concrete floor and drain in the bath you need:
- In the center of the steam room and washroom, install plastic pipes with a diameter of 5-10 centimeters with a bell at the end. Pipes must go through the foundation to the street and connect to the sewerage system.
- Lay down a layer of waterproofing material.
- Spread a layer of gravel 10-15 centimeters thick over the entire area of \u200b\u200bthe rooms.
- Make a cement mortar and pour the floor with a slope to the hole installed on the drain socket pipe.
- Install a grate on the drain hole to prevent debris from entering the sewer.

At the second stage, wooden floors are made:
- Install wooden logs in all rooms of the bath. Make the distance between the lags 30-40 centimeters. As a log, you can use bars with a section of 3x5 cm or 4x6 cm.
- Nail boards with a section of 2x15 cm or 5x20 cm onto the logs.
- In rooms where water is supposed to be drained, leave gaps of 0.5-1 cm between the boards.
Do not forget, before starting the installation of wooden floors, treat all parts with wood impregnation. When making floors, keep in mind that they should be above, or at the level of the top edge of the foundation.
Boiler
The model of the boiler for the bath will largely depend on your financial capabilities and the fuel that you will use for heating. If you know how to use welding, then you can make a simple boiler yourself, from thick sheet iron. If you prefer more advanced colas on gas or electricity, then they can be purchased from specialized companies.
The boiler in the steam room is installed in such a way that the combustion chamber is loaded with fuel either from the street or from the rest room (dressing room). The boiler itself, for fire safety purposes, is located 10-15 centimeters from the nearest walls. Walls to the height of the boiler, covered with sheets of iron. A good solution would be to overlay the boiler with bricks, thereby reducing its cooling time and protecting the walls from fire.
When arranging a chimney for a boiler, pay special attention to the place where the pipe is in contact with the ceiling. The hole for the chimney should be insulated with a refractory material. Also, pay attention to the place where the chimney pipe exits through the roof. Usually, this place is prone to leakage, so it should be carefully sealed. Below are the options for boilers for the bath:

- Homemade boiler from sheets of metal.

- Gas boiler.

- Electric boiler.

- Solid fuel boiler.
Bath arrangement
After the bath is built, it is necessary to equip it:

- Bring to the bath all the communications available on the site - electricity, sewerage, water supply.

- Place inside the sink, shower, light sources, furniture for relaxation.

- Decorate the walls of the steam room with curly slats and make stepped shelves.

- Buy wooden tubs, buckets, buckets and brooms.
After the arrangement, you can safely invite guests to take a steam bath in your personal bath!
You can also see the instructions for assembling a mini-bath for giving without a foundation in the video:
Variants of beautiful and unusual baths
In addition to traditional materials and design for a bath, there are many alternative solutions. Below we give photos of the most unusual baths:

- A mobile bath from a "lining", built on a car trailer.

- Sauna in a huge wine barrel.

- Bath from plastic bottles.

- Bath dugout, built right in the ground.

- Bath housed in an iron container.
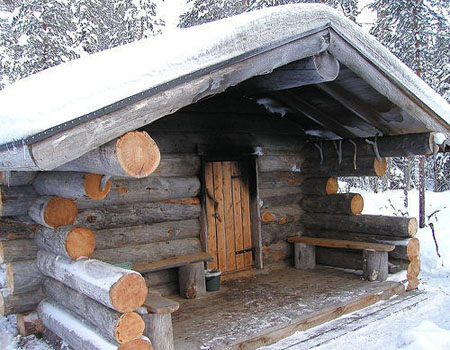
- Forest bath from raw logs.
![]()
- A beautiful bath from a gun carriage.

- Bath from unedged boards.
At the end of the article, I would like to remind you that heating the bath is associated with fire and high temperatures. Therefore, when building a bath from bricks, logs, cinder blocks or boards, pay great attention to fire safety. This warning also applies to the electrical wiring device, since the rooms inside the bath have high air humidity and the risk of a power outage due to condensate is very high. 
We hope that reading our article will encourage you to build a bath yourself!
Building your own bath is an occupation that must be approached with all responsibility. As practice shows, most often a beam is used for the manufacture of baths, which makes it possible to make an environmentally friendly, reliable and durable building. This article will discuss how to properly build a bath from a bar.
Advantages of a bar
Perhaps the most important advantage of the timber is the simple construction of a bath from scratch using this material. In addition, the beam qualitatively stands out among other materials used in the construction of bath structures, and even against the background of the closest analogue - rounded beam.
The main advantages of the beam are as follows:
- Ease of working with the material, thanks to which the bath can be built independently without resorting to the services of professional builders;
- Traditional lumber has the smallest shrinkage ratio compared to other wood materials;
- Building a bath from a bar is much cheaper than using other building materials;
- A special beam for a bath can have fasteners prepared from the factory, which greatly simplifies the installation process.

Nevertheless, despite the qualities described above, it must be understood that there are differences between timber and timber. That is why, since we are building a wooden bath, it is worth choosing the material wisely in order to avoid unpleasant consequences.
Choosing a beam for a bath
The quality of the wood directly affects the characteristics of the building, so you need to pay a lot of attention to this issue. When choosing, you must immediately check the timber for integrity - even extremely minor defects and flaws should be absent. The fact is that any damage has a cumulative effect, as a result of which a small crack can eventually lead to damage and destruction of the tree. It is necessary to understand which tree is better to build a bath from, and which one is better to refuse.
The surface of the wood should not have blue spots on it. The presence of such flaws always indicates the decay of the material from the inside, which is most likely provoked by dangerous and extremely harmful microorganisms. Naturally, it is strictly forbidden to use such a tree in the construction of a bath (and any other buildings).

If, during a visual inspection of the beam, traces of damage by rodents or beetles were noticed, then such material is also not suitable for arranging a bath. Good bars have a smooth and ugly surface without damage, dents, cracks, bends and distortions. The presence of any of the listed signs is a guarantee of the fragility of the material.
Bath construction algorithm

The stages of building a bath from a log house are as follows:
- Foundation arrangement.
- Foundation waterproofing.
- Arrangement of the first crown.
- Arrangement of the remaining crowns.
- Creation of door and window openings.
- Caulk of cracks.
- Roof arrangement.
Foundation arrangement
A finished wooden bath is relatively light in weight, so an extensive monolithic foundation under the building is not required. A perfectly suitable option would be a strip or column foundation.
When choosing a strip foundation, you will first have to dig a trench around the perimeter and under each wall of the future building. At the bottom of the pit, a mixture of sand and gravel is first poured, then a reinforcing mesh is laid. Further, everything is carried out according to the algorithm familiar to many - the formwork is installed and the concrete solution is poured.
The depth of the foundation is determined individually, depending on the degree of soil freezing. As practice shows, the average trench depth is about 70-100 cm. In order for the foundation to reliably protect the structure from dampness, it must be raised at least half a meter above ground level.

In the perimeter of the strip base, strips of crushed stone and sand should be poured. Then these strips can be poured, for example, with concrete mortar, or you can equip a wooden floor on top of them - you will have to choose the final option yourself. In the same way, you can build a bath in the country, which many do.
The columnar foundation is arranged differently. Work begins with the arrangement of brick supports or asbestos pipes filled with concrete. These elements should be installed around the perimeter, at the corners of the structure and under each wall of the bath. Supports are installed not just in the ground, but on top of a concrete pad. The distance between the individual posts should be about 1.5 m.
In any case, the base must be reinforced to ensure maximum strength. When the concrete hardens (and this usually takes about a month), it will be possible to continue work on the arrangement of the bath.
Foundation waterproofing
Heated bitumen is poured over the hardened concrete, on which sheet roofing material is laid. When the bitumen hardens, this whole operation will need to be repeated, resulting in a reliable hydro-barrier that can prevent moisture from entering the wooden elements of the bath.
Partly the same purpose is served by treating wood with an antiseptic - most special tools improve the resistance of the material to all types of damage.
Arrangement of the first crown
Having finished the preparatory stages, you can finally start laying the bath. The first stage is laying the first crown. Laths are laid on the waterproofing in increments of 30 cm, the thickness of which does not exceed 15 mm. Naturally, all rails must be impregnated with an antiseptic before starting work.
The laid slats protect the building from direct contact with the foundation, which significantly provides additional protection for the tree from moisture. The lower bars are laid on top of the rails.
The first crown should not be fixed immediately. First you need to make sure that the structure is laid out correctly and evenly, for which a square and a level are used. Only after leveling the bars can they be fastened. There are several ways to do this, but most often the timber is fastened with anchor bolts.


However, often when arranging a private bath, they simply refuse to fix the lower crown. The reason for this is quite simple: the own weight of the structure is large enough to hold the structure in place. In addition, this method provides an unexpected advantage - if it is necessary to replace part of the lower crown, much less effort will be required.
Regardless of the method of attachment, the space between the crown and the base is filled with mounting foam, after which further work can be done.
Installation of other crowns
A layer of heat-insulating material is laid over the first crown. For baths, jute, moss or tow is usually used. It is advisable to lay out the material in such a way that a small part of it (about 10 cm) sticks out - in the future it will be possible to use this tolerance for caulking.
After the first row, it is quite logical to lay the second. It is fixed with wooden dowels, for which suitable holes are pre-drilled in the bars. One dowel can connect several successively laid rows.

In the same way, all other rows that form the walls are mounted. It is worth checking the structure for horizontal and vertical alignment every 2-3 rows. Also, we must not forget about the sealing material, which must be present between all the crowns.
The top two rows of the bath are not fixed. The fact is that wood shrinks over time, and ceiling beams can be mounted only when this process becomes almost invisible. Before laying the beams, the upper crowns are dismantled.
Creating door and window openings
There are two fundamentally different schemes used to create doors and windows in a wooden bath:
- Windows and doors are created after the construction of the bath. In this case, at the stage of laying the crowns, it is necessary to leave gaps that correspond in size to the products being installed (more details: ""). When the bath is built, with the help of a chainsaw, suitable openings are cut in the right places.
- Windows and doors are prepared in advance. This method is much more complicated, since its implementation will require special grooves and bars with end cuts.

In practice, the first method is most often used, which is quite simple and does not require special costs.
caulking slots
The assembled building must be left for about six months so that the tree sags sufficiently. At this time, the structure should be covered with boards and slate. After that, you can start sealing the cracks.

Roof arrangement
Installation of the roof, which can only be started after the shrinkage of the building, is as follows:
- Wooden ceiling beams are laid above the upper wall trim.
- Rafters are attached to fixed beams at a distance of about a meter.
- A flooring made of pre-selected material or a crate under a sheet roof is nailed to the rafter legs.
- Now you can fasten the material in accordance with the technology of its installation.
- The ridge is closed with a sheet of galvanized iron.
- Gables are sewn up with suitable material (for example, siding or clapboard).

When the outer part of the roof is installed, it remains only to equip the interior space - installation of insulation, waterproofing and finishing work.
Conclusion
This article talks in detail about how to equip a bath from scratch with your own hands. This process is far from the most time-consuming, especially if you approach it responsibly, and competently to direct execution.
We also recommend
 The longest war in the history of mankind: history, interesting facts Theories of the origin of wars
 Chewing candies ROSHEN Crazy bee
 Picodi: All discounts in one place!
 What is important for an accountant to know about a special assessment of jobs?
 P \ 'five-year plans in the USSR All five-year plans of the USSR
 Scary statistics from the besieged Leningrad